Amazon Quick と Snowflake Cortex AI を活用した AML アラート自動選別
AWS と Snowflake の連携により、Amazon Quick Flows と Cortex AI を活用した AML アラート調査の自動化が実現され、処理時間を大幅に短縮する実証事例が示された。
キーポイント
AML 調査時間の劇的短縮
従来の 30-90 分かかっていたアラート調査が、自動化により 5 分未満に短縮される実証結果が得られた。
MCP プロトコルによる標準化連携
Amazon Quick の Quick Flows が MCP(Model Context Protocol)を採用することで、カスタムコネクタ不要で Snowflake Cortex とシームレスに連携可能となった。
AWS と Snowflake の深層統合
S3, Glue, SageMaker, Bedrock など 50 以上のネイティブ統合を活用し、データセキュリティを維持したままコンプライアンスワークフローを構築できる。
OAuth セキュリティ統合の構成
Amazon QuickSight と Snowflake を連携させるために、OAUTH タイプのセキュリティ統合を作成し、リダイレクト URI やロールリストを指定して有効化する必要があります。
認証情報の取得と確認
システム関数を使用してクライアント ID/シークレットを取得するとともに、OAuth 認証エンドポイントやトークンエンドポイントの正確な値を確認し、デプロイリージョンに合わせて設定を更新する必要があります。
最小権限原則の適用
QuickSight MCP アクセス専用のロールを作成し、MCP サーバーおよびそのツールへの USAGE 権限を明示的に付与することで、セキュリティリスクを低減します。
Snowflake MCP サーバーへの権限付与
AML トリアージエージェントとSemantic View、Cortex Search サービスに対して、特定のロール(AML_MCP_ROLE)にUSAGEおよびSELECT権限を付与する必要がある。
重要な引用
automated workflows built using Amazon Quick reduced alert investigation time from 30-90 minutes to under 5 minutes.
Amazon Quick Flows translates user requests into standardized MCP protocol calls, removing the need for custom connectors while maintaining enterprise security through OAuth authentication.
Access to the MCP server does not automatically grant access to the tools it exposes.
Confirm the exact URL for your deployment region in the Amazon Quick console and accordingly update the value for OAUTH_REDIRECT_URI.
GRANT USAGE ON MCP SERVER FINCRIMES_DB.AML_SCHEMA.AML_MCP_SERVER TO ROLE AML_MCP_ROLE;
Select the plus (+) icon on the Model Context Protocol tile to begin setup
影響分析・編集コメントを表示
影響分析
このニュースは、金融規制対応(FinTech)分野において、単なる AI ツールの導入ではなく、既存のクラウドインフラと AI モデルを標準プロトコルで統合し、実務フローに組み込む具体的な成功事例を示しています。特に、MCP プロトコルの採用により、ベンダーロックインやカスタム開発コストを抑えつつ、大規模なデータ処理と AI 推論を安全に行える枠組みが確立され、業界全体のコンプライアンス対応スピードの標準化に寄与する可能性があります。
編集コメント
「AI で何ができるか」から「AI をどう業務フローに組み込むか」というフェーズへの移行を象徴する記事です。MCP プロトコルを活用した異種プラットフォーム間の連携は、今後は標準的なアーキテクチャとして定着していくでしょう。
AWS および Snowflake を基盤とする金融機関は、Amazon Simple Storage Service (Amazon S3)、AWS Glue、Amazon SageMaker、Amazon Bedrock などの AWS サービスとの統合を含む、Snowflake の AI データクラウドと AWS クラウドインフラストラクチャを組み合わせる 深く統合されたフレームワーク から恩恵を受けています。AWS サービスと Snowflake の間には 50 以上のネイティブ統合が存在するため、組織はデータセキュリティを維持しつつ、価値実現までの時間を短縮するコンプライアンスワークフローを構築できます。
本記事では、金融サービス業界において最も労働集約的なワークフローの一つであるマネーロンダリング防止(AML)アラートトリアージを自動化する統合の実際を示します。Amazon Quick Flows と Snowflake Cortex を、Amazon Quick の Model Context Protocol (MCP) 統合を介して接続することで、トリアージワークフローを構築します。テスト環境における検証では、Amazon Quick を活用して構築された自動化ワークフローにより、アラート調査にかかる時間が従来の 30〜90 分から 5 分未満に短縮されました。実際の結果は、アラートの複雑さやデータ量に応じて変動する可能性があります。
AI の導入が成熟するにつれ、組織は最もインパクトの大きい展開が単独のアシスタントを超えたものになっていることに気づき始めています。それらは、チームがすでに使用しているツール間でオーケストレーションされる反復可能なワークフローであり、多段階の手動プロセスをワンクリックで実行できる体験に変換します。Amazon Quick は、生成 AI によるチャットエージェント、リサーチ機能、タスク自動化のための Quick Flows、およびプロセス自動化のための Amazon Quick Automate を提供するエンタープライズ向け AI サービスです。これは、ネイティブインデックス、カスタムナレッジベース、ユーザーアップロードファイルなど複数のソースからデータを集約します。Quick Flows は Amazon Quick の一部であり、ユーザーの要求を標準化された MCP プロトコル(オープンプロトコル規格)呼び出しに変換し、カスタムコネクタの必要性を排除しながら OAuth 認証を通じてエンタープライズセキュリティを維持します。Quick Flows は AML トリアージに非常に適しています。なぜなら、調査は毎回同じ構造化された手順(入力の収集、調査の実行、出力の生成)に従うためです。この MCP ベースのアプローチは、チームが現在手動でシステム間をつなぐ必要がある反復可能なワークフローにも適用されます。例えば、FinOps コストトリアージ、SRE インシデント対応、またはコンプライアンス調査などが該当します。
中規模から大規模の銀行における AML(マネーロンダリング防止)アナリストは、通常、1 件のアラートあたり 30 分から 90 分を費やして手動でデータを収集し、処分結果の記述を作成しています。業界調査によると、金融機関は AML アラートの 90〜95% が偽陽性(false positives)であることを発見しており、効率的なトリアージが極めて重要となっています。この規模での手動調査プロセスは、コンプライアンスチームに大きな業務負荷をもたらす可能性があります。自動化により、アナリストはアラートをより効率的に処理し、調査時間を短縮しながらもコンプライアンス基準を維持することが可能になります。
ソリューション概要
以下の図は、モデル・コンテキスト・プロトコル(Model Context Protocol: MCP)を通じて Amazon Quick と Snowflake を接続するエンドツーエンドの統合アーキテクチャを示しています。
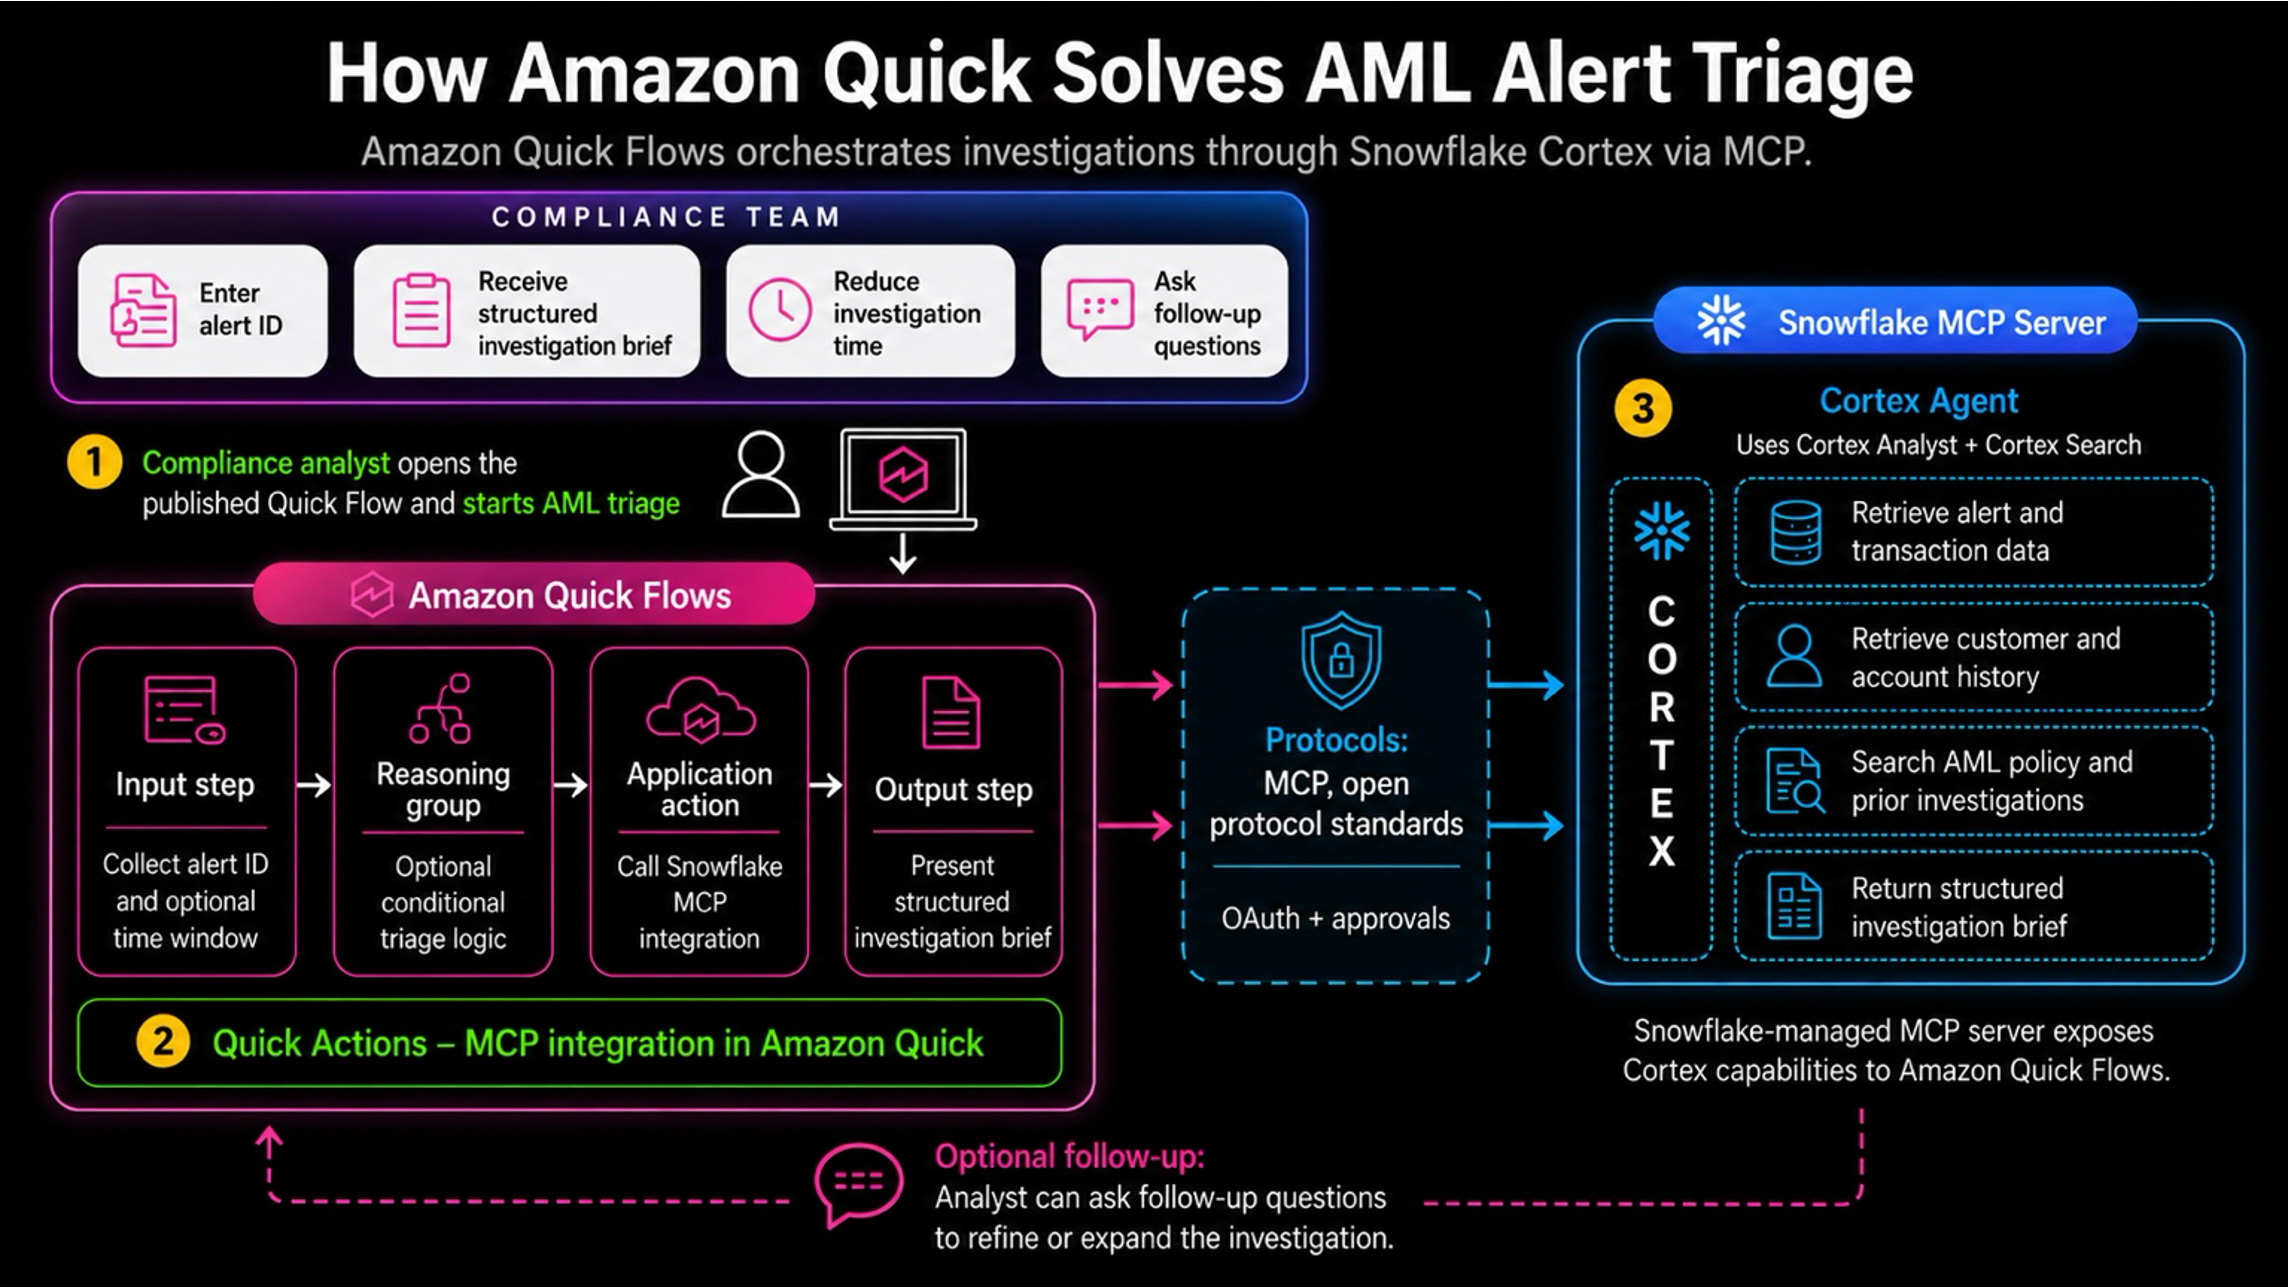
*図 1: モデル・コンテキスト・プロトコル(Model Context Protocol)を介した、Snowflake 管理型 MCP サーバーと Amazon Quick の統合*
本ソリューションでは、オーケストレーション層として Amazon Quick Flows を使用し、Amazon Quick によって管理される接続を通じて、OAuth 認証 OAuth authentication を用いた Snowflake 管理型 MCP サーバー Snowflake-managed MCP server に接続し、Snowflake Cortex Agent を経由します。Cortex Agent が調査業務を担当し、Cortex Analyst を通じて構造化された取引データを分析するとともに、Cortex Search を通じて非構造化のコンプライアンス文書を分析します。一方、Quick Flows は入力検証、推論ロジック、および整形された出力表示を担当します。
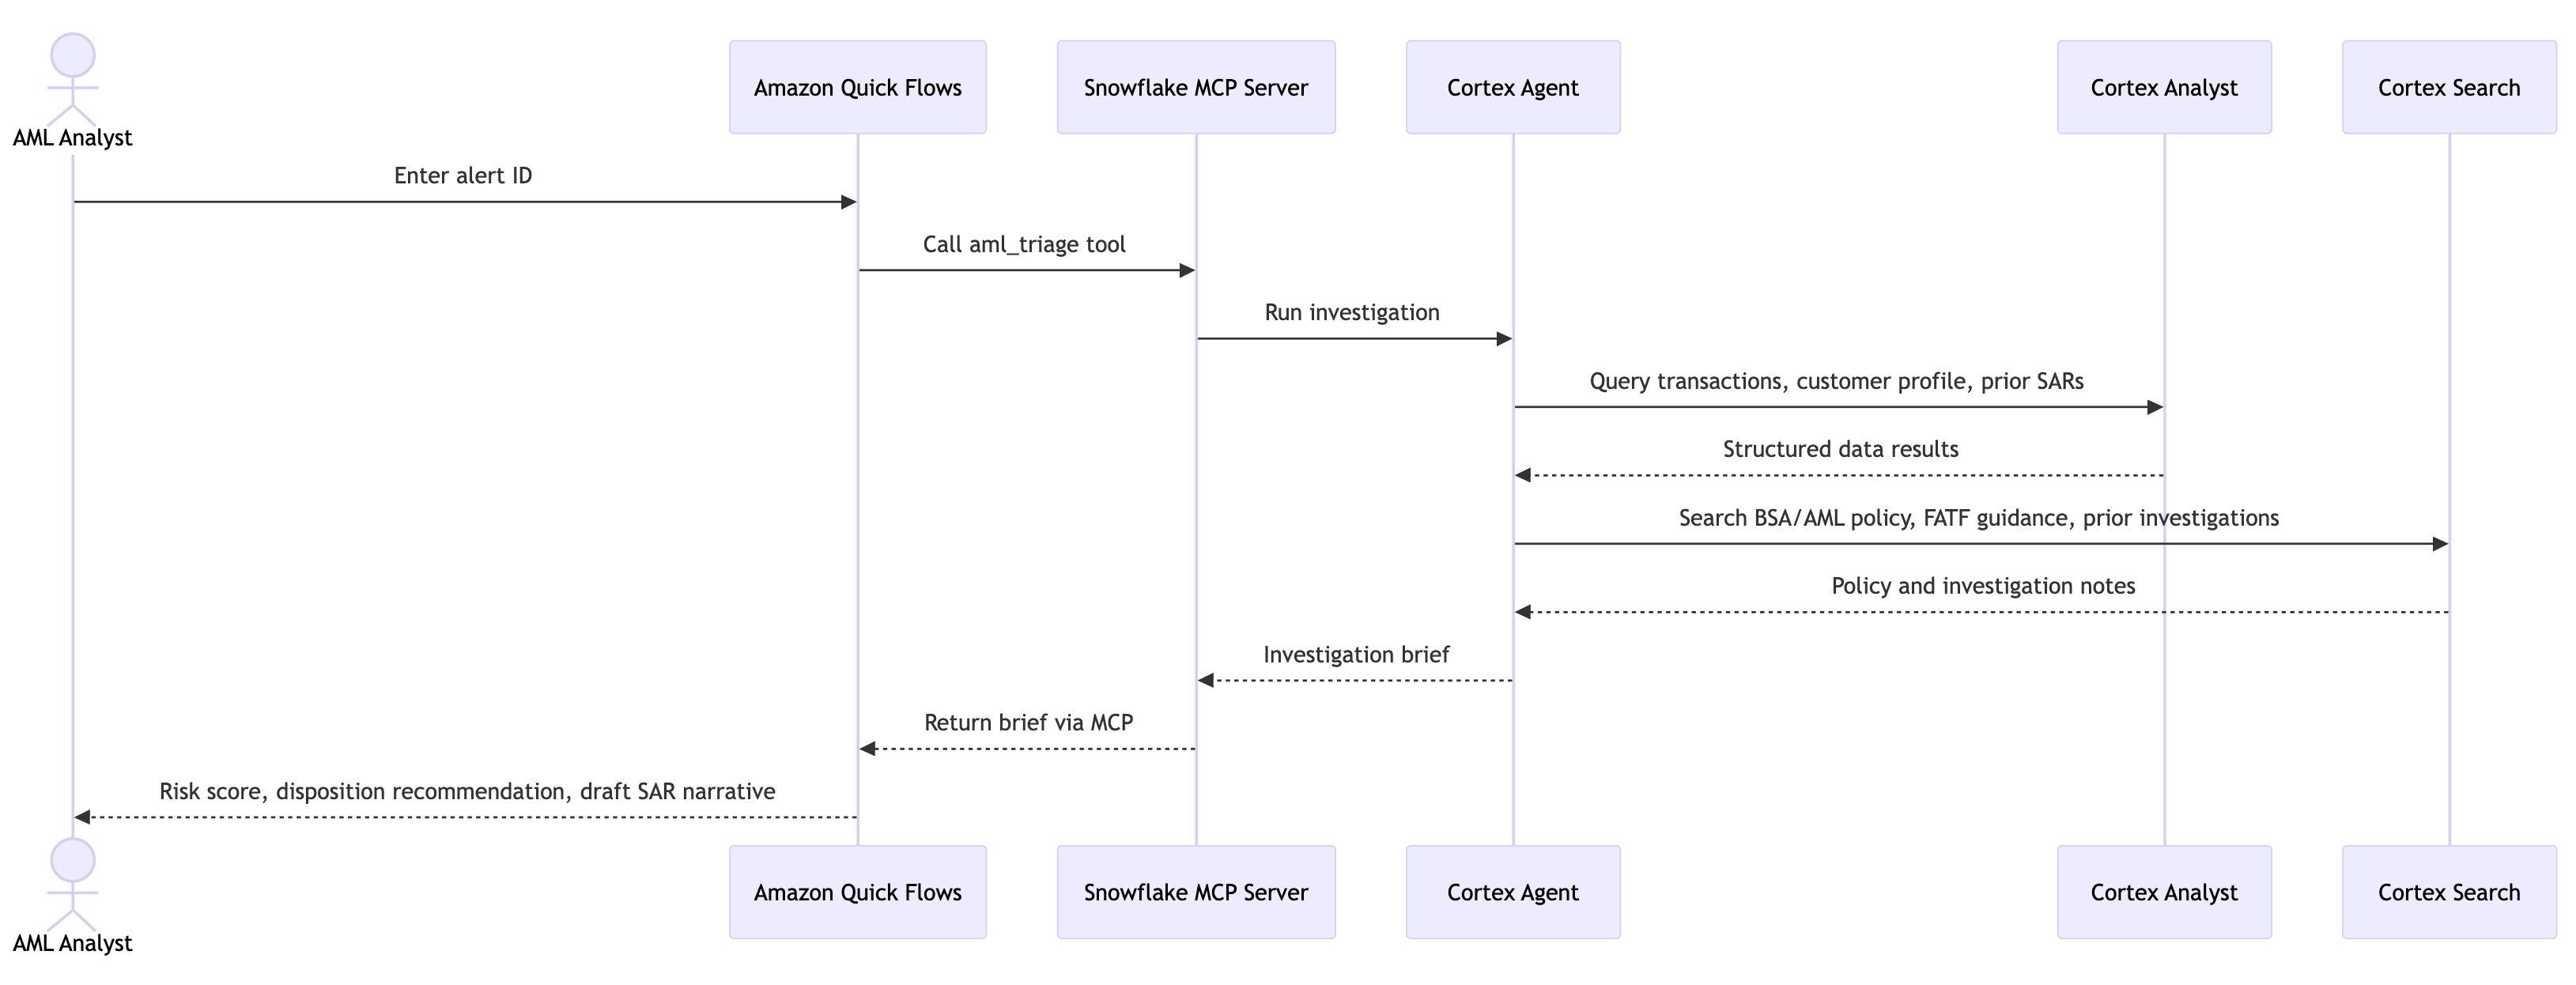
*図 2: AML アラートトリアージワークフロー:Snowflake Cortex Agent(Cortex Analyst および Cortex Search)を呼び出す MCP アクションステップを備えた Amazon Quick Flows*
以下は、Quick Flow の入力ステップから完了した調査ブリーフに至るまでのエンドツーエンドの分析官体験です。分析官は公開されたフローを開き、アラート ID(例:ALT-2026-03-02-002)を入力し、必要に応じて時間範囲を指定します。その後、フローは次のように動作します:
- 入力値を検証し、アラートが存在することを確認します。
- Snowflake Cortex エージェントを MCP を通じて呼び出し、取引データ、顧客プロファイル、過去の履歴、コンプライアンスポリシーにわたってアラートを調査します。
構造化された調査ブリーフを生成します:アラート要約、取引パターン、顧客プロファイル、過去の SAR(疑わしい活動報告書)、ポリシー参照、リスクスコア、処分推奨事項、およびドラフトナラティブです。
実装
このセクションでは、Snowflake データレイヤーの準備から Quick Flows オーケストレーションの設定まで、AML トリアージワークフローを構築する手順を順を追って説明します。開始前に必要な前提条件から始め、各ステップが前段階に基づいて積み上がっていくため、最終的には分析担当者がすぐに使用できる完全な機能を持つエンドツーエンドの自動調査パイプラインが完成します。
前提条件
- MCP アクションコネクタを設定できる権限を持つ Amazon Quick のアカウント。
- Cortex エージェント、Cortex Search、Snowflake が管理する MCP サーバー機能へのアクセス権限を持つ Snowflake のアカウント。AGENT、MCP SERVER、CORTEX SEARCH SERVICE、SECURITY INTEGRATION オブジェクトを作成するための権限が必要です。
- Snowflake 内の AML データ。取引監視アラート(Actimize、Norkom、または社内ルールエンジンなどの TMS から)、顧客/口座マスターデータ、KYC/CDD レコード。アラート、取引、顧客、処分の各次元をモデル化したセマンティックビューが必要です。
- Snowflake 内のコンプライアンス文書コーパス。BSA/AML ポリシーマニュアル、SAR 提出ガイドライン、過去の調査ノート、規制ガイダンス(FinCEN アドバイザリー、FFIEC BSA/AML マニュアル抜粋)を Cortex Search のインデックス用にテーブルにロードしたものです。
- SQL、Snowflake の管理、および AWS Identity and Access Management (IAM) の概念に関する知識。
ステップ 1:AML セマンティックビューの準備(Snowflake)
Cortex Analyst は、コンプライアンスチームがアラートや調査をどのように捉えているかに合致した セマンティックビュー を提供された場合に最も効果的に機能します。Snowflake 管理の MCP サーバーは、Cortex Analyst と連携するセマンティックビュー をサポートしています。Snowsight にアクセスし、「AI & ML」>「Semantic Views」へ移動して、Snowflake 内の AML テーブル(次元とメジャー)に対して セマンティックビュー を作成してください:
- アラートメタデータ:alert_id, alert_date, rule_name, rule_category, severity, status, alert_score。
- 取引詳細:txn_id, txn_date, txn_type, amount, currency, channel, originator, beneficiary, beneficiary_country。
- カスタマープロファイル:customer_id, full_name, risk_rating, country, industry, onboarding_date, pep_flag, sanctions_flag。
- アカウントアクティビティ:account_id, account_type, current_balance, avg_monthly_volume, status。
- 処理履歴:過去のアラート、過去の SAR(Suspicious Activity Report)、最後の処理結果、アナリストのメモ。
アラート、取引、顧客、アカウント、処理の間に関係性(ジョイン)を定義し、エージェントが単一のクエリでデータモデルを横断できるようにしてください。
ステップ 2:コンプライアンス文書用の Cortex Search サービスを構築する(Snowflake)
AML トリアージは非構造化された文脈に大きく依存しています。各トリアージ時にエージェントが関連するポリシーセクション、SAR 提出テンプレート、および過去の調査メモを取得できるように、コンプライアンス文書コーパス全体に対して Cortex Search サービスを作成してください。
CREATE OR REPLACE CORTEX SEARCH SERVICE aml_policy_search
ON search_content
ATTRIBUTES doc_type, effective_date, regulatory_body
WAREHOUSE = AML_WH
TARGET_LAG = '1 hour'
EMBEDDING_MODEL = 'snowflake-arctic-embed-l-v2.0'
AS (
    SELECT
        doc_id,
        doc_type,
        effective_date,
        regulatory_body,
        content AS search_content
    FROM FINCRIMES_DB.AML_SCHEMA.COMPLIANCE_DOCS
);
インデックス化する文書には、貴機関の BSA/AML ポリシーマニュアル、SAR 提出閾値およびナラティブテンプレート、FinCEN アドバイザリー、FFIEC BSA/AML マニュアル抜粋(必要に応じて赤acted)、過去の調査メモ(必要に応じて匿名化済み)、制裁措置・PEP スクリーニングガイダンスが含まれます。
ステップ 3: AML トリアージ用 Cortex エージェントの作成 (Snowflake)
トランザクションのセマンティックビュー(Cortex Analyst)とコンプライアンス文書検索サービス(Cortex Search)にまたがる Cortex エージェント を作成してオーケストレーションを行います。このエージェントの仕様には、貴機関の調査手法を記述したシステム指示ブロックが含まれています。このブロックは意図的に設けられており、カスタマイズが想定されています。ここで提供されるデフォルトの指示は一般的な AML トリアージワークフローを反映したものですが、本番環境への展開前に、組織固有の手順、エスカレーション基準、および規制上の義務に一致するように適応させる必要があります。
システム指示ブロック内の番号付き手順を見直し、貴機関のワークフローに適用されない手順については順序を入れ替えるか削除してください。管轄区域や適用される規制枠組みなど、貴機関固有のコンテキストを追加します。ケース管理システムの期待する出力構造に合わせて、レスポンス形式ブロックを更新してください。また、テスト時にエージェントの動作を検証するために、ご自身の環境から代表的なアラート ID やクエリパターンを抽出し、sample_questions ブロックに更新してください。
オーケストレーションの予算は控えめに設定し、Amazon Quick MCP のタイムアウト制約(現在は 300 秒)内でエージェントが確実に完了するようにしてください。エージェント作成後は Snowsight にアクセスし、Cortex Analyst ツールで使用するデフォルトのウェアハウスを更新してください。
CREATE OR REPLACE AGENT aml_triage_agent
COMMENT = 'Daily AML alert triage agent'
FROM SPECIFICATION
$$
orchestration:
budget:
seconds: 120
tokens: 16000
instructions:
system: |
You are an AML alert triage assistant for a regulated
financial institution.
Your job is to:
(1) Retrieve and summarize the flagged transaction pattern.
(2) Pull the customer profile and account activity baseline.
(3) Check for prior alerts, SARs, or investigations on this
customer.
(4) Retrieve relevant policy sections and SAR filing
thresholds.
(5) Produce a structured investigation brief with a risk
score and disposition recommendation.
Never fabricate transaction data. If data is missing, say so.
response: |
Always use this output format:
- Alert Summary (alert ID, rule, severity, date)
- Transaction Pattern (amounts, counterparties, channel,
frequency)
- Customer Profile (risk rating, onboarding, country,
industry)
- Prior History (past alerts, SARs, dispositions)
- Policy Reference (applicable thresholds, guidance)
- Risk Assessment (score 1-10, rationale)
- Disposition Recommendation (close / escalate / file SAR)
- Draft Narrative (2-3 paragraphs for case notes or SAR)
sample_questions:
- question: "Review alert ALT-2026-03-02-002"
answer: "I will pull the transaction details, customer
profile, check prior history, and produce an
investigation brief."
tools:
- tool_spec:
type: cortex_analyst_text_to_sql
name: TxnAnalyst
description: TxnAnalyst
- tool_spec:
type: cortex_search
name: PolicySearch
tool_resources:
TxnAnalyst:
semantic_view: FINCRIMES_DB.AML_SCHEMA.AML_SEMANTIC_VIEW
PolicySearch:
name: FINCRIMES_DB.AML_SCHEMA.AML_POLICY_SEARCH
$$;
必ず JSON 形式で返してください。translation フィールドのみ。他のフィールド (technical_terms 等) は一切追加しないこと — 余計なフィールドを書こうとして本文翻訳がトークン上限で打ち切られる事故を防ぐため:
{"translation": "翻訳全文"}
ステップ 4:Snowflake 管理型 MCP サーバーの作成
Snowflake Cortex エージェントは、外部 MCP クライアントに対して自動的に公開されるわけではありません。Amazon Quick が検出したいツールをリストアップした MCP SERVER オブジェクトを作成してください。
CREATE OR REPLACE MCP SERVER aml_mcp_server
FROM SPECIFICATION
$$
tools:
- title: "AML Triage Agent"
name: "aml_triage"
type: "CORTEX_AGENT_RUN"
identifier: "FINCRIMES_DB.AML_SCHEMA.AML_TRIAGE_AGENT"
description: "Runs the AML alert triage agent for daily
compliance investigation."
- title: "Transaction Analyst"
name: "txn_analyst"
type: "CORTEX_ANALYST_MESSAGE"
identifier: "FINCRIMES_DB.AML_SCHEMA.AML_SEMANTIC_VIEW"
description: "Governed natural-language queries over
transaction monitoring data."
- title: "Policy Search"
name: "policy_search"
type: "CORTEX_SEARCH_SERVICE_QUERY"
identifier: "FINCRIMES_DB.AML_SCHEMA.AML_POLICY_SEARCH"
description: "Search BSA/AML policy, SAR guidelines,
and prior investigation notes."
$$;
ステップ 5:Amazon Quick 用の Snowflake OAuth の設定
Amazon Quick は、MCP 統合のために OAuth をサポートしています。Snowflake の管理型 MCP サーバーは OAuth 2.0 をサポートしていますが、ダイナミッククライアント登録(Dynamic Client Registration)には対応していないため、Amazon Quick 側で手動構成オプションを使用する必要があります。
- Snowflake で、OAUTH タイプの SECURITY INTEGRATION を作成し、Amazon Quick のリダイレクト URL を登録します。
-- CREATE ROLES
CREATE OR REPLACE ROLE IDENTIFIER('AML_MCP_ROLE');
-- Quicksight のためのセキュリティ統合を作成する
CREATE OR REPLACE SECURITY INTEGRATION aml_quick_oauth
TYPE = OAUTH
OAUTH_CLIENT = CUSTOM
ENABLED = TRUE
OAUTH_CLIENT_TYPE = 'CONFIDENTIAL'
OAUTH_REDIRECT_URI = 'https://{region}.quicksight.aws.amazon.com/sn/oauthcallback'
OAUTH_ISSUE_REFRESH_TOKENS = TRUE
OAUTH_REFRESH_TOKEN_VALIDITY = 86400
PRE_AUTHORIZED_ROLES_LIST = ('AML_MCP_ROLE');
Amazon Quick コンソールでデプロイメント領域の正確な URL を確認し、上記のコマンド内の OAUTH_REDIRECT_URI の値をそれに応じて更新してください。
- 次のコマンドを実行して、クライアント ID とクライアントシークレットを取得します:
SELECT SYSTEM$SHOW_OAUTH_CLIENT_SECRETS('AML_QUICK_OAUTH');
OAUTH_CLIENT_ID および OAUTH_CLIENT_SECRET の値をメモしてください。
- Snowflake OAuth エンドポイントの値を取得するために、次のコマンドを実行します:
DESC INTEGRATION aml_quick_oauth;
OAUTH_AUTHORIZATION_ENDPOINT および OAUTH_TOKEN_ENDPOINT の値をメモしてください。
ステップ 6: 最小権限アクセス制御の適用 (Snowflake)
Amazon Quick MCP アクセス用の専用ロールを作成します。MCP サーバーおよびその基盤となるツールに対して USAGE を付与します。MCP サーバーへのアクセスは、自動的に公開されているツールへのアクセスを許可するものではありません。
CREATE OR REPLACE USER {quickuser} PASSWORD='{password}' DEFAULT_ROLE = AML_MCP_ROLE DEFAULT_WAREHOUSE='{DEFAULT_WAREHOUSE}';
GRANT USAGE ON DATABASE FINCRIMES_DB TO ROLE AML_MCP_ROLE;
GRANT USAGE ON SCHEMA FINCRIMES_DB.AML_SCHEMA TO ROLE AML_MCP_ROLE;
GRANT USAGE ON MCP SERVER FINCRIMES_DB.AML_SCHEMA.AML_MCP_SERVER
TO ROLE AML_MCP_ROLE;
GRANT USAGE ON AGENT FINCRIMES_DB.AML_SCHEMA.AML_TRIAGE_AGENT
TO ROLE AML_MCP_ROLE;
GRANT SELECT ON SEMANTIC VIEW
FINCRIMES_DB.AML_SCHEMA.AML_SEMANTIC_VIEW TO ROLE AML_MCP_ROLE;
GRANT USAGE ON CORTEX SEARCH SERVICE
FINCRIMES_DB.AML_SCHEMA.AML_POLICY_SEARCH TO ROLE AML_MCP_ROLE;
Step 7: Register the Snowflake MCP server in Amazon Quick
Amazon Quick コンソールでConnectorsに移動し、Connect to your teamタブを選択します。Model Context Protocolタイル上のプラス (+) アイコンを選択してセットアップを開始してください(図 3)。
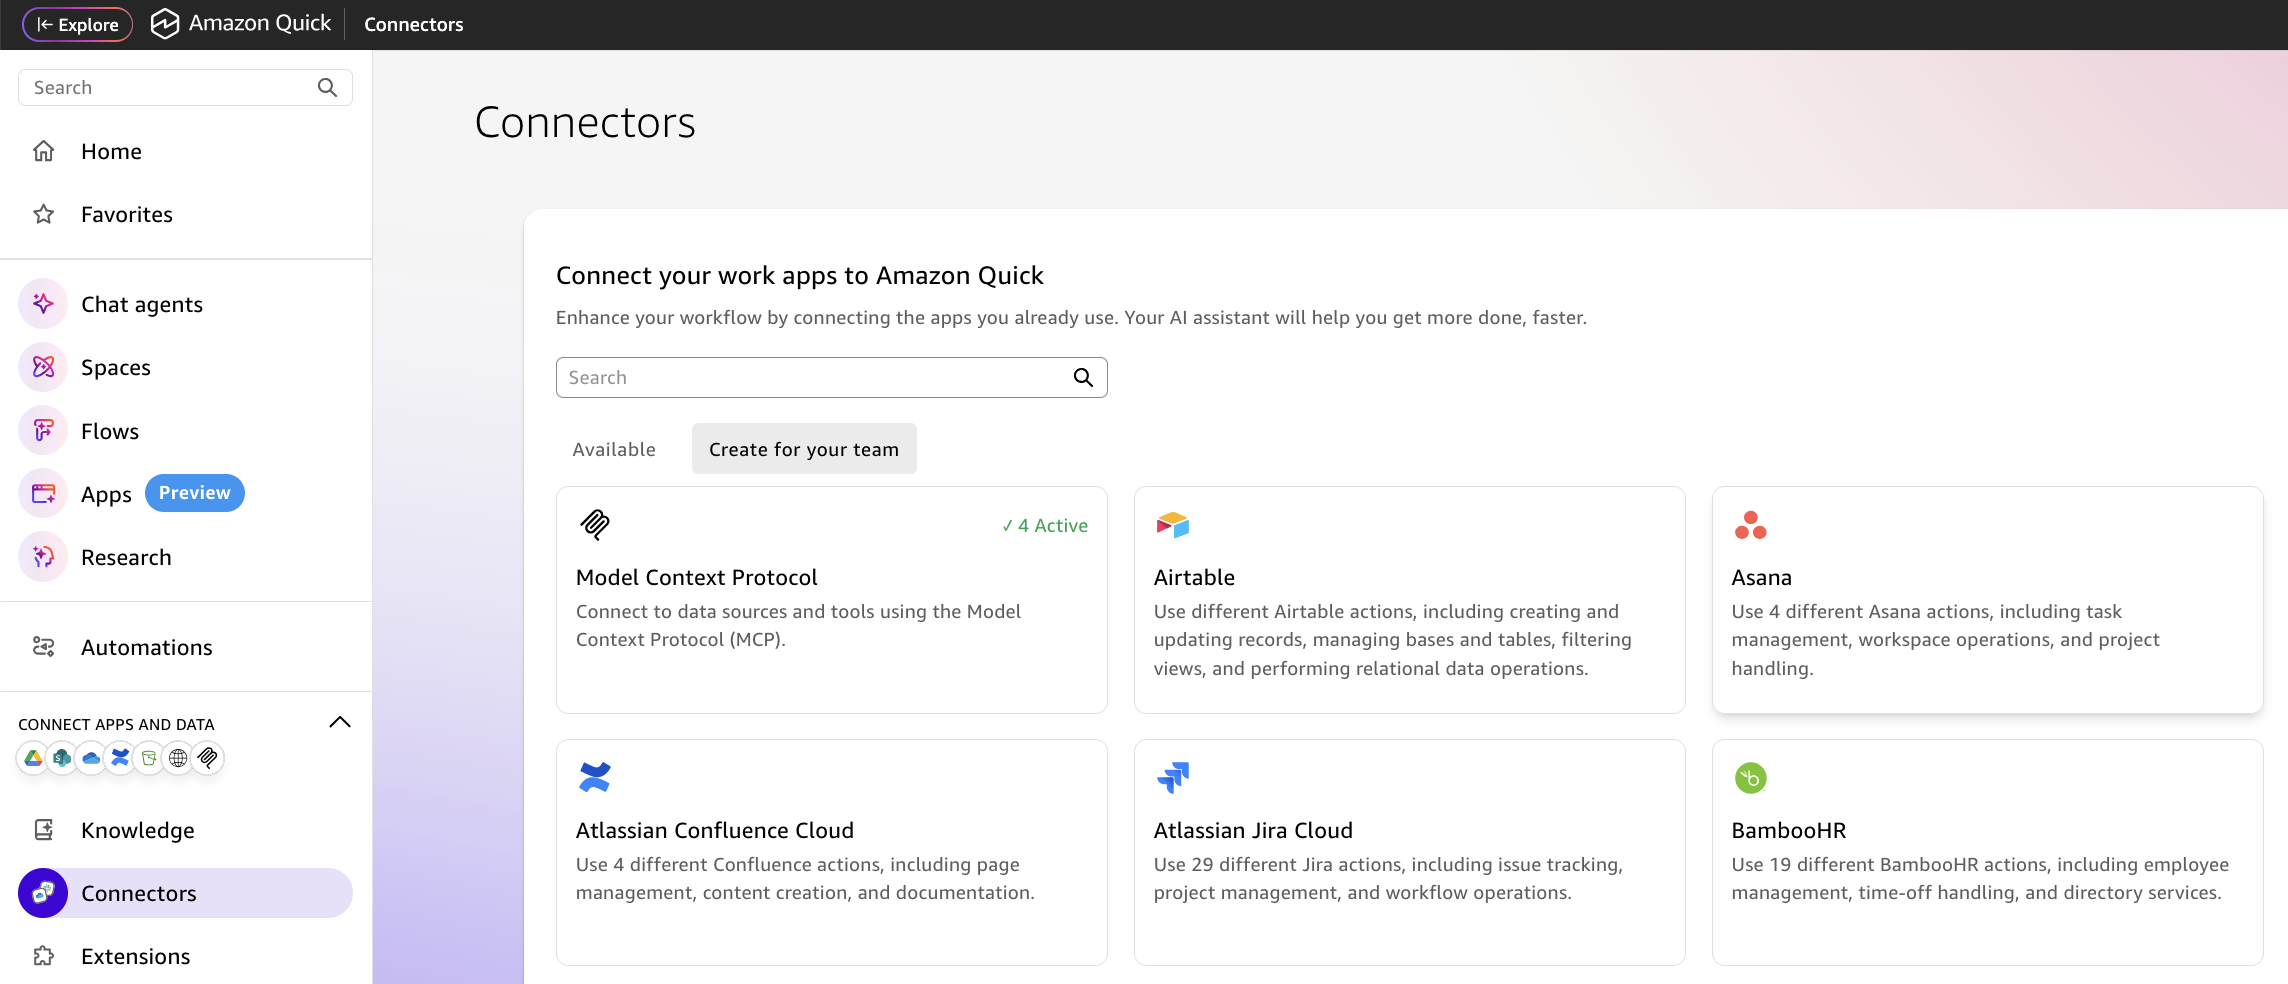
*図 3: Amazon Quick Connectors ページ:新しい MCP インテグレーションを追加するために Model Context Protocol タイルを選択中*
Snowflake MCP サーバーのエンドポイントを入力してください:
https:///api/v2/databases/FINCRIMES_DB/schemas/AML_SCHEMA/mcp-servers/AML_MCP_SERVER
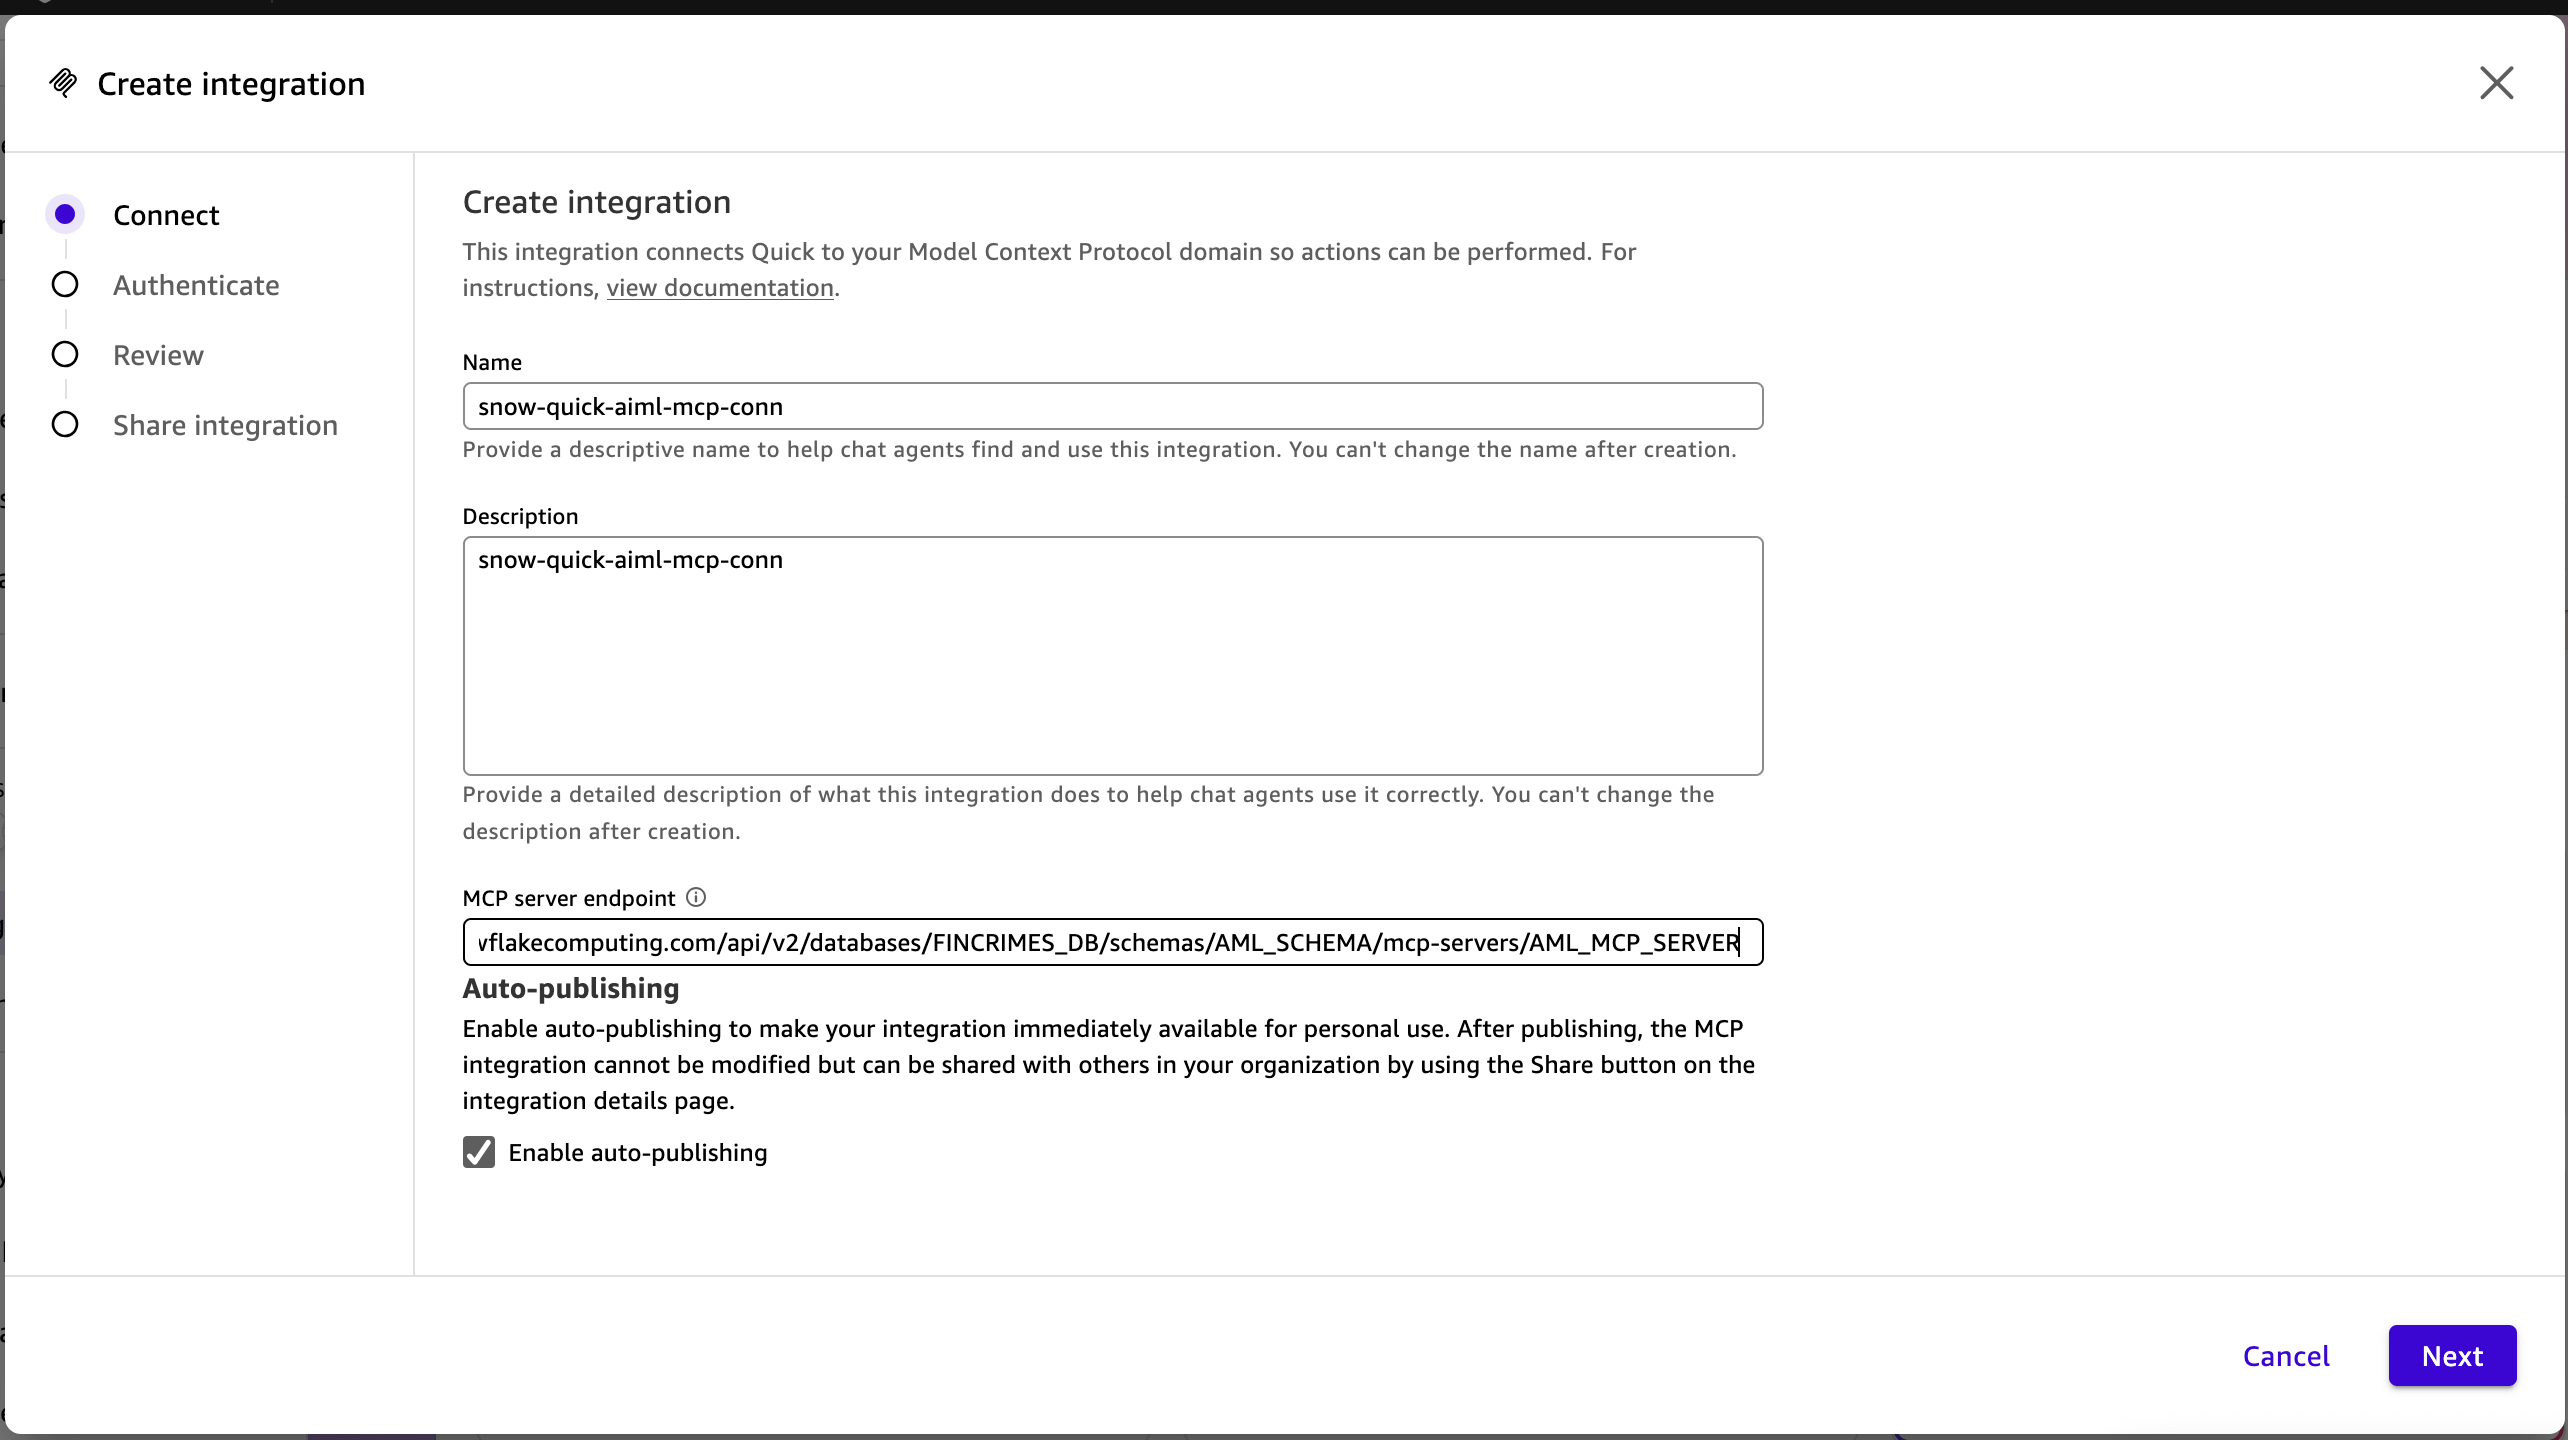
*図 4: Amazon Quick MCP インテグレーション:Snowflake MCP サーバーのエンドポイント URL の入力中*
次へを選択します。ユーザー認証 (OAuth) を選択し、手動設定を選びます。Snowflake の SECURITY INTEGRATION からクライアント ID とシークレットを入力し、さらに Snowflake OAuth 認可 URL とトークン URL も入力してください。作成を選択して続行します。
原文を表示
Financial institutions running on AWS and Snowflake benefit from a deeply integrated framework that combines Snowflake’s AI Data Cloud with AWS cloud infrastructure, including integrations with AWS services such as Amazon Simple Storage Service (Amazon S3), AWS Glue, Amazon SageMaker, and Amazon Bedrock. With over 50 native integrations between AWS services and Snowflake, organizations can build compliance workflows that maintain data security while accelerating time to value.
This post demonstrates that integration in action by automating one of the most labor-intensive workflows in financial services: anti-money laundering (AML) alert triage. You will build a triage workflow using Amazon Quick Flows and Snowflake Cortex, connected through the Amazon Quick Model Context Protocol (MCP) integration. In our testing environment, automated workflows built using Amazon Quick reduced alert investigation time from 30-90 minutes to under 5 minutes. Actual results may vary based on alert complexity and data volume.
As AI adoption matures, organizations are finding that the highest-impact deployments go beyond standalone assistants. They are repeatable workflows that orchestrate across tools teams already use, turning multi-step manual processes into a one-click experience. Amazon Quick is an enterprise AI service that provides generative AI-powered chat agents, research capabilities, Quick Flows for task automation, and Amazon Quick Automate for process automation, aggregating data from multiple sources including native indexes, custom knowledge bases, and user-uploaded files. Quick Flows, part of Amazon Quick, translates user requests into standardized MCP protocol (an open protocol standard) calls, removing the need for custom connectors while maintaining enterprise security through OAuth authentication. Quick Flows is a strong fit for AML triage because the investigation follows the same structured steps every time: collect input, run investigation, and produce output. The same MCP-based approach applies to repeatable workflows where teams currently bridge systems manually, such as FinOps cost triage, SRE incident response, or compliance investigations.
AML analysts at mid-to-large banks typically spend 30 to 90 minutes per alert manually gathering data and writing disposition narratives. According to industry research, financial institutions typically find that 90-95% of AML alerts are false positives, making efficient triage critical. Manual investigation processes at this scale can create significant workloads for compliance teams. Automation lets analysts process alerts more efficiently, reduce investigation time, and maintain compliance standards.
Solution overview
The following diagram illustrates the end-to-end integration architecture connecting Amazon Quick to Snowflake through the Model Context Protocol (MCP).
*Figure 1: Integrating Snowflake-managed MCP server with Amazon Quick through Model Context Protocol*
The solution uses Amazon Quick Flows as the orchestration layer, with a connection managed by Amazon Quick to reach a Snowflake Cortex Agent through a Snowflake-managed MCP server with OAuth authentication. The Cortex Agent performs the investigative work, analyzing both structured transaction data through Cortex Analyst and unstructured compliance documents through Cortex Search, while Quick Flows handles input validation, reasoning logic, and formatted output presentation.
*Figure 2: AML alert triage workflow: Amazon Quick Flows with MCP action steps calling Snowflake Cortex Agents (Cortex Analyst and Cortex Search)*
The following is the end-to-end analyst experience, from a Quick Flow input step to a completed investigation brief. The analyst opens the published flow, enters the alert ID (for example, ALT-2026-03-02-002), and optionally specifies a time window. The flow then:
- Validates the input and confirms the alert exists.
- Calls the Snowflake Cortex Agent through MCP to investigate the alert across transaction data, customer profiles, prior history, and compliance policy.
- Produces a structured investigation brief: alert summary, transaction pattern, customer profile, prior SARs, policy references, risk score, disposition recommendation, and a draft narrative.
Implementation
In this section, we walk you through the steps to build the AML triage workflow, from preparing your Snowflake data layer to configuring the Quick Flows orchestration. We start with the prerequisites you need before you begin, and each step builds on the last, so by the end you will have a fully functional, end-to-end automated investigation pipeline ready for analyst use.
Prerequisites
- An Amazon Quick account with the ability to configure an MCP action connector.
- A Snowflake account with access to Cortex Agents, Cortex Search, and the Snowflake-managed MCP server feature. You need permissions to create AGENT, MCP SERVER, CORTEX SEARCH SERVICE, and SECURITY INTEGRATION objects.
- AML data in Snowflake. Transaction monitoring alerts (from your TMS such as Actimize, Norkom, or in-house rules engine), customer/account master data, and KYC/CDD records. A semantic view that models your alert, transaction, customer, and disposition dimensions.
- Compliance document corpus in Snowflake. BSA/AML policy manual, SAR filing guidelines, prior investigation notes, and regulatory guidance (FinCEN advisories, FFIEC BSA/AML manual excerpts) loaded into a table for Cortex Search indexing.
- Familiarity with SQL, Snowflake administration, and AWS Identity and Access Management (IAM) concepts.
Step 1: Prepare the AML semantic view (Snowflake)
Cortex Analyst works best when you give it a semantic view that matches how your compliance team thinks about alerts and investigations. The Snowflake-managed MCP server supports semantic views with Cortex Analyst. Navigate to Snowsight, then AI & ML, then Semantic Views, and create a semantic view over your AML tables (dimensions and measures) in Snowflake:
- Alert metadata: alert_id, alert_date, rule_name, rule_category, severity, status, alert_score.
- Transaction details: txn_id, txn_date, txn_type, amount, currency, channel, originator, beneficiary, beneficiary_country.
- Customer profile: customer_id, full_name, risk_rating, country, industry, onboarding_date, pep_flag, sanctions_flag.
- Account activity: account_id, account_type, current_balance, avg_monthly_volume, status.
- Disposition history: prior alerts, prior SARs, last disposition outcome, analyst notes.
Define relationships (joins) between alerts, transactions, customers, accounts, and dispositions so the agent can traverse the data model in a single query.
Step 2: Build the Cortex Search service for compliance documents (Snowflake)
AML triage relies heavily on unstructured context. Create a Cortex Search service over your compliance document corpus so the agent can retrieve relevant policy sections, SAR filing templates, and prior investigation notes during each triage.
CREATE OR REPLACE CORTEX SEARCH SERVICE aml_policy_search
ON search_content
ATTRIBUTES doc_type, effective_date, regulatory_body
WAREHOUSE = AML_WH
TARGET_LAG = '1 hour'
EMBEDDING_MODEL = 'snowflake-arctic-embed-l-v2.0'
AS (
SELECT
doc_id,
doc_type,
effective_date,
regulatory_body,
content AS search_content
FROM FINCRIMES_DB.AML_SCHEMA.COMPLIANCE_DOCS
);The documents to index include your institution’s BSA/AML policy manual, SAR filing thresholds and narrative templates, FinCEN advisories, FFIEC BSA/AML manual excerpts, prior investigation notes (redacted as needed), and sanctions/PEP screening guidance.
Step 3: Create the AML triage Cortex Agent (Snowflake)
Create a Cortex Agent that orchestrates across your transaction semantic view (Cortex Analyst) and compliance document search service (Cortex Search). The agent specification includes a system instruction block that encodes your institution’s investigation methodology. This block is intentional and expected to be customized. The default instructions provided here reflect a common AML triage workflow, but you should adapt them to match your organization’s specific procedures, escalation criteria, and regulatory obligations before deploying to production.
Review the numbered steps in the system instruction block and reorder or remove steps that do not apply to your workflow. Add institution-specific context such as your jurisdiction and applicable regulatory frameworks. Update the response format block to match your case management system’s expected output structure. Update the sample_questions block with representative alert IDs or query patterns from your own environment to help validate agent behavior during testing.
Keep the orchestration budget conservative so the agent completes well within the Amazon Quick MCP timeout constraints (currently 300 seconds). Once the agent is created, go to Snowsight and update the default warehouse to be used for the Cortex Analyst tool.
CREATE OR REPLACE AGENT aml_triage_agent
COMMENT = 'Daily AML alert triage agent'
FROM SPECIFICATION
$$
orchestration:
  budget:
    seconds: 120
    tokens: 16000
instructions:
  system: |
    You are an AML alert triage assistant for a regulated
    financial institution.
    Your job is to:
    (1) Retrieve and summarize the flagged transaction pattern.
    (2) Pull the customer profile and account activity baseline.
    (3) Check for prior alerts, SARs, or investigations on this
    customer.
    (4) Retrieve relevant policy sections and SAR filing
    thresholds.
    (5) Produce a structured investigation brief with a risk
    score and disposition recommendation.
    Never fabricate transaction data. If data is missing, say so.
  response: |
    Always use this output format:
    1. Alert Summary (alert ID, rule, severity, date)
    2. Transaction Pattern (amounts, counterparties, channel,
    frequency)
    3. Customer Profile (risk rating, onboarding, country,
    industry)
    4. Prior History (past alerts, SARs, dispositions)
    5. Policy Reference (applicable thresholds, guidance)
    6. Risk Assessment (score 1-10, rationale)
    7. Disposition Recommendation (close / escalate / file SAR)
    8. Draft Narrative (2-3 paragraphs for case notes or SAR)
  sample_questions:
    - question: "Review alert ALT-2026-03-02-002"
      answer: "I will pull the transaction details, customer
      profile, check prior history, and produce an
      investigation brief."
tools:
  - tool_spec:
      type: cortex_analyst_text_to_sql
      name: TxnAnalyst
      description: TxnAnalyst
  - tool_spec:
      type: cortex_search
      name: PolicySearch
tool_resources:
  TxnAnalyst:
    semantic_view: FINCRIMES_DB.AML_SCHEMA.AML_SEMANTIC_VIEW
  PolicySearch:
    name: FINCRIMES_DB.AML_SCHEMA.AML_POLICY_SEARCH
$$;
Step 4: Create the Snowflake-managed MCP server
Snowflake Cortex Agents are not automatically exposed to external MCP clients. Create an MCP SERVER object that lists the tools you want Amazon Quick to discover.
CREATE OR REPLACE MCP SERVER aml_mcp_server
FROM SPECIFICATION
$$
tools:
  - title: "AML Triage Agent"
    name: "aml_triage"
    type: "CORTEX_AGENT_RUN"
    identifier: "FINCRIMES_DB.AML_SCHEMA.AML_TRIAGE_AGENT"
    description: "Runs the AML alert triage agent for daily
    compliance investigation."
  - title: "Transaction Analyst"
    name: "txn_analyst"
    type: "CORTEX_ANALYST_MESSAGE"
    identifier: "FINCRIMES_DB.AML_SCHEMA.AML_SEMANTIC_VIEW"
    description: "Governed natural-language queries over
    transaction monitoring data."
  - title: "Policy Search"
    name: "policy_search"
    type: "CORTEX_SEARCH_SERVICE_QUERY"
    identifier: "FINCRIMES_DB.AML_SCHEMA.AML_POLICY_SEARCH"
    description: "Search BSA/AML policy, SAR guidelines,
    and prior investigation notes."
$$;
Step 5: Set up Snowflake OAuth for Amazon Quick
Amazon Quick supports OAuth for MCP integrations. Snowflake’s managed MCP server supports OAuth 2.0 but does not support Dynamic Client Registration, so you will use the manual configuration option in Amazon Quick.
- In Snowflake, create a SECURITY INTEGRATION of type OAUTH and register the Amazon Quick redirect URL.
-- CREATE ROLES
CREATE OR REPLACE ROLE IDENTIFIER('AML_MCP_ROLE');

-- Create a security integration for quicksight
CREATE OR REPLACE SECURITY INTEGRATION aml_quick_oauth
    TYPE = OAUTH
    OAUTH_CLIENT = CUSTOM
    ENABLED = TRUE
    OAUTH_CLIENT_TYPE = 'CONFIDENTIAL'
    OAUTH_REDIRECT_URI = 'https://{region}.quicksight.aws.amazon.com/sn/oauthcallback'
    OAUTH_ISSUE_REFRESH_TOKENS = TRUE
    OAUTH_REFRESH_TOKEN_VALIDITY = 86400
    PRE_AUTHORIZED_ROLES_LIST = ('AML_MCP_ROLE');
Confirm the exact URL for your deployment region in the Amazon Quick console and accordingly update the value for OAUTH_REDIRECT_URI in the preceding command.
- Run the following command to retrieve the client ID and client secret:
SELECT SYSTEM$SHOW_OAUTH_CLIENT_SECRETS('AML_QUICK_OAUTH');Note down the values for OAUTH_CLIENT_ID and OAUTH_CLIENT_SECRET.
- Run the following command to retrieve values for Snowflake OAuth endpoints:
DESC INTEGRATION aml_quick_oauth;Note down the values for OAUTH_AUTHORIZATION_ENDPOINT and OAUTH_TOKEN_ENDPOINT.
Step 6: Apply least-privilege access control (Snowflake)
Create a dedicated role for Amazon Quick MCP access. Grant USAGE on the MCP server and the underlying tools. Access to the MCP server does not automatically grant access to the tools it exposes.
CREATE OR REPLACE USER {quickuser} PASSWORD='{password}' DEFAULT_ROLE = AML_MCP_ROLE DEFAULT_WAREHOUSE='{DEFAULT_WAREHOUSE}';

GRANT USAGE ON DATABASE FINCRIMES_DB TO ROLE AML_MCP_ROLE;
GRANT USAGE ON SCHEMA FINCRIMES_DB.AML_SCHEMA TO ROLE AML_MCP_ROLE;
GRANT USAGE ON MCP SERVER FINCRIMES_DB.AML_SCHEMA.AML_MCP_SERVER
    TO ROLE AML_MCP_ROLE;
GRANT USAGE ON AGENT FINCRIMES_DB.AML_SCHEMA.AML_TRIAGE_AGENT
    TO ROLE AML_MCP_ROLE;
GRANT SELECT ON SEMANTIC VIEW
    FINCRIMES_DB.AML_SCHEMA.AML_SEMANTIC_VIEW TO ROLE AML_MCP_ROLE;
GRANT USAGE ON CORTEX SEARCH SERVICE
    FINCRIMES_DB.AML_SCHEMA.AML_POLICY_SEARCH TO ROLE AML_MCP_ROLE;
Step 7: Register the Snowflake MCP server in Amazon Quick
In the Amazon Quick console, navigate to Connectors and choose the Connect to your team tab. Select the plus (+) icon on the Model Context Protocol tile to begin setup (Figure 3).
*Figure 3: Amazon Quick Connectors page: selecting the Model Context Protocol tile to add a new MCP integration*
Enter the Snowflake MCP server endpoint:
https:///api/v2/databases/FINCRIMES_DB/schemas/AML_SCHEMA/mcp-servers/AML_MCP_SERVER*Figure 4: Amazon Quick MCP integration: entering the Snowflake MCP server endpoint URL*
Choose Next. Select User authentication (OAuth) and choose Manual configuration. Enter the client ID and secret from the Snowflake SECURITY INTEGRATION, plus the Snowflake OAuth authorization and token URLs. Choose Create and continue<
関連記事
今日のまとめ
AI日報で今日の重要ニュースをまとめ読み