Claude Code の高性能エージェント構築入門
KDnuggets は、Claude Code を活用して高性能なプログラミングエージェントを構築するための初心者向けセットアップガイドを発表した。
キーポイント
Claude Code の導入と設定
高性能なコーディングエージェントとして Claude Code を機能させるための初期環境構築手順が解説されている。
パフォーマンス最適化の手法
単なるセットアップを超え、エージェントの処理能力と応答速度を最大化するための具体的なチューニング方法が含まれている。
初心者向けの構造化ガイド
複雑な技術設定を段階的に理解できるよう、体系的でアクセスしやすい形式で情報が提供されている。
重要な引用
A Beginner's Guide to Setting Up Claude Code for High Performance Agentic Programming
影響分析・編集コメントを表示
影響分析
この記事は、Claude Code の実用的な活用方法を体系化したものであり、特にエージェントベースの開発ワークフローへの移行を検討している開発者にとって即戦力となる情報を提供します。ただし、特定のツール(Claude Code)のセットアップ手順に焦点が絞られているため、業界全体を根本から変えるような革新的な技術発表というよりは、既存ツールの活用範囲を広げる重要な実践ガイドとして位置づけられます。
編集コメント
「Agentic Programming(エージェント型プログラミング)」という概念を、具体的なツールである Claude Code を通じて実践レベルで解説している点が評価できます。開発者が単なるチャットボットの枠を超え、自律的にコードを実行・修正する環境を構築するための第一歩として非常に有用な資料です。
はじめに
多くの人が Claude Code の設定を試しても、初日で挫折してしまいます。インストーラーを実行し、ログインしてプロンプトを入力すると、すぐに有用な回答が返ってくるため、その後は設定ファイルに触れることなく終わってしまうのです。
しかし数週間後には、セッションが以前の判断を忘れ始めたり、同じ権限許可のポップアップが 1 日に 50 回も表示されたりします。また、長時間かかるタスクはいつも同じ結末を迎えます。コンテキスト警告の山に直面し、会話を中断して最初からやり直さなければならなくなるのです。
これはモデル自体の限界ではありません。設定の問題です。Claude Code には合理的なデフォルト値が用意されていますが、「合理的なデフォルト」と「高パフォーマンス」は別物です。その差を埋めるのは、初心者がほとんど開くことのない数枚の設定ファイルだけです。このガイドでは、そのギャップを埋めるための実際の設定方法、権限管理、フックの仕組み、そしてコマンド操作の習慣について解説します。
これは単なるインストールから、実務で持続的なエージェント作業に耐えうる環境へと移行するための道筋です。古いバージョンのツールからの推測ではなく、Anthropic の最新のドキュメントに基づいて検証された内容となっています。
Claude Code を正しくインストールする方法
Claude Code はスタンドアロンのコマンドラインインターフェース (CLI) としてインストールされます。現在の推奨パス ではネイティブインストーラーが推奨されていますが、npm を使用することも可能です。
macOS、Linux、WSL の場合
curl -fsSL https://claude.ai/install.sh | bash
Windows PowerShell の場合
irm https://claude.ai/install.ps1 | iex
または、既存の Node ツールチェーンで管理したい場合は npm を使用します
npm install -g @anthropic-ai/claude-code
インストール後、初回実行前に必ず実際のプロジェクトディレクトリに移動してください。これは一見些細なことのように思えますが、実は非常に重要です。Claude Code は、起動したディレクトリを基準にプロジェクトのメモリや設定のスコープを切り替えるため、ホームフォルダやデスクトップから起動すると、作業中のコンテキストを正しく取得できなくなるからです。
cd your-project-directory
claude
初回実行時には認証プロセスが開始されます。Claude のサブスクリプション (Pro、Max、Team) を持っていれば OAuth ログインで、または Console アカウントに紐付いた API キーを入力することで利用可能です。ターミナル以外でも、VS Code 拡張機能、JetBrains プラグイン、デスクトップアプリ、そしてブラウザからセッションを引き継ぎたい場合に便利な Web ベース版 (claude.ai) でも利用できます。これらはすべて同じ基盤となる設定やプロジェクトファイルを読み込むため、ターミナルで設定した内容は後から統合開発環境 (IDE) パネルに移行しても無駄になりません。
インストール自体はこれで完了です。ここから Claude Code がどれだけうまく機能するかを決定するのは、多くのチュートリアルが飛ばしてしまう 3 つのファイルにあります。
実際に機能する 3 つのファイル
Claude Code は設定情報を 2 か所から読み込みます。1 つはプロジェクト内の .claude/ ディレクトリ(およびプロジェクトルートにある CLAUDE.md)で、もう 1 つはマシン上のすべてのプロジェクトに適用されるグローバルな ~/.claude/ ディレクトリです。このツールがうまく機能するか、それとも設定がずれてしまうかを決める最大の要因は「どこに何があるか」を理解することであり、これは Anthropic の公式ドキュメント でも強調されています。
CLAUDE.mdはプロジェクトの記憶装置です。そのリポジトリでのセッション開始時に Claude が参照する指示書で、アーキテクチャのメモ、ビルドやテストのコマンド、コードスタイルのルールなど、毎回説明し直す必要がある情報をここに記述します。新しいプロジェクトで/initを実行すると、Claude Code がコードベースをスキャンして初期のCLAUDE.mdを生成してくれます。その後、/memoryコマンドを使ってこれを洗練させていきましょう。内容は簡潔に保つことが重要です。Anthropic のガイダンスでは、これを約 2,500 トークン以内の生きた参照資料として扱うよう推奨されており、長文や特定のパスに依存する情報は.claude/rules/*.mdファイルに移すよう案内されています。これらのルールファイルは、Claude が関連するファイルに触れたときだけ読み込まれるようにスコープを設定できます。
settings.json は、プロジェクトごとの設定なら .claude/settings.json に、個人用のデフォルト設定なら ~/.claude/settings.json に配置されます。このファイルには、権限やフック、環境変数、モデルのデフォルト値などが実際に格納されています。多くの初心者が開くことのないこのファイルこそが、「頻繁に権限の確認を求められる」「タスクに必要な以上に高価なモデルを使ってしまう」という、Claude Code に関する最も一般的な不満の直接的な原因となっています。
「自動メモリ機能」は、より新しい、静かなレイヤーです。セッション中に Claude は、ファイルを直接管理することなく、自身の作業メモを書き込んだり読み込んだりできます。これは autoMemoryEnabled という設定で切り替えられます。あるいは、CLAUDE.md を通じて完全に手動かつ監査可能な状態にしたい場合は、CLAUDE_CODE_DISABLE_AUTO_MEMORY 環境変数を使用します。
これらの設定を結びつける実践的なルールは、Anthropic のドキュメントや構成システムの独自分析の両方で共通して言及されています。「安定したルールは CLAUDE.md に記述する」というものです。会話履歴の中に埋もれた指示は、セッションが長引いて自動的に要約(コンパクション)された瞬間に失われてしまいます。今日のセッションを超えて存続させる必要があるルールなら、必ず書き留めてください。
# 必要な前に権限とフックを設定する
Claude Code は、Shift+Tab キーを押して切り替えることができる 3 つの権限モードのいずれかで動作します:
- デフォルト:リスクのあるツール呼び出しごとに確認を求めます。
- 自動編集承認:ファイルの編集はプロンプトなしで実行可能ですが、他のツール呼び出しには制限を設けます。
「プランモード」は読み取り専用で、編集やシェルコマンドの実行は一切できません。このモードでは、ユーザーが承認するまで Claude は行動を起こしません。見慣れないコードベースでの最初のセッションでは、デフォルト値としてプランモードを推奨します。これにより、Claude が行動に移す前に必ず提案を行う仕組みになります。
インタラクティブなモード以外にも、settings.json を使用して実際の権限ルールを記述できます。これにより、同じ安全なコマンドをセッション中に手動で 50 回承認する必要がなくなります。
{
  "permissions": {
    "allow": [
      "Bash(npm test:*)",
      "Bash(npm run lint:*)",
      "Read(**)"
    ],
    "ask": [
      "Bash(git push:*)"
    ],
    "deny": [
      "Bash(rm -rf /*)",
      "Bash(sudo:*)",
      "Read(.env)"
    ]
  }
}この設定の仕組み: 「allow」に一致するコマンドはプロンプトなしで実行され、「deny」に一致するものは、他のルールが何であれ即座にブロックされます。リストされていない項目は、直接ユーザーに確認を求めます。この「 deny-first(拒否優先)」の順序が重要です。より広範な許可ルールが存在しても、拒否ルールが常に優先されるため、破壊的なコマンドへのアクセスを防ぎつつ、読み取りやテスト実行に対して比較的広い権限を与えることが安全に行えます。
フックは権限ルールの一歩先を行く機能です。ルールは呼び出しを許可またはブロックするだけですが、フックはその呼び出しに応じて実際に何かを実行できます。Claude が編集したすべてのファイルを自動でフォーマットする「PostToolUse」フックが、最も一般的に推奨される設定の一例です。
Claude Code の設定ガイド:高性能エージェントプログラミングのための基礎(その 6/15)
PostToolUseフックの仕組み
以下の設定は、Claude がファイルの作成や編集を行った直後に自動的に Prettier を実行するものです。
{
  "hooks": {
    "PostToolUse": [
      {
        "matcher": "Write|Edit",
        "hooks": [
          {
            "type": "command",
            "command": "npx prettier --write \"$CLAUDE_TOOL_INPUT_FILE_PATH\""
          }
        ]
      }
    ]
  }
}
このフックは、Claude がファイルを書き込んだり編集したりするたびに発火し、環境変数 $CLAUDE_TOOL_INPUT_FILE_PATH を通じて Claude Code から受け取ったパスを指定された対象ファイルに対して Prettier を実行します。これにより、編集のたびに手動でフォーマットし直す必要がなくなります。また、Claude が作成したファイルでも人間が編集したファイルでも、一貫してスタイルルールが適用されるようになります。
PreToolUseフックによる危険コマンドの阻止
さらに強力な機能として、PreToolUse フックを使用すれば、実行前に危険なコマンドをブロックすることも可能です。これは単なるパーミッション設定よりも信頼性が高く、パターンマッチングだけでなく、実行されるコマンドテキストそのものを精査できるためです。
#!/usr/bin/env python3
# .claude/hooks/block-dangerous-bash.py
import json, re, sys

DANGEROUS_PATTERNS = [
    r'\brm\s+.*-[a-z]*r[a-z]*f',
    r'sudo\s+rm',
    r'chmod\s+777',
    r'git\s+push\s+--force.*main',
]

input_data = json.load(sys.stdin)
if input_data.get('tool_name') == 'Bash':
    command = input_data.get('tool_input', {}).get('command', '')
    for pattern in DANGEROUS_PATTERNS:
        if re.search(pattern, command, re.IGNORECASE):
            print("BLOCKED: matches a dangerous command pattern", file=sys.stderr)
            sys.exit(2)
sys.exit(0)このスクリプトは、rm -rf(再帰的削除)、sudo rm、権限を全開にする chmod 777、そして git push --force main といった危険なコマンドパターンを検知します。該当するコマンドが検出されるとエラーメッセージを出力して実行を阻止し、安全なコマンドの場合は正常終了します。
何をするものか: Claude Code は、コマンド実行前にツール呼び出しの詳細を JSON 形式で標準入力(stdin)としてこのスクリプトに渡します。もし Bash ツールが再帰的な強制削除(recursive force-delete)、sudo rm、世界書き込み権限を持つ chmod、あるいは main ブランチへの強制的なプッシュを実行しようとした場合、このスクリプトは理由を出力して終了コード 2 で停止します。Claude Code のフックシステムはこのコード 2 を「絶対的なブロック」として扱い、コマンドが実行される前に即座に阻止します。
これを settings.json の PreToolUse セクションで Bash マッチャーとして登録しておけば、手動で確認する手間を省けるだけでなく、永続的な安全網として機能します。
最初に覚えるべきコマンド
Claude Code には現在、六十以上の組み込みコマンドが用意されています。初日にこれらすべてを暗記しようとするのは時間の無駄です。以下の表は、セッションのパフォーマンスに実際に影響を与える重要なコマンドのみを抽出し、用途別に整理したものです。出典は Claude Code の公式コマンドリファレンス です。
| コマンド | カテゴリ | 機能 |
|---|---|---|
/init | セットアップ | コードベースをスキャンし、初期の CLAUDE.md を生成します。 |
/memory | セットアップ | CLAUDE.md の編集画面を直接開きます。 |
/clear | コンテキスト | プロジェクトの記憶は保持したまま、会話を新規に開始します。 |
/compact [focus] | コンテキスト | 会話履歴を要約してコンテキスト領域を解放します。[focus] で何を優先して残すか指示できます。 |
| /context | コンテキスト | 現在のコンテキストウィンドウの使用状況を表示します。
/plan
プラン
計画モードを切り替え、Claude が実行前に提案を行います。承認されるまで何も実行されません。
/diff
レビュー
今セッションで行われたすべての変更に対する対話型の差分表示を開きます。
/code-review [--fix]
レビュー
現在の差分コードの正誤やバグを検査します。--fix オプションを指定すると、指摘された問題が自動的に修正されます。
/security-review
レビュー
現在の差分コードを特に対象に、セキュリティ上の脆弱性がないか検査します。
/review
レビュー
GitHub のプルリクエストに対して、閲覧専用のレビューを行います。
/resume [session]
ナビゲーション
名前または ID を指定して、以前の会話内容を再開します。
/branch [name] (alias /fork)
ナビゲーション
現在の会話を新しいセッションとしてフォーク(分岐)します。
/rewind
ナビゲーション
コードや会話履歴を、より以前のチェックポイントまで巻き戻します。
/model
コストとパフォーマンス
コンテキストを保持したまま、セッション中にアクティブなモデルを切り替えます。
/effort
コストとパフォーマンス
タスクの複雑さに応じて、推論深度(低から最大まで)を設定します。
/cost
コストとパフォーマンス
API キーユーザー向けに、トークン使用量と利用料金を表示します。
/agents
委任
サブエージェントを管理します。専門的なエージェントの表示、作成、呼び出しが可能です。
/permissions
設定
対話形式で権限ルールを管理します。
/hooks
設定
対話形式でフック(フック機能)を管理します。
/doctor
診断
インストール環境の構成に問題がないかチェックします。
初心者が身につけるべき習慣: まず /compact、/plan、/diff の 3 つのコマンドに慣れることです。これらだけで、コンテキストの肥大化によるセッションの劣化や、意図しない範囲での編集、そして何が変わったのかの把握不足といった、初期段階で最も頻繁に直面する課題の大半を解決できます。残りのコマンドは、この 3 つが筋肉記憶になることで、初めてその価値を発揮します。
自分だけの /truth コマンドを作る
注意: /truth は Claude Code に標準搭載されているコマンドではありません。公式コマンドリファレンスにも記載されておらず、この記事の調査時点での公式ドキュメントやコミュニティガイドでも確認できませんでした。しかし、実際に役立つのは「信頼して次に進む前に、Claude が直近で述べた主張を実際のコードベースと照合させる」ような機能です。これは明確な課題であり、Claude Code のカスタムコマンドシステムがその解決策として完璧な例となっています。ここでは、その仕組みを使って自分自身で /truth を構築する方法を紹介します。
カスタムコマンドは「スキル」として定義されます。具体的には SKILL.md ファイルを含むフォルダです。.claude/skills/truth/SKILL.md に以下のように作成してください。
description: Claude の直近の主張と編集内容を、実際のコードベースと照合して検証する
allowed-tools: Read, Grep, Glob, Bash(git diff:*)
この会話で私が直前に述べたことをすべて、現在のコードベースに実際に存在する内容と比較し再検討してください。具体的には:
必ず JSON 形式で返してください。translation フィールドのみ。他のフィールドは一切追加しないこと — 余計なフィールドを書こうとして本文がトークン上限で打ち切られる事故を防ぐため:
{"translation": "リライト全文"}
- 編集したと主張するすべてのファイルについて、再度読み込んで変更が実際に反映されているか、そしてその記述と一致しているかを確認してください。
- 既存のコードに関する主張(関数の動作、設定値、インポート、依存関係のバージョンなど)については、セッションの前半に読んだ記憶を信じるのではなく、実際のファイルに対して検証を行ってください。
git diffを実行し、実際に生成された差分と自分が記述した変更内容を比較してください。- 結果は率直に報告してください。どの主張が正しく、どの主張が間違っていたのか、そして失敗した項目について具体的にどこが食い違っているかを明確に述べてください。発見した不一致を和らげたり、曖昧な表現を使ったりせず、事実をそのまま伝えてください。
この仕組みの目的は以下の通りです:YAML フロントマターにより、このコマンドは読み取り専用ツールとスコープ限定の git diff に制限されます。つまり /truth コマンドを実行しても、それ自体が何らかの変更を加えることは決してありません。検証ステップ自体が変更を加えられる可能性がある場合、それは信頼できる検証とは言えないからです。
指示本文では「検証」の意味を意図的に具体的に定義しています。モデル自身が以前記述した内容に頼るのではなく、実際のファイルを再読することです。また、不一致が見つかった場合にそれを和らげようとするよう仕向けられた自己チェックは実質的な検証にならないため、Claude に対して不一致を見つけた場合はそれを率直に報告するよう明示的に指示しています。
ファイルを保存すると、そのプロジェクト内のすべてのセッションで /truth が使用可能になります。これは他のカスタムコマンドと同じ挙動を示し、/ と入力してフィルタリングを開始すると表示されます。
Claude が多段階のタスクを完了した後、特に複数のファイルにアクセスしたり、直近で再読していない既存コードについて言及したりした場合、それらの主張に基づいてコミットを行う前に /truth を実行してください。これは自己修正型エージェント全般に通じる基本的な原則です。チェックが価値を持つのは、それが自身の過去の出力とは異なる外部の情報を参照するよう強制された場合に限られます。/truth で実際のファイルや実際の git diff を指し示すことが、単にモデル同士が同意しているだけの状態を脱却させる鍵となります。
# サブエージェントと並列処理による実用的な速度向上
これまでの内容は、単一の Claude Code セッションの信頼性を高めるためのものです。一方、サブエージェントは、逐次的に行う必要のない作業において速度向上をもたらします。サブエージェントとは、独自のコンテキストウィンドウ、システムプロンプト、ツール権限を持つ専門的なインスタンスです。
Anthropic のサブエージェントドキュメント によると、サブエージェントはメインセッションから隔離して実行され、中間ファイルの読み込みやツールの呼び出しをすべて主要な会話に持ち込むのではなく、要約結果だけを返します。
この分離こそが、実際の性能向上の鍵となります。大規模コードベースの探索や依存関係の監査、テスト記述などは、すべて冗長な作業であり、本来であればメインセッションのコンテキスト予算を大きく圧迫してしまいます。これらをサブエージェントに任せることで、完了した結果のみを戻すようにすればよいのです。
セッション内で Claude にサブエージェント作成を依頼する
/agents
/agents を実行すると、サブエージェントの作成・表示・管理のための対話型メニューが開きます。あるいは、モデル選択やツールアクセス権限のためのフロントマターを含むファイルとして .claude/agents/<name>.md 上に直接定義することも可能です。これは前述のスキルファイルと構造が似ています。
一般的な初期パターンとしては、読み取り専用アクセスを持つ狭いスコープのコードレビュー用やテスト実行用のサブエージェントを作成するものです。これにより、変更を加えることなく検査・報告のみを行うことができます。これは上記のフックセクションで扱った「関心の分離」の考え方に通じるもので、今回は権限管理ではなく委任という形で適用されています。
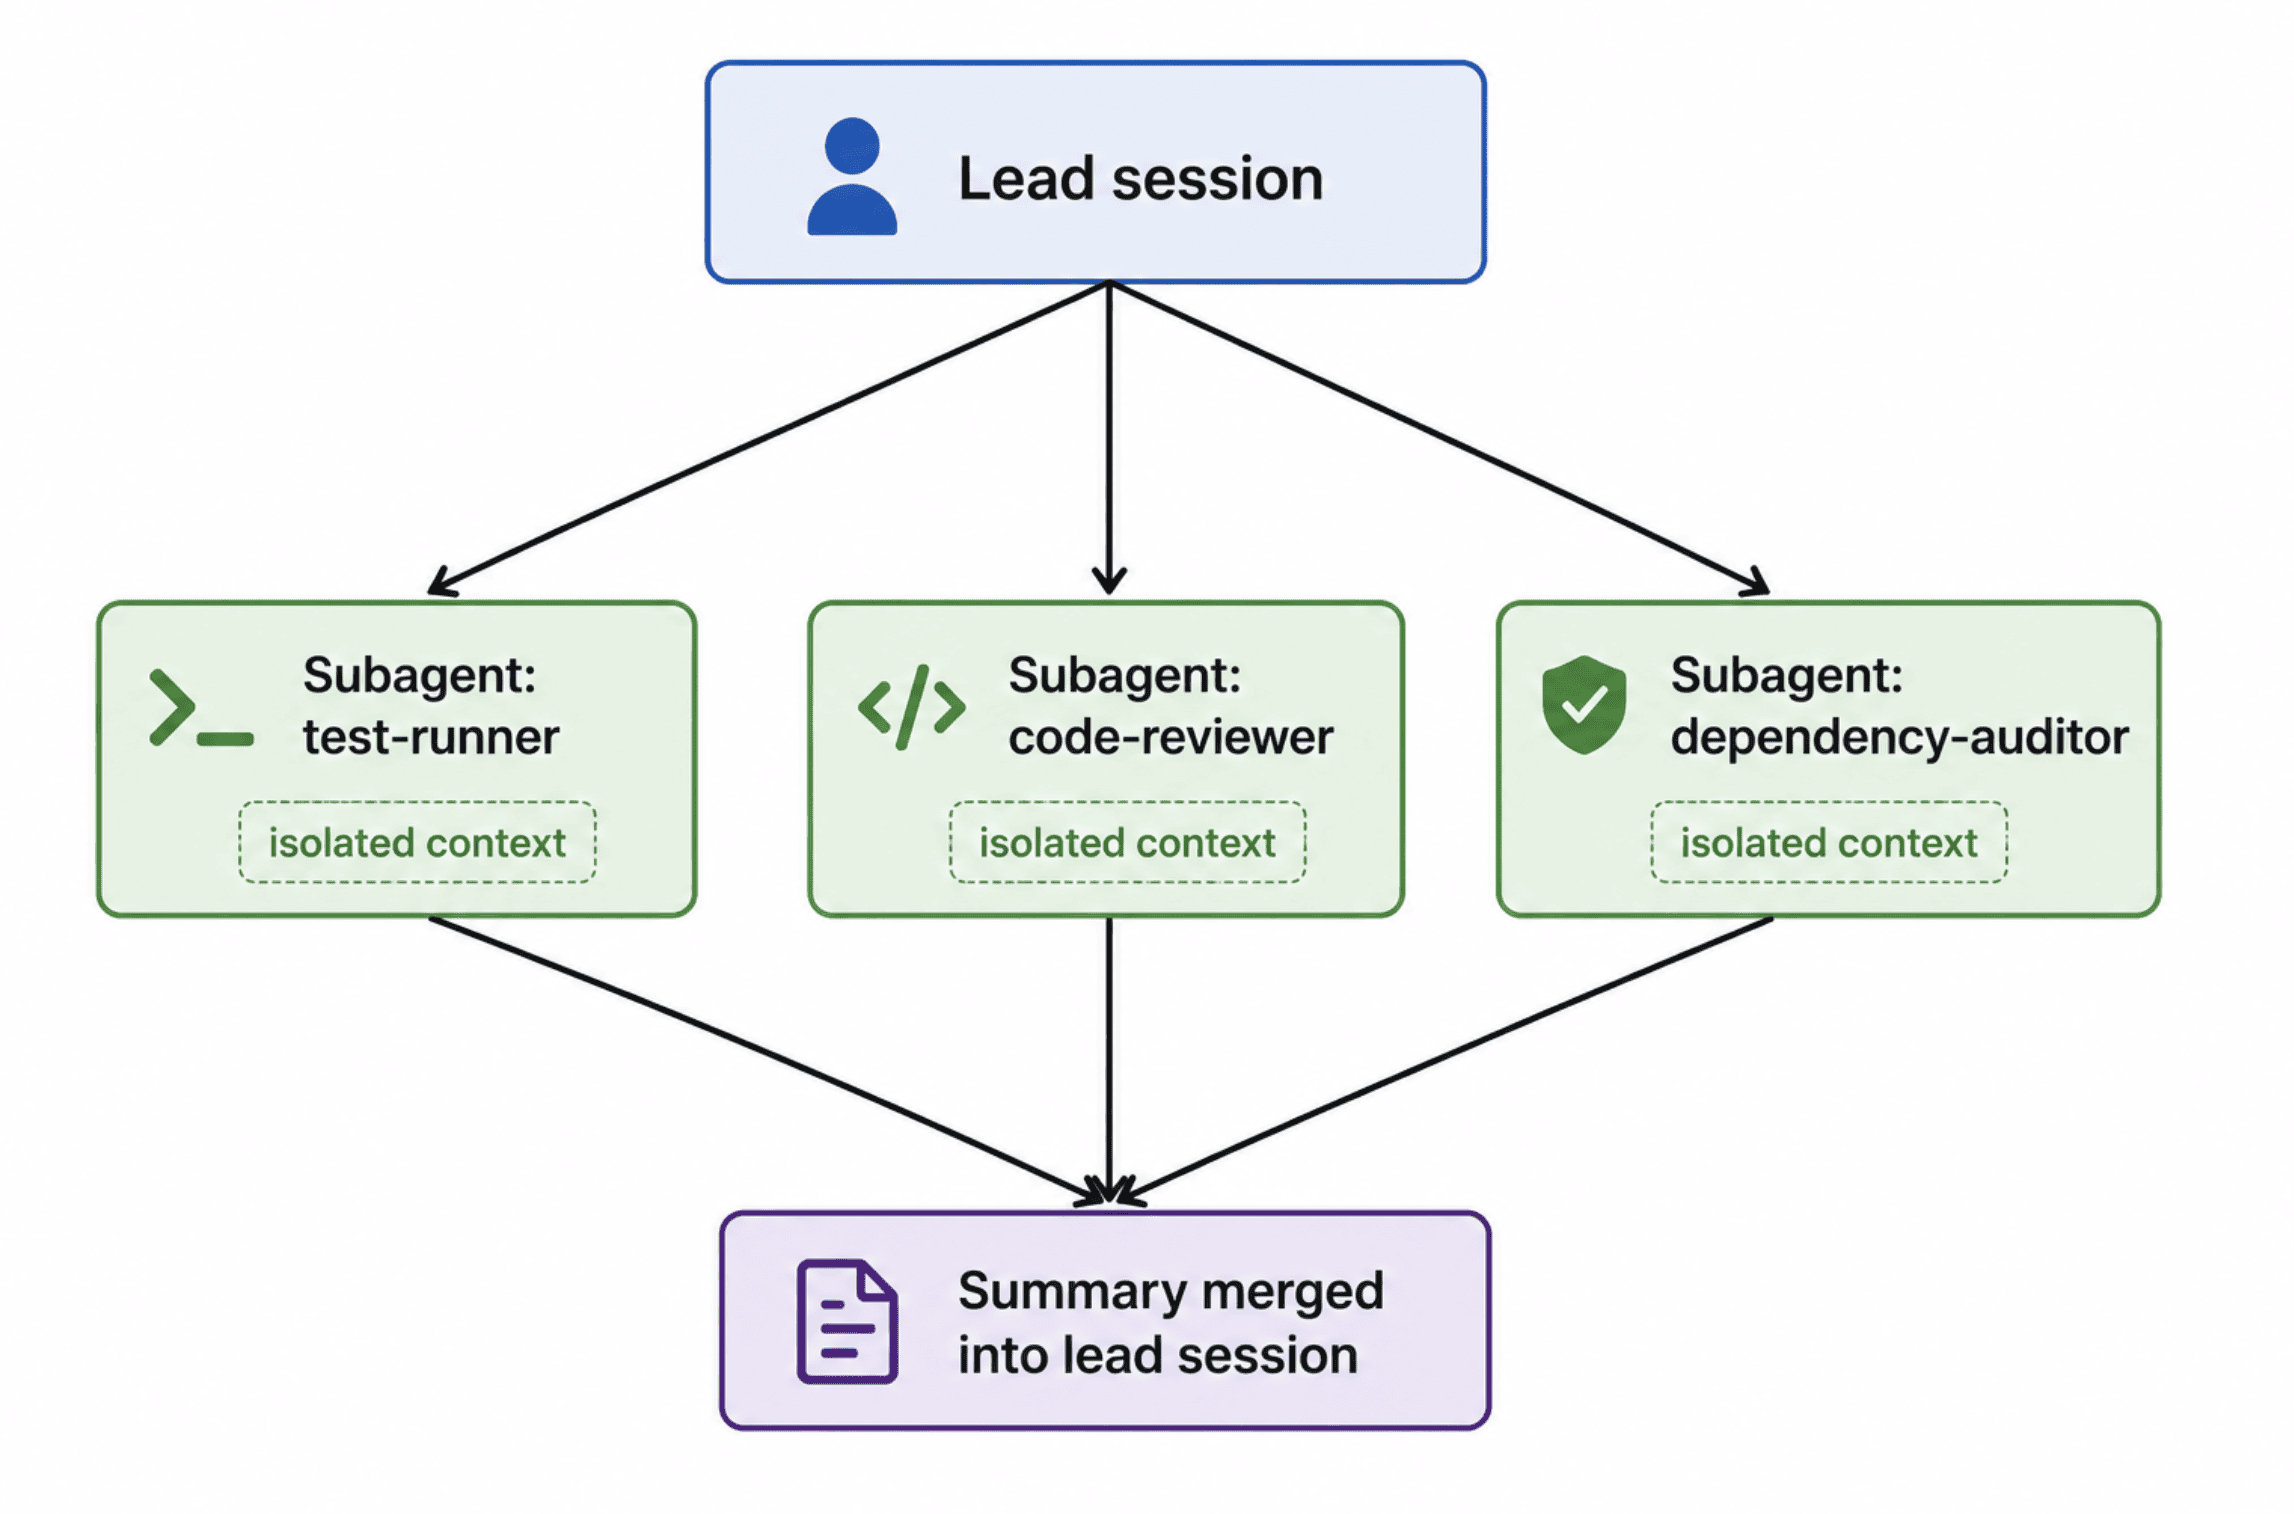
本格的に並列処理を行う場合、つまりコードベースの複数の無関係な部分を一度に編集して、ある変更が他の変更をブロックしないようにしたい場合は、/batch コマンドや --worktree セッションを使用します。これにより、複数の Claude Code インスタンスがそれぞれ独立した Git ワークツリーで同時に動作し、各インスタンスは独自の作業ディレクトリを持つため、互いの編集内容に干渉しません。
これは、初心者にとって最初の日から必須となる高度な運用パターンではありませんが、単一セッションでの作業がボトルネックになり始めた段階では、この機能の存在を知っておく価値があります。
実際に使える CLAUDE.md と settings.json のテンプレート
上記の内容をすべて統合し、新規プロジェクトのための合理的なスタート地点を示します。これをプロジェクトルートに CLAUDE.md として保存してください。
プロジェクトコンテキスト
スタック
- [ここに言語やフレームワークを記述(例:Node.js, TypeScript, React)]
コマンド
- テスト実行:
npm test - リント実行:
npm run lint - 開発サーバー起動:
npm run dev
規約
- [ここにコードスタイルルール、命名規則、フォルダ構成を記述]
タスク完了前の確認事項
- テストスイートを実行し、すべてがパスすることを確認する
- 1 つ以上のファイルの編集が含まれるタスクの場合は、
/truthを実行する
また、スタート用の .claude/settings.json は以下のようになります。
これで、本記事で紹介した基盤となる設定は完成です。安全で反復的なコマンドを妨げない適切な権限設定、本当に危険な操作に対する堅牢なブロック、編集時の自動フォーマット、そして Claude が推測ではなく実際のテストやリンティングのコマンドを参照するためのプロジェクトメモリファイル。これら 2 つのファイルをリポジトリにコミットしてください(機密情報を含むファイルは除外し、共有すべきでない個人用の上書き設定は .claude/settings.local.json に記述します)。そうすれば、プロジェクトをクローンしたチームメンバー全員が、ゼロから構築する手間なく、同じ高パフォーマンスなベースラインから作業を開始できます。
# まとめ
初心者の Claude Code 設定と、高パフォーマンスな環境の違いは、特別な機能や隠されたコマンドにあるわけではありません。重要なのは、実作業に入る前に CLAUDE.md や settings.json、そして数個のフックに二十分ほど時間を費やし、最適化を済ませたか、それともインストール時にデフォルトで設定されたまま三週間も使い続けているかの違いです。
このガイドで紹介するメモリファイルや権限ルール、フック、最初に覚えるべきコマンドなどは、すべてあなたが繰り返しぶつかる摩擦を取り除くために存在します。一度設定してリポジトリにコミットしておけば、その後のすべてのセッションは、前回のものよりも強力なベースラインからスタートできるようになります。
Shittu Olumide 氏はソフトウェアエンジニアであり技術ライターです。最先端の技術を駆使して説得力のある物語を紡ぐことに情熱を注ぎ、細部への洞察力と複雑な概念をわかりやすく解説する才能に長けています。Twitter では こちら で Shittu 氏を見つけることもできます。
原文を表示
**
# Introduction
Most people's Claude Code** setup never gets past day one. They run the installer, log in, type a prompt, get something useful back, and never touch a config file again. Weeks later, sessions start losing track of earlier decisions, the same permission prompt shows up fifty times a day, and every long task ends the same way: a wall of context warnings and a conversation that has to be abandoned and restarted from scratch.
None of that is a limitation of the model. It's a limitation of the setup. Claude Code ships with sensible defaults, but sensible defaults and high performance are different bars, and the gap between them is almost entirely made up of a handful of files most beginners never open. This guide closes that gap. It walks through the actual configuration, permissions, hooks, and command habits that separate a fresh install from a setup that holds up under real, sustained agentic work, verified against Anthropic's current documentation rather than assumed from an older version of the tool.
# Installing Claude Code the Right Way
**
Claude Code installs as a standalone command-line interface (CLI), and the current recommended path** is the native installer rather than npm, though npm still works as a fallback:
# macOS, Linux, or WSL
curl -fsSL https://claude.ai/install.sh | bash

# Windows PowerShell
irm https://claude.ai/install.ps1 | iex

# Or, via npm, if you'd rather manage it with your existing Node toolchain
npm install -g @anthropic-ai/claude-code
Once installed, cd into an actual project directory before running claude for the first time. This matters more than it sounds like it should: Claude Code scopes its project memory and settings to the directory you launch it from, so starting it from your home folder or your desktop means it never picks up the right context for anything you're working on.
cd your-project-directory
claude
The first run walks you through authentication — either OAuth login with a Claude subscription (Pro, Max, or Team) or an application programming interface (API) key tied to a Console account. Beyond the terminal, Claude Code is also available through a VS Code extension, a JetBrains plugin, a desktop app, and a web-based version at claude.ai for sessions you want to pick up from a browser rather than a terminal. All of them read from the same underlying settings and project files, so nothing you set up in the terminal is wasted if you later switch to an integrated development environment (IDE) panel.
With that done, the install itself is the easy part. What actually determines whether Claude Code performs well from here is the set of three files most tutorials skip past.
# The Three Files That Actually Run the Show
**
Claude Code reads configuration from two places: your project's .claude/ directory (and a CLAUDE.md at the project root), and a global ~/.claude/ directory that applies across every project on your machine. Understanding what lives where is the single biggest lever on whether the tool performs well or drifts, according to Anthropic's own documentation on the .claude directory structure**.
- CLAUDE.md is project memory — instructions Claude reads at the start of every session in that repository: architecture notes, build and test commands, code style rules, and anything else that would otherwise need re-explaining every single time. Run /init in a fresh project, and Claude Code will scan the codebase and generate a starting CLAUDE.md for you, which you then refine with /memory. Keep it lean. Anthropic's guidance is to treat it as a living reference under roughly 2,500 tokens, and to push anything long or path-specific into .claude/rules/*.md files instead, which can be scoped to load only when Claude touches matching files.
- settings.json, living at .claude/settings.json for project-level config or ~/.claude/settings.json for personal defaults, is where permissions, hooks, environment variables, and model defaults actually live. This is the file most beginners never open, and it's directly responsible for two of the most common complaints about the tool: constant permission interruptions and Claude reaching for a more expensive model than a task actually needs.
- Auto memory is the newer, quieter layer: Claude can write and read its own working notes across a session without you managing a file directly, toggled with the autoMemoryEnabled setting or the CLAUDE_CODE_DISABLE_AUTO_MEMORY environment variable if you'd rather keep memory fully manual and auditable through CLAUDE.md alone.
The practical rule that ties these together, echoed across Anthropic's documentation and independent breakdowns of the config system alike, is this: stable rules belong in CLAUDE.md, because instructions buried only in conversation history get lost the moment a long session triggers automatic compaction. If a rule needs to survive past today's session, write it down.
# Setting Up Permissions and Hooks Before Needed
**
Claude Code runs in one of three permission modes, cycled with Shift+Tab**:
- Default, which asks before every potentially risky tool call.
- Auto-Accept Edits, which lets file edits through without prompting while still gating other tools.
- Plan Mode, which is read-only — no edits, no shell commands — until you approve a plan. Plan Mode is worth defaulting to for your first sessions in an unfamiliar codebase, since it forces Claude to propose before it acts.
Beyond the interactive modes, settings.json lets you write actual permission rules, so you're not manually approving the same safe command fifty times a session:
{
  "permissions": {
    "allow": [
      "Bash(npm test:*)",
      "Bash(npm run lint:*)",
      "Read(**)"
    ],
    "ask": [
      "Bash(git push:*)"
    ],
    "deny": [
      "Bash(rm -rf /*)",
      "Bash(sudo:*)",
      "Read(.env)"
    ]
  }
}
What this does: anything matching allow runs without a prompt, anything matching deny is blocked outright regardless of what else matches, and anything left unlisted falls back to asking you directly. That deny-first ordering matters: a deny rule always wins even if a broader allow rule would otherwise cover it, which is what makes it safe to grant fairly broad read and test-running access without also opening the door to destructive commands.
Hooks go a step further than permission rules, since a rule can only allow or block a call, while a hook can actually run something in response to one. A PostToolUse hook that auto-formats every file Claude edits is one of the most commonly recommended starting points:
{
  "hooks": {
    "PostToolUse": [
      {
        "matcher": "Write|Edit",
        "hooks": [
          {
            "type": "command",
            "command": "npx prettier --write \"$CLAUDE_TOOL_INPUT_FILE_PATH\""
          }
        ]
      }
    ]
  }
}
What this does: every time Claude writes or edits a file, this hook fires afterward and runs Prettier against exactly the file that changed, using the path Claude Code passes in through the $CLAUDE_TOOL_INPUT_FILE_PATH environment variable. You stop manually reformatting after every edit, and your style rules apply consistently whether Claude wrote the file or you did.
A PreToolUse hook can go further and actually block a dangerous command before it runs, which is a stronger guarantee than a permission rule alone since it can inspect the exact command text rather than just matching a pattern:
#!/usr/bin/env python3
# .claude/hooks/block-dangerous-bash.py
import json, re, sys

DANGEROUS_PATTERNS = [
    r'\brm\s+.*-[a-z]*r[a-z]*f',
    r'sudo\s+rm',
    r'chmod\s+777',
    r'git\s+push\s+--force.*main',
]

input_data = json.load(sys.stdin)
if input_data.get('tool_name') == 'Bash':
    command = input_data.get('tool_input', {}).get('command', '')
    for pattern in DANGEROUS_PATTERNS:
        if re.search(pattern, command, re.IGNORECASE):
            print("BLOCKED: matches a dangerous command pattern", file=sys.stderr)
            sys.exit(2)
sys.exit(0)
What this does: Claude Code pipes the tool call's details to this script as JSON on stdin before the command runs. If the bash tool is about to execute something matching a recursive force-delete, a sudo rm, a world-writable chmod, or a forced push to main, the script prints a reason and exits with code 2, which Claude Code's hook system treats as a hard block — stopping the command before it ever runs. Register it in settings.json under PreToolUse with a Bash matcher, and this becomes a permanent safety net rather than something you have to remember to check for manually.
# The Commands Worth Learning First
**
Claude Code ships with more than sixty built-in commands as of this writing, and trying to memorize all of them on day one is a waste of time. The table below covers the ones that actually change how a session performs, organized by what they're for, pulled directly from Claude Code's official command reference**.
Command
Category
What It Does
/init
Setup
Scans your codebase and generates a starting CLAUDE.md
/memory
Setup
Opens CLAUDE.md for editing directly
/clear
Context
Starts a fresh conversation while keeping project memory
/compact [focus]
Context
Summarizes conversation history to free up context; accepts instructions on what to preserve
/context
Context
Shows current context window usage
/plan
Planning
Toggles Plan Mode; Claude proposes before it acts, nothing executes until you approve
/diff
Review
Opens an interactive diff of every change made this session
/code-review [--fix]
Review
Checks the current diff for correctness bugs; --fix applies the findings
/security-review
Review
Checks the current diff specifically for security vulnerabilities
/review
Review
Gives a read-only review of a GitHub pull request
/resume [session]
Navigation
Resumes a previous conversation by name or ID
/branch [name] (alias /fork)
Navigation
Forks the current conversation into a new session
/rewind
Navigation
Rolls code and/or conversation back to an earlier checkpoint
/model
Cost & Performance
Switches the active model mid-session without losing context
/effort
Cost & Performance
Sets reasoning depth (low through max) to match task complexity
/cost
Cost & Performance
Shows token usage and spend for API-key users
/agents
Delegation
Manages subagents — view, create, or invoke specialized agents
/permissions
Configuration
Manages permission rules interactively
/hooks
Configuration
Manages hooks interactively
/doctor
Diagnostics
Checks your install for configuration problems
A useful habit for a beginner: build fluency with /compact, /plan, and /diff first, since those three alone solve the majority of early frustration — sessions that degrade from context bloat, edits that go further than intended, and not knowing exactly what changed. Everything else in the table earns its place once those three are muscle memory.
# Building Your Own /truth Command
**
Here's a fair note before this section: /truth isn't a command that ships with Claude Code. It doesn't appear in the official command reference, and it's not something I could confirm across any current documentation or community guide while researching this article. What's genuinely useful, though — and likely what prompted the idea — is a command that makes Claude check its own recent claims against the actual codebase before you trust them and move on. That's a real gap worth closing, and it's a perfect example of Claude Code's custom command system, so here's how to build it yourself.
Custom commands are defined as skills — a folder with a SKILL.md file. Create one at .claude/skills/truth/SKILL.md:
---
description: Verify Claude's most recent claims and edits against the actual codebase
allowed-tools: Read, Grep, Glob, Bash(git diff:*)
---

Re-examine everything you just told me in this conversation against what
actually exists in the codebase right now. Specifically:

1. For every file you claim to have edited, read it again and confirm the
   change is actually present and matches what you described.
2. For every claim about existing code (a function's behavior, a config
   value, an import, a dependency version), verify it against the real
   file rather than your memory of reading it earlier in the session.
3. Run `git diff` and compare the actual diff against what you described
   changing.
4. Report back plainly: which claims checked out, which didn't, and
   exactly what the discrepancy was for anything that failed. Do not
   soften or hedge a discrepancy you find, state it directly.
What this does**: the YAML frontmatter restricts this command to read-only tools plus a scoped git diff, so running /truth can never itself modify anything — which matters since a verification step that can also make changes isn't a trustworthy verification step. The instruction body is deliberately specific about what "verify" means: re-reading actual files rather than trusting the model's own prior description of them, and explicitly telling Claude not to soften a discrepancy if it finds one, since a self-check that's incentivized to sound reassuring isn't actually checking anything.
Once the file is saved, /truth becomes available in any session in that project — the same way any other custom command works — and it shows up if you type / and start filtering. Run it after Claude finishes a multi-step task, especially one where it touched several files or made claims about existing code it hadn't re-read recently, and before you commit anything based on those claims. This is the same grounding principle behind self-correcting agents generally: a check is only worth something if it's forced to look at something outside its own prior output, and pointing /truth at the actual files and the actual git diff is what makes it more than a model agreeing with itself.
# Using Subagents and Parallel Work for Real Speed Gains
**
Everything so far makes a single Claude Code session more reliable. Subagents are what make it faster on the kind of work that doesn't need to happen sequentially. A subagent is a specialized instance with its own context window, its own system prompt, and its own tool permissions, and Anthropic's subagent documentation** describes them as running isolated from the main session, returning a summary rather than dragging every intermediate file read and tool call back into your primary conversation.
That isolation is the actual performance win. Large codebase exploration, dependency audits, and test-writing are all verbose work that would otherwise eat heavily into your main session's context budget. Delegate them to a subagent instead, and only the finished result comes back.
# Inside a session, ask Claude to create a subagent
/agents
Running /agents opens an interactive menu for creating, viewing, and managing subagents, or you can define one directly as a file at .claude/agents/<name>.md with its own frontmatter for model selection and tool access, similar in structure to the skill file above. A common starting pattern is a narrowly scoped code-reviewer or test-runner subagent with read-only access, so it can inspect and report without ever being able to make the change it's reviewing — the same separation-of-concerns idea covered in the hooks section above, just applied to delegation instead of permissions.
**
For genuinely parallel work — editing several unrelated parts of a codebase at once without one change blocking another — /batch and --worktree sessions let multiple Claude Code instances work in isolated git worktrees simultaneously, each with its own working directory so they can't step on each other's changes. That's a more advanced pattern than a beginner setup strictly needs on day one, but it's worth knowing it exists once single-session work stops being the bottleneck.
# A Starter CLAUDE.md and settings.json You Can Actually Use
Pulling everything above together, here's a reasonable starting point for a new project. Save this as CLAUDE.md at your project root:
# Project Context

## Stack
- [Your language/framework here, e.g. Node.js, TypeScript, React]

## Commands
- Test: `npm test`
- Lint: `npm run lint`
- Dev server: `npm run dev`

## Conventions
- [Your code style rules, naming conventions, folder structure]

## Before finishing any task
- Run the test suite and confirm it passes
- Run `/truth` if the task involved editing more than one file
And a starting .claude/settings.json:
{
  "permissions": {
    "allow": ["Bash(npm test:*)", "Bash(npm run lint:*)", "Read(**)"],
    "ask": ["Bash(git push:*)"],
    "deny": ["Bash(rm -rf /*)", "Bash(sudo:*)", "Read(.env)"]
  },
  "hooks": {
    "PreToolUse": [
      {
        "matcher": "Bash",
        "hooks": [{ "type": "command", "command": "python3 .claude/hooks/block-dangerous-bash.py" }]
      }
    ],
    "PostToolUse": [
      {
        "matcher": "Write|Edit",
        "hooks": [{ "type": "command", "command": "npx prettier --write \"$CLAUDE_TOOL_INPUT_FILE_PATH\"" }]
      }
    ]
  }
}
That's the entire foundation from this article in two files: sensible permissions that don't interrupt safe, repeated commands, a hard block on the genuinely dangerous ones, automatic formatting on every edit, and a project memory file that points Claude at your actual test and lint commands instead of guessing at them. Commit both to your repository (leaving anything containing secrets out, and using .claude/settings.local.json for personal overrides that shouldn't be shared), and every teammate who clones the project starts from the same high-performance baseline instead of rebuilding it from scratch.
# Wrapping Up
The difference between a beginner's Claude Code setup and a high-performance one isn't a secret feature or a hidden command; it's whether you spent twenty minutes on CLAUDE.md, settings.json, and one or two hooks before diving into real work, or whether you're still running on whatever the installer gave you by default three weeks in. Everything in this guide — the memory files, the permission rules, the hooks, the commands worth learning first — exists to remove friction you'd otherwise hit repeatedly and never fix. Set it up once, commit it to the repository, and every session after that starts from a stronger baseline than the one before it.
Shittu Olumide** is a software engineer and technical writer passionate about leveraging cutting-edge technologies to craft compelling narratives, with a keen eye for detail and a knack for simplifying complex concepts. You can also find Shittu on Twitter.
関連記事
今日のまとめ
AI日報で今日の重要ニュースをまとめ読み