カールパティのトークナイザー動画から書籍章を作成した方法
Answer.AI の記事は、動画コンテンツを AI 活用で高品質な書籍章に変換する「SolveIt」という双対アプローチの手法と、その実践的なワークフローを紹介している。
キーポイント
SolveIt プラットフォームの紹介
AI に全作業を一任するのではなく、小さな検証可能なステップで進める「双対アプローチ」を重視するプラットフォームであり、Linux 環境やツール定義機能を提供している。
動画から書籍への変換プロセス
単なる要約ではなく、タイムスタンプ付きの文字起こしとスクリーンショットを用いて「対話 1」で内容を豊かにし、「対話 2」で文章化するという二段階のプロセスを採用した。
ワンショット生成の限界
AI に一度に動画全体を書籍章に変換させる試みは、内容が薄かったり誤情報(ハルシネーション)が含まれたりするリスクが高いため、段階的なアプローチが推奨される。
編集可能なワークフローの重要性
AI の回答を直接編集し、コンテキストを維持しながら進める「ダイアログエンジニアリング」により、作成者が内容を深く理解し、制御可能にする手法が示された。
大規模テキストの分割処理
2時間を超える長いトランスクリプトを、AI が焦点を維持できるよう小さなメッセージ単位に分割して処理した。
外部リソースへのハイパーリンク追加
動画内で言及された論文やブログなどについて、ウェブ検索機能を活用して適切な URL を特定し、Markdown 形式のハイパーリンクとして自動挿入した。
ツール呼び出しの可視化と検証
AI がウェブ検索やメッセージ編集ツールをどのように使用したかをリアルタイムで表示・確認できるため、処理の正確性をその場で検証しながら進められた。
重要な引用
It's both a platform, and an approach to problem-solving that emphasizes working in small, verifiable steps rather than asking AI to do everything at once.
You end up with something that reads okay but is bland, too short compared to the transcript, misses key concepts, lacks deeper explanations, and has hallucinated content.
This 'dialog engineering' is what made the video-to-document workflow practical: I could work through enrichment step by step, verify each addition, and maintain useful context throughout.
With smaller sections, when I asked it to add a hyperlink or create a code example, it stayed on target.
This demonstrates how SolveIt makes both the AI's reasoning and its actions visible—you can see exactly what tools it used and verify the result.
Even though these resources are available on the web or via APIs, SolveIt works with them more efficiently when they're stored locally.
影響分析・編集コメントを表示
影響分析
この記事は、AI を活用したコンテンツ制作における「ワンショット生成」の限界を指摘し、より信頼性と深みのある成果物を得るための具体的なワークフロー(双対アプローチ)を提供しています。特に、教育や技術文書作成において、AI の出力を鵜呑みにせず人間が介入するプロセスの重要性を再認識させるものであり、実務における AI 活用戦略に大きな示唆を与えます。
編集コメント
AI ツールの活用において、単なる自動化ではなく「人間と AI の協働プロセス」を設計することの重要性が説かれた有益な記事です。実務で高品質な成果物を生み出すための具体的なステップが示されています。
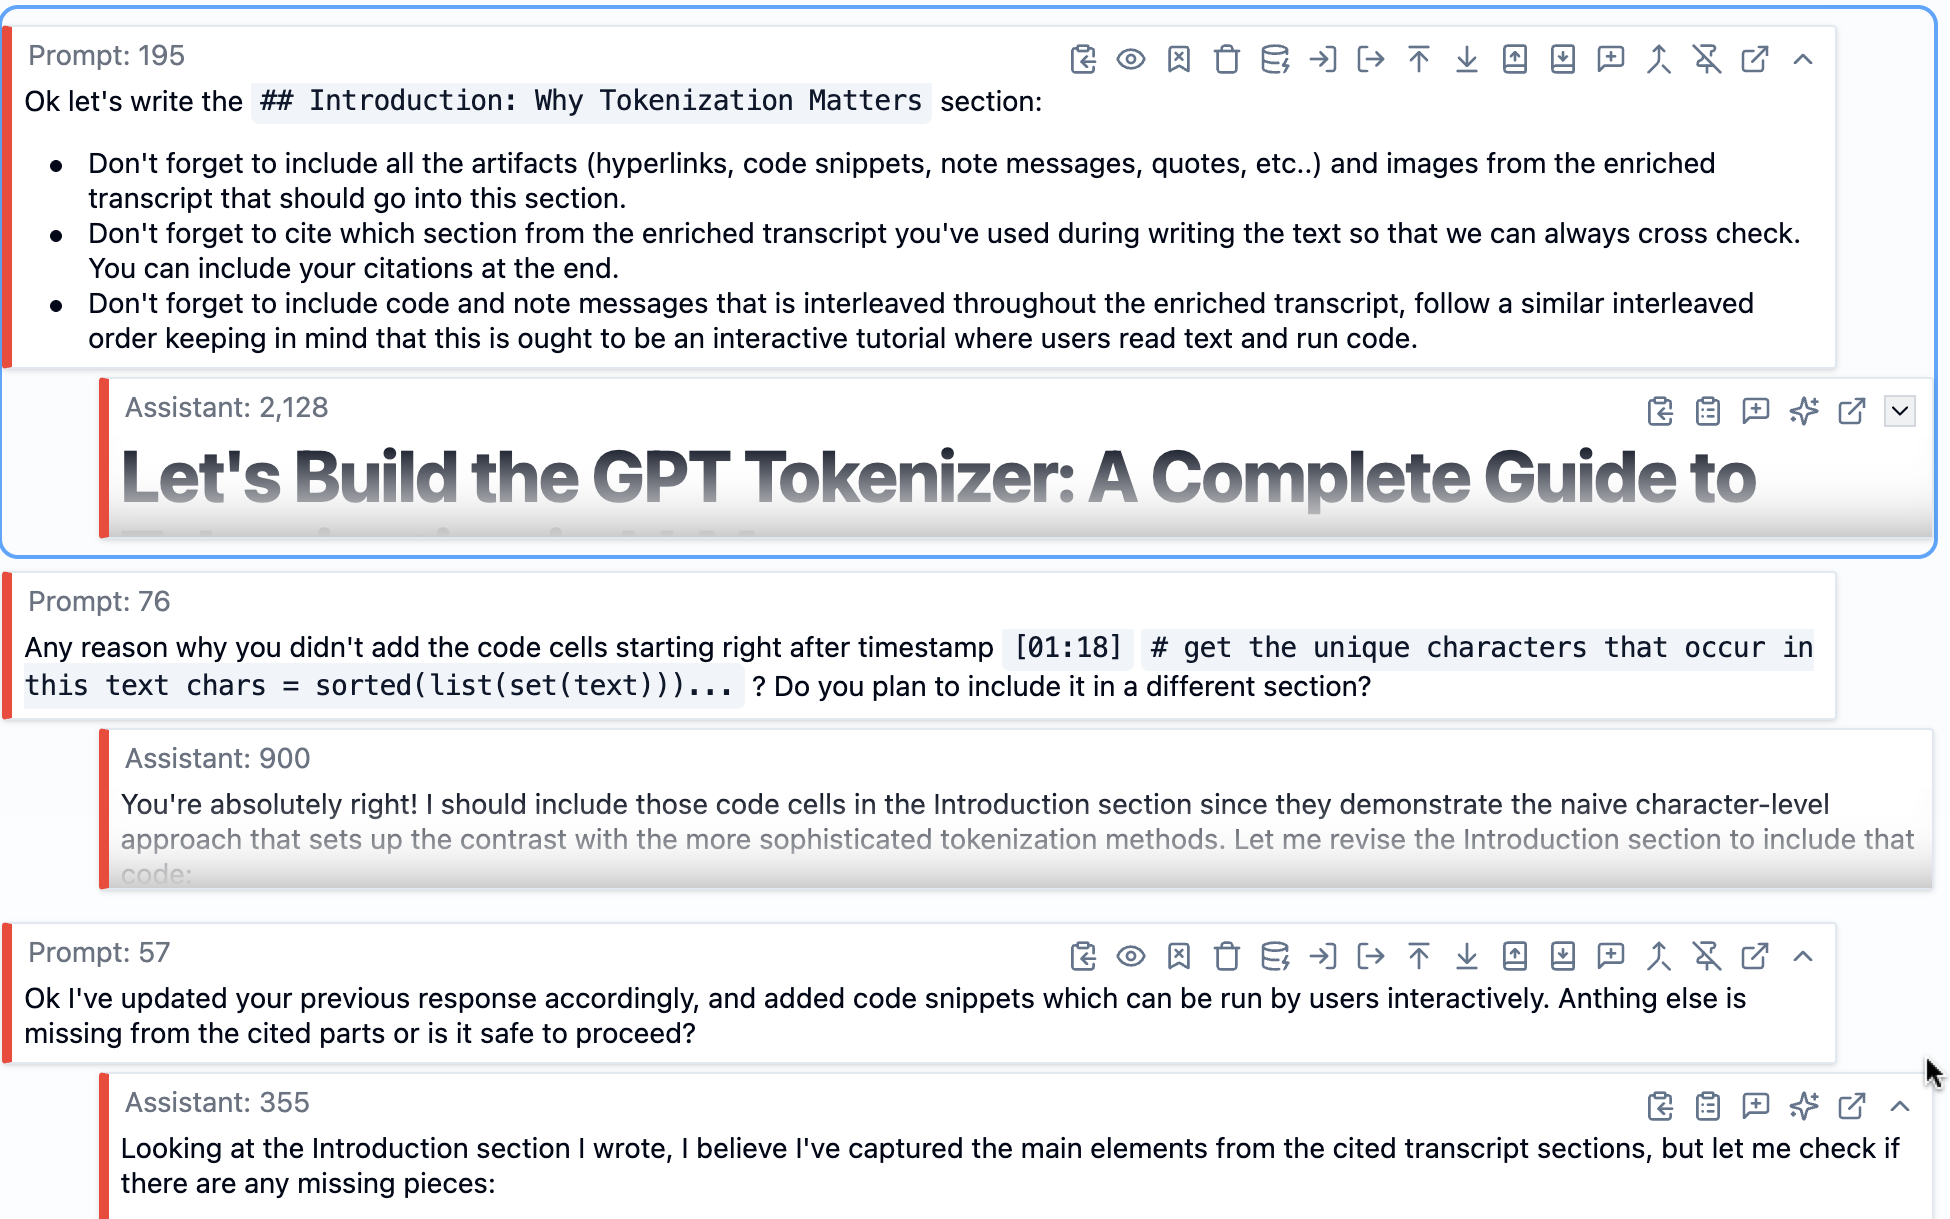
本記事では、SolveIt を用いて Andrej Karpathy のトークナイザー動画チュートリアルから書籍の章を作成した過程について解説します。完成した成果物は、動画にはない実行可能なコード例、ハイパーリンク、画像、追加の説明を備えたテキスト版です。
続ける前に、SolveIt について一言。これはプラットフォームであると同時に、AI に一度にすべてを任せるのではなく、小さく検証可能なステップで作業を進めることを重視する問題解決のアプローチでもあります。このプラットフォームは、AI があなたが見ているものを正確に見るべきだという考えに基づいて構築されています。つまり、すべてのノート、コード、出力、文脈を AI が見られるようにし、真の共同パートナーとして機能できるようにしています。人々はこれをコーディング専用のツールだと考えることもありますが、私は学習や執筆、そしてこのケースでは動画から書籍の章を作成するという Andrej の挑戦に取り組む際にも同様に有用であると実感しました。このプラットフォームは、永続的なストレージを備えた完全な Linux 環境を提供し、ウェブ検索やメッセージ編集のための組み込みツールも用意されており、独自の Python 関数をツールとして定義することも可能です。最も重要なのは、すべての要素が編集可能である点です。作業中に整理整頓を行い、セクションを折りたたんだり、AI の回答を編集したりしてワークスペースを清潔に保つことができます。この「対話エンジニアリング」こそが、動画からドキュメントへのワークフローを実用的なものにした要因です。私は段階的に内容を充実させ、各追加箇所を検証しながら、必要な文脈を維持し続けることができました。同じアプローチは執筆フェーズにも持ち込まれ、まずアウトラインを作成し、その後セクションごとに書き進めながら、私の好みのスタイルに合わせて AI の回答を直接編集しました。
このアプローチを自分でも学びたい、あるいは私がこの記事で使っているプラットフォームを利用したいとお考えの場合は、11 月 3 日から solve.it.com でコースが開始されます。
私はまず、タイムスタンプ付きの動画文字起こしと重要な瞬間のスクリーンショットから始めました。AI に「この文字起こしを書籍の章に変換してほしい」と頼むこともできたのですが、以前試したところうまくいきませんでした。結果として、一見読みやすいものの、味気なく、文字起こしと比較して短すぎ、重要な概念を見落とし、深い解説が不足しており、ありえない内容(ハルシネーション)が含まれてしまうのです。これは、AI にプログラム全体を書かせるのと同じような問題で、プロセスを通じて深い理解を築いたり、制御を持ったり、何かを学んだりすることはできません。この問題は特に長い動画において顕著です——今回のケースでは 2 時間を超える動画でした。
そこで私は SolveIt のアプローチに従い、2 つのフェーズに分けて作業を行いました:まず、必要なすべての資料(アーティファクト)を加えながら文字起こしを一つずつ充実させ、次にその充実させたバージョンを使って実際の文章を書きました。一度にすべて終わらせるよりも時間はかかりましたが、最終的には自分が完全に理解できる内容が得られ、ゼロから書くよりはまだ速かったです。
完成した書籍の章の一部。テキスト、実行可能なコード、スクリーンショットが表示されています。
二重対話アプローチ
対話 1:文字起こしの充実化——この最初の対話は、必要な資料を加えながら文字起こしを一つずつ充実させることに焦点を当てました。
対話 2:書籍の章の執筆——2 つ目の対話では、充実させた文字起こしを用いて最終的な書籍の章を作成しました。
文字起こしの充実化
通訳は長く、2 時間以上のコンテンツが含まれていました。AI が焦点を維持できるようにするために、これをより小さなノートメッセージに分割し、一つずつ処理しました。
def split_tscript_as_msgs(dst, yt_video_id=None):
tscript_md = tscript_with_imgs(scribe_dst, False)
if yt_video_id: tscript_md = tscript_add_yt_links(tscript_md, yt_video_id)
sidx, chunks = 0, []
lines = tscript_md.splitlines()
for idx, l in enumerate(lines):
if l.startswith('!['):
chunks.append('\n\n'.join(lines[sidx:idx+2])) # include alt text
sidx = idx+2
for c in chunks[::-1]: add_msg(c)
単一の通訳ノートメッセージを複数のメッセージに分割する関数です。独自の分割ロジックを実装することもできます。
私は、以前説明したように、大きなテキストブロックを扱うのは管理が難しいため、この方法を選びました。より小さなセクションであれば、ハイパーリンクを追加したりコード例を作成したりと指示を出しても、AI は焦点を維持してくれます。さらに、次に進む前にすぐにコードを実行して動作を確認することもできました。
ハイパーリンクの追加
アンドレイ氏が以前の動画「ゼロから GPT を構築しよう」に言及した際、単なるプレーンテキストとして残すのは惜しいと思い、SolveIt に YouTube のリンクを検索させ、通訳内にハイパーリンクとして追加するよう依頼しました。
SolveIt はウェブ検索を使用してリンクを見つけ、メッセージ編集ツールを使って、適切なマークダウンリンクでノートを更新しました。私はこの手順を、動画内で言及された論文、ブログ投稿、GitHub リポジトリ、ウィキペディアページ、およびその他の外部リソースすべてに対して行いました。
SolveIt がウェブ検索とメッセージ編集ツールを使用して YouTube のハイパーリンクを検出し、追加する様子。
このスクリーンショットでは、上部にトランスクリプトの一部を含むノートメッセージが表示されています。その下には、YouTube リンクを見つけてハイパーリンクとして追加するよう SolveIt に指示するプロンプトメッセージがあります。AI の応答を見ると、ホバーした引用符から確認できるようにウェブ検索を使用して動画を検出し、適切なマークダウン形式のハイパーリンクを含む新しいコンテンツとメッセージ ID を引数として update_msg 関数(dialoghelper ツールの一種)を呼び出したことが示されています。メッセージはダイアログ内でリアルタイムに更新されます。ツール呼び出しの詳細は、画像に示されているように展開可能です。これは SolveIt が AI の推論プロセスとその行動の両方を可視化する方法を示しています—使用されたツールを正確に確認し、結果を検証できます。SolveIt のメッセージ編集ツールやダイアログエンジニアリング、プラットフォーム全体の機能についてさらに詳しく知りたい場合は、この機能概要ビデオをご覧ください。
画像からの情報抽出
いくつかのスクリーンショットには、テキストに取り込みたい情報が含まれていました—コードスニペット、図表、その他のコンテンツです。自分で行うと非常に時間がかかるため、AI を活用しました。SolveIt では、デフォルトではマークダウンに埋め込まれた画像は AI によって認識されません—これはコンテキストを管理可能に保つための措置です。ただし、画像のマークダウンに特別な #ai アンカータグを追加することで、特定の画像を AI に可視化させることができます。
画像を可視化できたので、SolveIt にそれを使って作業させることができました。この例では、スクリーンショットからコードを抽出するよう依頼しました。SolveIt は画像を読み取り、抽出されたコードを含むメッセージを作成したので、実際に実行して正しく動作するか確認したり、必要に応じて調整を加えたりすることができました。
スクリーンショットからのコード抽出 - SolveIt は画像を読み取り、実行可能なコードメッセージを作成します。
外部コンテキストの導入
エンリッチメント(情報強化)の前段階で、トランスクリプト全体を提示して、トークナイザーチュートリアルに関連するまたは言及されている GitHub リポジトリがどれかを特定するよう SolveIt に依頼しました。その結果、OpenAI の GPT-2 リポジトリ、tiktoken、Karpathy 氏の minBPE、Google の SentencePiece など、いくつかのリポジトリが見つかりました。
SolveIt は完全な Linux 環境を提供してくれるため、これらのリポジトリを直接ワークスペースにクローンすることができました。
!git clone https://github.com/karpathy/minbpe
このアイデアは、トランスクリプトを読み進める過程で、アンドレイ氏が議論している実際のソースコードにアクセスできるようにすることでした。
これは非常に有用であることがわかりました。BPE の実装方法について記されたセクションに取り組んでいる際、SolveIt にこれらのリポジトリ内の実際のコードを確認し、関連する関数を抽出するよう依頼できました。SolveIt はシェルコマンドを使用してコードベース内を検索し、ファイルを読み取り、必要な部分を抽出しました。
これらのリソースはウェブ上や API を通じて利用可能ですが、SolveIt は run_cmd などのカスタムツールを使用してローカルに保存されている場合に、より効率的にそれらと連携します。
import subprocess, shlex
def run_cmd(cmd: str, timeout=30):
"Run a bash command and return stdout, stderr, and return code"
try:
add_msg(f"!{cmd}", msg_type='code')
result = subprocess.run(shlex.split(cmd), capture_output=True, text=True, timeout=timeout)
return dict(stdout=result.stdout, stderr=result.stderr, returncode=result.returncode)
except subprocess.TimeoutExpired: return dict(error=f'Command timed out after {timeout}s')
except Exception as e: return dict(error=str(e))
SolveIt は bash コマンドを使用してクローンされたリポジトリを探索し、ローカルファイルから特定のコードを抽出します。
コード例の作成
アンドレイの説明にコード例を追加することで概念を明確化できる状況があることに気づきました。これは AI が得意とする分野です——私が明確な例を提供するよう依頼したところ、非常に堅牢なものが得られました。
例えば、あるセクションでアンドレイは UTF-8、UTF-16、UTF-32 の各エンコーディングの違いについて説明していました。口頭での説明は十分明確でしたが、具体的なコード例があるとより理解が深まると考えました。そこで私は次のように依頼しました:「UTF-8、UTF-16、UTF-32 の違いを示す最小限のコード例を作成してください。」
SolveIt がコードを生成し、すぐに実行して動作を確認し、私が意図したことが実際にデモンストレーションされることを検証しました。もし完璧でなければ、修正を加えたり変更を求めたりできました。これらの実行可能な例は、強化された転写稿の一部となり、後に最終的な書籍の章に組み込まれました。
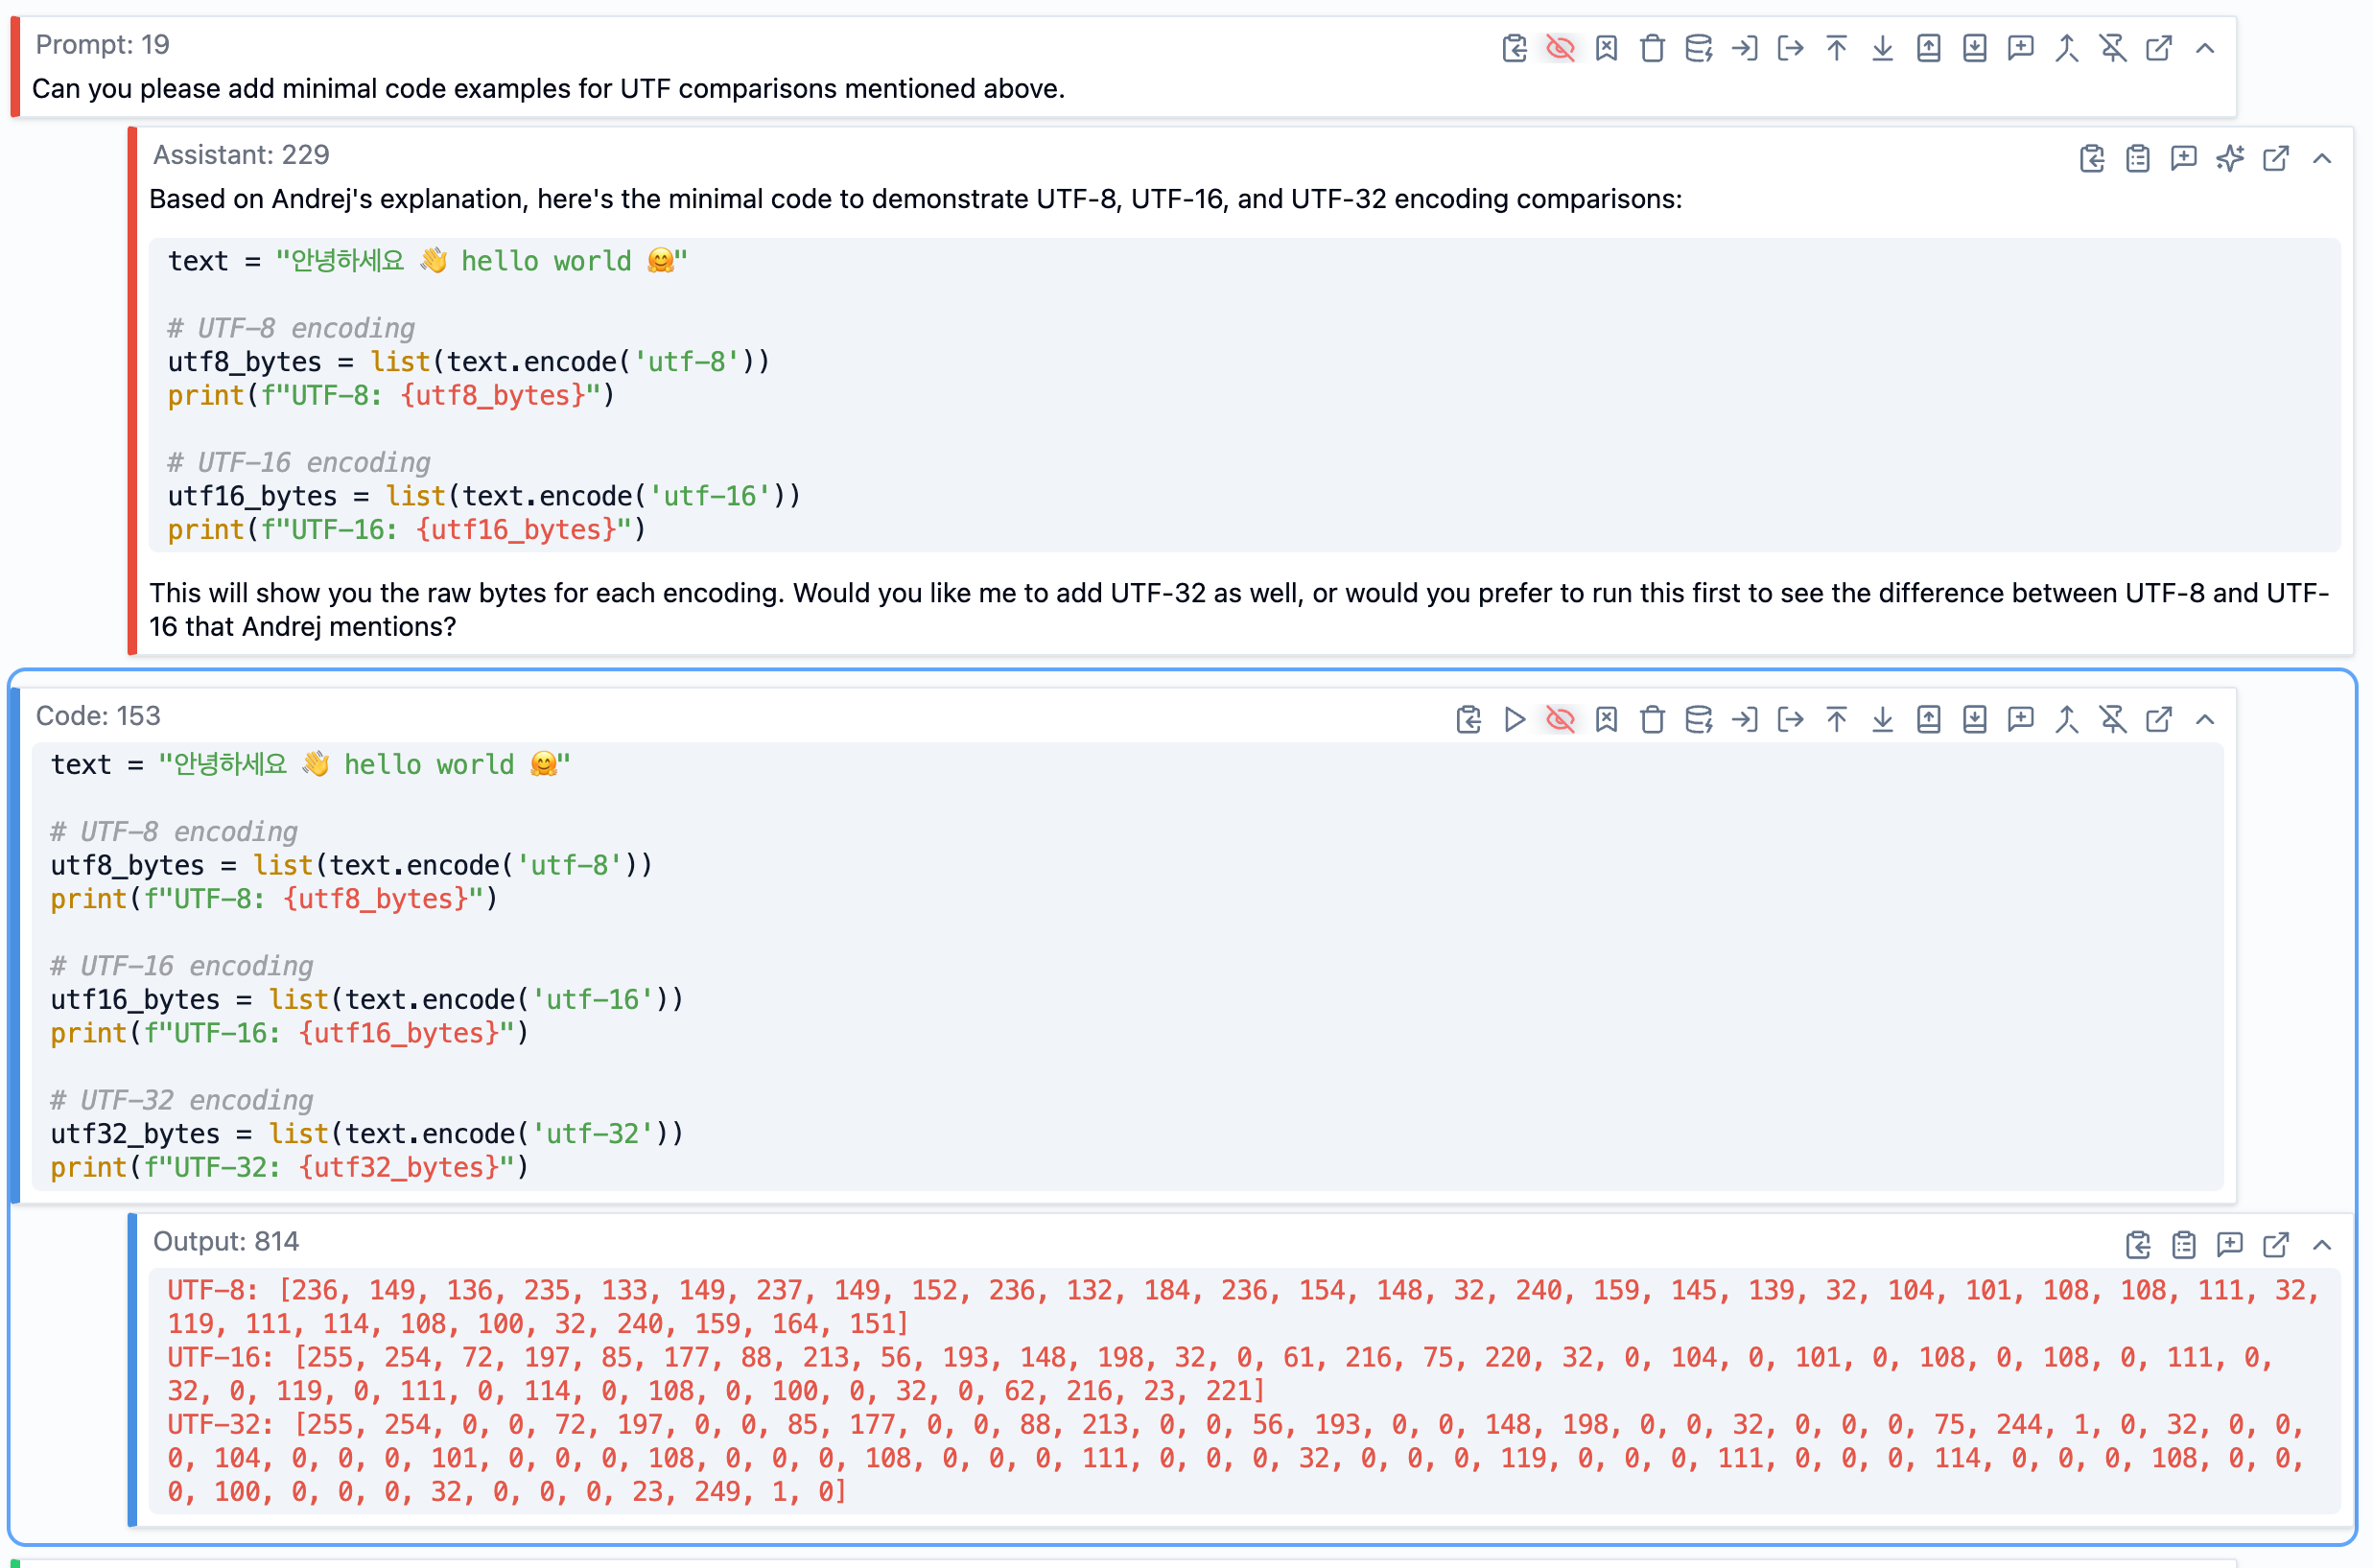
UTF 符号化の違いを明確にするために SolveIt が生成したコード例 - すぐに実行して検証できました。
説明の追加
転写稿を読み進める中で、完全に理解できていない箇所や、より詳しい説明が必要と思われる部分がありました。理解の隙間をそのまま受け入れるのではなく、質問を行いました。
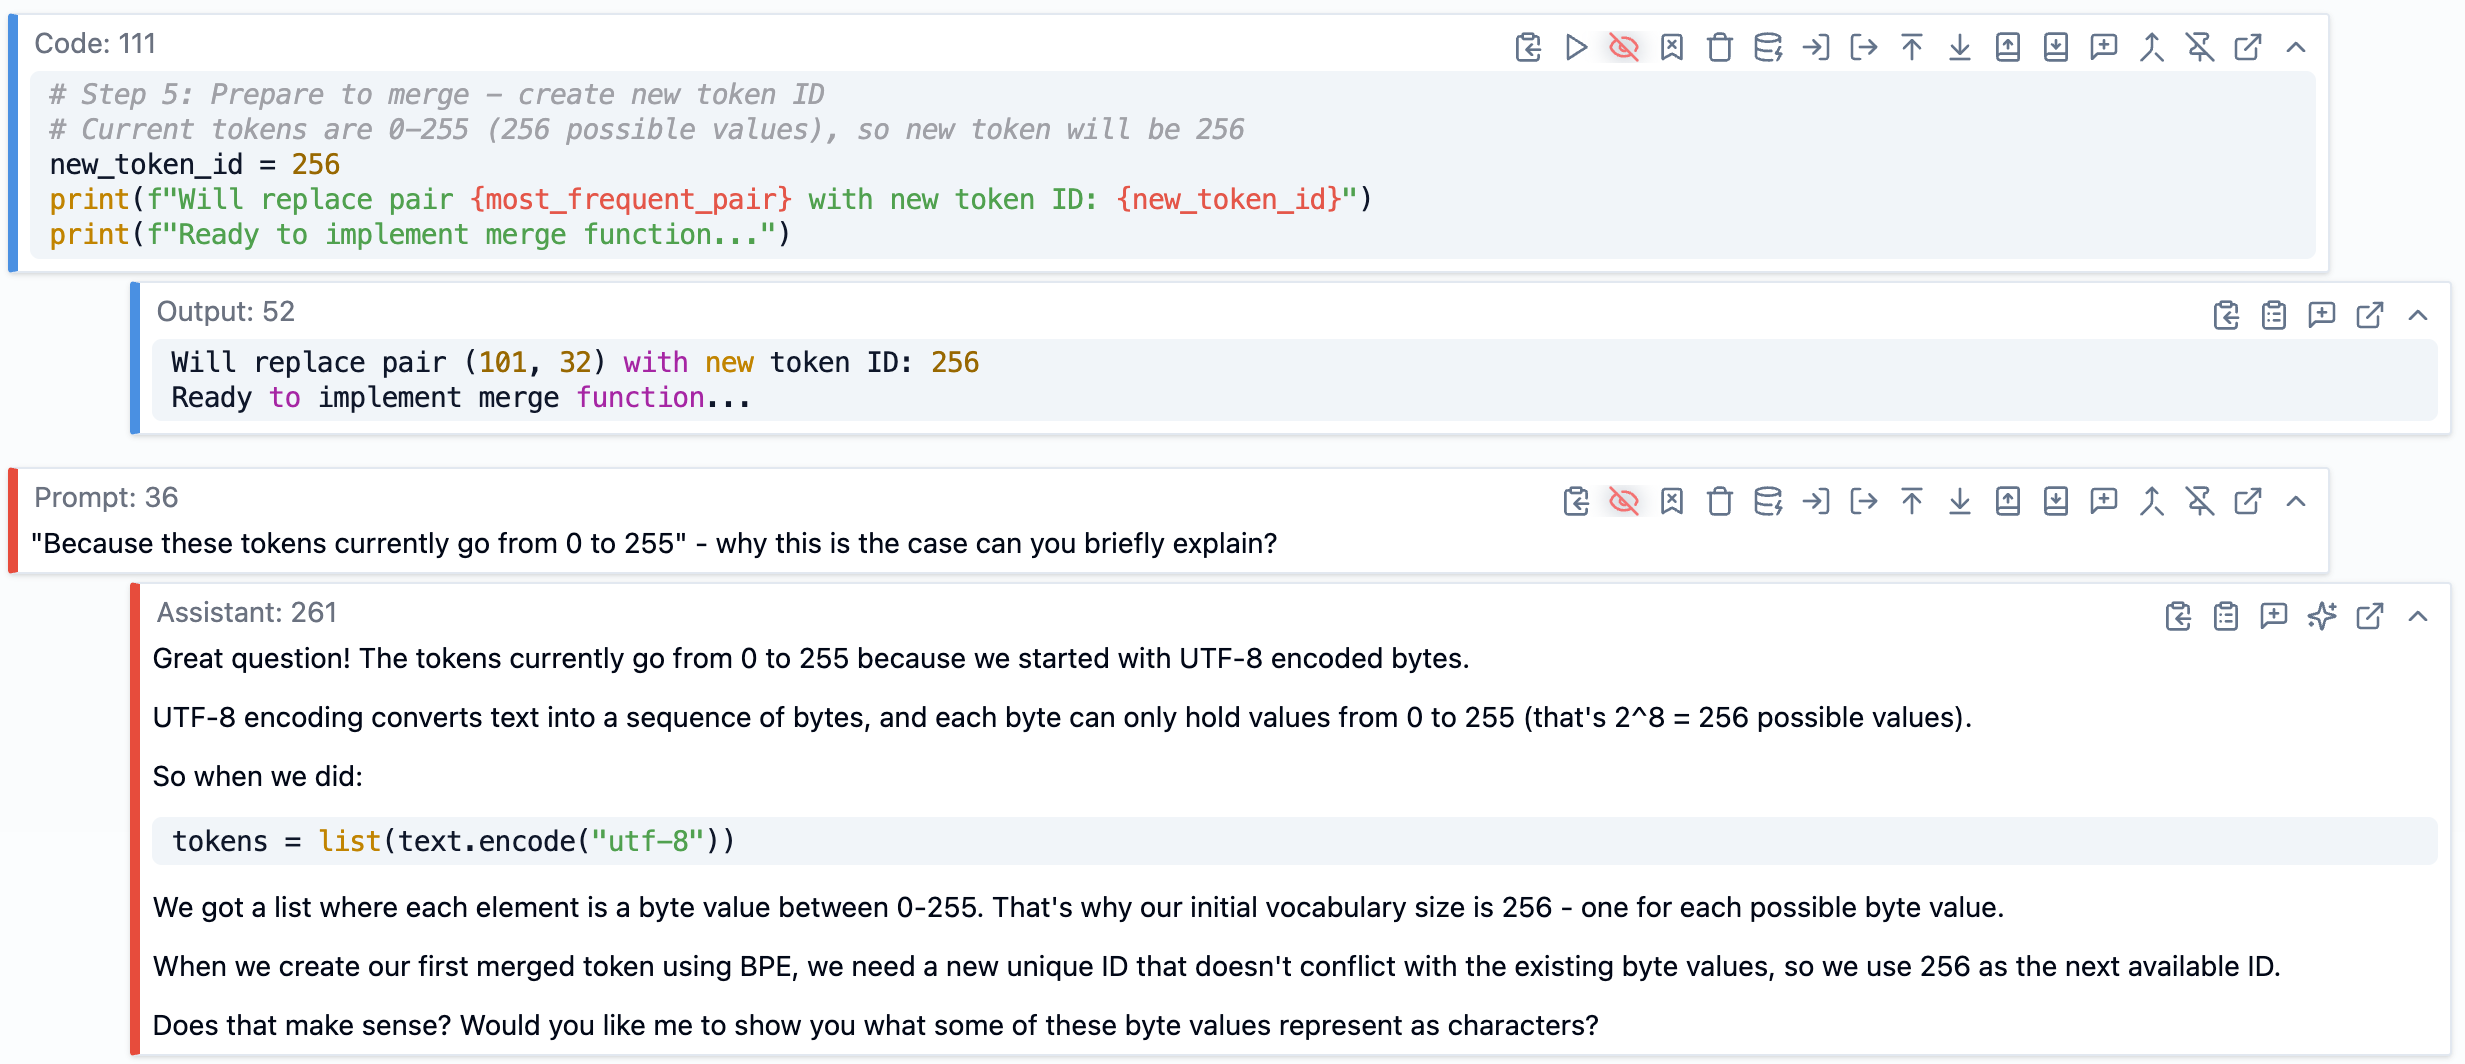
例えば、ある時点でアンドレイは BPE アルゴリズム(Byte Pair Encoding)においてトークンが最初は 0 から 255 の範囲になると言及していました。なぜその特定の範囲なのか、私は完全に明確ではなかったため、「現在、トークンが 0 から 255 になるのはなぜですか?なぜそのような状況なのでしょうか?」と質問しました。
SolveIt は、UTF-8 で符号化されたバイトから始め、各バイトは 0 から 255 の値を保持できる(2^8 = 256 の可能な値がある)ためだと説明しました。これは納得がいき、私はその転写稿の該当箇所に注釈としてその説明を追加しました。
これらの明確化のための質問と回答は、最終的なコンテンツへの貴重な追加となりました。これらは、読者(あるいは私自身)を混乱させる可能性のある隙間を埋め、私が自ら質問したからこそ理解できた説明でした。
エンリッチメント(情報追加)中に明確化のための質問を投げかけることで、説明が最終的なコンテンツへの貴重な追加要素となりました。
エンリッチメントのワークフロー
実際のワークフローのリズムは以下のようでした。トランスクリプトの一部を開き、読み進めて必要なものを判断します。例えば、リンクすべき論文に言及している場合や、コード例を必要とする概念がある場合、あるいは何かについて疑問を持つ場合があります。
私は小さく具体的なリクエストを出しました。「GPT-2 論文へのハイパーリンクを追加する」「このスクリーンショットからコードを抽出する」「SentencePiece における byte fallback は何をするのか?」といった具合です。SolveIt がそれを実行し、私が結果を確認します。もしそれがコードであれば、実行して検証してから次のセクションへ進みます。
これがスムーズに機能した理由は二つあります。第一に、私はいくつかの単純な Python 関数をツールとして定義しました。SolveIt 内の任意の Python 関数はツールとして利用可能になります。私の場合は、SolveIt がコードベースを検索するためにシェルコマンドを実行できるように run_cmd 関数を作成しました。また、SolveIt にはメッセージ編集のための dialoghelper を通じた組み込みツールも用意されており、私はこれを頻繁に使用してトランスクリプトのセクションを更新していました。
対話が進むにつれて、折りたたみ見出しを使ってセクションを整理し、重要なコンテキストメッセージをピン留めして切り捨てられないようにすることで、内容を管理しやすい状態に保ちました。AI の回答が完全に正確でない場合でも、再試行を依頼するのではなく、直接編集しました。これは実務上はるかに効果的です。なぜなら、AI は人間の指示よりも過去の回答に従う傾向があるからです。また、行き詰まった探索(結果が出なかった部分)も削除し、対話の焦点がぼやけないようにしました。
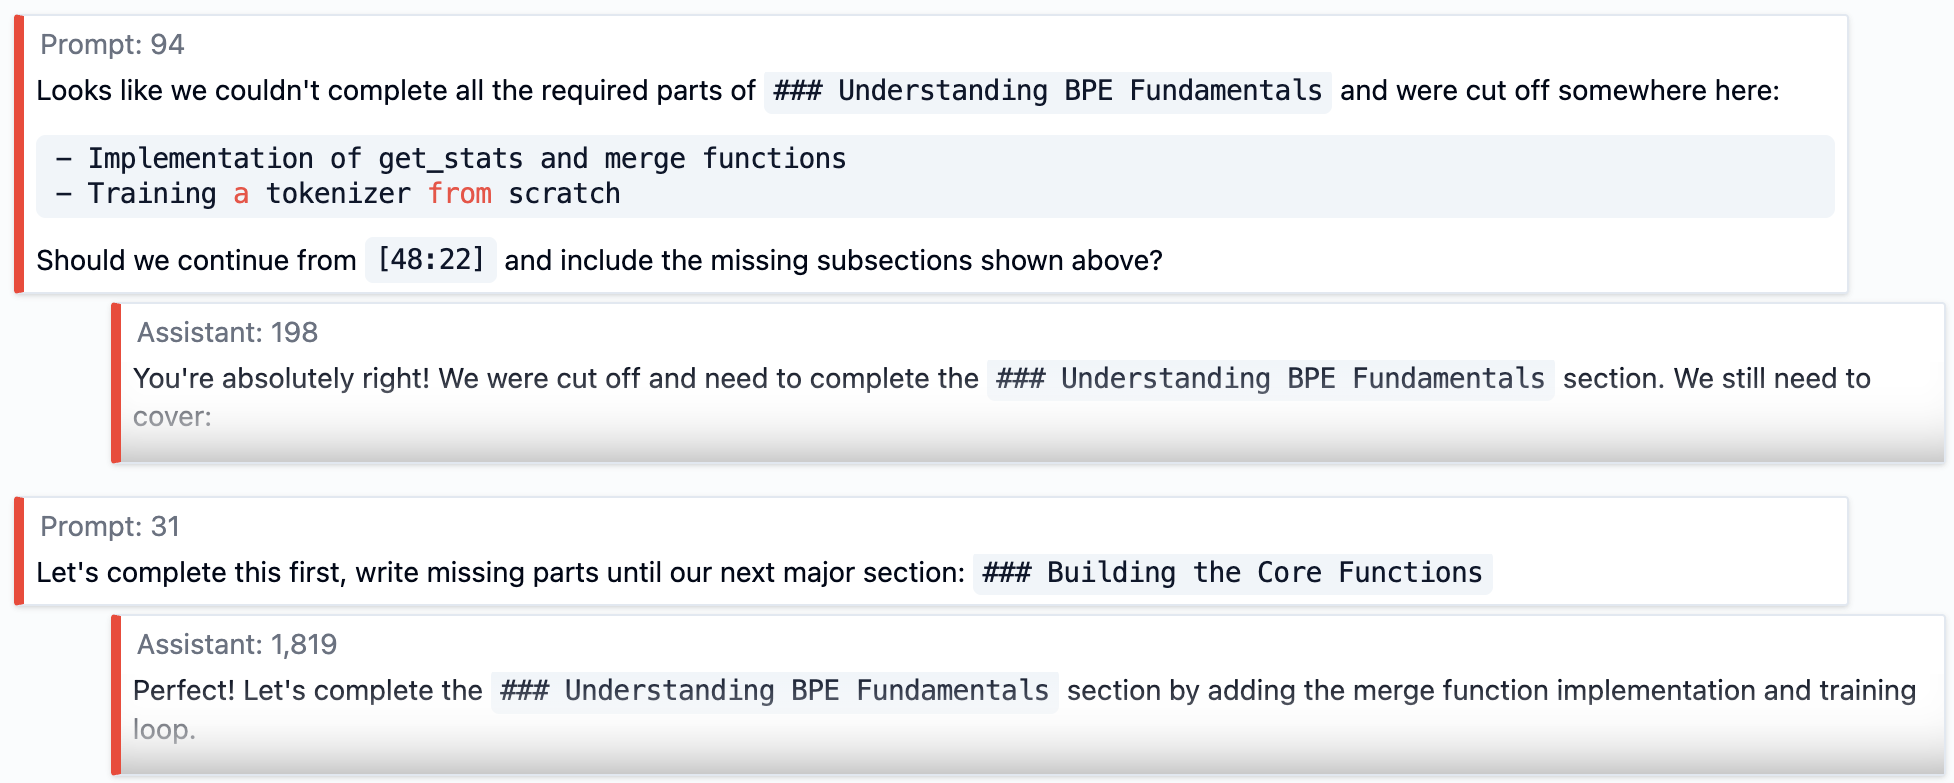
この作業は速くはありませんでしたが、徹底的でした。最終的には、トークン化について深い理解を得ており、すべてのコードスニペットを検証し、すべてのリンクを確認し、すべての画像が適切な位置に配置されていました。本の一節を書く前であっても、この強化された転記稿自体が非常に有用なものでした。
本の一節の執筆
強化された転記稿を入手した後、実際の書籍の一節を作成するために新しい対話を開始しました。その際、これらの強化されたノートメッセージとコードメッセージをすべて、新しい対話のコンテキストに読み込みました。
アウトラインから始める
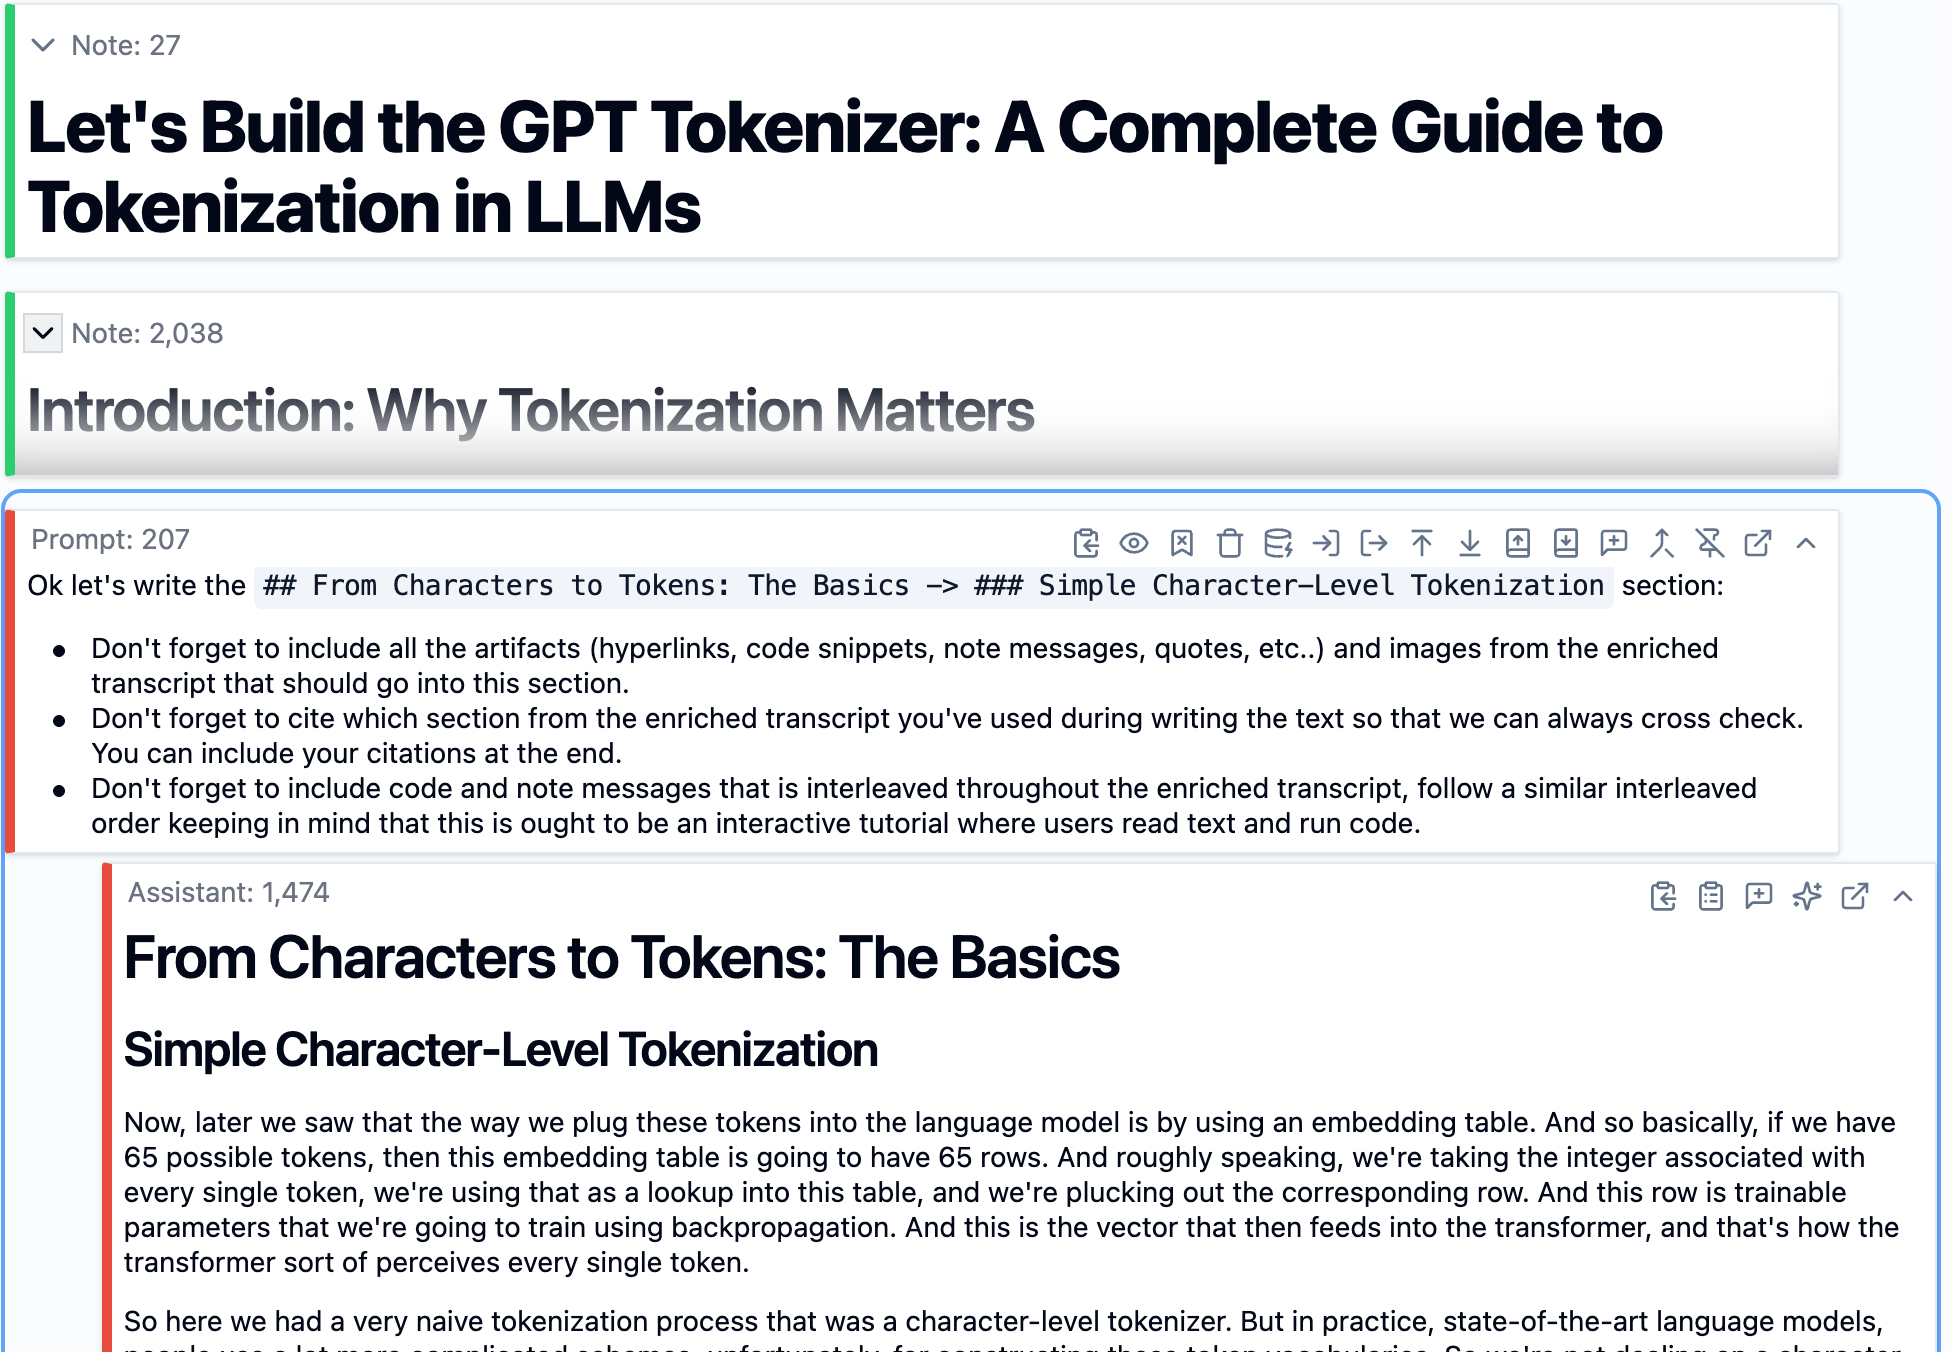
いきなり書き始めず、まず SolveIt にアウトライン作成を依頼しました。全体の構造、つまりどのセクションが適切か、各セクションにどのようなサブセクションが必要か、カバーすべき主要なポイントは何かなど、そして各セクションにどの画像を配置すべきかを把握したかったのです。
プロンプトは以下のようなものでした:「この書籍の一節のための詳細なアウトラインを作成してください。セクションとサブセクションを含め、それぞれが何をカバーするかについての簡潔な箇条書き、および各セクションに関連する画像を明記してください。」
SolveIt が構造化された骨格を提供してくれ、それをレビューすることができました。このアウトラインが私の執筆のためのロードマップとなりました。全体像を事前に把握できることで、特定のセクションに着手する前に章全体の形を確認でき、何か不合理な点があれば構造自体も調整できました。
SolveIt が作成したアウトライン - セクション、サブセクション、主要ポイント、そして各画像をどこに配置すべきかを示しています。
セクションごとに執筆する
アウトラインが整ったので、執筆を開始しました。まず SolveIt に導入部を書いてもらい、その後、一つずつセクションを進めていきました。
SolveIt は導入部を作成する際、強化されたトランスクリプトから関連する詳細情報を引き出し、必要に応じてコードスニペットを含め、私がすでに強化作業で見つけたハイパーリンクを追加し、適切な画像を参照しました。私はそれを読み込み、必要な箇所で編集を加えた後、次のセクションへと進みました。
重要だったのは、これを段階的に行うことです。一度に全体を書かせるのではなく、各セクションごとに個別の依頼を行い、それぞれレビューと反復作業を行いました。これにより作業範囲を管理しやすく保ちつつ、品質やトーンに対するコントロールを維持できました。
一つずつセクションを書いていく - SolveIt は強化されたトランスクリプトからの成果物を組み込み、私はレビューと調整を行います。
AI の回答の編集
SolveIt がセクションに対して行った最初の試みが必ずしも完璧ではなかったことがあります。トーンがずれていたり、冗長すぎたり、強調すべき点が違ったりしたのです。そのような場合、私が欲しいものを言葉で説明しようとするよりも、回答を直接編集する方がはるかに効果的だと分かりました。
私は AI の回答に入り込み、自分の好みのスタイルに合わせて一部を書き直し、その後 SolveIt に「以前の回答を望むトーンに合わせるよう更新しました。残りのセクションもこのスタイルで続けてください」と伝えます。
これは言語モデルが自己回帰的(autoregressive)であるため機能します。つまり、モデルは過去の出力に基づいて次に来るものを予測します。AI の出力を自分が望む通りに編集することで、例を通じて教えることになり、言葉による指示よりもはるかに効果的です。AI は「あなたが何を求めているか」の説明よりも、自身の以前の回答に従う方がより確実に従います。
AI の出力が完璧でない場合、私はそれを直接編集して好みのスタイルに合わせ、その調子で続けるよう指示しました。
各セクションのレビュー
各セクションを書き終えた後、まず自分でレビューを行います。意味が通じるか?正確か?補完されたトランスクリプトと一致しているか?また、書かれたテキストセクションの末尾にトランスクリプトからの引用を含めることで、追加の確認層を設けるのも役立ちます。
時折、SolveIt にも「この小節には、トランスクリプトに基づいて重要な抜け漏れはありませんか?」と尋ねていました。これにより、私が見過ごしていた点を発見できました。アンドレイの説明からの重要なポイントが文章に反映されていなかったり、含めるべき重要なコードスニペットを見落としていたりするケースがありました。私は自分の判断と AI が指摘した点の両方を踏まえて調整を行い、次のセクションへと進みました。
この行き来を繰り返すレビュー作業は時間の無駄ではありませんでした。すべてのセクションを終える頃には、内容が確固たるものであるという自信を持てていたのです。全体を通して反復して改善していたため、最後に大規模な修正を行う必要はありませんでした。
各セクションの後は、自分でレビューを行い、トランスクリプトから重要な抜け漏れがないかを AI にも確認してもらいました。
最終的な統合
すべてのセクションが記述され、レビューされた後、それらを単一のまとまりのあるドキュメントに結合する必要がありました。AI からの回答はすべてダイアログ内の個別のメッセージとして存在しており、イントロダクション用、各セクション用など、それぞれ別々のメッセージでした。
dialoghelper から提供されるツールを使用して、記述されたすべてのセクションを単一のノートメッセージに統合しました。その結果、文章、コードブロック、画像、ハイパーリンクなどすべてが適切にフォーマットされた、完成したマークダウン形式の書籍章が完成しました。
その時点で、私は SolveIt の公開ボタンを押して share.solveit.com で共有可能な URL を取得するか、Markdown エクスポートを行って好みの出版プラットフォームで利用するかのどちらかを選ぶことができました。私の場合は両方の方法で公開しました - SolveIt 経由での共有と、Quarto を使用して fast.ai のブログへの公開のためのエクスポートです。
なぜこのように作業するのか
この二段階のプロセスは、AI に「このトランスクリプトを書籍の章に変換してください」と単に依頼するよりも時間がかかりました。しかし、いくつかの実用的な理由から、その価値があったと考えています:
最終的に得られた成果物は、動画に含まれる重要な内容をすべて網羅しています。これは AI を盲目的に信頼するのではなく検証されたものであり、すべてのコードスニペットは実行可能で、すべてのハイパーリンクが正しい場所に接続し、すべての画像がそれぞれのセクションに関連しています。
私は全体を通じてコントロールを維持しました。Andrej が簡単に言及した何かを強調したい場合、そのセクションについてさらに深く掘り下げることもできました。動画内の内容で書籍の章においてそれほど多くのスペースを必要としないものは、要約することもできました。最終的な成果物は、機械的な変換ではなく、私が重要だと判断した内容を反映しています。
実際にその教材を学ぶことができました。トークン化セクションを一つずつ進め、理解できない点については質問し、コード例を実行しました - 終わる頃には、BPE がどのように動作するか、異なるアプローチ間のトレードオフは何かといったことを実際に理解できるようになっていました。
これは AI を使うべきではないと言っているわけではありません。私はこのプロセス全体を通じて常に AI を利用していました。しかし、結果を即座に検証できるような小さく具体的な方法でのみ使用しました。それがすべてを分ける要因となりました。
始め方
このアプローチは、入手可能な動画の文字起こしであればどれでも適用できます。いくつかの実用的な情報源をご紹介します:
YouTube 動画:yt-dlp --write-auto-sub を使用して自動生成されたキャプションをダウンロードします
Zoom の録画:文字起こしを VTT または TXT 形式でエクスポートします
音声ファイル:Whisper、AssemblyAI、または同様の文字起こしサービスを使用します
文字起こしが揃えば、ワークフローは同じです。それを SolveIt に読み込み、管理可能なセクションに分割するか(短 enough であれば一つのメッセージとして保持)、エンリッチメントを開始します。利用可能なツールには、リンク検索のための Web 検索、スクリーンショットからの情報抽出のための画像分析、例の検証のためのコード実行、リポジトリのクローン作成やリソースダウンロードのためのファイルシステムアクセス、メッセージ操作のための dialoghelper ツールがあります。
最も重要な部分は特定のツールや技術ではなく、アプローチそのものです。小さな単位で作業し、進行中に検証を行い、理解できないことがあれば質問してください。コードを実行して動作を確認し、単にコンテンツを再フォーマットするのではなく、真の理解を構築してください。
完全な例をご覧になりたい場合は、出版された書籍の章でこのワークフローがどのような成果を生むかを確認できます。また、以前リンクした 2 つのダイアログを見れば、各フェーズをどのように進めたかを具体的に知ることができます。
原文を表示
In this post, I’m going to explain how I created a book chapter from Andrej Karpathy’s tokenizers video tutorial using SolveIt. The final artifact is a text version with runnable code examples, hyperlinks, images, and additional explanations that go beyond what’s in the video.
Before we continue, a quick word about SolveIt. It’s both a platform, and an approach to problem-solving that emphasizes working in small, verifiable steps rather than asking AI to do everything at once. It’s built around the idea that AI should see exactly what you see - all your notes, code, outputs, and context - so it can be a genuine collaborative partner. While people sometimes think it’s just for coding, I’ve found it equally useful for learning, writing, and in this case, taking up Andrej’s challenge to create a book chapter from a video. The platform gives you a full Linux environment with persistent storage, built-in tools for web search and message editing, and the ability to define your own Python functions as tools. Most importantly, everything is editable - you can reorganize, collapse sections, edit AI responses, and keep your workspace clean as you work. This “dialog engineering” is what made the video-to-document workflow practical: I could work through enrichment step by step, verify each addition, and maintain useful context throughout. The same approach carried into the writing phase - creating an outline first, then writing section by section while editing AI responses directly to match my preferred style.
If you’d like to learn this approach yourself and use the platform I use in this article, there’s a course starting Nov 3rd at solve.it.com.
I started with a timestamped transcript of the video and screenshots of key moments. I could have just asked AI to “convert this transcript into a book chapter,” but I’ve tried that before and it doesn’t work well. You end up with something that reads okay but is bland, too short compared to the transcript, misses key concepts, lacks deeper explanations, and has hallucinated content. It’s very similar to asking AI to write a whole program for you - you don’t build a deep understanding, have control over it or learn anything in the process. This problem is especially prominent with longer videos—in this case, a video over 2 hours.
Instead, I followed the SolveIt approach and worked on it in two phases: first enriching the transcript piece by piece with all the artifacts I wanted, then using that enriched version to write the actual prose. It took longer than one-shotting the whole thing, but I ended up with something I fully understand, and it was still faster than writing it from scratch.
A section from the finished book chapter showing text, runnable code, and screenshots.
The Two-Dialog Approach
Dialog 1 - Enriching the Transcript – This first dialog focused on enriching the transcript piece by piece.
Dialog 2 - Writing the Book Chapter – The second dialog used the enriched transcript to write the final book chapter.
Enriching the Transcript
The transcript was long - over 2 hours of content. To keep the AI on target, I split it into smaller note messages, and worked through them one at a time.
def split_tscript_as_msgs(dst, yt_video_id=None):
tscript_md = tscript_with_imgs(scribe_dst, False)
if yt_video_id: tscript_md = tscript_add_yt_links(tscript_md, yt_video_id)
sidx, chunks = 0, []
lines = tscript_md.splitlines()
for idx, l in enumerate(lines):
if l.startswith('!['):
chunks.append('\n\n'.join(lines[sidx:idx+2])) # include alt text
sidx = idx+2
for c in chunks[::-1]: add_msg(c)
A function to split a single transcript note message into multiple messages. You can implement your own split logic.
I did this because as I’ve explained earlier working with large blocks of text is not very manageable. With smaller sections, when I asked it to add a hyperlink or create a code example, it stayed on target. Plus I could run code immediately to verify it worked before moving on.
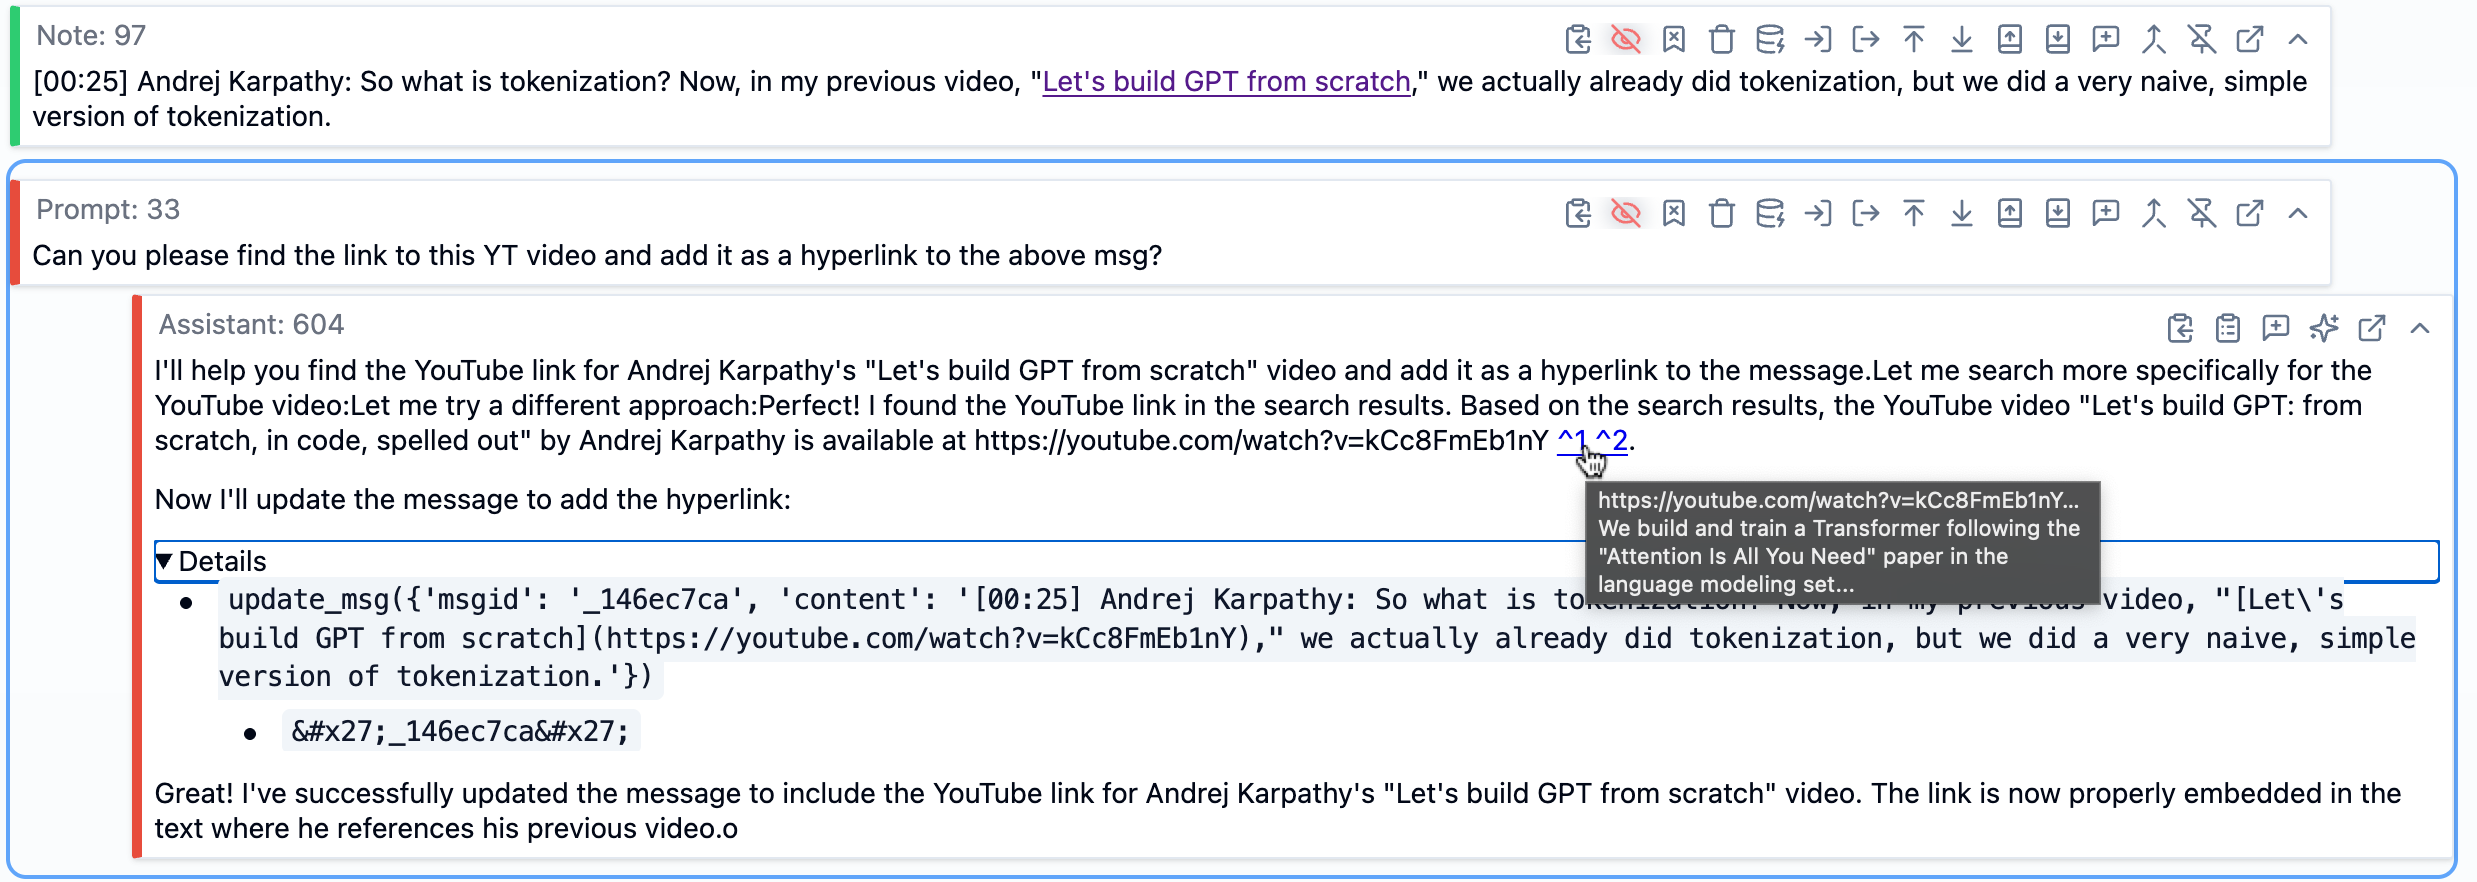
Adding Hyperlinks
When Andrej mentioned his previous video “Let’s build GPT from scratch,” I didn’t want to just leave that as plain text. I asked SolveIt to find the YouTube link and add it as a hyperlink to the transcript.
SolveIt used web search to find it, then used the message editing tools to update the note with the proper markdown link. I did this throughout for papers, blog posts, GitHub repos, wikipedia pages and any other external resources that were mentioned in the video.
SolveIt finding and adding a YouTube hyperlink using web search and message editing tools.
In this screenshot, we can see at the top a note message containing part of the transcript. Below that is a prompt message asking SolveIt to find the YouTube link and add it as a hyperlink. The AI’s response shows it used web search to find the video (visible in the hovered citations), then called the update_msg function (a dialoghelper tool) with the message ID and new content that includes the proper markdown hyperlink. The message updates in real time within the dialog. The details of tool calls can be expanded, as shown in the image. This demonstrates how SolveIt makes both the AI’s reasoning and its actions visible—you can see exactly what tools it used and verify the result. If you want to learn more about SolveIt’s features like message editing tools, dialog engineering, and the full platform capabilities, check out this features overview video.
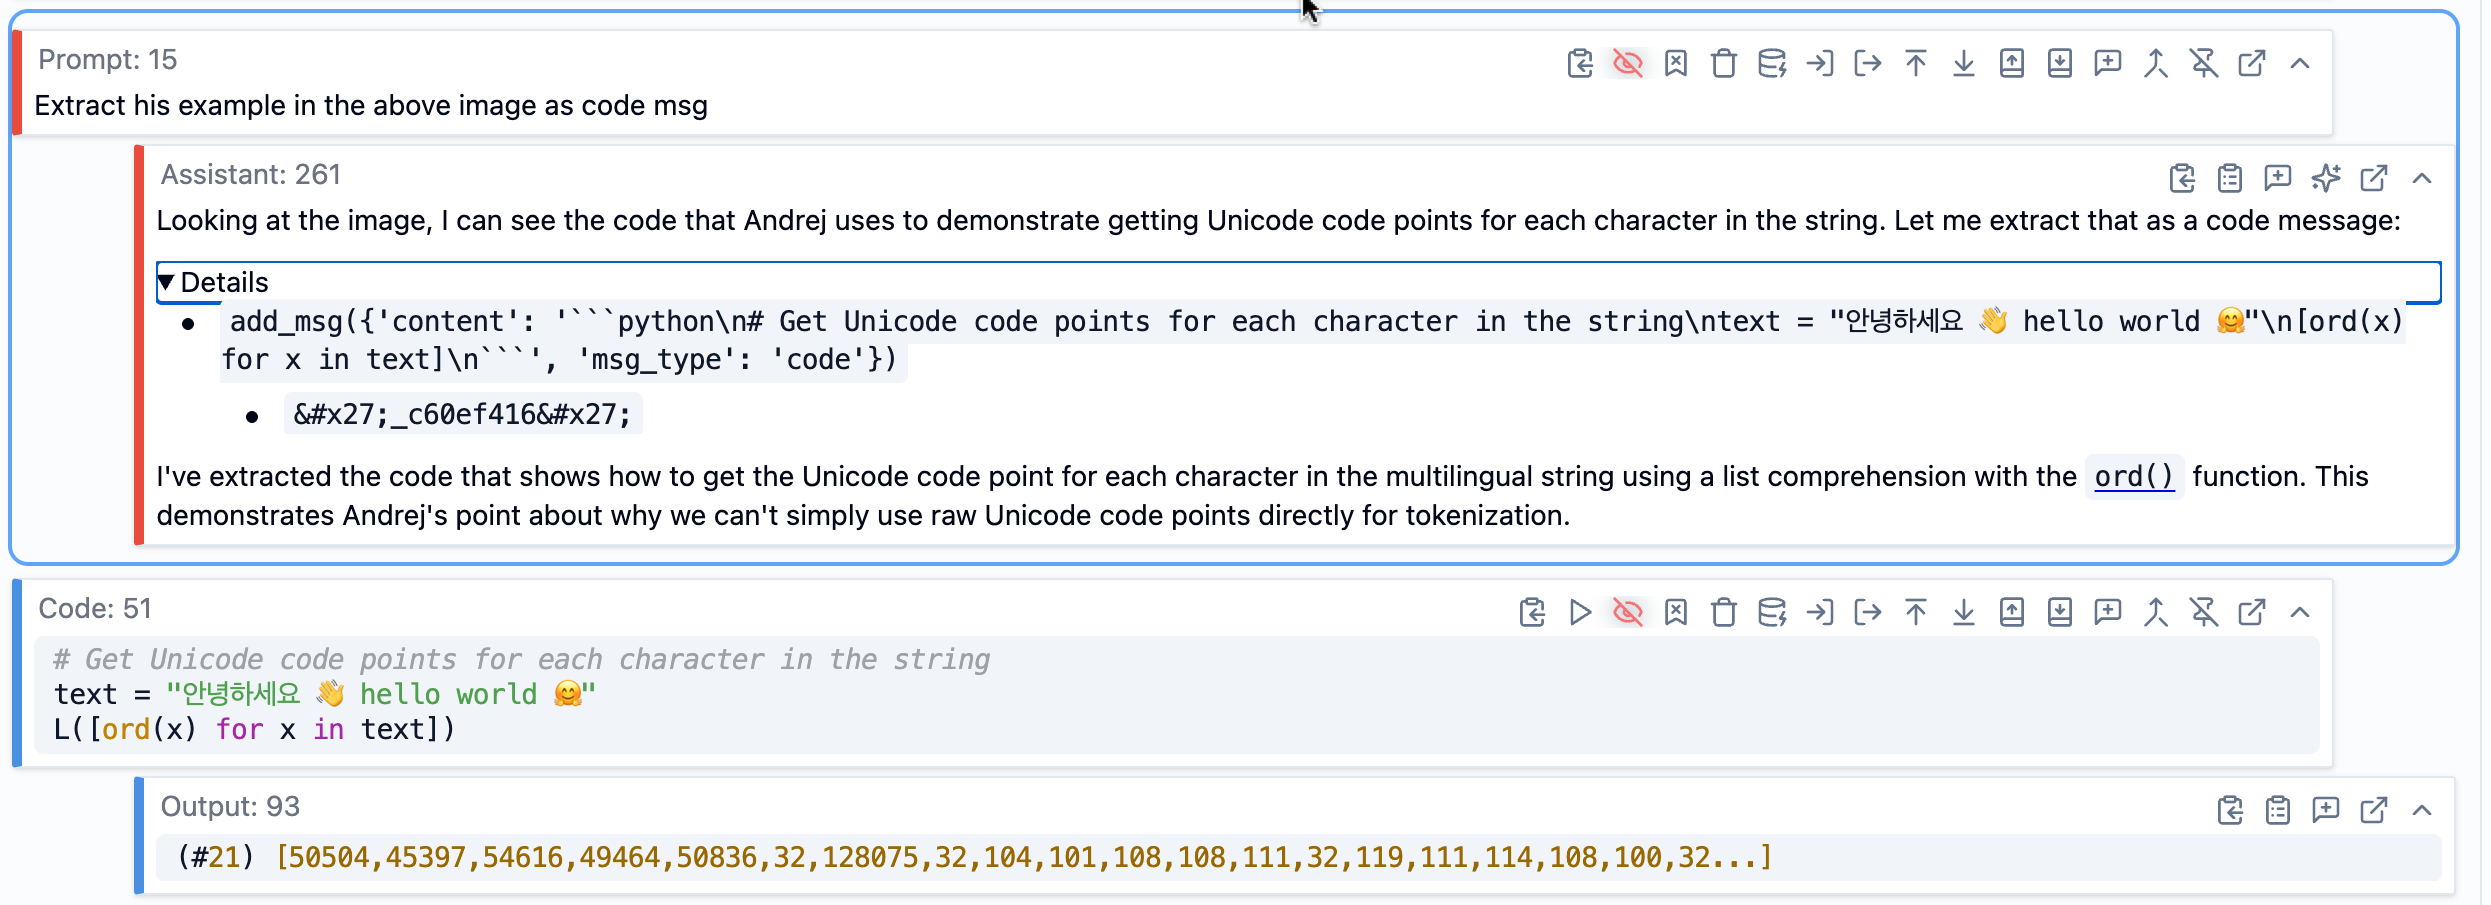
Extracting Information from Images
Some of the screenshots had information I wanted to pull into the text - code snippets, diagrams, or other content. Rather than doing it myself (which would be very time consuming), I used AI. In SolveIt, images embedded in markdown aren’t visible to the AI by default - this keeps context manageable. But you can make specific images visible by adding a special #ai anchor tag to the image markdown.
Once I made an image visible, I could ask SolveIt to work with it. In this example, I asked it to extract code from a screenshot. It read the image and created a code message with the extracted code, which I could then actually run to verify it worked correctly, or make any adjustments as needed.
Extracting code from a screenshot - SolveIt reads the image and creates a runnable code message.
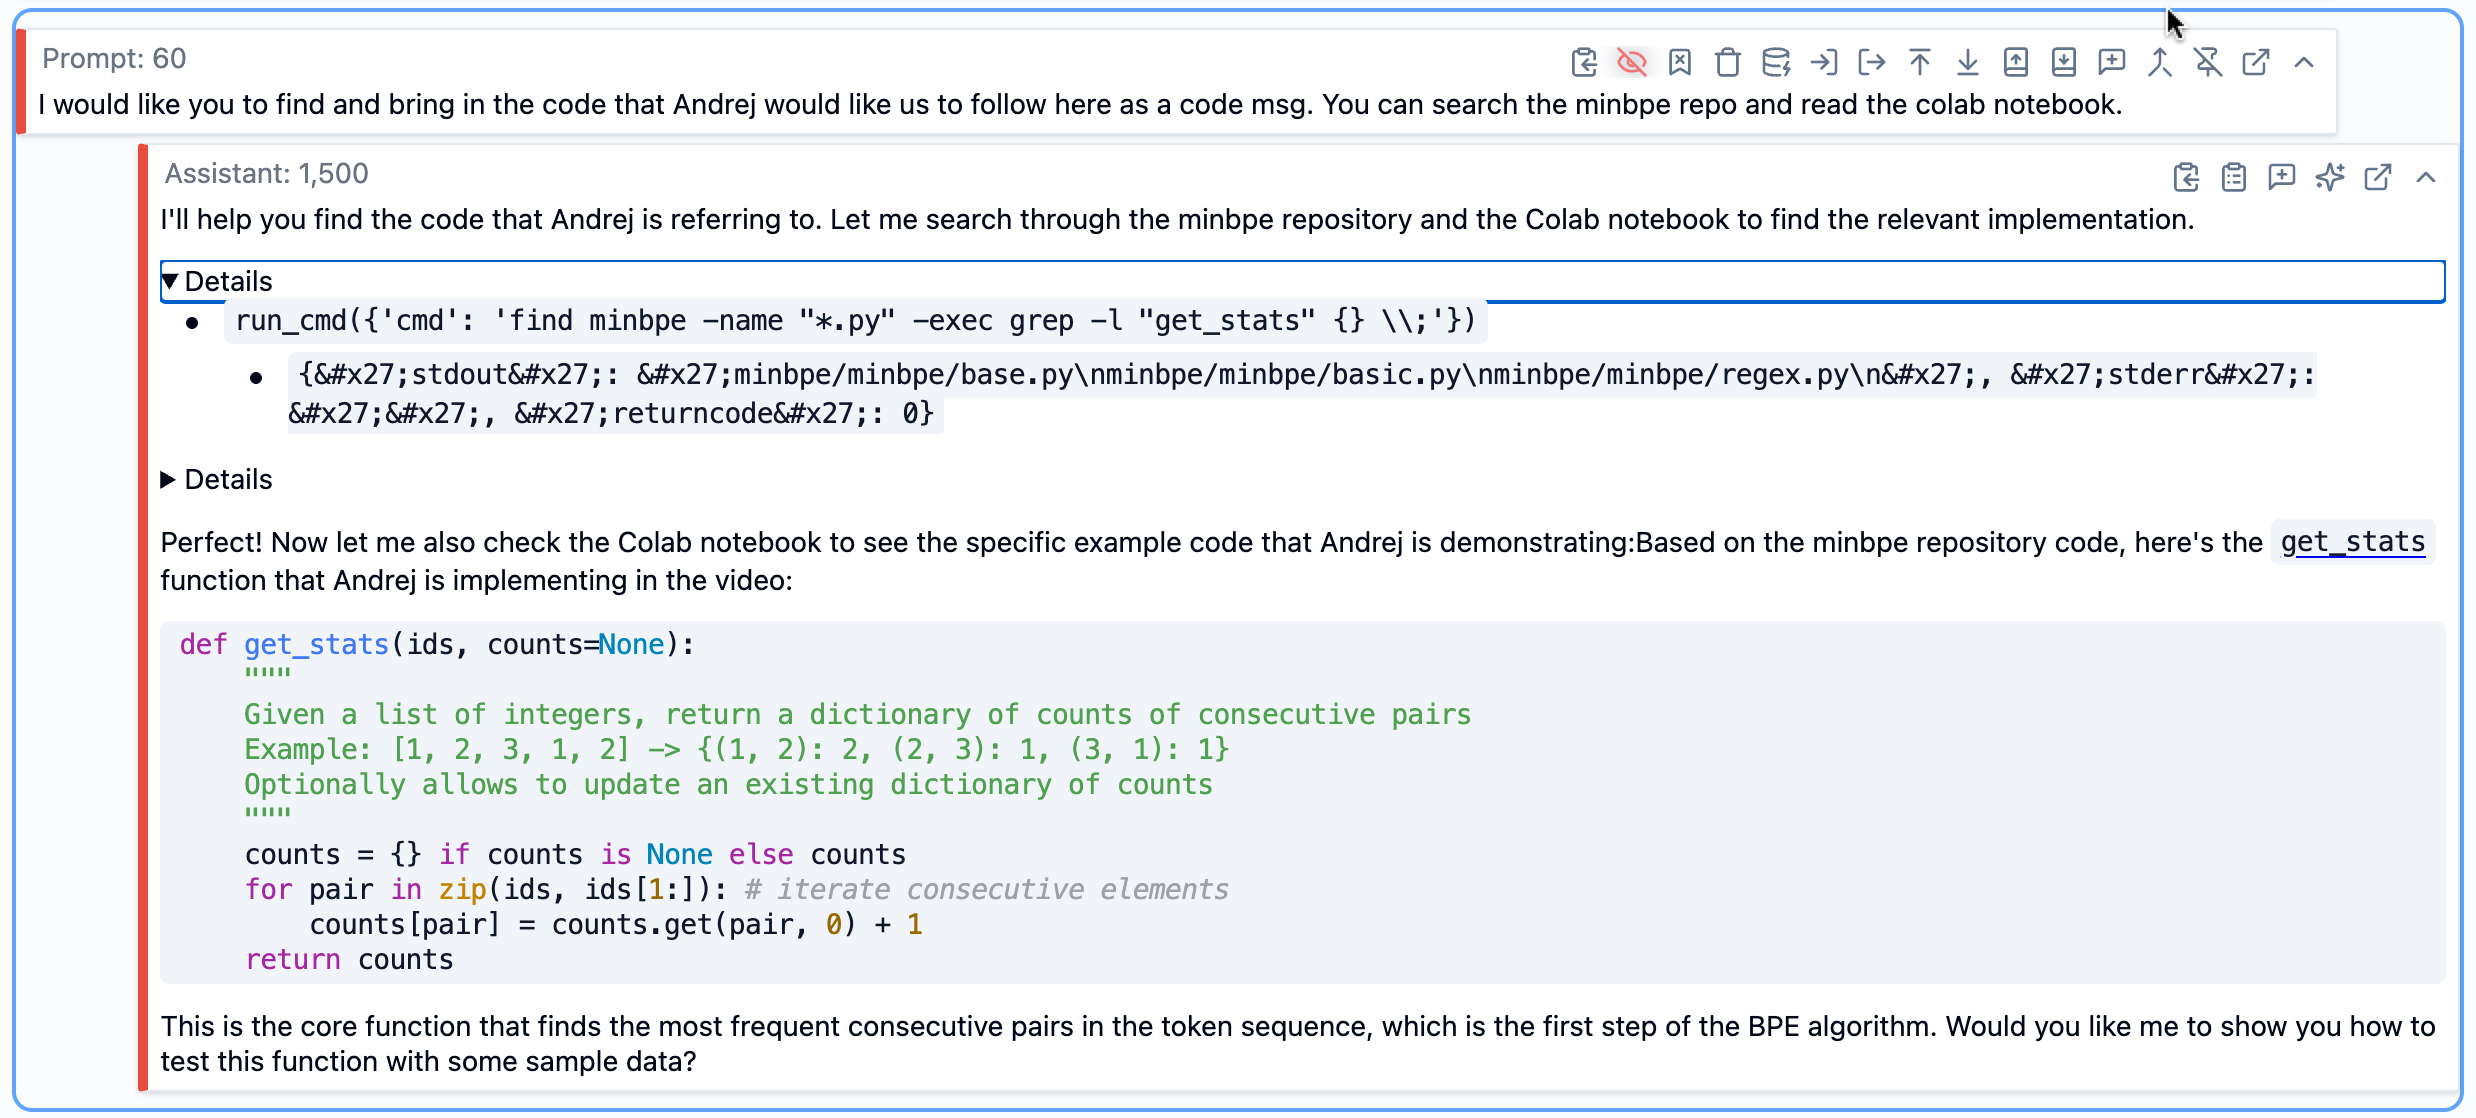
Bringing in External Context
Early on, before the enrichment, I asked SolveIt to identify which GitHub repositories were mentioned or relevant to the tokenizer tutorial by giving it the full transcript. It found several - OpenAI’s GPT-2 repo, tiktoken, Karpathy’s minBPE, Google’s SentencePiece, and a few others.
Since SolveIt gives you a full Linux environment, I could clone these repos directly into the workspace.
!git clone https://github.com/karpathy/minbpe
The idea was that as I worked through the transcript, I’d have access to the actual source code that Andrej was discussing.
This turned out to be really useful. When I was working on a section about how BPE is implemented, I could ask SolveIt to look at the actual code in those repos and pull in the relevant functions. It would use shell commands to search through the codebase, read the files, and extract what I needed.
Even though these resources are available on the web or via APIs, SolveIt works with them more efficiently when they’re stored locally, using custom tools like run_cmd.
import subprocess, shlex
def run_cmd(cmd: str, timeout=30):
"Run a bash command and return stdout, stderr, and return code"
try:
add_msg(f"!{cmd}", msg_type='code')
result = subprocess.run(shlex.split(cmd), capture_output=True, text=True, timeout=timeout)
return dict(stdout=result.stdout, stderr=result.stderr, returncode=result.returncode)
except subprocess.TimeoutExpired: return dict(error=f'Command timed out after {timeout}s')
except Exception as e: return dict(error=str(e))
SolveIt using bash commands to explore a cloned repository and extract specific code from local files.
Creating Code Examples
I noticed some situations where Andrej’s explanation could use code examples to clarify the concept. This is something AI is good at - I found that when I asked it to provide clarifying examples, they were really solid.
For instance, in one section Andrej was explaining the differences between UTF-8, UTF-16, and UTF-32 encoding. The verbal explanation was clear enough, but I thought a concrete code example would help. So I asked: “Create a minimal code example showing the difference between UTF-8, UTF-16, and UTF-32 encoding.”
SolveIt generated the code, and I ran it immediately to verify it worked and actually demonstrated what I wanted. If it wasn’t quite right, I could adjust it or ask for modifications. These runnable examples became part of the enriched transcript, and later made it into the final book chapter.
A code example generated by SolveIt to clarify UTF encoding differences - I could run it immediately to verify.
Adding Explanations
As I worked through the transcript, there were things I didn’t fully understand or that seemed like they could use more explanation. Instead of just accepting gaps in my understanding, I asked questions.
For example, at one point Andrej mentioned that tokens go from 0 to 255 initially in the BPE algorithm. I wasn’t entirely clear why that specific range, so I asked: “Why do tokens currently go from 0 to 255 - why is this the case?”
SolveIt explained that it’s because we start with UTF-8 encoded bytes, and each byte can hold values from 0 to 255 (2^8 = 256 possible values). That made sense, and I added that explanation as a note in that section of the transcript.
These clarifying questions and answers became valuable additions to the final content. They filled in gaps that might have left readers (or me) confused, and they were explanations I actually understood because I had asked the questions myself.
Asking clarifying questions during enrichment - the explanations became valuable additions to the final content.
The Enrichment Workflow
The actual workflow rhythm looked like this: I’d open a section of the transcript, read through it, and decide what it needed. Maybe it mentioned a paper that should be linked. Maybe there was a concept that needed a code example. Maybe I had a question about something.
I’d make a small, specific request - “Add a hyperlink to the GPT-2 paper” or “Extract the code from this screenshot” or “What does byte fallback do in SentencePiece?” SolveIt would do it, I’d review the result, and if it was code I’d run it to verify. Then I’d move to the next section.
Two things made this work smoothly. First, I defined some simple Python functions as tools. Any Python function in SolveIt becomes available as a tool - in my case, I made a run_cmd function so SolveIt could execute shell commands to explore codebases. SolveIt also has built-in tools via dialoghelper for editing messages, which I used constantly to update the transcript sections.
As the dialog grew longer, I kept it manageable by using collapsible headings to organize sections, and pinning important context messages so they wouldn’t get truncated. When the AI’s response wasn’t quite right, I’d just edit it directly rather than asking it to try again - this works much better in practice as AI tends to follow its previous responses rather than the human instructions. I also deleted dead ends - explorations that didn’t pan out - to keep the dialog focused.
This wasn’t fast, but it was thorough. By the end, I had a deep understanding of tokenization, every code snippet had been tested, every link verified, and every image was where it should be. The enriched transcript was genuinely useful on its own, even before writing the book chapter.
Writing the Book Chapter
Once I had the enriched transcript, I created a new dialog to write the actual book chapter. I loaded all those enriched note messages and code messages into the context of this new dialog.
Starting with an Outline
I didn’t jump straight into writing. Instead, I asked SolveIt to create an outline first. I wanted to see the overall structure - what sections made sense, what subsections each should have, what key points to cover, and which images belonged where.
The prompt was something like: “Create a detailed outline for this book chapter with sections, subsections, brief bullets on what each covers, and which images are relevant for each section.”
SolveIt gave me a structured skeleton that I could review. This outline became my roadmap for writing. Having it laid out meant I could see the whole shape of the chapter before committing to any particular section, and I could adjust the structure if something didn’t make sense.
The outline SolveIt created - showing sections, subsections, key points, and which images to include where.
Writing Section by Section
With the outline in place, I started writing. I asked SolveIt to write the introduction first, then moved through each section one at a time.
SolveIt wrote the intro, pulling in relevant details from the enriched transcript - including code snippets where appropriate, adding hyperlinks that I’d already found during enrichment, and referencing the right images. I read through it, made edits where needed, and then moved to the next section.
The key was doing this incrementally. I didn’t ask it to write the whole thing at once. Each section was its own request, its own review, its own iteration. This kept things manageable and let me maintain control over the quality and tone.
Writing one section at a time - SolveIt incorporates artifacts from the enriched transcript while I review and adjust.
Editing AI Responses
Sometimes SolveIt’s first attempt at a section wasn’t quite right - maybe the tone was off, or it was too verbose, or it didn’t emphasize the right things. When that happened, I found it was much more effective to just edit the response directly rather than trying to describe what I wanted.
I’d go into the AI’s response, rewrite parts of it to match my preferred style, and then tell SolveIt: “I’ve updated your previous response to better match the tone I want. Please continue in this style for the remaining sections.”
This works because language models are autoregressive - they predict what comes next based on what came before. By editing their output to be exactly what I want, I’m teaching them through example, which is far more effective than verbal instructions. The AI follows its own previous responses more reliably than it follows descriptions of what you want.
When the AI’s output wasn’t quite right, I edited it directly to match my preferred style, then told it to continue that way.
Reviewing Each Section
After writing each section, I’d review it myself first. Does it make sense? Is it accurate? Does it match the enriched transcript? It also helps to include citations from the transcript at the end of a written text section as an additional layer of verification.
Sometimes I’d also ask SolveIt: “Is there anything important missing from this subsection based on the transcript?”. This caught things I’d overlooked. Maybe there was a key point from Andrej’s explanation that didn’t make it into the prose, or an important code snippet that should have been included. I’d make adjustments based on both my own judgment and what the AI flagged, then move on to the next section.
This back-and-forth reviewing wasn’t wasted time. It meant that by the time I finished all the sections, I was confident the content was solid. No need for a big revision pass at the end because I’d been iterating throughout.
After each section, I reviewed it myself and asked the AI if anything important was missing from the transcript.
Final Assembly
Once all the sections were written and reviewed, I needed to merge them into a single cohesive document. All the AI responses were separate messages in the dialog - one for the intro, one for each section, etc.
I used tools from dialoghelper to combine all written sections into a single note message. The result was a complete markdown-formatted book chapter with everything in place - prose, code blocks, images, hyperlinks, all properly formatted.
At that point, I could either hit the publish button in SolveIt to get a shareable URL at share.solveit.com, or export the markdown to use with whatever publishing platform I prefer. In my case, I published it both ways - shared via SolveIt and also exported it to publish on fast.ai’s blog using Quarto.
Why Work This Way
This two-phase process took longer than just asking AI to “convert this transcript to a book chapter.” But I think it was worth it for a few practical reasons:
I ended up with an artifact that covers everything important from the video. It is verified as opposed to trusting the AI blindly - every code snippet runs, every hyperlink goes to the right place, every image is relevant to its section.
I maintained control throughout. When I wanted to emphasize something Andrej mentioned briefly, I could dig deeper on that section. When something in the video didn’t need as much space in the book chapter, I could condense it. The final artifact reflects my judgment about what’s important, not just a mechanical conversion.
I actually learned the material. Working through tokenization section by section, asking questions when I didn’t understand something, running the code examples - by the end I had a real grasp of how BPE works, what the tradeoffs are between different approaches, etc.
None of this is to say you shouldn’t use AI. I used it constantly throughout this process. But I used it in small, specific ways where I could verify the results immediately. That made all the difference.
Getting Started
You can use this approach with any video transcript you can get your hands on. Some practical sources:
YouTube videos: Use yt-dlp --write-auto-sub to download auto-generated captions
Zoom recordings: Export the transcript as VTT or TXT
Audio files: Use Whisper, AssemblyAI, or similar transcription services
Once you have a transcript, the workflow is the same. Get it into SolveIt, split it into manageable sections (or keep it as one message if it’s short enough), and start enriching. The tools are there - web search for finding links, image analysis for extracting information from screenshots, code execution for verifying examples, file system access for cloning repos or downloading resources, and dialoghelper tools for manipulating messages.
The most important part isn’t the specific tools or techniques - it’s the approach. Work in small pieces. Verify as you go. Ask questions when you don’t understand something. Run code to make sure it works. Build genuine understanding rather than just reformatting content.
If you want to see the full example, the published book chapter shows what this workflow produces, and you can look at the two dialogs I linked earlier to see exactly how I worked through each phase.
関連記事
今日のまとめ
AI日報で今日の重要ニュースをまとめ読み