Amazon SageMaker AI で SFT と DPO を活用し、エージェントのツール呼び出し精度を向上させる方法
AWS は、SFT と DPO を組み合わせて小規模言語モデルのツール呼び出し精度を向上させる手法と、Amazon SageMaker AI を活用した実装例を提供し、エージェントアプリケーションの実用化を支援している。
キーポイント
ツールの誤呼出がもたらす課題
エージェントが間違ったツールを選択したりパラメータ形式を誤ったりすると、タスク完了時間の増加やエラー率の上昇など、生産性とユーザー体験に深刻な悪影響を与える。
SFT と DPO の組み合わせによる最適化
Supervised Fine-Tuning (SFT) でツール固有の言語や制約を学習させ、Direct Preference Optimization (DPO) で人間のフィードバックに基づき望ましい応答を強化する手法が提案されている。
Amazon SageMaker AI によるインフラ管理の簡素化
AWS の SageMaker AI を利用することで、複雑なトレーニング環境の構築や管理から解放され、モデルの品質評価と比較に集中できる環境が提供される。
DPO によるリソース効率の向上
報酬関数や報酬モデルを必要としない DPO は、強化学習と同様の目標達成を実現しつつ、トレーニング時間と計算リソースの削減が可能である。
評価用データセットの構成
性能テストには、MCQ(多肢選択式)とLLM-as-a-judgeの2種類のファイルが含まれており、それぞれ異なる行数を持つデータセットとして提供されています。
トレーニングデータの事前処理
TRLのSFTTrainerおよびDPOTrainerで利用可能な形式に合わせるため、利用可能なツールのリストを含むシステムプロンプトを生成し、メッセージリストに追加する処理が必要です。
DPO データセットの形式変換
DPOTrainer は 'chosen' と 'rejected' カラムを必要とするため、元の 'chosen_response' と 'rejected_response' をリネームし、メッセージ列を適切に構成する必要があります。
重要な引用
As more organizations move agentic applications from pilot to production, having agents that select the right tool for each request is essential for reliable automation.
The training data in DPO contains a 'like this, not like that' preference, which optimizes the same goals as reinforcement learning without reward functions or reward models.
For this use case, we need to do a bit of preprocessing on the dataset to match the expected formats for TRL's SFTTrainer and DPOTrainer.
You are a helpful assistant with access to the following tools or function calls. Your task is to produce a sequence of tools or function calls necessary to generate response to the user utterance.
The <code>DPOTrainer</code> from TRL accepts a specific format that includes columns labeled as <code>chosen</code> and <code>rejected</code> in addition to <code>messages</code>
Now, save the SFT and DPO datasets in Amazon Simple Storage Service (Amazon S3) to make them available for training.
影響分析・編集コメントを表示
影響分析
この記事は、エージェント型アプリケーションの実用化における最大のボトルネックである「ツール呼び出しの精度」に対して、SFT と DPO という具体的な技術的解決策と、それを容易に実装できるクラウドプラットフォーム(SageMaker)を提供しています。これにより、企業はパイロット段階から本番環境への移行を加速させ、信頼性の高い自動化システムを構築できるようになります。
編集コメント
エエージェントの実用化において「ツール呼び出しの精度」は決定的な課題ですが、SFT と DPO を組み合わせたアプローチと AWS のサービス提供により、そのハードルが大幅に下がりました。技術的な深みのある解説であり、実装を検討するエンジニアにとって非常に価値の高い記事です。
AI エージェントは自律的に複雑な多段階タスクを処理できますが、その効果は適切なツールを呼び出して情報を取得したりアクションを実行したりできるかに依存します。エージェントが誤ったツールを選択したり、パラメータの形式を正しく設定できなかったり、ワークフローチェーンを断ち切ったりすると、タスク完了時間が延長し、エラー率が上昇し、サポートコストが増加し、ユーザーエクスペリエンスが悪化します。より多くの組織が自律型アプリケーションをパイロットから本番環境へ移行するにつれ、各リクエストに対して適切なツールを選択できるエージェントを持つことは、信頼性の高い自動化のために不可欠です。
この記事では、Supervised Fine-Tuning (SFT) と Direct Preference Optimization (DPO) を組み合わせて使用し、小型言語モデル(SLM)のツール呼び出し精度を向上させる方法を学びます。この例では Amazon SageMaker AI のトレーニングジョブを使用するため、独自のトレーニングインフラストラクチャを管理するのではなく、トレーニングコードに集中できます。また、ツール呼び出し精度の評価方法と、ベースモデルと複数のファインチューニング済みバリアントの比較方法も学ぶため、モデル品質についてデータ駆動型の意思決定を行うことができます。
ファインチューニング手法
Supervised Fine-Tuning(教師ありファインチューニング)は、モデルの意図した機能に密接に整合する高品質なデータセットをキュレーションすることを含み、特定のタスクを実行したり特定のツールと対話したりする方法について明確な例を提供します。この方法は特に、モデルがツール固有の言語、コマンド、および制約の微妙なニュアンスを認識するように教えるのに効果的です。
Direct Preference Optimization は、人間のフィードバックや事前に定義された目標をトレーニングループに直接組み込むことで、これらの相互作用を洗練させます。DPO は、特定の種類の応答や行動を他のものよりも優先することを強調することで、モデルの出力をターゲットアウトカムにより密接に整列させます。DPO のトレーニングデータには、「こうあるべきで、あああってはならない」という好みが含まれており、これは報酬関数や報酬モデルなしで強化学習と同じ目標を最適化します。このアプローチは、品質を維持しながらリソース要件とトレーニング時間を削減します。
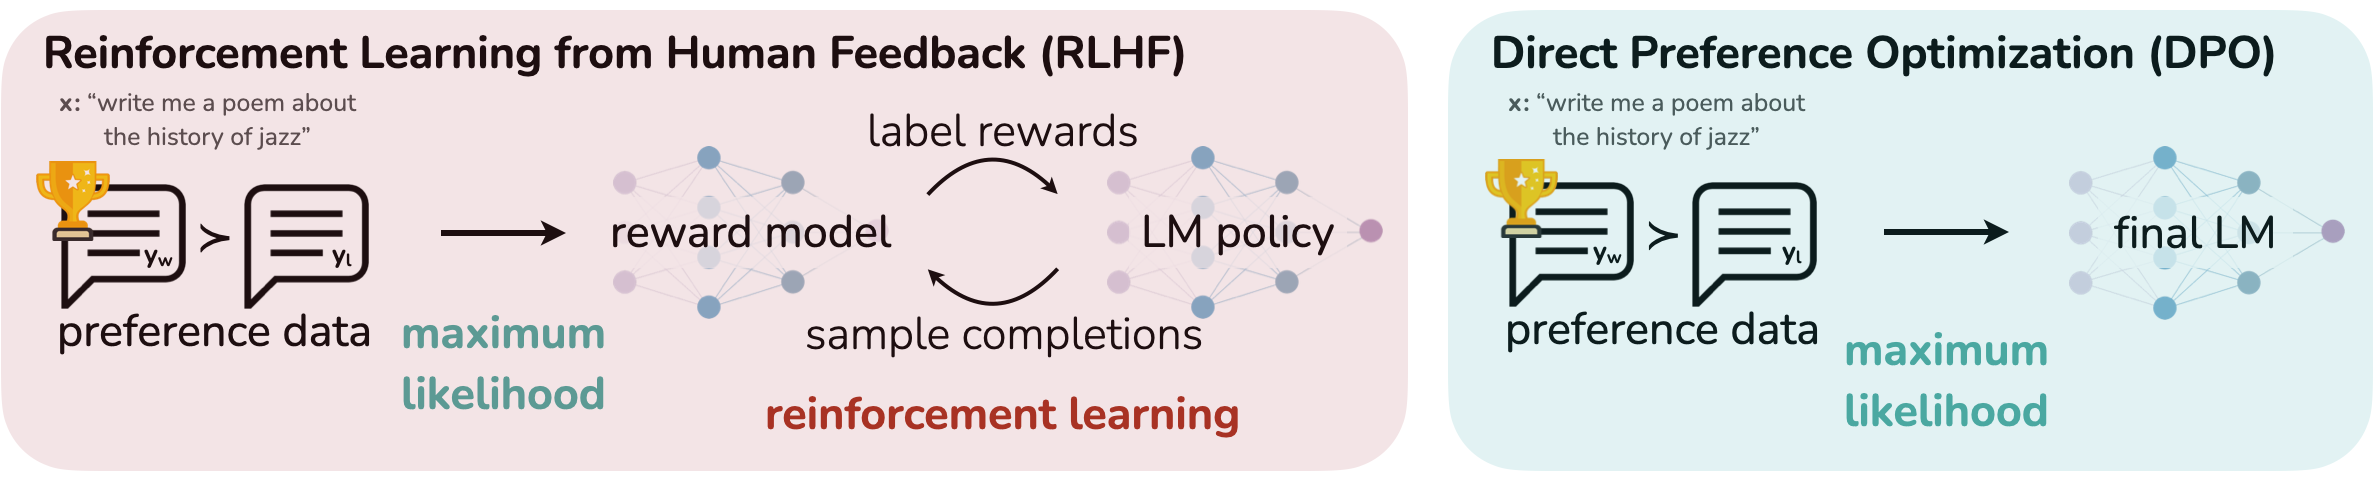
出典:arXiv:2305.18290 [cs.LG]
例えば、DPO 用の HuggingFace TRL ライブラリは、以下の形式でトレーニングサンプルを受け取ります:
{ "prompt": [""], "chosen": "", # k よりも評価が高い "rejected": "", # j よりも評価が低い }
このフィードバック駆動型アプローチにより、トレーニングデータ内の実際の使用パターンに基づいて、モデルのツール相互作用能力を反復的に改善することが可能になります。
SFT と DPO を組み合わせることで、言語モデルを多様なデジタルツールと連携させるための堅牢なファインチューニングフレームワークが構築されます。これらの技術を活用することで、人間のようなテキストを理解・生成し、外部アプリケーションとの自律的な相互作用を通じて複雑なタスクを実行できる AI システムを構築できます。これにより、消費者向けおよび企業向けの両環境において、AI の適用範囲と有用性が拡大します。
Amazon SageMaker Studio ノートブックや Amazon SageMaker AI 学習ジョブに関連するコストについては、SageMaker AI の価格ページをご参照ください。
ソリューションの概要
このセクションでは、分散型マルチ GPU およびマルチノード構成をサポートする完全管理型のサービスである Amazon SageMaker AI 学習ジョブ 上で Qwen3 1.7B をファインチューニングする方法を順を追って解説します。SageMaker AI 学習ジョブを使用すれば、必要に応じて高性能なクラスターを即座に起動し、数十億パラメータ規模のモデルを高速にトレーニングでき、ジョブ完了後は自動的にリソースを終了できます。インフラストラクチャからのメトリクスとトレーニングループ内部からのメトリクスは、後日の分析のために SageMaker AI 上の MLflow に送信されます。
前提条件
SageMaker AI で関数呼び出しモデルをファインチューニングするには、以下の前提条件が必要です:
- AWS リソースを含む AWS アカウント。
- SageMaker AI にアクセスするための AWS Identity and Access Management (IAM) ロール。IAM が SageMaker AI とどのように連携するかについては、AWS Identity and Access Management for Amazon SageMaker AI を参照してください。
- AWS アカウントにアクセスするように設定された開発環境です。ノートブックは、PyCharm や Visual Studio Code などの統合開発環境(IDE)を含むお好みの環境から実行できます。ローカル環境を設定するには、AWS Command Line Interface (AWS CLI) の設定構成に関するドキュメントを参照してください。SageMaker AI でシームレスな体験を得るには、Amazon SageMaker Studio を推奨します。
- MLflow を使用して SageMaker AI 内の実験を追跡する場合は、SageMaker AI ドキュメントの指示に従ってください。
- この投稿で使用される SageMaker AI コンピューティングインスタンスへのアクセス権限が必要です。トレーニングには SageMaker AI トレーニングジョブと、1 つの ml.p4d.24xlarge インスタンスを使用します。クォータを確認するには、AWS Management Console の AWS サービスクォータを参照してください。
Service Quotas コンソールで、トレーニングジョブ使用に関する SageMaker AI ml.p4d.24xlarge のクォータを表示します。
- 適用されたアカウントレベルのクォータ値が 0 の場合、アカウントレベルで 1 に増やすようリクエストしてください。
- この投稿用の GitHub リポジトリへのアクセス権限。
環境を設定する
以下のセクションでは、SageMaker Studio JupyterLab ノートブックインスタンス からコードを実行します。VS Code や PyCharm などの好みの IDE を使用することも可能です。前提条件に記載されている通り、ローカル環境が AWS と連携するように設定されていることを確認してください。
環境を設定するには、以下の手順を完了してください:
- SageMaker AI コンソールで、ナビゲーションペインの「ドメイン」を選択し、対象となるドメインを開きます。
- 「アプリケーションと IDE」セクション内のナビゲーションペインで、「Studio」を選択します。
- 「ユーザープロファイル」タブで、自分のユーザープロファイルを見つけて、「起動して Studio」を選択します。
- SageMaker Studio で、少なくとも 50 GB のストレージを持つ ml.t3.medium インスタンスの JupyterLab ノートブックを起動します。大規模なノートブックインスタンスは必要ありません。ファインチューニングジョブは、NVIDIA アクセラレータを搭載した別のエフェメラルトレーニングジョブインスタンス上で実行されるためです。
- ファインチューニングを開始するには、GitHub リポジトリをクローンします:git clone https://github.com/aws-samples/amazon-sagemaker-generativeai.git。
- 6_use_cases/usecases/function-calling-sft-dpo ディレクトリに移動します。
- Python 3.12 以降のカーネルを使用して、run_training_job.ipynb ノートブックを起動します。
データセットの準備
基盤モデル(FMs)のファインチューニングにおいて、適切なデータセットを選択して作成することは重要な最初のステップです。この例では、NVIDIA が公開した When2Call データセットを使用します。これは、基盤モデルにおけるツール呼び出しの意思決定を評価するために設計されたベンチマークであり、いつツール呼び出しを生成すべきか、フォローアップ質問を行うべきか、提供されたツールでは回答できないと示すべきか、また質問がツールの使用を必要としているように見えるがツール呼び出しができない場合にどう対処すべきかなどの要素を含んでいます。
データセットの生成に使用された評価コードおよび合成データ生成スクリプトは、NVIDIA の GitHub リポジトリ にあります。
データセットには 3 つの異なる部分が含まれています。
- 教師ありファインチューニング(SFT)用のデータセットで、15,000 サンプルを含みます。
from datasets import load_dataset
train_sft_ds = load_dataset("nvidia/When2Call", "train_sft")
train_sft_ds
DatasetDict({
train: Dataset({
features: ['tools', 'messages'],
num_rows: 15000
})
- プレファレンス整列用のデータセットで、この例では直接選好最適化(DPO)を使用します。このデータには 9,000 サンプルが含まれています。
from datasets import load_dataset
train_pref_ds = load_dataset("nvidia/When2Call", "train_pref")
train_pref_ds
DatasetDict({
train: Dataset({
features: ['tools', 'messages', 'chosen_response', 'rejected_response'],
num_rows: 9000
})
})
- パフォーマンステスト用のデータセットには2つのファイルがあります。1つは多肢選択式質問評価(MCQ)で、もう1つはLLM-as-a-judge(LLM を裁判官として用いる評価)です。後者は MCQ 評価セットのサブセットであり、単一の DatasetDict としてダウンロード可能です。
from datasets import load_dataset
test_ds = load_dataset("nvidia/When2Call", "test")
test_ds
DatasetDict({
llm_judge: Dataset({
features: ['uuid', 'source', 'source_id', 'question', 'correct_answer', 'answers', 'target_tool', 'tools', 'orig_tools', 'orig_question', 'held_out_param'],
num_rows: 300
})
mcq: Dataset({
features: ['uuid', 'source', 'source_id', 'question', 'correct_answer', 'answers', 'target_tool', 'tools', 'orig_tools', 'orig_question', 'held_out_param'],
num_rows: 3652
})
})
このユースケースでは、TRL の SFTTrainer および DPOTrainer が期待する形式に合わせて、データセットに対していくつかの前処理を行う必要があります。そのためには、利用可能なツールのリストを含むシステムプロンプト(system prompt)を作成し、元のデータセットのメッセージリストにこのシステムプロンプトを追加する必要があります。
def generate_and_tokenize_prompt(data_point):
"""
患者情報に基づいてツールを使用するプロンプトを生成します。
引数:
data_point (dict): ターゲットと意味表現のキーを含む辞書
戻り値:
dict: 整形されたプロンプトを含む辞書
"""
full_prompt = f"""
あなたは以下のツールまたは関数呼び出しにアクセスできる便利なアシスタントです。あなたのタスクは、ユーザーの発話に対する応答を生成するために必要な一連のツールまたは関数呼び出しを作成することです。必要に応じて以下のツールまたは関数呼び出しを使用してください:
{data_point["tools"]}
"""
return {"system_prompt": full_prompt.strip()}
dstrain_sft = dstrain_sft.map(
generate_and_tokenize_prompt,
batched=False
)
convos=[]
for mess, sys in zip(dstrain_sft['train']['messages'], dstrain_sft['train']['system_prompt']):
message = {
"content": f"{sys}",
"role": "system"
}
convos.append([message, mess[0], mess[1]])
dstrain_sft = dstrain_sft.rename_column("messages", "messages_1")
dstrain_sft['train'] = dstrain_sft['train'].add_column("messages", convos)
SFT に対して行ったことに加えて、DPO のためのデータも準備する必要があります。TRL から提供される DPOTrainer は、messages カラムに加え、chosen と rejected というラベルが付いたカラムを含む特定の形式を受け入れるため、messages カラムを作成し、chosen_response および rejected_response をそれぞれリネームする必要があります。
ds_train_pref = ds_train_pref.map(
generate_and_tokenize_prompt,
batched=False
)
ds_train_pref = ds_train_pref.rename_column("chosen_response", "chosen")
ds_train_pref = ds_train_pref.rename_column("rejected_response", "rejected")
Now, save the SFT and DPO datasets in Amazon Simple Storage Service (Amazon S3) to make them available for training.
# save train_dataset to s3 using our SageMaker session
input_path = f's3://{sagemaker_session.default_bucket()}/datasets/nvidia_function_calling'
Save datasets to s3
We will fine tune only with 20 records due to limited compute resource for the workshop
dstrain_sft["train"].to_json(f"{input_path}/train/dataset.json", orient="records")
sft_dataset_s3_path = f"{input_path}/train/dataset.json"
ds_train_pref["train"].to_json(f"{input_path}/pref/dataset.json", orient="records")
perf_dataset_s3_path = f"{input_path}/pref/dataset.json"
ds_train_pref["train"].to_json(f"{input_path}/pref/dataset.json", orient="records")
perf_dataset_s3_path = f"{input_path}/pref/dataset.json"
print(f"Training data uploaded to:")
print(sft_dataset_s3_path)
print(f"DPO data uploaded to:")
print(perf_dataset_s3_path)
print(f"https://s3.console.aws.amazon.com/s3/buckets/{sagemaker_session.default_bucket()}/?region={sagemaker_session.boto_region_name}&prefix={input_path.split('/', 3)[-1]}/")
ベースモデルに対する教師あり微調整 (SFT)
以下の例は、Qwen3-1.7B モデルを微調整する方法を示しています。このリポジトリには、scripts ディレクトリ内にレシピが格納されており、ここでは SFT 用のベースモデルやトレーニングパラメータを変更できます。本例では スペクトルベース の微調整レシピを使用していますが、LoRA や QLoRA などの他の PEFT (Parameter-Efficient Fine-Tuning: パラメータ効率型微調整) 手法も利用可能です。
このレシピには、モデルおよびトレーニングパラメータの構成が含まれています:
# Model arguments
model_name_or_path: Qwen/Qwen3-1.7B
tokenizer_name_or_path: Qwen/Qwen3-1.7B
model_revision: main
torch_dtype: bfloat16
attn_implementation: flash_attention_2
bf16: true
tf32: true
output_dir: /opt/ml/model/Qwen3-1.7B-function-calling

# Dataset arguments
dataset_id_or_path: /opt/ml/input/data/dataset/dataset.json
max_seq_length: 2048
packing: true

# Spectrum arguments
spectrum_config_path: /opt/ml/input/data/code/spectrum-layer/snr_results_Qwen-Qwen3-1.7B_unfrozenparameters_50percent.yaml

# Training arguments
num_train_epochs: 10
per_device_train_batch_size: 4
gradient_accumulation_steps: 2
gradient_checkpointing: true
gradient_checkpointing_kwargs:
  use_reentrant: true
learning_rate: 5.0e-5
lr_scheduler_type: cosine
warmup_ratio: 0.1

# Logging arguments
logging_strategy: steps
logging_steps: 5
report_to:
- wandb
save_strategy: "no" # "epoch"
seed: 42
必ず JSON 形式で返してください。translation フィールドのみ。他のフィールド (technical_terms 等) は一切追加しないこと — 余計なフィールドを書こうとして本文翻訳がトークン上限で打ち切られる事故を防ぐため:
{"translation": "翻訳全文"}
Hugging Face Hub
push_to_hub: false
hub_model_id: # if not defined same as output_dir
hub_strategy: every_save
SageMaker AI ModelTrainer を使用したトレーニングジョブの作成
次に、SageMaker AI のトレーニングジョブを使用してトレーニングクラスターを起動し、モデルのファインチューニングを実行します。SageMaker AI Python SDK ModelTrainer APIs は、完全に管理されたインフラストラクチャ上でトレーニングジョブを実行し、環境設定、スケーリング、アーティファクト管理を処理します。ModelTrainer を使用することで、サーバーを手動でプロビジョニングすることなく、トレーニングスクリプト、入力データ、計算リソースを指定できます。
まず、トレーニング環境を設定します:
from sagemaker.config import load_sagemaker_config
configs = load_sagemaker_config()
from sagemaker.modules.train import ModelTrainer
from sagemaker.modules.configs import Compute, SourceCode, InputData, StoppingCondition, CheckpointConfig
env = {}
env["FI_PROVIDER"] = "efa"
env["NCCL_PROTO"] = "simple"
env["NCCL_SOCKET_IFNAME"] = "eth0"
env["NCCL_IB_DISABLE"] = "1"
env["NCCL_DEBUG"] = "WARN"
env["HF_token"] = os.environ['hf_token'] #required for gated models, can be omitted for others
env["data_location"] = sft_dataset_s3_path
MLflow での実験追跡を有効にするには、ジョブに MLflow 追跡サーバーの ARN を指定します。
# MLflow tracker
tracking_server_arn = ""
env["MLFLOW_TRACKING_ARN"] = tracking_server_arn
トレーニング設定の Compute セクションは、トレーニングに必要なインフラストラクチャ要件を決定します。SourceCode セクションでは、トレーニングジョブにインポートされるコードへのローカルパスを定義します。
compute = Compute(
instance_count=1,
instance_type= "ml.p4d.24xlarge",
volume_size_in_gb=96,
keep_alive_period_in_seconds=3600,
)
source_code = SourceCode(
source_dir="./scripts",
requirements="requirements.txt",
entry_script="run_training_sft.sh",
)
以下は、SageMaker AI トレーニングジョブ上でファインチューニングを行うためのディレクトリ構造です。また、scripts ディレクトリには requirements.txt ファイルも提供されており、ModelTrainer が実行時に自動的に検出してリストされた依存関係をインストールします。ビルドの隔離を無効化するなどの高度なシナリオでは、トレーニング開始前にシェルコマンドを実行するためのエントリポイントとして bash スクリプトを提供できます。
scripts/
├── accelerate_configs/ # Accelerate 設定ファイル
├── run_training_sft.sh # SageMaker トレーニングジョブ上で Accelerate を使用した分散トレーニングの起動スクリプト
├── run_training_dpo.sh # SageMaker トレーニングジョブ上で Accelerate を使用した分散トレーニングの起動スクリプト
├── run_sft.py # 教師ありファインチューニング(SFT)のメイントレーニングスクリプト
├── run_dpo.py # Direct
原文を表示
AI agents can autonomously handle complex, multi-step tasks, but their effectiveness depends on calling the right tools to retrieve information or take action. When an agent picks the wrong tool, formats parameters incorrectly, or breaks a workflow chain, task completion times grow, error rates rise, support costs increase, and user experiences degrade. As more organizations move agentic applications from pilot to production, having agents that select the right tool for each request is essential for reliable automation.
In this post, you learn how to use Supervised Fine-Tuning (SFT) and Direct Preference Optimization (DPO) together to improve the tool-calling accuracy of a small language model (SLM). The example uses Amazon SageMaker AI training jobs, so you can focus on training code instead of managing your own training infrastructure. You also learn how to evaluate tool-calling accuracy and compare a base model to several fine-tuned variants, so you can make data-driven decisions about model quality.
Fine-tuning methodologies
Supervised fine-tuning involves curating a high-quality dataset that aligns closely with the model’s intended function, providing explicit examples of how the model should perform certain tasks or interact with specific tools. This method is particularly effective for teaching the model to recognize the nuances of tool-specific language, commands, and constraints.
Direct Preference Optimization refines these interactions by incorporating human feedback or predefined objectives directly into the training loop. DPO aligns the model’s output more closely with target outcomes by emphasizing a preference for certain types of responses or behaviors over others. The training data in DPO contains a “like this, not like that” preference, which optimizes the same goals as reinforcement learning without reward functions or reward models. This approach reduces resource requirements and training time while maintaining quality.
Source: arXiv:2305.18290 [cs.LG]
For example, the HuggingFace TRL library for DPO takes training samples in the following format:
{
    "prompt": [""],
    "chosen": "",  # rated better than k
    "rejected": "",  # rated worse than j
}
This feedback-driven approach allows for iterative improvement of the model’s tool-interaction capabilities based on real-world usage patterns in the training data.
Together, SFT and DPO form a robust framework for fine-tuning language models to interface with a wide range of digital tools. By using these techniques, you can build AI systems that understand and generate human-like text and that perform complex tasks by autonomously interacting with external applications, broadening the scope and utility of AI in both consumer and enterprise environments.
To understand the costs associated with Amazon SageMaker Studio notebooks and Amazon SageMaker AI training jobs, refer to the SageMaker AI pricing page.
Solution overview
In this section, we walk through how to fine-tune Qwen3 1.7B on Amazon SageMaker AI training jobs, a fully managed service that supports distributed multi-GPU and multi-node configurations. With SageMaker AI training jobs, you can spin up high-performance clusters on demand, train billion-parameter models faster, and automatically shut down resources when the job finishes. Metrics from infrastructure and from inside the training loop are sent to MLflow on SageMaker AI for later analysis.
Prerequisites
To fine-tune function-calling models on SageMaker AI, you need the following prerequisites:
- An AWS account that contains your AWS resources.
- An AWS Identity and Access Management (IAM) role to access SageMaker AI. To learn more about how IAM works with SageMaker AI, see AWS Identity and Access Management for Amazon SageMaker AI.
- A development environment configured to access your AWS account. You can run the notebook from your preferred environment, including integrated development environments (IDEs) such as PyCharm or Visual Studio Code. To set up your local environment, refer to Configuring settings for the AWS Command Line Interface (AWS CLI). We recommend Amazon SageMaker Studio for a streamlined experience on SageMaker AI.
- To track your experiments in SageMaker AI with MLflow, follow the instructions in the SageMaker AI documentation.
- Access to the SageMaker AI compute instances used in this post. We use SageMaker AI training jobs and a single ml.p4d.24xlarge instance for training. To check your quota, review the AWS service quotas in the AWS Management Console.
View the SageMaker AI ml.p4d.24xlarge for training job usage quota in the Service Quotas console.
- If the Applied account-level quota value is 0, request an increase at the account level of 1.
- Access to the GitHub repository for this post.
Set up your environment
In the following sections, we run the code from a SageMaker Studio JupyterLab notebook instance. You can also use your preferred IDE, such as VS Code or PyCharm. Make sure your local environment is configured to work with AWS, as listed in the prerequisites.
Complete the following steps to set up your environment:
- On the SageMaker AI console, choose Domains in the navigation pane, then open your domain.
- In the navigation pane under Applications and IDEs, choose Studio.
- On the User profiles tab, locate your user profile, then choose Launch and Studio.
- In SageMaker Studio, launch an ml.t3.medium JupyterLab notebook instance with at least 50 GB of storage. A large notebook instance isn’t required because the fine-tuning job runs on a separate ephemeral training job instance with NVIDIA accelerators.
- To begin fine-tuning, clone the GitHub repository: git clone https://github.com/aws-samples/amazon-sagemaker-generativeai.git.
- Navigate to the 6_use_cases/usecases/function-calling-sft-dpo directory.
- Launch the run_training_job.ipynb notebook with a Python 3.12 or higher version kernel.
Dataset preparation
Choosing and creating the right dataset is an important first step in fine-tuning foundation models (FMs). This example uses the When2Call dataset published by NVIDIA, a benchmark designed to evaluate tool-calling decision-making for FMs. It includes when to generate a tool call, when to ask follow-up questions, when to indicate that the question can’t be answered with the tools provided, and what to do if the question seems to require tool use but a tool call can’t be made.
The evaluation code and synthetic data generation scripts used to generate the datasets are in NVIDIA’s GitHub repository.
The datasets contain three different parts.
- Dataset for supervised fine-tuning (SFT), which contains 15,000 samples.
from datasets import load_dataset
train_sft_ds = load_dataset("nvidia/When2Call", "train_sft")
train_sft_ds
DatasetDict({
    train: Dataset({
        features: ['tools', 'messages'],
        num_rows: 15000
})- Dataset for preference alignment, which uses Direct Preference Optimization (DPO) in this example. This data contains 9,000 samples.
from datasets import load_dataset
train_pref_ds = load_dataset("nvidia/When2Call", "train_pref")
train_pref_ds

DatasetDict({
    train: Dataset({
        features: ['tools', 'messages', 'chosen_response', 'rejected_response'],
        num_rows: 9000
    })
})- The dataset for testing performance has two files: Multi-Choice Question evaluation (mcq) and LLM-as-a-judge (llm_judge), which is a subset of the MCQ evaluation set and can be downloaded as a single DatasetDict.
from datasets import load_dataset
test_ds = load_dataset("nvidia/When2Call", "test")
test_ds

DatasetDict({
    llm_judge: Dataset({
        features: ['uuid', 'source', 'source_id', 'question', 'correct_answer', 'answers', 'target_tool', 'tools', 'orig_tools', 'orig_question', 'held_out_param'],
        num_rows: 300
    })
    mcq: Dataset({
        features: ['uuid', 'source', 'source_id', 'question', 'correct_answer', 'answers', 'target_tool', 'tools', 'orig_tools', 'orig_question', 'held_out_param'],
        num_rows: 3652
    })
})
For this use case, we need to do a bit of preprocessing on the dataset to match the expected formats for TRL’s SFTTrainer and DPOTrainer. To do that, we need to build a system prompt that contains the list of available tools and add the system prompt to the messages lists from the original dataset.
def generate_and_tokenize_prompt(data_point):
    """
    Generates a tool using prompt based on patient information.

    Args:
        data_point (dict): Dictionary containing target and meaning_representation keys

    Returns:
        dict: Dictionary containing the formatted prompt
    """
    full_prompt = f"""
    You are a helpful assistant with access to the following tools or function calls. Your task is to produce a sequence of tools or function calls necessary to generate response to the user utterance. Use the following tools or function calls as required:
    {data_point["tools"]}
    """
    return {"system_prompt": full_prompt.strip()}

dstrain_sft = dstrain_sft.map(
    generate_and_tokenize_prompt,
    batched=False

convos=[]
for mess, sys in zip(dstrain_sft['train']['messages'], dstrain_sft['train']['system_prompt']):
    message = {
        "content": f"{sys}",
        "role": "system"
    }
    convos.append([message, mess[0], mess[1]])
dstrain_sft = dstrain_sft.rename_column("messages", "messages_1")
dstrain_sft['train'] = dstrain_sft['train'].add_column("messages", convos)
In addition to what we did for SFT, we need to prepare the data for DPO. The DPOTrainer from TRL accepts a specific format that includes columns labeled as chosen and rejected in addition to messages, so we need to create the messages column and rename chosen_response and rejected_response.
ds_train_pref = ds_train_pref.map(
    generate_and_tokenize_prompt,
    batched=False

ds_train_pref = ds_train_pref.rename_column("chosen_response", "chosen")
ds_train_pref = ds_train_pref.rename_column("rejected_response", "rejected")
Now, save the SFT and DPO datasets in Amazon Simple Storage Service (Amazon S3) to make them available for training.
# save train_dataset to s3 using our SageMaker session
input_path = f's3://{sagemaker_session.default_bucket()}/datasets/nvidia_function_calling'

# Save datasets to s3
# We will fine tune only with 20 records due to limited compute resource for the workshop
dstrain_sft["train"].to_json(f"{input_path}/train/dataset.json", orient="records")
sft_dataset_s3_path = f"{input_path}/train/dataset.json"
ds_train_pref["train"].to_json(f"{input_path}/pref/dataset.json", orient="records")
perf_dataset_s3_path = f"{input_path}/pref/dataset.json"
# ds_train_pref["train"].to_json(f"{input_path}/pref/dataset.json", orient="records")
# perf_dataset_s3_path = f"{input_path}/pref/dataset.json"
print(f"Training data uploaded to:")
print(sft_dataset_s3_path)
print(f"DPO data uploaded to:")
print(perf_dataset_s3_path)
print(f"https://s3.console.aws.amazon.com/s3/buckets/{sagemaker_session.default_bucket()}/?region={sagemaker_session.boto_region_name}&prefix={input_path.split('/', 3)[-1]}/")
Supervised fine-tuning (SFT) on the base model
The following example demonstrates how to fine-tune the Qwen3-1.7B model. The repository contains the recipe in the scripts directory, where you can modify the base model and training parameters for SFT. This example uses a Spectrum-based fine-tuning recipe, but you can also use other PEFT techniques like LoRA or QLoRA.
The recipe contains the configuration for the model and training parameters:
# Model arguments
model_name_or_path: Qwen/Qwen3-1.7B
tokenizer_name_or_path: Qwen/Qwen3-1.7B
model_revision: main
torch_dtype: bfloat16
attn_implementation: flash_attention_2
bf16: true
tf32: true
output_dir: /opt/ml/model/Qwen3-1.7B-function-calling

# Dataset arguments
dataset_id_or_path: /opt/ml/input/data/dataset/dataset.json
max_seq_length: 2048
packing: true

# Spectrum arguments
spectrum_config_path: /opt/ml/input/data/code/spectrum-layer/snr_results_Qwen-Qwen3-1.7B_unfrozenparameters_50percent.yaml

# Training arguments
num_train_epochs: 10
per_device_train_batch_size: 4
gradient_accumulation_steps: 2
gradient_checkpointing: true
gradient_checkpointing_kwargs:
  use_reentrant: true
learning_rate: 5.0e-5
lr_scheduler_type: cosine
warmup_ratio: 0.1

# Logging arguments
logging_strategy: steps
logging_steps: 5
report_to:
- wandb
save_strategy: "no" # "epoch"
seed: 42

# Hugging Face Hub
push_to_hub: false
# hub_model_id: # if not defined same as output_dir
hub_strategy: every_save
Create a training job with SageMaker AI ModelTrainer
Next, we use a SageMaker AI training job to spin up a training cluster and run the model fine-tuning. The SageMaker AI Python SDK ModelTrainer APIs run training jobs on fully managed infrastructure, handling environment setup, scaling, and artifact management. By using ModelTrainer, you can specify training scripts, input data, and compute resources without manually provisioning servers.
First, configure the training environment:
from sagemaker.config import load_sagemaker_config
configs = load_sagemaker_config()
from sagemaker.modules.train import ModelTrainer
from sagemaker.modules.configs import Compute, SourceCode, InputData, StoppingCondition, CheckpointConfig
env = {}
env["FI_PROVIDER"] = "efa"
env["NCCL_PROTO"] = "simple"
env["NCCL_SOCKET_IFNAME"] = "eth0"
env["NCCL_IB_DISABLE"] = "1"
env["NCCL_DEBUG"] = "WARN"
env["HF_token"] = os.environ['hf_token'] #required for gated models, can be omitted for others
env["data_location"] = sft_dataset_s3_path
To enable experiment tracking in MLflow, supply the MLflow tracking server ARN to the job.
# MLflow tracker
tracking_server_arn = ""
env["MLFLOW_TRACKING_ARN"] = tracking_server_arn
The Compute section of the training setup determines the infrastructure requirements for training. In the SourceCode section, we define the local paths to code that will be imported into the training job.
compute = Compute(
    instance_count=1,
    instance_type= "ml.p4d.24xlarge",
    volume_size_in_gb=96,
    keep_alive_period_in_seconds=3600,
)

source_code = SourceCode(
    source_dir="./scripts",
    requirements="requirements.txt",
    entry_script="run_training_sft.sh",
)
The following is the directory structure for fine-tuning on SageMaker AI training jobs. We also provide the requirements.txt file in the scripts directory, which ModelTrainer automatically detects and installs the listed dependencies at runtime. For advanced scenarios such as disabling build isolation, you can provide a bash script as the entry point to run shell commands prior to starting training.
scripts/
├── accelerate_configs/ # Accelerate configuration files
├── run_training_sft.sh # Launch script for distributed training with Accelerate on SageMaker training jobs
├── run_training_dpo.sh # Launch script for distributed training with Accelerate on SageMaker training jobs
├── run_sft.py # Main training script for supervised fine-tuning (SFT)
├── run_dpo.py # Main training script for Direct
関連記事
今日のまとめ
AI日報で今日の重要ニュースをまとめ読み