AgentCore Gateway を用いた MCP クライアント向けの安全な認証コードフロー構築
AWS は、Kiro IDE などのエージェント型コーディングアシスタントがエンタープライズ環境の MCP サーバーに安全にアクセスできるよう、AgentCore Gateway を介した OAuth 認証コードフローの実装ガイドを提供している。
キーポイント
AgentCore Gateway のセキュリティ機能強化
Amazon Bedrock AgentCore のゲートウェイが MCP リソースサーバーとして機能し、AI エージェントからのリクエストに対するインバウンド認証を中央集権的に管理する仕組みを解説している。
OAuth 認証コードフローの実装
IdP(Okta, Microsoft Entra ID, Cognito など)から発行されたトークンを用いて、エージェントと MCP サーバー間の通信を検証する具体的な構成手順を示している。
Kiro IDE などのクライアントとの統合
Kiro Integrated Development Environment といった最新の AI コーディングアシスタントを、組織のアイデンティティプロバイダと連携させるための実用的なセットアップ例を提供している。
エンタープライズ向け安全なエージェント運用
開発者がリモートツールを利用する際にも、厳格な身元確認と権限管理を適用することで、企業環境での AI エージェントの生産的かつ安全な導入を可能にする。
重要な引用
Amazon Bedrock AgentCore is a fully managed service that helps you deploy, manage, and scale AI agents in production.
When an AI assistant makes a request to an MCP server through the Gateway, that request must be verified before it's processed.
This post demonstrates how to implement Open Authorization (OAuth) Code flow as an inbound authorization mechanism for MCP servers hosted on Amazon Bedrock AgentCore Gateway.
影響分析・編集コメントを表示
影響分析
この記事は、AI エージェントが企業システムと直接連携する際のセキュリティ課題に対する標準的な解決策を示しており、MCP プロトコルの普及に伴う実運用の安全性を担保する重要な指針となる。AWS の AgentCore を活用することで、開発者は複雑な認証ロジックを自作せずとも、信頼性の高いアイデンティティ管理基盤を即座に構築できるため、エンタープライズ AI 導入の障壁を下げる効果がある。
編集コメント
AI エージェントが企業インフラと安全に連携するための標準的な認証パターンを、AWS の具体的なサービス構成で示した非常に実用的な技術記事です。MCP プロトコルの普及に伴い、セキュリティ設計の重要性が高まる中、即座に適用可能なアーキテクチャ例として注目すべき内容です。
現代の開発ワークフローにおいて、開発者は Kiro Integrated Development Environment (IDE) などのエージェント型コーディングアシスタントをますます活用し、リモートツールやサービスと対話しています。しかし、組織ではこれらのエージェント型コーディングアシスタントとエンタープライズ Model Context Protocol (MCP) サーバー間で安全なアイデンティティ検証アクセスを提供するために、堅牢な認証メカニズムを必要としています。
Amazon Bedrock AgentCore は、本番環境で AI エージェントのデプロイ、管理、スケーリングを支援するフルマネージドサービスです。その主要コンポーネントの一つである AgentCore Gateway は、エージェントからツールへの通信をルーティングおよび保護するための集中型エントリーポイントを提供します。AI アシスタントが Gateway を介して MCP サーバーにリクエストを送信する場合、そのリクエストは処理される前に検証されなければなりません。これを*インバウンド認証*と呼びます。許可されたユーザーとエージェントのみが、MCP サーバーによって公開されているツールやサービスにアクセスできます。組織では通常、Okta、Microsoft Entra ID、Amazon Cognito などのアイデンティティプロバイダー(IdP)を通じてユーザーのアイデンティティを管理しており、これらがユーザーの認証を行い、本人確認を行うセキュリティトークンを発行します。
本記事では、Amazon Bedrock AgentCore Gateway にホストされた MCP サーバーに対するインバウンド認証メカニズムとして、Open Authorization (OAuth) コードフローを実装する方法を示します。このガイドの終了時には、組織の ID プロバイダーから発行された有効なユーザーアイデンティティトークンによって各 AI アシスタントのリクエストが認証される、本番環境で利用可能なセットアップが完成します。
学習内容
- MCP リソースサーバーとして AgentCore Gateway と連携する Auth コードフローの仕組み。
- 組織の ID プロバイダー(Identity Provider)の手順別設定方法。
- AgentCore Gateway のインバウンド認証セットアップ。
- Kiro IDE クライアントとの統合方法。
ソリューション概要
インバウンド認証コードフロー OAuth セットアップにおいて、AgentCore Gateway は AI クライアントがツールにアクセスする前に有効なアイデンティティトークンの存在を要求する*MCP リソースサーバー*として機能します。
以下の図は、ID プロバイダー、AI クライアント、および MCP サーバー間の相互作用を含む、AgentCore Gateway を用いた認証コードフローの全体アーキテクチャを示しています。
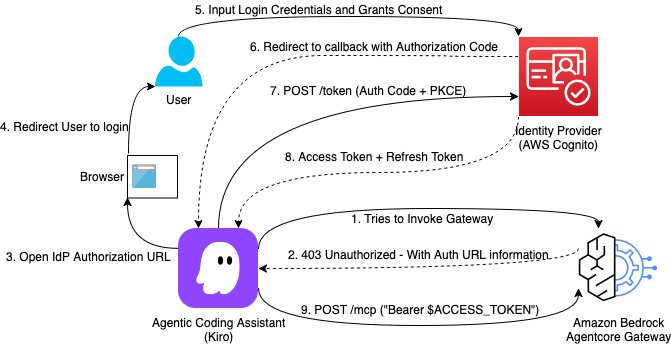
*図 1: 認証コードフローアーキテクチャ図。
主要コンポーネント
本ソリューションでは、認証フローを完了させるために以下のコンポーネントが連携して動作します:
- アイデンティティプロバイダー (IdP): ユーザー認証を管理し、トークンを発行します。前述の図では Amazon Cognito が参照されていますが、これは組織独自の IdP でも構いません。
- ユーザー: IdP を通じて認証を行うエンドユーザーであり、各リクエストに対してその身元が検証されます。
- Amazon Bedrock AgentCore Gateway: OAuth リソースサーバーとして機能し、トークンの検証を行い、MCP サーバーへのリクエストをプロキシします。
- エージェント型コーディングアシスタント: Kiro IDE であり、OAuth クライアントとして動作して認証フローを管理します。
- MCP サーバー: AI アシスタントがアクセスする必要があるバックエンドのツールおよびサービスです。
- MCP OAuth プロキシ (オプション): エージェント型コーディングアシスタント、IdP、MCP サーバー間の仕様標準化のギャップを埋める役割を果たします。MCP OAuth プロキシは、認可コードフローをサポートする標準化をもたらします。
受信側認可コードフロー
このフローにより、AI アシスタントが MCP サーバーに送信するすべてのリクエストが、ユーザーに属する有効なアイデンティティトークンによって認証されることが保証されます。
- MCP クライアント接続 – エージェント型コーディングアシスタント(例:Kiro IDE)が、AgentCore Gateway の MCP エンドポイントへの接続を開始します。
- 認証チャレンジ – Gateway はリクエストに有効なトークンが含まれていないことを検知し、www-authenticate ヘッダーを含む HTTP 401 を返します。このヘッダーは Gateway の OAuth Protected Resource Metadata エンドポイント(.well-known/oauth-protected-resource)を指しており、これは MCP 仕様の Protected Resource Metadata (PRM) パターンに従っています。
- ディスカバリー – MCP クライアントは Gateway から Protected Resource Metadata を取得し、Gateway は IdP の認証サーバーディスカバリ URL(例:https://{yourIdPDomain}/oauth2/default/.well-known/openid-configuration)を返します。
- ユーザーリダイレクト – MCP クライアントはユーザーのシステムブラウザを開き、PKCE チャレンジと共に IdP の認可エンドポイントへリダイレクトし、設定されたスコープ(例:openid profile email offline_access)を要求します。
- ユーザー認証と同意 – ユーザーは IdP のログインページで資格情報を入力します。IdP はユーザーの身元を確認し、アプリケーションへの権限付与に関する同意を求めます。
- 認可コードグラント – 承認後、IdP はユーザーのブラウザをクライアントのローカルコールバック URL(クライアントのローカルリスナーによって管理される)へリダイレクトし、認可コードを含めます。
- トークン交換リクエスト – MCP クライアントは、PKCE コード検証子と共に認可コードを IdP のトークンエンドポイントへ送信します。
- トークン発行 – IdP は認可コードと PKCE 検証子を検証し、アクセストークン(およびオプションでリフレッシュトークン)を MCP クライアントに返します。
- 認証済み MCP リクエストと検証 – MCP クライアントは、すべての後続のリクエストにおいて Authorization ヘッダーにアクセストークンを含めます。Gateway はトークンの署名、有効期限、発行者、およびオーディエンスまたはカスタムクレームを検証し、その後リクエストをターゲットの MCP サーバーへプロキシして実行します。
*図 2:認可コードフローのリクエストシーケンス。*
設定の概要
以下の表は、認可コードフローの設定に必要な各コンポーネントの設定を要約したものです。詳細な手順については、「技術的実装」セクションで順を追って説明します。
| コンポーネント | 必要な設定 |
|---|---|
| 1. ID プロバイダー (Identity provider) | 認可コードとリフレッシュトークンのグラントを有効にした OpenID Connect (OIDC) ウェブアプリケーションを作成してください。 |
| 2. AgentCore Gateway | 入力の認証に JWT を設定します。ディスカバリー URL を ID プロバイダーの発行者 (例:https://{yourIdPDomain}/oauth2/default/.well-known/openid-configuration) に設定してください。 |
| 3. Kiro IDE | 「設定」>「コネクタ」(または CLI を介して) でゲートウェイ URL を追加します。ゲートウェイが正しい認証ヘッダー付きで 401 Unauthorized を返した場合、クライアントは自動的に OAuth フローを開始します。 |
技術的実装
アーキテクチャとフローが確立されたので、各コンポーネントを設定してください。このセクションでは、設定の概要表で言及されている 3 つのコンポーネントに対する手順を順を追って提供します。
- アイデンティティプロバイダー:OIDC アプリケーションを登録し、認可付与タイプ、リダイレクト URI、およびトークン設定を設定します。
- AgentCore Gateway: JWT ベースのインバウンド認証を有効にし、IdP のディスカバリエンドポイントにポイントを指定します。
- MCP クライアント (Kiro IDE): クライアントを Gateway URL に接続し、エンドツーエンドの OAuth フローを検証します。
前提条件
この手順に従うには、以下の前提条件が整っている必要があります。
- AgentCore Gateway がデプロイされた AWS アカウント。
- アプリケーションの設定権限を持つアイデンティティプロバイダー (IdP)(例:Amazon Cognito、Okta、Auth0、またはその他のエンタープライズ ID プロバイダー)。
- MCP OAuth プロキシ。
- ローカルにインストールされた Kiro IDE。
- OAuth 2.0 フローに関する基本的な理解。
ステップ 1: 組織のアイデンティティプロバイダーの設定
このステップでは、組織のアイデンティティプロバイダーで OIDC アプリケーションを登録し、PKCE をサポートするコード認可フローに対応するように設定します。
1.1 OIDC アプリケーションの作成
IdP の管理コンソールにサインインし、新しい OIDC/OAuth 2.0 アプリケーション統合を作成します:
- サインイン方法:OIDC。
- アプリケーションタイプ:Web アプリケーション。
- 名前:AgentCore Gateway client(またはお好みの名称)。
1.2 認可付与タイプの設定
以下の認可付与タイプを有効にします:
- 認可コード (Authorization Code)。
- リフレッシュトークン (Refresh Token)。
1.3 リダイレクト URI の設定
AI クライアントが使用するコールバック URL を追加します:
http://localhost:PORT/callback
PORT を、お使いの クライアントで使用しているポート に置き換えてください。
1.4 トークン設定の設定
IdP アプリケーションの設定で、以下の操作を行ってください。
トークンの有効期間:
- アクセストークンの有効期間: 1 時間(推奨)。
- リフレッシュトークンの有効期間: 90 日(セキュリティ要件に応じて調整してください)。
-ID トークンの有効期間: 1 時間。
1.5 設定値の記録
以下の値を保存してください。Gateway の設定に必要になります:
- クライアント ID: アプリケーションの「一般」タブに記載されています(Kiro IDE クライアントの設定に必要)。
- イシューア URL: お使いの IdP のイシューア URL(例:https://{yourIdPDomain}/oauth2/default)。
- 発見 URL: お使いの IdP の OpenID Connect 発見エンドポイント(例:https://{yourIdPDomain}/oauth2/default/.well-known/openid-configuration)。
本設定における注意点:
- クライアントシークレットは不要です – このフローでは PKCE(Proof Key for Code Exchange)を使用しており、デスクトップアプリケーションなどのパブリッククライアント向けに設計されています。Kiro IDE ではクライアントシークレットは必要とされず、使用もされません。
- クライアント設定に IdP エンドポイントを含めない – Kiro IDE は、発見 URL を返す Gateway から OAuth エンドポイントを自動的に発見します。IdP の URL を直接クライアントで構成する必要はありません。
ステップ 2: AgentCore Gateway の設定
ID プロバイダーの設定が完了したら、次のステップは AgentCore Gateway を ID プロバイダー(IdP)に接続し、受信したトークンの検証を行えるようにすることです。
2.1 入力認証モードの設定
Gateway を構成して、IdP のディスカバリーエンドポイントを使用した JWT ベースの認証を利用するように設定します:
# 例:Gateway 設定(デプロイ方法に応じて調整してください)
aws agentcore update-gateway \
--gateway-id \
--inbound-auth-type JWT \
--jwt-discovery-url "https://{yourIdPDomain}/oauth2/default/.well-known/openid-configuration" \
--region
2.2 カスタムクレーム検証
AgentCore Gateway は、標準的な OAuth 2.0 クレームに基づいて JWT トークンを検証し、異なる IdP の実装に対応するためにカスタムクレーム検証をサポートしています。Gateway では、トークンに以下の項目が含まれていることを期待します:
- 標準クレーム: iss(発行者)、aud(聴衆)、exp(有効期限)、iat(発行時刻)、client_id(クライアント ID)、および scopes(許可されたスコープ)。
- クライアント識別: Gateway は、IdP に応じてさまざまなクレームを通じてクライアントの身元を検証できます。
他の IdP では、クライアント識別やスコープなどに異なるクレーム名を使用する場合があります(例:cid, azp, scp)。Gateway でカスタムクレーム検証を設定し、IdP のトークン構造に一致させることができます:
- カスタムクレーム:EQUALS(AgentCore Gateway の JWT セットアップを参照)。
- 例:cid EQUALS 0oaz7147z771FZmdQ697(Okta など cid を使用する IdP の場合)。
これにより、トークンが特定のアプリケーション向けに発行されたものであることが検証されます。
注記: カスタムクレームによる検証を使用する場合、ゲートウェイの「許可されたオーディエンス」フィールドは空のままにしておくことができます。カスタムクレームチェックによって必要なクライアントID検証が提供されます。
2.3 ゲートウェイのトークン検証を理解する
これでゲートウェイに IdP のディスカバリー URL とクレームルールを設定したので、ランタイム時にゲートウェイが入力されたトークンをどのように検証するかを見てみましょう。
AgentCore Gateway は、ユーザーが OAuth トークンを取得した方法に依存しないように設計されています。ゲートウェイは、以下のいずれかの手段で取得されたトークンの区別を行いません:
- クライアント認証情報フロー(アプリケーションが直接認証を行う)。
- 認可コードフロー(ユーザーが明示的に認証し、同意を与える)。
ゲートウェイが要求する唯一の条件は、リクエストに提示される OAuth トークンが、ゲートウェイ設定時に構成されたパラメータに基づいて有効であることです。
- トークンの署名:IdP のディスカバリー URL から取得した公開鍵に対して検証されます。
- トークンの有効期限:トークンが期限切れになっていないことを検証します。
- 発行者 (iss クレーム):期待される IdP 発行者と一致しているか確認します。
- オーディエンスまたはカスタムクレーム:この特定のゲートウェイまたはアプリケーションに対して発行されたトークンであることを検証します。
- 標準的な OAuth クレーム:iat、exp など必要なクレームが存在するかチェックします。
ユーザーがクライアント認証フロー、認可コードフロー、その他の OAuth グラントタイプを通じてトークンを取得するかどうかに関わらず、ゲートウェイはすべてのトークンを同等に扱います。ゲートウェイ設定で構成された検証チェックをパスすれば、リクエストは承認されます。この柔軟性により、使用ケースに適した認証フローを選択しつつ、ゲートウェイレベルで一貫したセキュリティを維持することができます。
2.4 ゲートウェイ設定の検証
ゲートウェイエンドポイントがアクセス可能であり、認証を必要とするかテストします:
# 実際の MCP リクエストによる認証テスト (認証トークンなしで POST)
curl -i -X POST https:///mcp \
-H "Content-Type: application/json" \
-d '{"jsonrpc":"2.0","method":"initialize","params":{},"id":1}'
以下のレスポンスは、認証が適切に設定されていることを確認します (未認証の MCP リクエストに対して 401 レスポンスが返されること):
認証が必要であることを示す予想されるレスポンス:
HTTP/2 401
www-authenticate: Bearer resource_metadata="https:///.well-known/oauth-protected-resource"
{"jsonrpc":"2.0","id":0,"error":{"code":-32001,"message":"Missing Bearer token"}}
ステップ 3: MCP OAuth プロキシ
本記事の目的のため、MCP クライアントインターフェースを標準化し、認証コードフローを完了させるために mcp-remote を使用します。
3.1 mcp-remote パッケージのインストール
Kiro IDE の MCP クライアントとゲートウェイの OAuth で保護されたエンドポイントをブリッジするために mcp-remote を使用します。
注: mcp-remote は動作する概念実証(PoC)であり、実験的なものとして扱うべきです。
npm install -g mcp-remote
ステップ 4: AI クライアント (Kiro IDE) の設定
ゲートウェイと MCP OAuth プロキシが設定されたことで、最終的な設定ステップは、AI クライアントをゲートウェイエンドポイントに接続することです。Kiro IDE は OAuth フローを自動的に処理します。ゲートウェイから 401 チャレンジを受け取ると、IdP(ID プロバイダー)との認証コードフローを開始します。
4.1 Kiro IDE の設定
ゲートウェイを MCP 設定ファイル ~/.kiro/settings/mcp.json に追加します:
{
"mcpServers": {
"gateway-tools": {
"command": "mcp-remote",
"args": [
"https:///mcp",
"",
"--static-oauth-client-info",
"{\"client_id\": \"\", \"redirect_uris\": [\"http://localhost:/oauth/callback\"], \"scope\": \"openid profile email offline_access\"}"
]
}
}
}
設定パラメータ:
- command: mcp-remote を使用してリモート MCP サーバーに接続します (mcp-remote)。
- 第1引数:/mcp パスを含むゲートウェイ URL です。
- 第2引数:OAuth コールバック用のローカルポート(例:3334)です。
- --static-oauth-client-info: 以下の情報を含む JSON ストリング:
client_id: IdP アプリケーションのクライアント ID です。
- redirect_uris: 第2引数で指定されたポートと一致している必要があります。
- scope: 基本認証には openid, profile, email, offline_access を含めます。
4.2 認証フローのテスト
ゲートウェイ接続を追加した後、認証フローが正常に完了したことを確認してください:
- AI クライアントを再起動します。
- ゲートウェイからツールを使用しようとしてください。
- IdP ログインのためにブラウザへリダイレクトされます。
- 認証に成功すると、ツールが実行されます。
ステップ 5:
原文を表示
In modern development workflows, developers increasingly rely on agentic coding assistants such as Kiro Integrated Development Environment (IDE) to interact with remote tools and services. However, organizations require robust authentication mechanisms to provide secure, identity-verified access between these agentic coding assistants and enterprise Model Context Protocol (MCP) servers.
Amazon Bedrock AgentCore is a fully managed service that helps you deploy, manage, and scale AI agents in production. One of its key components, the AgentCore Gateway, provides a centralized entry point for routing and securing agent-to-tool communications. When an AI assistant makes a request to an MCP server through the Gateway, that request must be verified before it’s processed. This is known as *inbound authentication*. Only authorized users and agents can access the tools and services exposed by the MCP server. Organizations typically manage user identities through an identity provider (IdP), such as Okta, Microsoft Entra ID, or Amazon Cognito, which authenticates users and issues security tokens that verify who they are.
This post demonstrates how to implement Open Authorization (OAuth) Code flow as an inbound authorization mechanism for MCP servers hosted on Amazon Bedrock AgentCore Gateway. By the end of this guide, you will have a production-ready setup where each AI assistant request is authenticated with a valid user identity token issued from your organization’s identity provider.
What you will learn
- How auth code flow works with AgentCore Gateway as an MCP resource server.
- Step-by-step configuration of your organization’s identity provider.
- AgentCore Gateway inbound authentication setup.
- Integration with Kiro IDE clients.
Solution overview
In an inbound authorization code flow OAuth setup, the AgentCore Gateway acts as an *MCP resource server* that requires a valid identity token before allowing AI clients to access any tools.
The following diagram shows the end-to-end architecture for the authorization code flow with AgentCore Gateway, including the identity provider, AI client, and MCP server interactions.
*Figure 1: Authorization code flow architecture diagram.*
Key components
The solution involves the following components working together to complete the authentication flow:
- Identity provider (IdP): Manages user authentication and issues tokens. The preceding diagram references Amazon Cognito, but it can be your organization’s IdP.
- User: The end user who authenticates with the IdP and whose identity is verified for each request.
- Amazon Bedrock AgentCore Gateway: Acts as the OAuth resource server, validating tokens and proxying requests to MCP servers.
- Agentic coding assistant: Kiro IDE, which acts as the OAuth client and manages the authentication flow.
- MCP server: Your backend tools and services that the AI assistant needs to access.
- MCP OAuth proxy (optional): Helps bridge the gap of spec standardization between agentic coding assistants, IdPs, and MCP servers. An MCP OAuth proxy brings standardization that supports the authorization code flow.
The inbound authorization code flow
This flow makes sure that every request that the AI assistant sends to the MCP server is authenticated with a valid identity token belonging to the user.
- MCP client connection – The agentic coding assistant (for example, Kiro IDE) initiates a connection to the AgentCore Gateway’s MCP endpoint.
- Authentication challenge – The Gateway detects that the request lacks a valid token and responds with an HTTP 401, including a www-authenticate header pointing to the Gateway’s OAuth Protected Resource Metadata endpoint (.well-known/oauth-protected-resource). This follows the MCP specification’s Protected Resource Metadata (PRM) pattern.
- Discovery – The MCP client fetches the Protected Resource Metadata from the Gateway, which returns the IdP’s authorization server discovery URL (for example, https://{yourIdPDomain}/oauth2/default/.well-known/openid-configuration).
- User redirection – The MCP client opens the user’s system browser and redirects to the IdP’s authorization endpoint with a PKCE challenge, requesting the configured scopes (for example, openid profile email offline_access).
- User authentication and consent – The user enters their credentials on the IdP login page. The IdP verifies the user’s identity and prompts for consent to authorize the application.
- Authorization code grant – After approval, the IdP redirects the user’s browser to the client’s local callback URL (managed by the client’s local listener) with an authorization code.
- Token exchange request – The MCP client sends the authorization code along with the PKCE code verifier to the IdP’s token endpoint.
- Token issuance – The IdP validates the authorization code and PKCE verifier, then returns an access token (and optionally a refresh token) to the MCP client.
- Authenticated MCP request and validation – The MCP client includes the access token in the Authorization header for all subsequent requests. The Gateway validates the token’s signature, expiration, issuer, and audience or custom claims, then proxies the request to the target MCP server for execution.
*Figure 2: Authorization code flow request sequence.*
Configuration overview
The following table summarizes the required configuration for each component in the authorization code flow setup. Detailed step-by-step instructions follow in the Technical implementation section.
Component
Required configuration
1
Identity provider
Create an OpenID Connect (OIDC) web application with Authorization Code and Refresh Token grants enabled.
2
AgentCore Gateway
Set inbound authorization to JWT. Configure the discovery URL to your IdP’s issuer (for example, https://{yourIdPDomain}/oauth2/default/.well-known/openid-configuration).
3
Kiro IDE
Add the Gateway URL in Settings > Connectors (or through the CLI). The client automatically triggers the OAuth flow if the Gateway returns a 401 Unauthorized with the correct auth headers.
Technical implementation
With the architecture and flow established, configure each component. This section provides step-by-step instructions for the three components referenced in the configuration overview table:
- Identity provider: Register an OIDC application and configure grant types, redirect URIs, and token settings.
- AgentCore Gateway: Enable JWT-based inbound authorization and point it to your IdP’s discovery endpoint.
- MCP client (Kiro IDE): Connect the client to the Gateway URL and verify the end-to-end OAuth flow.
Prerequisites
You must have the following prerequisites in place to follow along.
- An AWS account with AgentCore Gateway deployed.
- An identity provider (IdP) with permissions to configure an app (for example, Amazon Cognito, Okta, Auth0, or other enterprise identity providers).
- MCP OAuth proxy.
- Kiro IDE installed locally.
- Basic understanding of OAuth 2.0 flows.
Step 1: Configure the organization’s identity provider
In this step, you register an OIDC application with your organization’s identity provider and configure it to support the authorization code flow with PKCE.
1.1 Create an OIDC application
Sign in to your IdP admin console and create a new OIDC/OAuth 2.0 application integration:
- Sign-in method: OIDC.
- Application type: Web application.
- Name: AgentCore Gateway client (or your preferred name).
1.2 Configure grant types
Enable the following grant types:
- Authorization Code.
- Refresh Token.
1.3 Set redirect URIs
Add the callback URL that your AI client will use:
http://localhost:PORT/callbackReplace PORT with the port that your client uses.
1.4 Configure token settings
In your IdP application settings, do the following.
Token lifetimes:
- Access token lifetime: 1 hour (recommended).
- Refresh token lifetime: 90 days (adjust based on your security requirements).
- ID token lifetime: 1 hour.
1.5 Note your configuration
Save the following values. You will need them for Gateway configuration:
- Client ID: Found in the application’s General tab (needed for Kiro IDE client configuration).
- Issuer URL: Your IdP’s issuer URL (for example, https://{yourIdPDomain}/oauth2/default).
- Discovery URL: Your IdP’s OpenID Connect discovery endpoint (for example, https://{yourIdPDomain}/oauth2/default/.well-known/openid-configuration).
For this configuration:
- No client secret required – This flow uses PKCE (Proof Key for Code Exchange), which is designed for public clients like desktop applications. The client secret is not needed or used by Kiro IDE.
- No IdP endpoints in client config – Kiro IDE discovers the OAuth endpoints automatically from the Gateway, which returns the discovery URL. You don’t configure IdP URLs directly in the client.
Step 2: Configure AgentCore Gateway
With your identity provider configured, the next step is to connect AgentCore Gateway to your IdP so it can validate incoming tokens.
2.1 Set inbound authorization mode
Configure your Gateway to use JWT-based authentication with your IdP’s discovery endpoint:
# Example Gateway configuration (adjust based on your deployment method)
aws agentcore update-gateway \
  --gateway-id  \
  --inbound-auth-type JWT \
  --jwt-discovery-url "https://{yourIdPDomain}/oauth2/default/.well-known/openid-configuration" \
  --region
2.2 Custom claim validation
AgentCore Gateway validates JWT tokens based on standard OAuth 2.0 claims and supports custom claim validation to accommodate different IdP implementations. The Gateway expects tokens to contain:
- Standard claims: iss (issuer), aud (audience), exp (expiration), iat (issued at), client_id (client identity), and scopes (allowed scopes).
- Client identification: The Gateway can validate client identity through various claims depending on your IdP.
Other IdPs might use different claim names for client identification, scopes, and so on (for example, cid, azp, scp). You can configure custom claim validation in your Gateway to match your IdP’s token structure:
- Custom claim: EQUALS (see AgentCore Gateway: Set up a JWT).
- Example: cid EQUALS 0oaz7147z771FZmdQ697 (for IdPs that use cid, like Okta).
- This validates that the token was issued for your specific application.
Note: The Gateway’s Allowed audience field can be kept empty when using custom claim validation. The custom claim check provides the necessary client identity verification.
2.3 Understand Gateway token validation
Now that the Gateway is configured with your IdP’s discovery URL and claim rules, look at how it validates incoming tokens at runtime.
AgentCore Gateway is designed to be agnostic to how the OAuth token was obtained by the user. The Gateway doesn’t distinguish between tokens acquired through the following:
- Client credentials flow, where the application authenticates directly.
- Authorization code flow, where the user explicitly authenticates and grants consent.
The Gateway only requires that the OAuth token presented in the request is valid based on the parameters configured during Gateway setup:
- Token signature: Verified against the public keys from the IdP’s discovery URL.
- Token expiration: Validates the token hasn’t expired.
- Issuer (iss claim): Matches the expected IdP issuer.
- Audience or custom claims: Validates the token was issued for this specific Gateway or application.
- Standard OAuth claims: Checks required claims like iat, exp, and so on.
Whether users obtain tokens through a client credentials flow, authorization code flow, or other OAuth grant type, the Gateway treats all tokens equally. As long as the token passes the validation checks configured in your Gateway setup, the request is authorized. With this flexibility, you can choose the authentication flow that fits your use case while maintaining consistent security at the Gateway level.
2.4 Verify Gateway configuration
Test that your Gateway endpoint is accessible and requires authentication:
# Test authentication with an actual MCP request (POST without auth token)
curl -i -X POST https:///mcp \
  -H "Content-Type: application/json" \
  -d '{"jsonrpc":"2.0","method":"initialize","params":{},"id":1}'
The following response confirms that authentication is properly configured (a 401 response to unauthenticated MCP requests):
# Expected response showing authentication is required:
HTTP/2 401
www-authenticate: Bearer resource_metadata="https:///.well-known/oauth-protected-resource"
{"jsonrpc":"2.0","id":0,"error":{"code":-32001,"message":"Missing Bearer token"}}
Step 3: MCP OAuth proxy
For the purpose of this post, use mcp-remote to standardize the MCP client interface and complete the authorization code flow.
3.1 Install the mcp-remote package
Use mcp-remote to bridge Kiro IDE’s MCP client with the Gateway’s OAuth-protected endpoint.
Note: mcp-remote is a working proof-of-concept and should be considered experimental.
npm install -g mcp-remoteStep 4: Configure the AI client (Kiro IDE)
With the Gateway and MCP OAuth proxy configured, the final configuration step is connecting your AI client to the Gateway endpoint. Kiro IDE handles the OAuth flow automatically. When it receives a 401 challenge from the Gateway, it initiates the authorization code flow with your IdP.
4.1 Configure Kiro IDE
Add the Gateway to your MCP configuration file at ~/.kiro/settings/mcp.json:
{
  "mcpServers": {
    "gateway-tools": {
      "command": "mcp-remote",
      "args": [
        "https:///mcp",
        "",
        "--static-oauth-client-info",
        "{\"client_id\": \"\", \"redirect_uris\": [\"http://localhost:/oauth/callback\"], \"scope\": \"openid profile email offline_access\"}"
      ]
    }
  }
}
Configuration parameters:
- command: Use mcp-remote to connect to remote MCP servers (mcp-remote).
- First arg: Your Gateway URL with the /mcp path.
- Second arg: Local port for the OAuth callback (for example, 3334).
- --static-oauth-client-info: JSON string containing:
client_id: Your IdP application client ID.
- redirect_uris: Must match the port specified in the second arg.
- scope: Include openid profile email offline_access for basic auth.
4.2 Test the authentication flow
After adding the Gateway connection, verify that the authentication flow completes successfully:
- Restart your AI client.
- Attempt to use a tool from the Gateway.
- You’re redirected to your browser for IdP login.
- After successful authentication, the tool runs.
Step 5:
関連記事
今日のまとめ
AI日報で今日の重要ニュースをまとめ読み