FastAPI クラウドへの最初のアプリデプロイ方法
KDnuggets は、FastAPI の急速な普及と AI プロジェクトでの利用拡大を背景に、待機リスト制度下にある新プラットフォーム「FastAPI Cloud」を用いた最初のアプリのデプロイ手順を解説したチュートリアル記事を公開しました。
キーポイント
FastAPI の進化と FastAPI Cloud の登場
FastAPI は単なる API ライブラリから、AI・機械学習プロジェクトを支えるエコシステムへと成長しており、新プラットフォーム「FastAPI Cloud」によりサーバー設定なしで数秒でのデプロイが可能になりました。
具体的なチュートリアル内容
記事では、金・銀価格を API から取得し JSON 形式で返すライブメタルダッシュボードの作成例を通じて、プロジェクト構築からデプロイまでの実装手順を段階的に示しています。
必要な環境とセットアップ
開発には「uv」によるプロジェクトスケーフォールディングまたは最新 Python バージョンが必要であり、まずは FastAPI Cloud のアカウント取得(待機リスト経由)が必須条件となります。
依存関係の追加
アプリの実行に必要な httpx パッケージと FastAPI の標準エクストラを 'uv add' コマンドを使用してインストールします。
デフォルトアプリの置換
main.py ファイルの内容を、外部 API からリアルタイムの金・銀価格を取得し、ブラウザで自動更新されるダッシュボードを表示するカスタムコードに置き換えます。
動的価格取得とAPI設計
非同期関数を使用してXAU(金)とXAG(銀)のリアルタイム価格を取得し、構造化されたJSON形式で提供します。
レスポンシブなダッシュボードUIの実装
組み込みのHTML/CSSを使用して、グリッドレイアウトとダークモード対応のカードデザインを持つ直感的な価格表示画面を構築しています。
重要な引用
FastAPI has grown far beyond being just a simple Python library for serving APIs.
Instead of spending time configuring servers and deployment pipelines, you can deploy an application in seconds using the FastAPI Cloud command-line interface (CLI).
At the time of writing, access is still rolling out through a waitlist.
This command adds httpx for making outbound API requests and installs the standard FastAPI dependencies commonly needed for development and deployment.
Open main.py and replace its contents with the custom code shown below. This version does two things: it fetches live gold and silver prices from the Gold API, and it serves a simple browser dashboard that refreshes automatically every 15 seconds.
Prices refresh automatically every 15 seconds.
影響分析・編集コメントを表示
影響分析
この記事は、FastAPI の開発者体験をさらに向上させる新プラットフォームの導入を通知するものであり、特に AI モデルやデータパイプラインを迅速にプロダクション環境へ展開したいエンジニアにとって有用な情報です。ただし、サービスがまだ待機リスト段階であるため、即座に大規模な採用には至らないものの、今後の FastAPI エコシステムの成熟を示す重要な指標となります。
編集コメント
FastAPI のデプロイ体験を革新する新プラットフォームの登場は、AI プロジェクトの迅速な実装ニーズに応える重要な一歩です。ただし、現時点ではアクセス制限があるため、開発者は待機リストへの登録を検討すべきでしょう。
# イントロダクション
FastAPI は、単に API を提供するためのシンプルな Python ライブラリという枠を超え、特に AI や機械学習プロジェクトにおいて現代の Web アプリケーションを構築するために多くの開発者が依存するより広範なエコシステムへと成長しました。FastAPI がこれほど人気になった理由の一つは、その速度、シンプルさ、そして開発者フレンドリーなデザインです。
 image**
画像提供:FastAPI Cloud
現在、FastAPI Cloud により、デプロイ体験もさらに容易になっています。サーバーやデプロイパイプラインの構成に時間を費やす代わりに、FastAPI Cloud のコマンドラインインターフェース(CLI)を使用して、数秒でアプリケーションをデプロイできます。セットアップは直感的で軽量であり、現代のマネージドプラットフォームから開発者が期待するスムーズな体験に非常に近いです。
執筆時点では、アクセス権はまだウェイトリストを通じて段階的に付与されています。私は数ヶ月前に応募し、最近アクセス権を得たため、私の経験に基づいたシンプルなガイドを作成することにしました。このチュートリアルでは、基本的なセットアッププロセスを解説し、わずか数ステップで小さな FastAPI アプリケーションをデプロイする方法を示します。
# プロジェクトの作成
**
このチュートリアルでは、FastAPI を使用してシンプルなライブ金属ダッシュボードを構築します。アプリは API から金と銀の価格を取得し、データを JSON 形式で返すとともに、小さな HTML インターフェースを使用してブラウザ上で値を表示します。
始める前に、以下の準備を確認してください:
- プロジェクトのスケーフォールディングには uv をインストールするか、サポートされている最新の Python バージョンを用意してください。
- FastAPI Cloud のアカウントを保有していること。
開始するには、公式のセットアップコマンドを使用して新しい FastAPI プロジェクトを作成します:
uvx fastapi-new metals-live
cd metals-live
数秒以内に、FastAPI がプロジェクト構造を生成し、必要な依存関係を自動的にインストールします。
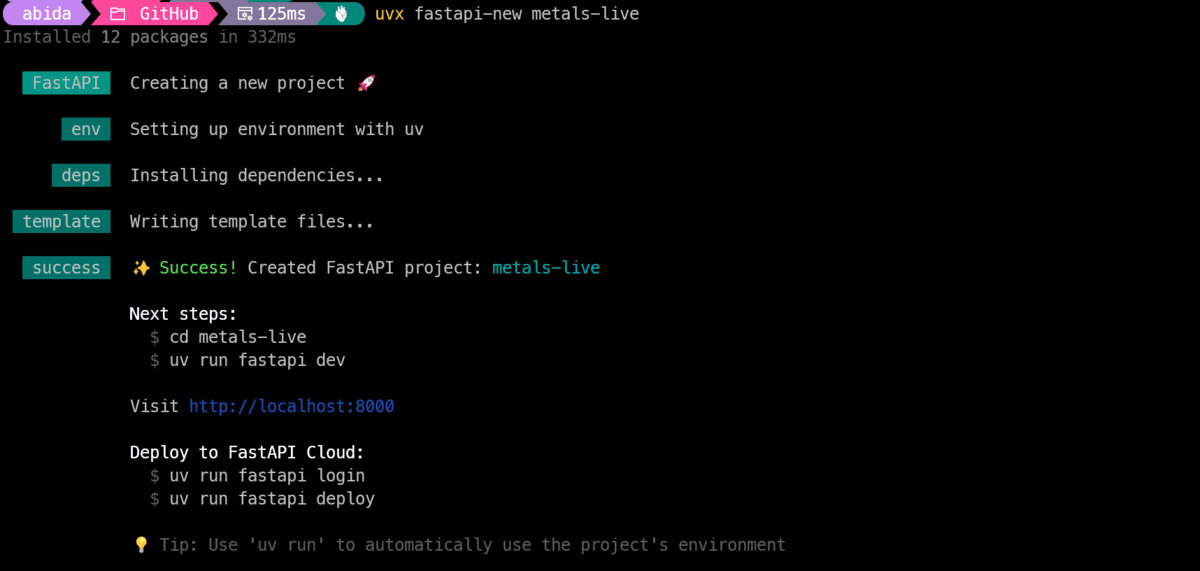
画像提供:著者
次に、プロジェクトディレクトリ内の仮想環境をアクティブ化します。
Linux/macOS の場合:
source .venv/bin/activate
Windows PowerShell の場合:
.venv\Scripts\Activate.ps1
# httpx の追加
次に、アプリで必要なパッケージをインストールします。httpx を使用して API からライブの金と銀の価格を取得し、FastAPI の標準的なエクストラもインストールして、依存関係が不足することなくアプリがスムーズに実行・デプロイされるようにします。
uv add httpx "fastapi[standard]"
このコマンドは、外部への API 要求を行うための httpx を追加し、開発およびデプロイで一般的に必要な標準的な FastAPI の依存関係をインストールします。
**
さて、実際にデプロイするバージョンに、デフォルトの FastAPI アプリケーションを置き換える時が来ました。
これがデフォルトのプロジェクト構造です:
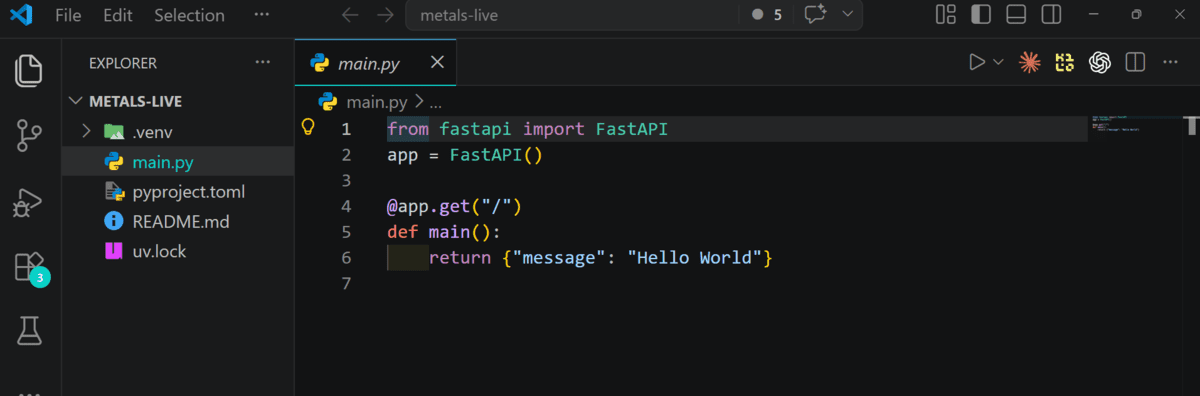
画像は著者によるものです
main.py を開き、その内容を以下のカスタムコードに置き換えてください。このバージョンでは 2 つのことが行われます:Gold API からライブの金と銀の価格を取得し、15 秒ごとに自動的に更新されるシンプルなブラウザ用ダッシュボードを提供します。
これを main.py に貼り付けてください:
import httpx
from fastapi import FastAPI, HTTPException
from fastapi.responses import HTMLResponse
app = FastAPI(title="Live Gold & Silver Prices")
GOLD_API_BASE = "https://api.gold-api.com"
async def fetch_price(symbol: str):
url = f"{GOLD_API_BASE}/price/{symbol}"
async with httpx.AsyncClient(timeout=10.0) as client:
response = await client.get(url)
if response.status_code != 200:
raise HTTPException(status_code=502, detail=f"Failed to fetch {symbol} price")
data = response.json()
return {
"symbol": data.get("symbol", symbol),
"name": data.get("name", symbol),
"price": data.get("price"),
"currency": data.get("currency", "USD"),
"updatedAt": data.get("updatedAt") or data.get("timestamp"),
}
必ず JSON 形式で返してください。translation フィールドのみ。他のフィールド (technical_terms 等) は一切追加しないこと — 余計なフィールドを書こうとして本文翻訳がトークン上限で打ち切られる事故を防ぐため:
{"translation": "翻訳全文"}
@app.get("/api/prices")
async def get_prices():
gold = await fetch_price("XAU")
silver = await fetch_price("XAG")
return {
"gold": gold,
"silver": silver,
}
必ず JSON 形式で返してください。translation フィールドのみ。他のフィールド (technical_terms 等) は一切追加しないこと — 余計なフィールドを書こうとして本文翻訳がトークン上限で打ち切られる事故を防ぐため:
{"translation": "翻訳全文"}
@app.get("/", response_class=HTMLResponse)
async def home():
return """
Live Gold & Silver Prices
body {
font-family: Arial, sans-serif;
background: #0f1115;
color: #ffffff;
margin: 0;
padding: 40px 20px;
}
.container {
max-width: 900px;
margin: 0 auto;
}
h1 {
margin-bottom: 8px;
}
p {
color: #b9c0cc;
}
.grid {
display: grid;
grid-template-columns: repeat(auto-fit, minmax(260px, 1fr));
gap: 20px;
margin-top: 30px;
}
.card {
background: #171a21;
border: 1px solid #2a2f3a;
border-radius: 16px;
padding: 24px;
}
.label {
font-size: 14px;
color: #9aa4b2;
margin-bottom: 10px;
}
.price {
font-size: 36px;
font-weight: bold;
margin-bottom: 8px;
}
.meta {
font-size: 14px;
color: #c6ced9;
}
.footer {
margin-top: 24px;
font-size: 13px;
color: #8c97a8;
}
Live Gold & Silver Prices
Prices refresh automatically every 15 seconds.
Gold
Loading...
Silver
Loading...
async function loadPrices() {
try {
const res = await fetch('/api/prices');
const data = await res.json();
const gold = data.gold;
const silver = data.silver;
document.getElementById('gold-price').textContent =
${gold.price ?? 'N/A'} ${gold.currency ?? ''};
document.getElementById('silver-price').textContent =
${silver.price ?? 'N/A'} ${silver.currency ?? ''};
document.getElementById('gold-meta').textContent =
gold.symbol || 'XAU';
document.getElementById('silver-meta').textContent =
silver.symbol || 'XAG';
const updated = gold.updatedAt || silver.updatedAt;
document.getElementById('updated').textContent =
updated
? Last updated: ${new Date(updated).toLocaleString()}
: 'Last updated: Unknown';
} catch (err) {
document.getElementById('gold-price').textContent = 'Error';
document.getElementById('silver-price').textContent = 'Error';
document.getElementById('gold-meta').textContent = '';
document.getElementById('silver-meta').textContent = '';
document.getElementById('updated').textContent = 'Could not load live prices.';
}
}
loadPrices();
setInterval(loadPrices, 15000);
"""
What this code does:
- Creates a FastAPI app.
- Fetches live gold and silver prices from the API.
- Returns the data through /api/prices.
- Serves a simple HTML dashboard at /.
- Refreshes the displayed prices every 15 seconds.
# Testing Locally
Before deploying, it is a good idea to run the app locally and make sure everything works as expected. FastAPI makes this easy with its built-in development server.
Start the app with:
fastapi dev main.py
Once the server starts, FastAPI will generate a local URL for your app and a docs URL for testing the endpoints.
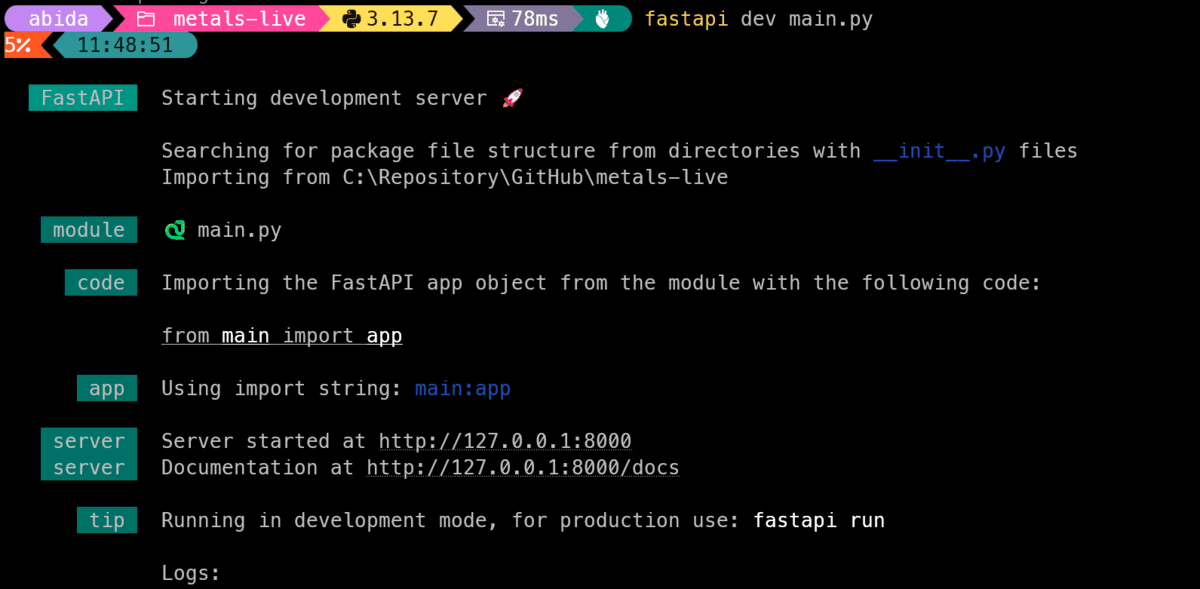
画像提供:著者
ブラウザを開いて、以下の URL にアクセスしてください:
http://127.0.0.1:8000
ゴールドとシルバーの価格を表示するライブダッシュボードが表示されるはずです。数値は 15 秒ごとに自動的に更新されます。
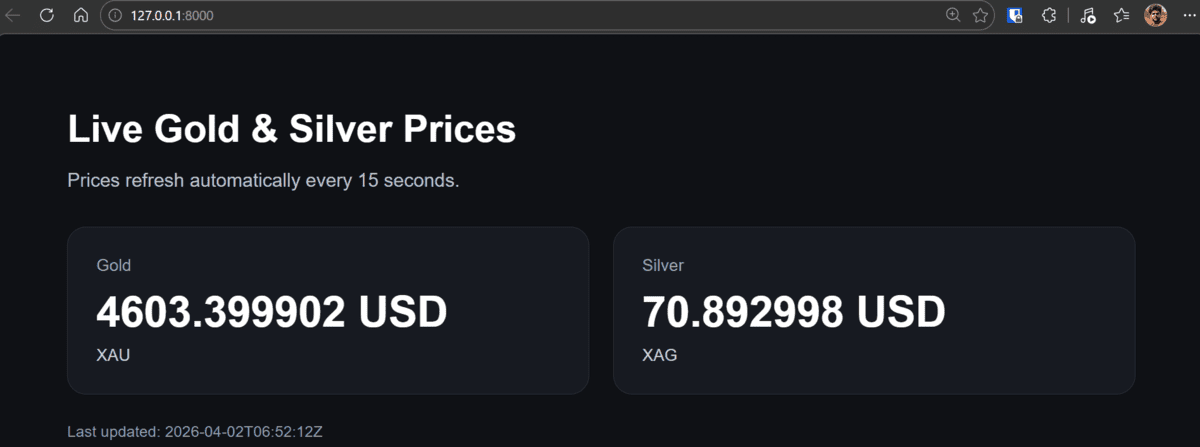
画像提供:著者
また、JSON エンドポイントを直接以下でテストすることもできます:
http://127.0.0.1:8000/api/prices
これは、生レスポンスを確認したい場合や、後でこのデータを別のフロントエンドやアプリケーションに接続したい場合に特に役立ちます。
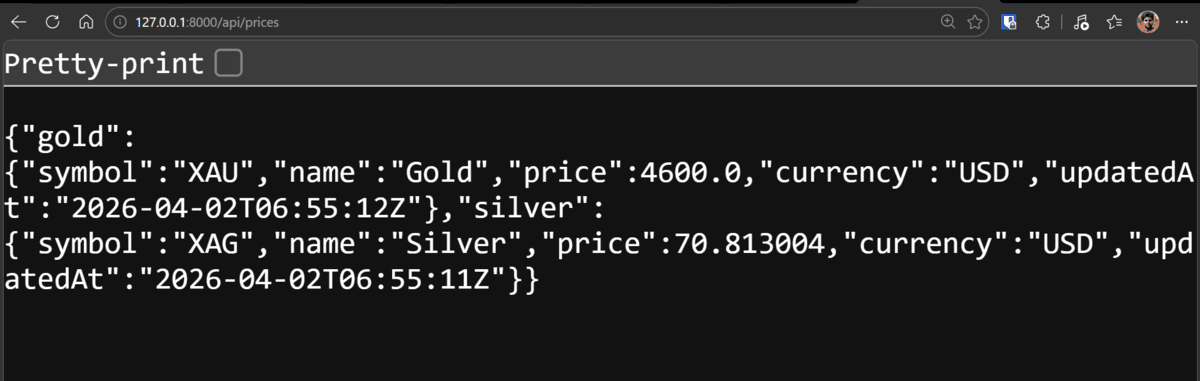
画像提供:著者
# FastAPI Cloud へのデプロイ
アプリがローカルで動作することが確認できたら、FastAPI Cloud へのデプロイの準備が整います。デプロイフローは非常にシンプルで、単一のコマンドから始まります。
以下を実行してください:
fastapi deploy
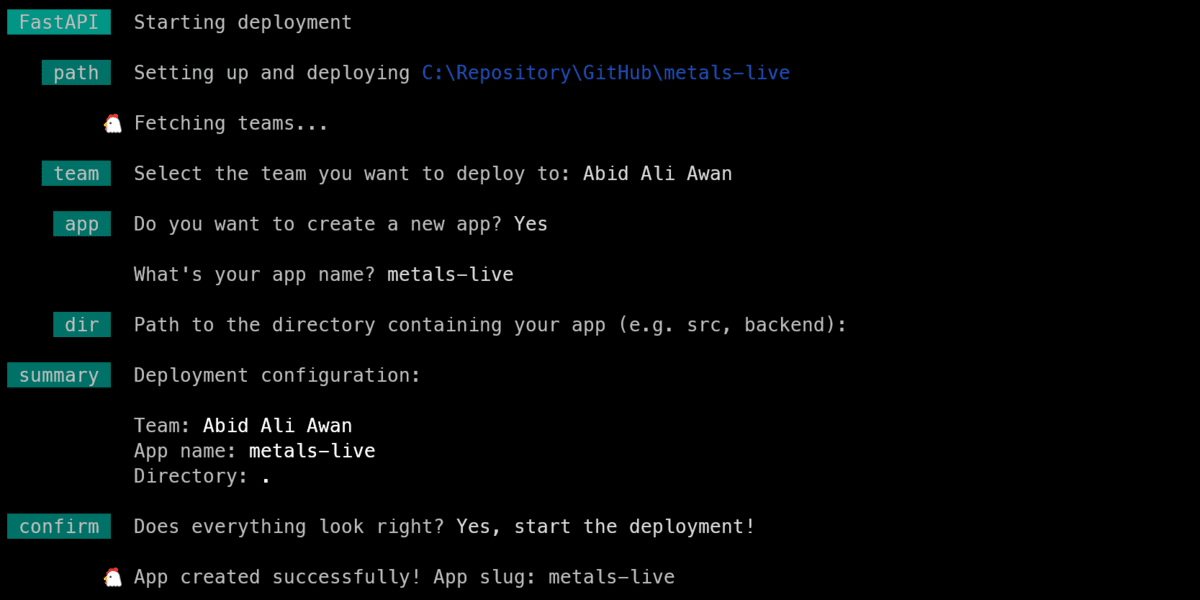
CLI(コマンドラインインターフェース)が、FastAPI Cloud アカウントとの接続とセットアップ完了を案内します。オンボーディング中、チーム名、アプリ名、デプロイ設定などについていくつかの短い質問を求められる場合があります。
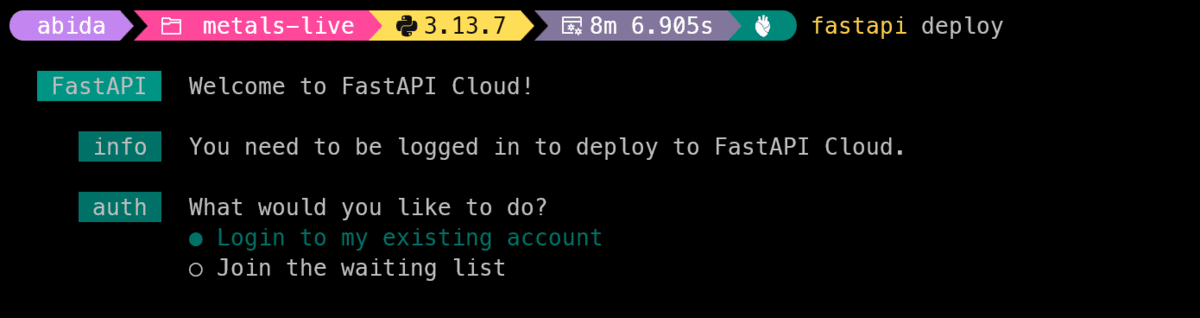
画像提供:著者
これで完了すると、FastAPI Cloud が自動的にアプリのビルドとデプロイを行います。
画像提供:著者
デプロイが完了したら、アプリ用のライブ公開 URL が取得できます。例えば:
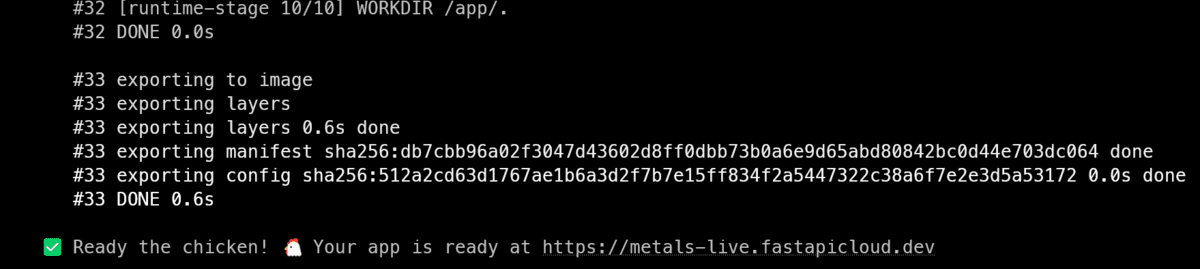
Image by Author
https://metals-live.fastapicloud.dev/
FastAPI Cloud では、以下の URL でもインタラクティブな API ドキュメントを利用できます:
https://metals-live.fastapicloud.dev/docs
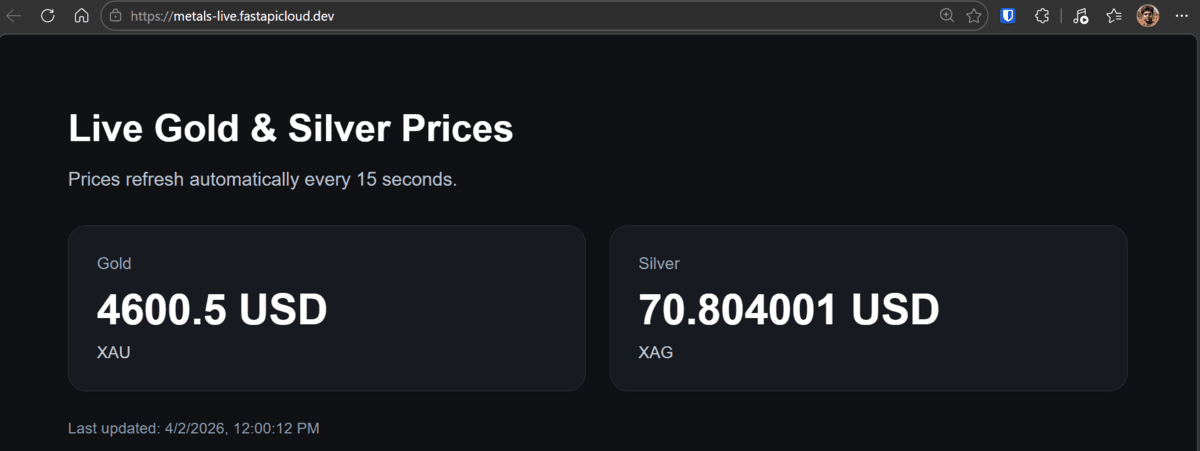
Image by Author
これは、追加のツールを必要とせずにブラウザから直接 API をテストできるため便利です。
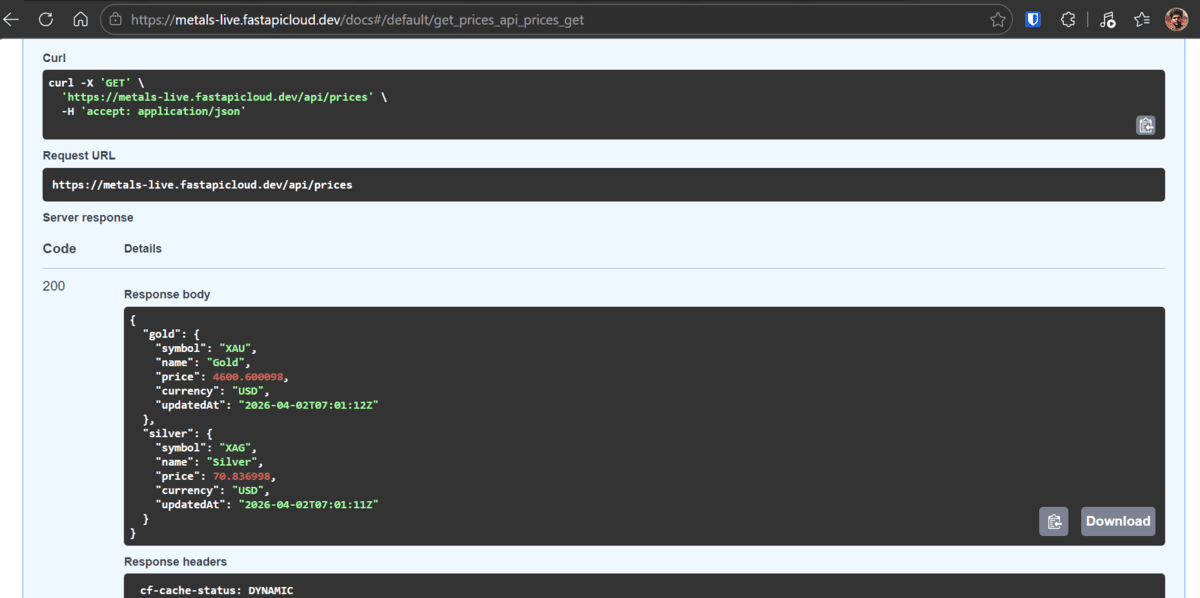
Image by Author
# アプリケーションのモニタリング
デプロイ後、FastAPI Cloud のダッシュボードを使用してアプリケーションを監視し、ログを確認できます。
ログを表示するには:
- FastAPI Cloud のダッシュボードを開く。
- Apps(アプリ)へ移動する。
- 対象のアプリを選択する。
- Logs(ログ)を開く。
これは、デプロイ後にアプリケーションが正しく動作しているか確認したり、API エラーを検出したり、問題のデバッグを行ったりするために役立ちます。
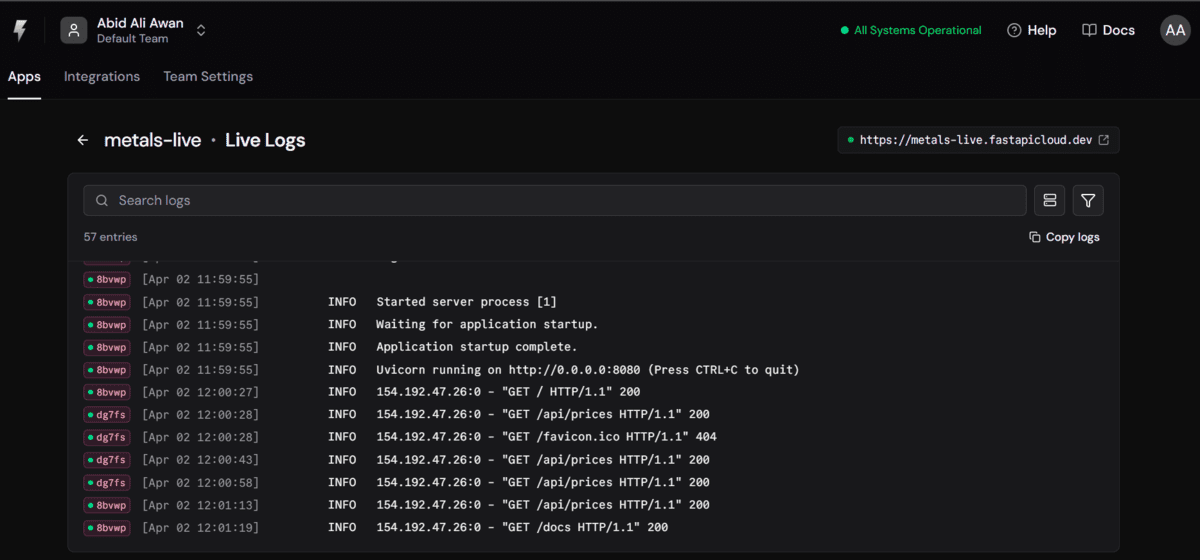
Image by Author
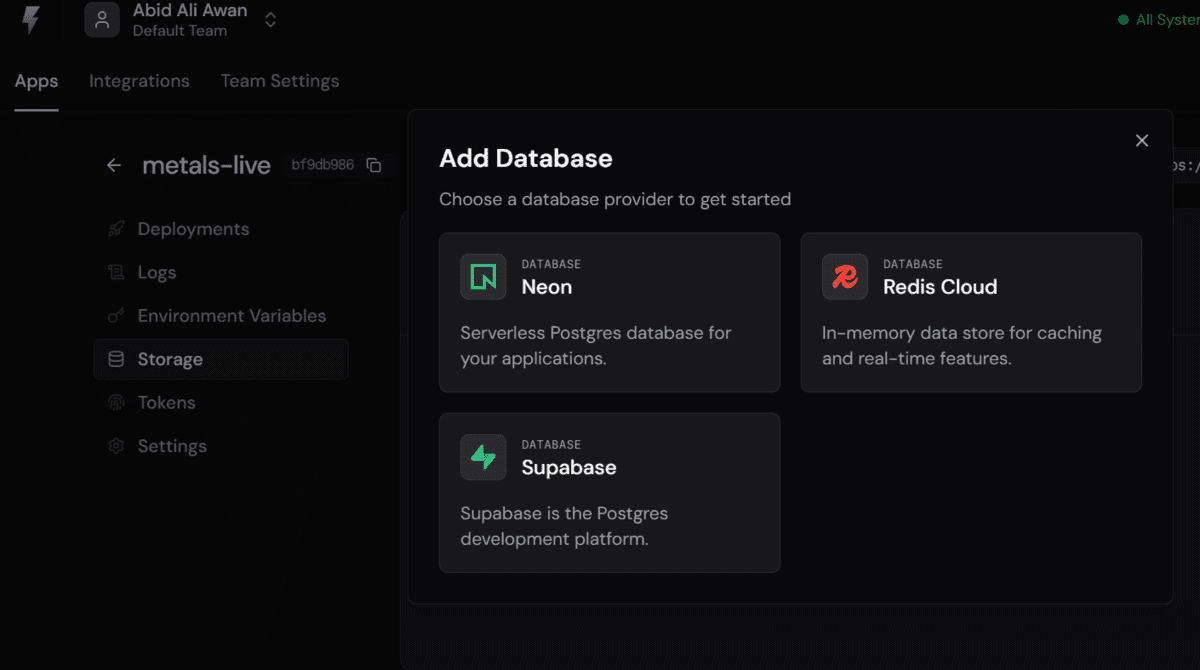
FastAPI Cloud は、管理されたホスティング、クイックな CLI ベースのデプロイ機能、およびアプリケーションの成長に合わせて接続できる追加の統合機能を備えているため、Supabase や Vercel といったプラットフォームに次第に近づいてきていると感じられます。
 image**
Image by Author
# まとめ
FastAPI Cloud を使えば、ローカル開発中の小さな FastAPI アプリをライブデプロイに移行することが容易になります。本ガイドでは、シンプルなライブ金属価格ダッシュボードを作成し、ローカルでテストし、1 つのコマンドでデプロイし、起動後にログを確認しました。
初めてのデプロイにおいて、このワークフローはシンプルであり、FastAPI Cloud の体験を学ぶのに最適な入門となります。
Abid Ali Awan (@1abidaliawan) は機械学習モデルの構築を愛する認定データサイエンティストです。現在、彼はコンテンツ作成に注力し、機械学習およびデータサイエンス技術に関する技術ブログの執筆を行っています。Abid 氏はテクノロジー管理の修士号と電気通信工学の学士号を取得しています。彼のビジョンは、精神疾患に苦しむ学生のためにグラフニューラルネットワークを用いた AI プロダクトを構築することです。
原文を表示
# Introduction
**
FastAPI** has grown far beyond being just a simple Python library for serving APIs. It has become a broader ecosystem that many developers rely on to build modern web applications, especially for AI and machine learning projects. One of the reasons FastAPI became so popular is its speed, simplicity, and developer-friendly design.
**
Image from FastAPI Cloud
Now, with FastAPI Cloud**, the deployment experience is becoming much easier too. Instead of spending time configuring servers and deployment pipelines, you can deploy an application in seconds using the FastAPI Cloud command-line interface (CLI). The setup feels straightforward, lightweight, and much closer to the smooth experience developers expect from modern managed platforms.
At the time of writing, access is still rolling out through a waitlist. I applied a couple of months ago and recently got access, so I wanted to put together a simple guide based on my experience. In this tutorial, I will walk through the basic setup process and show how to deploy a small FastAPI app in just a few steps.
# Creating the Project
**
In this tutorial, you will build a simple live metals dashboard using FastAPI. The app will fetch gold and silver prices from an API, return the data in JSON format, and display the values in the browser using a small HTML interface.
Before you begin, make sure you have:
- uv installed for project scaffolding, or a recent supported Python version.
- A FastAPI Cloud account.
To get started, create a new FastAPI project with the official setup command:
uvx fastapi-new metals-live
cd metals-liveWithin a few seconds, FastAPI will generate the project structure and install the required dependencies for you.
Image by Author
Next, activate the virtual environment inside the project directory.
On Linux/macOS:
source .venv/bin/activateOn Windows PowerShell:
.venv\Scripts\Activate.ps1# Adding httpx
Next, install the packages the app will need. We will use httpx** to fetch live gold and silver prices from the API, and we will also make sure the standard FastAPI extras are installed so the app runs and deploys smoothly without missing dependencies.
uv add httpx "fastapi[standard]"This command adds httpx for making outbound API requests and installs the standard FastAPI dependencies commonly needed for development and deployment.
# Replacing the Default App
**
Now it is time to replace the default FastAPI app with the version you will actually deploy.
This is what the default project structure looks like:
Image by Author
Open main.py and replace its contents with the custom code shown below. This version does two things: it fetches live gold and silver prices from the Gold API, and it serves a simple browser dashboard that refreshes automatically every 15 seconds.
Paste this into main.py:
import httpx
from fastapi import FastAPI, HTTPException
from fastapi.responses import HTMLResponse

app = FastAPI(title="Live Gold & Silver Prices")

GOLD_API_BASE = "https://api.gold-api.com"

async def fetch_price(symbol: str):
    url = f"{GOLD_API_BASE}/price/{symbol}"

    async with httpx.AsyncClient(timeout=10.0) as client:
        response = await client.get(url)

    if response.status_code != 200:
        raise HTTPException(status_code=502, detail=f"Failed to fetch {symbol} price")

    data = response.json()

    return {
        "symbol": data.get("symbol", symbol),
        "name": data.get("name", symbol),
        "price": data.get("price"),
        "currency": data.get("currency", "USD"),
        "updatedAt": data.get("updatedAt") or data.get("timestamp"),
    }

@app.get("/api/prices")
async def get_prices():
    gold = await fetch_price("XAU")
    silver = await fetch_price("XAG")
    return {
        "gold": gold,
        "silver": silver,
    }

@app.get("/", response_class=HTMLResponse)
async def home():
    return """
    <!doctype html>
    <html>
    <head>
      <meta charset="utf-8" />
      <meta name="viewport" content="width=device-width, initial-scale=1" />
      <title>Live Gold & Silver Prices</title>
      <style>
        body {
          font-family: Arial, sans-serif;
          background: #0f1115;
          color: #ffffff;
          margin: 0;
          padding: 40px 20px;
        }
        .container {
          max-width: 900px;
          margin: 0 auto;
        }
        h1 {
          margin-bottom: 8px;
        }
        p {
          color: #b9c0cc;
        }
        .grid {
          display: grid;
          grid-template-columns: repeat(auto-fit, minmax(260px, 1fr));
          gap: 20px;
          margin-top: 30px;
        }
        .card {
          background: #171a21;
          border: 1px solid #2a2f3a;
          border-radius: 16px;
          padding: 24px;
        }
        .label {
          font-size: 14px;
          color: #9aa4b2;
          margin-bottom: 10px;
        }
        .price {
          font-size: 36px;
          font-weight: bold;
          margin-bottom: 8px;
        }
        .meta {
          font-size: 14px;
          color: #c6ced9;
        }
        .footer {
          margin-top: 24px;
          font-size: 13px;
          color: #8c97a8;
        }
      </style>
    </head>
    <body>
      <div class="container">
        <h1>Live Gold & Silver Prices</h1>
        <p>Prices refresh automatically every 15 seconds.</p>

        <div class="grid">
          <div class="card">
            <div class="label">Gold</div>
            <div class="price" id="gold-price">Loading...</div>
            <div class="meta" id="gold-meta"></div>
          </div>

          <div class="card">
            <div class="label">Silver</div>
            <div class="price" id="silver-price">Loading...</div>
            <div class="meta" id="silver-meta"></div>
          </div>
        </div>

        <div class="footer" id="updated"></div>
      </div>

      <script>
        async function loadPrices() {
          try {
            const res = await fetch('/api/prices');
            const data = await res.json();

            const gold = data.gold;
            const silver = data.silver;

            document.getElementById('gold-price').textContent =
              `${gold.price ?? 'N/A'} ${gold.currency ?? ''}`;

            document.getElementById('silver-price').textContent =
              `${silver.price ?? 'N/A'} ${silver.currency ?? ''}`;

            document.getElementById('gold-meta').textContent =
              gold.symbol || 'XAU';

            document.getElementById('silver-meta').textContent =
              silver.symbol || 'XAG';

            const updated = gold.updatedAt || silver.updatedAt;
            document.getElementById('updated').textContent =
              updated
                ? `Last updated: ${new Date(updated).toLocaleString()}`
                : 'Last updated: Unknown';
          } catch (err) {
            document.getElementById('gold-price').textContent = 'Error';
            document.getElementById('silver-price').textContent = 'Error';
            document.getElementById('gold-meta').textContent = '';
            document.getElementById('silver-meta').textContent = '';
            document.getElementById('updated').textContent = 'Could not load live prices.';
          }
        }

        loadPrices();
        setInterval(loadPrices, 15000);
      </script>
    </body>
    </html>
    """
What this code does:
- Creates a FastAPI app.
- Fetches live gold and silver prices from the API.
- Returns the data through /api/prices.
- Serves a simple HTML dashboard at /.
- Refreshes the displayed prices every 15 seconds.
# Testing Locally
Before deploying, it is a good idea to run the app locally and make sure everything works as expected. FastAPI makes this easy with its built-in development server.
Start the app with:
fastapi dev main.pyOnce the server starts, FastAPI will generate a local URL for your app and a docs URL for testing the endpoints.
Image by Author
Open your browser and go to:
http://127.0.0.1:8000You should see your live dashboard showing gold and silver prices. The values will refresh automatically every 15 seconds.
Image by Author
You can also test the JSON endpoint directly at:
http://127.0.0.1:8000/api/pricesThis is especially useful if you want to inspect the raw response or later connect the data to another frontend or application.
Image by Author
# Deploying to FastAPI Cloud
Once the app works locally, you are ready to deploy it to FastAPI Cloud. The deployment flow is very simple and starts with a single command.
Run:
fastapi deployThe CLI will guide you through connecting your FastAPI Cloud account and completing the setup. During onboarding, you may be asked a few short questions, such as your team name, app name, and deployment settings.
Image by Author
Once that is done, FastAPI Cloud will build and deploy your app for you.
Image by Author
After the deployment finishes, you will get a live public URL for your app — for example:
Image by Author
https://metals-live.fastapicloud.dev/FastAPI Cloud also gives you interactive API docs at:
https://metals-live.fastapicloud.dev/docsImage by Author
This is useful because you can test your API directly from the browser, without needing any extra tools.
Image by Author
# Monitoring the App
After deployment, you can use the FastAPI Cloud dashboard to monitor your app and check its logs.
To view the logs:
- Open the FastAPI Cloud dashboard.
- Go to Apps.
- Select your app.
- Open Logs.
This is useful for checking whether your app is running correctly, spotting API errors, and debugging issues after deployment.
Image by Author
FastAPI Cloud also starts to feel closer to platforms like Supabase or Vercel**, with managed hosting, quick CLI-based deployment, and extra integrations you can connect to your app as you grow it.
**
Image by Author
# Wrapping Up
FastAPI Cloud makes it easy to take a small FastAPI app from local development to a live deployment. In this guide, we built a simple live metals dashboard, tested it locally, deployed it with one command, and checked logs after launch.
For a first deployment, the workflow is straightforward and a good introduction to the FastAPI Cloud experience.
Abid Ali Awan** (@1abidaliawan) is a certified data scientist professional who loves building machine learning models. Currently, he is focusing on content creation and writing technical blogs on machine learning and data science technologies. Abid holds a Master's degree in technology management and a bachelor's degree in telecommunication engineering. His vision is to build an AI product using a graph neural network for students struggling with mental illness.
関連記事
今日のまとめ
AI日報で今日の重要ニュースをまとめ読み