MonsterUI:FastHTMLに美しいUIをもたらす
Answer.AI は、FastHTML の簡潔さを維持しつつデザイン品質を向上させるための Python ベースの UI ライブラリ「MonsterUI」を発表し、CSS やクラス名の記述不要で高品質な Web アプリ構築を可能にしました。
キーポイント
FastHTML との統合による開発効率化
既存の複雑な CSS やクラス名管理の負担を排除し、Python コードのみでレスポンシブかつモダンな UI コンポーネントを構築できるレイヤーを提供します。
デザイン品質と柔軟性の両立
Tailwind CSS や FrankenUI などの現代的なライブラリに基づいたスマートなデフォルトスタイルを採用しつつ、必要に応じて Tailwind の完全なアクセス権を維持します。
Python 単一言語での UI 構築
ナビゲーションバーやカードなどの複雑なコンポーネントも、HTML/CSS/Python をまたぐコンテキストスイッチングなしに、Python の関数呼び出しだけで実装可能です。
スマートなデフォルトと完全な柔軟性の両立
MonsterUI は、現代のウェブ開発における既存のアプローチを基盤としつつ、生きた HTML/CSS の課題(古びたデザインや複雑なレイアウト管理)を解決するコンポーネントを提供します。
FrankenUI と FastHTML/HTMX の統合
フレームワークに依存しない FrankenUI を基盤とし、FastHTML や HTMX のプログレッシブ・エンハンスメントとシームレスに連携して、美しく読みやすいコードを実現します。
12 色のテーマと自動同期機能
ライト/ダークモードを含む 12 色のテーマから選択可能で、FrankenUI や DaisyUI など異なるスタイルのコンポーネント間でも色調が自動的に同期され、一貫した外観を保ちます。
構造化されたテキストスタイル
MonsterUI は HTML 標準仕様に基づき、<em>や<cite>などのセマンティックタグに自動的にスタイリングを適用し、設定不要で現代的なデザインを実現します。
重要な引用
MonsterUI is a layer on top of FastHTML that provides pre-styled components and smart defaults based on modern libraries
I controlled everything without needing special flexbox or CSS class knowledge.
If you're tired of context-switching between HTML, CSS, and Python just to build basic web UIs, MonsterUI might be for you.
MonsterUI is based on a simple principle: provide smart defaults while allowing full flexibility.
By combining FrankenUI's framework-agnostic approach with FastHTML, MonsterUI delivers modern, beautiful components that integrate seamlessly with HTMX's progressive enhancement paradigm - all while maintaining clean, readable code.
"Write semantic HTML in pure Python, get modern styling for free."
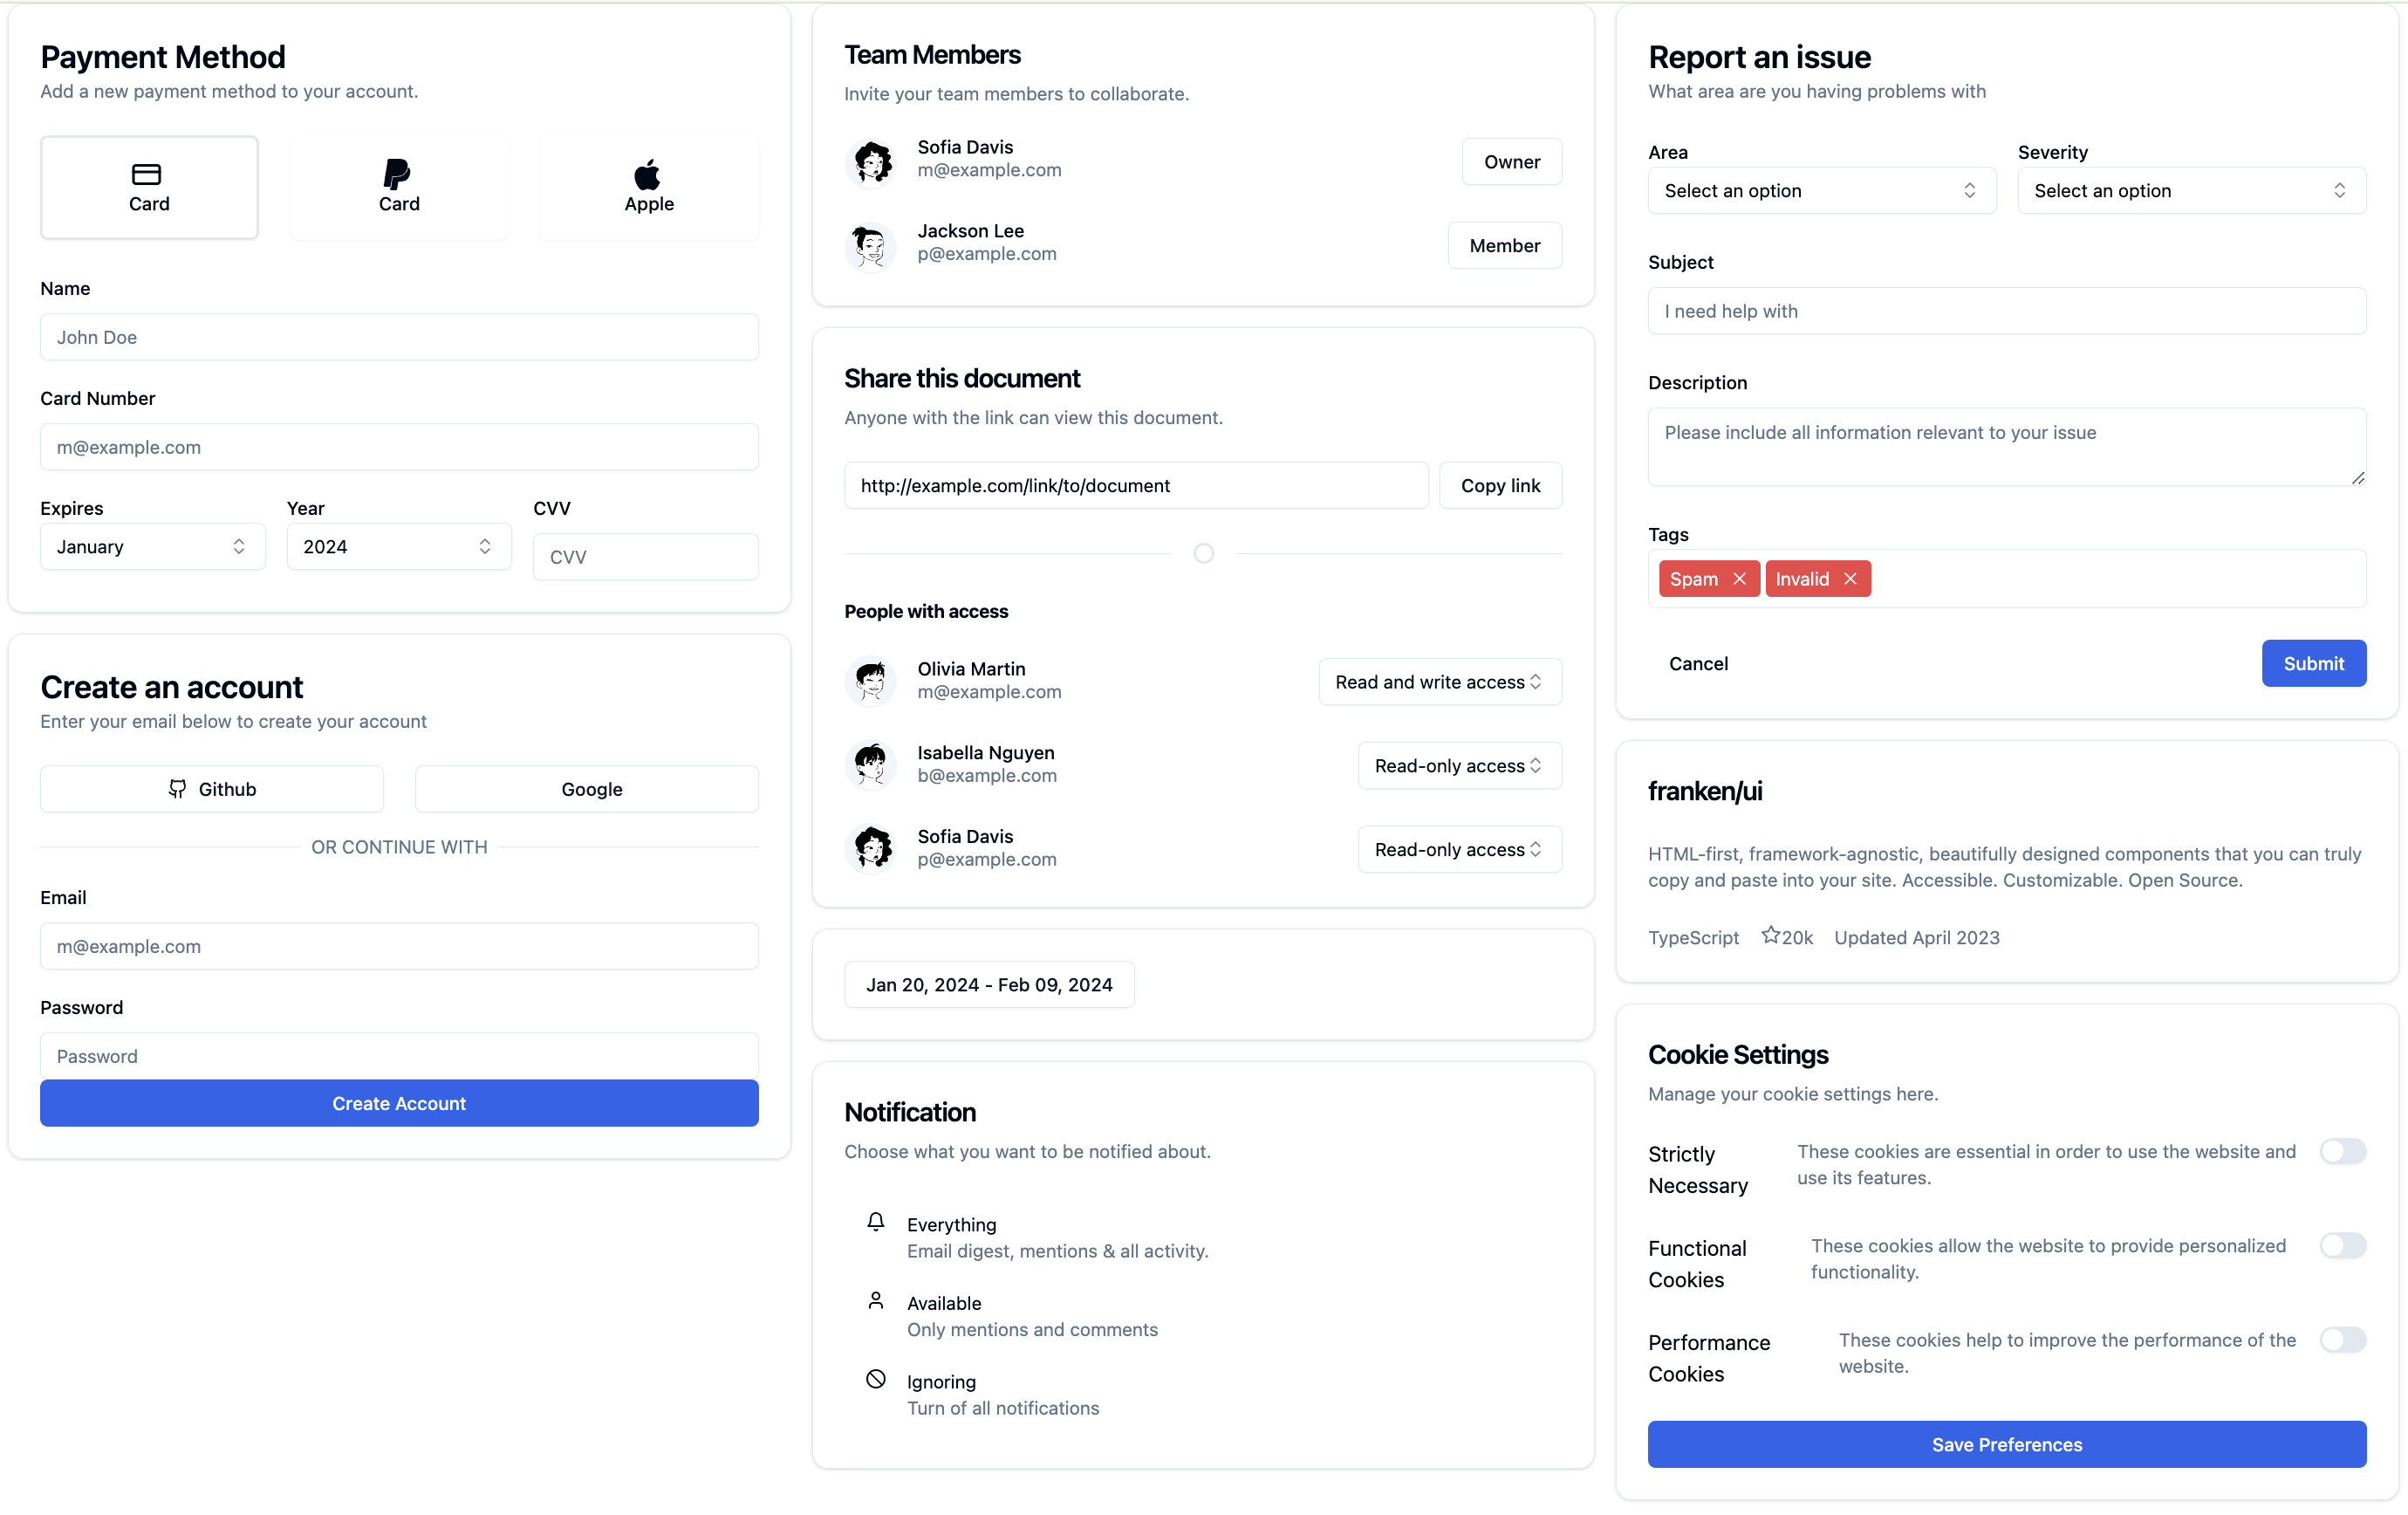
影響分析・編集コメントを表示
影響分析
この発表は、Python ベースの Web 開発において「デザインと実装の分離」による摩擦を解消する重要な一歩です。特に FastHTML のような軽量フレームワークユーザーにとって、CSS やデザインツールの学習コストを下げつつプロフェッショナルな UI を実現できるため、開発者の生産性向上に直結します。ただし、これは特定のエコシステム(FastHTML)に特化した解決策であり、汎用的な Web 開発全体を変えるものというよりは、同フレームワークの採用拡大とユーザー体験向上に寄与するものです。
編集コメント
CSS の記述から解放され、Python コードだけでデザインされた UI を構築できる点は、バックエンド開発者がフロントエンドの壁にぶつかる現状を打破する有望なアプローチです。ただし、FastHTML エコシステム内でのみ有効である点には注意が必要です。
モダンな Web 開発では、優れた UI を作成するために、複雑な依存関係や複数の言語にまたがる膨大なボイラープレートが必要とされています。MonsterUI はその課題を解決するために登場しました。
Web UI 開発における問題点
魅力的な Web アプリケーションを構築することは、常に複雑でした。FastHTML は HTMX、Starlette、HTML、そして HTTP の基本原理を統合することで、Web アプリの開発を簡素化します。
しかし、見た目を整えることは依然として非常に困難です。これには、膨大な量の CSS か、長いインラインクラス文字列を持つフレームワークのどちらか(あるいはその両方)が必要です。Bootstrap や Tailwind CSS を試すこともあるでしょう。すると今度は、クラス名の管理やユーティリティパターンの記憶、ボイラープレートとなるクラス文字列を確認するためのドキュメント参照に追われることになります。その結果、専門家デザイナーでない人にとっては、構築も維持も変更も困難なコードが生まれてしまいます。
一般的なアプリケーションには、ナビゲーションバー、フォーム、モーダル、カードなど、多くのコンポーネントが含まれています。それぞれが、スタイリング、レスポンシブ動作、インタラクティブな状態に対する慎重な検討を必要とします。アプリケーションが大きくなるにつれ、これらのスタイルを一貫して管理することはますます困難になっていきます。
この問題は私が Web アプリを開発している際に痛感しました。私はクラス文字列のコピー&ペーストや、複数のコンポーネントにわたる複雑なスタイリングロジックの維持に終始していました。FastHTML はアプリケーションロジックの開発を楽しいものに変えてくれましたが、スタイリングの側面は常に摩擦の原因となり続けていました。
基本となる Web UI を構築するために HTML、CSS、Python の間でコンテキストスイッチングすることに疲れたなら、MonsterUI があなたのためのソリューションかもしれません。
実例:ブログの構築
MonsterUI の紹介
MonsterUI を使えば、デザイン品質を犠牲にすることなく、純粋な Python で高品質でモダンな Web アプリを誰でも構築できます。
MonsterUI で構築し、FrankenUI でスタイリングされ、Shadcn のデザインに基づいています。
MonsterUI は、FastHTML(ファスト HTML)の上に位置するレイヤーであり、Tailwind CSS や FrankenUI、DaisyUI などのモダンなライブラリに基づく事前スタイル化されたコンポーネントとスマートなデフォルト値を提供します。必要に応じて Tailwind CSS にフルアクセスできる状態も維持されます。MonsterUI の特徴は以下の通りです。
- FastHTML のシンプルさを Web スタイリングに持ち込みます。
- 1 つの CSS クラスも記述することなく、美しくレスポンシブなコンポーネントを提供します。
- ユーティリティクラスの記憶に頼らず、機能構築に集中できます。
チームメンバー向けのカードを用いた例で学んでいきましょう:
def TeamCard(name, role, location="Remote"):
icons = ("mail", "linkedin", "github")
return Card(
DivLAligned(
DiceBearAvatar(name, h=24, w=24),
Div(H3(name), P(role))),
footer=DivFullySpaced(
DivHStacked(UkIcon("map-pin", height=16), P(location)),
DivHStacked(*(UkIconLink(icon, height=16) for icon in icons))))
レイアウト、フォントサイズ、アイコン、アバターをすべて Python だけで指定しました。特別な flexbox や CSS クラスの知識なしに、すべての制御が可能でした。
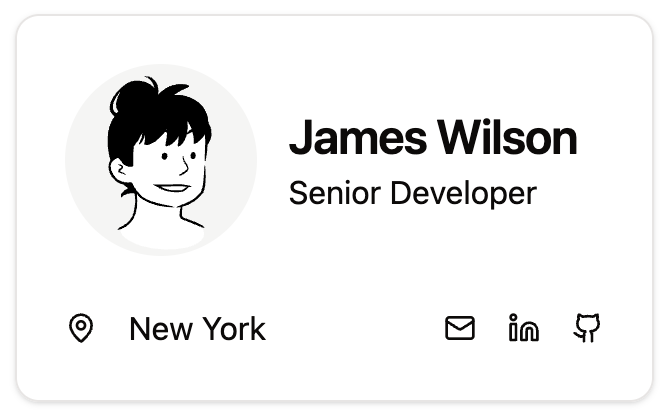
例はカードドキュメントページからのものです。
NoteExpand を展開すると、MonsterUI を使用しなかった場合に必要となるボイラープレートコードを確認できます
dicebear_url = 'https://api.dicebear.com/8.x/lorelei/svg?seed=James Wilson'
Div(Div(Div(
Span(Img(alt='Avatar', loading='lazy', src=dicebear_url,
cls='aspect-square h-24 w-24'),cls='relative flex h-24 w-24 shrink-0 overflow-hidden rounded-full bg-accent'),
Div(H3('James Wilson', cls='uk-h3'),
P('Senior Developer')),
cls='uk-flex uk-flex-left uk-flex-middle space-x-4'),
cls='uk-card-body space-y-6'),
Div(Div(Div(
Uk_icon(icon='map-pin', height='16'),
P('New York'),
cls='uk-flex uk-flex-row uk-flex-middle space-x-4'),
Div(A(Uk_icon(icon='mail', height='16'),href='#',cls='uk-icon-link'),
A(Uk_icon(icon='linkedin', height='16'),href='#',cls='uk-icon-link'),
A(Uk_icon(icon='github', height='16'),href='#',cls='uk-icon-link'),
cls='uk-flex uk-flex-row uk-flex-middle space-x-4'),
cls='uk-flex uk-flex-between uk-flex-middle uk-width-1-1'),
cls='uk-card-footer'),
cls='uk-card')
MonsterUI があなたに提供するもの
MonsterUI は、シンプルな原則に基づいています。それは、スマートなデフォルト値を提供しつつも、完全な柔軟性を許容するというものです。
私たちは、現代の Web 開発における最も革新的なプロジェクトから証明されたアプローチを基盤とし、生身の HTML/CSS が抱える課題に対応するコンポーネントを慎重に選択することで、これを実現しました。同時に、成熟した実戦で検証済みの戦略も維持しています。
MonsterUI の核となるのは FrankenUI です。これは sveltecult によって開発された、美しい HTML ファーストコンポーネントを採用した革新的なフレームワーク非依存の UI ライブラリです。FrankenUI そのものは、React 向けにコピー&ペースト可能な UI コンポーネントという概念を先駆けた shadcn の「shadcn/ui」に触発されています。
生粋の HTML と CSS は、2 つの主要な課題に直面しています。すなわち、時代遅れの視覚的デザインと複雑なレイアウト管理です。FrankenUI のフレームワーク非依存のアプローチを FastHTML と組み合わせることで、MonsterUI は HTMX の段階的強化(progressive enhancement)パラダイムとシームレスに統合される現代的で美しいコンポーネントを提供します。これにより、クリーンで読みやすいコードを維持しつつ実現されています。
これは単なる理論上の話ではありません。私たちは現在、プレビュー顧客とのテスト用として新規アプリケーションを開発中で、MonsterUI を実際にプロダクション環境で使用しています。そこでは、複雑なダイアログインターフェースから動的コンテンツレンダリングに至るまで、あらゆる機能を支えています。このライブラリは、実世界のエンタープライズ環境において堅牢性と保守性が証明されています。
いくつかの主要機能を見ていきましょう:
テーマ(Theme)
アプリに色テーマを選択できます。12 色のカラーパレットから選べ、それぞれにダークモードとライトモードが用意されています。デフォルトではユーザーのシステム設定を自動的に反映します。
すべてのテーマは同期されており、FrankenUI、DaisyUI、あるいは他のフレームワークでスタイリングされたコンポーネントかどうかに関わらず、同じページ上のコンポーネントが一貫して美しく表示されます。
テーマは、アプリ全体でカラーリングの一貫性を保つために必要なボイラープレート(定型コード)を追加します。
app, rt = fast_app(hdrs=Theme.blue.headers())
ベースコンポーネント(Base Components)
MonsterUI のすべての HTML 要素には、適切なデフォルトのスタイルが付与されています。Button は単なる HTML ボタンではなく、ホバー状態やフォーカスリング、一貫したパディングを備えたスタイル済みコンポーネントです。
Button("Save Changes")
MonsterUI では、スタイルの選択を容易にするため、ListT、TextT、ButtonT などのデータ構造(ListT, TextT, ButtonT など)を提供し、タブ補完機能もサポートしています。
例えば、テーマのプライマリカラーでスタイルを設定したい場合は、ButtonT.primary を使用します。プライマリカラーは、「カートに追加」や「送信」などのアクションボタンに使用されます。
Button("Add to Cart", cls=ButtonT.primary)
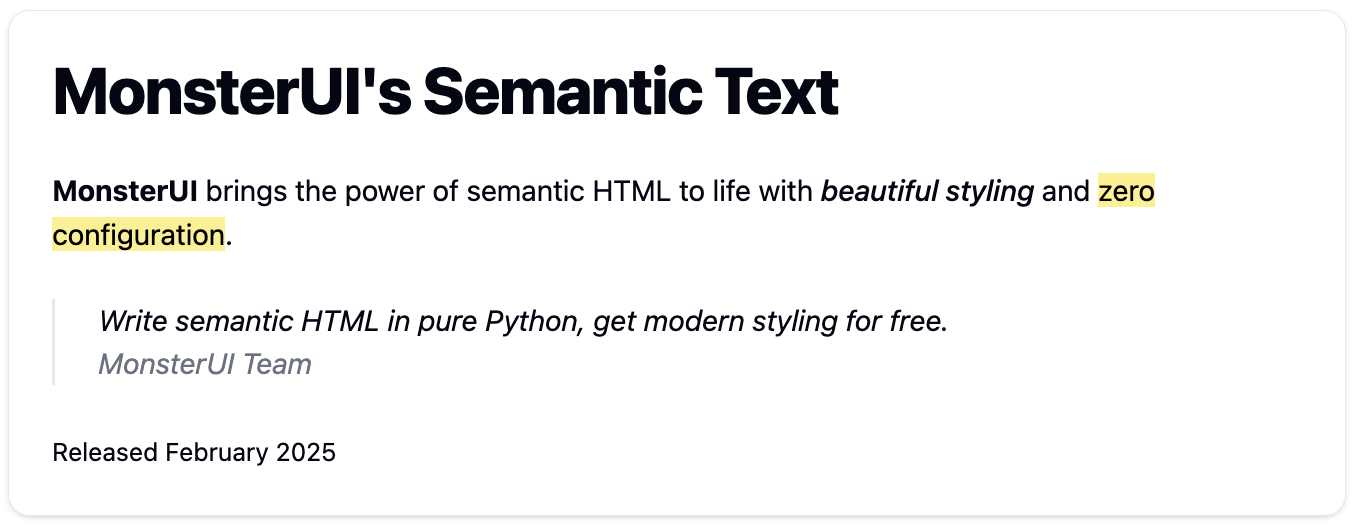
セマンティックテキストスタイル
Web の基盤の上に構築された MonsterUI は、HTML 仕様に基づいてセマンティックタグをスタイリングします。つまり、emphasis (), citation (), Marked (), small () など標準的な HTML タグを使用するテーマに一致するスタイル済み関数が用意されています。
Card(
H1("MonsterUI's Semantic Text"),
P(
Strong("MonsterUI"), " brings the power of semantic HTML to life with ",
Em("beautiful styling"), " and ", Mark("zero configuration"), "."),
Blockquote(
P("Write semantic HTML in pure Python, get modern styling for free."),
Cite("MonsterUI Team")),
footer=Small("Released February 2025"),
)
スマートレイアウトヘルパー
全体的なページレイアウトは、スマートなレイアウトヘルパー(DivVStacked, DivCentered, DivFullySpaced, Grid など)によってシンプルに作成されます。例えば、DivVStacked は要素を縦方向に積み重ねます。Grid はコンポーネントを配置するためのグリッドを作成します。
DivFullySpaced(
H1("Dashboard"),
DivRAligned(
Button("Export", cls=ButtonT.secondary),
Button("New Entry", cls=ButtonT.primary)))
スマートなレスポンシブカラムを持つグリッドレイアウト(モバイルとデスクトップ対応)
必要に応じてレスポンス性をカスタマイズするための引数が用意されています
Grid(map(TeamCard, products), cols_max=3)
注:詳細や高度な使用方法については、当社のレイアウトチュートリアルをご覧ください。
一般的な UI パターン
MonsterUI には、一般的な UI パターンのためのショートカットが含まれています。例えば、入力テキストボックスには通常、その用途を伝えるラベルが必要となるため、Label と Input のペアを作成するショートカットとして LabelInput を用意しています。
LabelInput("Name", id='myid')
Div, FormLabel, Input を使用してこれを自作することも可能ですが、このパターンは非常に一般的であるため、ショートカットを提供しました。以下がそのショートカットが置き換えるコードです:
Div(FormLabel('Name', fr='myid'),
Input(id='myid', name='myid'),
cls='space-y-2')
より高レベルなコンポーネント
また、ナビゲーションバー、モーダル、カード、テーブルといったより複雑なコンポーネントを生成するためのヘルパー関数も提供しています。これらはいずれも複数の基本コンポーネント(ModalContainer, ModalDialog など)の上に構築されているため、自分で組み上げることも可能です。ただし、ヘルパー関数を使用すれば、独自のボイラープレートコードを書く必要なく、必要な柔軟性をすべて得ることができます。これらのヘルパー関数は、モバイル端末でナビゲーションバーが自動的にハンバーガーメニューに折りたたまれるといった、優れたユーザーエクスペリエンス(UX)の動作を自動で作成してくれます。
例えば、モーダルを開くボタンを作成するには以下のように記述します:
Div(Button("Open Modal", uk_toggle="target: #my-modal" ),
Modal(ModalTitle("Simple Test Modal"),
P("With some somewhat brief content to show that it works!",
cls=TextPresets.muted_sm),
footer=ModalCloseButton("Close", cls=ButtonT.primary), id='my-modal'))
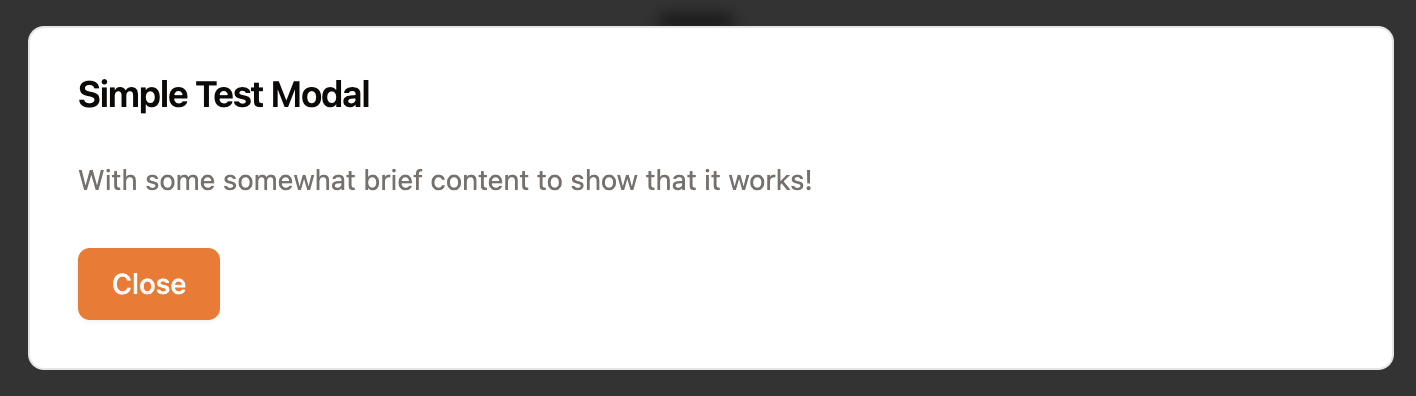
NoteExpand to see boilerplate you'd need if you weren't using MonsterUI
Div(Button('Open Modal', type='button', uk_toggle='target: #my-modal',
cls='uk-button uk-button-default'),
Div(Div(Div(H2('Simple Test Modal', cls='uk-modal-title'),
P('With some somewhat brief content to show that it works!',
cls='uk-text-muted uk-text-small'),
cls='uk-modal-body space-y-6'),
Div(Button('Close', type='button',
cls='uk-button uk-modal-close uk-button-primary'),
cls='uk-modal-footer'),
cls='uk-modal-dialog'),
uk_modal=True,
id='my-modal',
cls='uk-modal uk-modal-container'))
Rendering Markdown
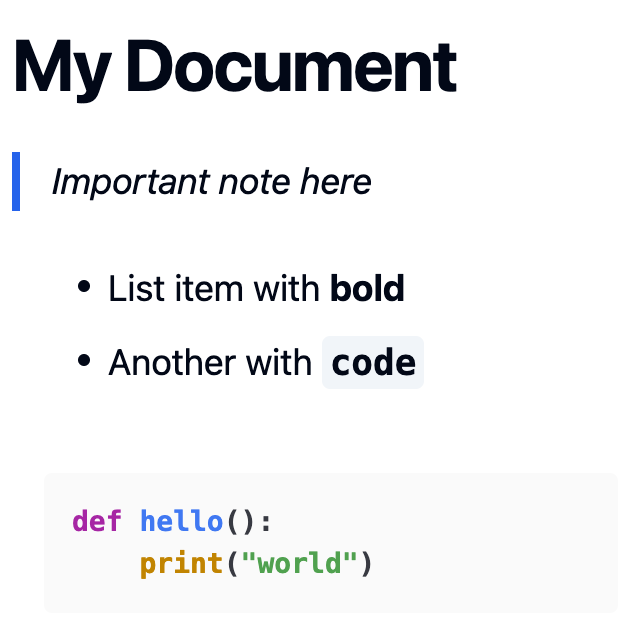
MonsterUI は、Markdown をスタイリングされた HTML に変換する render_md 関数を提供しています。コードブロックには HighlightJS による構文強調表示が適用され、スタイリングには FrankenUI クラスと Tailwind が使用されます。
render_md("""
My Document
Important note here
+ List item with bold
+ Another with code
def hello():
    print("world")
""")
Getting Started
まず、pip を使用してインストールしてください:
pip install MonsterUI
MonsterUI のスタイリングを備えた新しい FastHTML アプリケーションを作成します:
from fasthtml.common import *
from monsterui.all import *
Choose a theme color (blue, green, red, etc)
hdrs = Theme.blue.headers()
Create your app with the theme
app, rt = fast_app(hdrs=hdrs)
@rt
def index():
socials = (('github','https://github.com/AnswerDotAI/MonsterUI'),
('twitter','https://twitter.com/isaac_flath/'),
('linkedin','https://www.linkedin.com/in/isaacflath/'))
return Titled("Your First App",
Card(
H1("Welcome!"),
P("Your first MonsterUI app", cls=TextPresets.muted_sm),
P("I'm excited to see what you build with MonsterUI!"),
footer=DivLAligned(*[UkIconLink(icon,href=url) for icon,url in socials])))
serve()
これで完了です!設定ゼロでスタイリングされたアプリケーションが完成しました。このアプリにはすでに以下の機能が含まれています:
ユーザーの環境設定に基づいた自動的なダークモード/ライトモード切り替え
適切にスタイリングされたタイポグラフィと間隔
あらゆるデバイスに対応するレスポンシブレイアウト
すぐに使用可能な美しい UI コンポーネント
DaisyUI、FrankenUI、Tailwind と同期したカラースキーム
詳細な例やコンポーネントのリファレンスについては、ドキュメントをご覧ください。
原文を表示
Modern web development requires complicated dependencies and extensive boilerplate spread over multiple languages to make good UI. MonsterUI is here to fix that.
The Problem with Web UI Development
Building attractive web applications has always been complicated. FastHTML simplifies web app development by bringing HTMX, Starlette, HTML, and HTTP fundamentals together.
Getting the aesthetics right is still too hard. It requires either extensive CSS, a framework with long inline class strings, or both. You might try Bootstrap or Tailwind CSS. Now, you’re managing class names, remembering utility patterns, and checking docs for boilerplate class strings. This leads to code that is hard to build, maintain, and change for anyone who is not an expert designer.
A typical app has many components: nav bars, forms, modals, cards, and more. Each requires careful consideration of styling, responsive behavior, and interactive states. As your application grows, managing these styles consistently becomes more and more challenging.
This became apparent to me while I was developing web apps. I found myself copying and pasting class strings and maintaining complex styling logic across multiple components. FastHTML made the application logic development a joy, but the styling side remained a constant source of friction.
If you’re tired of context-switching between HTML, CSS, and Python just to build basic web UIs, MonsterUI might be for you.
Real-World Example: Building a Blog
Introducing MonsterUI
MonsterUI lets anyone build high-quality, modern web apps in pure Python without sacrificing design quality.
Built with MonsterUI, styled with FrankenUI, based on design by Shadcn
MonsterUI is a layer on top of FastHTML that provides pre-styled components and smart defaults based on modern libraries (such as Tailwind, FrankenUI, DaisyUI) while maintaining full access to Tailwind CSS when you need it. MonsterUI:
Brings FastHTML’s simplicity to web styling.
Provides beautiful, responsive components without writing a single CSS class.
Lets you focus on building features instead of remembering utility classes.
Let’s learn by example with a card for team members:
def TeamCard(name, role, location="Remote"):
icons = ("mail", "linkedin", "github")
return Card(
DivLAligned(
DiceBearAvatar(name, h=24, w=24),
Div(H3(name), P(role))),
footer=DivFullySpaced(
DivHStacked(UkIcon("map-pin", height=16), P(location)),
DivHStacked(*(UkIconLink(icon, height=16) for icon in icons))))
I specified the entire layout, font sizing, icons, and avatar using only Python. I controlled everything without needing special flexbox or CSS class knowledge.
Example is from the cards documentation page
NoteExpand to see boilerplate you’d need if you weren’t using MonsterUI
dicebear_url = 'https://api.dicebear.com/8.x/lorelei/svg?seed=James Wilson'
Div(Div(Div(
Span(Img(alt='Avatar', loading='lazy', src=dicebear_url,
cls='aspect-square h-24 w-24'),cls='relative flex h-24 w-24 shrink-0 overflow-hidden rounded-full bg-accent'),
Div(H3('James Wilson', cls='uk-h3'),
P('Senior Developer')),
cls='uk-flex uk-flex-left uk-flex-middle space-x-4'),
cls='uk-card-body space-y-6'),
Div(Div(Div(
Uk_icon(icon='map-pin', height='16'),
P('New York'),
cls='uk-flex uk-flex-row uk-flex-middle space-x-4'),
Div(A(Uk_icon(icon='mail', height='16'),href='#',cls='uk-icon-link'),
A(Uk_icon(icon='linkedin', height='16'),href='#',cls='uk-icon-link'),
A(Uk_icon(icon='github', height='16'),href='#',cls='uk-icon-link'),
cls='uk-flex uk-flex-row uk-flex-middle space-x-4'),
cls='uk-flex uk-flex-between uk-flex-middle uk-width-1-1'),
cls='uk-card-footer'),
cls='uk-card')
What MonsterUI does for you
MonsterUI is based on a simple principle: provide smart defaults while allowing full flexibility.
We’ve done this by builing upon proven approaches from some of the most innovative projects in modern web development, carefully selecting components that address the pain points of raw HTML/CSS while maintaining mature, battle-tested strategies.
MonsterUI’s core is FrankenUI, an innovative framework-free UI library by sveltecult that uses beautiful HTML-first components. FrankenUI itself was inspired by shadcn/ui by shadcn which pioneered the concept of copy-pasteable UI components for React.
Raw HTML and CSS present two key challenges: dated visual aesthetics and complex layout management. By combining FrankenUI’s framework-agnostic approach with FastHTML, MonsterUI delivers modern, beautiful components that integrate seamlessly with HTMX’s progressive enhancement paradigm - all while maintaining clean, readable code.
This isn’t just theory - we’re using MonsterUI in production for new applications we’re testing with preview customers, where it powers everything from complex dialog interfaces to dynamic content rendering. The library has been proven robust and maintainable in real-world enterprise settings.
Let’s explore some key features:
Theme
Pick a color theme for your app. There are 12 colors to choose from, each with a dark and a light mode. By default it uses the user’s system preferences.
All themes are synced so components look good on the same page regardless of whether the component is styled with FrankenUI, DaisyUI, or another framework.
Themes add the boilerplate needed to make color styling consistent throughout your app.
app, rt = fast_app(hdrs=Theme.blue.headers())
Base Components
Every HTML element in MonsterUI comes with sensible default styling. A Button isn’t just an HTML button. It’s a styled component with hover states, focus rings, and consistent padding.
Button("Save Changes")
MonsterUI provides data structures (ListT, TextT, ButtonT, etc.) for easy discoverability and tab completion for selecting styles.
For example, to style it with your Theme’s primary color, use ButtonT.primary. Primary colors are used for action buttons like “Add to Cart” or “Submit.”
Button("Add to Cart", cls=ButtonT.primary)
Semantic Text Styles
Build on the foundations of the web, MonsterUI styles semantic tags based on the HTML spec. This means that we have styled functions that match the themes that use standard HTML tags like emphasis (<em>), citation (<cite>), Marked (<mark>), small (<small>) and much more.
Card(
H1("MonsterUI's Semantic Text"),
P(
Strong("MonsterUI"), " brings the power of semantic HTML to life with ",
Em("beautiful styling"), " and ", Mark("zero configuration"), "."),
Blockquote(
P("Write semantic HTML in pure Python, get modern styling for free."),
Cite("MonsterUI Team")),
footer=Small("Released February 2025"),
)
Smart Layout Helpers
Overall page layout is made simple with the smart layout helpers (DivVStacked, DivCentered, DivFullySpaced, Grid, etc.). For example, DivVStacked stacks things vertically. Grid creates a grid in which to place components.
DivFullySpaced(
H1("Dashboard"),
DivRAligned(
Button("Export", cls=ButtonT.secondary),
Button("New Entry", cls=ButtonT.primary)))
Grid layout with smart responsive columns for mobile vs desktop
Easy args to customize responsiveness as you need
Grid(map(TeamCard, products), cols_max=3)
Note: See our layout tutorial for more details and advanced usage
Common UI Patterns
MonsterUI includes shortcuts for common UI patterns. For example, you almost always want an input text box to have a label to communicate what it’s for so we have provided LabelInput as a shortcut that creates a Label and Input pair..
LabelInput("Name", id='myid')
You can use Div, FormLabel, and Input to do this yourself, but this pattern is so common we’ve provided a shortcut. Here’s what the shortcut replaces:
Div(FormLabel('Name', fr='myid'),
Input(id='myid', name='myid'),
cls='space-y-2')
Higher Level Components
We also provide helpers to generate more complex components such as navbars, modals, cards, and tables. Each of these is built on top of several base components (ModalContainer, ModalDialog, etc.) so you could build them up yourself. However, the helper function usually gives all the flexibility you need without needing to write your own boilerplate. These helper functions create good UX behavior for you such as automatically collapsing your NavBar into a hamburger menu on mobile.
For example to create a button that opens a modal:
Div(Button("Open Modal",uk_toggle="target: #my-modal" ),
Modal(ModalTitle("Simple Test Modal"),
P("With some somewhat brief content to show that it works!",
cls=TextPresets.muted_sm),
footer=ModalCloseButton("Close", cls=ButtonT.primary),id='my-modal'))
NoteExpand to see boilerplate you’d need if you weren’t using MonsterUI
Div(Button('Open Modal', type='button', uk_toggle='target: #my-modal',
cls='uk-button uk-button-default'),
Div(Div(Div(H2('Simple Test Modal', cls='uk-modal-title'),
P('With some somewhat brief content to show that it works!',
cls='uk-text-muted uk-text-small'),
cls='uk-modal-body space-y-6'),
Div(Button('Close', type='button',
cls='uk-button uk-modal-close uk-button-primary'),
cls='uk-modal-footer'),
cls='uk-modal-dialog'),
uk_modal=True,
id='my-modal',
cls='uk-modal uk-modal-container'))
Rendering Markdown
MonsterUI provides a render_md function that converts Markdown to styled HTML, with syntax highlighting via HighlightJS for code blocks, FrankenUI classes for styling, and Tailwind for additional styling and spacing. Here’s how to use it:
render_md("""
My Document
Important note here
+ List item with bold
+ Another with code
def hello():
    print("world")
""")
Getting Started
First, install it using pip:
pip install MonsterUI
Create a new FastHTML application with MonsterUI styling:
from fasthtml.common import *
from monsterui.all import *
Choose a theme color (blue, green, red, etc)
hdrs = Theme.blue.headers()
Create your app with the theme
app, rt = fast_app(hdrs=hdrs)
@rt
def index():
socials = (('github','https://github.com/AnswerDotAI/MonsterUI'),
('twitter','https://twitter.com/isaac_flath/'),
('linkedin','https://www.linkedin.com/in/isaacflath/'))
return Titled("Your First App",
Card(
H1("Welcome!"),
P("Your first MonsterUI app", cls=TextPresets.muted_sm),
P("I'm excited to see what you build with MonsterUI!"),
footer=DivLAligned(*[UkIconLink(icon,href=url) for icon,url in socials])))
serve()
That’s it! You now have a styled application with zero configuration. The app already includes:
Automatic dark/light mode based on user preferences
Properly styled typography and spacing
Responsive layout that works on all devices
Beautiful UI components ready to use
Synchronized color scheme with DaisyUI, FrankenUI, and Tailwind
Check out our documentation for more examples and component references.
関連記事
今日のまとめ
AI日報で今日の重要ニュースをまとめ読み