GitHub Blog、AI 過剰なツール導入より「ハルネス」重視を提唱
GitHub Blog は、複雑なツールやプロンプトに頼らず、GitHub Copilot の基本機能である「ハネス」の理解と活用こそが生産性向上の鍵であると主張し、CLI やアプリなどでの実践的なワークフローを提示している。
AI深層分析を開く2026年7月28日 09:12
AI深層分析
キーポイント
複雑さよりもハネスの理解が重要
記事は、新しいツールやスキル、MCP(Model Context Protocol)への依存ではなく、GitHub Copilot という「ハネス」そのものを深く理解することが最大の生産性向上につながると論じている。
多様なインターフェースでの一貫した学習
CLI、VS Code、Visual Studio、JetBrains など複数の環境が存在するが、これらは同じハネスを共有しており、一度学習すればどこでも応用可能であると説明している。
初心者への CLI 推奨と実演
直感的で UI の学習コストが低い CLI から始めることを推奨しつつ、本記事のデモンストレーションでは GitHub Copilot アプリを使用する例を示している。
YOLOモードの活用とリスク管理
YOLOモードは承認待ちをなくして生産性を高めるが、ローカル環境や機密データがある現場での使用には注意が必要である。
サンドボックス環境の実践的推奨
安全性を確保しつつエージェントを実行するには、GitHub Codespacesや開発コンテナなどのサンドボックス環境を利用するべきである。
重要な引用
I see the biggest gains in my productivity from how I use the harness and how well I understand it.
The harness is all you need—mostly.
Learn the harness once, use it everywhere.
Agents need autonomy for you to see an increase in productivity.
編集コメントを表示
編集コメント
本記事は、流行りの機能に飛びつく前に基本を固めることの重要性を説く、実務家向けの視点を提供している。特に CLI を推奨する点は、GUI に慣れきった層にとって新たな学習アプローチとして示唆に富む内容である。
AI の最新動向に圧倒されていると感じているなら、あなただけではありません。
毎日、新しいツール、新しい MCP(モデル・プロトコル・コントローラー)、新しいモデル、新しいスキル、新しいワークフロー、新機能、そして「これ一つで AI を完全に使いこなせる」という奇妙なプロンプトを紹介する投稿が溢れています。
私はそれを信じません。
私は毎日 AI と向き合っていますが、私が実感しているのは、「少ないこと」こそが最も重要だということです。実際に大きな差を生むのは、何を入れたり設定したり、エージェントに巧妙な仕掛けをしたりすることではありません。それらは確かに興味深いですが、結局のところギミックのように感じられます。
私の生産性が劇的に向上したのは、ハネス(基盤)をどう使いこなすか、そしてそれをどれだけ深く理解しているかにかかっています。
そこで今回は、GitHub Copilot の既存機能を活用するだけで、AI への効果的な活用を劇的に改善できるシンプルなワークフローをご紹介します。奇妙なプロンプトも、他の人が知っているような特殊なスキルも不要です。必要なのはハネスだけです。ハネスこそが全て——ほぼそう言えます。
免責事項
本稿では「ハネス」という用語を「GitHub Copilot」と同義語として使用しています。この投稿の目的はシンプルさを保つことなので、GitHub Copilot はエージェント・ハネスであるとご理解ください。
スキルや MCP、指示、カスタムエージェントなどを決して必要としないと言っているわけではありません。実際、複雑なワークフローを定義し、チームのために自動化を進めるようになれば、これらの要素は非常に重要になります。私も本稿の中でいくつかのスキルを活用しています。
ここで指摘したいのは、AI で高い成果を上げるために、あれこれ特別なツールや環境が必須ではないということです。
また、世の中には質の低い生成物(スロップ)があふれています。もし不信感があるなら、エージェントに「何でもできるスキル」を作成させてみてください。喜んで応じてくれます。その生成されたスキルが実際に動作するかどうかは別として、簡単にあらゆるスキルや MCP リジストリに登録できてしまいます。
- ツールを選べばいい(どんなツールでも)
これは自明のことですよね?ツールを選ぶだけです。とても簡単です。
しかし、GitHub Copilot のファミリー内にも選択肢はたくさんあります。CLI、新しい GitHub Copilot アプリ、VS Code、Visual Studio、JetBrains など、その一例を挙げればきりがありません。
良いニュースとしては、これらの体験が次第に同じ「ハーンネス(基盤)」上に集約されつつあることです。ツールごとの詳細は異なりますが、コアとなるワークフローは一貫しています。ハーンネスの使い方を一度学べば、どこでも応用できます。
とはいえ、ハーンネスを学ぶことが鍵であることは間違いありません。そして、最も効果的な学習方法は、そのハーンネスにできるだけ近い環境で触れることです。もしこれから始められるのであれば、GitHub Copilot CLI から始めることをお勧めします。これはターミナルベースのインターフェースなので、テキストだけで完結します。複雑な UI を覚える必要はありません。プロンプトを入力するだけ。エージェントが作業を実行します。しかし、その相互作用はより直接的で即時的であり、何よりも非常に満足感が高いものです。
今回のデモでは、新しい GitHub Copilot アプリを使用します。ただし、このアプリで使われている「ハネス」は、GitHub Copilot CLI や Visual Studio Code、そして GitHub Copilot が利用可能な他の多くの場所でも同じものが使われます。
- YOLO モードを有効にする
YOLO モードは「すべて許可」とも呼ばれます。これにより、エージェントが承認を求めずに任意のコマンドを実行できるようになります。ツールの種類によって多少の違いはありますが、ほとんどの場合、チャットで /allow-all コマンドを入力するだけで有効化できます。これを設定しない場合、エージェントは何らかの作業を行うたびに停止してあなたの承認を待つことになります。
生産性の向上には、エージェントに自律性が不可欠です。もしエージェントが行うすべての行動に承認が必要であれば、自分でやったほうが早いでしょう。それよりもっと問題なのは、ユーザー体験が極端に悪化することです。誰も一日中デスクに向かい、「承認」ボタンを押し続ける運命を望んでいません。また、「承認」ボタンを連打する癖がつくと、何を確認すべきかを見ずに押すようになり、本来の目的が損なわれてしまいます。
とはいえ、エージェントを使う際は安全性も大切です。良い人でも不幸に見舞われることはあります。YOLO モードを使用する場合は、ローカルマシン上でエージェントを実行しないようにしてください。特に職場で利用する際は、組織のシステム上のデータは機密情報であり、ミスが大きなコストにつながる可能性があるため、なおさら注意が必要です。
幸いにも、サンドボックス環境でエージェントを実行するための選択肢はいくつかあります。手軽に始められるのは、GitHub Codespaces や開発用コンテナです。
- プロトタイプから始める
AI の最も魔法のような点の一つは、初期段階で何にでも簡単にプロトタイプを作れることです。かつてはそうではありませんでした。プロトタイピングはプロジェクトの完全なフェーズであり、しばしば贅沢なものとして扱われていました。しかし今では、プロンプト一つでそれを実現できます。
いくつか例を見てみましょう。
例えば、日付選択機能を持つ Web コンポーネントを作りたいとしましょう。一見単純そうですが、実はかなり複雑です。このコンポーネントで何ができるか考えてみてください。
コンポーネント内でどのように移動しますか?
選択された日付はどのような見た目になりますか?
選択範囲はどのように表示されますか?
ユーザーは日付、月、年をどうやって切り替えますか?
まずはシンプルなプロトタイプから始め、いくつかのバリエーションを作ります。私は通常、以下のようなプロンプトから始めます。
「日付選択機能を持つ Web コンポーネントのモックアップを 20 個作成してください。すべて 1 つの HTML ファイルにまとめて比較できるようにしてください。」
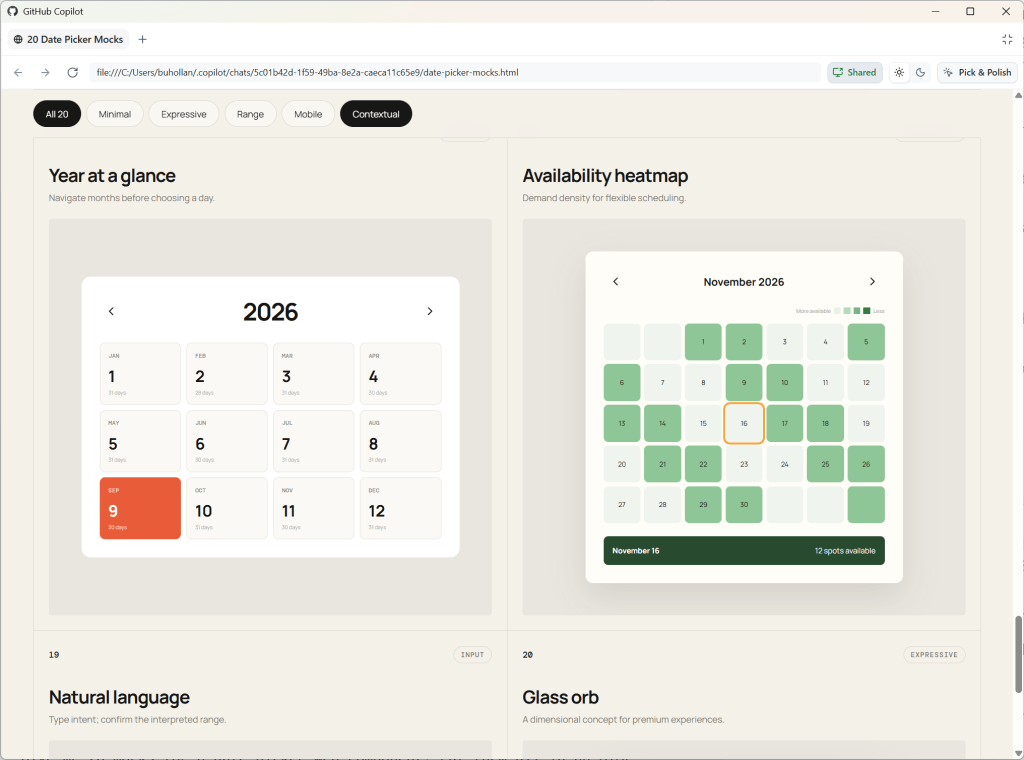
この場合、AI はさまざまなレイアウトを生成しましたが、その中には年表示から始まるモックアップも含まれていました。これは興味深いですね。私は日付選択機能で、ユーザーがまず年にズームアウトし、次に月に、そして最後に日にズームインできるような機能を追加したいと考えています。こうしたアイデアは、実際にそれを見て初めて気づくものです。
人間は、画像や形状、具体的なレイアウトといった感覚に訴えるモデルを、密集したテキストよりもはるかに速く処理できます。初期段階で低コストのプロトタイプを作成することは、複雑な概念を直感的に理解する手助けになります。
これは視覚的なタスクだけでなく、非視覚的なタスクにも当てはまります。
例えば、新しい API エンドポイントを追加したい場合でも、実装に着手する前に要件や制約を理解するために、まずは視覚的なプロトタイプを作成します。
このプロジェクトの API について視覚的なモックアップを作成してください。ユーザーが分析データをダウンロードできる新しい API エンドポイントを扱うための方法を、5 つの選択肢として提示してください。
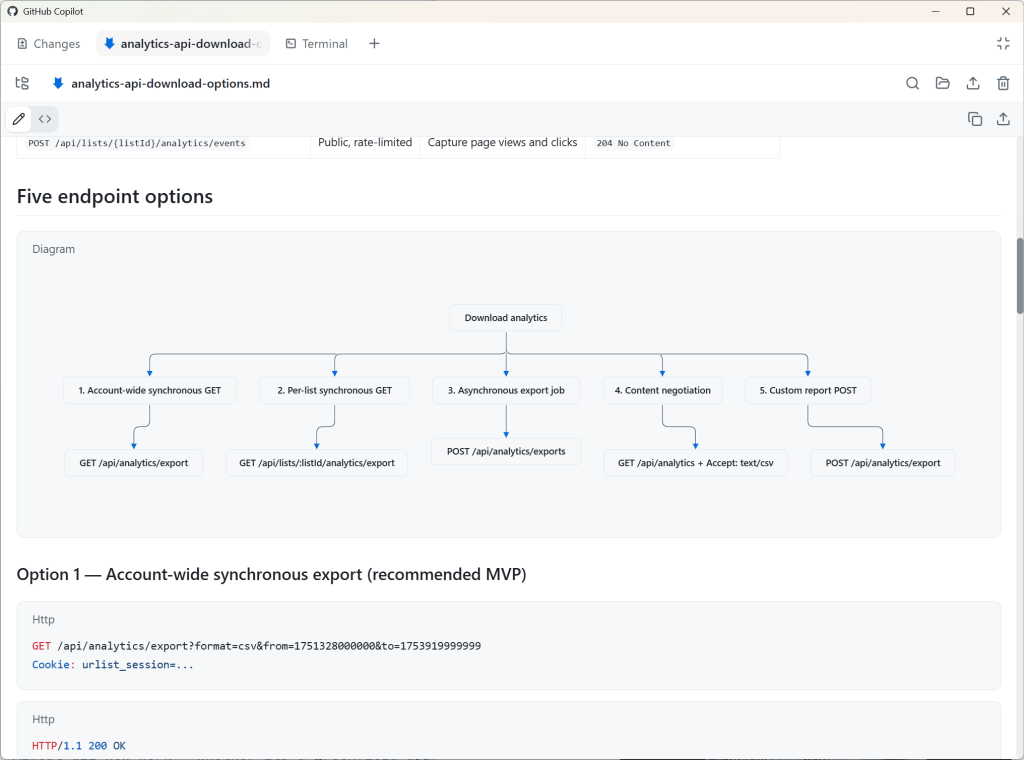
GitHub Copilot アプリは Mermaid 図をサポートしているため、エージェントはこの指示を Markdown としてレンダリングし、5 つの実装方法をマッピングします。
エージェントと作業する際、すべての要素に微妙なニュアンスがあることを忘れがちです。プロトタイピングを行うことで、こうしたニュアンスを事前に把握でき、後でやり直しに貴重な時間やトークンを費やすのを防げます。
ほとんどの作業には、GPT 5.6 Terra や Claude Sonnet といった中規模モデルを「標準的な推論」モードで使用することをお勧めします。また、特定の機能追加、バグ修正、または改善作業中は、一度選んだモデルに統一して使い続けることも推奨します。プロンプトキャッシュを使えばトークンを節約できます。モデルや推論レベルを変更しない限り、以前のチャット履歴はモデルにキャッシュされたままとなり、今後のリクエストで割引が適用されます。
- 体系的に計画する
実際に欲しいものと、最初に思っていたものの違いがわかった今からは、実装の計画を立てる時です。
新しいセッションを開始せず、GitHub Copilot の「プランモード」に切り替えてください。
「/plan 日付選択の Web コンポーネントを作成してください。ユーザーが年、月、日をズームイン・アウトできるようにしたいです。」
これは非常に曖昧な指示ですが、実際には私よりも多くの文脈情報をモデルに提供できるはずです。ここではあくまでデモとして提示しているだけです。
もし追加の文脈がないとしても問題ありません。むしろ、このステップがそのために存在するのです。
理論上は、完璧な順序で構成された完璧なプロンプトと文脈さえ用意できれば、モデルをワンショットで何でもこなせるようになります。ただし、それはあくまで理論上の話です。
しかし、現実には誰もそんなことはできません。そこで「プランニング(計画)」が役立ちます。これは、もし手作業でこの機能を実装する際に自分で答えなければならない質問をすべてモデルに投げかけることで、理想の状況に近づけるための手法です。
具体的には以下のような問いを立てます:
開始日と終了日は同じにしてよいのか?
部分的な選択は有効なのか?
ユーザーが日付をクリアできる機能が必要か?
「今日」は常に選択肢に表示すべきか?
手動での入力も許可するのか?
日付の保存形式はどうするか?
コピー&ペーストによる日付入力は許容するのか?
こうした質問は尽きることがありません。人間がすべてのエッジケースを網羅的に考えるのは不可能ですが、モデルならその多くを特定する手助けをしてくれます。
さらに、Matt Pocock 氏が提供する「grill-me」スキルをインストールすることで、プランモードの質をさらに高めることができます。これにより、モデルはより攻撃的な数の質問やエッジケースを提示できるようになります。
/plan /grill-me Build a date picker web component. I want the user to be able to zoom in and out of years, months, and days.
この計画段階は極めて重要です。AI の提案を鵜呑みにするのではなく、自ら深く問題と向き合い、モデルを導くことが目的です。ここがあなたの専門性が活きる場所です。
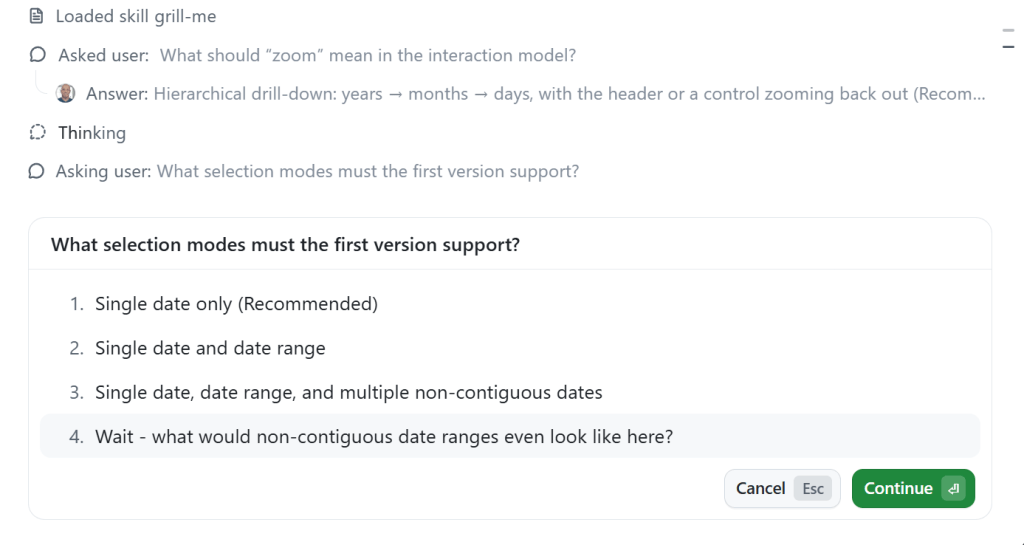
逆に、あなたからモデルに質問を投げかけることも可能です。下のスクリーンショットでは、モデルが「連続していない日付」について私に尋ねています。私はここでモデルの意図をほぼ理解していますが、認識を合わせるために確認の質問をしておきます。
確認のための質問などで中断しても、計画プロセスは継続します。
- オートパイロットで実装へ
計画が完了すると、GitHub Copilot は通常、オートパイロットモードに切り替えて実装を開始するよう促します。
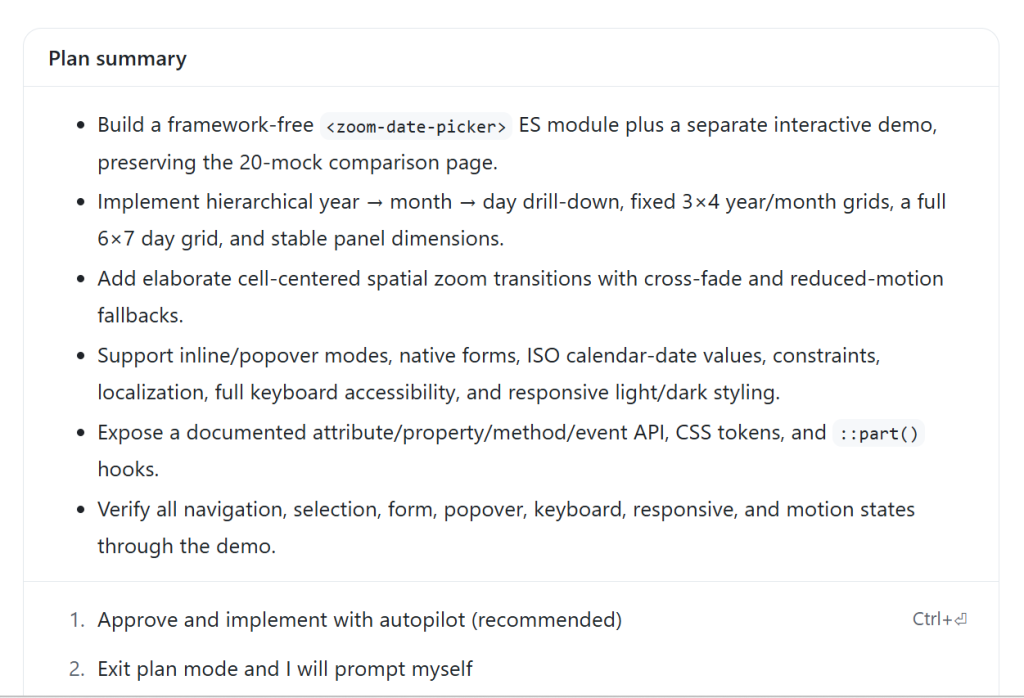
オートパイロットは内蔵されたループ機能です。モデルが実際に言った通り、つまり計画内のすべての項目を完了したことを確認することで、作業を継続させます。
GitHub Copilot はこのフェーズで自動的にオーケストレーターとして機能します。コードベース内のファイルを読み取る必要がある場合、小規模なモデルを搭載した「Explore」サブエージェントを使用します。一方、アクションが比較的複雑だと判断した場合、大規模なモデルを搭載した「General Purpose」サブエージェントを選択するのが一般的です。
カスタムエージェントや指示を通じて GitHub Copilot でオーケストレーションを細かく制御することも可能ですが、サブエージェントやマルチモデルワークフローの恩恵を受けるために特別な設定は必要ありません。これらの仕組みが存在することを知らなくても、そのままの状態ですぐに使えるようになります。
- 人間のレビューと反復
ここが最もワクワクする瞬間です。AI が何を作り上げたのかを確認できるからです。
ただし、期待した通りの結果が得られるとは限りません。これは当然のことであり、予想されることです。モデルはあなたの心を読むことはできませんし、誤りを犯すこともあります。実際に欲しいものが完成するまで、モデルと対話しながら反復していきましょう。コードの修正なのか、UI の改善なのかに関わらず、最終製品の品質を決めるのはあなたの審美眼です。
例えば、GitHub Copilot が生成した日付ピッカーがこちらです。
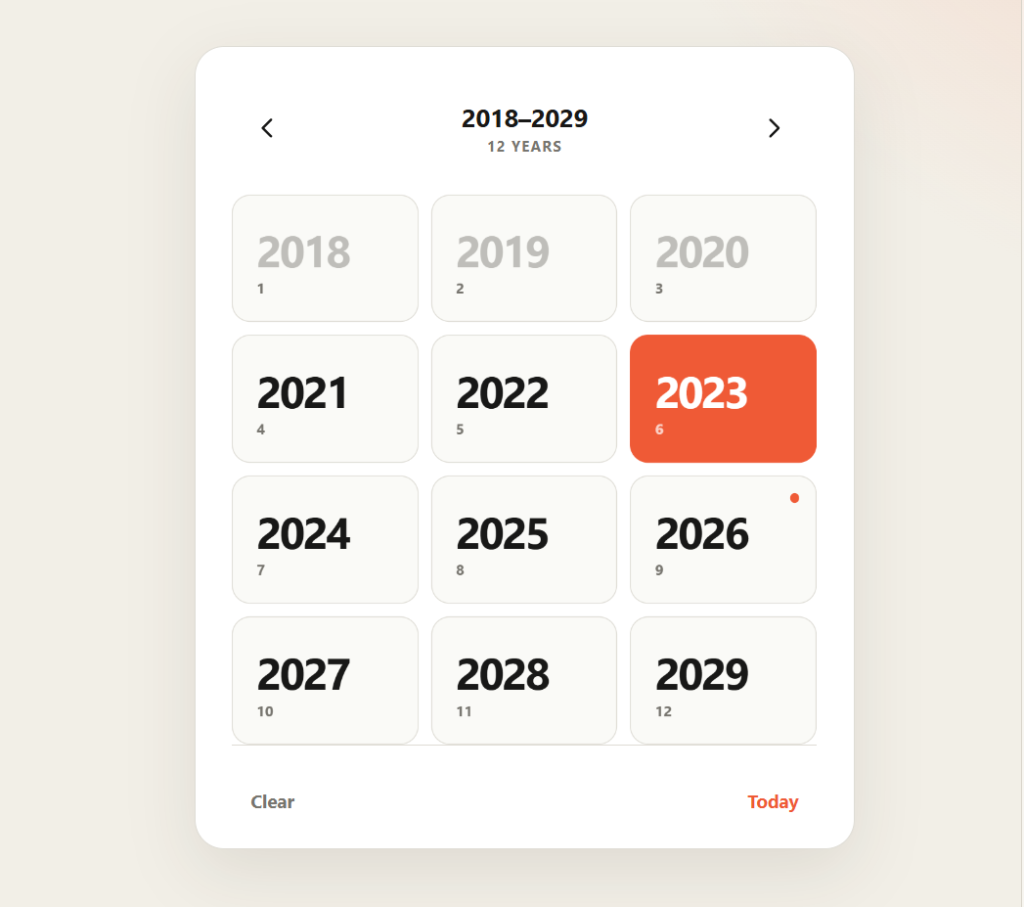
すでにいくつかの問題が見て取れます。
- アニメーションの一貫性がない
- 選択した日付の上にマウスを乗せた際、色のコントラストが不足して文字が読み取りにくい
- 上部に「12 YEARS」という表示は不要
- 「Today」ボタンを押しても、月または年ビューの状態で現在の日付へ移動しない
また、デザインについてはあまり気に入っていません。AI によって作成されたように見えすぎているからです——実際、それが事実なのです。
そこで今回はフォローアップとして、私が開発した CSS フレームワーク「Postrboard」を使用します。このスキルを登録し、CSS ファイルへの参照と使用方法をエージェントに指示するだけです。必要であれば自分でインストールすることもできますし、お好みの他の CSS フレームワークを選ぶことも可能です。モデルに対してデザインに関するガイダンスを与えるのは非常に役立ちますし、多くの場合、CSS フレームワークさえあれば十分です。
ok - landing page は不要です。最小限の環境で、コンポーネント、出力パネル、設定パネルのみを表示してください。デザインと色には /postboard スキルを使用します。
日付ピッカーについてですが、日付をクリックするとズームインしようとしてしまいますが、ズーム先の対象がないため失敗してしまいます。ここでのズームは不要です。
上部に「ズームアウト」という表示も必要ありません。
選択された日付を含む月や年にマウスを乗せたとき、ホバーテキストが見えにくくなっています。
「Today」をクリックすると、現在が月の表示か年の表示かに関わらず、その日の詳細ビューへ遷移するようにしてください。
月の下に数字を表示する必要はありませんし、枠で囲む必要もありません。同様に年についても同様です。また、上部に「12 年間」という表示も不要です。
このように会話調で書くのがポイントです。考えすぎないでください。このような小さな修正を複数行う際は、そのままモデルに指示を出せば大丈夫です。文脈さえあれば、プロンプトは完成しています。
「まあまあの成果」で満足せず、AI の出力には常に高い品質を求め続けることが最も重要です。その判断基準はあなた自身にあり、質の高い結果とそうでないものを区別できる能力こそが、あなたが提供する価値です。どんな AI にも、人間の持つ感性や創造性を完全に代替することはできません。
私が最終的に完成させた日付選択コンポーネントの例を以下に示します。この投稿の末尾で実際に動く様子を確認できます。
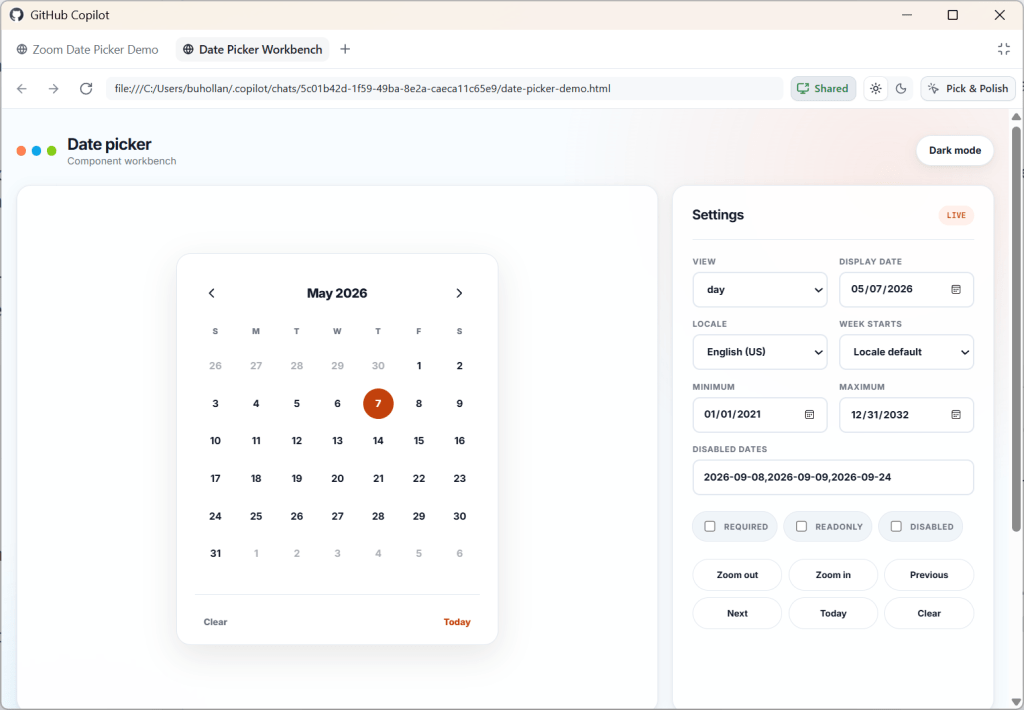
7. 結果をラバーダックレビューする
試行錯誤を重ね、作成したものに満足したら、最終的な見直しを行う時が来ました。
GitHub Copilot に「ラバーダックレビュー」を依頼しましょう。単に以下のように指示を出すだけで実行できます。
Perform a rubber duck review on this date picker component implementation
ラバーダックレビューでは、GitHub Copilot が異なる AI ファミリー(例えば GPT 5.6 Terra を使用している場合なら Sonnet)のモデルに対してレビューを依頼します。異なるモデルは学習データが異なるため、それぞれに「盲点」が存在します。複数の視点からチェックすることで、単一のモデルでは見落としがちな潜在的な問題を発見できるのです。
なお、この手法はワークフローのどの段階でも活用可能です。プロトタイプや設計案に対してもラバーダックレビューを行うことができます。要するに、「もう一度 AI にレビューしてほしい」と思えばいつでも使えるツールです。
さらに一歩踏み出したい場合は、ラバーダックレビューと Autopilot を組み合わせることもできます。これにより複数のモデルがループ状に連携し、最終的な成果物をより高品質なものへと改善していくことが可能になります。
「この日付ピッカーの実装を、自動パイロット機能を使ってラバーダックレビューしてください。結果が出たら慎重に見直し、必要な調整を加えてください。残った項目がもはや大きな改善をもたらさないと感じるまで、このレビュープロセスを繰り返してください。」
このステップを終えると、以前よりもさらに洗練されたコードが完成し、多くのエッジケースを発見できているはずです。この工程にはトークン消費が増えるというコストがかかりますが、これは将来の自分への投資です。今のうちに問題を把握しておけば、後で同じトラブルに直面することはありません。
- 収益化(完了)
ここまできたところで、ステージングしてコミットするか、あるいはこのプルリクエストに追加する次の機能に取り掛かる準備が整いました。
日付ピッカーとは直接関係ない作業については、新しいチャットセッションを開始することを推奨します。チャットセッションはトピックごとに分けるのが適切です。メインの話題から大きく逸れ始めたと思ったら、新しいセッションに移るタイミングです。
以下は、本記事でこの日付ピッカーを構築する際に私が使用したワークフローによる最終結果です。
これは少し作り込まれた例かもしれませんが、今や AI を使ってこれほどまでを実現できることに、一度立ち止まって驚嘆してみませんか?かつて日付ピッカーの作成は、挑戦すべき最も困難なタスクの一つでした。実際にそれらを構築してきた開発者たちに聞いてみてください。
複雑である必要はありません
このシンプルなワークフローは、ほとんどの人にとって十分です。シンプルであることは、マルチタスクを容易にします。エージェントがどのような状態にあるか、直前に何を行っていたかを把握しやすくなるからです。また、コンテキストウィンドウの容量にも限りがあります。
現在、AI 分野では非常に多くのことが起こっています。構築や実験できることに上限はありません。MCP サーバーやスキル、指示、カスタムエージェントを追加できます。ワークフローやループを設定したり、エージェントにプロンプトを与える別のエージェントを作成したり、仮想開発チーム全体を立ち上げたりすることも可能です。
ただし、誰も本当に何をしているのか分かっていないことを忘れないでください。私たちは皆、試行錯誤しながらこの道を探っています。今日では AI に対する魔法のような呪文とされるものが、明日にはアンチパターンになっていることも珍しくありません。
最も重要なのは、できる限りシンプルな方法で、再現性が高く高品質な結果を得ることです。ハarness(基盤)の使い方を身につければ、問題なくこなせるはずです。
GitHub Copilot を試す >
この記事は The GitHub Blog に掲載されました。
原文を表示
If you’re feeling overwhelmed by AI right now, you’re not alone.
Every day it seems there is a new tool, new MCP, new model, new skill, new workflow, new feature, new social post that is some form of “Hey look! I have completely figured out AI with this one weird prompt.”
I…don’t believe you.
I work with AI every single day, and what I’m finding is that less is way more. It’s not about what I install or configure or trick the agent into doing that makes any real difference. That stuff is interesting, but at the end of the day it feels like gimmicks.
I see the biggest gains in my productivity from how I use the harness and how well I understand it.
So in this post, I’m sharing you a simple workflow that you can use to drastically improve your effectiveness with AI just by using existing features of GitHub Copilot. No weird prompts. No skill everyone else seems to know about. Just the harness. The harness is all you need—mostly.
Disclaimers
I’m using the term “harness” interchangeably with “GitHub Copilot.” The point of this post is to keep things simple, so just know that GitHub Copilot is an agent harness.
I don’t mean to insinuate that you won’t ever need any skills or MCPs or instructions or custom agents, etc. In fact, those things will become quite important as you progress and need to define complex workflows and automate things for your teams. In fact, I use a few throughout this blog post!
What I am pointing out here is that you do not need any of those things to be highly successful with AI.
Also, there is a lot of slop out there. If you don’t believe that, ask the agent to create a skill to do anything at all. It will happily oblige. Whether or not that generated skill actually works, it can be easily published to any number of skill or MCP registries.
- Pick a tool, any tool
This is an obvious one, right? Pick a tool! It’s so easy!
But even within the GitHub Copilot family, there are a lot of options. These include the CLI, the new GitHub Copilot app, VS Code, Visual Studio, and JetBrains, just to name a few.
The good news is that these experiences are increasingly being centralized on the same harness. The details can differ by tool, but the core workflow is consistent. Learn the harness once, use it everywhere.
That said, I do believe that learning the harness is key, and the best way to learn it is to be as close to it as possible. So if you are just starting out, I’d recommend beginning with the GitHub Copilot CLI. It’s a terminal interface, which means it’s just text. There isn’t much UI to learn. You enter a prompt. The agent does things. But the interaction is more direct, immediate, and, frankly, very satisfying.
For this demonstration, I’ll be using the new GitHub Copilot app. But the harness that app uses is the exact same thing you’ll be using if you are using the GitHub Copilot CLI, Visual Studio Code and many other places you can find GitHub Copilot.
- Turn on YOLO mode
YOLO mode is also known as “Allow All.” This lets the agent execute any command without asking permission. This can vary depending on the tool you are using, but for most it is simply an /allow-all command in the chat. Otherwise, the agent is going to stop and wait for your approval every single time it needs to do some work.
Agents need autonomy for you to see an increase in productivity. If you have to approve everything the agent does, you might as well just do it yourself. Besides, that’s a miserable user experience. Nobody wants to be relegated to sitting at a desk pressing the “Approve” button all day. And pressing “Approve” over and over just trains you not to read what you are being asked to approve, which defeats the purpose.
You want to be safe with agents, though. Bad things happen to good people. When using YOLO mode, you don’t want to run the agent on your local machine. This is especially true when you are using them at work—data is private on your organization’s systems, and mistakes can be costly.
Fortunately there are a bunch of options for running agents in sandboxes. An easy one to get started with is GitHub Codespaces or development containers.
- Start with a prototype
One of the most magical things about AI is that you can easily prototype anything and everything up front. Historically, this was not the case. Prototyping was a full phase of a project, and were often a luxury. Now, you can make one with a prompt.
Let’s look at a few examples.
Let’s say we want to build a date picker web component. That seems straighforward, but it’s actually quite complex. Think of all the different things you might want to do with it.
How do you navigate within the component?
What does the selected date look like?
What does a selected range look like?
How does the user navigate between days, months, and years?
Start with a simple prototype and get several variations. I usually start with something like this:
Give me 20 mocks for a date picker web component. Put them all in an HTML file so I can compare.
In this case, the AI generated a bunch of different layouts, but one of them is a mock where it starts with the year view. That’s interesting. I would like my date picker to enable the user to zoom out to the year, then into the month, and finally to the day. These are the kinds of things you don’t consider until you see them.
As humans, we process sensory-rich models like images, shapes, and tangible layouts much faster than dense text. Creating low-effort prototypes early on helps make complex concepts immediately intuitive.
And this applies to non-visual tasks as well.
For instance, if I want to add a new API endpoint, I’ll still create a visual prototype to understand the requirements and constraints before diving into the implementation.
Create a visual mockup of the API for this project. Add five options for how we could handle a new API endpoint that allows the user to download their analytics data.
Since the GitHub Copilot app supports Mermaid diagrams, the agent renders this as Markdown, mapping out five different ways we could implement this API endpoint.
When working with agents, it’s easy to forget that everything is nuanced. Prototyping helps uncover the nuances up front, so you avoid spending valuable time and tokens on rework.
I recommend using a medium-sized model, such as GPT 5.6 Terra or Claude Sonnet, on medium reasoning for most work. I also recommend you stick with whatever model you choose here for the duration of this particular feature, bug, or enhancement. Prompt caching will save you tokens. As long as you don’t switch to a different model or reasoning level, your previous chats remain cached with the model, giving you a discount on future requests.
- Plan methodically
Now that you know what you actually want versus what you initially thought you wanted, it’s time to plan out the implementation.
Switch to plan mode in GitHub Copilot without starting a new session.
“/plan Build a date picker web component. I want the user to be able to zoom in and out of years, months, and days.”
That’s a pretty vague prompt, and you’ll likely have more context for the model than I do here, but this is just a demonstration. If you don’t have more context, it’s OK. That’s exactly what this step is for.
In theory, you can get a model to one-shot anything if you compose the perfect prompt with the perfect context in the perfect order. In theory.
But none of us can do that. Planning helps you get closer to that ideal, though, by asking all of the questions that you would need to answer yourself along the way if you were to build this out by hand:
Can the start and end date be the same?
Are partial selections valid?
Should users be able to clear the date?
Should “today” always be a visible option?
Is manual entry allowed?
What format is the date stored in?
Should pasting in dates be allowed?
The list goes on and on. You cannot possibly think of all of these edge cases, but the model can help you identify many of them.
You can make plan mode even more aggressive in the sheer number of questions and edge cases it asks about by installing the “grill-me” skill from Matt Pocock.
/plan /grill-me Build a date picker web component. I want the user to be able to zoom in and out of years, months, and days.
This planning step is critical. The point is not for you to just accept every suggestion from the AI. If you do that, you are negating the value of this planning process. The point is for you to deeply engage with the problem and guide the model. This is where your expertise comes into play.
You can also ask the model questions back. In the screenshot below, it asks me about “non-contiguous dates.” I’m pretty sure I know what the model means here, but I’m going to ask for clarification so we’re on the same page.
The planning process will keep going even if you interrupt to ask clarifying questions, etc.
- Implement with Autopilot
Once the plan is finished, GitHub Copilot will likely prompt you to switch to Autopilot and start implementing the plan.
Autopilot is a built-in loop. It forces the model to continue working by ensuring that it has actually done what it said it would do—which in this case is completing every item in the plan.
GitHub Copilot will automatically act as an orchestrator during this phase. If it needs to read files in the codebase, it will use the “Explore” subagent with a small model. If it deems an action relatively complex, it will likely choose the “General Purpose” subagent with a larger model. While you can get fine-grained control over orchestration in GitHub Copilot with custom agents and instructions, you don’t need to do anything special to get the advantages of subagents and multimodel workflows. This works out of the box, even if you did not know that any of these things existed.
- Human review and iteration
This is where you get your dopamine hit. You get to see what the AI has created.
But it’s likely that you won’t get exactly what you wanted. That’s normal and expected. The model cannot read your mind, and it is error-prone. Iterate with the model until you get what you actually want. Whether that’s just code or an improved UI, this is the part where your taste will decide the quality of the final product.
For instance, here’s the date picker that GitHub Copilot gave me.
Already I can see it has some issues:
Animations are inconsistent
Text is unreadable when hovering over a selected date because of color contrast
It doesn’t need to say “12 YEARS” at the top.
When I click “Today”, it doesn’t take me to the day if I’m in the month or year view.
Also, I don’t love the design. It looks a little too much like it was created by AI—because it was!
So here we’re just in follow-up mode. I’m going to use a CSS framework I created called Postrboard. I add it as a skill that just points to the CSS and tells the agent how to use it. You can feel free to install it yourself if you’d like to use it, or you can pick any other CSS framework out there that you like. Giving the model some design guidance is quite helpful, and often a CSS framework is all you need.
ok - we don't need a landing page here - just the component, output and settings panel in a minimal setting. Use the /postboard skill for the design and colors.
For the date picker, when I click on the day, it tries to zoom in, but can’t because there is nothing to zoom to. There should be no zoom there.
It doesn’t need to say “Zoom Out” at the top
When I mouse over a month or year that contains the selected day, I cannot read the hover text.
When I click “Today” it should take me to that day view, even if I’m on the month or the year.
The months don’t need numbers under them and they don’t need to be in boxes
Same goes for years. And it doesn’t need to say “12 years” at the top.”
Notice how conversational this is. Don’t overthink it. When you’re fixing a bunch of small things like this, just give it to the model. If you’ve got the context, you’ve got the prompt.
The most important thing is not to settle for AI output that is “good enough.” Insist on quality. Be ruthless about it. That part is still your responsibility, and knowing what a quality result is from something that isn’t is the value that you bring. No AI will ever replace your human touch and creativity.
Here’s what my final date picker looks like. Scroll to the end of this post to see it in action.
- Rubber duck the result
After you’ve iterated and are happy with what you’ve created, it’s time to do a final review.
Request a Rubber Duck review from GitHub Copilot. You can do this just by asking for it:
Perform a rubber duck review on this date picker component implementation
In a Rubber Duck review, GitHub Copilot will request a review from a model of a different AI family. For instance, since I was using GPT 5.6 Terra, it requested a review from Sonnet. Different models were trained on different data, so they have different blind spots. A Rubber Duck review helps identify potential issues that might be missed by a single model.
Note that you can use this at any point in this workflow. You can rubber duck prototypes. You can rubber duck plans. It all just depends on if you want a second AI review on something.
And if you want to take this a step further, you can combine rubber duck with Autopilot to get the models to work together in a loop to improve the final result.
“/autopilot rubber duck this date picker implementation. When you have the result, review it carefully and make any necessary adjustments. Repeat the rubber duck review until both you and the reviewing model agree that the only items that remain have diminishing returns.”
After this step, you will have an even more refined result than before and will have likely identified many extra edge cases. This step does cost more tokens, but you are really battle-hardening the code. Think of it as an investment in your future self who won’t have to deal with these issues because you caught them now.
- Profit
At this point, you’re ready to stage and commit, or move on to the next feature you want to add along with this pull request.
I’d recommend starting a new chat session for anything you do next that doesn’t have to do with this date picker. You can think of chat sessions as being topical; if you start to diverge too much from the main topic, it’s probably time for a new session.
Here’s the final result from my workflow building the date picker for this post.
I realize that this is a bit of a contrived example, but can we all just pause for a moment and marvel at what we’re able to pull off with AI now? Building a date picker used to be one of the hardest things you could try to do. Just ask any of the heroes out there who have built them.
Things don’t have to be complicated
This simple workflow will be enough for most people. The simplicity also helps you multitask. It’s easier to reason about what agent is in what state and what you were doing last when you keep things simple. Your context window is limited too.
There is so much happening in the AI space right now. There is no upper limit on the things that you can build and experiment with. You can add MCP servers, skills, instructions, and custom agents. You can set up workflows and loops, create agents that prompt agents, and stand up entire virtual dev teams.
But keep in mind that nobody really knows what they are doing right now. We’re all figuring this out as we go. A lot of what is today’s magical incantation for AI will be tomorrow’s anti-pattern.
Just focus on getting a repeatable, high-quality result in the simplest way that you can. Learn the harness and you’ll be just fine.
Try GitHub Copilot >
The post The harness is all you need (mostly) appeared first on The GitHub Blog.
関連記事
News to Guide
ニュースの次に確認する
発表内容を、現在の料金や仕様と照らし合わせられる関連ガイドです。
今日のまとめ
AIデイリーブリーフで今日の重要ニュースをまとめ読み