認証コードフローを使用してMCPサーバーをAmazon Bedrock AgentCore Gatewayに接続する方法
AWSはAmazon Bedrock AgentCore GatewayがOAuth 2.0 Authorization Code flowをサポートし、認証が必要なMCPサーバーへの安全な接続を一元管理できるようになったことを発表した。
キーポイント
AgentCore Gatewayの役割
組織内のAIエージェントがツールやMCPサーバーに接続する際の認証、可観測性、ポリシー適用を単一エンドポイントで一元管理する層を提供する。
OAuth 2.0 Authorization Code flowのサポート
エンタープライズ向けMCPサーバーで一般的なOAuth 2.0認証に対応し、AgentCore Identityを通じて認証コードフローによる安全な接続を実現した。
スケーリング時の課題解決
組織がAIエージェントを拡大するにつれてMCPサーバー数が急増し、IDEレベルでの接続・認証管理が非現実的になる問題を、単一のコントロールプレーンで解決する。
主要ベンダーのMCPサーバー対応
AWS、GitHub、Salesforce、Databricksなど主要テック企業が提供するプロダクショングレードのMCPサーバーへのアクセスを一元化できる。
GitHub OAuthクライアントの設定
AgentCore IdentityでOAuthクライアントを作成し、GitHubプロバイダーを選択してクライアントIDとシークレットを設定する。コールバックURLをGitHub OAuthプロバイダーに登録する必要がある。
暗黙的同期のフロー
CreateGatewayTarget呼び出し時に、AgentCore GatewayがAgentCore Identityからワークロードアクセストークンを取得し、OAuth 2.0アクセストークンを要求する。管理者が認可を完了すると、MCPサーバーのツール定義が取得・キャッシュされる。
ターゲット作成時の設定
MCPバージョン2025-11-25以降を使用し、認可コードグラント(3LO)を選択する。リターンURLを設定し、スコープや追加パラメータを指定できる。
重要な引用
AgentCore Gateway centralizes this complexity, giving teams a single control plane for MCP access while giving developers a frictionless experience.
With this, your agents can securely access protected MCP servers without embedding credentials in application code or managing the token lifecycle manually.
Instead of configuring each MCP server individually per IDE, teams point to one Gateway URL for consistent access to their full MCP toolset across tool.
AgentCore Gateway requests a workload access token from the AgentCore Identity Credential Provider, passing the AgentCore Gateway workload identity and a user ID in the format {gatewayId}{targetId}{uuid}.
After creating the target, the target is in Needs Authorization status. The admin opens the authorization URL in their browser, signs in, and grants the requested permissions to the AgentCore Gateway.
影響分析・編集コメントを表示
影響分析
この発表は、企業がAIエージェントを本格導入する際の運用上のボトルネックである認証・接続管理を解決する実用的なソリューションを示しており、AWSの生成AIプラットフォーム戦略におけるインテグレーション深化を反映している。特にOAuth連携の標準化は、サードパーティサービスとの連携拡大に道を開く。
編集コメント
技術的な実装詳細よりも、エンタープライズ環境での実用性とスケーリング課題の解決に焦点を当てた実務指向の記事。AWSの生成AIエコシステム統合戦略の一端を示す内容。
Amazon Bedrock AgentCore Gateway は、組織全体で AI エージェントがツールや MCP サーバーに接続する方法を管理するための集中型レイヤーを提供します。認証、観測可能性(observability)、ポリシー適用を単一のエンドポイントに統合し、各 MCP サーバー接続を個別に設定して保護する必要をなくします。
この投稿では、Authorization Code flow を使用して AgentCore Gateway を OAuth で保護された MCP サーバーに接続するように構成する方法について説明します。
MCP サーバーエンドポイントとしての AgentCore Gateway の使用
組織が AI エージェントの展開をスケールアップするにつれて、各チームが依存する MCP サーバーの数は急速に増加します。開発者は、複数の MCP サーバーへのアクセス用の単一エンドポイントとして Amazon Bedrock AgentCore Gateway を採用しています。IDE ごとに各 MCP サーバーを個別に設定する代わりに、チームは単一の Gateway URL を指し示すことで、ツール全体を通じて MCP ツールセットの一貫したアクセスを実現します。
このパターンは、チームがカスタムMCPサーバーから離れ、AWS、GitHub、Salesforce、Databricksなどの本番環境向けのサードパーティ製MCPサーバーを採用するにつれて加速しています。これらのMCPサーバーの多くは、フェデレーションを通じて主要なアイデンティティプロバイダーによって保護されていますが、他のサーバーは独自の認証サーバーによってセキュリティが確保されています。組織あたりのMCPサーバー数が増加するにつれて、IDEレベルでの接続、認証、ルーティングの管理は持続不可能になります。AgentCore Gatewayはこの複雑さを一元化し、チームにはMCPアクセスのための単一のコントロールプレーンを提供すると同時に、開発者には摩擦のない体験を提供します。
多くのエンタープライズMCPサーバーはOAuth 2.0認証を必要とし、エージェントがツールを呼び出す前にユーザーに代わって認証を行う必要があります。AgentCore Gatewayは、Amazon Bedrock AgentCore Identityを通じてOAuth 2.0 Authorization Code flowをサポートしています。これにより、アプリケーションコードに資格情報を埋め込んだり、トークンのライフサイクルを手動で管理したりすることなく、エージェントは保護されたMCPサーバーに安全にアクセスできます。
主要な用語
- AgentCore Gateway ユーザー:MCP クライアントを通じて Amazon Bedrock AgentCore Gateway のツールを利用するエンドユーザー。Gateway ユーザーは AgentCore Gateway 自体を管理しません。彼らは、単一の AgentCore Gateway URL を使用して、自分に利用可能なツールにアクセスします。
- 管理者ユーザー:Amazon Bedrock AgentCore Gateway の管理および保守を行うユーザー。このユーザーは、AgentCore Gateway ユーザーが利用できるように、MCP サーバー、ツール、または API を AgentCore Gateway に接続する責任を負います。
- MCP サーバー:本稿では、MCP サーバーが OAuth 2.0 Authorization Code flow(認可コードフロー)によって保護されており、認証を完了するためにユーザーの対話が必要であると仮定します。これは、Client Credentials(クライアント資格情報)や Token Exchange(トークン交換)などのマシン間認証方式とは異なり、これらの方式ではユーザーの介入は不要です。本稿で説明するパターンは、ユーザー委任による認可を必要とする MCP サーバーに特に関連します。
Authorization Code flow の動作原理
Authorization Code Grant 型をサポートするために、ターゲット作成には2つの方法を提供しています。
- MCP サーバーターゲット作成時の暗黙的同期
この方法では、管理者ユーザーが CreateGatewayTarget、UpdateGatewayTarget、または SynchronizeGatewayTargets の操作中に認可コードフロー(Authorization Code flow)を完了します。これにより、AgentCore Gateway は MCP サーバーのツール(Tools)を事前に検出し、キャッシュすることができます。
- MCP サーバーターゲット作成時にスキーマを事前に提供
この方法では、管理者ユーザーが CreateGatewayTarget または UpdateGatewayTarget 操作の実行時にツールスキーマを直接提供し、AgentCore Gateway が MCP サーバーから動的に取得するのではなく処理を行います。AgentCore Gateway は提供されたスキーマを解析し、ツール定義をキャッシュします。これにより、管理者ユーザーはターゲットの作成または更新時に認可コードフロー(Authorization Code flow)を完了する必要がなくなります。これは、作成や更新の操作中に人間の介入が不可能な場合に推奨されるアプローチです。また、MCP サーバーターゲットから提供されるすべてのツールを公開したくない場合にも、この方法は有益です。
注: この方法ではツールスキーマを事前に提供するため、SynchronizeGatewayTargets 操作はサポートされていません。ターゲット設定を更新することで、Method 1 と Method 2 の間でターゲットを切り替えることができます。
つまり、AgentCore Gateway のユーザーは、MCP サーバーの認証サーバーに対して認証を促されることなく list/tools を呼び出すことができます。これは、キャッシュされたツールを取得するためです。認可コードフローは、Gateway ユーザーがその MCP サーバー上のツールを呼び出した場合にのみトリガーされます。これは、単一の Gateway に複数の MCP サーバーが接続されている場合に特に有益です。ユーザーは、すべての MCP サーバーに対して認証を行うことなく、完全なツールカタログ(キャッシュされたツール)を閲覧でき、呼び出した特定のサーバーに対してのみフローを完了すればよいのです。
URL セッションバインディング
URL セッションバインディング は、OAuth 認可リクエストを開始したユーザーが、同意を与えたのと同じユーザーであることを検証します。AgentCore Identity が認可 URL を生成する際、同時にセッション URI も返されます。ユーザーが同意処理を完了すると、ブラウザはセッション URI を含むコールバック URL へリダイレクトされます。その後、アプリケーションは CompleteResourceTokenAuth API を呼び出し、ユーザーのアイデンティティとセッション URI の両方を提示する責任を負います。AgentCore Identity は、認可コードをアクセストークンと交換する前に、フローを開始したユーザーがそれを完了したのと同じユーザーであることを検証します。これにより、ユーザーが誤って認可 URL を共有し、別の人物が同意処理を完了して間違った当事者にアクセストークンが付与されるというシナリオを防ぎます。認可 URL とセッション URI は 10 分間のみ有効であり、悪用される可能性のある時間的窓をさらに制限します。セッションバインディングは、管理者ターゲットの作成(暗黙的同期)時およびツール呼び出し時に適用されます。
解決策の概要
この投稿では、GitHub MCP サーバーを Amazon Bedrock AgentCore Gateway に接続する方法として、Method 1(ターゲット作成時の管理者による同期)および Method 2(ターゲット作成時にツールスキーマを事前に提供する方法)の両方について説明します。関連するコードは、このリポジトリで入手可能です。
前提条件
この投稿と併せて、以下の前提条件を必ず満たしてください。
- GitHub OAuth アプリケーションの設定
https://github.com/settings/apps にアクセスし、「New GitHub App」をクリックします。
- 詳細を入力:
GitHub アプリ名: AgentCore Gateway GitHub MCP
- ホームページ URL(GitHub アプリのウェブサイトの完全な URL): ホームページ URL は、ユーザーが OAuth アプリを閲覧した際に表示されるクリック可能なリンクとして表示され、アプリについて詳しく学べるようになっています。これにより、ユーザーは GitHub アカウントへのアクセスを要求しているアプリの正当性を確認できます。
- 認証コールバック URL: 認証コールバック URL(リダイレクト URI)は、ユーザーが OAuth アプリを承認(または拒否)した後に GitHub がユーザーをリダイレクトする URL です。現時点では https://example.com/auth を設定してください。後でこの値を変更します。
- 高度な設定: ここでは推奨されるデフォルト値を確認します。ただし、組織のポリシーに基づいてセキュリティのベストプラクティスに従ってください。
ユーザー認証トークンの有効期限: 無効化 – 有効にすると、AgentCore Identity がユーザーのトークンを自動的に更新できるようになります。
- インストール時にユーザー認証(OAuth)を要求: 無効化。
- デバイスフロー: 無効化 – ブラウザを備えていないデバイス(CLI ツール、スマート TV、CI 環境など)での認証を可能にします。
- Webhook: 無効化。
- ユーザー権限: 使用ケースに依存しますが、現時点ではデフォルトのままにしてください – これらの権限は、ユーザーが OAuth 認証フローを完了した際に付与されます。必要なものだけをリクエストしてください。ユーザーは同意画面でこれらの権限を確認でき、過度な権限は信頼性を低下させます。
-
- 「Create GitHub App」を選択します。
- アプリの Client ID(App ID とは異なります)を必ずメモしてください。
- OAuth アプリの一般設定の下で、「Generate a new client secret」を選択します。GitHub は作成時に一度だけクライアントシークレットを表示するため、必ずメモしてください。
- IAM 権限: このブログ記事のコードを実行するには、適切な IAM 権限が必要です。これらは必要な最小限の IAM 権限です。
- コードリポジトリ: まず GitHub リポジトリをクローンし、次に github-mcp-server.ipynb を開きます。このブログ記事のコンソール指示に従って概念を理解し、その後コードのウォークスルーを確認することをお勧めします。
git clone https://github.com/awslabs/amazon-bedrock-agentcore-samples.git

cd 01-tutorials/02-AgentCore-gateway/05-mcp-server-as-a-target/03-authorization-code-flow
- GitHub credential provider: このステップでは、Agentcore Identity Credential Provider(エージェントコアアイデンティティ資格情報プロバイダー)を設定します。Amazon Bedrock AgentCore コンソールで、AgentCore Identity に移動し、OAuth クライアントを作成します。
OAuth クライアントに名前を付け、含まれている GitHub プロバイダーを選択し、GitHub OAuth アプリのクライアント ID とクライアントシークレットを入力します。
- AgentCore Identity OAuth クライアントのコールバック URL をコピーし、作成した GitHub OAuth プロバイダーに戻って、Authorization callback URL(認可コールバック URL)を更新してください。
MCP Server ターゲット作成時の暗黙的同期
このセクションでは、MCP Server ターゲット作成時に発生する暗黙的同期の仕組みについて説明します。AgentCore Gateway の実行ロールに GetWorkloadAccessTokenForUserId および CompleteResourceTokenAuth 権限が付与されていることを確認してください。まず、フローの理解から始めましょう。
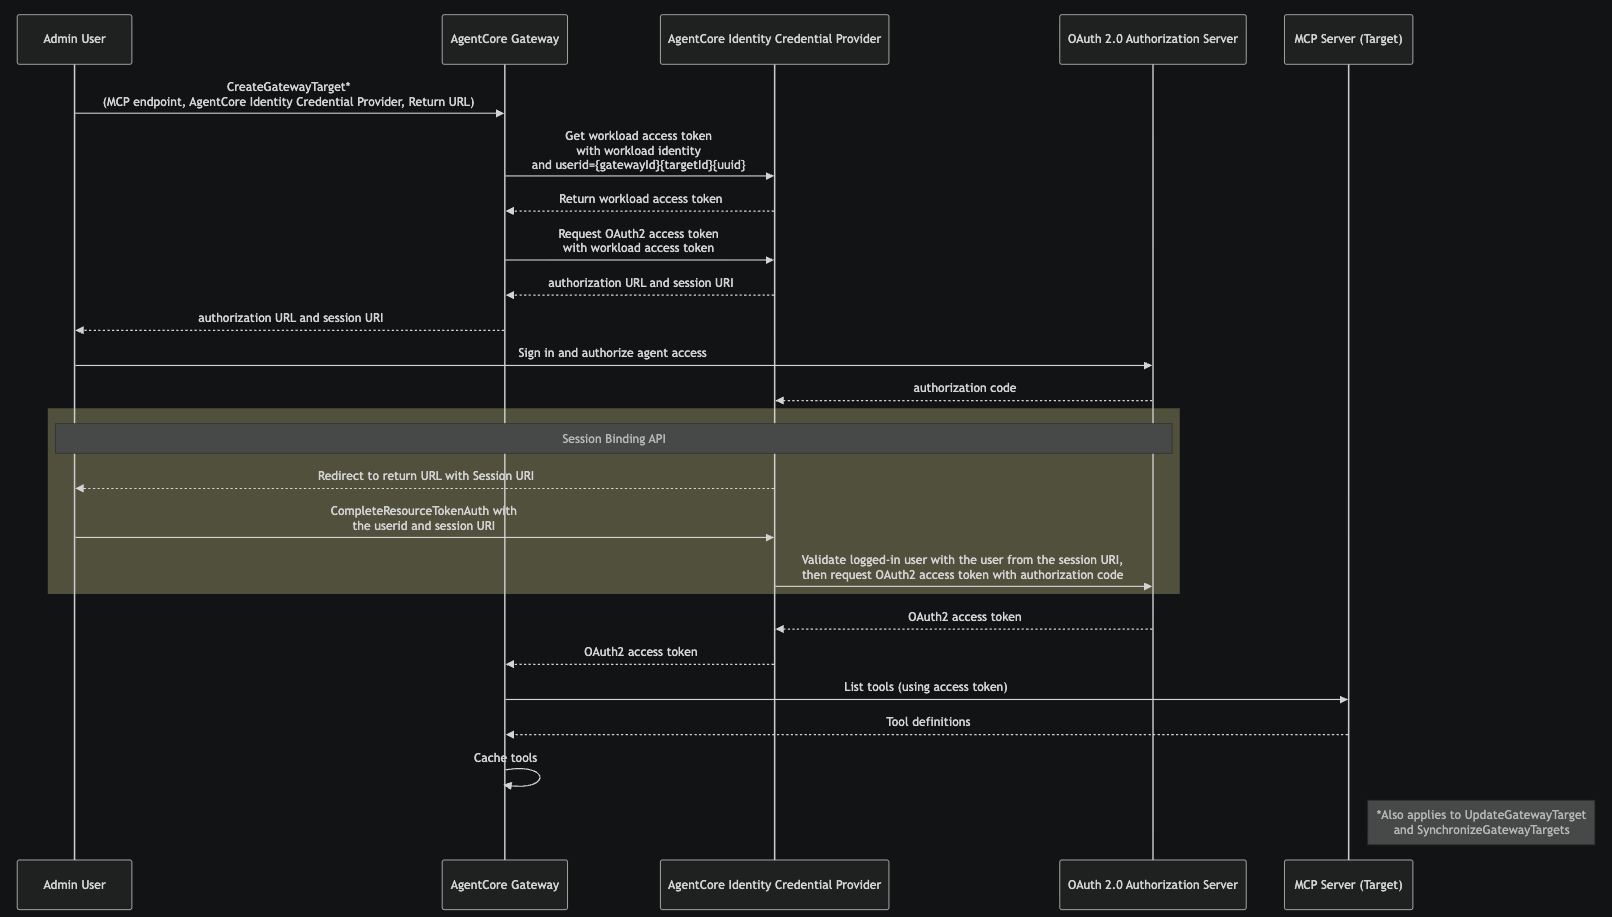
- 管理者ユーザーは、MCP サーバーのエンドポイント、AgentCore ID 資格情報プロバイダー、およびリターン URL を指定して CreateGatewayTarget を呼び出します。これにより、AgentCore Gateway が接続する MCP サーバーと、OAuth 2.0 トークンの取得に使用する資格情報プロバイダーが指定されます。このフローは、UpdateGatewayTarget および SynchronizeGatewayTargets 操作にも適用されます。
- AgentCore Gateway は、AgentCore Gateway のワークロード ID と {gatewayId}{targetId}{uuid} 形式のユーザー ID を渡して、AgentCore ID 資格情報プロバイダーからワークロードアクセストークンを要求します。このワークロードアクセストークンは、後続の資格情報操作に対して AgentCore Gateway が承認された呼び出し元であることを識別します。
- ワークロードアクセストークンを使用して、AgentCore Gateway は AgentCore ID 資格情報プロバイダーから OAuth 2.0 アクセストークンを要求します。これにより、管理者ユーザーに認可 URL とセッション URI が提供されます。この段階では、ターゲットは「認可が必要(Needs Authorization)」ステータスになります。
- 管理者はブラウザで認可 URL を開き、サインインして、AgentCore Gateway に対して要求された権限を付与します。
- 管理者が同意を与えた後、OAuth 2.0 認可サーバーは、AgentCore ID 資格情報プロバイダーの登録済みコールバックエンドポイントに認可コードを送信します。
- 資格情報プロバイダーは、セッション URI を含むリターン URL に管理者のブラウザをリダイレクトします。管理者アプリケーションは、ステップ 2 で返されたユーザー ID とセッション URI を提示して CompleteResourceTokenAuth を呼び出します。資格情報プロバイダーは、認可フロー(ステップ 3)を開始したユーザーが、同意を完了したユーザーと同じであることを検証します。これにより、認可 URL が誤って共有された場合のトークンハイジャックを防ぎます。AWS コンソールからフローが開始された場合は、このステップは自動的に処理されます。他のコンテキストから開始された場合、管理者が CompleteResourceTokenAuth API を直接呼び出す責任を負います。
- セッションバインディング検証が成功した後、資格情報プロバイダーは OAuth 2.0 認可サーバーと交換して、OAuth 2.0 アクセストークンを取得します。
- このアクセストークンは、MCP サーバーターゲット上のツールを一覧表示するために使用されます。ターゲットから返されたツールの定義は、AgentCore Gateway でキャッシュされます。
注:その後、ターゲットに対する更新または同期が行われても、アクセストークンは再利用されません。代わりに、AgentCore ID は認可サーバーから新しいアクセストークンを取得します。
ターゲットの作成
まず、Amazon Bedrock AgentCore GatewayとTargetを作成し、MCP Serverターゲットの作成時に暗黙的な同期(implicit sync)がどのように機能するかを確認しましょう。
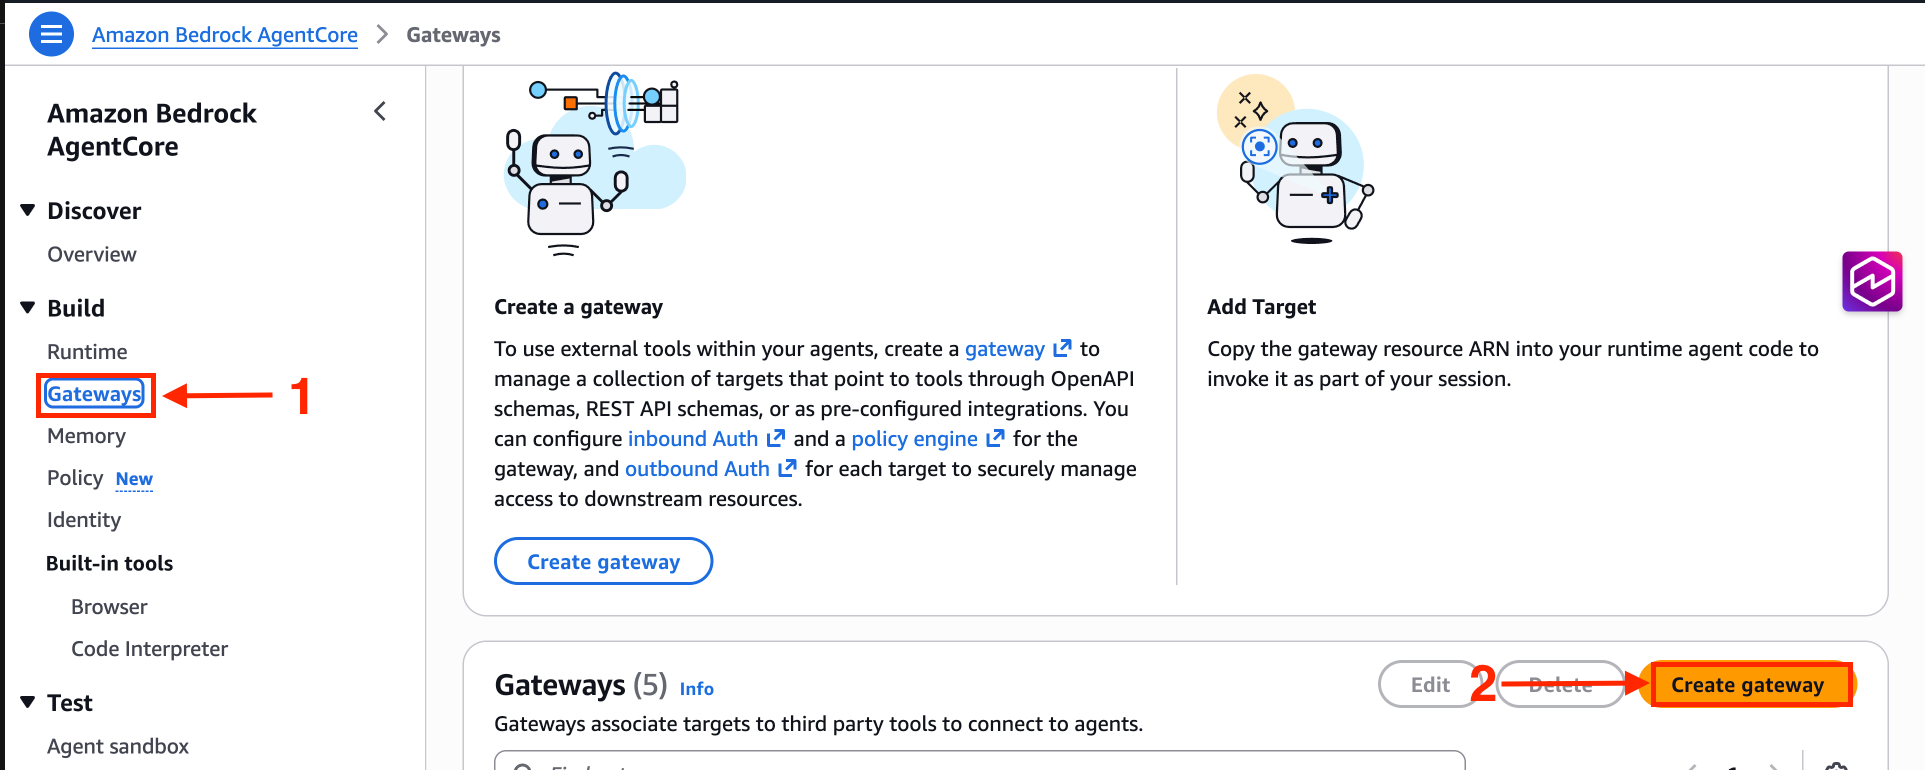
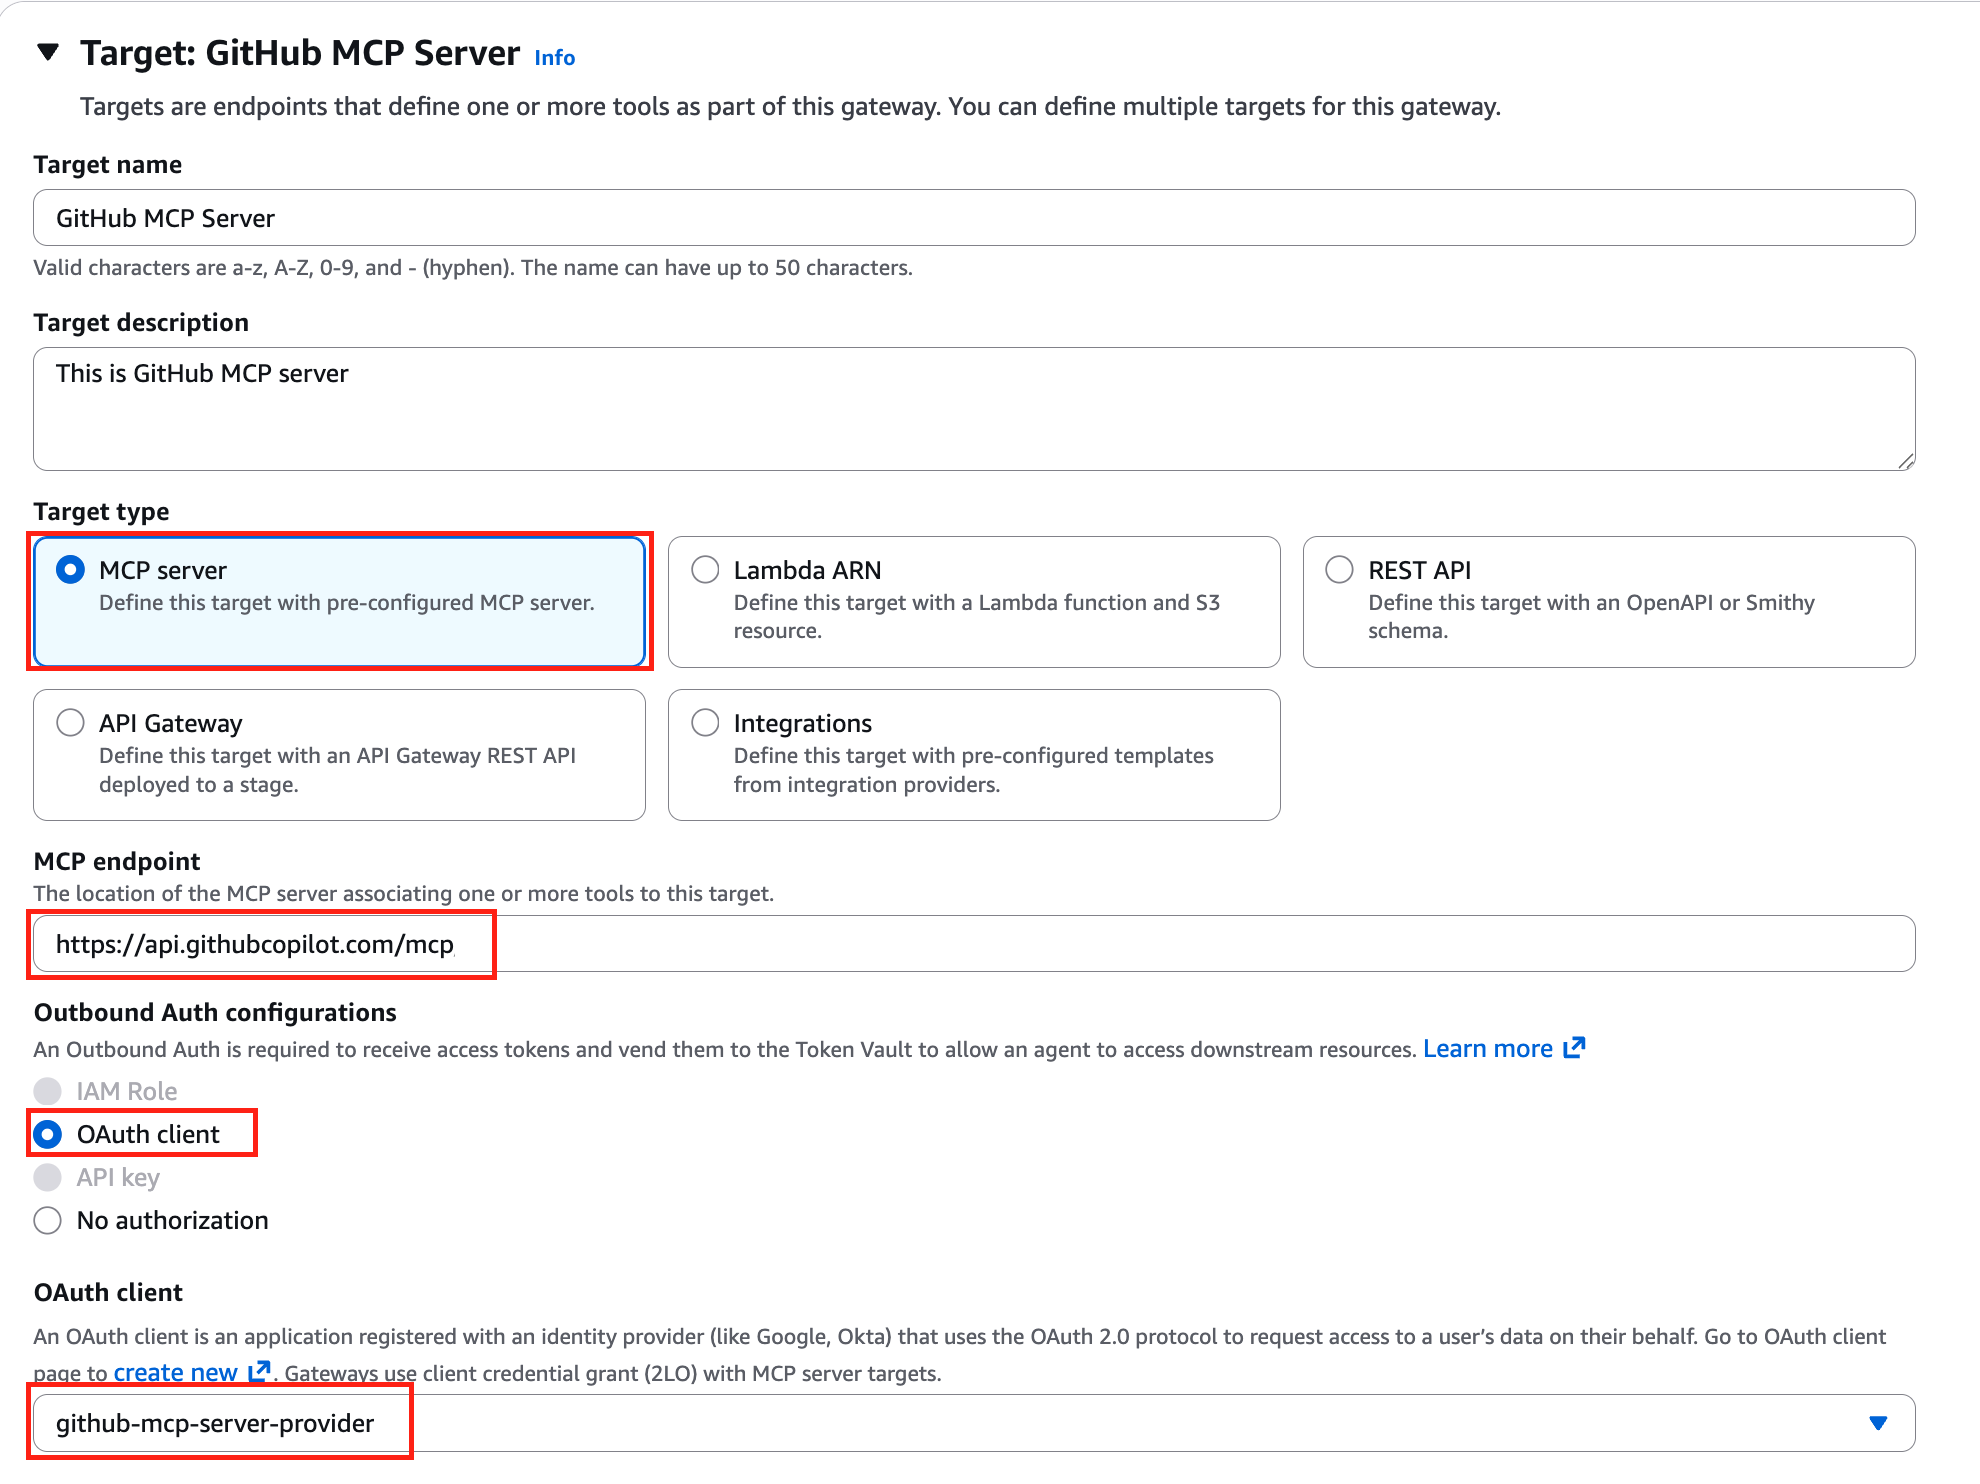
AgentCore Gatewayを作成する際、MCPバージョン2025-11-25以降を使用する必要があります。その他の設定はデフォルトのままにし、MCP server targetを選択します。MCPサーバーのエンドポイントを入力し、OAuthクライアントには、前提条件セクションで作成したAgentCore Identity OAuth Clientを選択します。
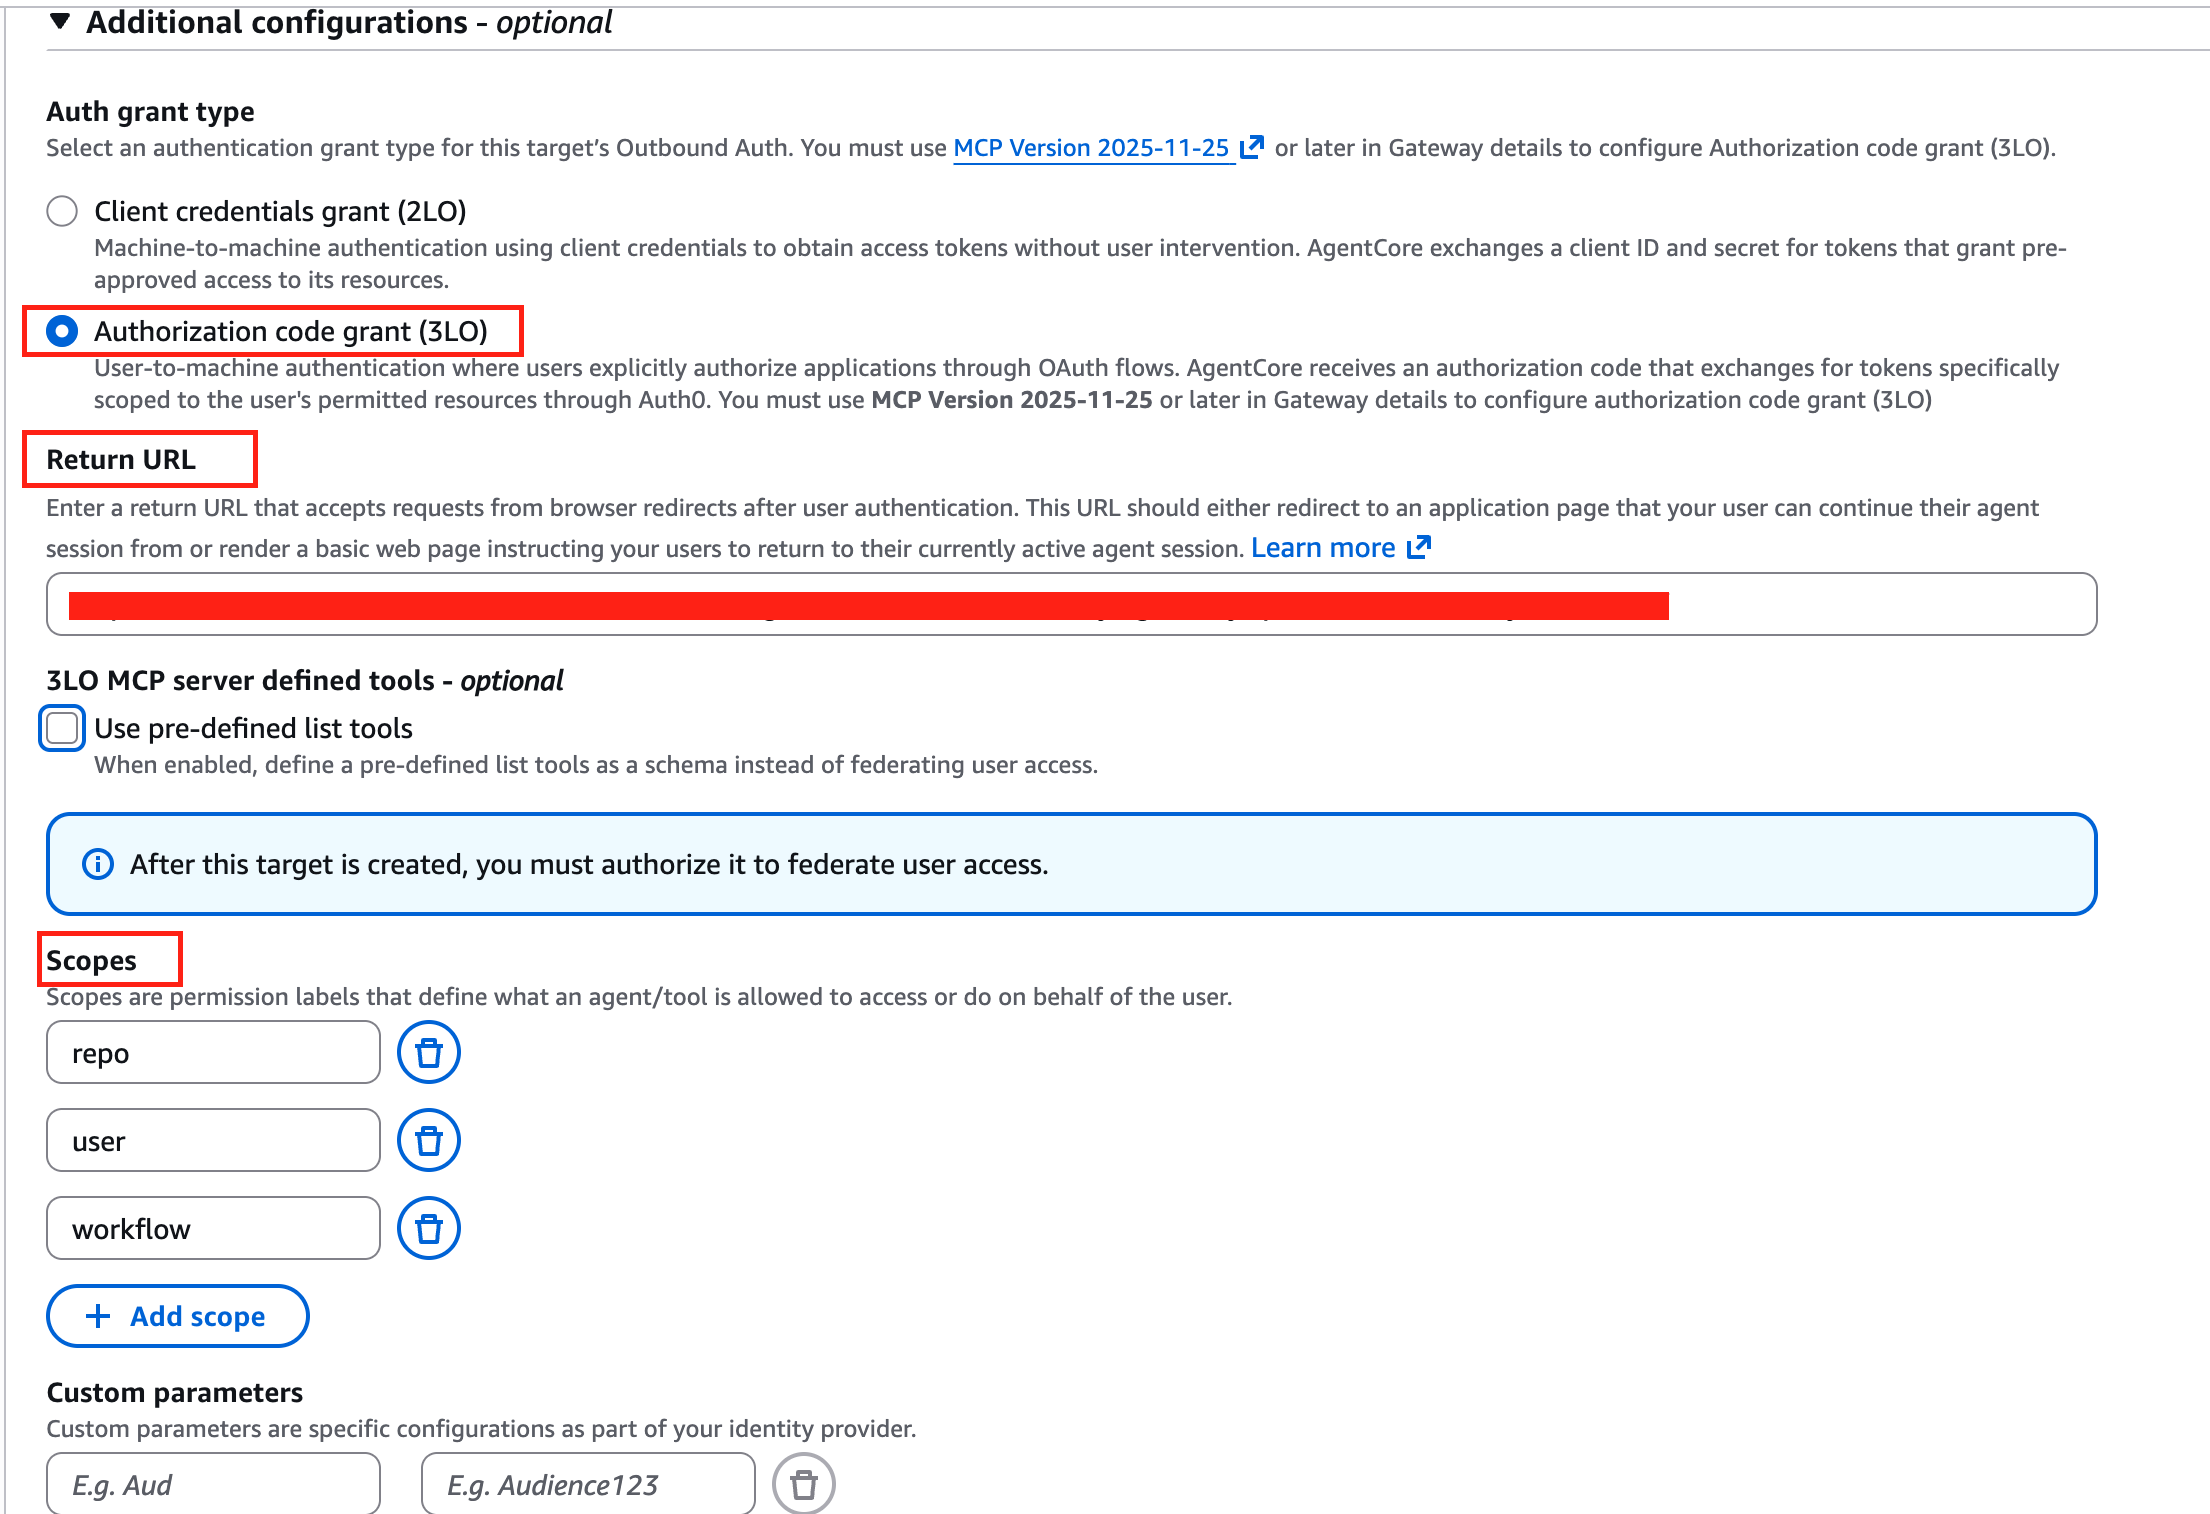
追加の設定において、Authorization code grant (3LO) を選択してください。AgentCore Gateway が MCP バージョン 2025-11-25 以降で作成されていない場合、Authorization code grant (3LO) オプションは無効になります。ここでは、リターン URL も指定する必要があります。認可コードフロー後のセッションバインディングプロセス中、ユーザーは暗黙的同期およびツール呼び出しの両方でこの URL にリダイレクトされます。呼び出し時にリターン URL の値を上書きできます。詳細については、Amazon Bedrock AgentCore 開発者ガイドの 例:Authorization code grant を参照してください。ターゲットを設定する際、audience などのスコープや追加パラメータを指定できます。これらのパラメータは、AgentCore Identity が認可サーバーの /authorize エンドポイントにアクセスする際にリクエストに含まれます。
ターゲット作成後、targe
原文を表示
Amazon Bedrock AgentCore Gateway provides a centralized layer for managing how AI agents connect to tools and MCP servers across your organization. It consolidates authentication, observability, and policy enforcement into a single endpoint, removing the need to configure and secure each MCP server connection individually.
In this post, we walk through how to configure AgentCore Gateway to connect to an OAuth-protected MCP server using the Authorization Code flow.
Using AgentCore Gateway as an MCP server endpoint
As organizations scale their AI agent deployments, the number of MCP servers that each team relies on grows quickly. Developers are adopting Amazon Bedrock AgentCore Gateway as a single endpoint for accessing multiple MCP servers. Instead of configuring each MCP server individually per IDE, teams point to one Gateway URL for consistent access to their full MCP toolset across tool.
This pattern is accelerating as teams move beyond custom MCP servers and adopt production-grade third-party ones, like those from AWS, GitHub, Salesforce, and Databricks. Many of these MCP servers are protected by their primary identity provider through federation, while others are secured by their own authorization servers. As the number of MCP servers per organization grows, managing connections, authentication, and routing at the IDE level becomes unsustainable. AgentCore Gateway centralizes this complexity, giving teams a single control plane for MCP access while giving developers a frictionless experience.
Many enterprise MCP servers require OAuth 2.0 authorization, where the agent must authenticate on behalf of a user before invoking tools. AgentCore Gateway now supports the OAuth 2.0 Authorization Code flow through Amazon Bedrock AgentCore Identity. With this, your agents can securely access protected MCP servers without embedding credentials in application code or managing the token lifecycle manually.
Key terms
- AgentCore Gateway user – The end user who consumes the tools in Amazon Bedrock AgentCore Gateway with MCP clients. Gateway users don’t manage the AgentCore Gateway itself. They use the single AgentCore Gateway URL to access the tools available to them.
- Admin user – The user that manages and maintains Amazon Bedrock AgentCore Gateway. This user is responsible for attaching MCP servers, tools, or APIs to the AgentCore Gateway so that AgentCore gateway users can consume them.
- MCP server – In this post, we assume that the MCP server is protected by an OAuth 2.0 Authorization Code flow, which requires user interaction to complete authentication. This is distinct from machine-to-machine authentication methods such as Client Credentials or Token Exchange, where no user intervention is required. The patterns described in this post apply specifically to MCP servers that require user-delegated authorization.
How Authorization Code flow works
To provide support for the Authorization Code Grant type, we provide two ways for target creations.
- Implicit sync during MCP Server target creation
In this method, the admin user completes the authorization code flow during CreateGatewayTarget, UpdateGatewayTarget, or SynchronizeGatewayTargetsoperations. This allows AgentCore Gateway to discover and cache the MCP server’s tools upfront.
- Provide schema upfront during MCP Server targets creation
With this method, admin users provide the tool schema directly during CreateGatewayTargetor UpdateGatewayTargetoperations, rather than AgentCore Gateway fetching them dynamically from the MCP server. AgentCore Gateway parses the provided schema and caches the tool definitions. This removes the need for the admin user to complete the authorization code flow during target creation or update. This is the recommended approach when human intervention isn’t possible during create/update operations. This method is beneficial when you don’t want to expose all the tools provided by the MCP server target.
Note: Because tool schemas are provided upfront with this method, the SynchronizeGatewayTargets operation isn’t supported. You can switch a target between Method 1 and Method 2 by updating the target configuration.
This means that AgentCore Gateway users can call list/tools without being prompted to authenticate with the MCP server authentication server, because this fetches the cached tools. The authorization code flow is only triggered when a Gateway user invokes a tool on that MCP server. This is particularly beneficial when multiple MCP servers are attached to a single Gateway. Users can browse the full tool catalog (cached tools) without authenticating to every MCP server and only complete the flow for the specific server whose tool they invoke.
URL Session Binding
URL session binding verifies that the user who initiated the OAuth authorization request is the same user who granted consent. When AgentCore Identity generates an authorization URL, it also returns a session-URI. After the user completes consent, the browser redirects back to a callback URL with the session-URI. The application is then responsible for calling the CompleteResourceTokenAuth API, presenting both the user’s identity and the session-URI. AgentCore Identity validates that the user who started the flow is the same user who completed it before exchanging the authorization code for an access token. This helps avoid a scenario where a user accidentally shares the authorization URL, and someone else completes the consent, which would grant access tokens to the wrong party. The authorization URL and session URI are only valid for 10 minutes, further limiting the window for misuse. Session binding applies during admin target creation (implicit sync) and during tool invocation.
Solution overview
In this post, we show how to attach the GitHub MCP server to Amazon Bedrock AgentCore Gateway using Method 1 (admin-initiated sync during target creation) and Method 2 (providing the tool schema upfront during target creation). The accompanying code is available in thisrepository.
Prerequisites
You must follow the following prerequisites along with this post.
- GitHub OAuth Apps setup
Go to https://github.com/settings/apps → New GitHub App
- Fill in details:
GitHub App name: AgentCore Gateway GitHub MCP
- Homepage URL (The full URL to your GitHub App’s website): The Homepage URL appears as a clickable link when user see your OAuth app, letting them learn more about your app. It helps users verify the legitimacy of the app requesting access to their GitHub account.
- Authorization callback URL: The Authorization callback URL (redirect URI) is the URL GitHub redirects the user to after they authorize (or deny) your OAuth app. For now, let’s put https://example.com/auth, we will come back and change this value.
- Advanced Settings: Here we go over the recommended defaults. However, please ensure to follow security best practices based on your organizations polices.
Expire user authorization tokens: Disable – If enabled, this will allow AgentCore Identity to automatically refresh tokens for the user.
- Request user authorization (OAuth) during installation: Disable.
- Device Flow: Disable – Allows authorization on devices that don’t have a browser (for example, CLI tools, smart TVs, CI environments).
- Webhook: Disable.
- User permissions: Use case dependent, keep it default for now – These are granted when the user goes through the OAuth authorization flow. Only request what you need, users see these permissions on the consent screen and excessive permissions reduce trust.
-
- Choose Create GitHub App.
- Make sure to note down the app Client ID (different to the App ID).
- Under your Oauth app general settings, choose Generate a new client secret. Make sure to note down the client secret as GitHub only shows it once upon creation.
- IAM permissions: You need appropriate IAM permissions to run the code from this blog post. These are the minimum IAM permissions required.
- Code repository: First clone the GitHub repository, and then open github-mcp-server.ipynb. We recommend following the console instructions on this blog post to understand the concepts and then look at the code walkthrough.
git clone https://github.com/awslabs/amazon-bedrock-agentcore-samples.git
cd 01-tutorials/02-AgentCore-gateway/05-mcp-server-as-a-target/03-authorization-code-flow- GitHub credential provider: In this step we will setup Agentcore Identity Credential Provider. On the Amazon Bedrock AgentCore console, go to AgentCore Identity and create an OAuth client.
Provide a name for the OAuth Client, choose the included GitHub provider, and fill in the GitHub OAuth App client ID and client secret.
- Copy the AgentCore Identity OAuth client callback URL, and make sure to go back to GitHub OAuth provider you created and update the Authorization callback URL.
Implicit sync during MCP Server target creation
In this section, we will introduce how implicit sync during MCP Server target creation works. Make sure that the AgentCore Gateway execution role has GetWorkloadAccessTokenForUserId and CompleteResourceTokenAuth permissions. First, let’s start by understanding the flow.
- The admin user calls CreateGatewayTarget, providing the MCP server endpoint, the AgentCore Identity Credential Provider, and return URL. This tells AgentCore Gateway which MCP server to connect to and which credential provider to use for obtaining OAuth 2.0 tokens. This same flow also applies to UpdateGatewayTarget and SynchronizeGatewayTargets operations.
- AgentCore Gateway requests a workload access token from the AgentCore Identity Credential Provider, passing the AgentCore Gateway workload identity and a user ID in the format {gatewayId}{targetId}{uuid}. This workload access token identifies the AgentCore Gateway as an authorized caller for subsequent credential operations.
- Using the workload access token, AgentCore Gateway requests an OAuth 2.0 access token from the AgentCore Identity Credential Provider. This provides the admin user with an authorization URL and a session-URI. At this stage, the target is in Needs Authorization status.
- The admin opens the authorization URL in their browser, signs in, and grants the requested permissions to the AgentCore Gateway.
- After the admin grants consent, the OAuth 2.0 authorization server sends an authorization code to the AgentCore Identity Credential Provider’s registered callback endpoint.
- The credential provider redirects the admin browser to the return URL, with the session URI. The admin application calls CompleteResourceTokenAuth, presenting the user id and the session-URI returned in step 2. The credential provider validates that the user who initiated the authorization flow (step 3) is the same user who completed consent. This revents token hijacking if the authorization URL was accidentally shared. If the flow was initiated from the AWS Console, this step is handled automatically. If initiated from another context, the admin is responsible for calling the CompleteResourceTokenAuth API directly.
- After successful session binding validation, the credential provider exchanges the authorization code with the OAuth 2.0 authorization server for an OAuth 2.0 access token.
- This access token is used to list the tools on MCP server target; returned tool definitions from the target are cached at AgentCore Gateway.
Note that a subsequent update or synchronization to the target won’t reuse the access token. Instead, AgentCore Identity will get a new access token from Authorization Server.
Target creation
First, let’s start by creating an Amazon Bedrock AgentCore Gateway and Target and see how implicit sync works during MCP Server target creation.
When creating an AgentCore Gateway, you must use MCP version 2025-11-25 or later. Keep everything else default and select MCP server target. Provide the MCP server endpoint, and for OAuth client, select the AgentCore Identity OAuth Client created during the prerequisites section.
Under additional configuration, make sure to select Authorization code grant (3LO). The Authorization code grant (3LO) option will be disabled if the AgentCore Gateway wasn’t created with MCP version 2025-11-25 or later. Here, you must also provide the return URL. During the session binding process after the authorization code flow, users will be returned to this URL, both during implicit sync and tool invocation. You can override the return URL value during invocation. For more information, see Example: Authorization code grant in the Amazon Bedrock AgentCore Developer Guide. You can provide scopes and additional parameters such as audience when configuring the target. These parameters are included in the request when AgentCore Identity reaches out to the authorization server’s /authorize endpoint.
After creating the target, the targe
関連記事
今日のまとめ
AI日報で今日の重要ニュースをまとめ読み