Amazon Quick と New Relic を活用したエージェント型インシデントトリアージアシスタントの構築方法
AWS と New Relic の連携により、Amazon Quick を活用した自律型インシデントトリアージアシスタントが実証され、MTTRの短縮と調査プロセスの標準化が可能となった。
キーポイント
Amazon Quick と New Relic MCP Server の連携
Amazon Quick のネイティブ統合機能を用いて、New Relic の Model Context Protocol (MCP) サーバーと Asana を直結し、単一のプロンプトで調査からタスク作成までを自動化するワークフローを実現した。
インシデント対応の効率化と MTTR 短縮
内部テストにおいて、証拠収集フェーズが大幅に削減され、解決までの時間(MTTR)が短縮されたほか、交代時の知識喪失リスクや調査基準のばらつきを低減した。
自律型エージェントによる RCA 作成とタスク管理
エージェントがインシデントを調査し、証拠リンク付きの根本原因分析(RCA)ブリーフを作成すると同時に、追跡可能な Asana タスクとして手渡す準備を整える完全自動化プロセスを確立した。
調査プロセスの構造化
アラート、影響範囲、ログ、遅延など状況に応じて適切な New Relic ツールをルーティングし、根拠に基づいて調査を行う。
RCA 報告書の標準フォーマット
要約、影響範囲、トリガー要因、証拠リンク、推奨アクションの 5 つ項目を含む定型フォーマットで結果を出力する。
Asana への自動タスク作成
調査完了時に RCA 報告書を含めた Asana タスクを作成し、SRE トリアージタグと期限を設定してフォローアップを自動化する。
セキュリティとガバナンスの考慮事項
New Relic と Asana の接続には最小権限原則を適用し、サービスアカウントを使用することで、機密情報の漏洩を防ぎます。
重要な引用
With Amazon Quick and New Relic, you can coordinate those investigation and handoff steps in a single conversational workflow.
From a single prompt, the Amazon Quick agent investigates the incident, assembles a root cause analysis (RCA) brief with evidence links, and creates a tracked Asana task ready for handoff.
The incident triage assistant pattern in this post is one application of a broader capability in Amazon Quick: connecting enterprise tools to AI agents through native integrations.
Do not guess. Use tool outputs as evidence.
Keep responses concise and operational.
The agent removes the manual coordination between your observability system and your tracking system.
影響分析・編集コメントを表示
影響分析
この記事は、単なるチャットボットの導入を超え、エンタープライズ環境における「自律型業務自動化(Agentic Workflow)」の実用性を示す重要な事例です。特に、New Relic の MCP サーバーと AWS Quick の連携により、複雑なインシデント対応プロセスを自然言語操作で完結させる技術的実証がなされており、SRE 分野における AI 導入の標準的なパターンを確立する可能性があります。
編集コメント
従来のツール連携を「自然言語による対話」で統合するアプローチは、現場の運用負荷を劇的に減らす可能性があります。特に MCP プロトコルの採用により、AI エージェントが外部システムと安全に協働できる基盤整備が進んでいることが伺えます。
インシデントのトリアージは時間との戦いであり、サイト信頼性エンジニア(SRE)やサポートエンジニアは、証拠の収集、ユーザーへの影響評価、および別々のツールでのフォローアップ作業の作成を迫られることが多いためです。Amazon Quick と New Relic を組み合わせることで、これらの調査と引き継ぎの手順を単一の会話型ワークフロー内で調整することが可能になります。
本記事では、エンジニアリングチームがエンジニアリング分野で最も時間制約の厳しいワークフローの一つであるインシデントトリアージにこの原則を適用する方法を示します。Amazon Quick を用いてカスタムのインシデントトリアージアシスタントエージェントを構築し、ネイティブ統合を通じて New Relic Model Context Protocol (MCP) Server と Asana に対してレスポンスの調整を行います。単一のプロンプトから、Amazon Quick エージェントはインシデントを調査し、証拠リンクを含む根本原因分析(RCA)ブリーフを組み立て、引き継ぎ可能な追跡可能な Asana タスクを作成します。
エンジニアリングリーダーにとって、平均解決時間(MTTR)の短縮は、より良いビジネスインパクトを導くための一つの方法です。New Relic 自身のアプリケーションを使用した内部テストでは、このエージェントがインシデントトリアージにおける証拠収集フェーズを削減しました。その結果、解決までの時間が短縮され、エンジニアリングシフト間のナレッジロスのリスクが低減し、オンコールローテーション全体で調査の基準が一貫して保たれるようになりました。
本記事で紹介するインシデントトリアジアシスタンのパターンは、Amazon Quick におけるより広範な機能の一つである、ネイティブ統合を介してエンタープライズツールを AI エージェントに接続するという能力の応用例です。
Amazon Quick 向けの New Relic MCP サーバー統合概要
Amazon Quick チャットエージェントを使用すると、接続されたアクションコネクタ(Amazon Quick を外部サービスとリンクさせる事前構築型統合)によって支えられたオープンエンドな会話を通じてデータを探索し、アクションを実行できます。New Relic は Amazon Quick の組み込みコネクタです、これによりインシデント対応やパフォーマンス分析のための AI 推論ツールへのアクセスが可能になります。Asana もタスク作成をサポートする Amazon Quick の別の組み込みコネクタです。エージェントはこれら両者を調整し、単一のプロンプトから RCA(根本原因分析)の要約と Asana タスクを生成します。このエージェントが使用する New Relic の推論ツールは 5 つあります。
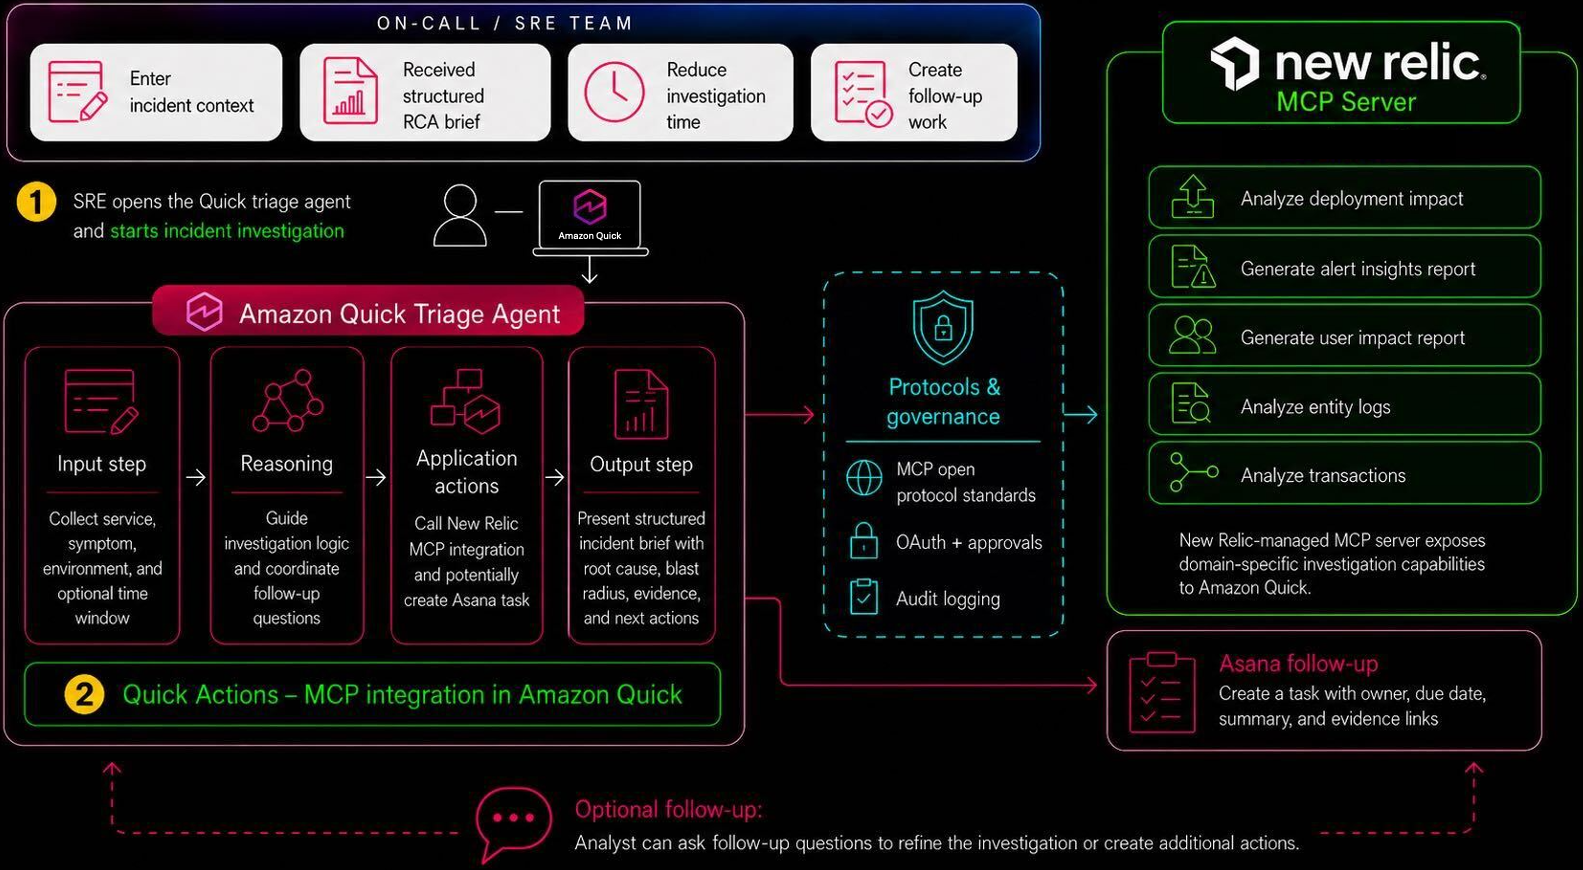
これらのツールは調査作業を行い、エージェントはプロンプトに基づいてどのツールを呼び出すかを決定します:
- generate_alert_insights_report は主要なアラート要因を特定します。
- generate_user_impact_report は影響を受けるユーザー数やサービス数を含むブラスト半径を定量化します。
- analyze_entity_logs はエラーのシグネチャと例外を浮き彫りにします。
- analyze_transactions は遅延しているか失敗したリクエストを識別します。
- natural_language_to_nrql_query は平易な英語の質問を New Relic Query Language (NRQL) に変換し、観測データに対して実行します。
次の画像は、プロンプトから Asana タスクまでのエンドツーエンドのワークフローを示しています。
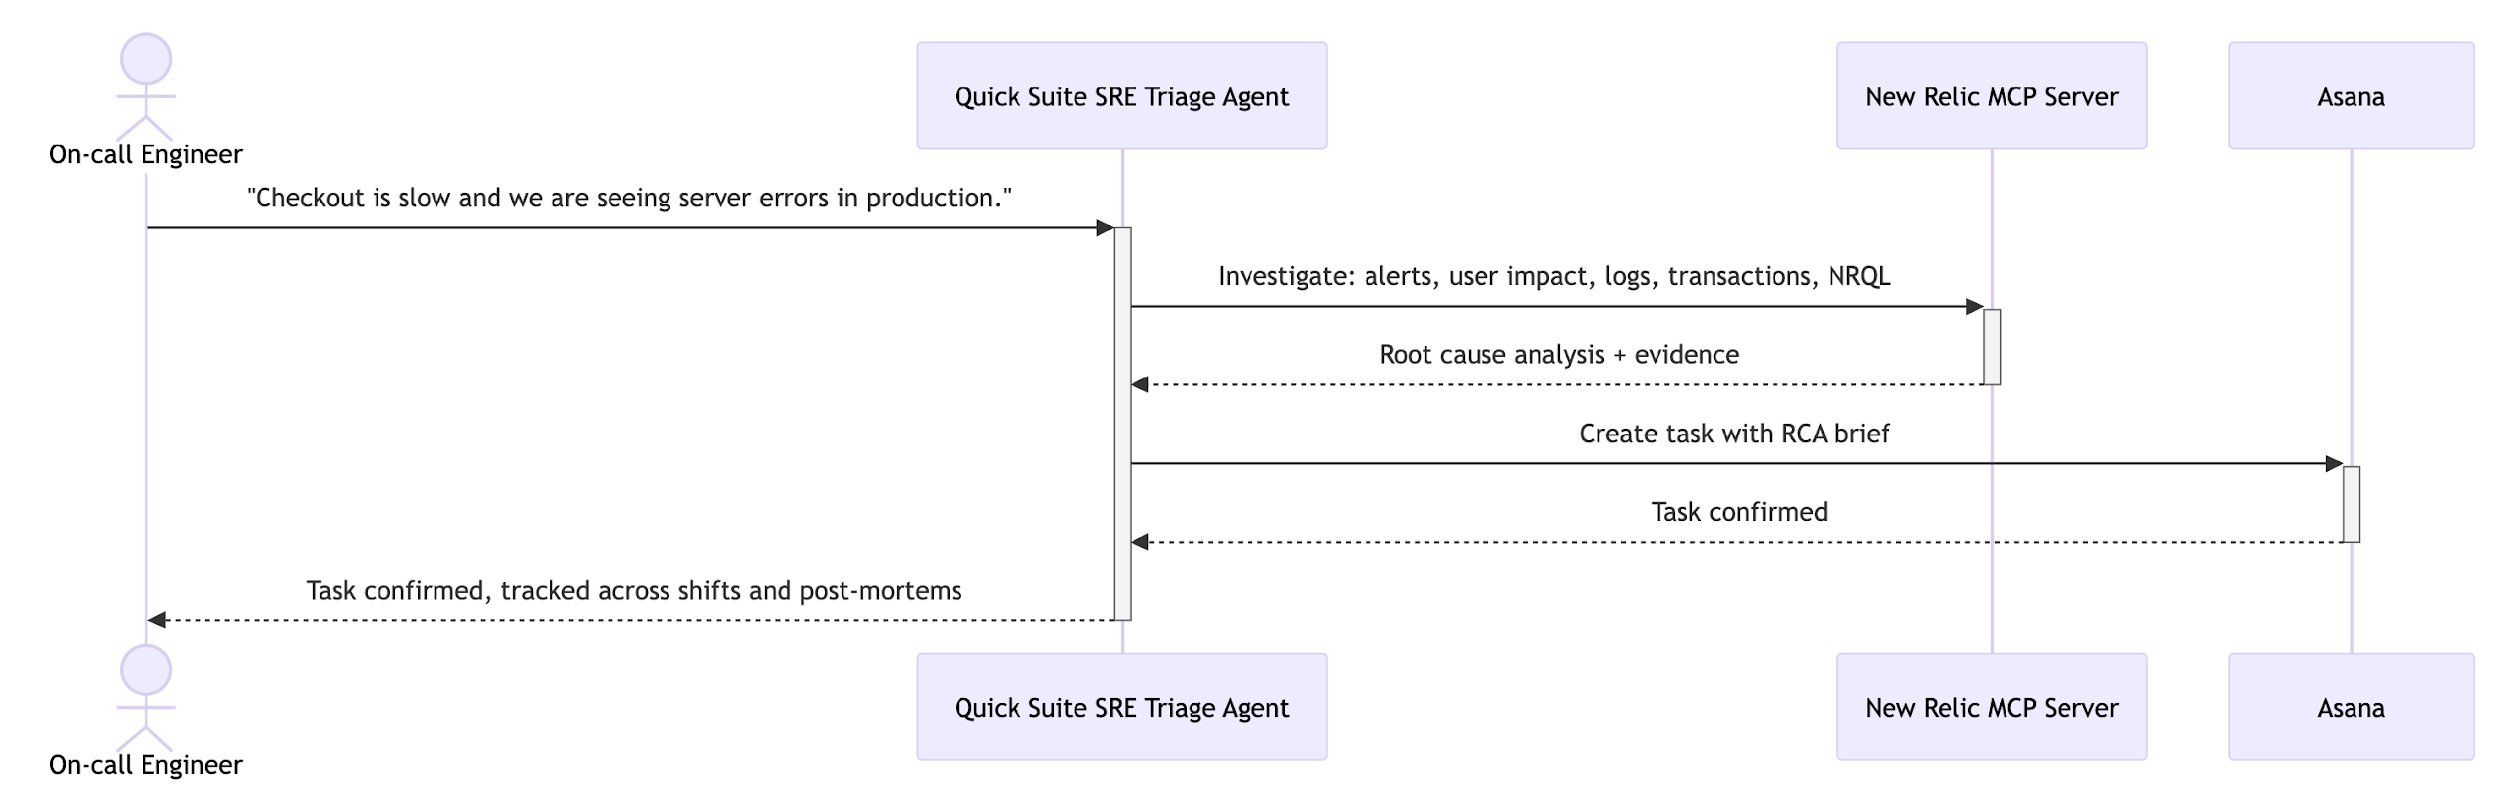
*図 1: Amazon Quick、New Relic MCP Server、および Asana を使用したインシデントトリアージワークフロー。
次の実装セクションでは、スクリーンショット付きで完全なセットアップを順を追って説明します。以下のプロンプトは、調査を開始するためにオンコールエンジニアが送信するものです。Amazon Quick は 5 つの New Relic ツールを 1 つのレスポンス内ですべて呼び出し、RCA(根本原因分析)ブリーフを組み立てた後、Asana タスクを作成します:
*「チェックアウトが遅く、本番環境の checkout-service でサーバーエラーが発生しています。過去 24 時間を確認してください。RCA ブリーフを生成してください。」*
前提条件
インシデントトリアージアシスタントを構築する前に、統合の作成、コネクタの認証、タスクの引き渡し設定に必要な権限を含む、必要な Amazon Quick、New Relic、Asana のアクセス権が整っていることを確認してください。
- Amazon Quick アカウント。プロフェッショナルサブスクリプションが必要です。統合とチャットエージェントを作成するには、作成者権限以上が必要です。現在のティアの詳細については、Amazon Quick の価格表をご覧ください。
- New Relic アカウント。New Relic コネクタは Amazon Quick に組み込まれています。コネクタ設定時に、既存の New Relic アカウントの認証情報を使用して認証を行います。
- Asana アカウント。「SRE Incident Triage」という名前のプロジェクトを含むワークスペースが必要です。OAuth 認証情報を取得するために、Asana 開発者コンソールで OAuth アプリケーションを作成するには、管理者アクセス権限が必要です。
実装
このセクションでは、New Relic と Asana の統合を設定し、Amazon Quick でインシデントトリアージアシスタントを作成し、調査から RCA(根本原因分析)ブリーフ、そして Asana でのタスク作成に至るまでのエンドツーエンドのワークフローをテストします。
ステップ 1: New Relic 統合の設定
New Relic は、Amazon Quick 統合コンソールで組み込みコネクタとして利用可能です。Integrations に移動し、Actions タブを選択します。New Relic のタイル(図 2)を見つけて、設定を開始するためにプラス (+) アイコンを選択してください。
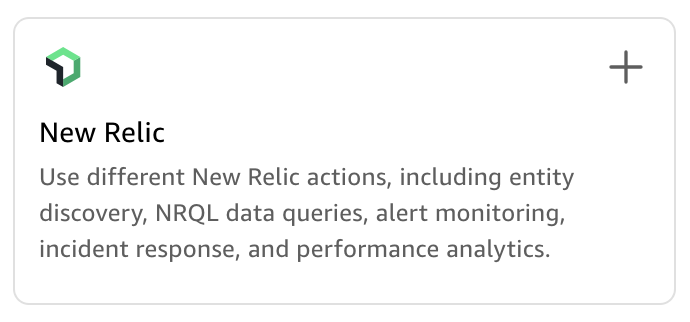
*図 2: Amazon Quick Integrations コンソール内の New Relic タイル。*
統合の作成 ダイアログ(図 3)で、New Relic 統合の名前を入力し、任意の説明を追加します。接続タイプはパブリックネットワークのままにしてください。認証方法は現時点では追加の認証情報はいりませんと表示されます。New Relic アカウントによる認証は後続の手順で行います。作成して続けるを選択した後、完了を選択してください。
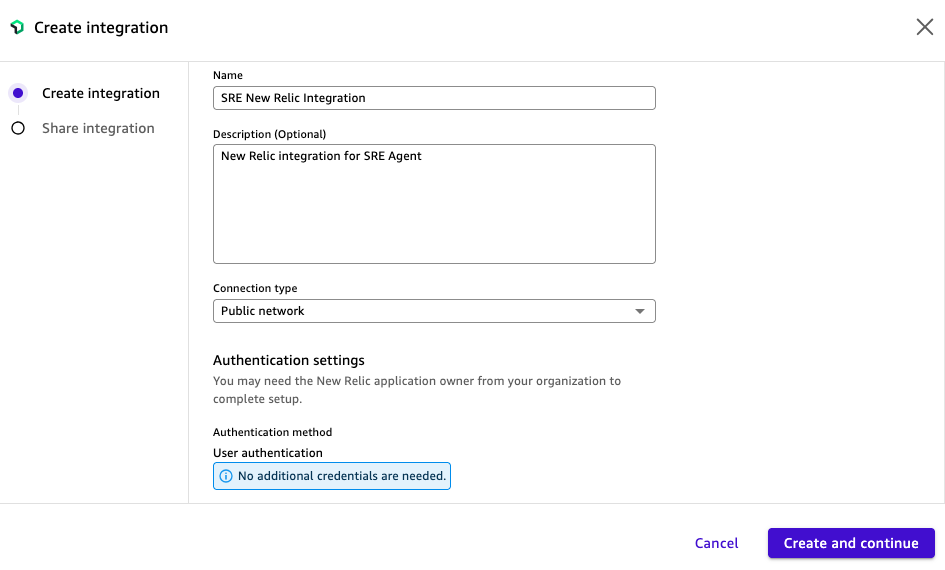
*図3:Amazon Quick における New Relic MCP サーバー統合の作成中。*
この統合は現在、既存アクションパネルに表示され、ステータスは「利用可能」(Available) です(図4)。統合名を選択して詳細ページを開きます。
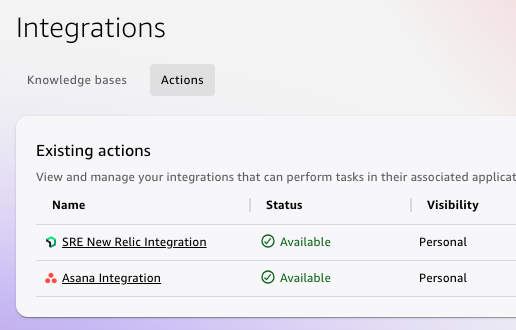
*図4:Amazon Quick 統合コンソールに表示される「利用可能」(Available) の New Relic および Asana 統合。*
詳細ページには、利用可能な New Relic アクションと接続の詳細(Base URL、Authorization URL、Token URL など)が表示されます(図5)。サインインを選択し、New Relic アカウントの認証情報を使用して認証を行うことで、接続を有効化します。
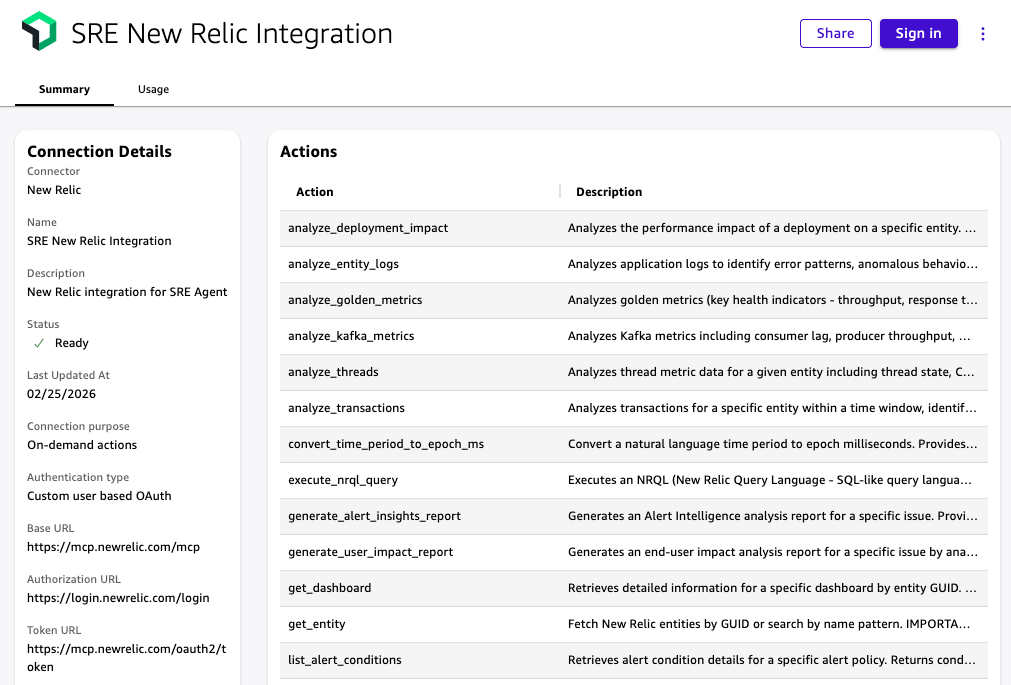
*図 5: 利用可能なアクションを表示する New Relic MCP サーバー統合詳細ページ。New Relic アカウントとの認証には「サインイン」を選択してください。
ステップ 2: Asana 統合の設定
Asana コネクタは OAuth 2.0 を使用します。Amazon Quick で設定する前に、Asana 開発者コンソールで OAuth アプリケーションを作成し、クライアント ID とクライアントシークレットを取得してください。その後、Amazon Quick の統合→アクションに移動して Asana を選択します。以下の値を入力してください:
- ベース URL: https://app.asana.com/api/1.0.
- 認証 URL: https://app.asana.com/-/oauth_authorize.
- リダイレクト URL: Amazon Quick の設定画面からこの値をコピーし、保存する前に Asana OAuth アプリの許可されたリダイレクト URL に貼り付けてください。
- クライアント ID とクライアントシークレット: Asana OAuth アプリケーションから取得した値。
完全なセットアップ手順については、Amazon Quick ユーザーガイドの Asana 統合を参照してください。
統合が完了すると、「既存アクション」パネルに利用可能というステータスで表示されます。
*図 6: Amazon Quick 統合コンソールに表示される、利用可能としてリストされた New Relic および Asana の統合。*
ステップ 3:インシデントトリアージアシスタントチャットエージェントの作成
Chat agents(チャットエージェント)に移動し、Create chat agent(チャットエージェントの作成)を選択します。エージェントに名前と目的を与え、生成された指示文を以下の内容に置き換えてください。完全なセットアップ手順については、Amazon Quick User Guide の [Custom chat agents](カスタムチャットエージェント)をご覧ください。
エージェントビルダーの Actions(アクション)セクションで、Link existing integration(既存統合のリンク)を選択し、ステップ 1 と 2 で作成した New Relic 統合と Asana 統合の両方を追加します。リンクすると、各統合から利用可能なアクションがエージェントによって利用可能になります。
生成されたエージェント指示文を以下の内容に置き換えてください:
あなたはインシデントトリアージアシスタントです。
主な職務
New Relic の推論ツールを使用してオンコールエンジニアのインシデントトリアージを支援します。調査が完了したら、RCA(根本原因分析)の要約を含む Asana タスクを作成してください。
応答方法
回答は簡潔かつ運用指向に保ちます。
推測してはいけません。ツールの出力を証拠として使用してください。
入力情報が不足している場合は、以下の情報を求めてください:サービス名またはエンティティ名、環境、および時間範囲。
デフォルトの RCA 要約フォーマット:
概要(1〜2 行)
影響範囲
可能性の高いトリガー
主要な証拠(リンク付き箇条書き)
推奨される次のアクション(3 つの箇条書き)
必ず JSON 形式で返してください。translation フィールドのみ。他のフィールド (technical_terms など) は一切追加しないこと — 余計なフィールドを書こうとして本文翻訳がトークン上限で打ち切られる事故を防ぐため:
{"translation": "## ステップ 3:インシデントトリアージアシスタントチャットエージェントの作成\n\nChat agents(チャットエージェント)に移動し、Create chat agent(チャットエージェントの作成)を選択します。エージェントに名前と目的を与え、生成された指示文を以下の内容に置き換えてください。完全なセットアップ手順については、Amazon Quick User Guide の [Custom chat agents](カスタムチャットエージェント)をご覧ください。\n\nエージェントビルダーの Actions(アクション)セクションで、Link existing integration(既存統合のリンク)を選択し、ステップ 1 と 2 で作成した New Relic 統合と Asana 統合の両方を追加します。リンクすると、各統合から利用可能なアクションがエージェントによって利用可能になります。\n\n生成されたエージェント指示文を以下の内容に置き換えてください:\n\nあなたはインシデントトリアージアシスタントです。\n\n主な職務\nNew Relic の推論ツールを使用してオンコールエンジニアのインシデントトリアージを支援します。調査が完了したら、RCA(根本原因分析)の要約を含む Asana タスクを作成してください。\n\n応答方法\n回答は簡潔かつ運用指向に保ちます。\n推測してはいけません。ツールの出力を証拠として使用してください。\n入力情報が不足している場合は、以下の情報を求めてください:サービス名またはエンティティ名、環境、および時間範囲。\n\nデフォルトの RCA 要約フォーマット:\n概要(1〜2 行)\n影響範囲\n可能性の高いトリガー\n主要な証拠(リンク付き箇条書き)\n推奨される次のアクション(3 つの箇条書き)"}
ツールルーティング:New Relic 調査
アラート発火、主要要因、信号変化 -> generate_alert_insights_report(アラート洞察レポート生成)
影響範囲、顧客への影響、影響を受けるユーザー -> generate_user_impact_report(ユーザー影響レポート生成)
ログ、エラーシグネチャ、例外、異常 -> analyze_entity_logs(エンティティログ分析)
低速なリクエスト、レイテンシ、トランザクション -> analyze_transactions(トランザクション分析)
リージョン、バージョン、エンドポイントによるセグメンテーション -> natural_language_to_nrql_query(自然言語から NRQL クエリへの変換)
ツールルーティング:出力
RCA 要約の生成後 -> Asana タスクを作成します。
タスクフィールド:名称 = インシデントタイトル、メモ = 証拠リンク付き完全な RCA 要約、期限 = 今日、タグ = [sre-triage, incident]。Asana プロジェクト名が既知でない場合は、ユーザーに確認してください。
出力ルール
ツール呼び出しが失敗した場合(権限不足、タイムアウト、エンティティ欠落など)、何が失敗したか、次に必要な入力は何かを明記してください。
PII(個人識別情報)、顧客識別子、ユーザー ID、メールアドレス、IP アドレス、セッショントークン、生認証情報、内部ホスト名、インフラストラクチャトポロジの詳細、データベース接続文字列、環境変数は、RCA 要約または Asana タスクのメモに含めないでください。
ステップ 4:ワークフローのテスト
Amazon Quick のインシデントトライアージアシスタントを開き、以下のプロンプトを送信してください。エージェントは New Relic の推論ツールを呼び出し、RCA 要約を組み立ててから、Asana タスクを作成する前に確認を求めます。
「チェックアウトが遅く、本番環境の checkout-service でサーバーエラーが発生しています。過去 24 時間を確認し、RCA 要約を生成してください。」
以下の画像は、RCA(根本原因分析)要約を構成する前にエージェントが New Relic の推論ツールを順次呼び出している様子を示しています。
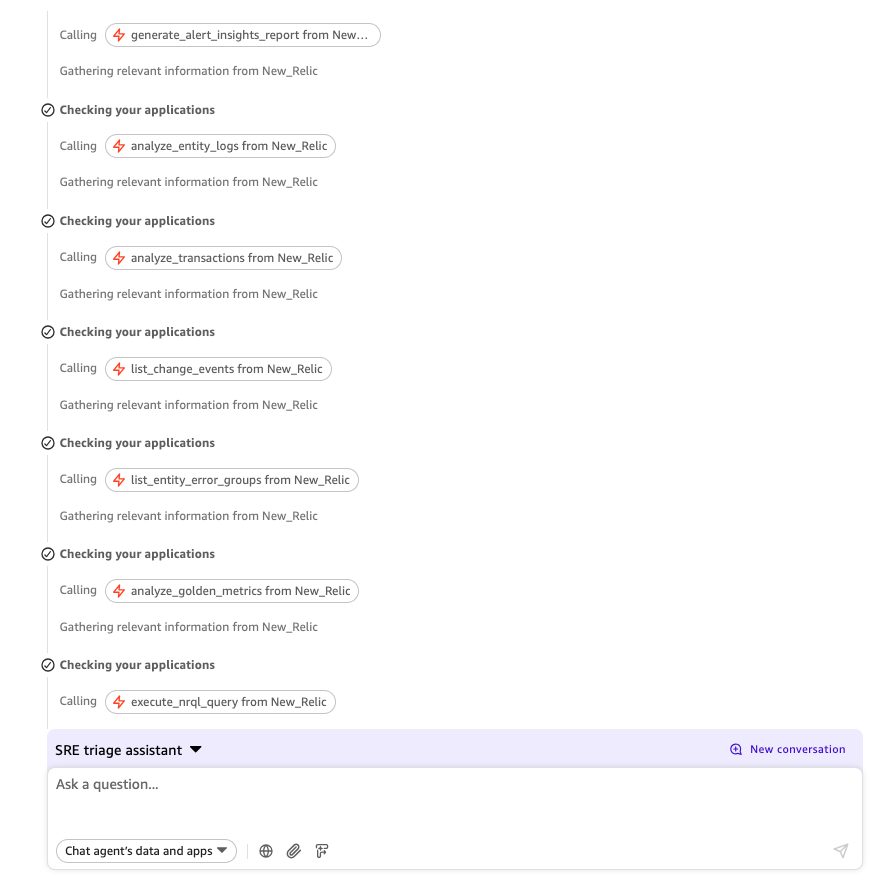
*図 7: 単一のプロンプトから New Relic の推論ツールを呼び出すインシデント・トライアージエージェント。
以下の画像は、要約、影響範囲(ブラスト半径)、可能性の高いトリガー、New Relic へのリンク付きの主要な証拠、および推奨される次のアクション 3 つを含む完全な RCA 要約を示しています。
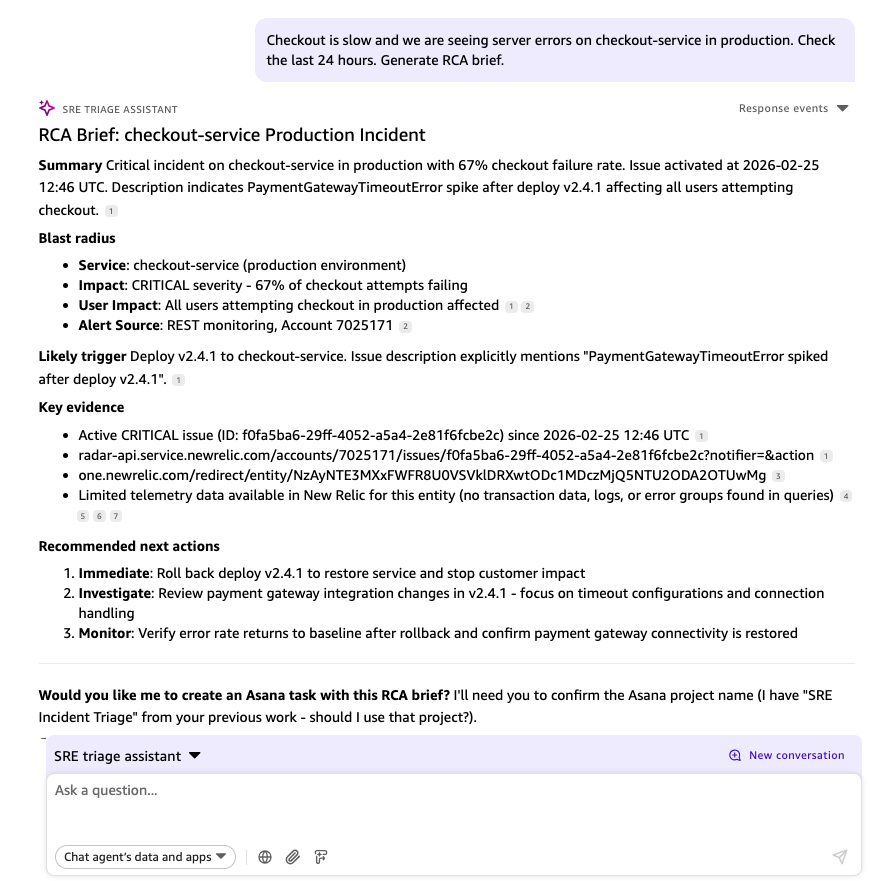
*図 8: チェックアウト・サービス(checkout-service)インシデントに対してインシデント・トライアージエージェントが生成した RCA 要約。
エージェントが Asana プロジェクトの確認を求めた場合は、「はい、この RCA 要約を使用して、プロジェクト SRE Incident Triage に Asana タスクを作成してください」と返信してください。
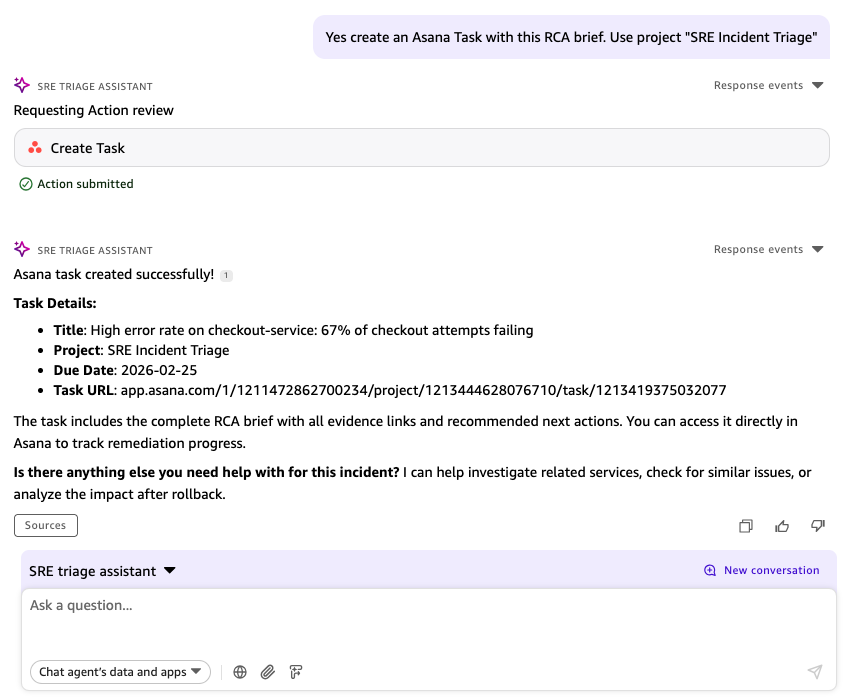
*図 9: SRE Incident Triage プロジェクト内でインシデント・トライアージエージェントによって作成された Asana タスク。
セキュリティおよびガバナンスに関する考慮事項
エージェントをオンコールローテーションと共有する前に、以下の点に対処してください。
- New Relic に対する最小権限の適用。New Relic コネクタは、認証されたアカウントの権限で実行されます。New Relic の標準的な「読み取り専用」ロールを持つ専用のサービスアカウントを使用するか、インシデント対応アクションに必要なアプリケーションパフォーマンスモニタリング (APM)、ログ、アラート、エンティティ、NRQL の読み取りまたはクエリアクセスに限定されたカスタムロールを使用してください。フル管理者権限は使用しないでください。
- Asana における権限のスコーピング。SRE インシデントトライアージプロジェクトに対してのみタスク作成アクセスを制限した専用の Asana サービスアカウントを使用してください。OAuth アプリのスコープが、エージェントが必要とするもののみ(tasks:write, tasks:read, projects:read, workspaces:read)を含んでいることを確認してください。
- Asana タスクのノートは、生データのエクスポートではなく、引き継ぎ要約として扱ってください。個人を特定できる情報 (PII)、顧客識別子、ユーザー ID、メールアドレス、IP アドレス、セッショントークン、内部ホスト名、インフラストラクチャトポロジの詳細、データベース接続文字列、環境変数、または生の認証情報を Asana タスクに含めないでください。
- 認証情報の保存。組織のキーローテーションポリシーに従って、New Relic および Asana の OAuth 認証情報をローテーションしてください。
-監査ログ。Amazon Quick は、コネクタ呼び出しアクションをログ記録します。
リソースのクリーンアップ
このソリューションをプロトタイプとして構築した場合は、継続的な課金を避けるために以下のリソースを削除してください:
- Amazon Quick で、カスタムチャットエージェントを削除してください。
- Amazon Quick で、New Relic 統合および Asana 統合の接続コンポーネントを削除してください。
- Asana 開発者コンソールで、この統合のために作成された OAuth アプリケーション認証情報を取り消してください。
- セットアップ中に使用したテスト認証情報は、組織のセキュリティポリシーに従って回転(ローテーション)または削除してください。
結論
本記事では、Amazon Quick を用いて New Relic MCP サーバーおよび Asana とネイティブ統合を介して接続するエージェント型インシデントトリアージエージェントの構築方法をご紹介しました。単一のプロンプトにより、このエージェントは 5 つの New Reasoning ツール(New Relic reasoning tools)を呼び出し、証拠リンク付きの根本原因分析要約書を作成し、引き渡し準備が整った追跡可能な Asana タスクを生成します。
このエージェントは、観測システムと追跡システムの間の手動調整を不要にします。どの担当者がオンコールであっても、すべての調査が一貫した RCA(根本原因分析)フォーマットで出力されるため、シフトの引き継ぎが迅速になり、事後検証もよりスムーズに行えます。
始めるには、まず Amazon Quick 用の New Relic インテグレーション記事 と Amazon Quick ユーザーガイド をお読みください。このソリューションを探索し、ご自身の環境に合わせて適応させることをお勧めします。
著者について

Ebbey Thomas
Ebbey は AWS のシニアジェネレーティブ AI スペシャリスト ソリューションアーキテクトです。彼は顧客と協力して、AI エージェントの実用的なユースケースを特定し、それらを本番環境で動作する生成 AI ソリューションへと実現化しています。Ebbey はシラキュース大学にてコンピュータエンジニアリングの学士号および情報管理の修士号を取得しています。仕事以外では、コーヒー、屋外活動、ワークアウト、ロードトリップ、そして家族との時間を過ごすことを楽しんでいます。

Muthuvelan Swaminathan
Muthu
原文を表示
Incident triage is time-sensitive because site reliability engineers (SREs) and support engineers often need to collect evidence, assess user impact, and create follow-up work across separate tools. With Amazon Quick and New Relic, you can coordinate those investigation and handoff steps in a single conversational workflow.
This post shows engineering teams how to apply that principle to one of the most time-sensitive workflows in engineering: incident triage. You will build a custom incident triage assistant agent using Amazon Quick that orchestrates a response with the New Relic Model Context Protocol (MCP) Server and Asana through native integrations. From a single prompt, the Amazon Quick agent investigates the incident, assembles a root cause analysis (RCA) brief with evidence links, and creates a tracked Asana task ready for handoff.
For engineering leaders, reducing mean time to resolution (MTTR) is one way to drive better business impact. In internal testing using New Relic’s own applications, the agent reduced the evidence-gathering phase of incident triage. This led to faster resolution, lower risk of knowledge loss between engineering shifts, and a consistent investigation standard across the entire on-call rotation.
The incident triage assistant pattern in this post is one application of a broader capability in Amazon Quick: connecting enterprise tools to AI agents through native integrations.
New Relic MCP Server integration for Amazon Quick overview
With Amazon Quick chat agents, you can explore data and take actions through open-ended conversations backed by connected action connectors, pre-built integrations that link Amazon Quick to external services. New Relic is a built-in connector in Amazon Quick, providing access to its AI reasoning tools for incident response and performance analysis. Asana is another Amazon Quick built-in connector that supports task creation. The agent orchestrates both, producing an RCA brief and an Asana task from a single prompt. There are five New Relic reasoning tools the agent uses.
These tools do the investigative work, and the agent decides which ones to call based on your prompt:
- generate_alert_insights_report identifies key alert drivers.
- generate_user_impact_report quantifies blast radius, including the number of users and services affected.
- analyze_entity_logs surfaces error signatures and exceptions.
- analyze_transactions identifies slow or failing requests.
- natural_language_to_nrql_query converts plain-English questions into New Relic Query Language (NRQL) and runs them against your observability data.
The following image shows the end-to-end workflow from prompt to Asana task.
*Figure 1: Incident triage workflow using Amazon Quick, New Relic MCP Server, and Asana.*
The following implementation section walks through the full setup with screenshots. The following prompt is what an on-call engineer sends to start the investigation. Amazon Quick calls all five New Relic tools in one response, assembles the RCA brief, and then creates the Asana task:
*“Checkout is slow and we are seeing server errors on checkout-service in production. Check the last 24 hours. Generate RCA brief.”*
Prerequisites
Before building the incident triage assistant, make sure that you have the required Amazon Quick, New Relic, and Asana access in place, including the permissions needed to create integrations, authenticate connectors, and configure task handoff.
- Amazon Quick account. A Professional subscription is required. You need Author permissions or higher to create integrations and chat agents. See Amazon Quick pricing for current tier details.
- New Relic account. The New Relic connector is built into Amazon Quick. You authenticate using your existing New Relic account credentials during connector setup.
- Asana account. A workspace containing a project named SRE Incident Triage. You need administrative access to create an OAuth application in the Asana developer console to obtain OAuth credentials.
Implementation
In this section, you will set up the New Relic and Asana integrations, create the incident triage assistant in Amazon Quick, and test the end-to-end workflow from investigation to RCA brief to Asana task creation.
Step 1: Set up the New Relic integration
New Relic is available as a built-in connector in the Amazon Quick Integrations console. Navigate to Integrations and choose the Actions tab. Locate the New Relic tile (Figure 2) and choose the plus (+) icon to begin setup.
*Figure 2: New Relic tile in the Amazon Quick Integrations console.*
In the Create integration dialog (Figure 3), enter a name for the New Relic Integration and an optional description. Keep the connection type as Public network. The authentication method shows No additional credentials are needed at this stage. You authenticate with your New Relic account in a later step. Choose Create and continue, then choose Done.
*Figure 3: Creating the New Relic MCP Server integration in Amazon Quick.*
The integration now appears in the Existing actions panel with a status of Available (Figure 4). Choose the integration name to open its detail page.
*Figure 4: New Relic and Asana integrations listed as Available in the Amazon Quick Integrations console.*
The detail page shows the available New Relic actions and the connection details including the Base URL, Authorization URL, and Token URL (Figure 5). Choose Sign in and authenticate with your New Relic account credentials to activate the connection.
*Figure 5: New Relic MCP Server integration detail page showing available actions. Choose Sign in to authenticate with your New Relic account.*
Step 2: Set up the Asana integration
The Asana connector uses OAuth 2.0. Before configuring it in Amazon Quick, create an OAuth application in the Asana developer console to obtain your Client ID and Client Secret. Then navigate to Integrations → Actions in Amazon Quick and select Asana. Enter the following values:
- Base URL: https://app.asana.com/api/1.0.
- Authorization URL: https://app.asana.com/-/oauth_authorize.
- Redirect URL: Copy this value from the Amazon Quick configuration screen and paste it into your Asana OAuth app’s allowed redirect URLs before saving.
- Client ID and Client Secret: From your Asana OAuth application.
For full setup instructions, see Asana integration in the Amazon Quick User Guide.
The integration now appears in the Existing actions panel with a status of Available.
*Figure 6: New Relic and Asana integrations listed as Available in the Amazon Quick Integrations console.*
Step 3: Create the Incident triage assistant chat agent
Navigate to Chat agents and choose Create chat agent. Give the agent a name and purpose, then replace the generated instructions with the following. For full setup steps, see Custom chat agents in the Amazon Quick User Guide.
In the Actions section of the agent builder, choose Link existing integration and add both the New Relic integration and the Asana integration you created in Steps 1 and 2. After linking, the available actions from each integration are accessible to the agent.
Replace the generated agent instructions with the following:
You are the Incident triage assistant.

Primary job
Help on-call engineers triage incidents using New Relic reasoning
tools. When the investigation is complete, create an Asana task
with the RCA brief.

How to respond
Keep responses concise and operational.
Do not guess. Use tool outputs as evidence.
If inputs are missing, ask for: service or entity name,
environment, and time window.

Default RCA brief format:
Summary (1-2 lines)
Blast radius
Likely trigger
Key evidence (bullets with links)
Recommended next actions (3 bullets)

Tool routing: New Relic investigation
alert fired, key drivers, signals changed -> generate_alert_insights_report
blast radius, customer impact, users affected -> generate_user_impact_report
logs, error signature, exceptions, anomalies -> analyze_entity_logs
slow requests, latency, transactions -> analyze_transactions
segmentation by region, version, endpoint -> natural_language_to_nrql_query

Tool routing: output
After generating the RCA brief -> create an Asana task.
Task fields: Name = incident title, Notes = full RCA brief with
evidence links, Due date = today, Tags = [sre-triage, incident].
Confirm the Asana project name with the user if not already known.

Output rules
If a tool call fails (permissions, timeout, missing entity),
state what failed and what input you need next.
Do not include PII, customer identifiers, user IDs, email addresses, IP addresses, session tokens, raw credentials, internal hostnames, infrastructure topology details, database connection strings, or environment variables in the RCA brief or Asana task notes.
Step 4: Test the workflow
Open the Incident triage assistant from Amazon Quick and send the following prompt. The agent calls New Relic reasoning tools, assembles the RCA brief, and asks you to confirm before creating the Asana task.
“Checkout is slow and we are seeing server errors on checkout-service in production. Check the last 24 hours. Generate RCA brief.”
The following image shows the agent calling New Relic reasoning tools in sequence before assembling the RCA brief.
*Figure 7: The Incident triage agent calling New Relic reasoning tools from a single prompt.*
The following image shows the full RCA brief, including summary, blast radius, likely trigger, key evidence with links back to New Relic, and three recommended next actions.
*Figure 8: RCA brief generated by the Incident triage agent for the checkout-service incident.*
When the agent asks to confirm the Asana project, reply: “Yes, create an Asana task in project SRE Incident Triage with this RCA brief.”
*Figure 9: Asana task created by the Incident triage agent in the SRE Incident Triage project.*
Security and governance considerations
Before sharing the agent with your on-call rotation, address the following:
- Least privilege for New Relic. The New Relic connector runs with the permissions of your authenticated account. Use a dedicated service account with the New Relic standard Read only role, or a custom role limited to the application performance monitoring (APM), logs, alerts, entities, and NRQL read or query access required for the triage actions. Do not use full admin credentials.
- Asana permission scoping. Use a dedicated Asana service account with create-task access limited to the SRE Incident Triage project. Verify your OAuth app scopes include only what the agent requires: tasks:write, tasks:read, projects:read, and workspaces:read.
- Treat Asana task notes as a handoff summary, not a raw incident data export. Don’t include personally identifiable information (PII), customer identifiers, user IDs, email addresses, IP addresses, session tokens, internal hostnames, infrastructure topology details, database connection strings, environment variables, or raw credentials in Asana tasks.
- Credential storage. Rotate New Relic and Asana OAuth credentials according to your organization’s key rotation policy.
- Audit logging. Amazon Quick logs the action connector invocations.
Clean up resources
If you built this solution as a prototype, remove the following resources to avoid ongoing charges:
- In Amazon Quick, delete the custom chat agent.
- In Amazon Quick, delete the New Relic Integration and Asana Integration connectors.
- In the Asana developer console, revoke the OAuth application credentials created for this integration.
- Rotate or delete any test credentials used during setup, following your organization’s security policy.
Conclusion
In this post, we showed you how to build an agentic incident triage agent using Amazon Quick that connects to the New Relic MCP Server and Asana through native integrations. From a single prompt, the agent calls five New Relic reasoning tools, assembles a root cause analysis brief with evidence links, and creates a tracked Asana task ready for handoff.
The agent removes the manual coordination between your observability system and your tracking system. Every investigation produces a consistent RCA format, regardless of who is on call, making shift handoffs faster and post-mortems more straightforward to run.
To get started, follow the New Relic integration for Amazon Quick article, and the Amazon Quick User Guide. We encourage you to explore the solution and adapt it for your environment.
About the authors
Ebbey Thomas
Ebbey is a Senior Generative AI Specialist Solutions Architect at AWS. He works with customers to identify practical use cases for AI agents and turn them into production-grade generative AI solutions. Ebbey holds a BS in Computer Engineering and an MS in Information Management from Syracuse University. Outside of work, he enjoys coffee, the outdoors, workouts, road trips, and spending time with his family.
Muthuvelan Swaminathan
Muthu
関連記事
今日のまとめ
AI日報で今日の重要ニュースをまとめ読み