Amazon Quick で顧客維持ワークフローを自動化し、離脱対応を数日から数分に短縮
AWS は Amazon Quick を活用した顧客維持自動化パイプラインを公開し、CSAT や通話記録の分析から優先度スコアリング、オファー生成までを数分で実行可能にする仕組みを提供する。
AI深層分析を開く2026年7月30日 01:14
AI深層分析
キーポイント
顧客維持サイクルの劇的短縮
従来の5日間かかっていた顧客離脱対応を、Amazon Quick を用いることで数分以内に短縮できる事例が紹介されている。
定量的・定性的データの統合分析
Quick Chat Agent が CSAT や FCR などの数値指標と通話記録の感情分析を組み合わせ、顧客が離脱する背景を特定する。
カスタムロジックの実装機能
MCP Action を使用してサーバーレスエンドポイントを構築し、独自のビジネスロジックに基づく顧客スコアリングと優先順位付けを実現する。
顧客維持パイプラインの5段階自動化
このパイプラインは、リスクのある顧客データの取得からスコアリング、個別対応レターの作成・PDF化、そしてS3への保存までを自動実行する。
優先度に基づく顧客選定とレター生成
カスタマーサクセススコア(CSAT)と問題発生からの経過日数を基準に上位2件のケースを選出し、各顧客の具体的な課題を参照したボーナス付与レターを作成する。
重要な引用
Automating customer retention workflows in Amazon Quick can turn a five-day churn-response cycle into one that takes minutes.
It identifies customers with CSAT scores at or below 2.
An MCP Action is a serverless endpoint that extends Quick Automate with custom business logic.
The pipeline executes five sequential steps. It downloads the list of at-risk customers and contact center data from Amazon Simple Storage Service (Amazon S3).
編集コメントを表示
編集コメント
AWS は自社の AI エコシステム内で、顧客維持という具体的なビジネス課題に対する実用的な解決策を提示している。このアプローチは、単なる分析ツールの提供を超え、アクション可能なインサイトから実行までの一連のフローを自動化する点に特徴がある。
Source Article
元記事を日本語で読む
本文に関係しない購読案内、埋め込み通知、サイト内プロモーションは除いています。
Automating customer retention workflows in Amazon Quick can turn a five-day churn-response cycle into one that takes minutes. Last quarter, a mid-size SaaS company lost 12% of its at-risk accounts because the retention team took five days to identify and contact dissatisfied customers. By the time someone manually reviewed CSAT spreadsheets and call transcripts, those customers had already churned. Amazon Quick shortens that response window from days to minutes.
This post walks through building an automated retention pipeline in Amazon Quick. The pipeline detects dissatisfied customers from structured data. It analyzes sentiment from call transcripts and scores customers by retention priority. It then generates retention offers tailored to each situation. In this post, you learn how to:
- Configure a Quick Space with contact center datasets and call transcripts.
- Create and register a custom MCP Action for customer scoring.
- Build a Chat Agent that combines quantitative key performance indicators (KPIs) with qualitative transcript analysis.
- Convert the analysis into a reusable Quick Flow.
- Orchestrate the full pipeline with Amazon Quick Automate.
Solution overview
The retention pipeline connects four Amazon Quick components in sequence. Quick Dashboard monitors contact center KPIs, including CSAT (Customer Satisfaction Score, a 1–5 rating customers give after each call), FCR (First Call Resolution, whether the team resolved the issue in a single call), and AHT (Average Handle Time). It identifies customers with CSAT scores at or below 2.
Quick Chat Agent uses natural language to query structured data and unstructured call transcripts. It combines quantitative scores with qualitative sentiment signals. This surfaces why a customer is at risk, not just that they are.
Amazon Quick Flows turns the repeatable Chat-based analysis into a scheduled or on-demand automation that runs without manual intervention. Its final step formats the results as a structured list of at-risk customers that downstream automation can consume directly.
Quick Automate executes a multi-step pipeline. It ingests the structured at-risk customer list that the Flow produces and scores those customers through a custom MCP Action. An MCP Action is a serverless endpoint that extends Quick Automate with custom business logic. Refer to the Quick Automate MCP developer guide for details. The pipeline then ranks customers by priority, generates retention letters, and uploads them to Amazon Simple Storage Service (Amazon S3) for distribution.
You run the workflow on AWS infrastructure and can access audit trails, breakpoints, and role-based access controls.
Automate pipeline architecture
The pipeline executes five sequential steps. It downloads the list of at-risk customers and contact center data from Amazon Simple Storage Service (Amazon S3). A scoring step ranks those customers by retention priority (based on CSAT and how recently each customer had an issue) and picks the top two highest-priority cases. The pipeline then drafts bonus-credit letters that reference each customer’s specific issues, saves them as a PDF, and uploads the finished letters to Amazon S3 for delivery and archival.
The following table summarizes each step:
Step
Action
Details
1
Download at-risk customers and contact center dataset
Download the at-risk customers file (Negative Sentiment.doc) as well as the structured dataset contact_center_data.csv from Amazon S3.
2
Retention scoring
Score each customer on CSAT and issue recency through the custom MCP Action, and pick the top two highest-priority cases.
3
Retention letter generation
Draft bonus-credit letters that reference each customer’s specific issues.
4
PDF creation
Save the generated letters as a PDF document.
5
Upload to Amazon S3
Store the generated letters in Amazon S3 for delivery and archival.
This solution uses Amazon S3, Amazon Quick (Dashboard, Chat, Flows, Automate), and custom MCP Actions.
Prerequisites
To follow this walkthrough, you need:
- An AWS account with Amazon Quick activated (Dashboard, Chat, Flows, and Automate)
- A structured contact center dataset in CSV format named contact_center_data.csv (columns: customer_id, csat_score, call_date, call_reason, team_id). A sample dataset is provided with this post.
- Call transcript documents named Call_transcripts.docx in PDF or TXT format.
- An Amazon S3 bucket for pipeline input and output (example: amzn-s3-demo-bucket)
Solution walkthrough
The following sections walk through the build end to end, from preparing your Quick Space and registering the MCP Action connector to assembling the Chat Agent, Flow, and Automate workflow. Complete them in order, because each step builds on the components created before it.
To prepare your Quick Space
A Quick Space is the data layer that gives the Chat Agent access to both structured datasets (for filtering and aggregation) and unstructured documents (for sentiment analysis). Creating the Space first helps verify that every downstream component draws from the same source of truth.
- From the Quick console, select Spaces.
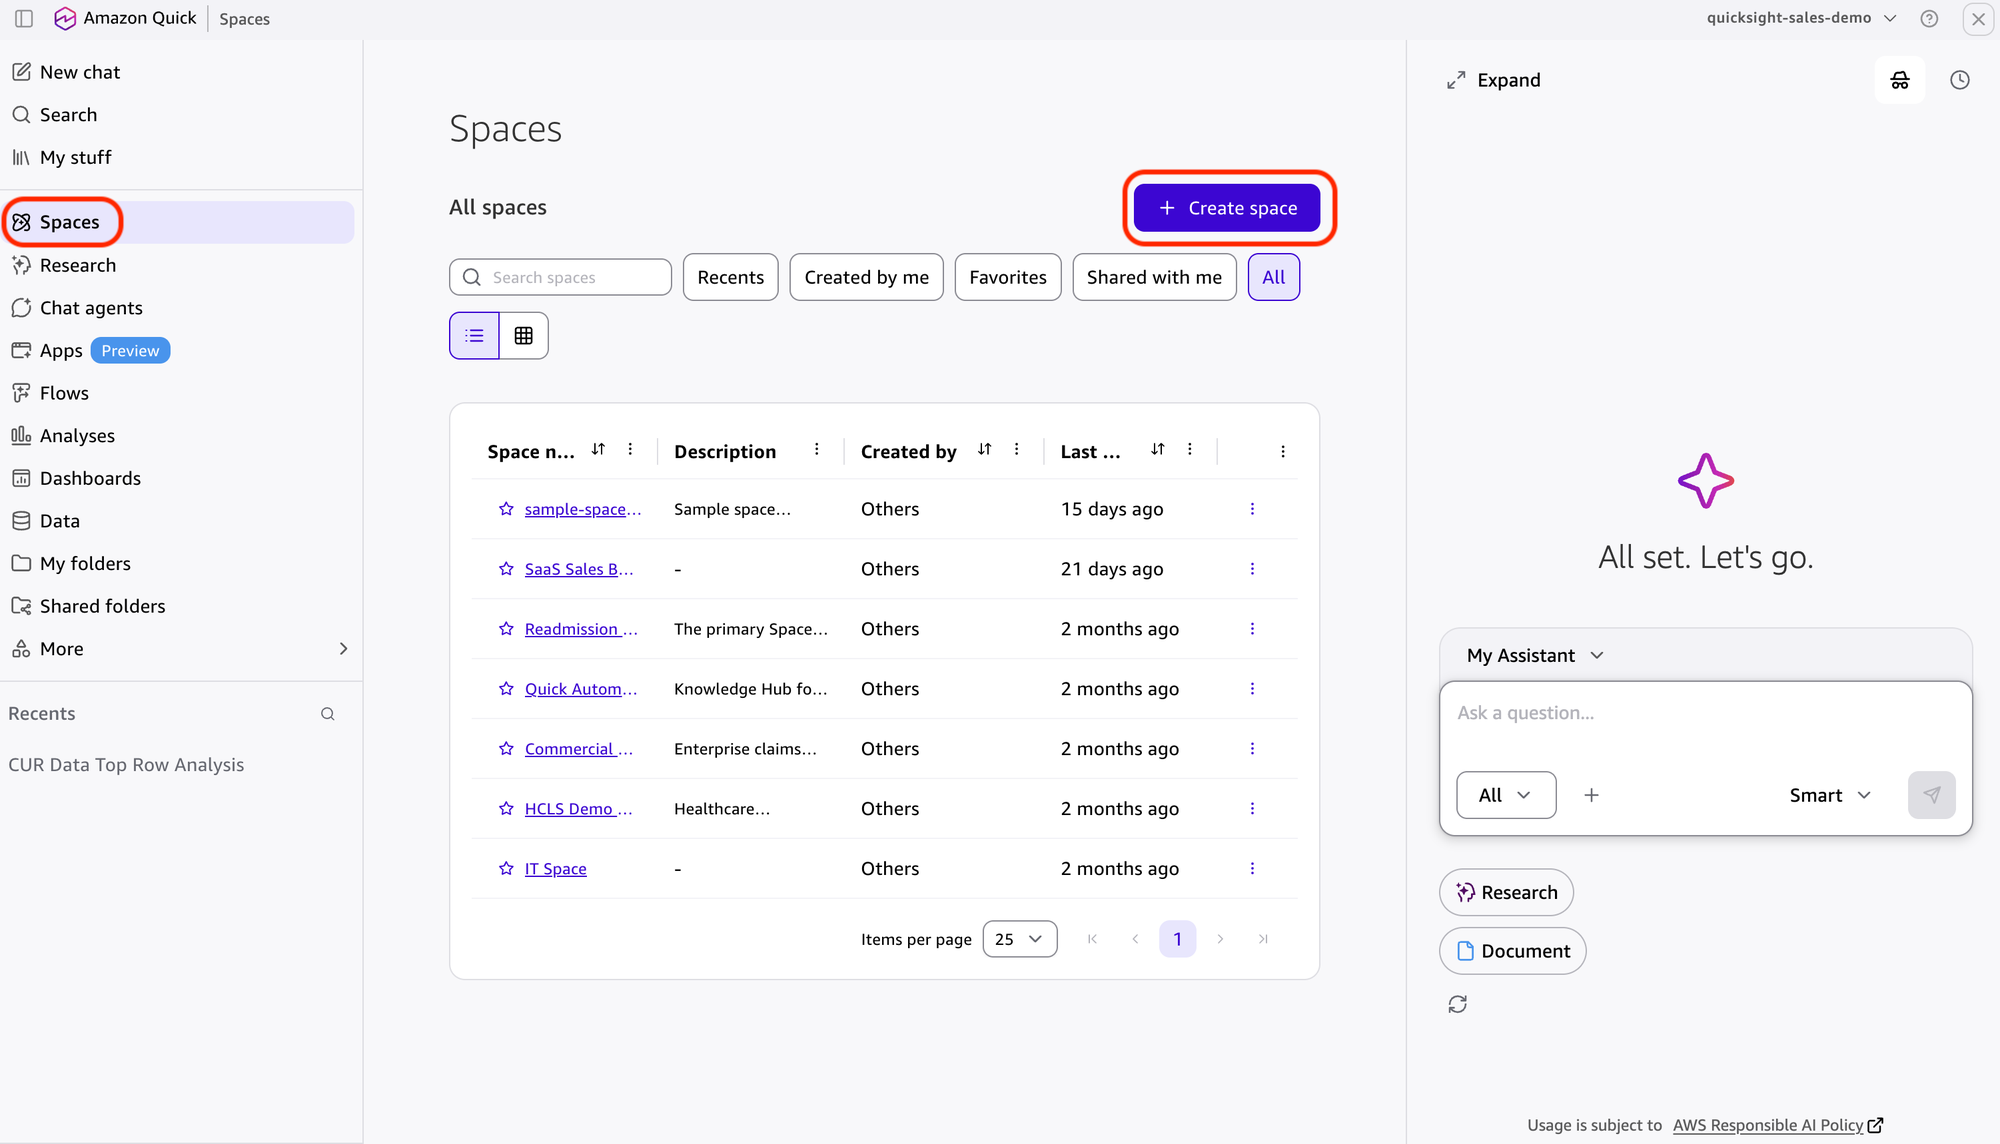
- Select “Create space”.
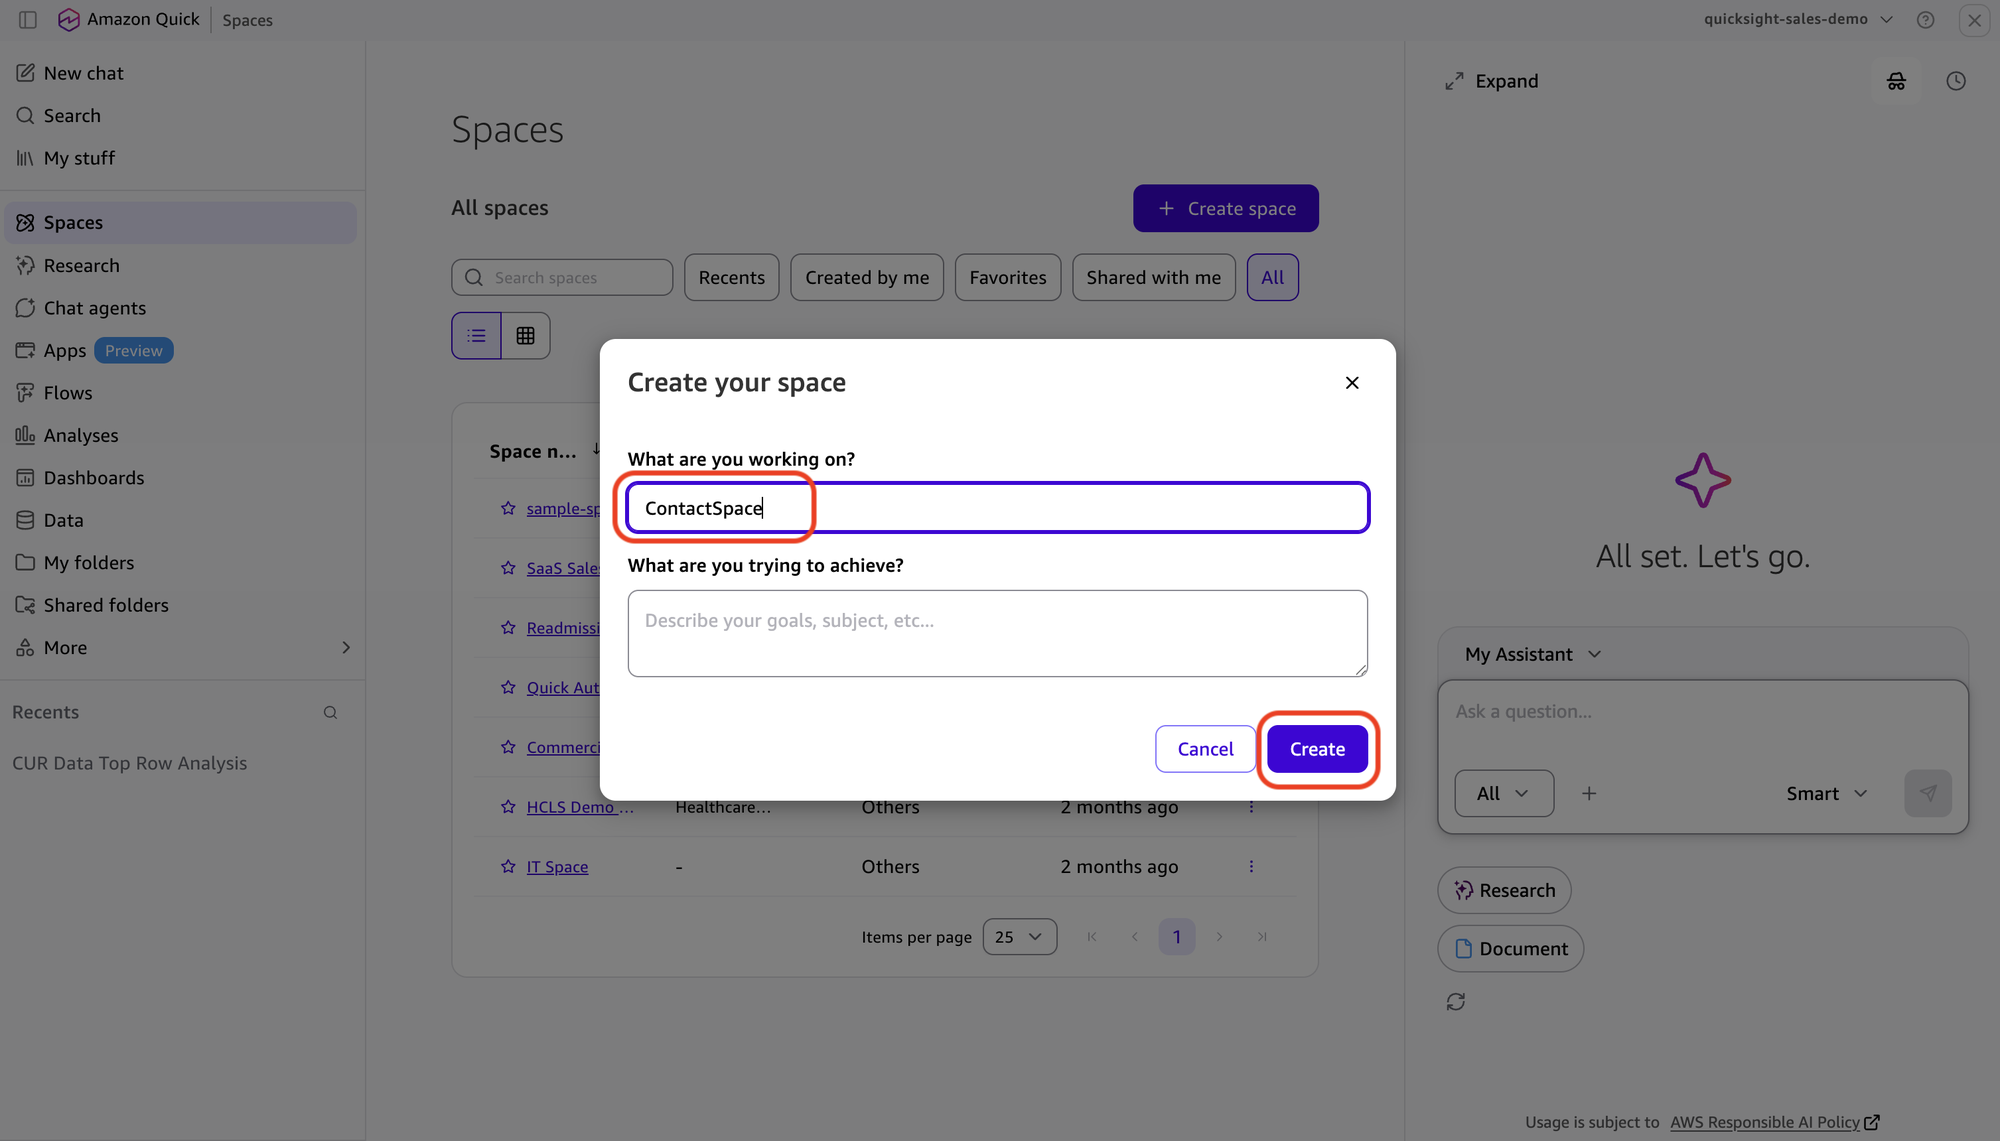
- For Space name, enter ContactSpace.
- In the screen that follows, select Datasets.
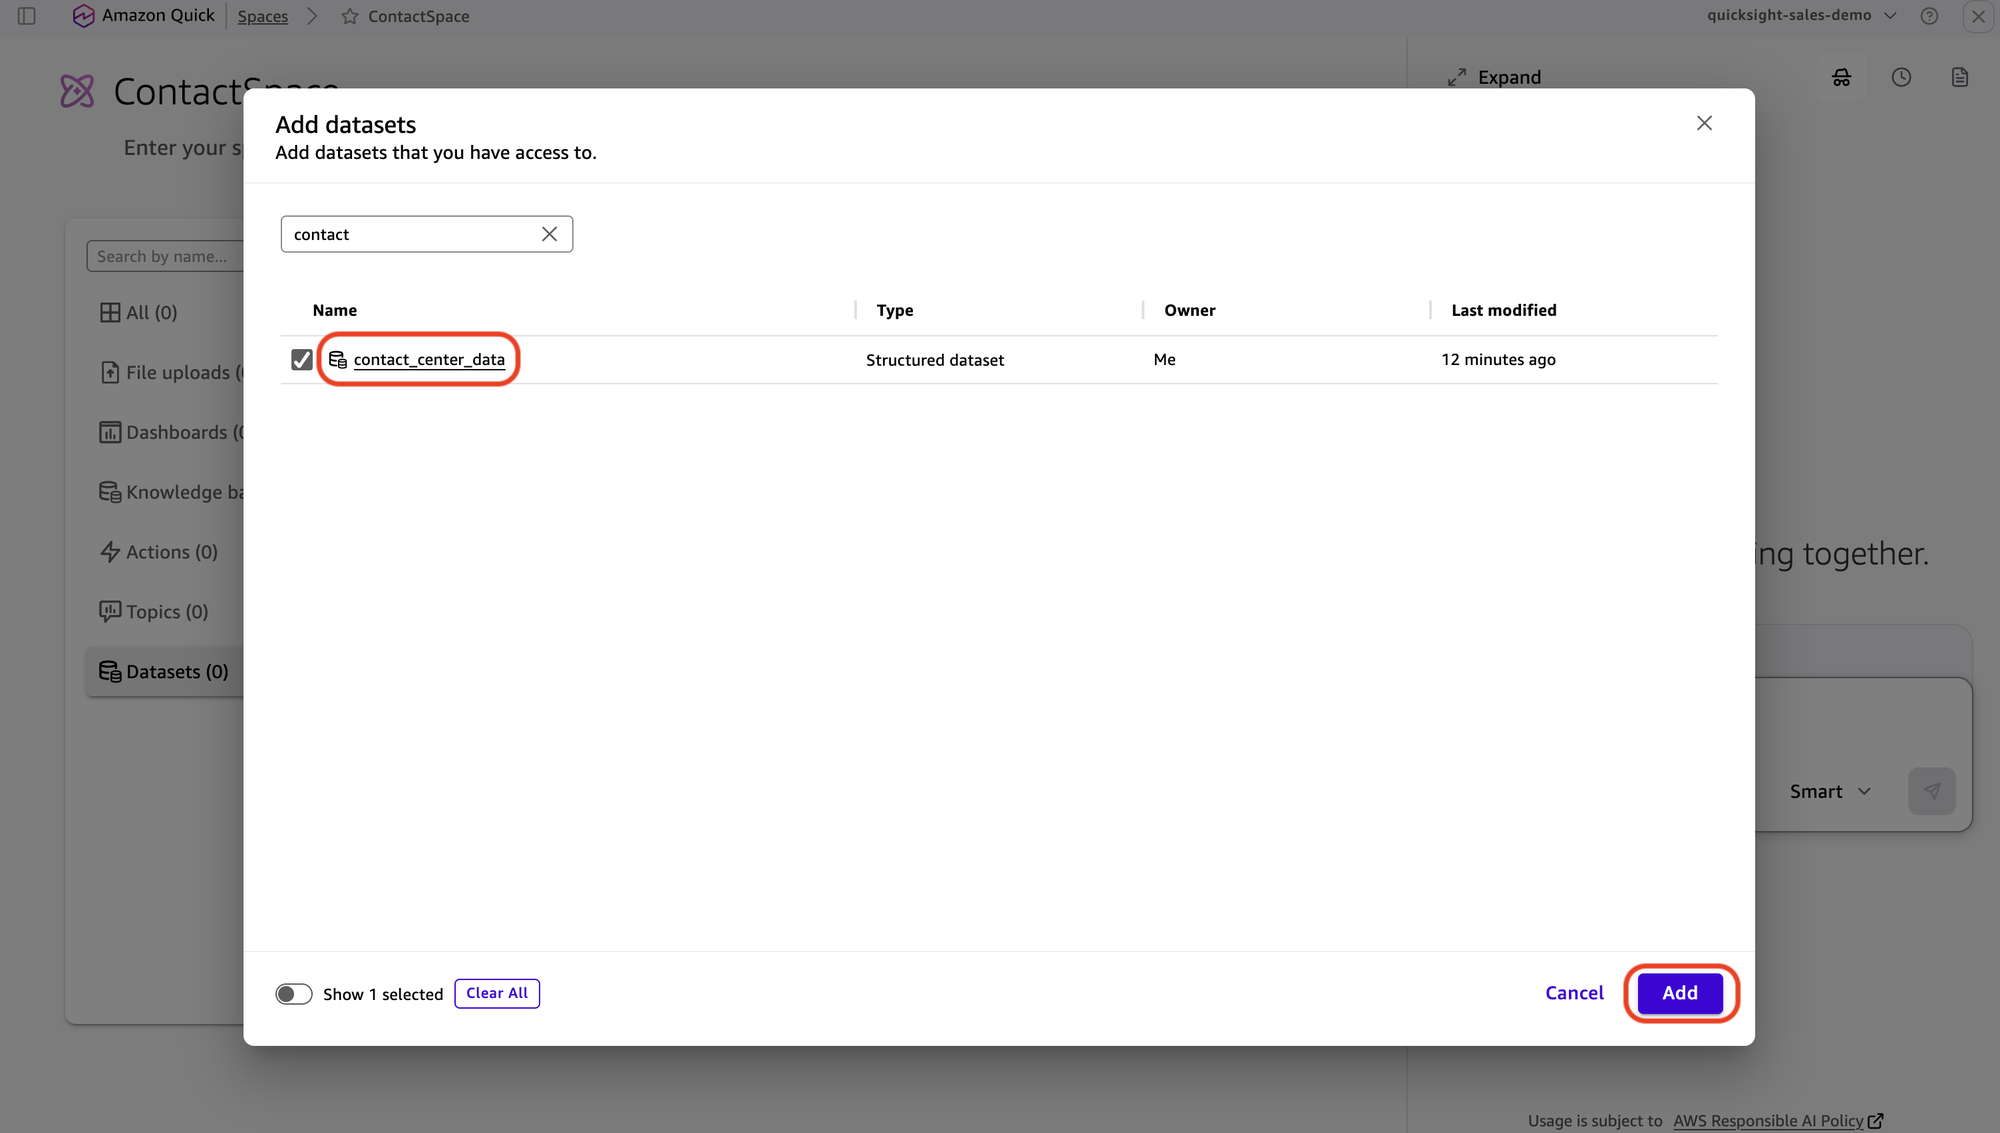
- Then select Add datasets. Search for and select the checkbox next to your contact_center_data dataset, then choose Add.
- Select File Uploads, then select Upload Files, and upload your Call_transcripts.docx transcript file, then choose Open.
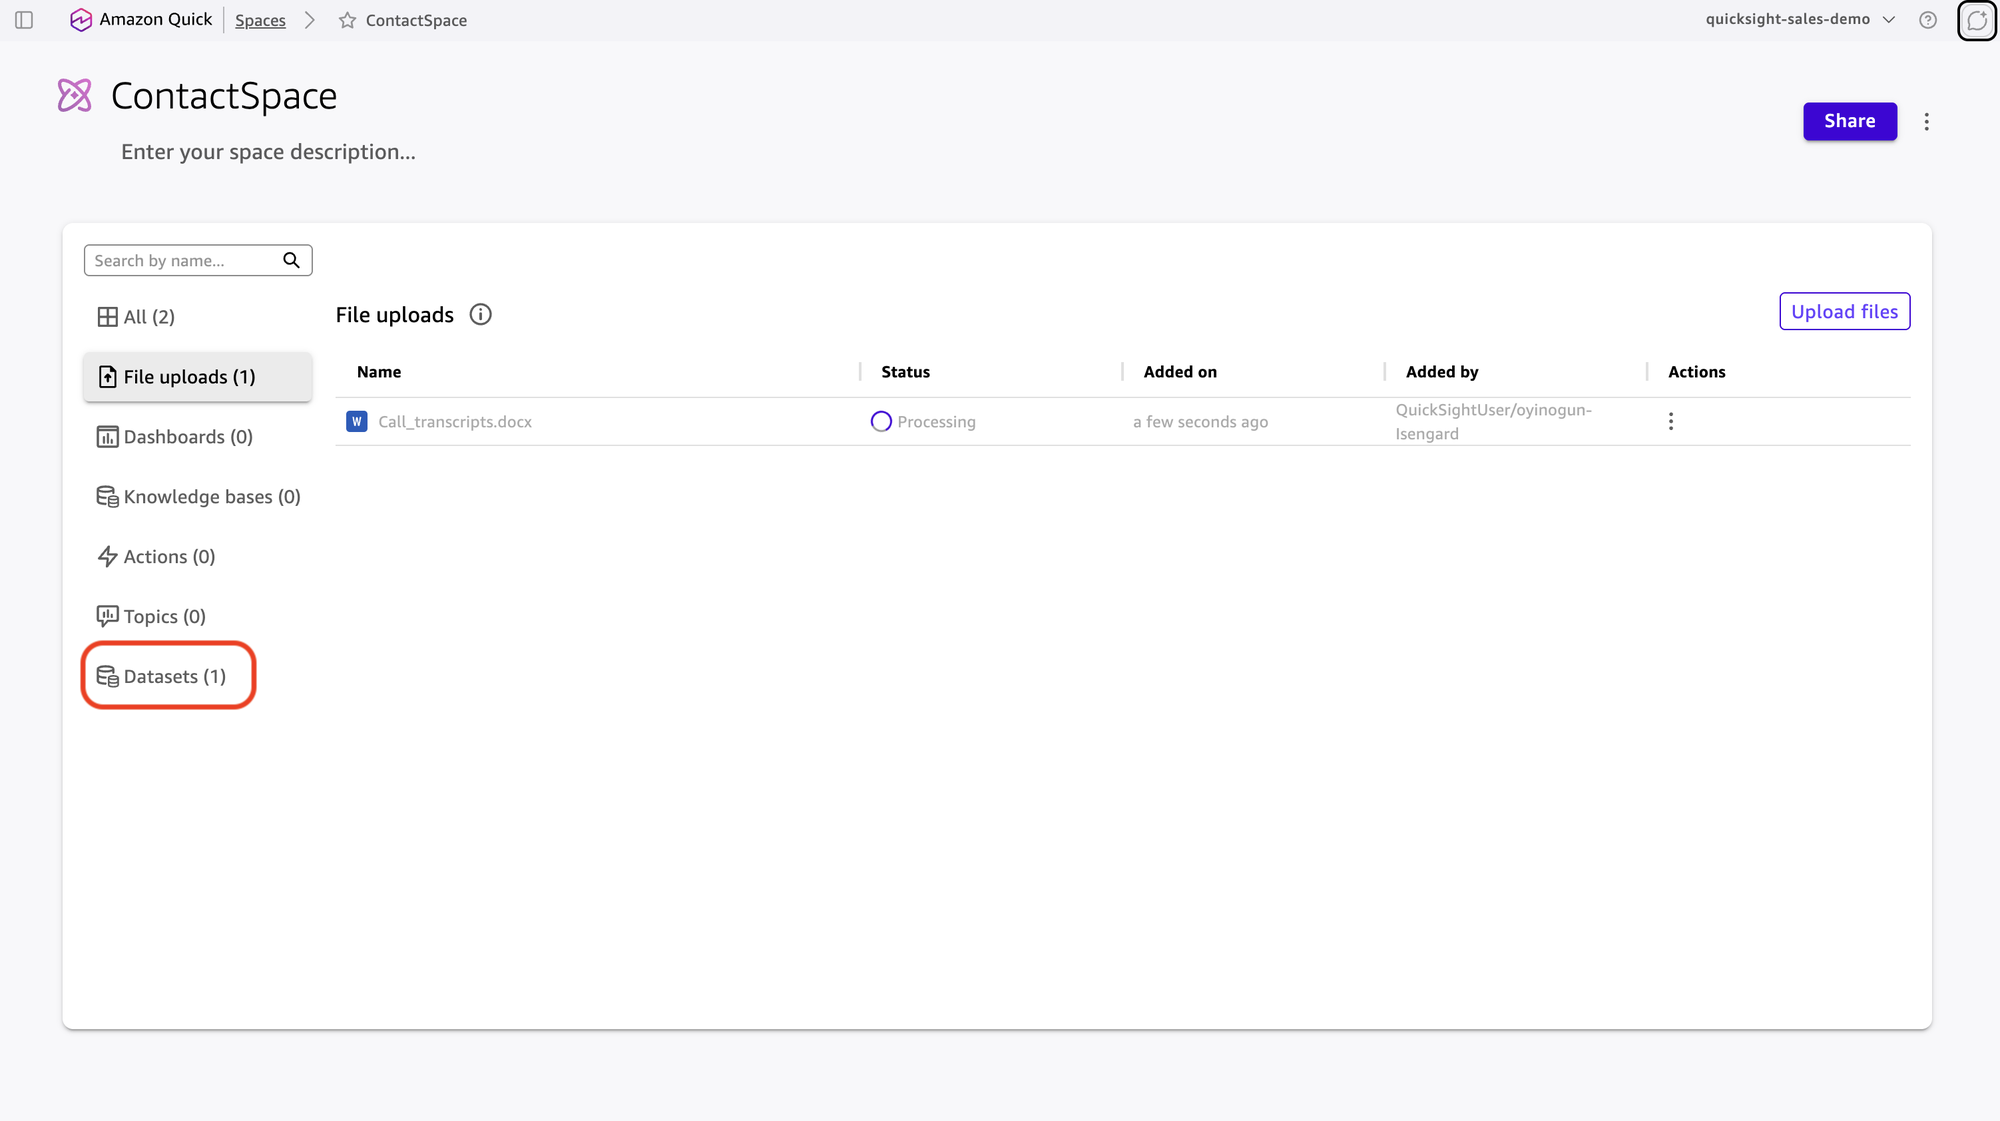
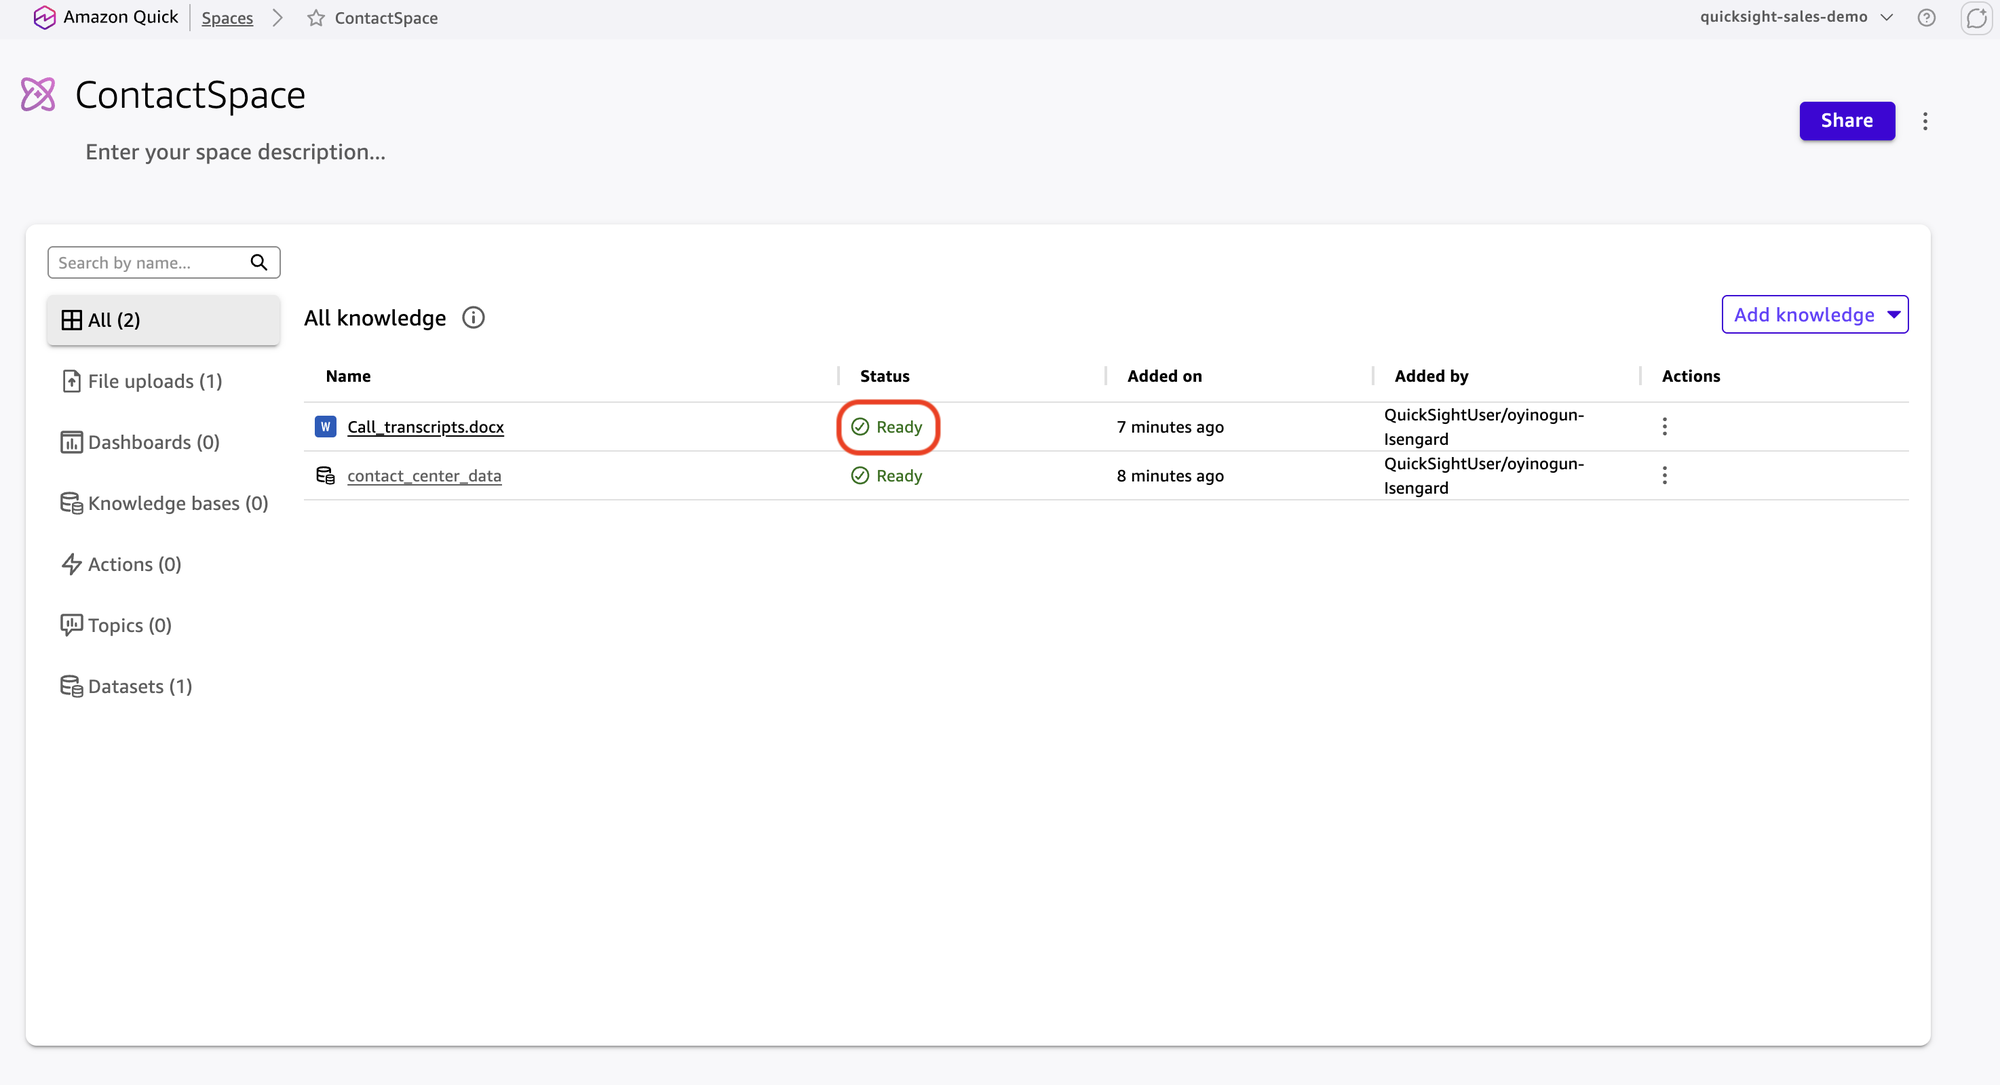
- Wait for indexing to complete. The Status column shows Ready for both the dataset and the document.
To create the MCP Action connector
An MCP Action connector bridges Amazon Quick and your custom business logic. It defines the connector and makes it available as an HTTP endpoint. You write an AWS Lambda function that contains your scoring algorithm wrapped in the MCP protocol, make it available through Amazon API Gateway, and register that endpoint in Amazon Quick.
The Model Context Protocol (MCP) is an open standard that lets AI assistants such as Amazon Quick call external tools in a consistent request-and-response format. If you are new to these services, AWS Lambda lets you run code without provisioning servers, and Amazon API Gateway exposes that code as a web address (an HTTP endpoint) that Amazon Quick can call. You first create the Lambda function, then put an API Gateway endpoint in front of it, and finally register that endpoint in Amazon Quick.
The following Lambda function implements a minimal MCP server. It handles the three JSON-RPC methods Amazon Quick calls during connection: initialize (the handshake), tools/list (which advertises the score_customers tool so Amazon Quick can discover it), and tools/call (which runs the scoring when the tool is invoked). The tool’s inputSchema follows JSON Schema Draft 7, which Amazon Quick requires at publish time:
import json

# Tool catalog advertised to Amazon Quick during discovery (tools/list).
# inputSchema uses JSON Schema Draft 7 (required is an array at the root).
TOOLS = [
    {
        "name": "score_customers",
        "description": "Scores contact center customers by retention priority.",
        "inputSchema": {
            "type": "object",
            "properties": {
                "customers": {
                    "type": "array",
                    "description": "Customer records to score.",
                    "items": {
                        "type": "object",
                        "properties": {
                            "customer_id": {"type": "string"},
                            "csat_score": {"type": "number"},
                            "days_since_last_issue": {"type": "number"}
                        },
                        "required": ["customer_id"]
                    }
                }
            },
            "required": ["customers"]
        }
    }
]

def score_customers(customers):
    scored = []
    for c in customers:
        score = 0
        # Weight factors: low CSAT = high churn risk
        score += (5 - c.get("csat_score", 3)) * 20
        # Recency: issues in last 7 days score higher
        score += 30 if c.get("days_since_last_issue", 30) < 7 else 0
        scored.append({
            "customer_id": c["customer_id"],
            "retention_score": round(score, 1),
            "explanation": f"CSAT:{c.get('csat_score')}, days_since_last_issue:{c.get('days_since_last_issue')}"
        })
    scored.sort(key=lambda x: x["retention_score"], reverse=True)
    return scored

def lambda_handler(event, context):
    """MCP-compliant JSON-RPC handler for customer retention scoring."""
    req = json.loads(event.get("body", "{}"))
    method = req.get("method")
    req_id = req.get("id")

    def rpc(result):
        return {"statusCode": 200,
                "headers": {"Content-Type": "application/json"},
                "body": json.dumps({"jsonrpc": "2.0", "id": req_id, "result": result})}

    if method == "initialize":
        return rpc({
            "protocolVersion": "2024-11-05",
            "capabilities": {"tools": {}},
            "serverInfo": {"name": "customer-scoring", "version": "1.0.0"}
        })

    if method == "tools/list":
        return rpc({"tools": TOOLS})

    if method == "tools/call":
        params = req.get("params", {})
        if params.get("name") == "score_customers":
            args = params.get("arguments", {})
            scored = score_customers(args.get("customers", []))
            return rpc({"content": [{"type": "text", "text": json.dumps(scored)}]})

    return {"statusCode": 200,
            "headers": {"Content-Type": "application/json"},
            "body": json.dumps({"jsonrpc": "2.0", "id": req_id,
                                "error": {"code": -32601, "message": "Method not found"}})}
Deploy this function to AWS Lambda:
- Open the AWS Lambda console and choose Create function. Select Author from scratch.
- For Function name, enter customer-scoring. For Runtime, choose a recent supported Python version (for example, Python 3.13). Choose Create function.
- In the Code tab, replace the default code with the function shown earlier, then choose Deploy.
With the function deployed, create an API Gateway endpoint in front of it using the following AWS Command Line Interface (AWS CLI) commands. If you prefer, you can perform these same steps in the API Gateway console. Run the commands in order. Each one produces a value (such as the API ID) that you use in the next.
Replace the placeholder values (, , , ) with your own:
# 1. Create REST API
aws apigateway create-rest-api
--name customer-scoring-api
--endpoint-configuration types=REGIONAL

# Note the "id" value from the response ->

# 2. Get root resource ID
aws apigateway get-resources --rest-api-id

# Note the "id" value ->

# 3. Create POST method
aws apigateway put-method
--rest-api-id
--resource-id
--http-method POST
--authorization-type NONE

# 4. Integrate with Lambda
aws apigateway put-integration
--rest-api-id
--resource-id
--http-method POST
--type AWS_PROXY
--integration-http-method POST
--uri "arn:aws:apigateway::lambda:path/2015-03-31/functions/arn:aws:lambda:::function:/invocations"

# 5. Allow API Gateway to invoke Lambda
aws lambda add-permission
--function-name
--statement-id apigateway-invoke
--action lambda:InvokeFunction
--principal apigateway.amazonaws.com
--source-arn "arn:aws:execute-api:::/*/POST/"

# 6. Deploy
aws apigateway create-deployment
--rest-api-id
--stage-name prod

# Your endpoint URL:

# https://.execute-api..amazonaws.com/prod/mcp
The create-deployment command returns a deployment id and timestamp. Construct the endpoint URL yourself using your API ID and Region in the following format: https://.execute-api..amazonaws.com/prod/mcp. Note this URL. You use it when registering the connector in Amazon Quick.
Production consideration: This walkthrough uses API Gateway directly in front of Lambda for simplicity. For production workloads, consider using Agentcore gateways in front of Lambda, which provide built-in, agent-level authentication, throttling, and observability out of the box.
To register the MCP Action connector in Amazon Quick
- From the Amazon Quick home page, select More, then select Connectors.
- In the right section, select Create for your team.
- Select Model Context Protocol.
- In the screen that follows, Select No, create new.
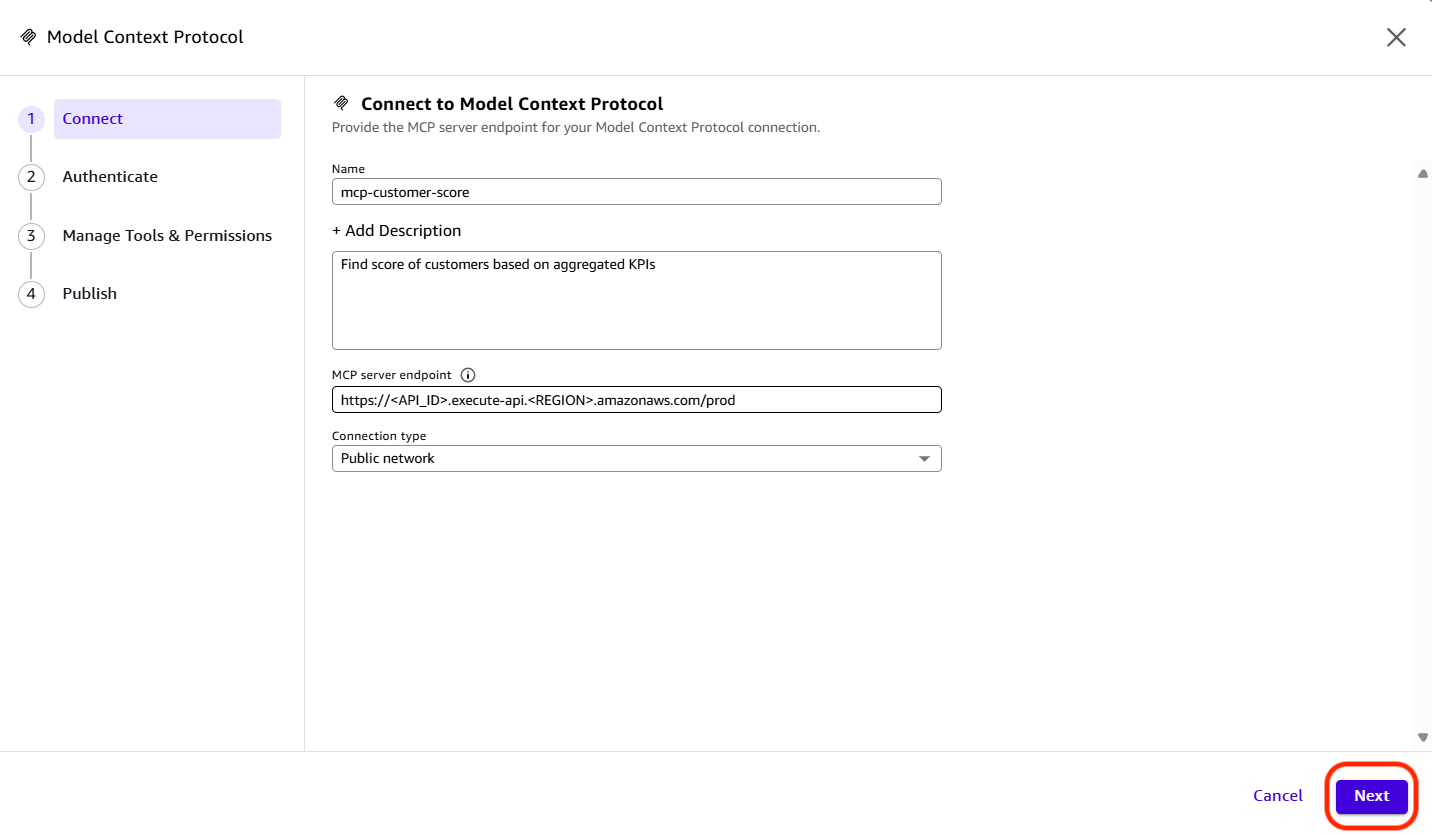
- Enter the following values and choose Next:
- Name: mcp-customer-score.
- Description: Find score of customers based on aggregated KPIs.
- MCP server endpoint: paste the endpoint URL https://.execute-api..amazonaws.com/prod/mcp.
- Connection type: Public network.
- Choose Next.
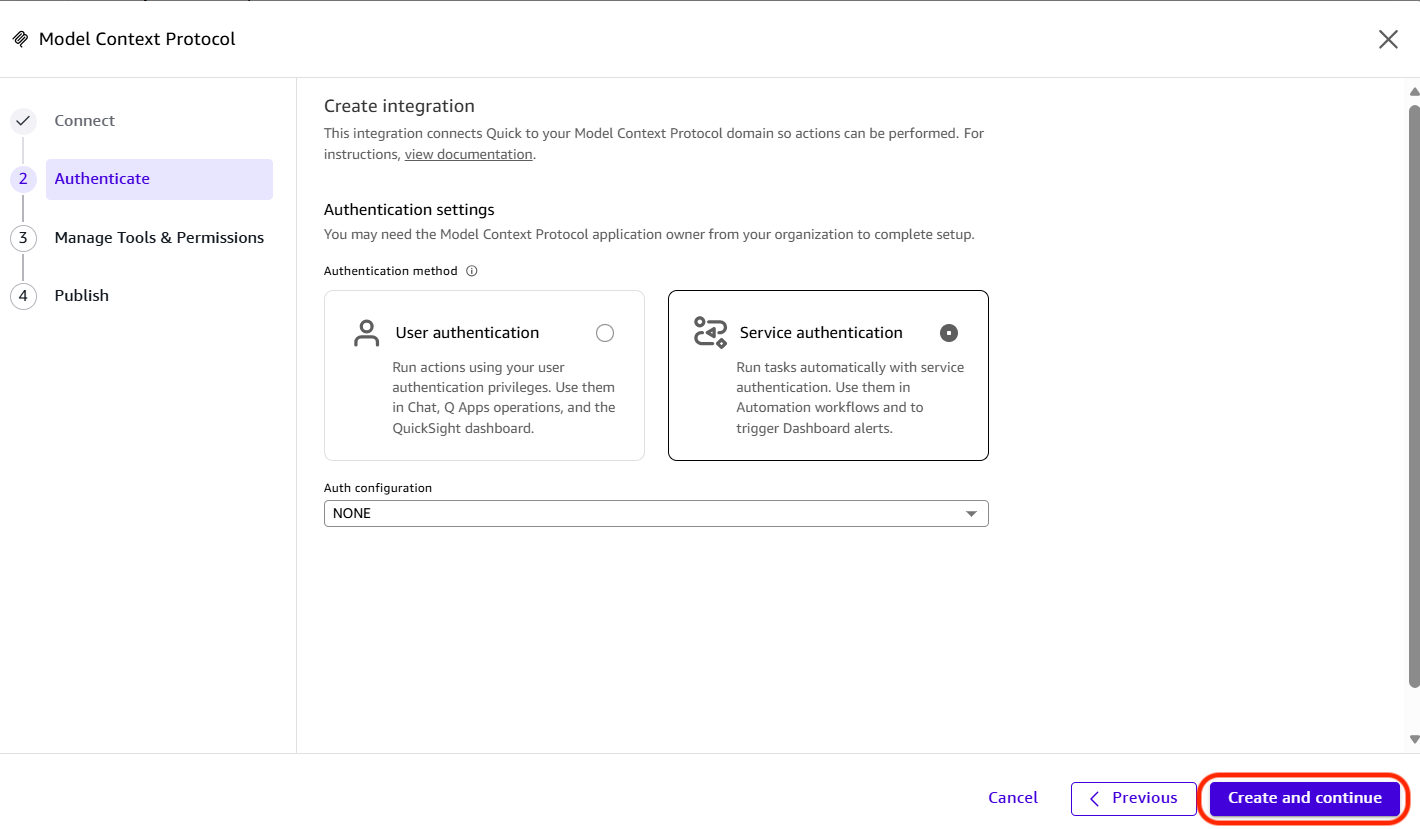
- On the Authenticate step, select Service authentication, then open the Auth configuration list and choose None. This endpoint is intentionally open for demonstration purposes. In a production environment, you would typically add an authentication layer, most commonly two-legged OAuth (2LO), to secure the endpoint. Because the scoring endpoint you deployed uses –authorization-type NONE, it accepts unauthenticated requests, so no client ID or secret is required. (Use an OAuth option only if your MCP server is protected by OAuth.)
- Choose Create and continue.
- Choose Publish.
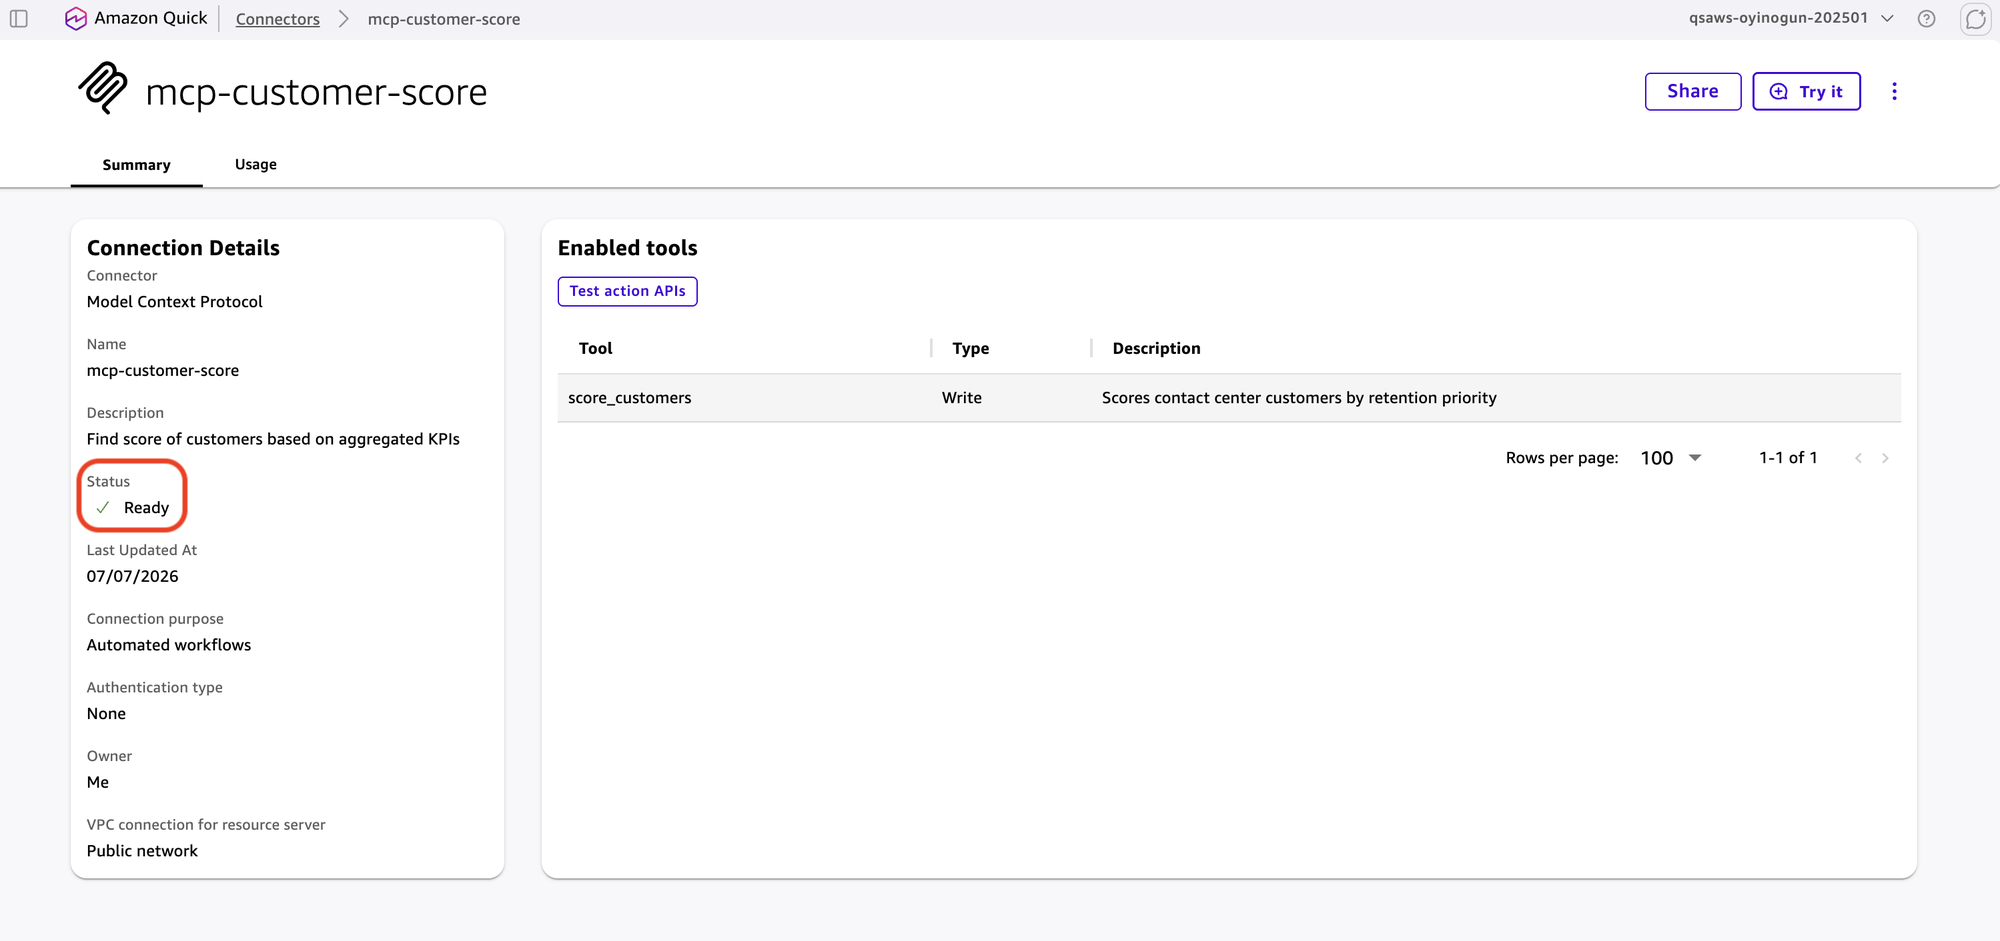
- Wait a few minutes, then choose the new connector in the Available section. Confirm the status shows Ready.
To create a custom Chat Agent for contact center analysis
A custom Chat Agent connects to your ContactSpace and has access to the MCP Action connector you registered. The system prompt is the critical component. It tells the agent how to interpret the data, what questions to ask of the transcripts, and when to invoke the scoring tool versus answering from the dataset directly.
- From the Quick home page, select Chat agents, then choose Blank, followed by Skip to create a custom chat agent from scratch.
- For Agent name, enter Contact Center Strategy Analyst.
- Under Knowledge Sources, link the ContactSpace.
- Under Actions, add the mcp-customer-score connector.
- For the system prompt, enter text similar to the following:
You are a Contact Center Strategy Analyst. You have access to:
- contact_center_data.csv - structured CSAT, call, and team data
- Call_transcripts.docx - unstructured call transcript documents
- mcp-customer-score tool - calculates retention priority sc
AI算出
導入事例ainew評価標準
Amazon Quick の機能紹介と、それを活用した顧客維持ワークフローの自動化事例が中心であり、AI エージェント運用の実践例として評価できる。ただし、これはベンダー公式による導入事例紹介であり、独立した新事実や画期的な技術発表ではないため新規性は低く、日本固有の情報もない。
6つの評価軸を見る
- AI関連度
- 75
- 情報源の信頼性
- 100
- 新規性
- 25
- 調べる価値
- 75
- 重複の少なさ
- 100
- 日本での有用性
- 25
関連記事
今日のまとめ
AIデイリーブリーフで今日の重要ニュースをまとめ読み