ShellSageがiTermを愛する理由
Answer.AI は、Nate Cooper が開発した AI コマンド支援ツール「ShellSage」を、ターミナルエミュレータ iTerm2 の機能である「tmux control mode」を活用することで、学習コストをかけずに自然なインターフェースで利用可能にする設定方法を解説している。
キーポイント
ShellSage と tmux の連携原理
ShellSage はターミナルエミュレータとシェルの間に位置する tmux を介してコマンド履歴を AI に提供するため、通常は tmux 固有の操作や UI が必要となる。
iTerm2 の control mode 活用
iTerm2 では「tmux -CC」オプションにより control mode が有効化され、従来のテキストベースの UI ではなくネイティブなタブやスクロールバーとして tmux を表示できる。
学習コストゼロでの導入方法
iTerm2 のプロファイル設定で起動時に自動的に tmux control mode を経由して ShellSage が有効化されるように構成することで、新しいキーバインドを覚えることなく AI 支援を利用可能にする。
具体的な設定手順の提示
ローカル環境での tmux とシェルのパス確認、.tmux.conf の設定、そして iTerm2 プロファイルでの起動コマンド指定という具体的なステップが示されている。
ローカルおよびリモート接続の iTerm プロファイル設定
ローカル環境では `tmux -CC new-session` を、リモート環境では SSH 経由で同様の tmux コマンドを実行するプロファイルを作成することで、ShellSage の制御モードをシームレスに起動できます。
UI の整理とデフォルト設定の活用
iTerm2 の設定で「接続後に tmux クライアントセッションを自動的に隠す」オプションを有効にし、不要な制御モードウィンドウを表示しないようにして画面を整理できます。
ShellSage と iTerm の相性
iTerm2 の制御モードは複雑なマルチプレクシング操作を透明化し、ShellSage の哲学と合致しており、ターミナル UX を損なわずに高度な機能を享受できます。
重要な引用
If your main interest in tmux is just to enable ShellSage, then you might want to explore tmux control mode, a feature available in iTerm2.
Instead of seeing tmux panes indicated by a text footer, you will just see separate tabs in your window.
So what? In short, if you use tmux through iTerm2's control mode, then you get the benefit of ShellSage without modifying your terminal interface or learning new commands.
It takes a fiddly thing (multiplexing, multiple planes, and attaching to sessions, custom keyboard commands) and makes it transparent and frictionless.
Control mode isn't perfect. Its main problem is that it's not widely supported on other terminal emulators (sorry, Windows!)
影響分析・編集コメントを表示
影響分析
この記事は、AI ツールと既存のインフラストラクチャ(ターミナル環境)を摩擦なく統合するための具体的な実装パターンを示しており、開発者のワークフロー効率化に即座に寄与する可能性が高い。特に、新しいツールの学習コストを極限まで抑えつつ AI 機能を導入したいエンジニアにとって、iTerm2 の機能活用という現実的な解決策を提供している。
編集コメント
AI ツールの導入障壁を下げたい開発者にとって、既存のツール設定をいじるだけで機能を追加できるこの手法は非常に有益です。特にターミナル操作に慣れている層には、学習コストをかけずに AI を取り入れる最適な入り口となるでしょう。
これは、AnswerAI から最近登場した最もクールな技術ツールの一つである Nate Cooper 氏の ShellSage を便利に利用するための簡単なノートです。
Nate が指摘している通り、ShellSage はその魔法を tmux に依存しています。tmux はターミナルマルチプレクサ(terminal multiplexer)です。伝統的には、ターミナルエミュレータ(macOS 上の Terminal.app など)と 1 つ以上のシェル(bash など)の間に位置します。この「間に入る」構造こそが、入力されるコマンドとその出力を監視し、その文脈を AI に利用可能にする仕組みです。
iTerm2 と tmux コントロールモード
しかし、マルチプレクシング自体に興味がない場合、どうでしょうか?具体的には、tmux ペイン間の切り替えに使う tmux のキーボードコマンドを学ぶことや、複数のペインを 1 つのターミナルウィンドウに配置する tmux のビジュアルインターフェースを使用することに興味がないかもしれません。
tmux への主な関心が ShellSage を有効化することだけであるなら、iTerm2 で利用可能な機能である「tmux コントロールモード」を検討してみる価値があります。これを使えば、ターミナルはデフォルトで統合されたシェルセージ(ShellSage)を備えて起動します。以下のようにです。
簡潔に説明すると、tmux コントロールモードが何を行うか、そして ShellSage のためにそれを設定するいくつかの方法についてご紹介します。
iTerm2.app は、OS に標準搭載されている Terminal.app や Warp などと同様、macOS のターミナルエミュレータの一つに過ぎません。しかし iTerm2 では、tmux -CC を実行して制御モードを有効化すると、カスタムのテキスト UI を描画する代わりに、tmux が制御信号を直接 iTerm2 に送信し、iTerm2 がネイティブの UI コントロールを使用して tmux のペインを描画します。その結果、テキストフッターで示された tmux ペインではなく、ウィンドウ内に別々のタブとして表示されます。キーボードショートカット(次へは C-b n など)でペインを切り替える代わりに、マウスまたは通常のショートカット(C-})でタブを切り替えることができます。同様に、タブ内ではネイティブのスクロールバーを使用してスクロールできます。
つまり、tmux の制御モードを使用している間、tmux はその機能を提供しつつ、インターフェースをほとんど変更しません。それで何になるのでしょうか?要するに、iTerm2 の制御モードを通じて tmux を使用すれば、ターミナルインターフェースを変更したり新しいコマンドを覚えたりすることなく、ShellSage の恩恵を受けることができます。
これを手間なく実現するための鍵は、tmux を介さずにシェルを起動するかのように、直接 tmux へ起動する iTerm2 プロファイルを設定することです。
これを実現する方法を二つ紹介します。
ローカルマシンへの接続の場合
まず、ローカルマシンに tmux がインストールされていることを確認し、tmux 実行ファイルのパスをメモしてください。ここでは tmux のパスを /opt/homebrew/bin/tmux と仮定します。
第二に、デフォルトで開きたいシェルのパスを見つけます。それがシステム標準のシェル(macOS では /bin/zsh)でない場合、tmux 自体が起動する際のシェルを指定する行を ~/.tmux.conf に追加してください。例えば、以下の行は homebrew が提供する新しいバージョンの bash を tmux で使用するように設定します:
set-option -g default-shell /opt/homebrew/bin/bash
第三に、iTerm2 の「設定」→「プロファイル」へ移動し、新しいプロファイルを作成します。「一般」セクション内の「コマンド」サブセクションで、「コマンド」ドロップダウンの値を以下のように設定してください:
/opt/homebrew/bin/tmux -CC new-session -A -s main
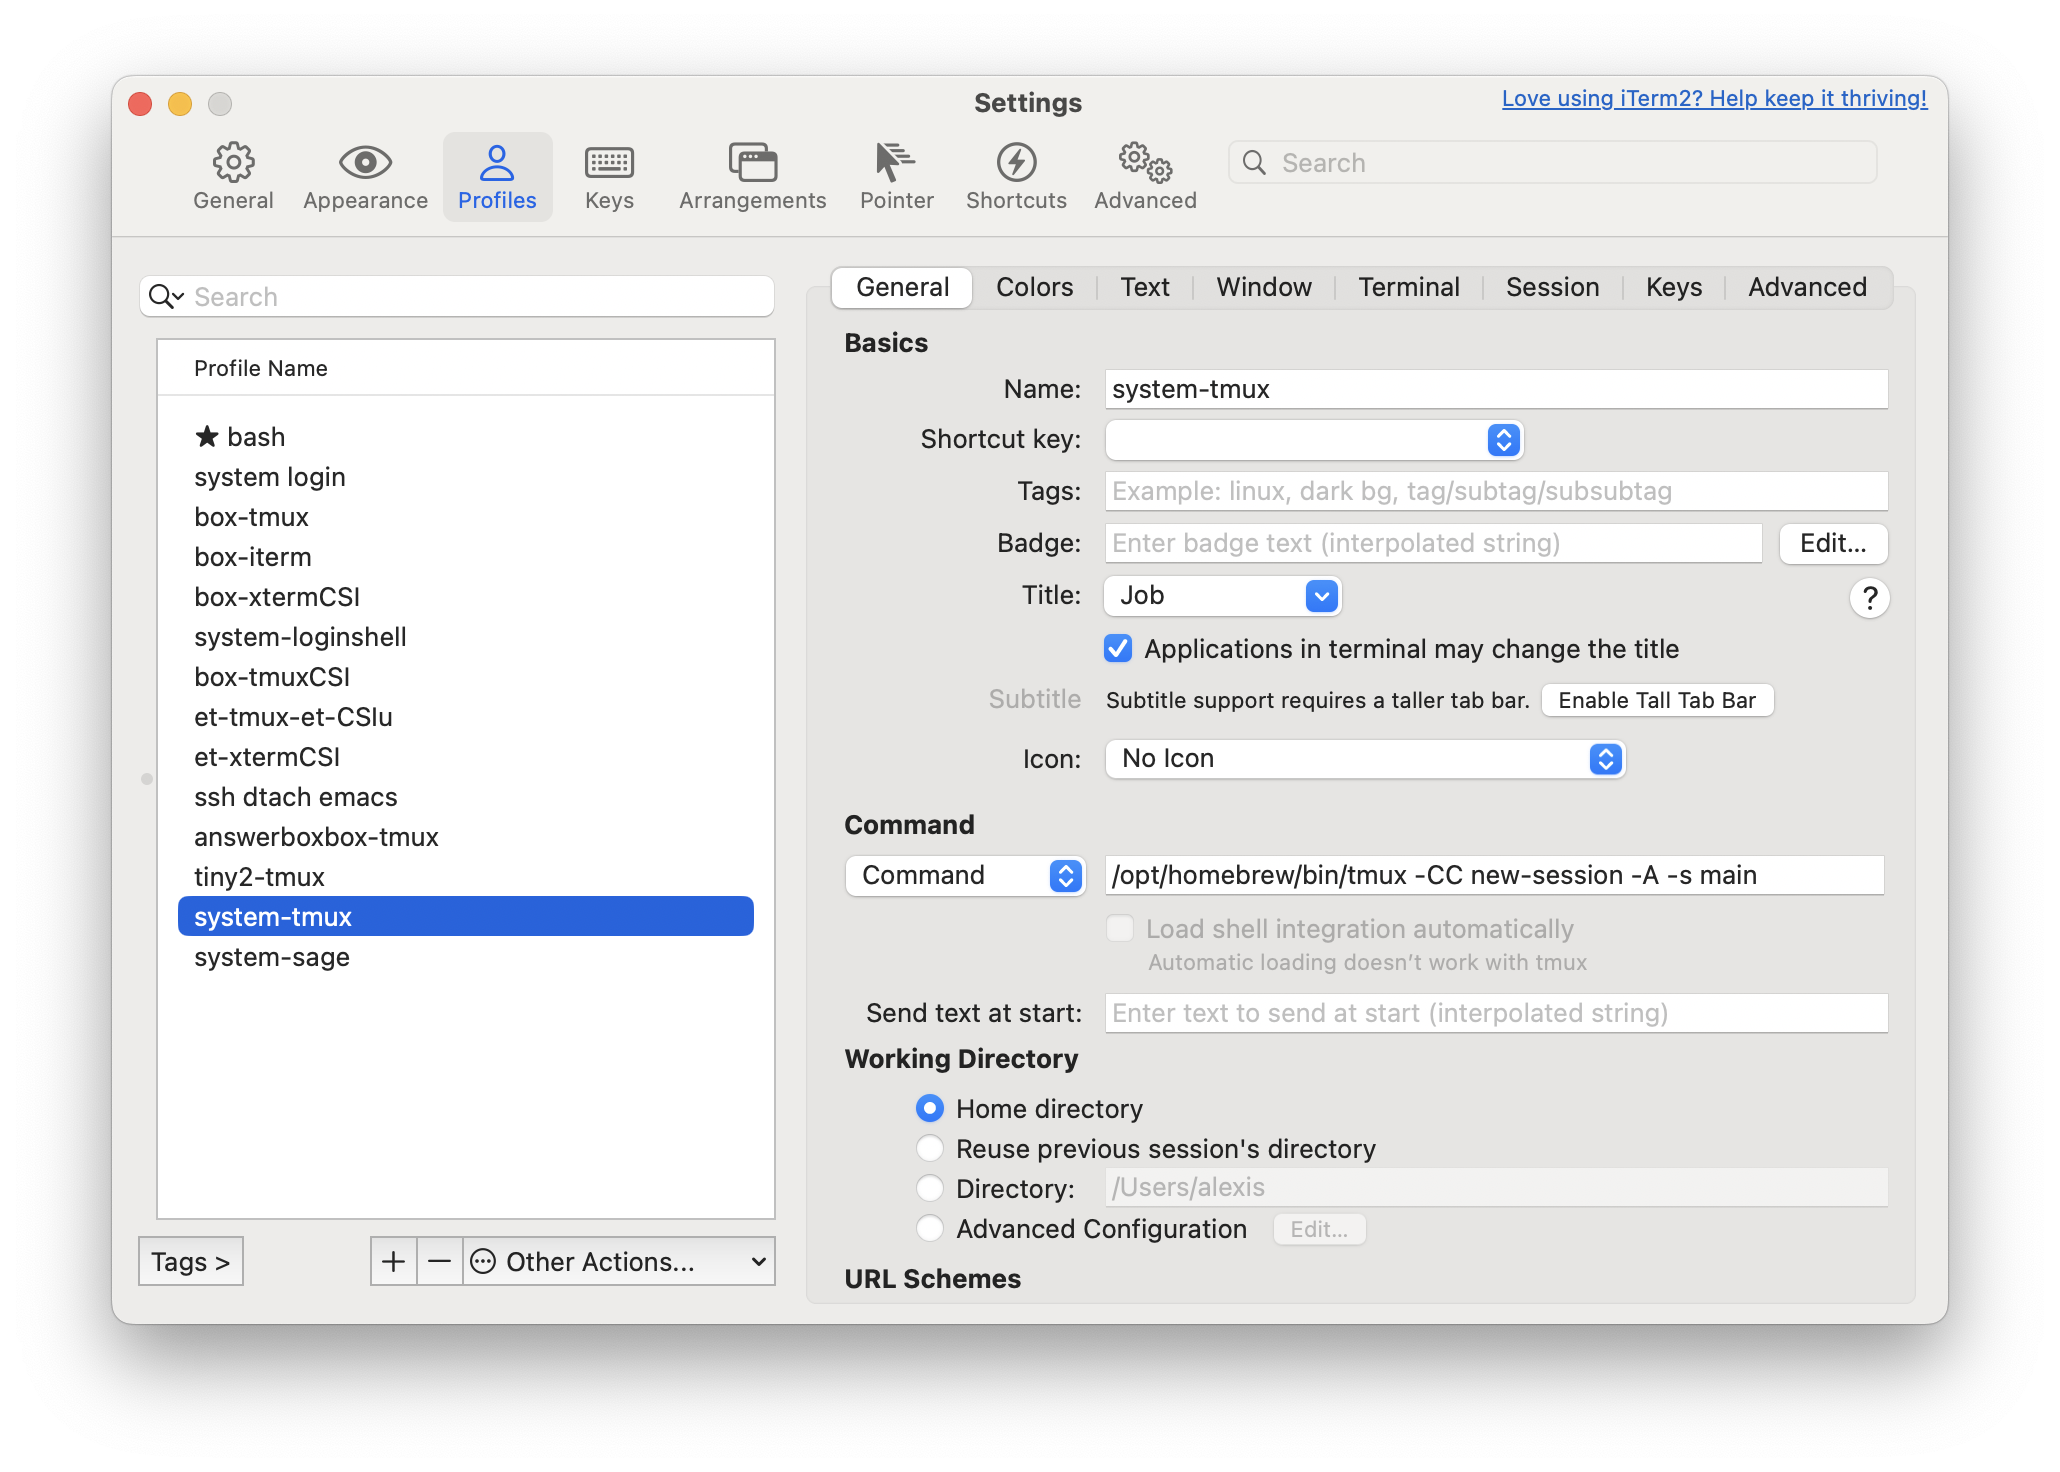
ローカル tmux 用の iTerm プロファイル設定
このプロファイルを起動すると、bash を直接起動する代わりに、tmux が制御モードで起動し、「main」という名前の tmux セッションを作成または接続するように指示されます。そして、前述の .tmux.conf の最初の設定により、その結果として bash シェルが起動します。
リモートホストへの接続の場合
リモートホストの場合もセットアップは同様です。
唯一の違いは、リモートホストの名前を box と仮定すると、以下のようなコマンドを使用する必要がある点です:
/usr/bin/ssh -t box 'tmux -CC new-session -A -s main'
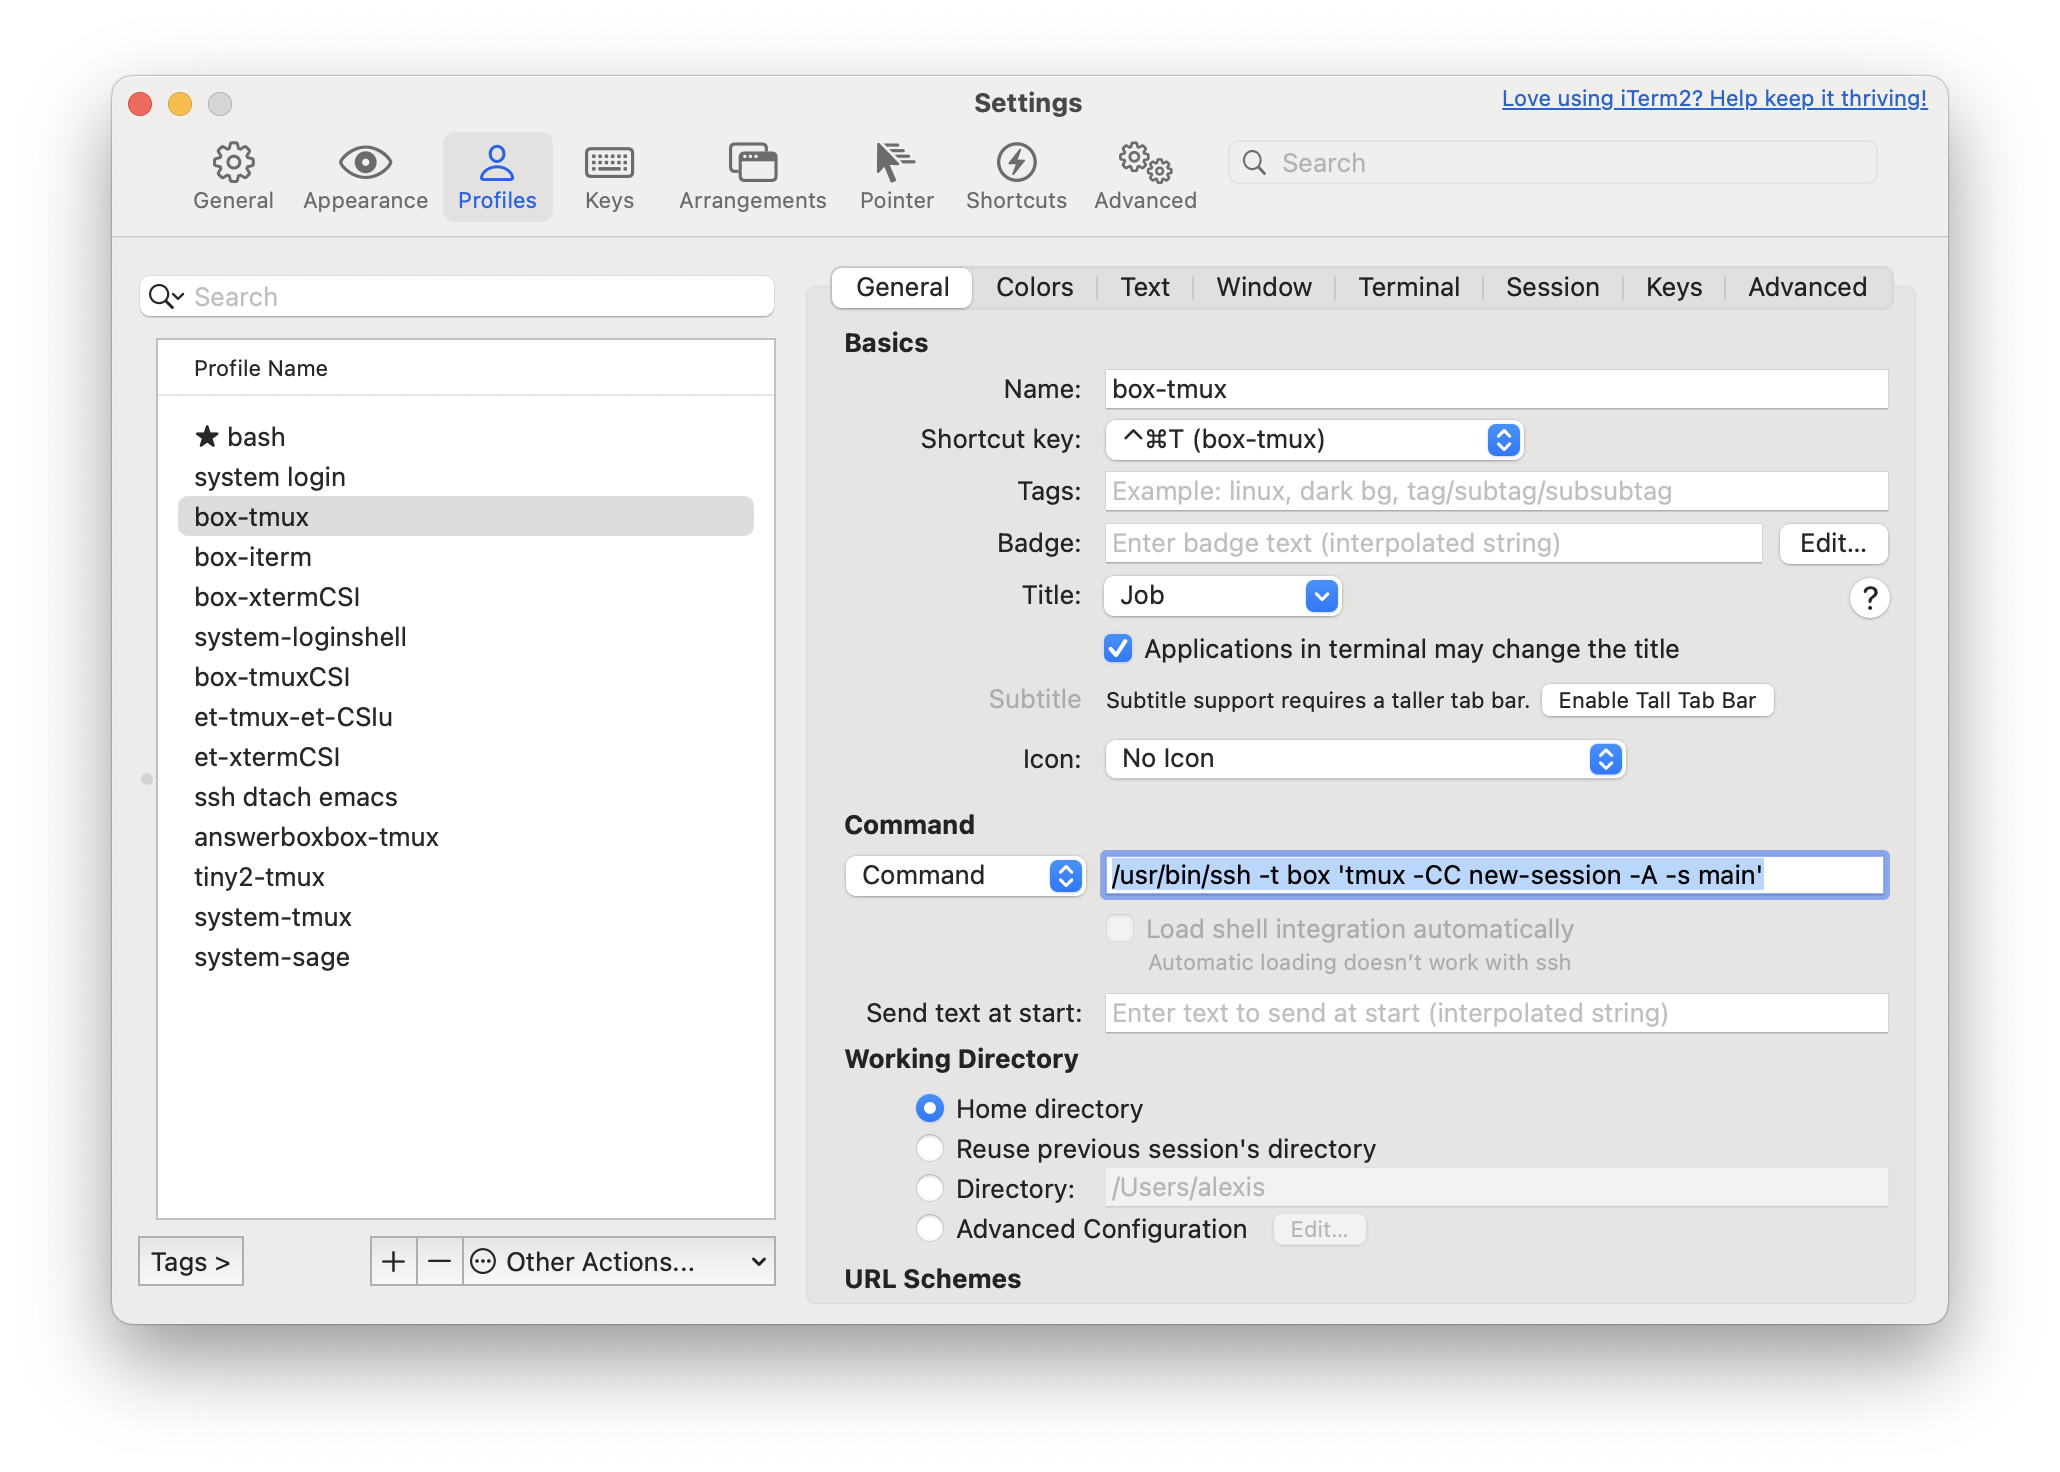
リモート tmux 用の iTerm プロファイル設定
このコマンドを使用すると、プロファイルが起動され、ホストに SSH で接続されると同時に同じ tmux コマンドが渡され、「main」と名付けられた tmux セッションへの再接続または作成が行われます。
その他の利便性と詳細
これらのプロファイルのいずれかをデフォルトとして設定できます。これにより、iTerm を起動する際に自動的に起動されるようになります。この方法であれば、ワークフローに他の変更を加えることなく、慣れ親しんだターミナル UX 内で ShellSage をデフォルトで利用できるようになります。あるいは、これらのプロファイルを直接簡単に起動できるようにキーボードショートカットを割り当てることもできます。
最後に、整理を保つために、iTerm2 の設定 > 一般 > tmux に移動し、「接続後に tmux クライアントセッションを自動的に隠す」というラベルのチェックボックスが有効になっていることを確認してください。これを無効にすると、tmux は制御モードのバックチャネルを表示するためだけに別のウィンドウも開いてしまいます。これはデバッグや接続操作のための別キーボードインターフェースを提供する場合に便利ですが、必要ないため、デフォルトで表示したくないでしょう。
コントロールモードは完璧ではありません。主な問題は、他のターミナルエミュレータ(申し訳ありませんが、Windows!)では広くサポートされていないことです。しかし、人々が引き続き質問しているので、状況が変わるかもしれません。良いニュースは、このモードに縛られないということです。別のクライアントから通常の tmux を使用して、同じセッションにいつでも再接続できます。同時に接続することも可能です。
ただし、iTerm を使用することに満足しているなら、コントロールモードは素晴らしいものです。これは、細かな調整が必要な作業(マルチプレクシング、複数の平面、セッションへのアタッチ、カスタムキーボードコマンドなど)を、透明で摩擦のないものに変えます。この点では ShellSage と同じであり、両者がよく相性合うのは驚くべきことではありません。
原文を表示
This is a quick note on a convenient way to use Nate Cooper’s ShellSage, one of the coolest pieces of tech to come out of AnswerAI recently.
As Nate notes, ShellSage relies on tmux to do its magic. tmux is a terminal multiplexer. It traditionally sits in between your terminal emulator (like Terminal.app on macOS) and one or more shells (like bash). Sitting in between is what allows it to see your incoming commands, and their output, and make that context available to an AI.
iTerm2 and tmux control mode
But, what if you’re not interested in multiplexing as such? In particular, you might not want to learn the tmux keyboard commands for switching between tmux panes, or to use the tmux visual interface which places multiple panes into one terminal window.
If your main interest in tmux is just to enable ShellSage, then you might want to explore tmux control mode, a feature available in iTerm2. Using this, your terminal can open up with shell sage integrated by default, like so:
Briefly, here’s what tmux control mode does and a couple way to set it up for ShellSage.
iTerm2.app is just another macOS terminal emulator, much like Terminal.app (which comes with the OS), Warp, and others. But in iTerm2, if you invoke tmux with tmux -CC, it enables control mode, and then instead of drawing its custom text UI, tmux will send control signals directly to iTerm2, and iTerm2 will render tmux panes using native UI controls. So instead of seeing tmux panes indicated by a text footer, you will just see separate tabs in your window. Instead of switching among panes with a key command (C-b n for next, and so on), you can just switch tabs (with your mouse, or with the usual shortcut of C-}). And similarly, within a tab, you can scroll using native scrollbars.
In other words, when you’re using tmux control mode, tmux just provides its functionality while hardly changing your interface at all. So what? In short, if you use tmux through iTerm2’s control mode, then you get the benefit of ShellSage without modifying your terminal interface or learning new commands.
The key to make this effortless is to configure iTerm2 profiles which launch directly into tmux, just as if you were launching your shell without tmux in between.
Here’s two ways to set this up.
For connecting to your local machine
First, ensure you have tmux installed on your local machine, and note the path of the tmux executable. I’ll assume the path to tmux is /opt/homebrew/bin/tmux.
Second, find the path of the shell you want to open by default. If it is not the default system shell (which is /bin/zsh on macOS), then add a line like the following to your ~/.tmux.conf which sets the shell for tmux itself to launch. This line, for instance, sets my tmux to use a newer version of bash provided by homebrew:
set-option -g default-shell /opt/homebrew/bin/bash
Third, in iTerm2, go to Settings, Profiles, and create a new profile, where under the General section, in the “Command” subsetion, you set the dropdown “Command” value as follows:
/opt/homebrew/bin/tmux -CC new-session -A -s main
iTerm profile setup for local tmux
Launching this profile, instead of launching bash directly, will launch tmux into control mode, directing it to create or connect to a tmux session named “main”. And because of your earliest setting in .tmux.conf, that will in turn launch your bash shell.
For connecting to a remote host
The setup is similar for remote hosts.
The only difference is that you should a command like the following, supposing the remote host is named box:
/usr/bin/ssh -t box 'tmux -CC new-session -A -s main'
iTerm profile setup for remote tmux
With this command, launching the profile will ssh into the host, and immediately pass it the same tmux command, reconnecting to or creating the tmux session named “main”.
Other conveniences and details
You can set one of these profiles as your default, so that it launches automatically when you launch iTerm. This way, you can get ShellSage by default, within a familiar terminal UX, with no other changes to your workflow. Or, you can assign keyboard shortcuts to make these profiles easy to launch directly.
Finally, to keep things tidy, in iTerm2, go to Settings, General, tmux, and ensure that the checkbox labeled “Automatically bury the tmux client session after connecting” is enabled. When this is disabled, tmux will also open a separate window just for displaying the control mode backchannel. This can be handy for debugging or for providing a separate keyboard interface for manipulating the connection, but you don’t need it so you probably don’t want to show it by default.
Control mode isn’t perfect. Its main problem is that it’s not widely supported on other terminal emulators (sorry, Windows!), but people keep asking so maybe that will change. The good news is that it doesn’t box you in. You can always reconnect to those same sessions using tmux normally from another client, even simultaneously.
But if you’re happy to use iTerm, control mode is fantastic. It takes a fiddly thing (multiplexing, multiple planes, and attaching to sessions, custom keyboard commands) and makes it transparent and frictionless. In this way, it’s just like ShellSage, so it’s no surprise that they go well together.
関連記事
今日のまとめ
AI日報で今日の重要ニュースをまとめ読み