Amazon Bedrock AgentCore、プライベートキー JWT を認証にサポート
Amazon Bedrock AgentCore がプライベートキー JWT クライアント認証をサポートし、エージェントが共有シークレットではなく署名付き JWT により下流の ID プロバイダーへ認証できるようになった。
AI深層分析を開く2026年7月30日 02:13
AI深層分析
キーポイント
Private Key JWT 認証のサポート開始
Amazon Bedrock AgentCore Identity が、従来の共有秘密鍵に代わり署名付き JWT を用いたクライアント認証をサポートした。
AWS KMS を活用した秘密鍵管理
対応する秘密鍵は AWS Key Management Service (KMS) に保持され、公開鍵のみをアイデンティティプロバイダに登録することでセキュリティが強化される。
OAuth 2.0 グラントフローのサポート
AgentCore Identity が KMS を用いて JWT を署名し、アイデンティティプロバイダへ送信してアクセストークンを取得するフローが実装された。
認証プロセスの詳細と監査
AWS 管理コンソールでの設定手順や、CloudTrail イベントによるエージェントのアクセス記録例が解説されている。
サポートされる認証フローの概要
Private Key JWT はマシン間通信 (M2M)、オンビハーフオブ (OBO)、ユーザー委譲アクセスの3つのグラントフローで動作する。各フローは、エージェントが自身として動作するか、既存トークンを利用するか、対面同意を必要とするかによって区別される。
重要な引用
Amazon Bedrock AgentCore Identity now supports Private Key JWT client authentication for agents.
the corresponding private key stays in an AWS Key Management Service (AWS KMS).
AgentCore Identity uses AWS KMS to sign the assertion and sends the signed assertion to the identity provider
Private Key JWT authentication works for the three grant flows:
編集コメントを表示
編集コメント
AI エージェントが外部システムと連携する際の認証基盤を強化する重要なアップデートである。共有秘密鍵の管理負担から解放され、より堅牢なゼロトラスト環境の実現に寄与する技術的進展と言える。
Source Article
元記事を日本語で読む
本文に関係しない購読案内、埋め込み通知、サイト内プロモーションは除いています。
Amazon Bedrock AgentCore Identity では、エージェント向けのプライベートキー JWT クライアント認証がサポートされるようになりました。この機能を使えば、エージェントは共有 OAuth 2.0 クライアントシークレットの代わりに、署名付き JSON Web Token (JWT) をクライアントアサーションとして使用し、下流の ID プロバイダーのトークンエンドポイントに認証できます。
公開キーを ID プロバイダーに登録し、対応する秘密キーは AWS Key Management Service (AWS KMS) の中に保管します。認証時には、AgentCore Identity が AWS KMS を利用してアサーションに署名を行い、署名済みアサーションを ID プロバイダーへ送信します。ID プロバイダーは、あなたが登録した公開キーを使ってその署名を検証します。
本稿では、AgentCore Identity におけるプライベートキー JWT クライアント認証の仕組みと、サポートされているグラントフローについて解説します。その後、AWS KMS による署名鍵の作成、ID プロバイダーへの公開キー登録、AWS マネジメントコンソールでの資格情報プロバイダー設定、そしてエージェントのアクセス記録を示す AWS CloudTrail イベントの確認までを順を追って説明します。
How does it work?
以下の例は、リクエストの流れを示しています。例えば、ID プロバイダーで保護された社内注文 API から顧客の注文履歴を読み取る必要があるカスタマーサポートエージェントを想定してください。
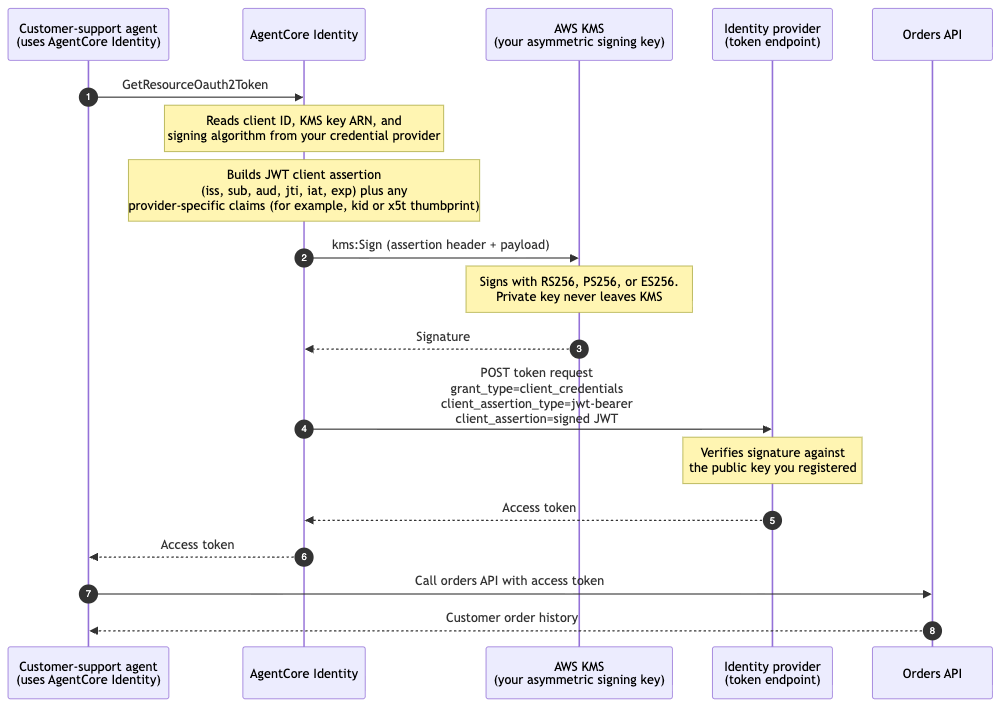
*図 1 – エージェントから下流 API までの、マシン間トークンリクエストの例フロー*
以下の図は、リクエストの流れを示しています。
- エージェントが AgentCore Identity の GetResourceOauth2Token を呼び出し、orders API 用のトークンを要求します。
- AgentCore Identity は、資格情報プロバイダーからクライアント ID、KMS キー ARN、署名アルゴリズムを読み取ります。そして、必要なペイロードクレーム(キー識別子や証明書フィンガープリントなど、あなたが設定した追加のヘッダーやペイロードクレームも含まれます)を組み込んで、短期有効な JWT クライアントアサーションを構築します。その後、構成した署名アルゴリズム(RS256、PS256、または ES256)を使用して、KMS 非対称署名鍵に対して kms:Sign を呼び出します。
- AWS KMS がアサーションに署名し、その署名を AgentCore Identity に返却します。この際、秘密鍵が KMS から外部へ漏れることはありません。
- AgentCore Identity は、署名されたアサーションを ID プロバイダーのトークンエンドポイントに POST します。このリクエストでは grant_type=client_credentials および client_assertion_type=urn:ietf:params:oauth:client-assertion-type:jwt-bearer が指定されます。
- ID プロバイダーは、あなたが登録した公開鍵に対して署名を検証し、アクセストークンを AgentCore Identity に返却します。
- AgentCore Identity は、そのアクセストークンをエージェントに返却します。
- エージェントはこのアクセストークンを用いて orders API を呼び出します。
- orders API は顧客の注文履歴を返却します。
サポートされている認証フローの概要
Private Key JWT 認証は、以下の 3 つの認証フローで利用可能です。
- マシン間 (M2M): エージェントが自身として動作します。人間ユーザーは関与しません。エージェントはリソースにアクセスする必要があります。例えば、データを同期するバックグラウンドジョブや、トリガーした担当者に関わらずすべてのカスタマーサポートエージェントが閲覧できるサービスなどが該当します。この場合、トークンはアプリケーションまたはエージェントのアイデンティティを表します。
client_credentialsグラントを使用し、トークンのサブジェクトはクライアント自体となります。
- オン・ビハーフ・オブ (OBO): エージェントは特定のユーザーに代わって動作し、そのユーザーがすでに保有するトークンを利用します。ユーザーは既にどこかでサインインしており、入力側のユーザートークンが存在します。エージェントはそのユーザーの権限とアイデンティティを引き継ぎながら、下流の API を呼び出す必要があります。AgentCore Identity は、クライアントアサーションで自身を認証しつつ、入力側のユーザートークンを下流のユーザーを表すトークンに交換します。ID プロバイダに応じて、RFC 8693 のトークン交換または RFC 7523 の JWT 認可グラントを使用できます。
- ユーザー委任アクセス: エージェントはユーザーに代わって動作しますが、ユーザーが対話型で同意を与える必要があります。交換用の既存トークンは存在しません。代わりに、ユーザーは対話型のログインと同意(オーソリゼーションコード/3 つの脚を持つ OAuth フロー)を経由し、エージェントに許可する範囲を承認します。同意後、エージェントはユーザーを表すトークンを取得します。
authorization codeグラントを使用します。
事前準備
本記事では、以下の前提条件を満たしていることを想定しています。
AWS アカウントには、KMS、AgentCore、および AWS CloudTrail へのアクセス権限を持つ AWS マネジメントコンソールが必要です。
また、アプリケーションの公開鍵を登録できる ID プロバイダー上のテナントも用意してください。
クライアントが ID プロバイダーとの検出や統合に使用する Discovery URL と Client ID も確認しておきましょう。
ID プロバイダーが Private Key JWT クライアント認証で要求する署名アルゴリズムを確認し、AWS KMS と AgentCore Identity の両方がそのアルゴリズムと鍵仕様をサポートしていることを確認してください。
フローの各部分に必要な権限は以下の通りです。
- KMS キーの作成と設定:
kms:CreateKeyおよびkms:PutKeyPolicy - 公開鍵のエクスポート(ID プロバイダーに登録用):
kms:GetPublicKey
(キーペアを ID プロバイダーが生成し、秘密鍵素材を提供する場合は、KMS へのインポートに kms:GetParametersForImport と kms:ImportKeyMaterial も必要です。)
- クレデンシャルプロバイダーの作成:
bedrock-agentcore-control:CreateOauth2CredentialProvider
はじめに
以下のセクションでは、AWS マネジメントコンソールを使用して Private Key JWT をクライアント認証方式として設定する方法を解説します。
ステップ 1: KMS 署名キーの作成と公開キーの登録
まず、AgentCore Identity が JWT クライアントアサーションの署名に使用する非対称 KMS キーを作成します。本例では KMS でキーを生成し、対応する公開キーを ID プロバイダーへエクスポートしています。ただし、ID プロバイダー側で鍵ペアを生成して秘密鍵の素材を受け取る場合も想定されており、その場合は KMS へのインポートが可能です。
認証に使用する秘密鍵 JWT を Amazon Bedrock AgentCore Identity で利用するには、まず、資格情報プロバイダと同じ AWS リージョンで AWS KMS コンソールを開きます。
「カスタマー管理キー」を選択し、「キーの作成」をクリックします。「キータイプ」では「非対称」を、「キーの使用用途」では「署名と検証」を選択してください。また、「KeySpec」には、使用する署名アルゴリズムに互換性のある仕様が設定されている必要があります。本例では、ES256 署名アルゴリズムに対応する ECC_NIST_P256 を使用します。
「次へ」をクリックし、エイリアスを入力してキー管理者およびキーの使用許可の手順を進めます。「キーポリシーの編集」ステップでは、以下のステートメントをキーポリシーに追加し、AgentCore Identity に対してキーの使用権限を付与してください。ここで 111122223333 はあなたの AWS アカウント ID に置き換え、bedrock-agentcore-identity..amazonaws.com の部分は使用中の AgentCore リージョン名に置き換えてください。
この kms:ViaService 条件により、リクエストが AgentCore Identity を経由して発生した場合のみキーの使用が可能になります。
「完了」をクリックします。キーの詳細ページで、キー ARN を確認しておいてください。これは資格情報プロバイダを作成する際に必要となります。
次に、公開鍵をエクスポートして、ID プロバイダーに登録します。
鍵の詳細ページで「公開鍵」タブを選択し、公開鍵をダウンロードしてください。KMS は DER 形式でエンコードされた公開鍵を提供します。
- 公開鍵をプロバイダーが必要とする形式(Microsoft Entra ID の場合は X.509 証明書、Okta の場合は JSON Web Key など)に変換し、アプリケーションに登録してください。
ステップ 2: OAuth クライアントの追加
- Amazon Bedrock AgentCore コンソールを開きます。
- 左側のナビゲーションペインで「Build」の下にある「Identity」を選択します。
- 「Outbound Auth」セクションで「Add Outbound Auth」を選択し、続いて「Add OAuth client」をクリックします。
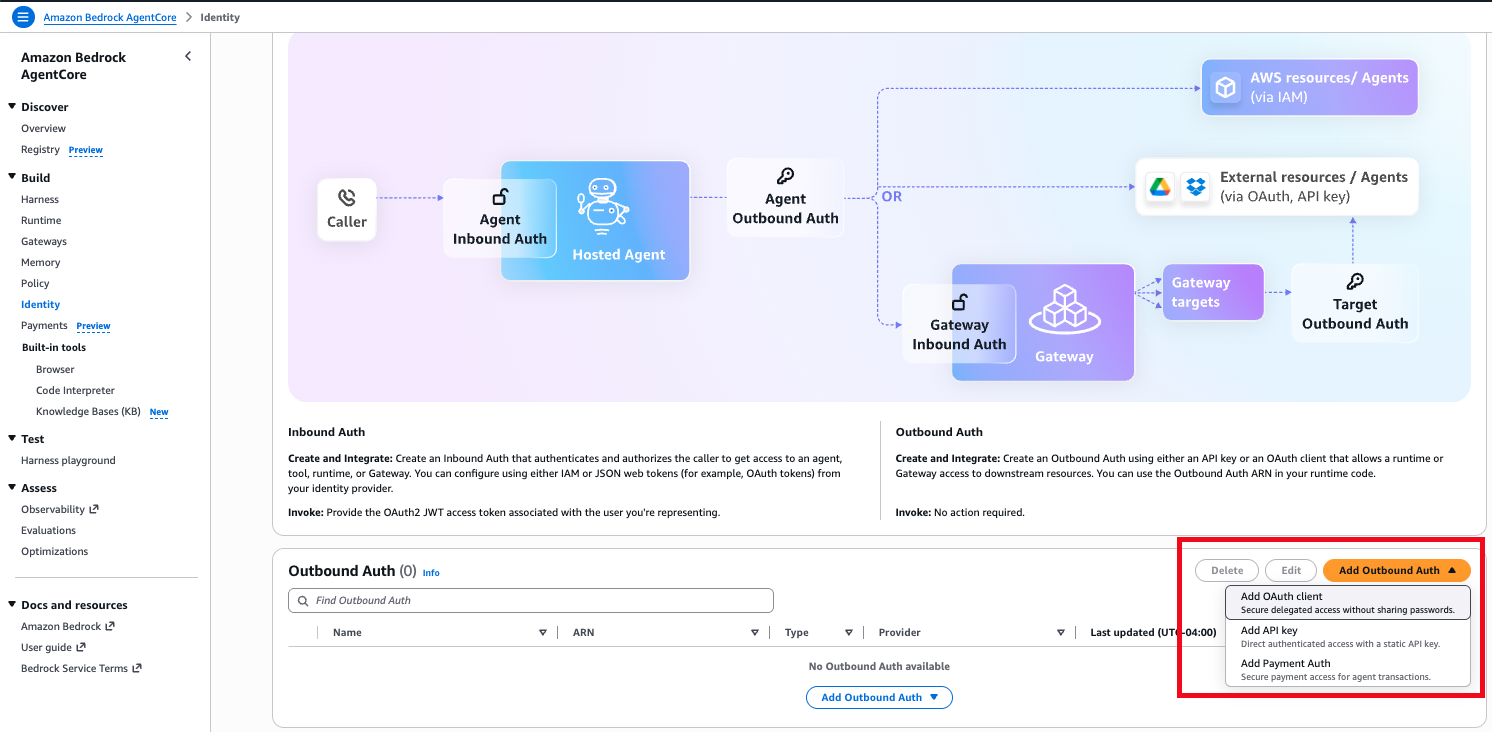
*図 2 – AgentCore Identity コンソールから OAuth クライアントを追加する操作*
ステップ 3: クライアント認証方式として「Private key JWT」を選択
「Add OAuth Client」ページで、「Provider configurations」セクションの設定を行います。
- 「Configuration type」には「Discovery URL」を選択します。これにより、AgentCore Identity がプロバイダーの構成情報を自動的に取得できます。(プロバイダーがディスカバリーエンドポイントを公開していない場合は「Manual config」を選択してください。)
- 「Client authentication method」には「Private key JWT」を選択します。
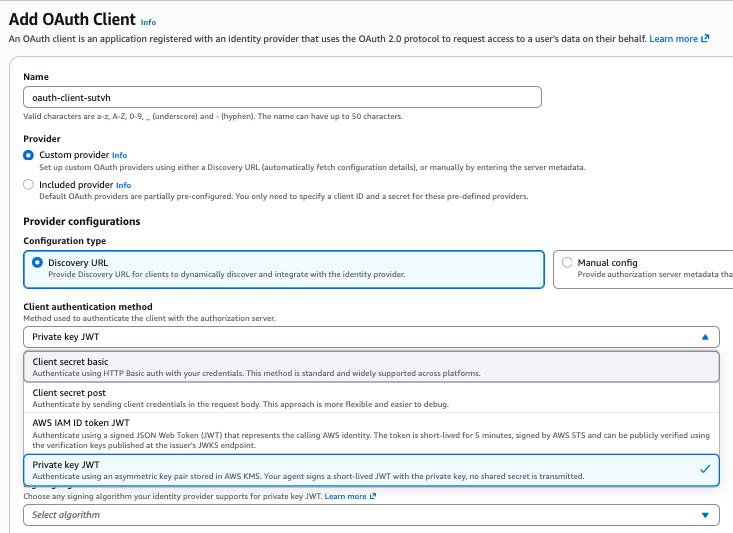
*図 3 – クライアント認証方式として「Private key JWT」を選択する操作*
ステップ4:ディスカバリーURL、クライアントID、KMSキー、署名アルゴリズムの入力
- Discovery URL には、プロバイダーがOpenID Connectの設定情報を公開しているURL(
.well-known/openid-configurationで終わるもの)を入力します。
- Client ID には、アイデンティティプロバイダーに登録済みのクライアント識別子を入力します。
- KMS キー には、非対称の KMS 署名キーの ARN を選択してください。リストに表示されるためには、このキーは
SIGN_VERIFYという用途で作成されており、かつ同じリージョン内に存在している必要があります。
注意:同じリージョン内の別のアカウントにあるキーを使用することも可能です。その場合は、該当するキーの ARN を入力します。ただし、他アカウントからのアクセスには両方のアカウントで追加の権限設定が必要です。詳細は 他のアカウントのユーザーが KMS キーを使用できるようにする をご覧ください。
- Signing algorithm には、アイデンティティプロバイダーが Private Key JWT で要求しているアルゴリズムを選択してください。これは KMS キーの仕様と互換性がある必要があります。
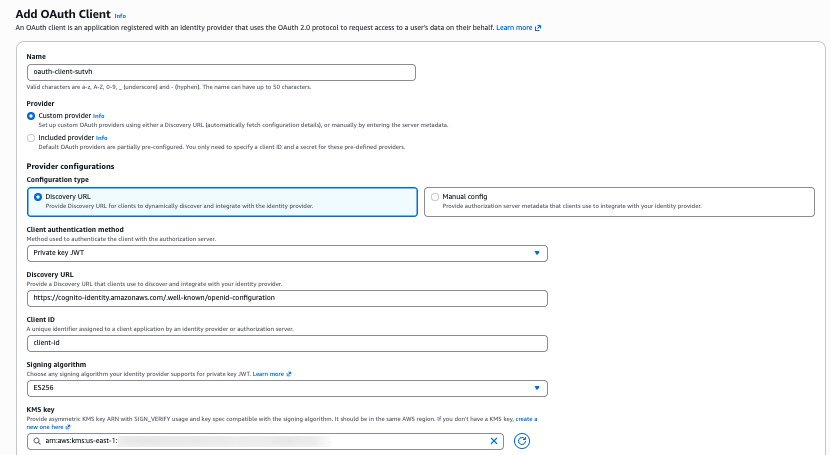
*図 4 – ディスカバリー URL、クライアント ID、非対称 KMS キー、署名アルゴリズムの入力画面*
ステップ5:(オプション)クレームの追加とクライアント作成
アイデンティティプロバイダーが JWT クライアントアサーションに追加のクレームを要求する場合は、ここで指定してください。
ヘッダークレームセクションでは、オプションで「Add header claim」を選択し、キー識別子などのプロバイダー固有のヘッダークレームを追加できます。ただし、「alg」と「typ」は予約済みキーのため設定できません。
ペイロードクレームセクションでも同様に、「Add payload claim」を選択してプロバイダー固有のクレームを追加可能です。しかし、「iss」「sub」「jti」「exp」「iat」「nbf」は予約済みキーであり、これらを設定することはできません。
次に「Add OAuth Client」をクリックします。
作成された資格情報プロバイダーが「Outbound Auth」リストに表示されているか確認し、正常に作成されたことを検証してください。
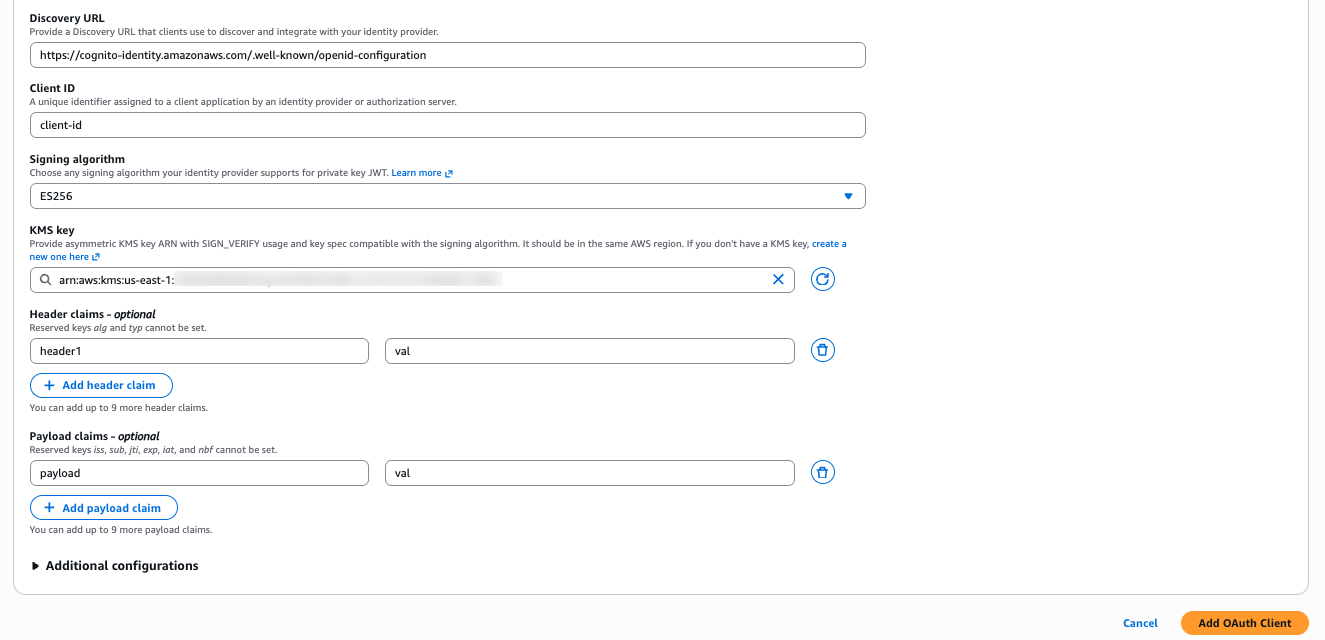
*図 5 – クライアント作成前にオプションのヘッダーおよびペイロードクレームを追加する様子*
エージェントアクセスの CloudTrail ログ例
エージェントが資格情報プロバイダーを使用してトークンを取得すると、その操作は AWS CloudTrail に記録されます。これにより、各アクセスを監査することが可能です。イベント名としては以下のようなものが表示されます:
- GetWorkloadAccessToken (イベントソース: bedrock-agentcore.amazonaws.com) – エージェントがワークロードアイデンティティトークンを取得します。requestParameters には workloadName が記録され、resources ブロックでワークロードアイデンティティが特定されます。返されるトークンはセキュリティ上の理由から伏字になっています。
{
"eventSource":"bedrock-agentcore.amazonaws.com",
"eventName":"GetWorkloadAccessToken",
"requestParameters":{
"workloadName":"my-agent-workload"
},
"responseElements":{
"workloadAccessToken":"HIDDEN_DUE_TO_SECURITY_REASONS"
},
"resources":[
{
"accountId":"111122223333",
"type":"AWS::BedrockAgentCore::WorkloadIdentity",
"ARN":"arn:aws:bedrock-agentcore:us-east-1:111122223333:workload-identity-directory/default/workload-identity/my-agent-workload"
}
]
}
- GetResourceOauth2Token (イベントソース: bedrock-agentcore.amazonaws.com) – エージェントが下流リソースのアクセストークンを要求します。requestParameters には、使用された資格情報プロバイダー、スコープ、およびグラントフローが表示され、受け入れられたトークンは伏字になっています。
{
"eventSource":"bedrock-agentcore.amazonaws.com",
"eventName":"GetResourceOauth2Token",
"requestParameters":{
"workloadIdentityToken":"HIDDEN_DUE_TO_SECURITY_REASONS",
"resourceCredentialProviderName":"my-private-key-jwt-provider",
"scopes":[
"https://graph.microsoft.com/.default"
],
"oauth2Flow":"M2M"
},
"resources":[
{
"accountId":"111122223333",
「type」: "AWS::BedrockAgentCore::OAuth2CredentialProvider",
「ARN」: "arn:aws:bedrock-agentcore:us-east-1:111122223333:token-vault/default/oauth2credentialprovider/my-private-key-jwt-provider"
}
]
}
- 署名(イベントソース:kms.amazonaws.com)– AgentCore Identity が、あなたの KMS キーを使用して JWT クライアントアサーションに署名します。これは Private Key JWT が正しく動作していることを示すイベントです。「userIdentity.invokedBy」「sourceIPAddress」「userAgent」のすべてが「bedrock-agentcore.amazonaws.com」になっている点にご注意ください。これは AgentCore Identity があなたの代わりに「kms:Sign」を実行したことを裏付けるものです。なお、この署名イベントで記録されるのは KMS の署名アルゴリズム名であり、あなたが設定した JWT のアルゴリズム名ではありません。
{
"eventSource":"kms.amazonaws.com",
"eventName":"Sign",
"userIdentity":{
"invokedBy":"bedrock-agentcore.amazonaws.com"
},
"sourceIPAddress":"bedrock-agentcore.amazonaws.com",
"userAgent":"bedrock-agentcore.amazonaws.com",
"requestParameters":{
"signingAlgorithm":"RSASSA_PKCS1_V1_5_SHA_256",
"keyId":"arn:aws:kms:us-east-1:111122223333:key/1234abcd-12ab-34cd-56ef-1234567890ab",
"messageType":"DIGEST"
},
"responseElements":null,
"readOnly":true,
"managementEvent":true,
"resources":[
{
"accountId":"111122223333",
"type":"AWS::KMS::Key",
"ARN":"arn:aws:kms:us-east-1:111122223333:key/1234abcd-12ab-34cd-56ef-1234567890ab"
}
]
}
クリーンアップ
継続的な課金を避け、不要になったリソースを削除するために、このチュートリアルで作成した資格情報プロバイダーと KMS 署名キーをクリーンアップしてください。
OAuth 資格情報プロバイダーの削除
- Amazon Bedrock AgentCore コンソールを開きます。
- 左側のナビゲーションペインで「Build」の下にある「Identity」を選択します。
- 「Outbound Auth」セクションで、作成した資格情報プロバイダーを探します。
- プロバイダーを選択し、「Delete」をクリックして削除を確認してください。
KMS キーの削除スケジュール設定
KMS キーの削除は元に戻せず、永続的な操作です。キーを削除すると、そのキーに依存するデータや署名を今後生成できなくなるため、AWS KMS では即時削除ではなく、待機期間を設定して削除を予約する必要があります。
削除を予約する前に、そのキーが資格情報プロバイダーや ID プロバイダーの登録によって参照されていないことを確認してください。キーの使用状況が不明な場合は、キーを無効化することを検討しましょう。これにより使用は停止されますが、復元可能な状態が維持されます。
作成したキーと同じリージョンで AWS KMS コンソールを開きます。
「顧客管理キー」を選択し、作成した非対称署名キーを選びます。
「キー操作」をクリックして、「キーの削除スケジュール設定」を選択します。
待機期間を 7〜30 日の範囲で入力します。この間、キーは無効化されますが、削除スケジュールを取り消すことで復元可能です。
キーの削除をスケジュールしてもよいか確認します。
待機期間が経過すると、KMS はそのキーを完全に削除します。
原文を表示
Amazon Bedrock AgentCore Identity now supports Private Key JWT client authentication for agents. With Private Key JWT client authentication, your agents can authenticate to a downstream identity provider’s token endpoint using a signed JSON Web Token (JWT) client assertion instead of a shared OAuth 2.0 client secret. You can register a public key with your identity provider, while the corresponding private key stays in an AWS Key Management Service (AWS KMS). To authenticate, AgentCore Identity uses AWS KMS to sign the assertion and sends the signed assertion to the identity provider, which verifies it using the public key you registered.
This post explains how Private Key JWT client authentication works in AgentCore Identity and reviews the supported grant flows. We then walk through creating an AWS KMS signing key, registering its public key with your identity provider, configuring a credential provider on the AWS Management Console, and reviewing example AWS CloudTrail events that record your agent’s access.
How does it work?
The following example illustrates the request flow. Consider a customer-support agent that needs to read a customer’s order history from an internal orders API protected by your identity provider.
*Figure 1 – Example request flow for a machine-to-machine token request, from the agent’s call through to the downstream API*
The following diagram illustrates the request flow:
- The agent calls GetResourceOauth2Token on AgentCore Identity to request a token for the orders API.
- AgentCore Identity reads the client ID, KMS key ARN, and signing algorithm from your credential provider. It builds a short-lived JWT client assertion with the required payload claims (plus any additional header or payload claims you configured, such as a key identifier or a certificate thumbprint), and calls kms:Sign against your KMS asymmetric signing key using the signing algorithm you configured (RS256, PS256, or ES256).
- AWS KMS signs the assertion and returns the signature to AgentCore Identity. The private key never leaves KMS.
- AgentCore Identity posts the signed assertion to your identity provider’s token endpoint with grant_type=client_credentials and client_assertion_type=urn:ietf:params:oauth:client-assertion-type:jwt-bearer.
- The identity provider verifies the signature against the public key you registered and returns an access token to AgentCore Identity.
- AgentCore Identity returns the access token to your agent.
- The agent calls the orders API with the access token.
- The orders API returns the customer’s order history.
Overview of supported grant flows
Private Key JWT authentication works for the three grant flows:
- Machine-to-machine (M2M): the agent acts as itself. There is no human user in the picture. The agent needs to access a resource, for example a background job syncing data, or a service that any customer-support agent can read regardless of who triggered it. The token represents the application/agent identity. Uses the client_credentials grant. The token’s subject is the client itself.
- On-behalf-of (OBO): the agent acts for a specific user, using that user’s existing token. A user has already signed in somewhere and there is an inbound user token. The agent needs to call a downstream API as that user, so their permissions and identity carry through. AgentCore Identity exchanges the inbound user token for a downstream token that represents the user, while still authenticating itself with the client assertion. You can use RFC 8693 token exchange or the RFC 7523 JWT authorization grant, depending on the identity provider.
- User-delegated access: the agent acts for a user, but the user grants consent interactively first. There is no pre-existing token to exchange. Instead, the user goes through an interactive login/consent (the authorization code / three-legged OAuth flow), approving what the agent can do. After consent, the agent gets a token representing the user. Uses the authorization code grant.
Prerequisites
This post assumes that you have
- An AWS account with AWS Management Console access to KMS, AgentCore and AWS CloudTrail.
- A tenant on your identity provider, where you can register a public key for an application.
- Discovery URL and Client ID that clients use to discover and integrate with your identity provider.
- Confirm the signing algorithm your identity provider requires for Private Key JWT client authentication. Confirm the same algorithm and key spec is supported by both AWS KMS and AgentCore Identity.
- Permissions for each part of the flow:
Create and configure the KMS key – kms:CreateKey and kms:PutKeyPolicy.
- Export the public key to register with your identity provider – kms:GetPublicKey. (If your identity provider generates the key pair and gives you the private key material instead, you also need kms:GetParametersForImport and kms:ImportKeyMaterial to import it into KMS.)
- Create the credential provider – bedrock-agentcore-control:CreateOauth2CredentialProvider.
Getting started
The following sections show how to configure Private Key JWT as the client authentication method using the AWS Management Console.
Step 1: Create the KMS signing key and register the public key
Start by creating an asymmetric KMS key that AgentCore Identity will use to sign the JWT client assertion. In this example, we create the key in KMS and export the corresponding public key to the Identity provider. However, if your identity provider generates the key pair and gives you the private key material instead, you can import it to KMS.
- Open the AWS KMS console in the same AWS Region as your credential provider.
- Choose Customer managed keys, then choose Create key.
- For Key type, choose Asymmetric.
- For Key usage, choose Sign and verify.
- For Key spec, choose a spec compatible with your signing algorithm. This example uses ECC_NIST_P256 with the ES256 signing algorithm.
- Choose Next, enter an Alias, and proceed through the key administrator and key usage permission steps.
- On the Edit key policy step, add the following statement to the key policy to grant AgentCore Identity permission to use the key, replacing 111122223333 with your AWS account ID and with AgentCore region in use. The kms:ViaService condition verifies the key can only be used when the request originates through AgentCore Identity:
{
  "Id": "BedrockAgentCoreIdentityPrivateKeyJwtAccess",
  "Version": "2012-10-17",
  "Statement": [
    {
      "Effect": "Allow",
      "Principal": {
        "AWS": "arn:aws:iam::111122223333:root"
      },
      "Action": [
        "kms:Sign",
        "kms:DescribeKey"
      ],
      "Resource": "*",
      "Condition": {
        "StringEquals": {
          "aws:ResourceAccount": "${aws:PrincipalAccount}"
        },
        "StringLike": {
          "kms:ViaService": "bedrock-agentcore-identity..amazonaws.com"
        }
      }
    }
  ]
}- Choose Finish. On the key’s detail page, note the key ARN. You provide it when you create the credential provider.
- Next, export the public key and register it with your identity provider:
On the key’s detail page, choose the Public key tab and download the public key. KMS provides a DER-encoded public key.
- Convert the public key into the format your provider requires (for example, an X.509 certificate for Microsoft Entra ID or a JSON Web Key for Okta) and register it on your application.
Step 2: Add an OAuth client
- Open the Amazon Bedrock AgentCore console.
- In the left navigation pane, under Build, choose Identity.
- In the Outbound Auth section, choose Add Outbound Auth, and then choose Add OAuth client.
*Figure 2 – Adding an OAuth client from the AgentCore Identity console*
Step 3: Choose Private key JWT as the client authentication method
On the Add OAuth Client page, in the Provider configurations section:
- For Configuration type, choose Discovery URL so AgentCore Identity can retrieve your provider’s configuration automatically. (Choose Manual config if your provider does not publish a discovery endpoint.)
- For Client authentication method, choose Private key JWT.
*Figure 3 – Selecting Private key JWT as the client authentication method*
Step 4: Provide the discovery URL, client ID, KMS key and signing algorithm
- For Discovery URL, enter the URL where your provider publishes its OpenID Connect configuration (ending in .well-known/openid-configuration).
- For Client ID, enter the client identifier registered at your identity provider.
- For KMS key, choose the ARN of your asymmetric KMS signing key. The key must have been created with SIGN_VERIFY as usage and be in the same Region for it to show up in the list.
Note: You can also use a key from another account in the same Region by entering that key’s ARN. Cross-account access requires extra permissions in both accounts. See Allowing users in other accounts to use a KMS key.
- For Signing algorithm, choose the algorithm your identity provider requires for Private Key JWT. It must be compatible with your KMS key spec:
*Figure 4 – Providing the discovery URL, client ID, asymmetric KMS key and signing algorithm*
Step 5: (Optional) Add claims, then create the client
If your identity provider requires additional claims in the JWT client assertion, add them here:
- Under Header claims – optional, choose Add header claim to add provider-specific header claims, such as a key identifier. The reserved keys alg and typ cannot be set.
- Under Payload claims – optional, choose Add payload claim to add provider-specific payload claims. The reserved keys iss, sub, jti, exp, iat, and nbf cannot be set.
- Choose Add OAuth Client.
- Verify that the credential provider was created by checking that it appears in the Outbound Auth list.
*Figure 5 – Adding optional header and payload claims before creating the client*
Example CloudTrail logs for the agent access
When an agent uses the credential provider to fetch a token, the operations are recorded on AWS CloudTrail so you can audit each access. You will see event names such as:
- GetWorkloadAccessToken (event source bedrock-agentcore.amazonaws.com) – the agent obtains its workload identity token. The requestParameters record the workloadName, the resources block identifies the workload identity, and the returned token is redacted:
{
   "eventSource":"bedrock-agentcore.amazonaws.com",
   "eventName":"GetWorkloadAccessToken",
   "requestParameters":{
      "workloadName":"my-agent-workload"
   },
   "responseElements":{
      "workloadAccessToken":"HIDDEN_DUE_TO_SECURITY_REASONS"
   },
   "resources":[
      {
         "accountId":"111122223333",
         "type":"AWS::BedrockAgentCore::WorkloadIdentity",
         "ARN":"arn:aws:bedrock-agentcore:us-east-1:111122223333:workload-identity-directory/default/workload-identity/my-agent-workload"
      }
   ]
}- GetResourceOauth2Token (event source bedrock-agentcore.amazonaws.com) – the agent requests an access token for the downstream resource. The requestParameters show which credential provider, scopes, and grant flow were used, and the inbound token is redacted.
{
   "eventSource":"bedrock-agentcore.amazonaws.com",
   "eventName":"GetResourceOauth2Token",
   "requestParameters":{
      "workloadIdentityToken":"HIDDEN_DUE_TO_SECURITY_REASONS",
      "resourceCredentialProviderName":"my-private-key-jwt-provider",
      "scopes":[
         "https://graph.microsoft.com/.default"
      ],
      "oauth2Flow":"M2M"
   },
   "resources":[
      {
         "accountId":"111122223333",
         "type":"AWS::BedrockAgentCore::OAuth2CredentialProvider",
         "ARN":"arn:aws:bedrock-agentcore:us-east-1:111122223333:token-vault/default/oauth2credentialprovider/my-private-key-jwt-provider"
      }
   ]
}- Sign (event source kms.amazonaws.com) – AgentCore Identity signs the JWT client assertion with your KMS key. This is the event that shows Private Key JWT working: userIdentity.invokedBy, sourceIPAddress, and userAgent are all bedrock-agentcore.amazonaws.com, confirming that AgentCore Identity called kms:Sign on your behalf. Note that the Sign event records the KMS signing algorithm name, not the JWT algorithm name you configured.
{
   "eventSource":"kms.amazonaws.com",
   "eventName":"Sign",
   "userIdentity":{
      "invokedBy":"bedrock-agentcore.amazonaws.com"
   },
   "sourceIPAddress":"bedrock-agentcore.amazonaws.com",
   "userAgent":"bedrock-agentcore.amazonaws.com",
   "requestParameters":{
      "signingAlgorithm":"RSASSA_PKCS1_V1_5_SHA_256",
      "keyId":"arn:aws:kms:us-east-1:111122223333:key/1234abcd-12ab-34cd-56ef-1234567890ab",
      "messageType":"DIGEST"
   },
   "responseElements":null,
   "readOnly":true,
   "managementEvent":true,
   "resources":[
      {
         "accountId":"111122223333",
         "type":"AWS::KMS::Key",
         "ARN":"arn:aws:kms:us-east-1:111122223333:key/1234abcd-12ab-34cd-56ef-1234567890ab"
      }
   ]
}
Clean up
To avoid incurring ongoing charges and to remove resources you no longer need, clean up the credential provider and the KMS signing key you created in this walkthrough.
Remove the OAuth credential provider
- Open the Amazon Bedrock AgentCore console.
- In the left navigation pane, under Build, choose Identity.
- In the Outbound Auth section, locate the credential provider you created.
- Select the provider, choose Delete, and confirm the deletion.
Schedule deletion of the KMS key
Deleting a KMS key is irreversible and permanent. Once the key is deleted, any data or signatures that depend on it can no longer be produced, so KMS requires you to schedule deletion with a waiting period rather than deleting immediately. Before you schedule deletion, confirm the key is no longer referenced by any credential provider or identity provider registration. If you are unsure whether the key is still in use, consider disabling the key instead, which stops it from being used while keeping it recoverable.
- Open the AWS KMS console in the Region where you created the key.
- Choose Customer managed keys, then select the asymmetric signing key you created.
- Choose Key actions, then choose Schedule key deletion.
- Enter a waiting period between 7 and 30 days. During this window the key is disabled but can still be recovered by canceling the scheduled deletion.
- Confirm that you want to schedule the key for deletion.
After the waiting period elapses, KMS permanently d
AI算出
主要ニュースainew評価高い
AI エージェントの運用セキュリティを強化する重要な新機能を公式に発表しており、技術的詳細と実装フローが明確に記載されているため新規性は高い。ただし、対象は AWS のグローバル機能であり、日本固有の規制や企業事例への言及がないため、日本の関連性は標準的なレベルとなる。
6つの評価軸を見る
- AI関連度
- 75
- 情報源の信頼性
- 100
- 新規性
- 75
- 調べる価値
- 75
- 重複の少なさ
- 100
- 日本での有用性
- 25
関連記事
今日のまとめ
AIデイリーブリーフで今日の重要ニュースをまとめ読み