Adobe Marketing Agent for Amazon Quick によるキャンペーンワークフローの加速
AWS と Adobe は、Model Context Protocol (MCP) を活用した連携により、マーケティング担当者が自然言語でキャンペーン分析や競合リスクの特定を可能にする「Amazon Quick for Adobe Marketing Agent」を発表しました。
キーポイント
MCP による標準化された連携
AWS の Amazon Quick と Adobe Marketing Agent が、業界標準である Model Context Protocol (MCP) を介して統合され、外部ツールの発見と登録が自動化されます。
自然言語による高度な分析
マーケターはチャットインターフェースを通じて、キャンペーンパフォーマンス、オーディエンスランク、ロイヤリティセグメント、競合リスクなどの複雑なデータを自然言語で照会できます。
ガバナンスとセキュリティの強化
権限管理(最小権限)、テナント分離、監査ログ、スキーマバージョン管理、およびランチ前の人間によるレビューなど、企業レベルでの厳格なガバナンスが実装されています。
データの根拠に基づく回答
推測を避け、ツール出力を証拠として使用し、必要な入力(キャンペーン、対象者、期間など)が不足している場合は質問して補完する。
構造化されたレスポンス形式の採用
要約、使用データ、主要観察点、人間によるレビューのための推奨事項という標準フォーマットで情報を提供し、各分析項目(オーディエンス、ロイヤリティ、ジャーニーなど)に特化したツールルーティングを行う。
多角的なキャンペーン分析の実行
オーディエンスの規模やセグメント、ロイヤリティ層の重複、ジャーニーの使用状況、タイミングの競合、コンテンツ効果など、複数の視点からキャンペーン計画を支援する。
自然言語によるデータ分析と可視化
Amazon Quick のチャットエージェントを使用して、プロファイル数が多い上位オーディエンスやロイヤルティセグメントの分布を自然言語クエリで即座に取得し、バーチャートや洞察として可視化できます。
影響分析・編集コメントを表示
影響分析
この発表は、エンタープライズ向け AI ツールにおける「標準化された接続プロトコル」の重要性を浮き彫りにしており、MCP が異なるベンダー間のシームレスな連携を可能にする基盤技術として確立されつつあることを示しています。また、マーケティング領域において生成 AI を単なるチャットボットから、ガバナンスされた意思決定支援システムへと進化させる具体的な実装例を提供し、業界全体の AI 導入のハードルを下げる契機となるでしょう。
編集コメント
MCP(Model Context Protocol)の採用により、異なるベンダー間の AI エージェント連携が標準化される流れが加速しています。特にマーケティング領域での実装例は、生成 AI の実用性とガバナンスの両立を追求する企業にとって重要な指針となるでしょう。
Amazon Quick と Adobe Marketing Agent を活用することで、マーケティングチームは数秒で管理された会話内でキャンペーンのインサイト(洞察)にアクセスできるようになります。マーケターは自然言語で、キャンペーンのパフォーマンス、オーディエンス、ジャーニー、キャンペーンの競合、コンテンツのパフォーマンスなどについて質問することができます。Amazon Quick はチャット体験とアクションのオーケストレーションを提供し、Adobe はこれらの質問の背後にある承認されたデータソースに対してマーケティングドメインの分析を提供します。
本記事では、Model Context Protocol (MCP) を使用して Amazon Quick 上で Adobe Marketing Agent を有効にする方法を紹介します。統合の設定方法、Adobe の認証情報を使用した認証手順、そして Amazon Quick で最新のインサイトを取得する方法を順を追って解説します。サンプルのワークフローでは、オーディエンスランキング、ロイヤリティセグメントの要約、ジャーニーの使用状況、および競合に関する推奨事項が返されます。
概要:Amazon Quick 向けの Adobe Marketing Agent
Amazon Quick の統合機能により、外部アプリケーションやサービスが AI を活用した分析と自動化に接続されます。MCP(Model Context Protocol)統合を使用すると、Amazon Quick はリモート MCP サーバーに接続し、公開されているツールを検出するとともに、選択されたツールをアクションとして登録します。アシスタントは会話中にこれらのアクションを呼び出すことができます。本ソリューションでは、Adobe Marketing Agent がマーケティング関連のツールを公開しています。対象となるツールには、オーディエンスランキング、ロイヤルティ分析、ジャーニー検索、競合分析、およびコンテンツパフォーマンスサマリーが含まれます。
以下のアーキテクチャ図は、エンドツーエンドのリクエストフローを示しています。マーケターが Amazon Quick でキャンペーン計画に関する質問を行います。チャットエージェントは、Adobe Marketing Agent 統合から承認されたアクションを選択します。MCP サーバーがリクエストを検証し、権限付与された Adobe マーケティングデータを照会します。Amazon Quick はその応答を回答、表、グラフ、または推奨事項としてレンダリングします。フロー全体にガバナンスコントロールを適用してください。これには、最小権限の原則、テナント分離、監査ログ、スキーマバージョン管理、およびローンチ決定における人的レビューが含まれます。
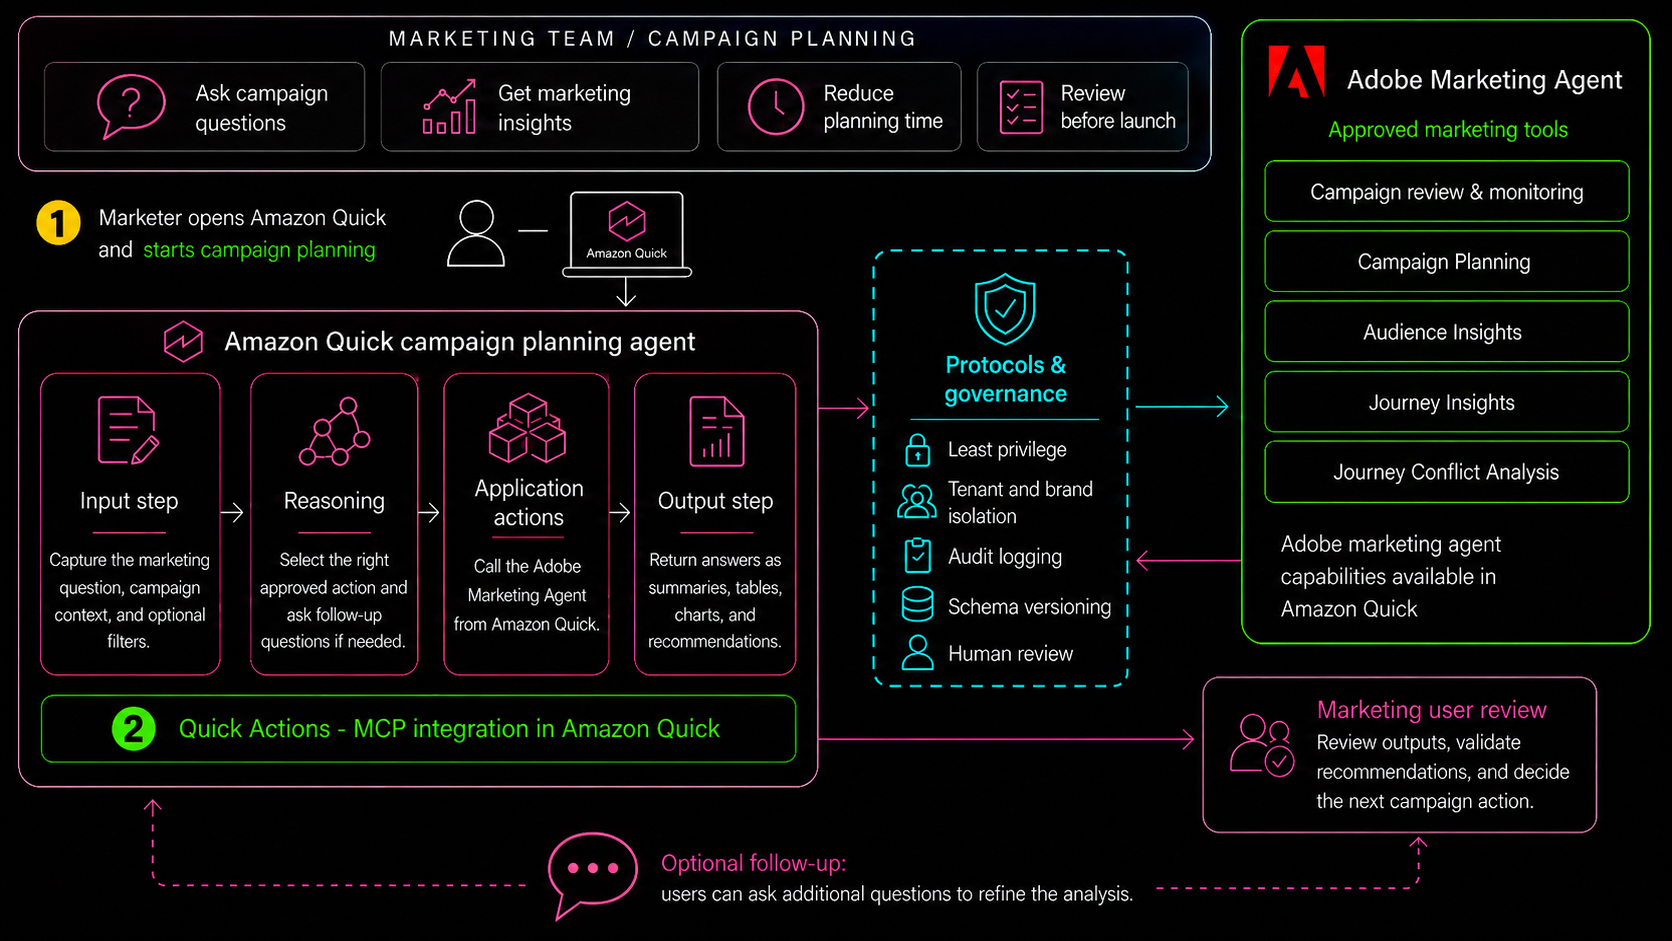
*図 1. MCP を使用して Adobe Marketing Agent を Amazon Quick に接続するためのアーキテクチャ。
このワークフローは以下の 4 つの部分で構成されています。
- Amazon Quick の管理者は、ブランド化されたコネクタタイルまたは汎用の MCP セットアップパスを使用して、Adobe Marketing Agent 統合を作成します。
- Amazon Quick は MCP ツールを検出し、選択したツールをアクションとして登録します。
- カスタムチャットエージェントは、これらのアクションを使用して自然言語でマーケティングに関する質問に回答します。
- マーケティング担当者は、キャンペーン計画やローンチの意思決定に使用する前に出力を確認します。
Adobe Marketing Agent のアクションは、以下の機能を提供します:
- キャンペーンレビューとモニタリングにより、マーケティング担当者はキャンペーンレビューおよびモニタリングワークフローを支援するキャンペーンメトリクスを可視化できます。
- キャンペーンプランニングでは、マーケティングチームがリーチや過去のキャンペーンパフォーマンスなどのキャンペーンに関するインサイトにアクセスし、将来のキャンペーン決定を支援できます。
- オーディエンスインサイトにより、マーケティング担当者はプロファイルサイズ、頻繁に変化するオーディエンス、オーディエンス間の重複などを収集してオーディエンスインサイトを把握し、キャンペーンリーチを拡大するための属性を特定できます。
- ジョーニーインサイト(Journey Insights)では、マーケティング担当者が既存のジョーニーインサイトにアクセスしてビジネス成果を監視し、意図した結果につながる是正措置のための戦略を立案できます。
- ジョーニー競合分析(Journey Conflict Analysis)により、マーケティング担当者はローンチ前に解決が必要な既存のジョーニー競合を迅速に特定し、顧客体験の競合を回避してキャンペーン成果に向けて最適化できます。
事前準備
Adobe Marketing Agent の統合を設定する前に、以下の事前準備を完了する必要があります。
- Amazon Quick、Adobe オルガニゼーション、ID プロバイダーへのアクセス権限、および必要な認証情報を持つ Adobe 提供の Adobe Marketing Agent MCP エンドポイントがあることを確認してください。Adobe 側のエンタイトルメントとエージェントアクセス要件については、Adobe Experience Platform Agent Orchestrator を参照してください。
- Amazon Quick Enterprise サブスクリプションを保有し、統合やチャットエージェントの作成、レビュー、共有、管理を行う権限を持っていること。
- Adobe Real-Time CDP、Adobe Customer Journey Analytics、または Adobe Journey Optimizer のいずれか 1 つ以上を含む、Adobe CX Enterprise プロダクトのライセンスを取得していること。
- Adobe Experience Platform Agent Orchestrator のライセンスを取得し、プロビジョニング済みであること。Adobe は MCP エンドポイントとツールを提供します。
- Adobe Marketing Agent Model Context Protocol (MCP) 統合のためのガバナンスプランを策定すること。プランには以下の項目を含める必要があります:
ユーザーまたはサービス認証。
- カスタムチャットエージェントの共有権限。
- Adobe テナント、ブランド、サンドボックス境界における Adobe Experience Platform のアクセス制御。
- MCP ツール呼び出しの監査ログとモニタリング。
- 運用に影響を与える推奨事項に対する人的レビュー。
- MCP リクエストメタデータおよび生成された成果物(テーブル、チャート、推奨事項など)の保持ルール。
MCP エンドポイント、認証情報、パイロットユーザーが準備できた後、セットアップに要する推定時間は 45〜60 分です。コストは、Amazon Quick サブスクリプション、Adobe ライセンス、および MCP サーバーをホストするインフラストラクチャによって異なります。
実装:Adobe Marketing Agent を Amazon Quick に接続する
このセクションでは、Adobe Marketing Agent を Amazon Quick に接続し、焦点を絞ったチャットエージェントを作成し、読み取り専用プロンプトを使用してワークフローを検証します。スクリーンショットにはサンプルのマーケティングデータを使用しており、Amazon Quick で統合が利用可能になった後のユーザーエクスペリエンスを示しています。
ステップ 1:Adobe Marketing Agent インテグレーションを接続する
Amazon Quick インテグレーションコンソールでは、Adobe Marketing Agent をブランド化されたコネクタタイルとして見つけることができます。
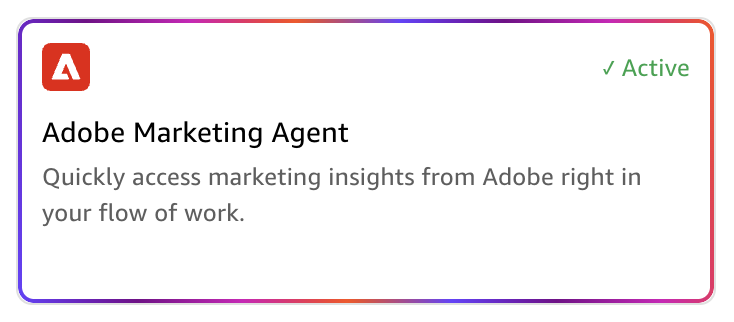
*図 2. Amazon Quick インテグレーションコンソール内の Adobe Marketing Agent タイル。
インテグレーションの作成方法
- Amazon Quick コンソールを開き、「コネクタ」を選択します。
- チーム用に「作成」を選択します。
- 「Adobe Marketing Agent」を選択します。
- Adobe Marketing Agent 接続詳細ページで、説明的な名前(例:Adobe Marketing Agent)を入力します。オプションとして、マーケティングワークフローの説明を追加できます。
- 「接続タイプ」には「パブリックネットワーク」を、「認証設定」には「デフォルト OAuth アプリ」を選択します。ブランド化されたコネクタを使用すると、Amazon Quick は追加の認証情報が必要ないことを示します。
- 「次へ」を選択します。
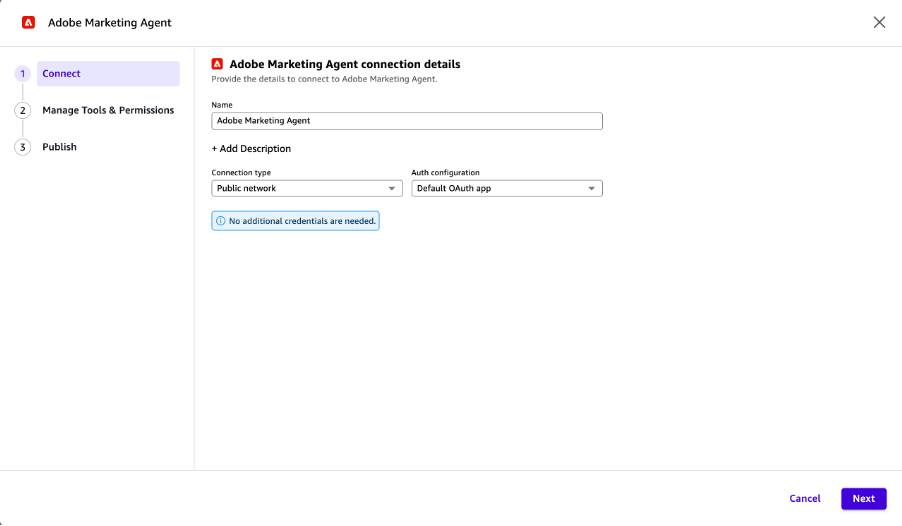
*図 3. Amazon Quick 内の Adobe Marketing Agent 接続詳細。
ツールと権限の管理
- 「ツールと権限の管理」ページで、アクセスレベルのデフォルトを確認してください。
- 最初のパイロットでは、「常に確認する」を選択し、各アクションを実行する前に明示的なユーザー承認が必要となるように設定します。
- 「書き込み操作」と「読み取り操作」を展開し、Adobe Marketing Agent コネクタによって公開されているアクションをレビューしてください。
- パイロット期間中は書き込み操作を「常に確認する」に設定したままにします。読み取り操作は、後のステップで使用する検証プロンプトのために利用します。
- 「次へ」を選択します。
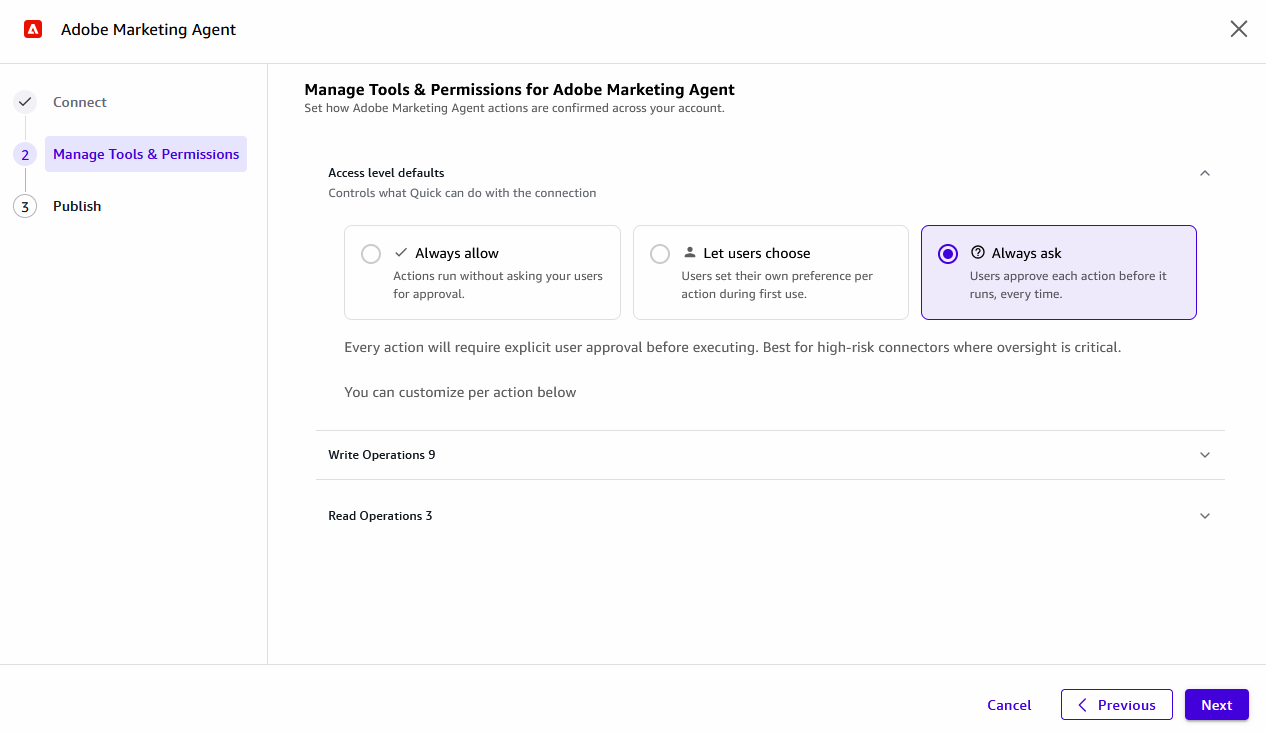
*図 4. Adobe Marketing Agent アクションのツール承認設定。*
接続の公開と承認
- 接続の公開ページで、誰がこの接続にアクセスできるかを選択します。
- コネクタが組織全体での使用を承認されていない限り、「組織内の全員」をオフのままにしてください。
- 「特定のグループ」の下に、この接続を使用するチームまたはグループを入力し、「追加」を選択します。
- 「公開」を選択します。接続を公開すると、Adobe 認証ウィンドウが開きます。
- Adobe 認証ウィンドウで、要求されたアクセス権限を確認します。この例では、基本プロフィール情報、メールアドレス、Adobe オrganization データ、および Adobe Experience Platform データへのアクセスが含まれています。Adobe 側のユーザー権限とサンドボックスアクセスについては、「アクセス制御の概要」を参照してください。
- 「アクセスを許可」を選択して認証を完了させます。
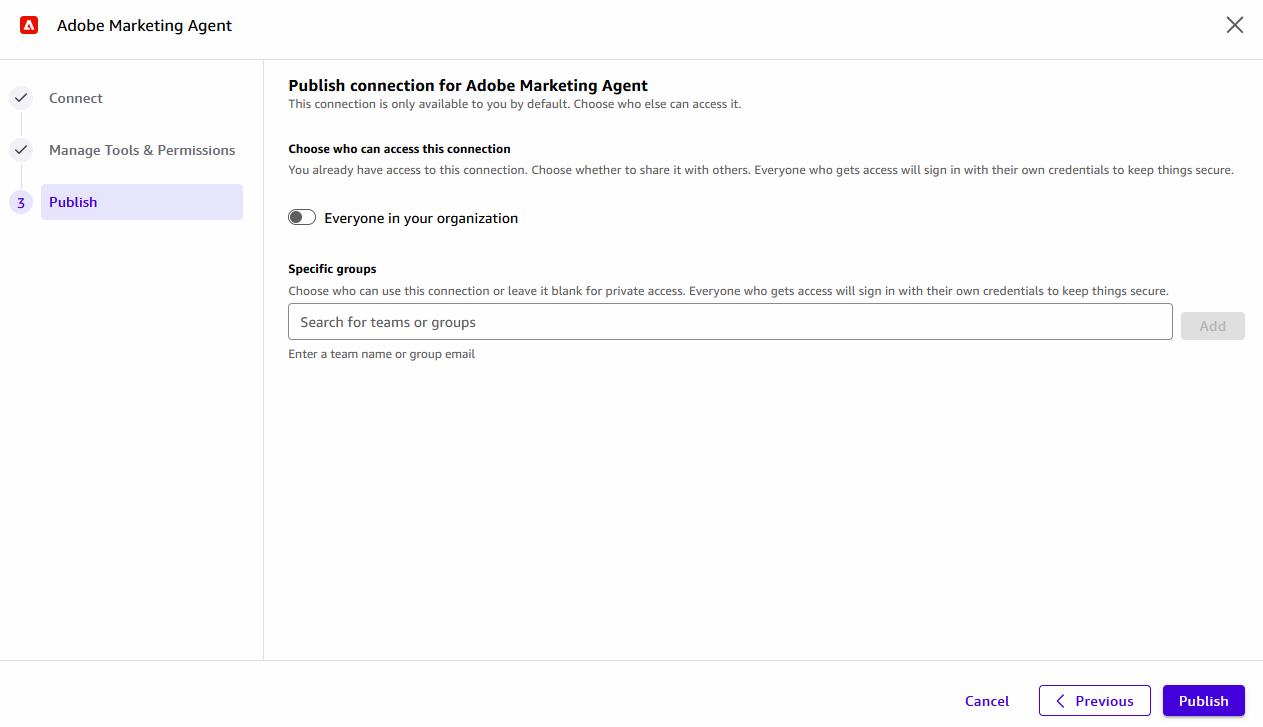
*図 5. Adobe Marketing Agent 接続を共有するための公開設定。
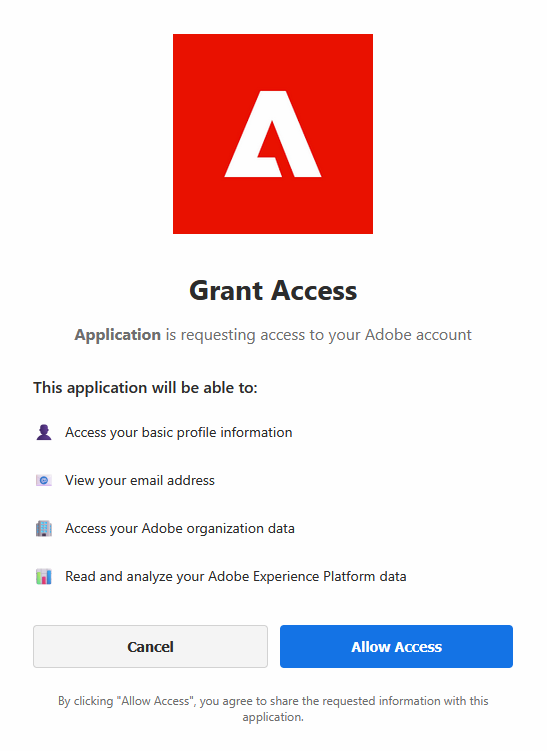
*図 6. Adobe Marketing Agent 接続に対する Adobe の認証リクエスト。
認証が完了すると、Adobe Marketing Agent 接続が公開され、カスタムチャットエージェントで使用できるようになります。次のステップでは、キャンペーン計画用のチャットエージェントを作成し、それを Adobe Marketing Agent のアクションにリンクします。
ステップ 2:キャンペーン計画チャットエージェントの作成
汎用的なマーケティングアシスタントではなく、焦点を絞ったチャットエージェントを作成してください。狭い範囲に特化したキャンペーン計画用エージェントは、テストや説明、ガバナンスが容易です。
- チャットエージェントへ移動し、「チャットエージェントの作成」を選択します。
- エージェント名として「Adobe Marketing Agent」を入力し、パイロットワークフロー用の短い説明文を追加します。
- アクションセクションで「既存の統合をリンク」を選択し、ステップ 1 で作成した Adobe Marketing Agent のアクションを選択します。
- 次の例に示すエージェント指示を追加してください。特定の分析ニーズに応じて、指示の追加や修正が可能です。
- エージェントをプレビューし、承認されたプロンプトそれぞれをテストします。回答が受け入れ基準を満たした場合のみ、起動してください。
あなたは Adobe キャンペーン計画アシスタントです。
主な職務
Adobe Marketing Agent のアクションを使用して、マーケティング担当者がキャンペーン計画に関する質問に答えるのを支援すること。
オーディエンス、ロイヤルティセグメント、ジャーニー、競合状況、コンテンツ効果について、まず読み取り専用分析から開始してください。
応答方法
回答は簡潔かつ実務的であること。
推測してはいけません。ツールの出力を根拠として使用してください。
入力情報が不足している場合は、キャンペーン、オーディエンス、日付範囲、地域、またはチャネルについて質問してください。
このデフォルトのレスポンス形式を使用してください:
要約
使用されたデータ
主要な観察点
人間のレビューのための推奨事項
ツールルーティング
オーディエンスサイズ、上位セグメント、リーチ → オーディエンスランキング
ロイヤリティティア、ロイヤリティコホート、重複 → ロイヤリティセグメントサマリー
ジャーニー参照、ジャーニーステータス、オーディエンス使用状況 → ジャーニー使用状況ルックアップ
オーディエンスの重複、タイミングの競合、一貫性のないメッセージング → キャンペーン競合分析
キャンペーンコンテンツ、チャネルパフォーマンス、クリエイティブの有効性 → コンテンツ有効性サマリー
出力ルール
ユーザーが明示的に要求し、かつ承認が必要なアクションである場合を除き、キャンペーンオブジェクトを作成または変更しないでください。個人識別情報 (PII)、顧客識別子、メールアドレス、電話番号、IP アドレス、または生のプロファイル ID を含めないでください。また、アクセストークン、シークレット、制限付き Adobe メタデータも回答に含まれないようにしてください。
ステップ 3: チャットエージェントを開き、以下のクエリを実行する
Amazon Quick からチャットエージェントを開きます。図 7 は、チャット体験で選択された Adobe Marketing Agent を示しています。キャンペーンの状態を変更せずに、認証、ツールディスカバリー、データ取得、アーティファクトレンダリング、および自然言語応答を検証するためにこれを使用してください。
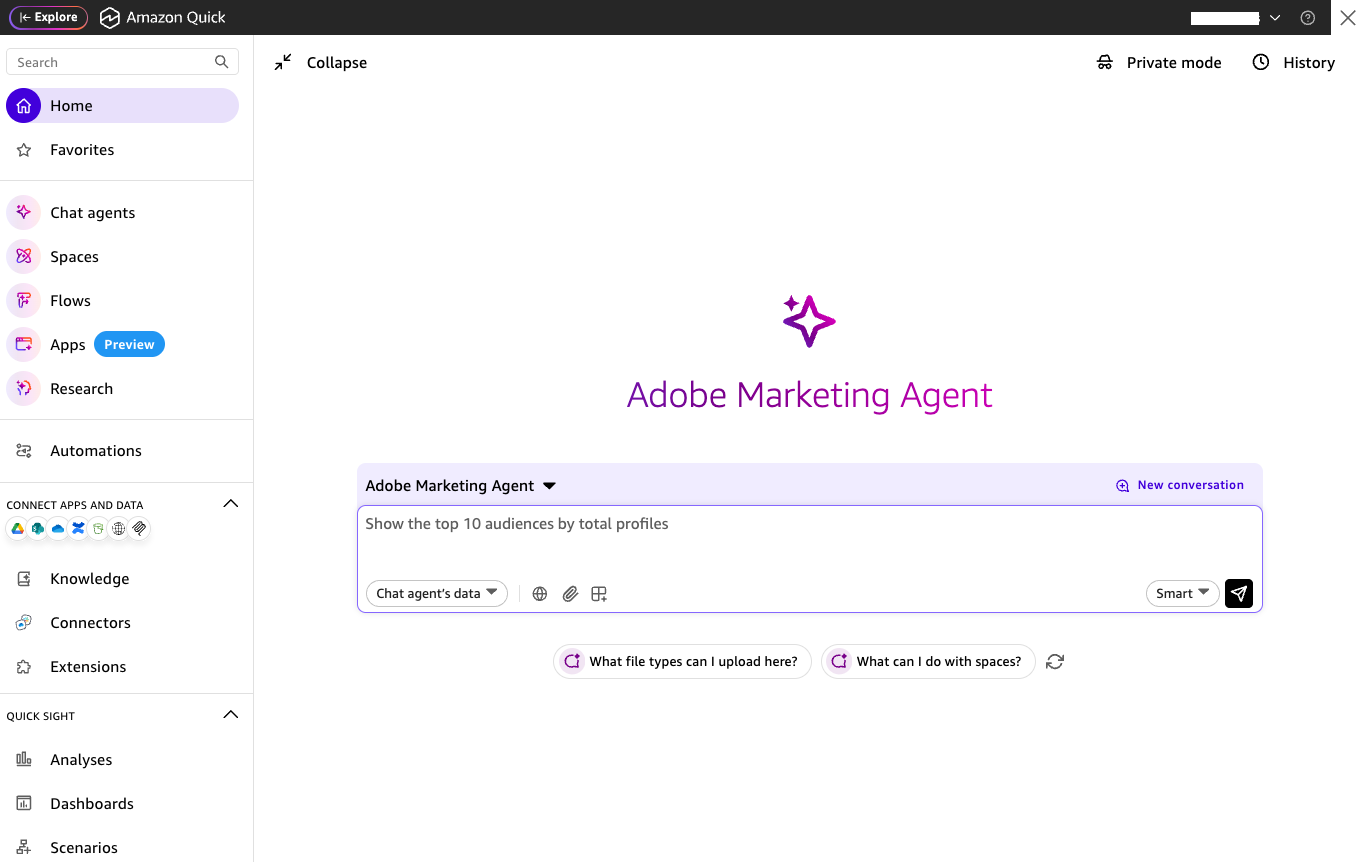
*図 7. Adobe Marketing Agent が選択された Amazon Quick チャット体験。
以下のプロンプトをチャットエージェントに送信してください:
上位 10 のオーディエンスを総プロファイル数で表示してください。
ステップ 4:オーディエンスランキング出力の検証
総プロフィール数による上位オーディエンスのプロンプトを入力すると、Amazon Quick は MCP を介して Adobe Marketing Agent のオーディエンスランク付けアクションを呼び出します。図 8 は、棒グラフ、チャットパネル内の小さなグラフ、およびマーケター向けの主要なインサイトを含む応答を示しています。
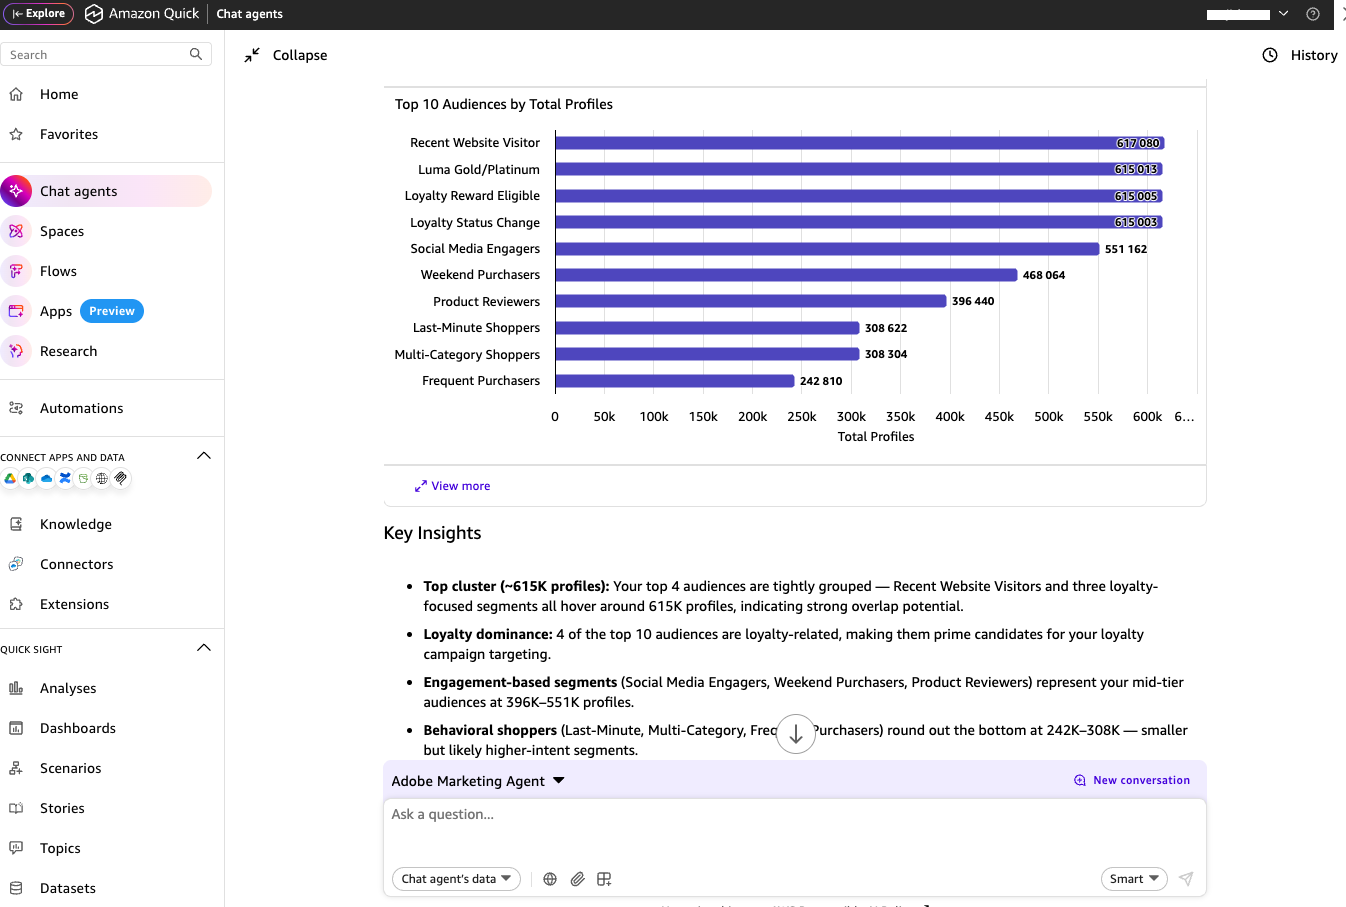
*図 8. 総プロフィール数による上位オーディエンスおよび生成された主要インサイト。
ステップ 5:ロイヤルティオーディエンスセグメントの分析
上位オーディエンスビューが機能した後、分析をロイヤルティオーディエンスに絞り込むフォローアッププロンプトを検証します。エージェントは必要に応じて会話の文脈を再利用すべきです。また、合計オーディエンス数がユニークリーチを過大評価する可能性がある場合、ロイヤルティセグメントアクションを呼び出し、重複の仮定について説明する必要があります。
以下のようなプロンプトを送信してください:
上位ロイヤルティオーディエンスを表示し、属性タイプ別にグループ化してください。
次の図は、Amazon Quick で返されるロイヤルティオーディエンスの分布とセグメントレベルでの観察結果を示しています。
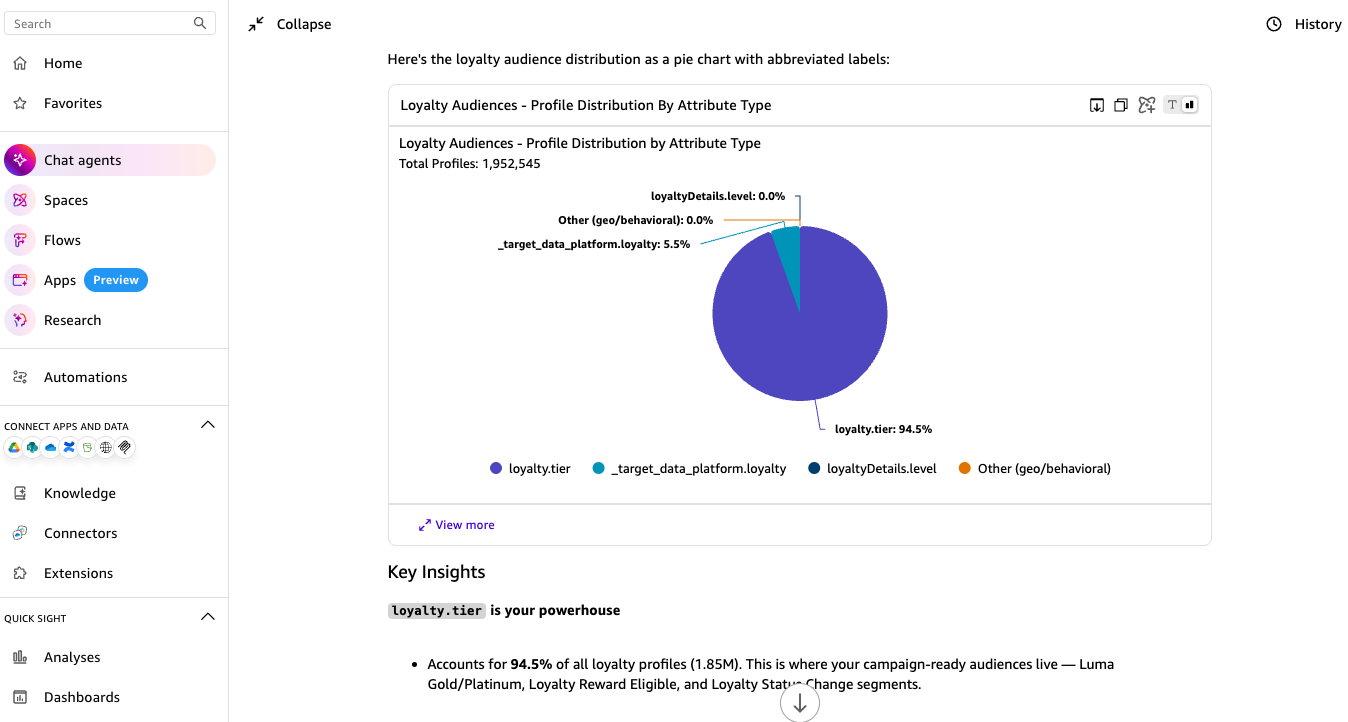
*図 9. ロイヤルティオーディエンスの分布とセグメントインサイト。
ステップ 6:ロイヤルティオーディエンスを使用するジャーニーの分析
次に、どのジャーニーがロイヤルティオーディエンス(顧客層)を使用しているかを問い合わせてください。これにより、Adobe Marketing Agent がオーディエンス分析とジャーニー分析を連携できることを検証します。回答は、ローンチ前にマーケティング運用チームが確認できるよう表形式で返されるべきです。
以下のようなプロンプトを送信してください:
どのジャーニーがロイヤルティオーディエンスを使用していますか?
以下の図は、ロイヤルティオーディエンスを参照しているジャーニーを示しています。これには使用されているオーディエンス、ロイヤルティ属性、および生成されたパターンが含まれています。この出力により、キャンペーンチームは新しいキャンペーンが稼働する前に、繰り返されるオーディエンスの使用や潜在的なキャンペーン間の相互作用を特定できます。
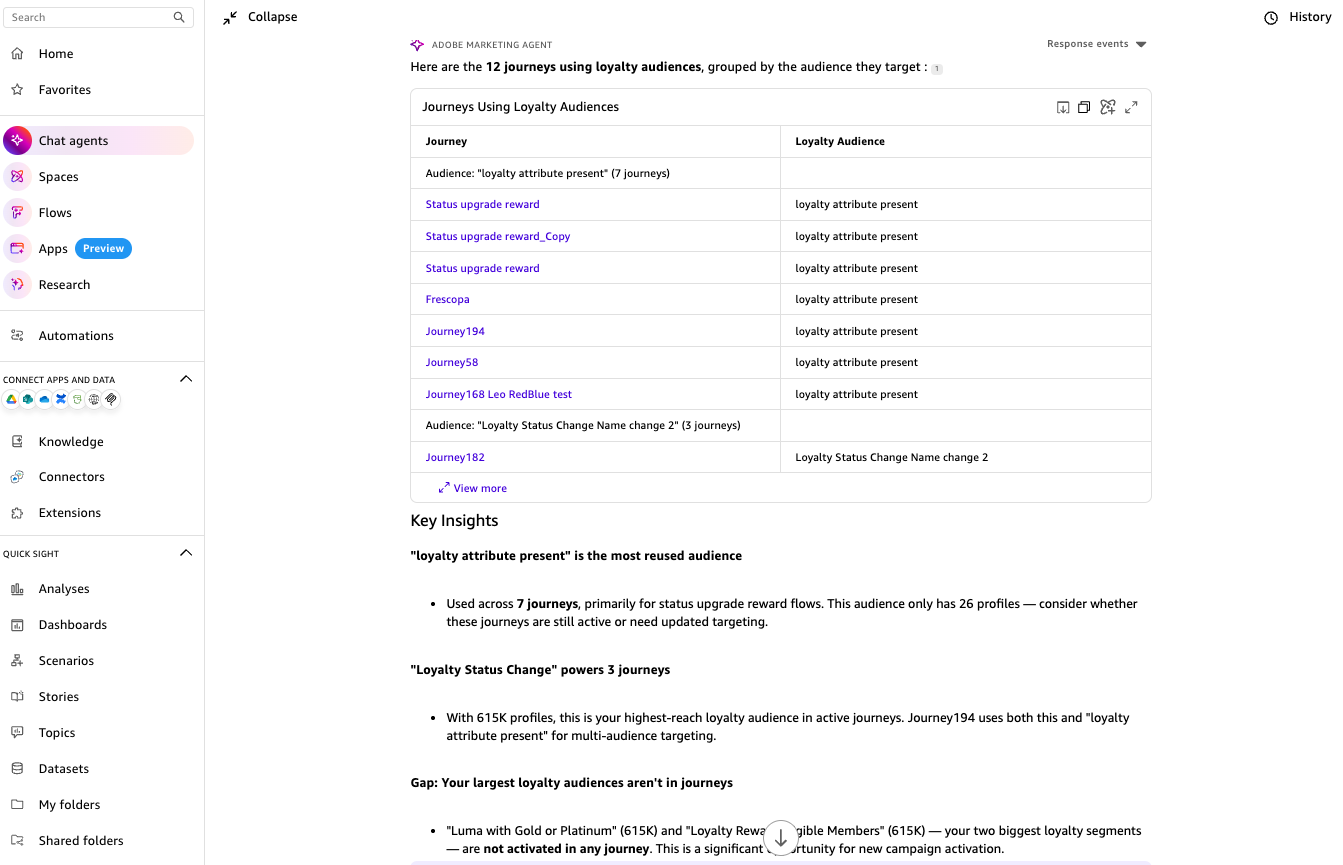
*図 10. ロイヤルティオーディエンスを有するジャーニーおよび生成されたパターンの分析。
ステップ 7:ローンチ前の競合確認
最終的な検証プロンプトでは、エージェントに人間によるレビューのための競合と推奨事項の要約を依頼します。このアクションは最初のリリースにおいては助言的なものとして維持してください。エージェントによってレビューサイクルを短縮できますが、キャンペーンのローンチ決定については、貴組織の承認プロセスが管理を行う必要があります。
以下のようなプロンプトを送信してください:
ローンチ前に確認すべき競合事項を要約してください。
以下の図は、リスクレベル、オーディエンスの重複率、主要な観察点、および調整推奨事項を含む競合サマリーを示しています。このサンプルでは、出力は 2.3% のオーディエンス重複を伴う中程度のリスクを持つ競合を特定しています。レビュー担当者は、リスクに関する記述、指標の定義、および推奨事項が自社のマーケティングガバナンス基準に一致しているかを確認する必要があります。
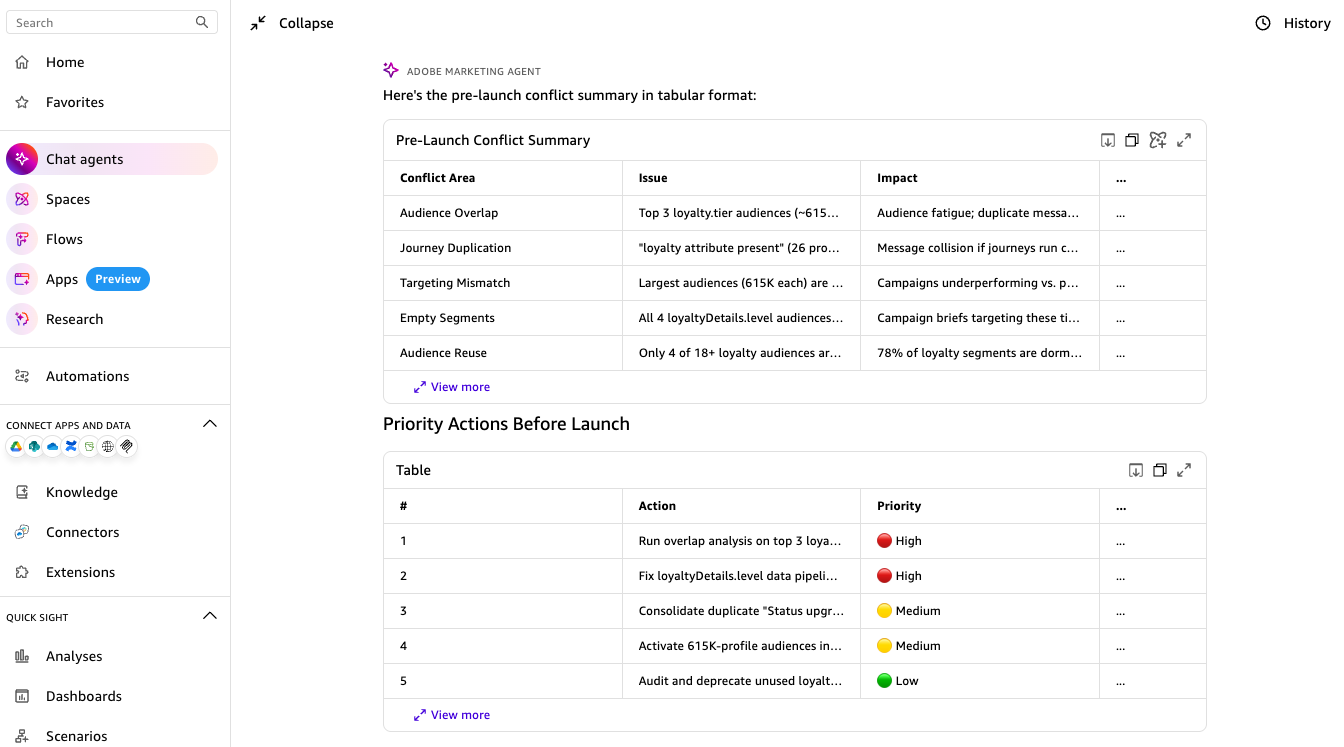
*図 11. 競合サマリーおよび推奨される調整戦略。
ステップ 8: ワークフローの開始、共有、サポート
検証プロンプトが受け入れ基準を満たした後、チャットエージェントを起動し、承認されたパイロットユーザーまたはグループと共有してください。起動すると、そのエージェントはチャットエージェントライブラリで利用可能になり、共有設定により使用できるユーザーを制御できます。手順については、カスタムチャットエージェント を参照してください。
セキュリティおよびガバナンスに関する考慮事項
チャットエージェントの起動または共有を行う前に、Adobe データへのアクセス、ツールの使用、キャンペーン開始決定を保護する制御を確認してください。初期接続設定中は、
原文を表示
Amazon Quick and Adobe Marketing Agent help marketing teams access campaign insights within governed conversations in seconds. Marketers can ask questions about campaign performance, audiences, journeys, campaign conflicts, and content performance in natural language. Amazon Quick provides the chat experience and action orchestration. Adobe provides marketing-domain analysis to the approved data sources behind those questions.
This post shows how to enable Adobe Marketing Agent for Amazon Quick using a Model Context Protocol (MCP). We walk you through how to configure the integration, authenticate using your Adobe credentials, and get the latest insights in Amazon Quick. The sample workflow returns audience rankings, loyalty segment summaries, journey usage, and conflict recommendations.
Overview: Adobe Marketing Agent for Amazon Quick
Amazon Quick integrations connect external applications and services to AI-powered analysis and automation. With MCP integrations, Amazon Quick connects to remote MCP servers, discovers exposed tools, and registers selected tools as actions. An assistant can call those actions during a conversation. In this solution, the Adobe Marketing Agent exposes marketing tools. The tools cover audience ranking, loyalty analysis, journey lookup, conflict analysis, and content performance summaries.
The following architecture shows the end-to-end request flow. A marketer asks a campaign planning question in Amazon Quick. The chat agent selects an approved action from the Adobe Marketing Agent integration. The MCP server validates the request and queries authorized Adobe marketing data. Amazon Quick renders the response as an answer, table, chart, or recommendation. Apply governance controls across the flow, including least privilege, tenant isolation, audit logging, schema versioning, and human review for launch decisions.
*Figure 1. Architecture for connecting Adobe Marketing Agent to Amazon Quick using MCP.*
The workflow has four parts:
- An Amazon Quick administrator creates the Adobe Marketing Agent integration using the branded connector tile or the generic MCP setup path.
- Amazon Quick discovers the MCP tools and registers selected tools as actions.
- A custom chat agent uses those actions to answer marketing questions in natural language.
- Marketing users review the output before using it in campaign planning or launch decisions.
The Adobe Marketing Agent actions provide following capabilities:
- Campaign review & monitoring enables marketers to visualize campaign metrics that inform campaign review and monitoring workflows.
- Campaign Planning enables marketing teams to access insights about campaign such as reach and past campaign performance to inform future campaign decisions.
- Audience Insights enables marketers to gather audience insights such as profile size, frequently changing audiences, overlap between audiences and identify attributes to grow campaign reach.
- Journey Insights enables marketers to access existing journey insights to monitor for business outcomes and inform strategies for corrective action that drive towards intended results.
- Journey Conflict Analysis enables marketers to quickly surface existing journey conflicts that need to be addressed before go-live and avoid conflicting customer experiences and optimize towards campaign outcomes.
Prerequisites
Before you configure the Adobe Marketing Agent integration, you must complete the following prerequisites.
- Verify that you have access to Amazon Quick, your Adobe organization, your identity provider, and an Adobe-provided Adobe Marketing Agent MCP endpoint with required authentication details. For Adobe-side entitlement and agent access requirements, refer to Adobe Experience Platform Agent Orchestrator.
- Amazon Quick Enterprise subscription and permissions to create, review, share, and manage integrations and chat agents.
- Licensed one or more of the Adobe CX Enterprise products, including Adobe Real-Time CDP, Adobe Customer Journey Analytics, or Adobe Journey Optimizer.
- Licensed and provisioned Adobe Experience Platform Agent Orchestrator. Adobe provides MCP endpoints and tools.
- A governance plan for the Adobe Marketing Agent Model Context Protocol (MCP) integration. Your plan should cover the following:
User or service authentication.
- Custom chat agent sharing permissions.
- Adobe Experience Platform access control for Adobe tenant, brand, and sandbox boundaries.
- MCP tool-invocation audit logs and monitoring.
- Human review for launch-impacting recommendations.
- Retention rules for MCP request metadata and generated artifacts such as tables, charts, and recommendations.
The estimated setup time is 45–60 minutes after the MCP endpoint, credentials, and pilot users are ready. Costs depend on your Amazon Quick subscription, Adobe licensing, and the infrastructure that hosts the MCP server.
Implementation: Connect the Adobe Marketing Agent to Amazon Quick
In this section, you connect Adobe Marketing Agent to Amazon Quick, create a focused chat agent, and validate the workflow with read-only prompts. The screenshots use sample marketing data and show the user experience after the integration is available in Amazon Quick.
Step 1: Connect the Adobe Marketing Agent integration
You can find Adobe Marketing Agent as a branded connector tile in the Amazon Quick Integrations console.
*Figure 2. Adobe Marketing Agent tile in the Amazon Quick Integrations console.*
To create the integration
- Open the Amazon Quick console and choose Connectors.
- Choose Create for your team.
- Choose Adobe Marketing Agent.
- On the Adobe Marketing Agent connection details page, enter a descriptive name, such as Adobe Marketing Agent. Optionally, add a description for the marketing workflow.
- For Connection type, select Public network. For Auth configuration, select Default OAuth app. With the branded connector, Amazon Quick shows that no additional credentials are needed.
- Choose Next.
*Figure 3. Adobe Marketing Agent connection details in Amazon Quick.*
To manage tools and permissions
- On the Manage Tools & Permissions page, review the access level defaults.
- For the first pilot, choose Always ask so each action requires explicit user approval before it runs.
- Expand Write Operations and Read Operations, and review the actions exposed by the Adobe Marketing Agent connector.
- Keep write operations set to Always ask for the pilot. Use read operations for the validation prompts in later steps.
- Choose Next.
*Figure 4. Tool approval settings for Adobe Marketing Agent actions.*
To publish and authorize the connection
- On the Publish connection page, choose who can access the connection.
- Keep Everyone in your organization turned off unless the connector is approved for organization-wide use.
- Under Specific groups, enter the team or group that should use the connection, and choose Add.
- Choose Publish. The Adobe authorization window opens after you publish the connection.
- In the Adobe authorization window, review the requested access. In this example, the request includes access to basic profile information, email address, Adobe organization data, and Adobe Experience Platform data. For Adobe-side user permissions and sandbox access, refer to Access control overview.
- Choose Allow Access to complete authorization.
*Figure 5. Publish settings for sharing the Adobe Marketing Agent connection.*
*Figure 6. Adobe authorization request for the Adobe Marketing Agent connection.*
After authorization completes, the Adobe Marketing Agent connection is published and ready to use in a custom chat agent. In the next step, you create the campaign planning chat agent and link it to the Adobe Marketing Agent actions.
Step 2: Create the campaign planning chat agent
Create a focused chat agent instead of a general-purpose marketing assistant. A narrow campaign planning agent is easier to test, explain, and govern.
- Navigate to Chat agents and choose Create chat agent.
- Add the agent name Adobe Marketing Agent and a short description for the pilot workflow.
- In the actions section, choose Link existing integration and select the Adobe Marketing Agent actions created in Step 1.
- Add the agent instructions shown in the following example. You can add to or modify the instructions based on your specific analysis needs.
- Preview the agent, test each approved prompt, and launch it only after the answers match your acceptance criteria.
You are the Adobe campaign planning assistant.

Primary job
Help marketers answer campaign planning questions using Adobe Marketing Agent actions.
Start with read-only analysis for audiences, loyalty segments, journeys, conflicts, and content effectiveness.

How to respond
Keep responses concise and operational.
Do not guess. Use tool output as evidence.

If inputs are missing, ask for the campaign, audience, date range, region, or channel.

Use this default response format:
Summary
Data used
Key observations
Recommendations for human review
Tool routing
Audience size, top segments, reach -> audience ranking
Loyalty tiers, loyalty cohorts, overlap -> loyalty segment summary
Journey references, journey status, audience usage -> journey usage lookup
Audience overlap, timing conflicts, inconsistent messaging -> campaign conflict analysis
Campaign content, channel performance, creative effectiveness -> content effectiveness summary

Output rules
Do not create or modify campaign objects unless the user explicitly asks and the action requires approval. Do not include PII, customer identifiers, email addresses, phone numbers, IP addresses, or raw profile IDs. Also do not include access tokens, secrets, or restricted Adobe metadata in the answer.
Step 3: Open the chat agent and run the following query
Open the chat agent from Amazon Quick. Figure 7 shows the Adobe Marketing Agent selected in the chat experience. Use it to verify authentication, tool discovery, data retrieval, artifact rendering, and the natural language response without changing campaign state.
*Figure 7. Amazon Quick chat experience with Adobe Marketing Agent selected.*
Send the following prompt to the chat agent:
Show the top 10 audiences by total profiles.Step 4: Validate audience ranking output
When you enter the prompt for top audiences by total profiles, Amazon Quick invokes the Adobe Marketing Agent audience-ranking action through MCP. Figure 8 shows the response with a bar chart, a smaller chart in the chat panel, and key insights for the marketer.
*Figure 8. Top audiences by total profiles and generated key insights.*
Step 5: Analyze loyalty audience segments
After the top-audience view works, validate a follow-up prompt that narrows the analysis to loyalty audiences. The agent should reuse conversation context where appropriate. It should call the loyalty-segment action and explain overlap assumptions when summed audience counts can overstate unique reach.
Send a prompt like the following:
Show the top loyalty audiences and group them by attribute type.The following figure shows the loyalty audience distribution and segment-level observations returned in Amazon Quick.
*Figure 9. Loyalty audience distribution and segment insights.*
Step 6: Analyze journeys that use loyalty audiences
Next, ask which journeys use loyalty audiences. This validates that the Adobe Marketing Agent can connect audience analysis with journey analysis. The response should return a table for marketing operations teams to review before launch.
Send a prompt like the following:
Which journeys use loyalty audiences?The following figure shows journeys that reference loyalty audiences. It includes the audience used, the loyalty attribute, and generated patterns. The output helps campaign teams identify repeated audience usage and potential campaign interactions before a new campaign goes live.
*Figure 10. Journeys with loyalty audiences and generated pattern analysis.*
Step 7: Review conflicts before launch
The final validation prompt asks the agent to summarize conflicts and recommendations for human review. Keep this action advisory for the first release. The agent can shorten the review cycle. Your organization’s approval process should control campaign launch decisions.
Send a prompt like the following:
Summarize conflicts I should review before launch.The following figure shows a conflict summary with risk level, audience overlap, key observations, and coordination recommendations. In this sample, the output identifies a medium-risk conflict with 2.3 percent audience overlap. Reviewers should verify that the risk language, metric definitions, and recommendations match your marketing governance standards.
*Figure 11. Conflict summary and recommended coordination strategy.*
Step 8: Launch, share, and support the workflow
After the validation prompts meet your acceptance criteria, launch the chat agent and share it with approved pilot users or groups. Launching makes the agent available in the chat agent library, and sharing controls which users can use it. For instructions, see Custom chat agents.
Security and governance considerations
Before you launch or share the chat agent, review the controls that protect Adobe data access, tool use, and campaign launch decisions. During the initial connection setup, use the
関連記事
HSBC、Google Cloud と AI 銀行提携を拡大
HSBC は Google Cloud と多年度提携を結び、グローバル業務で Gemini モデルなどを用いた AI ツールの開発・導入を開始する。
Amazon Bedrock AgentCore に Web 検索機能を導入
AWS は、学習データに依存して最新情報を取得できない AI エージェントの課題を解決するため、Amazon Bedrock AgentCore に Web 検索機能を一般提供開始した。これによりエージェントはリアルタイムの株価やニュースなどを参照可能になった。
SAP と Google Cloud がエージェント型コマースアーキテクチャを展開
SAP と Google Cloud は、企業規模でのマルチエージェントマーケティングおよび小売業務の自動化を目的として、エージェント型コマースアーキテクチャの展開を開始した。両社は顧客データの共有不足という構造的課題への対応を掲げている。
今日のまとめ
AI日報で今日の重要ニュースをまとめ読み