最初の自律型エージェントの構築とデプロイに向けた7 つの手順
本記事は、AI エージェントの概念検証から実運用への移行を阻む「グレイゾーン」を埋めるため、LangGraph を用いた研究エージェントの構築とデプロイに至る7つの具体的なステップを解説する実践的ガイドである。
AI深層分析を開く2026年7月27日 22:04
AI深層分析
キーポイント
開発と運用のギャップ解消
多くのプロジェクトがローカル環境での動作に留まり、本番環境への展開で失敗する現状に対し、15行の統合コードやコンテナ化など実装プロセスを明確にする。
LangGraph の採用推奨
CrewAI やベンダーロックされたSDKではなく、状態管理とスケーラビリティに優れたLangGraphを2026年の本番デフォクトとして選択する理由を提示する。
エージェントの範囲定義
開発前にエージェントが何を行い、何をしないかを明確にし、失敗処理やガバナールールを含む適切なスコープ設定の重要性を説く。
実装とデプロイの実践
Web検索、情報収集、要約出力を行う研究エージェントを、完全なコードブロックと解説付きで1セッション内で構築し、URLを持つ形で公開する手順を示す。
エージェントの役割と境界を明確に定義する
開発前に、エージェントが実行すべき単一のタスク、成功した出力の基準、そして人間による承認なしに絶対にやってはいけない行動を明記する必要がある。
重要な引用
That gap between "it worked when I ran it" and "it's live, and someone else is using it" is where most agent projects quietly die.
Close to 79% of companies say they've adopted AI agents in some form, but only about 11% have anything running in production.
LangGraph has become the closest thing to a production default for stateful agents in 2026, with built-in checkpointing and a graph model that scales past a single afternoon project without a rewrite.
"Skipping this step is a big part of why Gartner expects more than 40% of agentic AI projects to be canceled by the end of 2027, usually because nobody defined the boundaries early enough and the project either did too little to be useful or too much to be trusted."
編集コメントを表示
編集コメント
本記事は、理論的な議論に終始しがちなAIエージェントの話題に対し、LangGraphという具体的なツールを用いた実装プロセスを提示しており、開発現場の即戦力となる内容である。特に「プロトタイプと製品の差」を埋めるための技術的・組織的アプローチが明確に示されている点は、実務家にとって極めて価値が高い。
Source Article
元記事を日本語で読む
本文に関係しない購読案内、埋め込み通知、サイト内プロモーションは除いています。
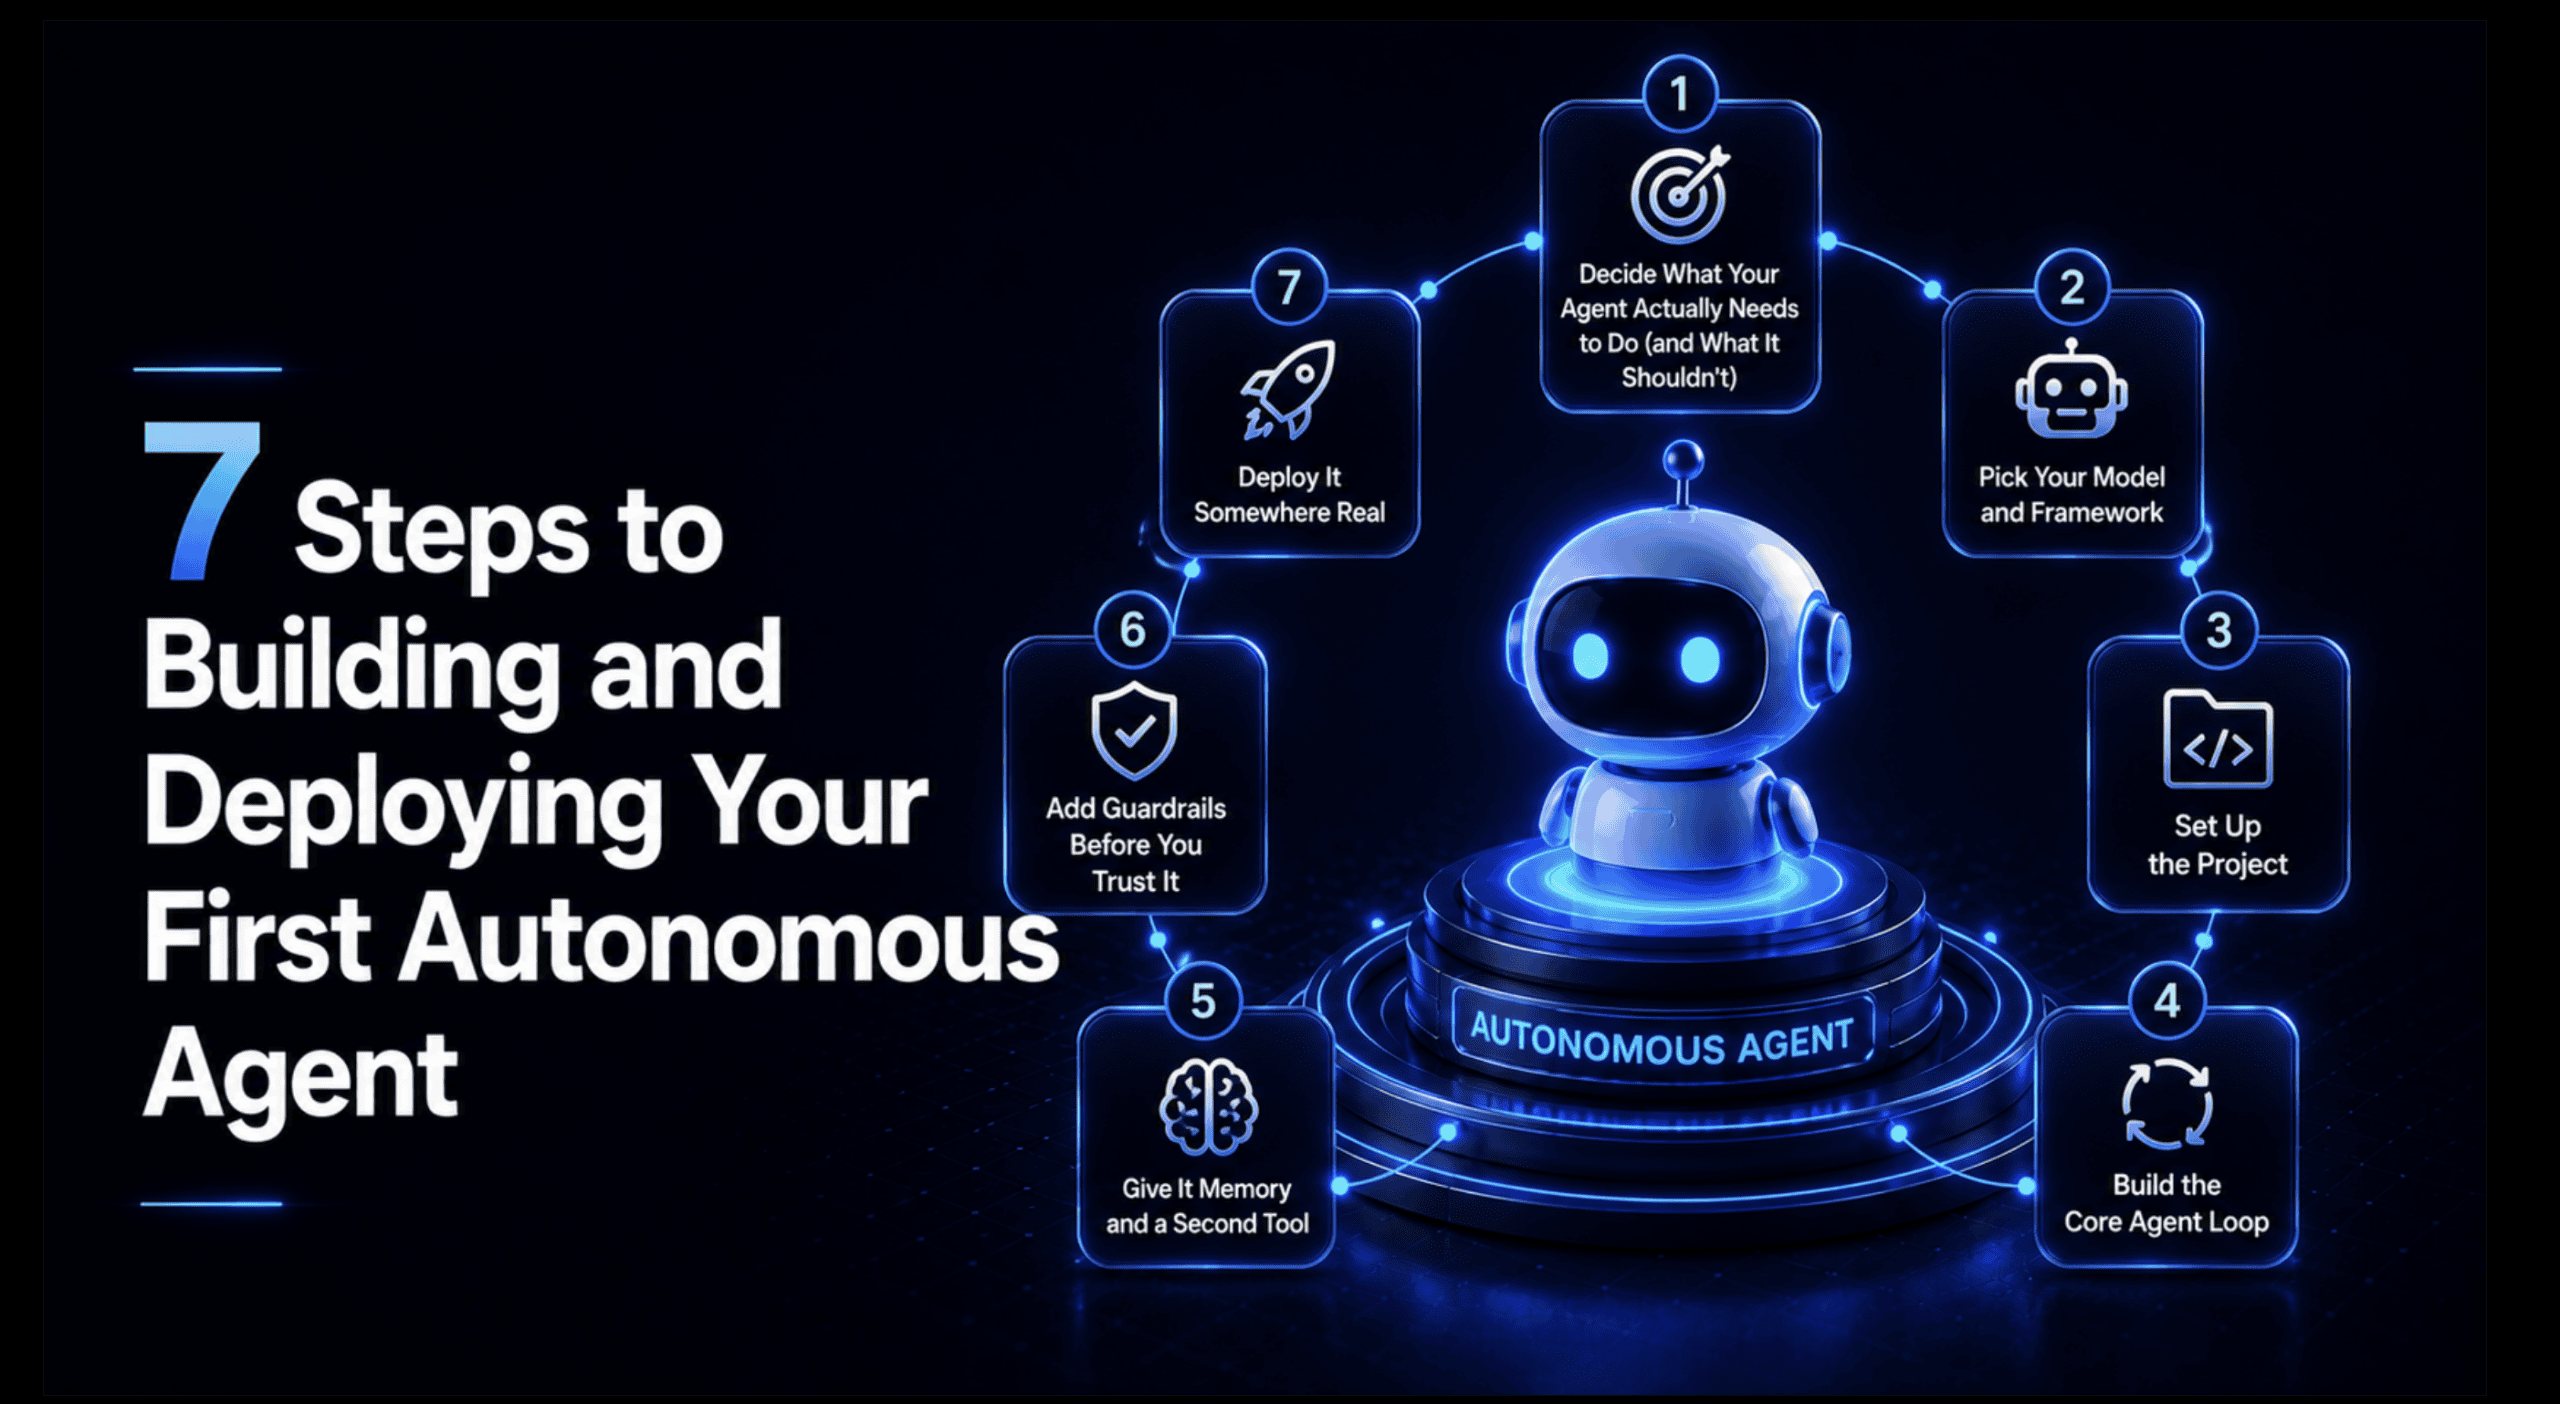
はじめに
多くの人が最初に作る AI エージェントは、結局ラップトップの中で終わってしまいます。ターミナルで一度実行してそれなりの回答を出力するものの、その後に止まったままです。なぜなら、スクリプトを実行可能なものから、他者や他のシステムが実際に呼び出せる形に変えるための「接着剤」コード(15 行程度)を書く人がいないからです。
「自分の環境では動いた」という状態と、「本番環境に展開され、誰かが利用している」という状態の間に大きな溝があります。多くのエージェントプロジェクトは、この溝で静かに消滅してしまいます。
その実態を数字が裏付けています。ある調査によると(Gartner、McKinsey、IDC のデータをまとめた 2026 年の統計まとめ こちら)、企業の約 79% が何らかの形で AI エージェントを導入したと回答しています。しかし、実際に本番環境で稼働させているのはわずか 11% 程度です。
これは無視できない差です。デモとプロダクトの違いであり、モデル自体が弱すぎるせいではありません。プロジェクトを適切に範囲設定しなかったこと、失敗時の対応を怠ったこと、あるいはコンテナ化して URL でアクセスできる場所に配置することを誰も行わなかったことが原因なのです。
この記事では、特定のプロジェクトを通じてそのギャップを埋めます。読み終える頃には、研究用エージェントの構築とデプロイが完了しています。テーマを与えると、ウェブを検索し、信頼できるソースを取得して、リンク付きで短い要約レポートを返す仕組みです。ツール使用、メモリ管理、安全装置(ガードレール)が必要になるほど複雑ですが、一度の作業で全体を構築できる規模に収まっています。以下のコードブロックはすべて完全な実装で、コメントも付いています。各コードブロックの直後には、その動作と目的を平易な日本語で解説します。
始める前に一点注意:今回は LangGraph を採用し、CrewAI やベンダーロックされた SDK ではなく構築します。CrewAI はプロトタイプを素早く作れる利点がありますが、2026 年現在、状態管理型エージェントの事実上のデファクトスタンダードとして LangGraph が最も注目されています。チェックポイント機能やグラフモデルが備わっており、単なる午後の練習プロジェクトを超えて本番環境でも拡張可能です。もし CrewAI でプロトタイプを作りたい場合は、ステップ 1、2、6、7 の概念はそのまま流用できますが、ステップ 4 と 5 のコード記述は異なります。
ステップ 1:エージェントに「何をするべきか」と「何をしてはいけないか」を明確にする
エディタを開く前に、以下の 3 点を必ず書き出してください。一つ目はエージェントの単一の役割、二つ目は成功した出力の具体的な姿、三つ目は人間が確認するまで絶対に実行してはいけない行為です。
今回の研究用エージェントの場合、以下のように定義します。
タスクは、特定のトピックを入力として受け取り、ウェブ検索を実行し、その結果を読み込んで、要約と出典リストを含む文章によるブリーフを作成することです。
成功の基準は、500 語以内で論理的に整合し、事実関係が裏付けられたブリーフであり、すべての主張がソース URL に追跡可能であることです。
最も重要な制約は、検索と閲覧は自由に実行できるものの、外部への投稿や送信、ワークスペース外へのファイル書き込みは、必ず人間による承認を経るまで行わないという点です。
この 3 つ目のポイントが、思っている以上に重要です。このステップを省略すると、プロジェクトが有用性を欠くか、信頼性が損なわれるかのどちらかに陥りやすく、これがガートナーが予測する「2027 年末までにアジェンシー AI プロジェクトの 40% 以上が中止される」主な原因の一つとなっています。
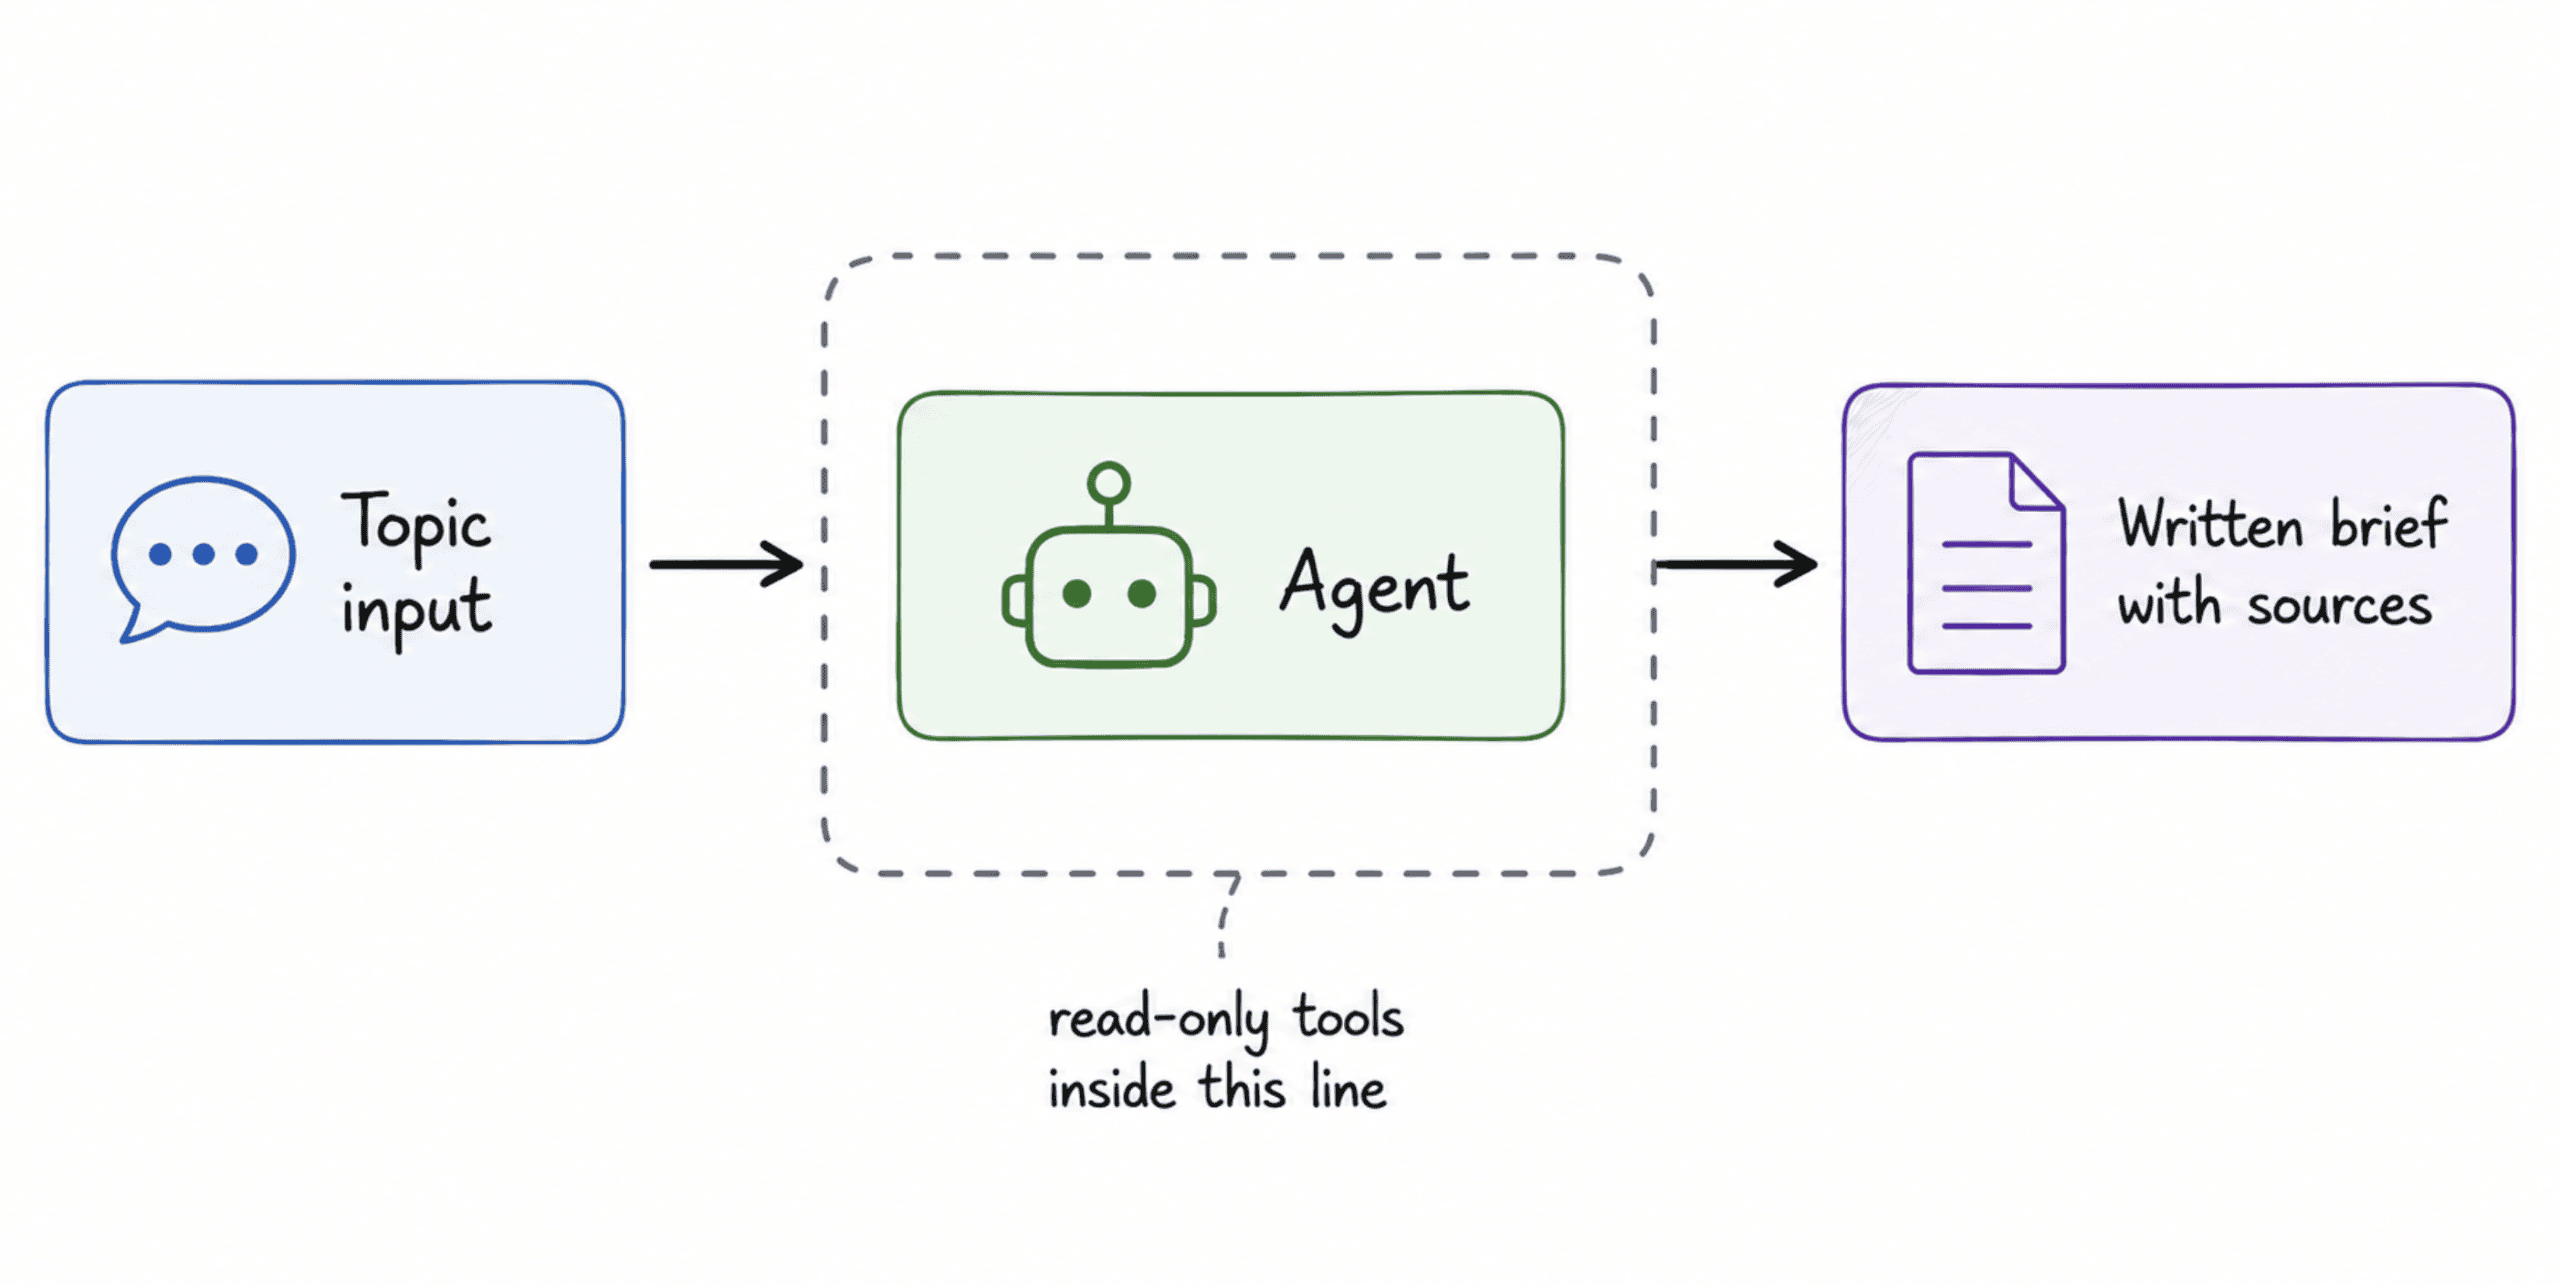
このチュートリアルで構築するプロジェクトに合わせて、上記の 3 つの文を自分なりに書き換えてみてください。これに要するのはわずか 5 分ですが、途中で全体を再設計する必要を防ぐのに役立ちます。
ステップ 2:モデルとフレームワークの選定
ここでは 2 つの決断が必要です。1 つ目は推論を行うモデルをどこで選ぶか、2 つ目は思考・行動・結果の確認というループを管理するフレームワークをどうするかです。
モデルには、現在利用可能な最先端のモデルであれば、ツール使用能力が確立されているものであれば何でも採用可能です。Claude、GPT、Gemini はいずれもこの用途に適しています。
コード例では Claude を採用しますが、これは多段階タスクにおけるツール呼び出しの信頼性が一貫して高いためです。他のプロバイダーに差し替えても、変更するのは単一の行だけです。
フレームワークについては、2026 年後半に向けた現状を、生産環境向けのエージェントフレームワークの比較と、個別のフレームワーク選定ガイドに基づいて以下にまとめます。
LangGraph はエージェントをグラフ上のノードとエッジとしてモデル化し、ビルトインのチェックポイント機能により、実行中にクラッシュしても再開でき、最初からやり直す必要がありません。このライブラリの月間 PyPI ダウンロード数は 3800 万回を超え、Klarna、Uber、LinkedIn といった企業が本番環境で採用しています。その代わり学習曲線は急峻で、使いこなせるようになるまで通常 1〜2 週間ほどかかります。
CrewAI はエージェントを役割と目標を持つ「クルー」としてモデル化し、わずか 20 行未満のコードで動作するプロトタイプを作成できます。アイデアの有効性を素早く検証するには最適な選択肢ですが、ワークフローが複雑になると制御性が低下します。そのため多くのチームは、いずれ CrewAI から LangGraph へと移行することになります。
マルチエージェント対話パターンにおけるデファクトスタンダードだった AutoGen も言及する価値がありますが、新規プロジェクトでは避けるよう案内するためです。Microsoft はこのライブラリをメンテナンスモードに移行し、開発の重心を統合された Microsoft Agent Framework へ移しました。2026 年に新しいものを構築するなら、ここは最適な場所ではありません。
OpenAI Agents SDK や Anthropic の Claude Agent SDK といったベンダー提供の SDK も検討に値しますが、特定のプロバイダに完全に依存し、フレームワークのオーバーヘッドを最小限に抑えたい場合に限られます。その代わり、そのベンダーのモデルにロックインされることになります。
今回の構築では LangGraph を採用します。研究用エージェントにはチェックポイント機能が不可欠であり(検索がタイムアウトしても最初からやり直す必要はない)、またこのスキルセットは実務での本番環境運用へと最も直接的に転用できるためです。
# Step 3: Setting Up the Project
まず、プロジェクト用のフォルダを作成し、仮想環境を構築して必要なライブラリをインストールしましょう。
プロジェクトフォルダの作成と移動
mkdir research-agent && cd research-agent
依存関係が混在しないよう、仮想環境を作成します
python3 -m venv venv
source venv/bin/activate # Windows の場合は:venv\Scripts\activate
コアとなるライブラリをインストールします:
langgraph: エージェントの調整(オーケストレーション)フレームワーク
langchain-anthropic: LangGraph から Claude モデルを呼び出すためのモジュール
langchain-community: Tavily 検索ツールやページローダーを提供するコミュニティライブラリ
beautifulsoup4: ページローダーが依存する HTML パーサー
python-dotenv: API キーをコードに直接記述せず、.env ファイルから読み込むためのツール
pip install langgraph langchain-anthropic langchain-community python-dotenv tavily-python beautifulsoup4
この手順の利点は、仮想環境によってプロジェクト固有のパッケージが他の環境と切り離される点です。これにより、あるプロジェクトの依存関係更新が別のプロジェクトを静かに壊してしまうという典型的な問題を回避できます。今回インストールするパッケージ群は、調整機能(langgraph)、モデル接続(langchain-anthropic)、Web 検索ツールやページローダー(langchain-community、tavily-python、beautifulsoup4)、そして安全なキー管理(python-dotenv)を網羅しています。
次に、プロジェクトのルートディレクトリに .env ファイルを作成して、API キーを保存します。Anthropic Console から Anthropic API キーと、Tavily の検索 API キーが必要です。Tavily は無料枠を提供しており、このチュートリアルには十分な容量があります。
.env ファイル(バージョン管理にコミットしないこと)
ANTHROPIC_API_KEY=your-anthropic-key-here
TAVILY_API_KEY=your-tavily-key-here
最後に、フォルダ構成を整えましょう。
research-agent/
├── venv/
├── .env
├── .gitignore
├── agent.py
├── app.py
├── requirements.txt
└── Dockerfile
この構成のメリット: agent.py(エージェントロジック)と app.py(それを公開する Web サーバー)を分離することでコードの見通しが良くなり、API にラップする前にターミナルで直接エージェントをテストできます。また、.env と venv/ を .gitignore に追加すれば、機密情報がリポジトリに混入するのを防げます。
# ステップ 4: コアとなるエージェントループの構築
これがプロジェクトの中核です。タスクを読み込み、ツールが必要かどうかを判断し、ツールを実行して結果を確認し、次の行動を決定するループ部分です。agent.py を開き、一つずつ組み立てていきましょう。
agent.py
from dotenv import load_dotenv
from langchain_anthropic import ChatAnthropic
from langchain_community.tools.tavily_search import TavilySearchResults
from langgraph.prebuilt import create_react_agent
.env ファイルから API キーを読み込む
load_dotenv()
モデルの初期化
一貫性のある正確な出力を得るため、温度パラメータは低く設定します。
model = ChatAnthropic(
model="claude-sonnet-4-6",
temperature=0.2,
max_tokens=1500,
)
検索ツールのセットアップ
max_results で検索結果のページ数を制限し、低品質な情報に埋もれないようにします。
search_tool = TavilySearchResults(max_results=5)
create_react_agent はモデルとツールを結合して動作ループを構築します。
モデルはタスクを読み取り、ツールの使用が必要か判断し、呼び出し、結果を確認して、回答に必要な情報を得るまでこれを繰り返します。
agent = create_react_agent(model, tools=[search_tool])
def run_research(topic: str) -> str:
"""トピック文字列を受け取り、エージェントが作成した最終的な要約文を返す関数です。"""
result = agent.invoke({
"messages": [
(
"system",
"あなたは研究アシスタントです。与えられたトピックについて、信頼性の高い最新情報を検索し、500 語以内の要約を作成してください。すべての事実上の主張には、直後にソースの URL を括弧で付記してください。情報源間で意見が分かれる場合は、その旨を明記してください。"
),
("user", topic),
]
})
# 返されたリスト内の最後のメッセージがエージェントの回答です
return result["messages"][-1].content
if __name__ == "__main__":
topic = input("何について調査しますか? ")
print(run_research(topic))
各行の役割を解説します。load_dotenv() は .env ファイルからキーを読み込み、機密情報がコード内に直接含まれないようにします。ChatAnthropic はモデルへの接続を設定し、低い温度設定により回答が創造的になりすぎず、正確性が重視される研究ツールとして適切に機能するように制御します。TavilySearchResults を使用することで、エージェントは既存の知識に頼るのではなく、実際にインターネット上の生データへアクセスできるようになります。
create_react_agent は、LangGraph が提供する便利な機能で、手動でグラフノードやエッジを記述することなく、推論と行動を繰り返す古典的なループ(ReAct:Reasoning and Acting の略)を構築できます。また、run_research 内のシステムメッセージも重要な役割を果たしており、エージェントが単に自信ありげな段落を返すのではなく、必ず出典を明記し、意見の相違がある場合はそれを指摘するよう強制しています。
ターミナルで python agent.py を実行し、トピックを入力すれば、リンク付きの簡易レポートが得られます。もし処理が止まったりエラーが出たりした場合は、.env ファイル内のキーが正しいか、そして仮想環境が正しくアクティブ化されているかを確認してください。
# ステップ 5:記憶機能と第二のツールの追加
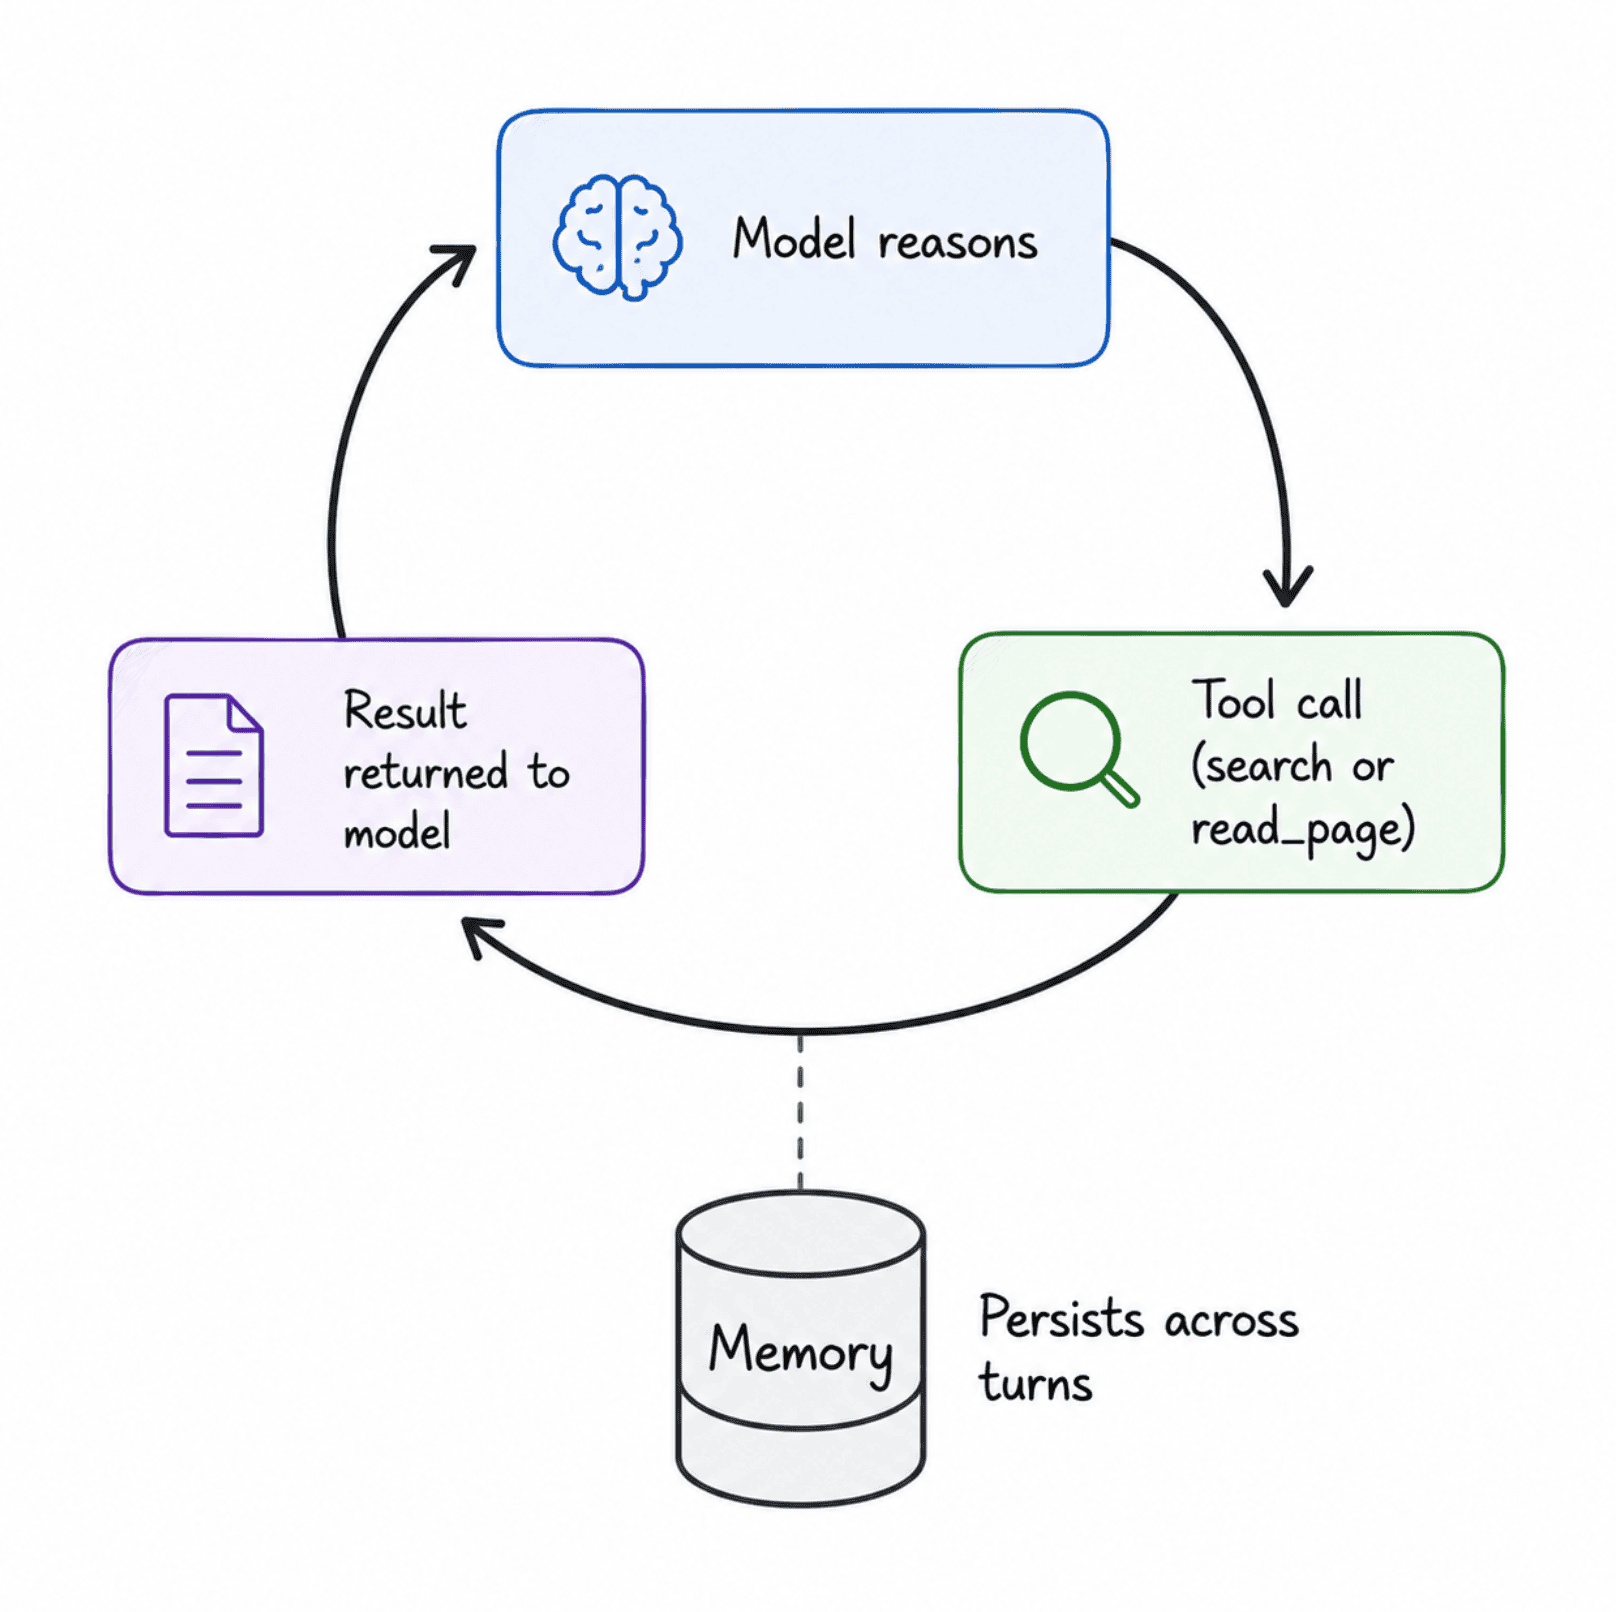
現状のエージェントは、タスク完了直後にすべての情報を忘却してしまいます。単発の質問であれば問題ありませんが、「ではそれを X と比較してほしい」といった続投質問には対応できず、機能が破綻してしまいます。
これを解決するために、会話履歴を保持する「記憶機能」を追加し、検索スニペットだけでは不十分な場合にフルページの内容を取得できる第二のツールを実装します。
agent.py (更新版)
from dotenv import load_dotenv
from langchain_anthropic import ChatAnthropic
from langchain_community.tools.tavily_search import TavilySearchResults
from langchain_community.document_loaders import WebBaseLoader
from langchain_core.tools import tool
from langgraph.prebuilt import create_react_agent
from langgraph.checkpoint.memory import MemorySaver
load_dotenv()
model = ChatAnthropic(model="claude-sonnet-4-6", temperature=0.2, max_tokens=1500)
search_tool = TavilySearchResults(max_results=5)
@tool
def read_page(url: str) -> str:
"""指定された URL の Web ページから読み取り可能なテキストを取得します。
検索結果のスニペットに詳細が不足している場合に使用してください。"""
try:
loader = WebBaseLoader(url)
docs = loader.load()
# 1 ページの長文でコンテキスト予算を圧迫しないよう、3000 文字以内にする
return docs[0].page_content[:3000]
except Exception as e:
return f"ページを読み込めませんでした: {e}"
システムプロンプトはエージェント自体に組み込みます。チェックポインタが履歴を保存している場合、
毎回プロンプトを送信するとスレッド内に同じ指示の重複コピーが蓄積されてしまいます。
SYSTEM_PROMPT = (
"あなたは研究アシスタントです。信頼性の高い最新情報を検索し、500 語以内で簡潔に記述してください。"
"すべての主張には、出典 URL を括弧付きで明記してください。事実確認のために検索スニペットが不十分な場合は、"
"read_page ツールを使用してください。"
)
MemorySaver checkpoints the conversation so the agent remembers
earlier turns within the same thread_id
memory = MemorySaver()
agent = create_react_agent(
model,
tools=[search_tool, read_page],
prompt=SYSTEM_PROMPT,
checkpointer=memory,
)
def run_research(topic: str, thread_id: str = "default") -> str:
"""thread_id lets you keep separate memory per user or session."""
config = {"configurable": {"thread_id": thread_id}}
result = agent.invoke({"messages": [("user", topic)]}, config=config)
return result["messages"][-1].content
if __name__ == "__main__":
thread = "cli-session-1"
while True:
topic = input("\nWhat should I research? (or 'quit') ")
if topic.lower() == "quit":
break
print(run_research(topic, thread_id=thread))
何が変わり、なぜそうなのか:WebBaseLoader はエージェントに「read_page」という2つ目のツールを提供します。これは検索結果の短いスニペットではなく、特定の URL の全文を取得するものです。
@tool デコレータは通常の Python 関数をエージェントが自律的に呼び出せるように変換します。また、関数定義直下のドキュストリング(docstring)は単なる注釈ではなく、モデルがそのツールをいつ使うべきかを判断するために実際に参照する情報です。
MemorySaver は LangGraph に組み込まれたチェックポインタで、これによりエージェントは会話の初期段階に戻ったりせず、同じ会話内での過去のやり取りを記憶できます。これがシステムプロンプトを run_research 関数からエージェント自体へ移動させた理由でもあります。メッセージリストに渡された内容は保存されるスレッドに書き込まれるため、毎回呼び出し時にシステムメッセージを送ると、自分自身のコピーが積み重なってしまいます。
thread_id は、ある会話の記憶と別の会話の記憶を区別する鍵です。つまり、複数のユーザーに対応する場合、各ユーザーはそれぞれ独立したスレッドを持ち、他の人のセッションに混入することはありません。
# Step 6: Adding Guardrails Before You Trust It
検索や読書ができるエージェントはリスクが低く、その結果に基づいて行動できるエージェントは全く別の話です。また、読み取り専用であっても、コストの管理、無限ループの防止、不適切な入力への対応といった境界線が必要です。多くのチュートリアルがこのステップを省略しているため、エージェントプロジェクトが本番環境に到達する前に立ち往生してしまう現実的な理由となっています。
agent.py (ガードレール追加)
ファイルの先頭に「import time」を追加してください
import time
MAX_TOPIC_LENGTH = 300
MAX_RETRIES = 2
RECURSION_LIMIT = 15
def validate_topic(topic: str) -> str:
"""モデルに到達する前に、空または不審な長さの入力を拒否します。"""
topic = topic.strip()
if not topic:
raise ValueError("トピックは空にできません。")
if len(topic) > MAX_TOPIC_LENGTH:
raise ValueError(f"トピックは {MAX_TOPIC_LENGTH} 文字以内に抑えてください。")
return topic
def run_research_safely(topic: str, thread_id: str = "default") -> str:
"""エージェント呼び出しを、入力検証、一時的な失敗時のリトライ、そして1回の不良実行が永遠にループしないための厳格な上限でラップします。"""
topic = validate_topic(topic)
for attempt in range(1, MAX_RETRIES + 1):
try:
# recursion_limit caps how many reasoning/tool-call steps
# the agent can take in a single run, preventing runaway loops
result = agent.invoke(
{"messages": [("user", topic)]},
config={
"configurable": {"thread_id": thread_id},
"recursion_limit": RECURSION_LIMIT,
},
)
return result["messages"][-1].content
except Exception as e:
if attempt == MAX_RETRIES:
return f"Research failed after {MAX_RETRIES} attempts: {e}"
time.sleep(2) # brief pause before retrying
このコードが果たす役割は、入力値が明らかに不適切な場合(空文字列や異常に長いテキストなど)をモデルに渡す前に検出し、無駄な API 呼び出しや混乱を招くエラーメッセージを防ぐことです。このブロックで最も重要な設定は recursion_limit です。これは1回の実行でエージェントが取れる推論やツール呼び出しのステップ数を制限し、役に立たない結果ばかり返ってくる検索が、気づかないうちに API バジェットを使い果たす無限ループに陥るのを防ぎます。
リトライループは、ネットワークの一時的な不具合やレート制限といった一般的な問題に対応します。潔く失敗する前に、もう一度挑戦する機会を与える仕組みです。また、このコードブロック内にはシステムプロンプトの記述がありません。これは、システムプロンプトが前のステップでエージェントに紐付けられており、すべての呼び出しに対して自動的に適用されるためです。
もしこのエージェントを、検索や読書以外のアクション(メール送信、投稿、共有ファイルへの書き込みなど)を実行できるように拡張する場合は、実行後に承認を追加するのではなく、実行前に人間による承認ステップを設けるべきです。読み取り専用の研究用エージェントであれば厳密にはそのゲートは不要ですが、次のよりリスクの高いプロジェクトでも自然にできるよう、ここで習慣化しておく価値があります。
ステップ 7: 実際の場所でデプロイする
ラップトップ上で動作するスクリプトだけでは、デプロイされたエージェントとは言えません。どこからでも呼び出せるようにするには、FastAPI で小さな API を作成し、Docker でコンテナ化して、Railway に展開します。CPU 負荷が高く GPU を必要としないこの種のワークロードには、Railway が最もシンプルな選択肢の一つです。
まずは API のラッパーから始めましょう。
app.py
from fastapi import FastAPI, HTTPException
from pydantic import BaseModel
from agent import run_research_safely
app = FastAPI(title="Research Agent API")
class ResearchRequest(BaseModel):
topic: str
thread_id: str = "default"
@app.get("/health")
def health_check():
"""ホスティングプラットフォームがサービスが生きていることを確認するための基本的な健康チェックです。"""
return {"status": "ok"}
@app.post("/research")
def research(request: ResearchRequest):
"""トピックを受け取り、エージェントが作成した要約を返します。"""
try:
brief = run_research_safely(request.topic, request.thread_id)
return {"topic": request.topic, "brief": brief}
except ValueError as e:
raise HTTPException(status_code=400, detail=str(e))
このコードの役割: FastAPI を使うと、Python の関数が HTTP エンドポイントに変換され、外部アプリケーションやフロントエンド、スクリプトから単純な POST リクエストで呼び出せるようになります。/health ルートは見た目以上に重要です。ホスティングプラットフォームはこのエンドポイントを定期的に確認してサービスが正常に稼働しているかをチェックします。このルートがないと、デプロイが遅かったりプロセスがクラッシュしたりしても、実際には停止しているのに「稼働中」と誤って表示されてしまいます。try/except ブロックは、入力エラーを分かりにくい 500 エラー(サーバー内部エラー)にするのではなく、適切な 400 エラー(不正なリクエスト)として返す役割を果たします。
次に必要な依存関係です。
requirements.txt
langgraph
langchain-anthropic
langchain-community
tavily-python
beautifulsoup4
python-dotenv
fastapi
uvicorn
そして、コンテナの設定は以下の通りです。
Dockerfile
FROM python:3.11-slim
WORKDIR /app
依存関係のインストールを先に実行し、Docker のキャッシュ層を作成します。
これにより、コードを変更しても再インストールが不要になります。
COPY requirements.txt .
RUN pip install --no-cache-dir -r requirements.txt
アプリケーションコードをコピーします
COPY . .
Railway などの主要なプラットフォームは、実行時に PORT 変数を自動で注入します。
そのためここではその値を読み込み、ローカル環境ではデフォルトの 8000 を使用します。
EXPOSE 8000
CMD ["sh", "-c", "uvicorn app:app --host 0.0.0.0 --port ${PORT:-8000}"]
この仕組みの役割: requirements.txt をコピーして依存関係をインストールした後に、残りのコードをコピーするという手順は、ビルド時間の短縮に役立つちょっとした工夫です。Docker はそのファイルが変更された場合のみ依存関係の再インストールを行いますが、Python の1行を編集するたびに再インストールするわけではありません。uvicorn コマンドは、コンテナ内で実際に FastAPI サーバーを起動し、すべてのネットワークインターフェースでリスニングすることで、ホスティングプラットフォームがトラフィックをルーティングできるようにします。また、ポート番号は環境変数から読み取るため、ローカル環境でも、ホスト側で自動的に割り当てられた環境でも動作します。.dockerignore ファイルに .env と venv/ を追加して、COPY . . コマンドで機密情報がイメージに埋め込まれてしまうのを防ぎましょう。
ここから Railway へのデプロイは、このリポジトリを GitHub にプッシュし、Railway のダッシュボードで接続し、プロジェクト設定の環境変数として2つの API キーを追加するだけで完了します。コード内に直接記述する必要はありません。Railway は Dockerfile を自動的に検出してビルドし、公開 URL を発行してくれます。これは現在、エージェントオーケストレーション層に対して推奨されるパターンに合致しています。具体的には、この種のワークロードは GPU 推論ではなく CPU 集約型の Python プロセスであるため、GPU インフラの費用負担や管理が不要だからです。もし将来的にエージェントが独自のモデル重みを実行したり、より重い計算処理が必要になったりする場合、Modal が次の自然な選択肢となりますが、ツール呼び出しを行うようなこの種のエージェントであれば、シンプルなコンテナホスティングで十分です。
デプロイが完了したら、どこからでもエージェントを呼び出すには以下のようになります:
curl -X POST https://your-app.up.railway.app/research \
-H "Content-Type: application/json" \
-d '{"topic": "current trends in solid-state batteries"}'
この単一のリクエストこそ、直後の6つのステップが示す核心です。トピックを入力すると、実際の HTTP リクエストがトリガーとなってエージェントループが動き出し、信頼できる情報源から得た要約が返ってきます。これらはすべて、ターミナルウィンドウで手動監視する必要のないインフラ上で動作します。
まとめ
これで、検索・読解・記憶・失敗モードの防止・そしてローカルターミナルではなく実際の URL に対して応答するエージェントが完成しました。これは多くの最初のプロジェクトよりも一歩進んだ成果です。他者がデモでつまずいているのとこの実装との差は、ほとんどがチュートリアルで省略されがちな「ガードレール(安全装置)」と「デプロイ作業」にあります。
次の合理的なステップとしては、サードパーティのツールを追加することです。例えば、要約を単に返すだけでなくデータベースへ保存する機能などです。あるいは、より大規模なマルチエージェントシステムに移行する場合は、CrewAI のプロトタイプが LangGraph コアの前段として配置され、高速な反復が必要な部分を担う方法を検討してもよいでしょう。いずれにせよ、最も難しい部分はすでにクリアしました。他者が実際に使えるものが動いているのです。
Shittu Olumide 氏は、ソフトウェアエンジニアであり技術ライターです。最先端の技術を駆使して魅力的な物語を紡ぐことに情熱を注いでおり、細部へのこだわりと複雑な概念をわかりやすく説明する能力に長けています。Twitter では Shittu_Olumide_ のアカウントでも活動しています。
原文を表示
**
# Introduction
Most people's first AI agent never leaves their laptop. It runs once in a terminal, prints a decent answer, and then sits there because nobody wrote the fifteen lines of glue code needed to turn a script into something other people, or other systems, can actually call. That gap between "*it worked when I ran it*" and "*it's live, and someone else is using it*" is where most agent projects quietly die.
The numbers back this up. Close to 79% of companies say they've adopted AI agents in some form, but only about 11% have anything running in production, according to a 2026 statistics roundup that pulls from Gartner, McKinsey, and IDC data. That's not a small gap. It's the difference between a demo and a product, and it's almost never caused by the model being too weak. It's caused by nobody scoping the job properly, nobody handling failure, or nobody bothering to containerize the thing and put it somewhere with a URL.
This article closes that gap for one specific project. By the end, you'll have built and deployed a research agent: you give it a topic, it searches the web, pulls sources, and hands back a short written brief with links attached. It's complex enough to need real tool use, memory, and guardrails, but small enough that you can build the whole thing in one sitting. Every code block below is complete and commented, and every one is followed by a plain explanation of what it's doing and why.
One note before we start: we're building this with LangGraph rather than CrewAI** or a vendor-locked software development kit (SDK). CrewAI gets you to a working prototype faster, but LangGraph has become the closest thing to a production default for stateful agents in 2026, with built-in checkpointing and a graph model that scales past a single afternoon project without a rewrite. If you'd rather prototype in CrewAI, the concepts in steps 1, 2, 6, and 7 transfer directly; only the code in steps 4 and 5 would look different.
# Step 1: Deciding What Your Agent Actually Needs to Do (and What It Shouldn't)
**
Before opening an editor, write down three things: the one job the agent does, what a successful output looks like, and what it's never allowed to do without a human checking first.
For our research agent, that looks like this:
The job**: take a topic as input, run web searches, read the results, and produce a written brief with a summary and a list of sources.
Success looks like: a coherent, factually grounded brief under 500 words, with every claim traceable to a source URL.
The hard boundary: it can search and read freely, but it never posts anything, sends anything, or writes to a file outside its own workspace without a person approving it first.
That third point matters more than it sounds. Skipping this step is a big part of why Gartner expects more than 40% of agentic AI projects to be canceled by the end of 2027, usually because nobody defined the boundaries early enough and the project either did too little to be useful or too much to be trusted.
**
Write your own version of these three sentences for whatever you build after this tutorial. It takes five minutes and saves you from redesigning the whole thing halfway through.
# Step 2: Picking Your Model and Framework
You need two decisions here: which model does the reasoning, and which framework manages the loop of thinking, acting, and checking the result.
For the model, any current frontier model with solid tool use qualifies: Claude, GPT, and Gemini all work here. We'll use Claude in the code below because its tool-calling has been consistently reliable for multi-step tasks, but swapping in another provider only changes one line.
For the framework, here's where things stand heading into the second half of 2026, based on a comparison of production agent frameworks and a separate framework decision guide:
- LangGraph models your agent as nodes and edges in a graph, with built-in checkpointing so a crashed run can pick back up instead of restarting. It has crossed 38 million monthly PyPI downloads and is what companies like Klarna, Uber, and LinkedIn run in production. The tradeoff is a steeper learning curve, usually a week or two before it clicks.
- CrewAI models agents as a "crew" with roles and goals, and you can have something working in under 20 lines of code. It's the fastest way to validate an idea, and it has picked up over 44,000 GitHub stars, but it hands you less control once a workflow gets complicated, and teams commonly outgrow it and migrate to LangGraph.
- AutoGen, once a default choice for multi-agent conversation patterns, is worth mentioning only to steer you away from it for new projects. Microsoft has moved it into maintenance mode and shifted development to the unified Microsoft Agent Framework, so it's not where you want to build something new in 2026.
- Vendor SDKs like the OpenAI Agents SDK or Anthropic's Claude Agent SDK are worth a look if you're fully committed to one provider and want the least amount of framework overhead, but they lock you to that vendor's models.
We're using LangGraph for this build because a research agent benefits from the checkpointing (a search that times out shouldn't mean starting over), and because it's the version of this skill that transfers most directly to a real production job.
# Step 3: Setting Up the Project
Create a folder, a virtual environment, and install what you need.
# Create and enter the project folder
mkdir research-agent && cd research-agent

# Create a virtual environment so dependencies stay isolated
python3 -m venv venv
source venv/bin/activate   # on Windows use: venv\Scripts\activate

# Install the core libraries:
# langgraph - the agent orchestration framework
# langchain-anthropic - lets LangGraph call Claude models
# langchain-community - gives us the Tavily search tool and the page loader
# beautifulsoup4 - the HTML parser the page loader depends on
# python-dotenv - loads API keys from a .env file instead of hardcoding them
pip install langgraph langchain-anthropic langchain-community python-dotenv tavily-python beautifulsoup4
What this does**: the virtual environment keeps this project's packages separate from anything else on your machine, which avoids the classic problem of one project's dependency update silently breaking another. The packages we install cover orchestration (langgraph), the model connection (langchain-anthropic), a ready-made web search tool and page loader (langchain-community plus tavily-python and beautifulsoup4), and safe key management (python-dotenv).
Next, create a .env file in the project root to hold your keys. You'll need an Anthropic API key from the Anthropic Console and a search API key from Tavily, which offers a free tier that's more than enough for this tutorial.
# .env file, never commit this to version control
ANTHROPIC_API_KEY=your-anthropic-key-here
TAVILY_API_KEY=your-tavily-key-here
Finally, set up the folder structure:
research-agent/
├── venv/
├── .env
├── .gitignore
├── agent.py
├── app.py
├── requirements.txt
└── Dockerfile
What this does: separating agent.py (the agent logic) from app.py (the web server that exposes it) keeps the code readable and means you can test the agent directly in a terminal before wrapping it in an API. Add .env and venv/ to your .gitignore so your keys never end up in a repository.
# Step 4: Building the Core Agent Loop
**
This is the heart of the project: the loop where the agent reads the task, decides whether it needs a tool, calls that tool, reads the result, and decides what to do next. Open agent.py and build it piece by piece.
# agent.py
from dotenv import load_dotenv
from langchain_anthropic import ChatAnthropic
from langchain_community.tools.tavily_search import TavilySearchResults
from langgraph.prebuilt import create_react_agent

# Load API keys from the .env file
load_dotenv()

# Initialize the model. Temperature is kept low because we want
# consistent, grounded output rather than creative variation.
model = ChatAnthropic(
    model="claude-sonnet-4-6",
    temperature=0.2,
    max_tokens=1500,
)

# Set up the search tool. max_results caps how many pages come back
# per search so the agent doesn't drown in low-quality results.
search_tool = TavilySearchResults(max_results=5)

# create_react_agent wires the model and tools into a working loop:
# the model reads the task, decides if it needs the tool, calls it,
# reads the result, and repeats until it has enough to answer.
agent = create_react_agent(model, tools=[search_tool])

def run_research(topic: str) -> str:
    """Takes a topic string and returns the agent's final written brief."""
    result = agent.invoke({
        "messages": [
            (
                "system",
                "You are a research assistant. When given a topic, search "
                "for current, credible information and write a brief under "
                "500 words. Every factual claim must be followed by the "
                "source URL in parentheses. If sources disagree, say so."
            ),
            ("user", topic),
        ]
    })
    # The final message in the returned list is the agent's answer
    return result["messages"][-1].content

if __name__ == "__main__":
    topic = input("What should I research? ")
    print(run_research(topic))
What this does, line by line**: load_dotenv() reads your keys from the .env file, so nothing sensitive lives in the code itself. ChatAnthropic sets up the connection to the model, and the low temperature keeps answers grounded rather than inventive, which matters for a research tool where accuracy counts more than variety. TavilySearchResults gives the agent an actual way to reach the live internet instead of relying only on what the model already knows. create_react_agent is LangGraph's shortcut for building the classic reasoning loop (often called ReAct, short for reasoning and acting) without you having to write the graph nodes and edges by hand. The system message inside run_research is doing real work too: it's what forces the agent to cite sources and flag disagreement rather than just handing back a confident-sounding paragraph.
Run it from the terminal with python agent.py, give it a topic, and you should get a short brief with links. If it hangs or errors out, check that both keys in your .env file are correct and that you're in the activated virtual environment.
# Step 5: Giving It Memory and a Second Tool
**
Right now, the agent forgets everything the moment it finishes. That's fine for a single question, but it falls apart the moment someone asks a follow-up like "*now compare that to X*." We'll fix that by adding conversation memory, and we'll add a second tool so the agent can pull a full page's content when a search snippet isn't enough detail.
# agent.py (updated)
from dotenv import load_dotenv
from langchain_anthropic import ChatAnthropic
from langchain_community.tools.tavily_search import TavilySearchResults
from langchain_community.document_loaders import WebBaseLoader
from langchain_core.tools import tool
from langgraph.prebuilt import create_react_agent
from langgraph.checkpoint.memory import MemorySaver

load_dotenv()

model = ChatAnthropic(model="claude-sonnet-4-6", temperature=0.2, max_tokens=1500)
search_tool = TavilySearchResults(max_results=5)

@tool
def read_page(url: str) -> str:
    """Fetches the readable text of a single web page, given its URL.
    Use this when a search result snippet doesn't have enough detail."""
    try:
        loader = WebBaseLoader(url)
        docs = loader.load()
        # Trim to 3000 characters so one long page doesn't eat the context budget
        return docs[0].page_content[:3000]
    except Exception as e:
        return f"Could not load that page: {e}"

# The system prompt now lives on the agent itself. Once a checkpointer is
# saving history, re-sending it with every call would stack up duplicate
# copies of the same instructions inside the thread.
SYSTEM_PROMPT = (
    "You are a research assistant. Search for current, credible "
    "information and write a brief under 500 words. Cite every claim "
    "with the source URL in parentheses. Use the read_page tool when a "
    "search snippet is too thin to confirm a fact."
)

# MemorySaver checkpoints the conversation so the agent remembers
# earlier turns within the same thread_id
memory = MemorySaver()

agent = create_react_agent(
    model,
    tools=[search_tool, read_page],
    prompt=SYSTEM_PROMPT,
    checkpointer=memory,
)

def run_research(topic: str, thread_id: str = "default") -> str:
    """thread_id lets you keep separate memory per user or session."""
    config = {"configurable": {"thread_id": thread_id}}
    result = agent.invoke({"messages": [("user", topic)]}, config=config)
    return result["messages"][-1].content

if __name__ == "__main__":
    thread = "cli-session-1"
    while True:
        topic = input("\nWhat should I research? (or 'quit') ")
        if topic.lower() == "quit":
            break
        print(run_research(topic, thread_id=thread))
What changed and why**: WebBaseLoader gives the agent a second tool, read_page, that fetches the full text of a specific URL rather than the short snippet a search returns. The @tool decorator is what turns a normal Python function into something the agent can call on its own, and the docstring right under the function definition isn't just documentation; the model actually reads it to decide when the tool is useful. MemorySaver is LangGraph's built-in checkpointer, and it's what lets the agent recall earlier turns in the same conversation instead of treating every message as a fresh start. That's also why the system prompt moved out of run_research and onto the agent itself — anything you pass in the messages list gets written into the saved thread, so a system message sent on every call would pile up copies of itself. The thread_id is the key that separates one conversation's memory from another's, so if you were serving multiple users, each one would get their own thread rather than bleeding into someone else's session.
**
# Step 6: Adding Guardrails Before You Trust It
An agent that can search and read is low risk. An agent that can act on what it finds is a different conversation entirely, and even a read-only agent needs boundaries around cost, runaway loops, and bad input. This is the step most tutorials skip, and it's a real reason so many agent projects stall before reaching production.
# agent.py (guardrails added)
# add "import time" to the imports at the top of the file
import time

MAX_TOPIC_LENGTH = 300
MAX_RETRIES = 2
RECURSION_LIMIT = 15

def validate_topic(topic: str) -> str:
    """Rejects empty or suspiciously long input before it reaches the model."""
    topic = topic.strip()
    if not topic:
        raise ValueError("Topic can't be empty.")
    if len(topic) > MAX_TOPIC_LENGTH:
        raise ValueError(f"Keep the topic under {MAX_TOPIC_LENGTH} characters.")
    return topic

def run_research_safely(topic: str, thread_id: str = "default") -> str:
    """Wraps the agent call with input validation, a retry on transient
    failures, and a hard cap so one bad run can't loop forever."""
    topic = validate_topic(topic)

    for attempt in range(1, MAX_RETRIES + 1):
        try:
            # recursion_limit caps how many reasoning/tool-call steps
            # the agent can take in a single run, preventing runaway loops
            result = agent.invoke(
                {"messages": [("user", topic)]},
                config={
                    "configurable": {"thread_id": thread_id},
                    "recursion_limit": RECURSION_LIMIT,
                },
            )
            return result["messages"][-1].content
        except Exception as e:
            if attempt == MAX_RETRIES:
                return f"Research failed after {MAX_RETRIES} attempts: {e}"
            time.sleep(2)  # brief pause before retrying
What this does**: validate_topic catches obviously bad input — empty strings or absurdly long text — before it ever reaches the model, which saves an API call and a confusing error message. recursion_limit is the single most important setting in this block: it caps how many steps the agent can take in one run, so a search that keeps returning unhelpful results can't turn into an infinite loop that quietly burns through your API budget. The retry loop handles the ordinary case of a network blip or a rate limit, giving it one more chance before giving up cleanly instead of crashing. Notice that the system prompt doesn't appear here at all, because it's attached to the agent from the previous step and applies to every call automatically.
If you ever extend this agent to take actions beyond searching and reading (sending an email, posting somewhere, writing to a shared file), that's the point where you add a human approval step before the action executes, not after. A read-only research agent doesn't strictly need that gate, but it's worth building the habit here so it's second nature on your next, riskier project.
# Step 7: Deploying It Somewhere Real
**
A working script on your laptop isn't a deployed agent. To make this callable from anywhere, we'll wrap it in a small API with FastAPI, containerize it with Docker, and ship it to Railway**, which is one of the more straightforward paths for exactly this kind of CPU-bound, non-GPU agent workload.
First, the API wrapper:
# app.py
from fastapi import FastAPI, HTTPException
from pydantic import BaseModel
from agent import run_research_safely

app = FastAPI(title="Research Agent API")

class ResearchRequest(BaseModel):
    topic: str
    thread_id: str = "default"

@app.get("/health")
def health_check():
    """Basic health check so the hosting platform knows the service is alive."""
    return {"status": "ok"}

@app.post("/research")
def research(request: ResearchRequest):
    """Accepts a topic and returns the agent's written brief."""
    try:
        brief = run_research_safely(request.topic, request.thread_id)
        return {"topic": request.topic, "brief": brief}
    except ValueError as e:
        raise HTTPException(status_code=400, detail=str(e))
What this does: FastAPI turns your Python function into an HTTP endpoint that any application, front-end, or script can call with a simple POST request. The /health route matters more than it looks like it should: hosting platforms ping this endpoint to check the service is actually alive, and without it, a slow deploy or a crashed process can look "up" when it isn't. The try/except block converts a bad input into a proper 400 error response instead of a confusing 500 crash.
Now the dependencies:
# requirements.txt
langgraph
langchain-anthropic
langchain-community
tavily-python
beautifulsoup4
python-dotenv
fastapi
uvicorn
And the container:
# Dockerfile
FROM python:3.11-slim

WORKDIR /app

# Install dependencies first so Docker can cache this layer
# and skip reinstalling on every code change
COPY requirements.txt .
RUN pip install --no-cache-dir -r requirements.txt

# Copy the application code
COPY . .

# Railway and most platforms inject a PORT variable at runtime, so read it
# here and fall back to 8000 when you run the container locally
EXPOSE 8000
CMD ["sh", "-c", "uvicorn app:app --host 0.0.0.0 --port ${PORT:-8000}"]
What this does: copying requirements.txt and installing it before copying the rest of the code is a small trick that speeds up rebuilds. Docker only reinstalls dependencies when that file changes, not every time you edit a line of Python. The uvicorn command is what actually starts the FastAPI server inside the container, listening on all network interfaces so the hosting platform can route traffic to it, and reading the port from the environment so it works both locally and on a host that assigns one for you. Add a .dockerignore containing .env and venv/ as well, so COPY . . doesn't bake your keys into the image.
Deploying to Railway from here is a matter of pushing this repository to GitHub, connecting it in the Railway dashboard, and adding your two API keys as environment variables in the project settings rather than in the code. Railway detects the Dockerfile automatically, builds it, and gives you a public URL. This fits the pattern most current guides recommend for agent orchestration layers, specifically because this kind of workload is CPU-bound Python rather than GPU inference, so you don't need to pay for or manage GPU infrastructure at all. If your agent later needs to run its own model weights or heavier compute, Modal is the natural next stop, but for a tool-calling agent like this one, a straightforward container host is enough.
Once it's live, calling your agent from anywhere looks like this:
curl -X POST https://your-app.up.railway.app/research \
  -H "Content-Type: application/json" \
  -d '{"topic": "current trends in solid-state batteries"}'
That single request is the whole point of the last six steps: a topic goes in, a real HTTP call triggers the agent loop, and a sourced brief comes back, running on infrastructure you don't have to babysit from a terminal window.
# Wrapping Up
**
You now have an agent that searches, reads, remembers, guards against its own failure modes, and answers to a real URL instead of a local terminal. That's further than most first agent projects get, and the gap between this and the demos everyone else is stuck on is almost entirely the guardrails and deployment work most tutorials skip.
From here, the next reasonable step is adding a third tool (maybe a way to save briefs to a database instead of just returning them), or, if you move on to a bigger multi-agent system, looking at how a CrewAI prototype could sit in front of the same LangGraph core for the parts that need faster iteration. Either way, you've already done the hard part; you have something running that other people can actually use.
Shittu Olumide** is a software engineer and technical writer passionate about leveraging cutting-edge technologies to craft compelling narratives, with a keen eye for detail and a knack for simplifying complex concepts. You can also find Shittu on Twitter.
AI算出
技術分析ainew評価標準
記事は AI エージェントの実装という明確な主題を持ち、特定のツール(LangGraph)を用いた実践的なアプローチを提供しているが、これは既存の技術概念の体系化であり世界初の発表ではないため新規性は低められる。また、日本語訳された海外の技術ガイドであり、日本固有の事例や規制情報はないため日本の関連性は限定的である。
6つの評価軸を見る
- AI関連度
- 75
- 情報源の信頼性
- 50
- 新規性
- 25
- 調べる価値
- 50
- 重複の少なさ
- 100
- 日本での有用性
- 25
関連記事
今日のまとめ
AIデイリーブリーフで今日の重要ニュースをまとめ読み