llama.cpp、DFlash、Pi でローカル環境の Muse Glimmer を実行しコーディング体験を向上
本文の状態
日本語全文を表示中
詳細モードで約8分の本文を読めます。
同じ出来事の情報源
この情報源を基点に整理
KDnuggets
Muse Glimmer は Qwen の 27B クラスモデルと比較され、特にローカルでのコーディングやエージェントワークフローにおいて多くの場合で優れたパフォーマンスを発揮しているとされている。
AI深層分析を開く2026年8月21日 23:19
AI深層分析
キーポイント
Muse Glimmer の性能と評価
Muse Glimmer は Qwen の 27B クラスモデルと比較され、特にローカルでのコーディングやエージェントワークフローにおいて多くの場合で優れたパフォーマンスを発揮しているとされている。
必要なコンポーネントの準備
Hugging Face から Muse Glimmer のメインモデル(16.8 GB)と DFlash ドラフター(1.63 GB)をダウンロードし、Hugging Face CLI をインストールして認証を行う手順が示されている。
llama.cpp の構築と実行
CUDA サポート付きで llama.cpp をビルド・インストールし、DFlash ドラフターを併用して Muse Glimmer をローカルサーバーとして起動する具体的なコマンドが記載されている。
Pi による統合と活用
llama.cpp で稼働させたモデルを Pi に接続することで、ターミナルから直接プロジェクトの構築、テスト、デバッグを行うローカル・バイブコーディング環境が実現可能であると説明されている。
DFlashによる推論速度の向上
llama.cpp はメインモデルと DFlash ドラフターを GPU に読み込み、スペキュレーティブ・デコーディングを使用して生成速度を改善する。
重要な引用
Muse Glimmer is gaining attention in the local AI community and is being compared with Qwen's 27B-class models.
It will be able to build, test, and debug a project directly from the terminal.
llama.cpp loads the main model and the separate DFlash drafter onto the GPU, using speculative decoding to improve generation speed.
During longer coding tasks, I saw speeds reach around 127 tokens/second, making the model feel much faster for agentic coding workflows.
編集コメントを表示
編集コメント
ローカル環境での高性能 AI モデル実行を可能にする具体的な技術スタックと手順が示されており、開発現場の実用性を高める内容である。Muse Glimmer が Qwen と比較される点は、オープンソースモデルの競争力強化を示唆する重要な指標と言える。
Source Article
元記事を日本語で読む
本文に関係しない購読案内、埋め込み通知、サイト内プロモーションは除いています。

ローカル AI コミュニティで注目を集めている「Muse Glimmer」は、Qwen の 27B クラスのモデルと比較されることもありますが、多くの場合でより高い性能を発揮しています。特にローカル環境でのコーディングやエージェントワークフローにおいては、その差が顕著です。
メタ(Meta)社はオープンソースモデル分野で強固な地位を築いていますが、このように数回の改良を重ねることで、同様のモデルはプロプライエタリ(独自開発)システムと互角に戦えるようになるでしょう。AI 愛好家として、このような高性能な AI をローカル環境で動かせることは非常に興奮する出来事です。
本ガイドでは、llama.cpp で Muse Glimmer を実行し、DFlash で高速化を図り、さらに Pi と接続してローカルでの「バイブコーディング(直感的な開発体験)」を実現します。これにより、ターミナルから直接プロジェクトの構築、テスト、デバッグが可能になります。
1. Muse Glimmer のダウンロード
まず、Hugging Face からメインとなる Muse Glimmer モデルと、DFlash ドラフターの両方をダウンロードしましょう。
Hugging Face CLI をインストールします:
curl -LsSf https://hf.co/cli/install.sh | bash
echo 'export PATH="/root/.local/bin:$PATH"' >> ~/.bashrc
source ~/.bashrc
ログインを行います:
hf auth loginモデル用のディレクトリを作成します:
mkdir -p /workspace/muse-glimmer16.8 GB のメインモデルをダウンロードします:
hf download meta-models/Muse-Glimmer-30B-GGUF \
  muse-glimmer-30B-kquant-17gb.gguf \
  --local-dir /workspace/muse-glimmer
1.63 GB の DFlash ドラフターもダウンロードします:
hf download meta-models/Muse-Glimmer-30B-GGUF \
  dflash-kquant.gguf \
  --local-dir /workspace/muse-glimmer
両方のファイルは /workspace/muse-glimmer ディレクトリに保存されます。
2. llama.cpp のインストールと実行
次に、CUDA サポート付きで llama.cpp をインストールし、DFlash ドラフターを活用して Muse Glimmer をサーバーとして起動します。
llama.cpp をインストール・ビルドします:
cd /workspace

git clone https://github.com/ggml-org/llama.cpp.git
cd llama.cpp
git pull origin master
cmake -B build -DGGML_CUDA=ON -DCMAKE_BUILD_TYPE=Release
cmake --build build --config Release -j$(nproc)
ln -sf "$(pwd)/build/bin/llama-server" /root/.local/bin/llama-server
インストールの確認:
git pull origin master
cmake -B build -DGGML_CUDA=ON -DCMAKE_BUILD_TYPE=Release
cmake --build build --config Release -j$(nproc)
ln -sf "$(pwd)/build/bin/llama-server" /root/.local/bin/llama-server
インストールされた llama.cpp のバージョンとビルド情報が表示されるはずです。
次に、DFlash による推測型デコーディングを使用して Muse Glimmer を起動します:
llama-server \
  -m /workspace/muse-glimmer/muse-glimmer-30B-kquant-17gb.gguf \
  -md /workspace/muse-glimmer/dflash-kquant.gguf \
  --spec-type draft-dflash \
  --spec-draft-n-max 15 \
  -ngl all \
  --spec-draft-ngl all \
  -fa on \
  --ctx-size 16384 \
  --alias muse \
  --host 0.0.0.0 \
  --port 8080 \
  --jinja
ここでは、llama.cpp がメインモデルと別個の DFlash ドラフターを GPU に読み込み、推測型デコーディングによって生成速度を向上させています。
3. Muse Glimmer のテスト
サーバーが起動したら、組み込みのllama.cpp Web UIを通じて Muse Glimmer を直接テストできます。
以下を開いてください:
http://localhost:8080/私の初期テストでは、1 秒あたり約 46 トークンという速度が出ました。これはすでに非常に良好な数値です。
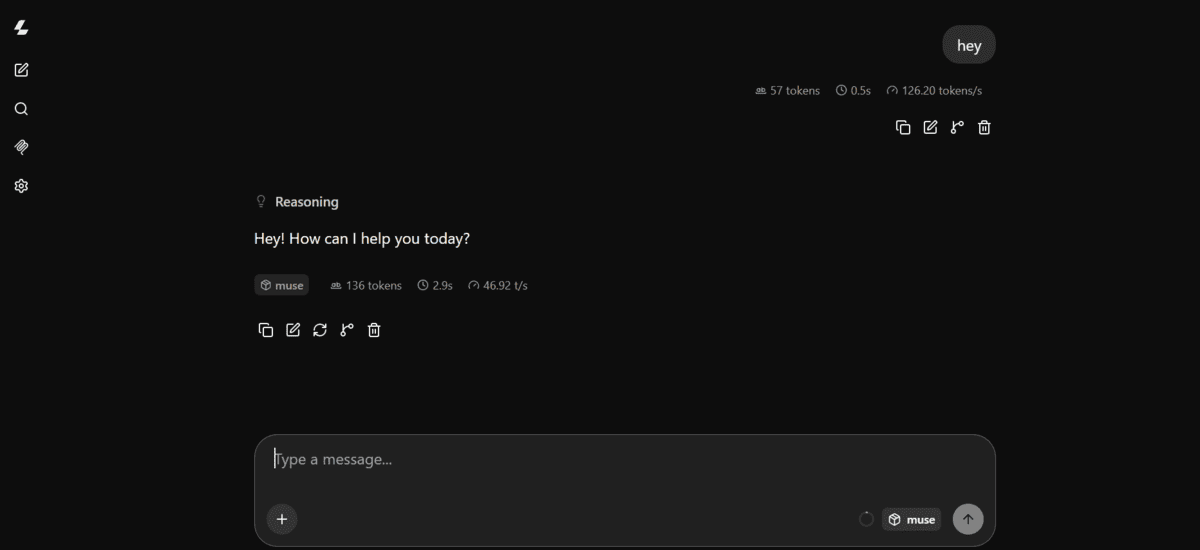
より長いコーディングタスクでは、速度が1 秒あたり約 127 トークンに達することもあり、エージェント型コーディングワークフローにおいてモデルの応答性が格段に向上したように感じられました。

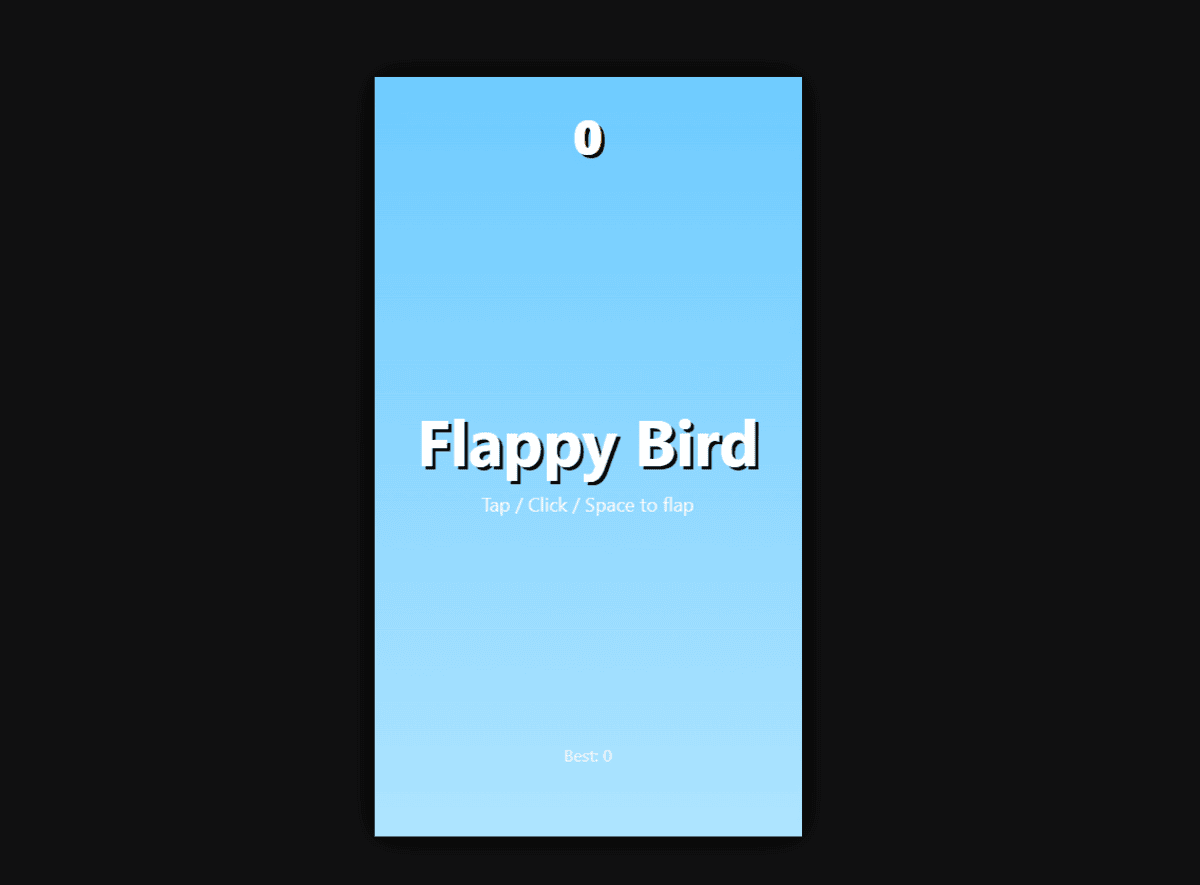
ただし、結果は賛否両論でした。Muse Glimmer は HTML ゲームを生成しましたが、その動作は必ずしも良好ではありませんでした。この種のタスクにおいては、Qwen3.8-27Bの方が、動作する HTML アプリやゲームの作成において明らかに優れていると感じました。
4. Pi コーディングエージェントのインストール
次に、Pi をインストールして、Muse Glimmer を実行している llama.cpp サーバーに接続します。
Pi のインストール:
curl -fsSL https://pi.dev/install.sh | shその後、Hugging Face 製の llama.cpp 拡張機能をインストールしてください。
pi install git:github.com/huggingface/pi-llamaインストールが完了したらターミナルを再起動してください。
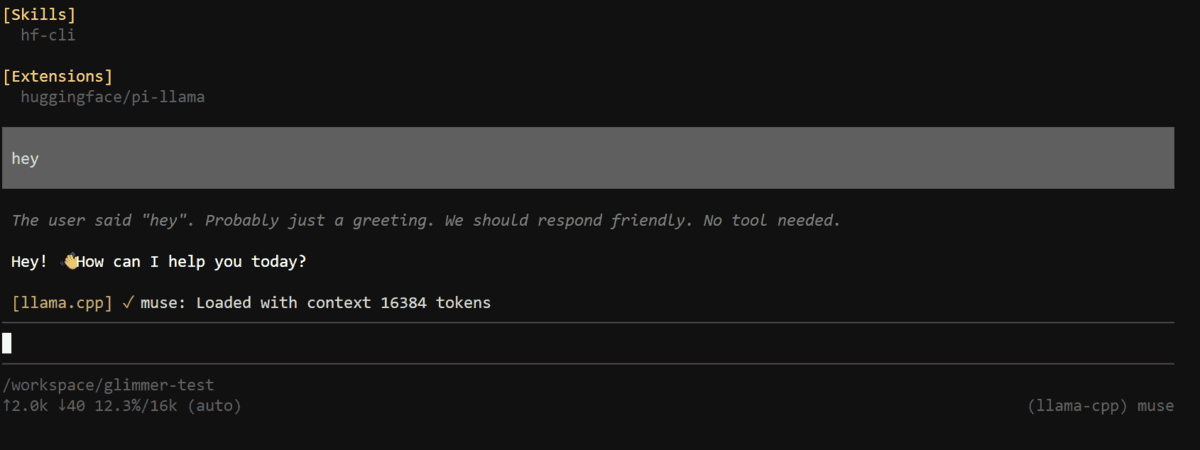
pi-llama 拡張機能は自動的に以下に接続します。
http://localhost:8080/v1llama.cpp が提供しているモデルを自動検出するため、手動で models.json を設定する必要はありません。
5. ローカルでのコーディング開始
プロジェクトを作成し、Pi 内で Muse Glimmer をモデルとして選択しましょう。
空のプロジェクトを作成します:
mkdir -p /workspace/glimmer-test
cd /workspace/glimmer-test
Pi を起動します:
piPi の内部で以下を実行してください:
/model検索対象:
llama-cppその後、選択を行います:
muse
これで、Muse Glimmer が Pi の llama-cpp プロバイダーを通じて利用可能になります。
6. コーディングエージェントとしての Muse Glimmer のテスト
最後に、Muse Glimmer に完全なコーディングタスクを与え、プロジェクトの構築、テスト、デバッグを自身に行わせてみましょう。
私が使用したプロンプトは以下の通りです:
FastAPI を使ってゼロから完全な Python によるタスク管理 API を構築しましょう。要件は以下の通りです。
- クリーンなプロジェクト構造を作成する
- タスクの作成、一覧表示、更新、削除を行うエンドポイントを追加する
- データ永続化には SQLite を使用する
- 入力値の検証とエラーハンドリングを実装する
- すべてのエンドポイントに対して pytest テストを追加する
- requirements.txt と README.md を作成する
- 実際にテストを実行し、エラーがあれば修正してすべてがパスするまで再実行する
ファイルの作成やコマンドの実行を私に依頼しないでください。プロジェクト全体を自分で構築・テストしてください。
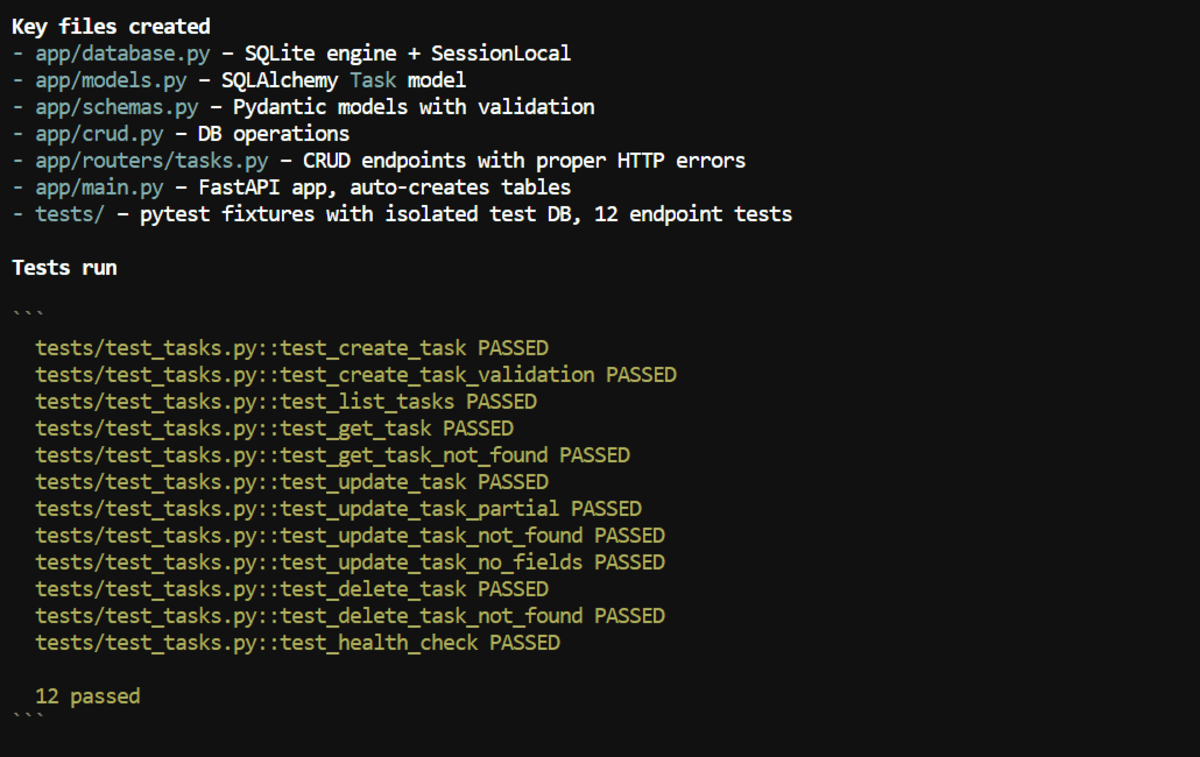
Muse Glimmer は、わずか 2 分ほどでプロジェクトを構築しました。
ローカル環境で動作を確認するには、以下のコマンドを実行してください。
pip install -r requirements.txt
uvicorn app.main:app --reload
API ドキュメントは以下で開いてください。
http://localhost:8000/docs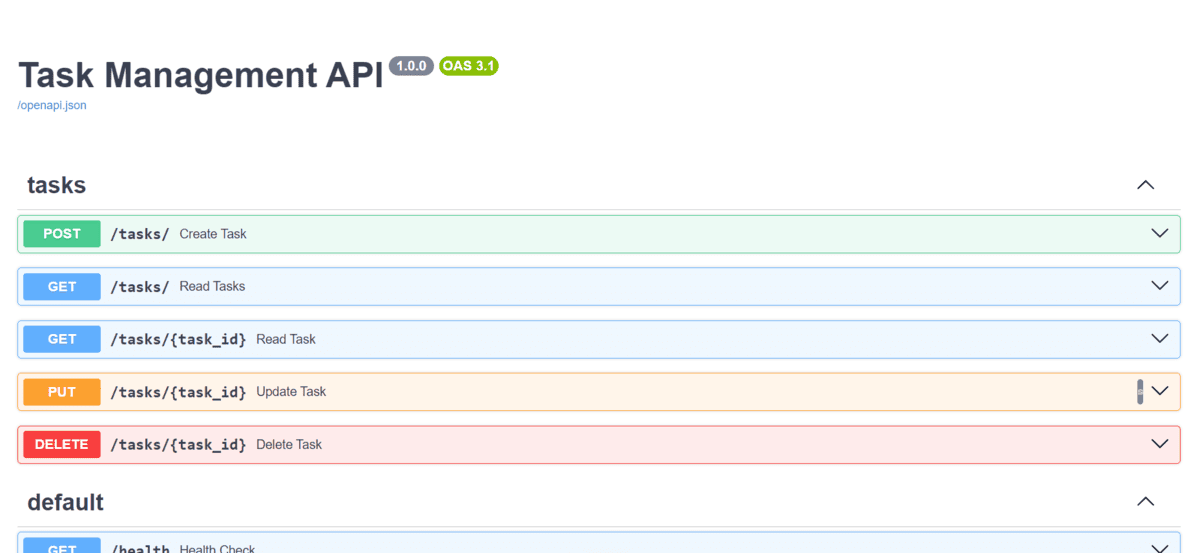
各エンドポイントを一つずつ手動でテストするのではなく、Muse Glimmer に API 全体を自動で検証させ、最終的なレポートも取得しました。

ローカル環境でのエージェント型コーディングにおいて、Muse Glimmer が最も印象に残ったのはその速度と多段階タスクへの対応力です。デバッグ中に問題を特定して修正するまでにも数秒しかかかりませんでした。
総括
Muse Glimmer は、メタが公式モデルファイルと推奨設定を提供したことで、ローカル AI コーディングがどれほど進化を遂げたかを示す良い指標となっています。私にとって、セットアップも使い始めも非常に簡単でした。
まだ改善の余地はありますが、Muse Glimmer や llama.cpp、DFlash、そして周辺ツールが成熟するにつれて、ローカル環境での結果や速度、エージェント型コーディングのパフォーマンスはさらに向上すると期待しています。
RTX 3090、4090、5090 をお持ちであれば、Muse Glimmer または Qwen3.8 をローカルで試すことを強くお勧めします。すでに AI コーディングのリクエストごとに課金したり、コードやデータをサードパーティのサービスに共有したりする正当性が薄れつつあります。
ローカルモデルはすでに GLM-5.2 などのモデルに近い体験を提供し始めており、今後の数回のアップデートでローカル AI コーディングがさらに魅力的になるでしょう。
原文を表示
Muse Glimmer is gaining attention in the local AI community and is being compared with Qwen's 27B-class models. In many cases, it is performing better, especially for local coding and agentic workflows.
Meta looks strong in the open-model space, and with a few more iterations, models like this could start competing closely with proprietary systems. As an AI enthusiast, it's exciting to be able to run this level of AI locally.
In this guide, we will run Muse Glimmer with llama.cpp, speed it up with DFlash, and connect it to Pi for local vibe coding. It will be able to build, test, and debug a project directly from the terminal.
1. Downloading Muse Glimmer
First, download the main Muse Glimmer model and its DFlash drafter from Hugging Face.
Install the Hugging Face CLI:
curl -LsSf https://hf.co/cli/install.sh | bash
echo 'export PATH="/root/.local/bin:$PATH"' >> ~/.bashrc
source ~/.bashrc
Log in:
hf auth loginCreate a model directory:
mkdir -p /workspace/muse-glimmerDownload the 16.8 GB main model:
hf download meta-models/Muse-Glimmer-30B-GGUF \
  muse-glimmer-30B-kquant-17gb.gguf \
  --local-dir /workspace/muse-glimmer
Download the 1.63 GB DFlash drafter:
hf download meta-models/Muse-Glimmer-30B-GGUF \
  dflash-kquant.gguf \
  --local-dir /workspace/muse-glimmer
Both files will be saved in /workspace/muse-glimmer.
2. Installing and Running llama.cpp
Next, install llama.cpp with CUDA support and use it to serve Muse Glimmer with the DFlash drafter.
Install and build llama.cpp:
cd /workspace

git clone https://github.com/ggml-org/llama.cpp.git
cd llama.cpp
git pull origin master
cmake -B build -DGGML_CUDA=ON -DCMAKE_BUILD_TYPE=Release
cmake --build build --config Release -j$(nproc)
ln -sf "$(pwd)/build/bin/llama-server" /root/.local/bin/llama-server
Check the installation:
git pull origin master
cmake -B build -DGGML_CUDA=ON -DCMAKE_BUILD_TYPE=Release
cmake --build build --config Release -j$(nproc)
ln -sf "$(pwd)/build/bin/llama-server" /root/.local/bin/llama-server
You should see the installed llama.cpp version and build information.
Now start Muse Glimmer with DFlash speculative decoding:
llama-server \
  -m /workspace/muse-glimmer/muse-glimmer-30B-kquant-17gb.gguf \
  -md /workspace/muse-glimmer/dflash-kquant.gguf \
  --spec-type draft-dflash \
  --spec-draft-n-max 15 \
  -ngl all \
  --spec-draft-ngl all \
  -fa on \
  --ctx-size 16384 \
  --alias muse \
  --host 0.0.0.0 \
  --port 8080 \
  --jinja
Here, llama.cpp loads the main model and the separate DFlash drafter onto the GPU, using speculative decoding to improve generation speed.
3. Testing Muse Glimmer
Once the server is running, you can test Muse Glimmer directly through the built-in llama.cpp Web UI.
Open:
http://localhost:8080/In my initial testing, I was getting around 46 tokens/second, which is already quite good.
During longer coding tasks, I saw speeds reach around 127 tokens/second, making the model feel much faster for agentic coding workflows.
The results were mixed, though. Muse Glimmer created an HTML game for me, but it didn't work particularly well. For this kind of task, I still found Qwen3.8-27B noticeably better at producing working HTML apps and games.
4. Installing Pi Coding Agent
Next, install Pi and connect it to the llama.cpp server running Muse Glimmer.
Install Pi:
curl -fsSL https://pi.dev/install.sh | shThen install Hugging Face's llama.cpp extension:
pi install git:github.com/huggingface/pi-llamaRestart your terminal after installation.
The pi-llama extension automatically connects to:
http://localhost:8080/v1It detects the models being served by llama.cpp, so you do not need to configure models.json manually.
5. Starting Local Vibe Coding
Now create a project and select Muse Glimmer as the model inside Pi.
Create an empty project:
mkdir -p /workspace/glimmer-test
cd /workspace/glimmer-test
Launch Pi:
piInside Pi, run:
/modelSearch for:
llama-cppThen select:
museMuse Glimmer should now be available through Pi's llama-cpp provider.
6. Testing Muse Glimmer as a Coding Agent
Finally, give Muse Glimmer a complete coding task and let it build, test, and debug the project itself.
I used this prompt:
Build a complete Python task management API from scratch using FastAPI.
Requirements:
- Create a clean project structure.
- Add endpoints to create, list, update, and delete tasks.
- Use SQLite for persistence.
- Add input validation and error handling.
- Add pytest tests for all endpoints.
- Create requirements.txt and README.md.
- Run the tests yourself.
- Fix any errors and rerun the tests until everything passes.
Do not ask me to create files or run commands for you. Build and test the complete project yourself.
Muse Glimmer built the project in around 2 minutes.
To test it locally:
pip install -r requirements.txt
uvicorn app.main:app --reload
Open the API documentation at:
http://localhost:8000/docsInstead of manually testing every endpoint, I also asked Muse Glimmer to test the complete API itself and give me a final report.
For local agentic coding, this is where Muse Glimmer impressed me most. It was fast, handled multi-step tasks well, and took only a few seconds to identify and fix issues during debugging.
Final Thoughts
Muse Glimmer is a good indicator of how far local AI coding has come, especially when Meta provides the official model files and recommended configuration. For me, it was very easy to set up and start using.
There are still a few rough edges, but as Muse Glimmer, llama.cpp, DFlash, and the surrounding tooling matures, I expect better results, faster speeds, and stronger agentic coding performance locally.
If you have an RTX 3090, 4090, or 5090, I would highly recommend trying either Muse Glimmer or Qwen3.8 locally. At this point, it is becoming harder to justify paying for every AI coding request or sharing your code and data with third-party services.
Local models are already getting surprisingly close to the experience of models like GLM-5.2, and I think the next few iterations will make local AI coding even more compelling.
Abid Ali Awan (@1abidaliawan) is a certified data scientist professional who loves building machine learning models. Currently, he is focusing on content creation and writing technical blogs on machine learning and data science technologies. Abid holds a Master's degree in technology management and a bachelor's degree in telecommunication engineering. His vision is to build an AI product using a graph neural network for students struggling with mental illness.
関連記事
今日のまとめ
AIデイリーブリーフで今日の重要ニュースをまとめ読み