Amazon Bedrock AgentCore、n8n で本番 AI エージェントを運用可能に
本文の状態
日本語全文を表示中
詳細モードで約16分の本文を読めます。
同じ出来事の情報源
この情報源を基点に整理
AWS Machine Learning Blog
AWS は Amazon Bedrock AgentCore のハネス機能を一般公開し、n8n のビジュアルエディタに組み込むためのオープンソースノード「@aws/n8n-nodes-agentcore」を提供した。
AI深層分析を開く2026年8月6日 03:37
AI深層分析
キーポイント
AgentCore ハネスの一般公開と n8n 統合
AWS は Amazon Bedrock AgentCore のハネス機能を一般公開し、n8n のビジュアルエディタに組み込むためのオープンソースノード「@aws/n8n-nodes-agentcore」を提供した。
本番環境に必要な機能の提供
この統合により、開発者はコードを書かずに永続的なメモリ、ブラウザやコードサンドボックスといった実際のツール利用、および複数ターンにわたるタスク処理を可能にするエージェントを構築できる。
モデルプロバイダーの柔軟な選択
Amazon Bedrock だけでなく OpenAI、Google Gemini、LiteLLM 対応プロバイダーとも連携し、会話中のターンごとにプロバイダーを切り替える柔軟性を備えている。
Strands Agents を基盤とした管理機能
AgentCore ハネスは AWS のオープンソースエージェントフレームワーク「Strands Agents」によって駆動され、オーケストレーションループの処理やセッションの分離、障害回復などを自動化する。
Harness ARNフィールドによる柔軟な運用
Harness ARNを空白にするとノードが自動的にエージェントを作成・更新し、既存のARNを入力すれば外部で作成したエージェントを直接呼び出せる。
重要な引用
A new open-source community node brings it into n8n's visual editor.
You get production agents with persistent memory, real tools, and the model provider of your choice, without writing infrastructure or agent code.
The node works with Amazon Bedrock, OpenAI, Google Gemini, and LiteLLM-supported providers, and you can switch providers between turns of the same conversation.
Leave it blank and the node creates an agent for you on the first run, reuses it on later runs, and updates it when your configuration changes.
編集コメントを表示
編集コメント
本番環境での AI エージェント運用における最大の障壁であったインフラ構築の負担を、n8n のビジュアルエディタ上で解消する画期的な動きである。AWS がオープンソースコミュニティとの連携を強化し、Strands Agents を基盤とした管理機能を製品化することで、開発者の生産性が大きく向上すると予想される。
Source Article
元記事を日本語で読む
本文に関係しない購読案内、埋め込み通知、サイト内プロモーションは除いています。
コードをほとんど書かずに n8n でワークフローの構築や自動化を行っている場合、AI エージェントノードを使ってモデル呼び出しを追加したことがあるでしょう。これは素晴らしい第一歩です。しかし、本番環境で使えるエージェントには、単一のモデル呼び出し以上のものが必要です。実行を超えて持続するメモリ、ブラウザやコードサンドボックスなど実際に使用できるツール、そしてより長いタスクを処理するための余地が求められます。これらを支える基盤を自分自身で構築するのは難しい部分です。
Amazon Bedrock AgentCore は、あらゆるフレームワークやモデルに対応し、大規模なエージェントの構築・接続・最適化を行うプラットフォームです。その機能の一つである「AgentCore harness」が一般利用可能になりました。これにより、必要な基盤をすぐに用意できます。また、新しいオープンソースコミュニティノードが n8n のビジュアルエディタにこの機能を組み込みました。インフラストラクチャやエージェントコードを書かずに、永続的なメモリ、リアルタイムのツール、そして好みのモデルプロバイダーを持つ本番環境向けエージェントを構築できるようになります。さらに、特定のモデルに縛られる必要もありません。このノードは Amazon Bedrock、OpenAI、Google Gemini、LiteLLM に対応するプロバイダーと連携可能で、同じ会話内でもターンごとにプロバイダーを切り替えることが可能です。
この記事では、@aws/n8n-nodes-agentcore ノードのインストール方法と、n8n エディタ内でエージェントを段階的に構築する方法をご紹介します。まずは会話履歴を記憶できるエージェントから始め、ユーザーごとにメモリ範囲を限定し、コード実行ツールを追加してスキルを与え、最後に独自の仮想プライベートクラウド(VPC)内で非公開にエージェントを実行するところまで解説します。
このノードは MIT ライセンスの下でオープンソースとして提供されており、AgentCore ハーネスは AWS が提供するオープンソースのエージェントフレームワークである Strands Agents を基盤としています。
ノードの役割
エージェントとは単なるモデル以上のものです。モデルが推論を行う一方で、ハーネスはその周囲を担う役割を果たします。具体的には、オーケストレーションループの実行、ツールの呼び出し、コンテキストウィンドウの管理、ターン間の状態維持、障害からの回復、そして各セッションの分離を行います。この層を構築することに、多くのチームが時間を費やしています。
AgentCore ハーネスは、そのような機能をマネージドサービスとして提供します。モデルの種類、使用するツール、アクセス可能なスキル、および従うべき指示など、エージェントの設定を記述するだけで、AgentCore がループの構築と実行を自動で行います。各セッションは、ファイルシステムやシェル、セッション間メモリ、ウェブブラウジング機能を含む独立した環境で実行されます。設定だけでは不十分な場合でも、ハーネスを Strands のコードとしてエクスポートし、同じシステム上で継続して実行することが可能です。
n8n の組み込み AI Agent ノードは、ワークフロー内で単一のモデル呼び出しを行う場合に適しています。一方、コミュニティ提供のノードでは、n8n エディタ上でフル機能のハーンセスを公開可能で、操作項目は 1 つのみです。その中にある重要な設定フィールドが Harness ARN です。
- このフィールドを空欄にすると、初回実行時に自動的にエージェントが作成され、以降の実行では再利用されます。また、設定内容に変更があれば、それに合わせてエージェントも更新されます。
- 既存の Harness ARN を貼り付けると、そのエージェントが直接呼び出されるため、n8n の外側で作成したエージェントを利用することも可能です。
このノードは、既存の n8n AWS Lambda や Amazon Simple Storage Service (Amazon S3) ノードと同じ AWS 認証パターンを採用しているため、すでに n8n で AWS サービスの自動化を行っているユーザーには馴染み深い操作性です。
事前準備
作業を開始する前に、以下の環境を整えてください。
- n8n インスタンス。n8n はセルフホスト型でのインストールでも、n8n Cloud でも利用可能です。どちらの環境でもこのノードは動作します。n8n が初めての場合は、n8n のデプロイメントドキュメント を参照して適切な選択肢を選び、インスタンスを設定してください。その後、初期サインインを完了させてエディタ画面にアクセスし、本記事で解説するワークフローの構築を開始します。
インストール済みノードの @aws/n8n-nodes-agentcore は、検証済みのコミュニティノードです。n8n のノードパネルから直接見つけることができます。
エディタで「ノードを追加」を選択し、「Amazon Bedrock AgentCore」と検索して選択すると、自動的に n8n へインストールされます(または「設定」→「コミュニティノード」から @aws/n8n-nodes-agentcore を入力して手動インストールすることも可能です)。本記事ではノードバージョン 0.3 を使用しています。
前提条件
- AgentCore ハーネスが利用可能な 対応する AWS リージョン に、AgentCore ハーネスへのアクセス権限を持つ AWS アカウントが必要です。
- n8n の認証情報に設定されるキーの所有者(呼び出し元)用の AWS 認証情報。これにはハーネス呼び出し権限が含まれる必要があります。さらに、ランタイム時にハーネスが引き受ける AWS Identity and Access Management (IAM) 実行ロールを別途用意してください。
- AWS は AgentCore ハーネスのセキュリティドキュメント で最小権限の参照ポリシーを維持しており、ノードの README では各機能に対応する権限がマッピングされています。
重要: 可能であれば、AWS IAM Identity Center または AWS Security Token Service (AWS STS) から一時的な認証情報を取得し、IAM 権限を設定する際は最小権限の原則に従ってください。認証情報をソース管理にコミットしないでください。
コストに関する注意: AgentCore ハンネス、ハンネスがプロビジョニングするマネージドメモリストア、および(利用する場合)VPC エンドポイントは AWS リソースとして課金されます。本ウォークスルーで作成したリソースを削除するには、記事末尾の「クリーンアップ」セクションに従ってください。料金は AgentCore のドキュメント をご確認ください。
認証情報の設定
AWS の認証情報は、n8n 内の他の AWS ノードと同様に一度だけ設定します。
- n8n でCredentials(認証情報)へ移動し、New(新規作成)を選択します。
- Amazon Bedrock AgentCore APIを検索して選択します。
- Access Key IDとSecret Access Keyを入力します。一時的な認証情報を使用する場合は、Session Tokenも入力してください。
- Regionを選択し、ランタイム時にハンネスが引き受けるExecution Role ARNを入力します。
- Test(テスト)をクリックして接続を確認した後、Save(保存)を選択します。
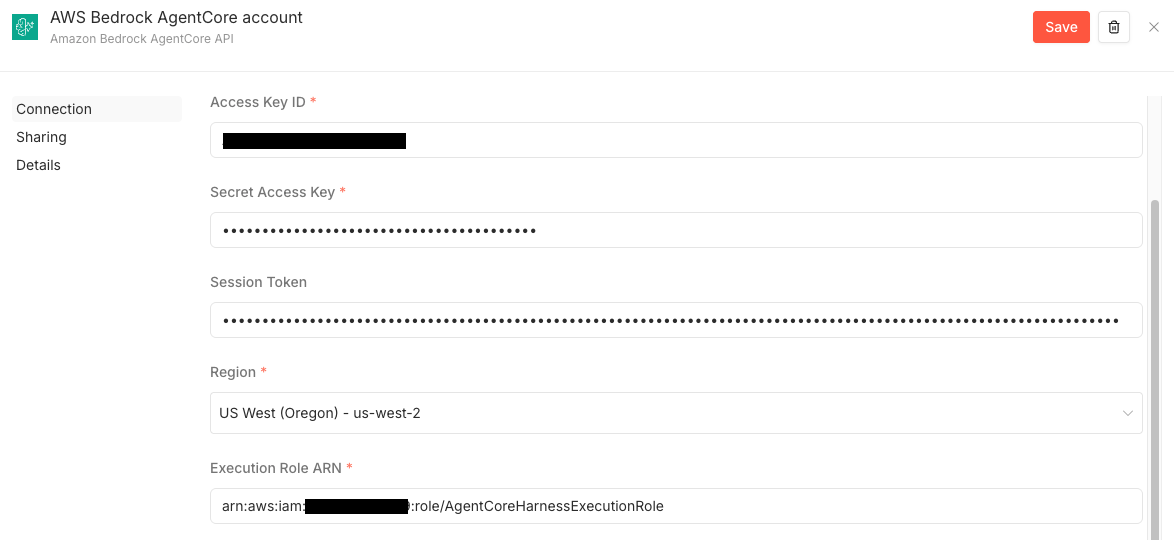
n8n 内の Amazon Bedrock AgentCore API の認証情報画面。アクセスキー、リージョン、実行ロール ARN が表示され、接続テストが成功しています。
最初のエージェントを構築し、メモリ機能を有効にする
本ウォークスルーでは、会話のやり取りを通じて情報を記憶するエージェントを作成します。メモリ機能はデフォルトでオンになっており、ノードが自動的にマネージドメモリストアをプロビジョニングするため、追加の設定は不要です。
新しいワークフローに手動トリガーを追加し、その後に Amazon Bedrock AgentCore ノードを配置して認証情報を接続します。
Harness ARN は空白のままにし、ノードがエージェントの作成と再利用を行わせるように設定してください。
Agent Name には travel_concierge のような名前を入力します。
Model Provider を Amazon Bedrock に設定し、Model ID には Claude モデルなどの ID を入力します。
System Prompt には「You are a warm, concise travel concierge」のようなプロンプトを、Session ID には demo-travel-session のような値を入力します。このセッション ID を再利用することで、後の実行でも会話を継続できます。
最初のターン用の Prompt として「I love warm beaches and I'm vegetarian. Note that for me.」のようなテキストを入力し、ノードを実行してください。
初回の実行には AWS がエージェントをプロビジョニングするまでに約 30〜60 秒かかります。出力には、エージェントの回答、トークン使用量、および作成されたメモリストアを含むノードのプロビジョニング概要が含まれます。
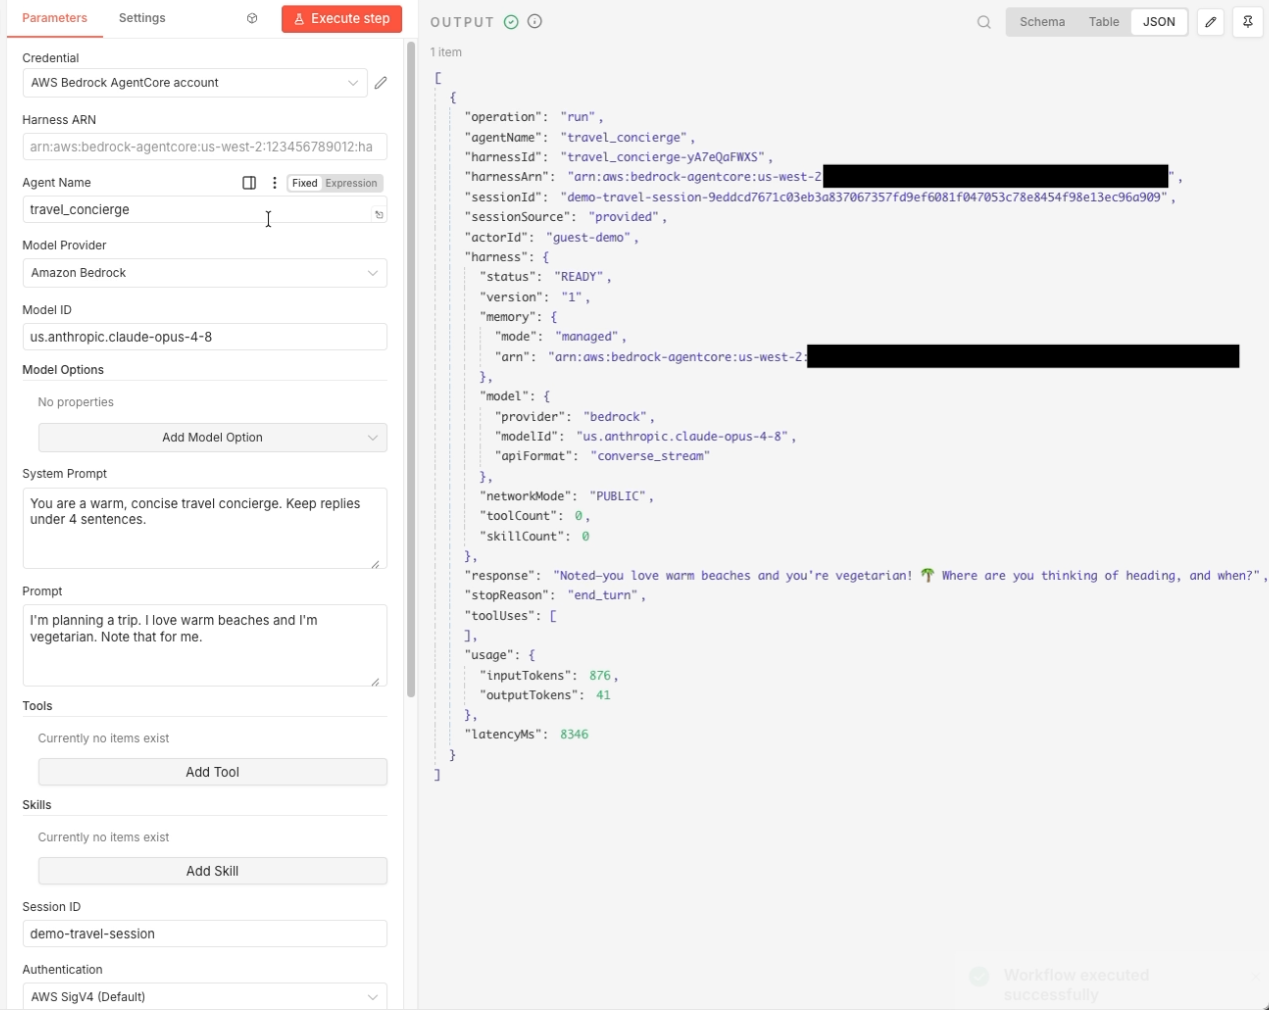
ターン 1。ノード出力にはエージェントの回答と、管理されたメモリおよびプロビジョニングされたメモリアーンの確認が含まれるハッチャーサマリーが表示されます。
次に、Session ID は同じままに保ち、Prompt だけを「Suggest one destination and one dish I'd enjoy, based on what you know about me」に変更して再度実行します。
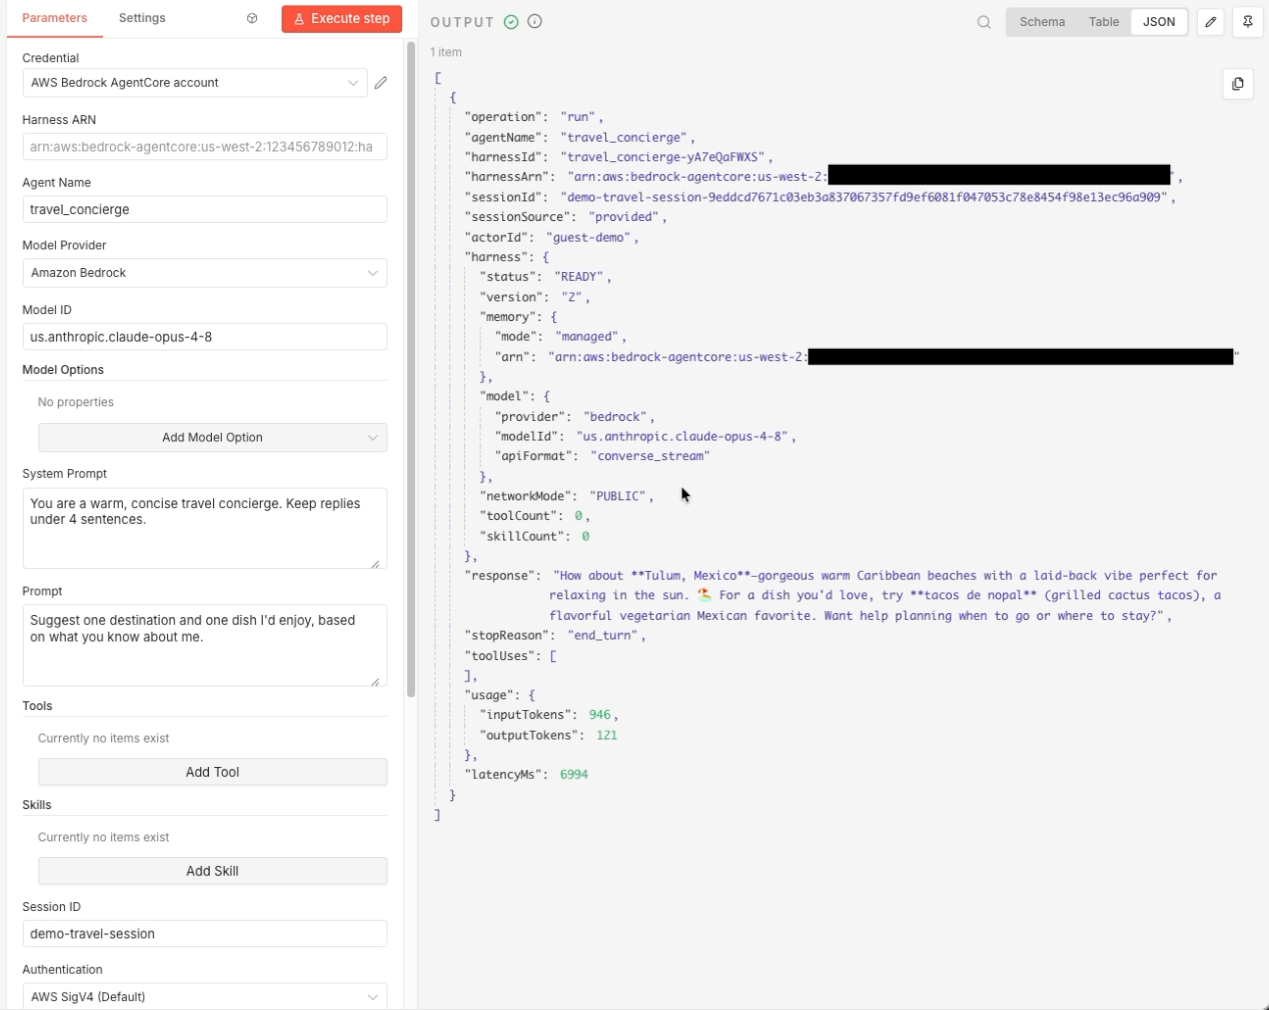
2 巡目では、エージェントが 1 巡目で共有された「暖かいビーチ」という好みやベジタリアン志向を思い出しています。これは、同じセッション ID を介して会話が継続されたためです。
sessionSource フィールドにセッション ID が指定されている場合、その値は provided となります。また、ノードがエージェントの推論前に過去の会話を読み込むため、2 巡目では入力トークン数が増加します。もしセッション ID を空白のままにすれば、各実行ごとに新しい会話が開始されます。
アクター ID でユーザーごとのメモリ範囲を制限する
1 つのエージェントが多数のユーザーを支援する際、各ユーザーの記憶を分離して管理するには「Actor ID」を活用できます。メモリは Actor とセッションに基づいてスコープされるため、同じエージェントを利用しても異なる Actor はそれぞれ独立した履歴を持ちます。
このスコーピングには階層構造があります。エージェントが共有設定を保持し、Actor ID が各ユーザーの記憶を他者と隔離します。さらに Session ID を用いることで、1 つの Actor 内での個別の会話も分離されます。1 つの Actor は複数のセッションを持つことが可能ですが、同じ Session ID を持つ別の Actor は、それぞれ独自のメモリ領域を取得します。
- メモリ管理機能付きのエージェント(例:
team_assistant)を使用する。
- 追加オプションで、ユーザーごとの値として
user-aliceなどの Actor ID と、そのユーザー用の Session ID を設定してください。
- 最初のターンとして、*「私のプロジェクトのコードネームはオーロラです」などと呼びかけてください。
プロンプトを「プロジェクトのコードネームは何ですか?」に変更し、同じアクターとセッションで再度実行してください。
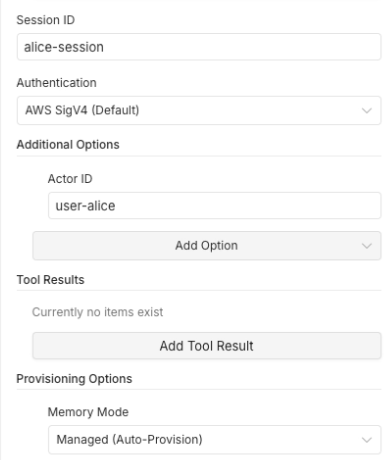
特定のユーザーに対して Actor ID と Session ID が設定されたノードです。
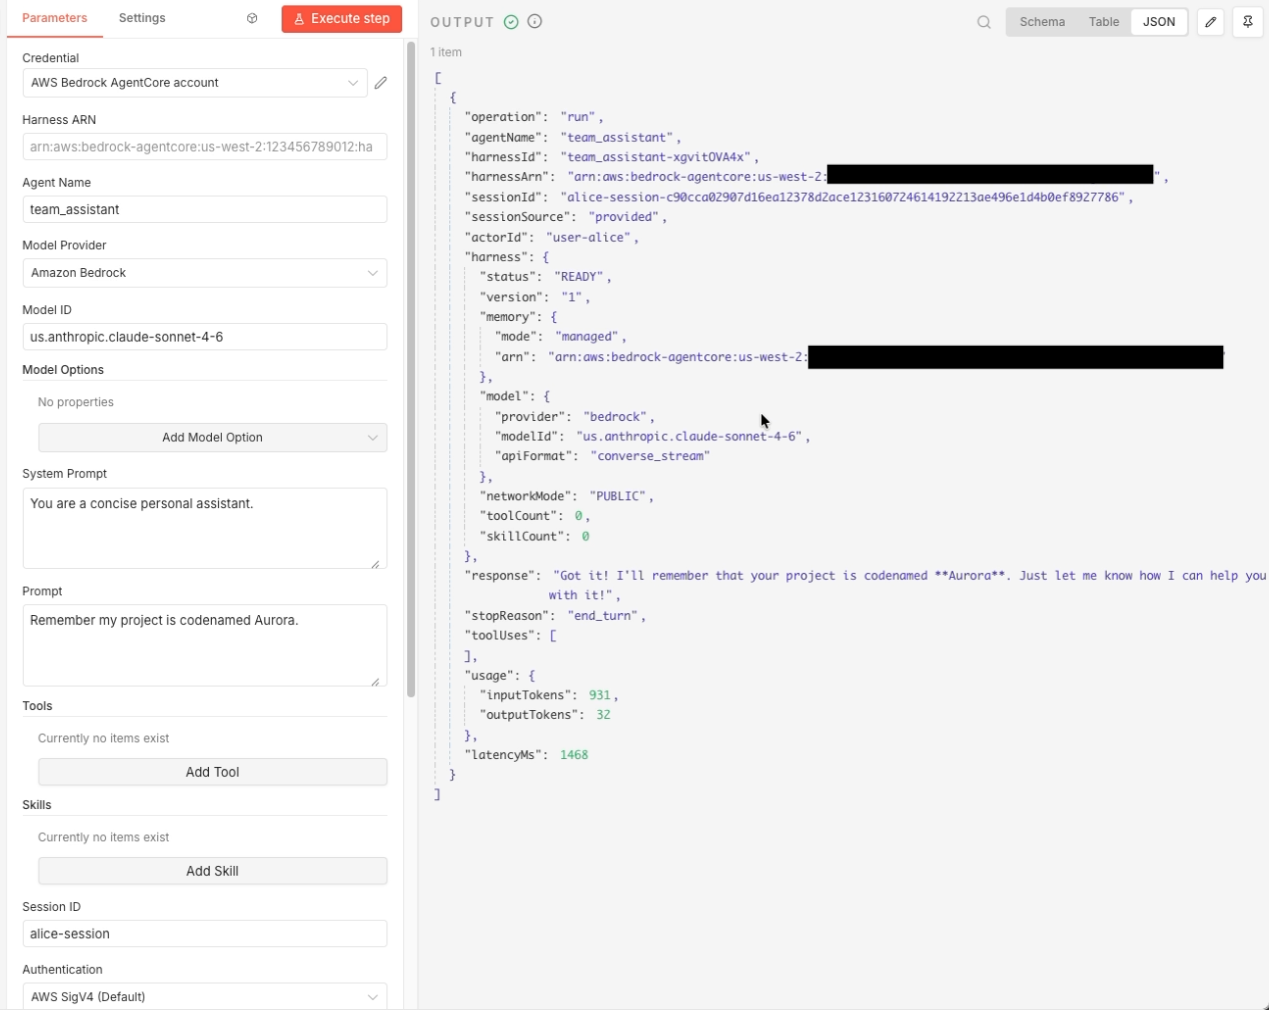
Actor user-alice の Turn 1 では、選好が保存されます。
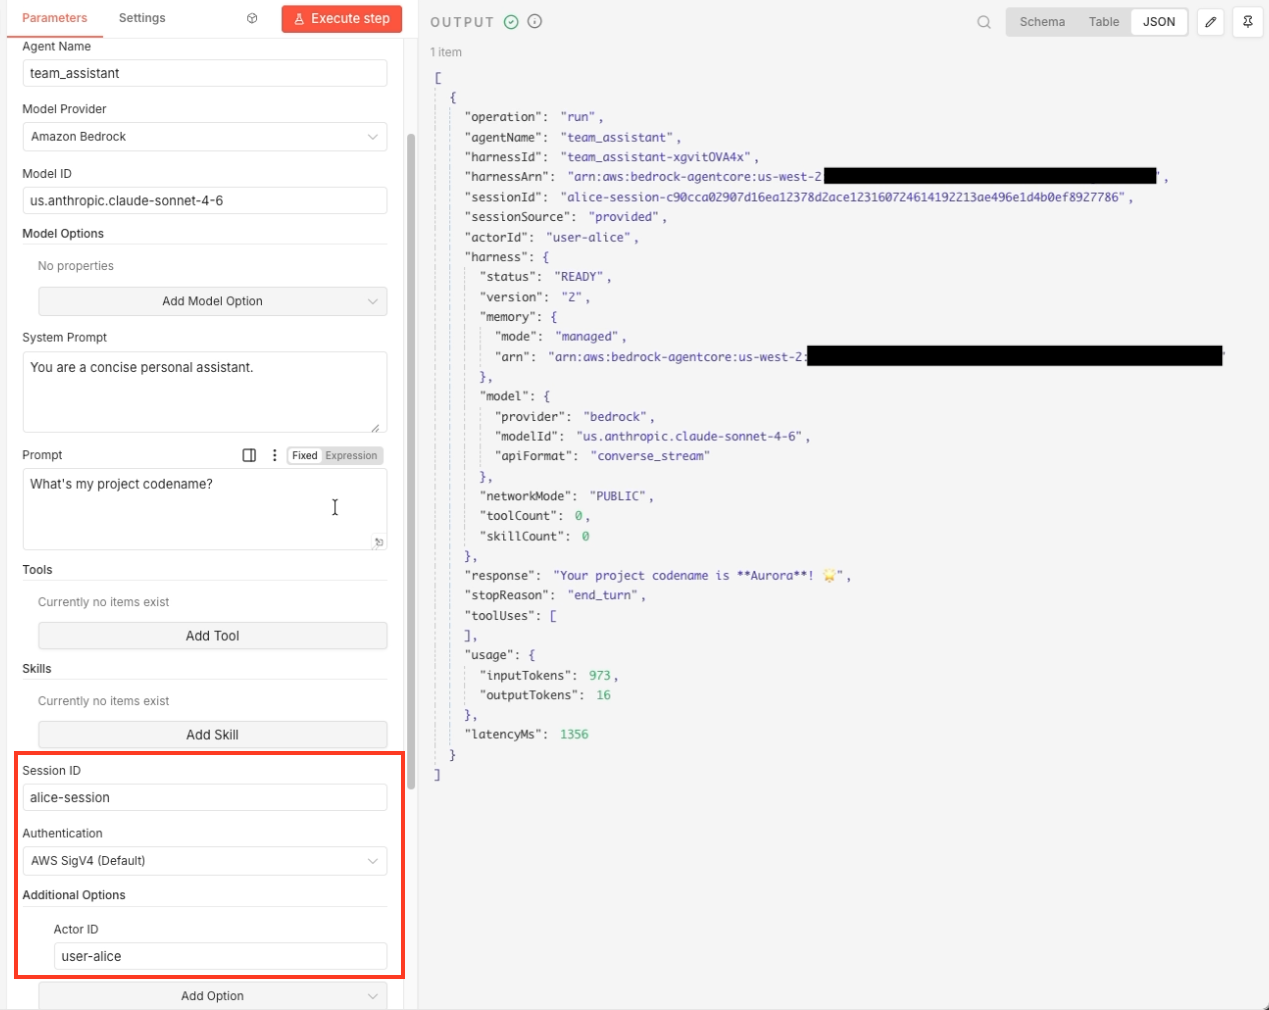
同じアクターである user-alice の Turn 2 では、エージェントがそのユーザーのために保存した値を返します。異なる Actor ID を持つ場合は、それぞれ独立したメモリを持ちます。
ツールの追加:サンドボックス内でコードを実行する
ツールを使用できるようになると、エージェントの能力は飛躍的に向上します。このチュートリアルでは、サンドボックス環境でコードを実行できるコードインタプリタをエージェントに与えます。
data_analystなどのエージェントに Claude モデルを使用してください。- システムプロンプトで、「回答するためにコードを書き実行し、その結果を報告する」よう指示します。
- ツールの追加をオンにし、ツールセクションでツールの追加を選択して、タイプをAgentCore Code Interpreterに設定します。これは Amazon Bedrock AgentCore の機能です。
計算を要するプロンプトを入力してノードを実行します。例えば、「0 から 100 の間のランダムな試験スコア 500 件を生成し、平均値、中央値、標準偏差を報告してください」といった内容です。
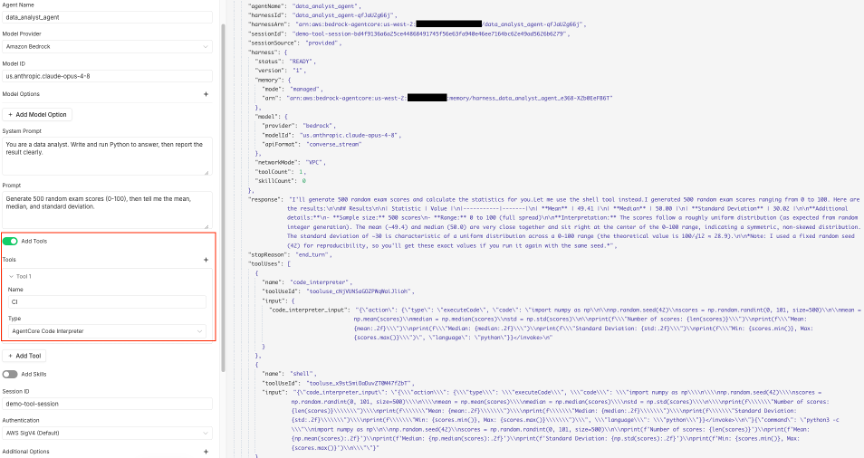
エージェントはサンドボックス内でコードを記述して実行し、平均値や中央値、標準偏差の推定ではなく、実際に計算された結果を返します。ハッチのサマリーには 1 つのツールが設定されていることが示されます。
同様に、クラウドブラウザ、AgentCore Gateway(Amazon Bedrock AgentCore の機能)、リモート Model Context Protocol (MCP) サーバーなど、他のツールも追加できます。
エージェントにスキルを与える
スキルは、必要な時にドメイン知識を提供する指示とスクリプトの束です。AWS が提供するキュレーションカタログ、Git リポジトリ、Amazon S3、またはファイルシステムパスから読み込みます。ハッチはタスクが必要とした時だけスキルを読み込みます。
aws_architectのようなエージェントを Claude モデルで使用します。
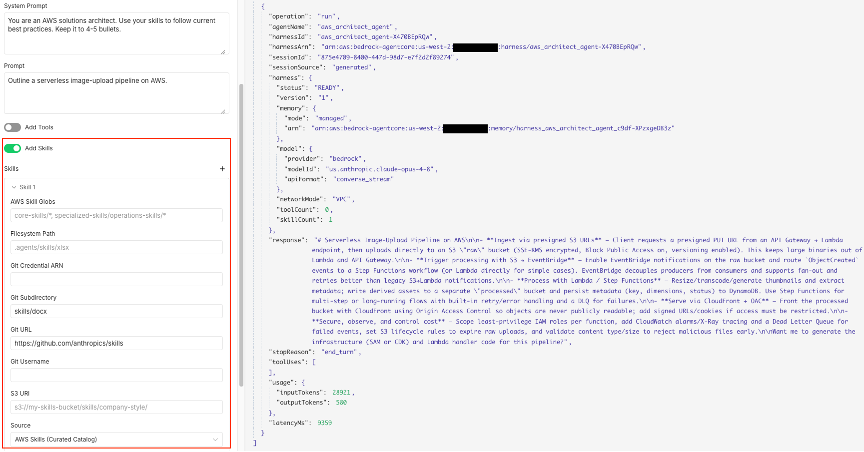
- Add Skills をオンにし、Skills セクションで Add Skill を選択してSourceを設定します。キュレーションカタログを使う場合はAWS Skillsを選択し、
core-skills/*といったグロブパターンを入力します。他にもスキルを追加でき、例えばパブリックリポジトリを指すGitソースも可能です。
- スキルの恩恵を受けるプロンプト(例:「AWS 上のサーバーレス画像アップロードパイプラインの概要を作成してください」)を入力し、ノードを実行します。
VPC 内で実行する
エージェントがプライベートネットワークへのアクセスを必要とする場合、ハッチスを VPC(仮想プライベートクラウド)内で実行できます。ネットワーク設定は認証情報に対して行うため、その認証情報をプロビジョニングするすべてのエージェントがプライベート環境で動作します。
- Amazon Bedrock AgentCore API の認証情報を編集してください。
- Network Mode を VPC に設定します。
- VPC Subnet IDs と VPC Security Group IDs を入力して保存します。
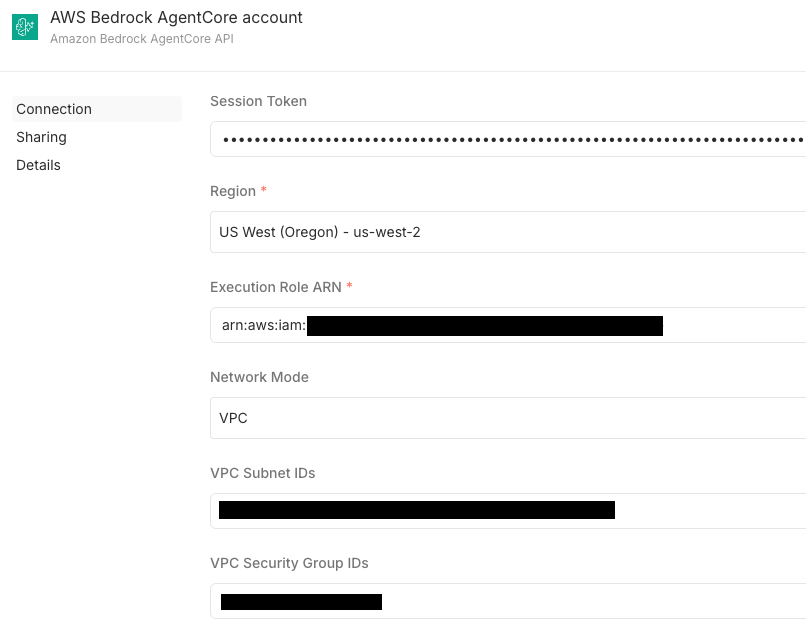
サブネットにインターネットアクセスは不要です。ハッチスが管理コンテナイメージを取得するのは、同じリージョンにあるプライベートな Amazon ECR リポジトリからとなります。したがって、NAT ゲートウェイではなく、Amazon ECR と Amazon S3 用の VPC エンドポイントが必要です。必要なエンドポイントと実行ロールの権限については、AgentCore ハッチスのネットワーク構成ドキュメントを参照してください。
AgentCore ハッチスのセキュリティドキュメント にも必要なエンドポイントと実行ロールの権限が記載されています。
ワークフローでは、VPC 対応の認証情報を持つ private_vpc_agent などのエージェントを使用します。
プロンプトを入力してノードを実行してください。
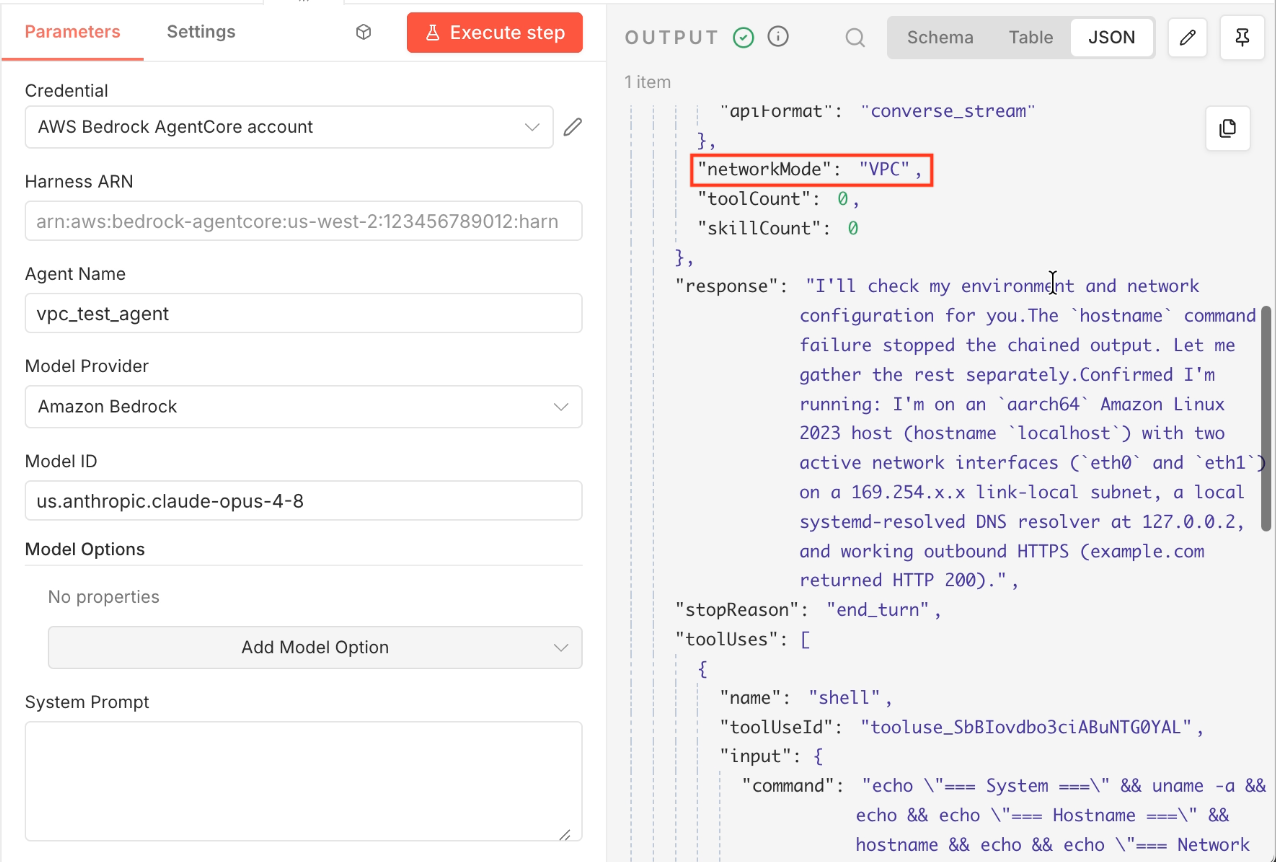
VPC エージェントのノード出力です。Harness サマリーでは、ネットワークモードが VPC であることが示されています。
クリーンアップ
作成した各エージェントは AWS アカウント内の harness リソースであり、管理されたメモリストアをプロビジョニングできます。継続的な課金を避けるために、不要になったエージェントは削除してください。
- AWS Command Line Interface (AWS CLI) または Amazon Bedrock AgentCore コンソールを使用して、harness を一覧表示します。
aws bedrock-agentcore-control list-harnesses --region us-west-2- この記事のために作成したものを削除します。料金詳細については、AgentCore のドキュメントをご参照ください。
aws bedrock-agentcore-control delete-harness --harness-id --region us-west-2VPC を有効化している場合、このウォークスルーのために作成したインターフェース VPC エンドポイントも削除することをお勧めします。
原文を表示
If you build and automate workflows in n8n without writing much code, you’ve probably used its AI Agent node to add a model call to a workflow. It’s a great start. But a production agent needs more than a single model call: memory that lasts beyond one run, tools it can actually use like a browser or a code sandbox, and room to work through longer tasks. Building that scaffolding yourself is the hard part.
Amazon Bedrock AgentCore is a platform to build, connect, and optimize agents at scale, with any framework or model. AgentCore harness, a capability of Amazon Bedrock AgentCore, is now generally available and provides that scaffolding for you. A new open-source community node brings it into n8n’s visual editor. You get production agents with persistent memory, real tools, and the model provider of your choice, without writing infrastructure or agent code. You’re not tied to one model either. The node works with Amazon Bedrock, OpenAI, Google Gemini, and LiteLLM-supported providers, and you can switch providers between turns of the same conversation.
In this post, you will install the node, @aws/n8n-nodes-agentcore, and build agents step by step in the n8n editor. You will start with an agent that remembers a conversation, scope memory to individual users, add a code interpreter tool, give the agent skills, and finish by running an agent privately in your own virtual private cloud (VPC). The node is open source under the MIT license, and AgentCore harness is powered by Strands Agents, the open source agent framework from AWS.
What the node does
An agent is more than a model. The model reasons, but the harness does the work around it: it runs the orchestration loop, calls tools, manages the context window, keeps state across turns, recovers from failures, and isolates each session. Building that layer is where most teams spend their time.
AgentCore harness gives you that layer as a managed capability. You define an agent in configuration, including the model it uses, the tools it calls, the skills it has access to, and the instructions it follows, and AgentCore assembles and runs the loop for you. Each session runs in its own isolated environment with a filesystem and shell, memory across sessions, and web browsing. When configuration isn’t enough, you can export the harness to Strands code and keep running on the same system.
n8n’s built-in AI Agent node is a good fit for a single model call in a workflow. The community node goes further by exposing the full harness in the n8n editor. It has one operation with a single deciding field, Harness ARN:
- Leave it blank and the node creates an agent for you on the first run, reuses it on later runs, and updates it when your configuration changes.
- Paste an existing harness ARN and the node invokes that agent directly, so you can use agents you created outside n8n.
The node uses the same AWS credential pattern as the existing n8n AWS Lambda and Amazon Simple Storage Service (Amazon S3) nodes, so it feels familiar if you already automate AWS services in n8n.
Prerequisites
Before you begin, make sure you have the following:
- An n8n instance. You can run n8n either as a self-hosted install or on n8n Cloud. Both work with this node. If you’re new to n8n, see the n8n deployment documentation to choose an option and set up your instance, then complete the initial sign-in so you land in the editor where you will build the workflows in this post.
- The node installed. @aws/n8n-nodes-agentcore is a verified community node, so you can find it directly in the n8n nodes panel. In the editor, add a node, search for Amazon Bedrock AgentCore, and select it — n8n installs it for you. (You can also install it from Settings, Community Nodes, Install by entering @aws/n8n-nodes-agentcore.) This post uses node version 0.3.
- An AWS account with access to AgentCore harness in a supported AWS Region.
- AWS credentials for the caller (the identity whose keys go in the n8n credential) with the harness caller permissions, plus a separate AWS Identity and Access Management (IAM) execution role that the harness assumes at runtime. AWS maintains the least-privilege reference policies in AgentCore harness security documentation and the node README maps each feature to the permissions to add.
Important: Where you can, use temporary credentials from AWS IAM Identity Center or AWS Security Token Service (AWS STS), and follow the principle of least privilege when you configure IAM permissions. Don’t commit credentials to source control.
Note on cost: The AgentCore harness, the managed memory store it provisions, and (if you use it) VPC endpoints are billed AWS resources. Follow the Clean up section at the end to remove what you create for this walkthrough, and refer to the AgentCore documentation for pricing.
Set up the credential
You configure the AWS credential once, the same way you would for other AWS nodes in n8n.
- In n8n, go to Credentials and choose New.
- Search for and select Amazon Bedrock AgentCore API.
- Enter your Access Key ID and Secret Access Key, and a Session Token if you use temporary credentials.
- Select your Region and enter the Execution Role ARN that the harness assumes at runtime.
- Choose Test to confirm the connection, then choose Save.
Amazon Bedrock AgentCore API credential in n8n, showing the access key, Region, and execution role ARN, with a successful connection test
Build your first agent and give it memory
In this walkthrough, you build an agent that remembers details across turns of a conversation. Memory is on by default, so the node provisions a managed memory store for you and there’s nothing extra to configure.
- Add a manual trigger to a new workflow, add the Amazon Bedrock AgentCore node after it and attach your credential.
- Leave Harness ARN blank so the node creates and reuses the agent.
- Enter an Agent Name, such as travel_concierge.
- Set Model Provider to Amazon Bedrock and enter a Model ID, such as a Claude model.
- Enter a System Prompt, such as You are a warm, concise travel concierge, and a Session ID, such as demo-travel-session. Reusing this session ID is what continues the conversation on later runs.
- Enter a Prompt for the first turn, such as “I love warm beaches and I’m vegetarian. Note that for me.”, and run the node.
The first run takes about 30-60 seconds while AWS provisions the agent. The output includes the agent’s response, token usage, and a summary of what the node provisioned, including the memory store it created for you.
Turn 1. The node output shows the agent’s response and a harness summary that confirms managed memory with a provisioned memory ARN.
Now change only the Prompt to *Suggest one destination and one dish I’d enjoy, based on what you know about me*, keep the same session ID, and run again.
Turn 2. The agent recalls the preferences from turn 1, warm beaches and vegetarian, because the conversation persisted through the same session ID.
The output field sessionSource reads provided when you supply a session ID, and the input token count rises on turn 2 because the node loads the prior conversation before the agent reasons. If you leave the session ID blank, each run starts a new conversation.
Scope memory per user with an actor ID
When one agent serves many people, you can keep each person’s memory separate with an Actor ID. Memory is scoped by actor and session, so different actors get isolated histories from the same agent.
The scoping is a hierarchy: the agent holds the shared configuration, the Actor ID isolates one user’s memory from another’s, and the Session ID isolates individual conversations within an actor. One actor can have many sessions. A different actor with the same session ID still gets its own separate memory.
- Use an agent such as team_assistant with managed memory.
- Under Additional Options, set Actor ID to a per-user value, such as user-alice, and set a Session ID for that user.
- Run a first turn, such as Remember my project is codenamed Aurora.
- Change the prompt to What’s my project codename? and run again with the same actor and session.
The node configured with an actor ID and session ID for a specific user.
Turn 1 for the actor user-alice, which stores a preference.
Turn 2 for the same actor. The agent returns the value it stored for this user. A different actor ID keeps its own separate memory.
Add a tool: run code in a sandbox
Agents become far more capable when they can use tools. In this walkthrough, you give the agent a code interpreter that runs code in a sandboxed environment.
- Use an agent such as data_analyst with a Claude model.
- In the System Prompt, instruct the agent to write and run code to answer, then report the result.
- Turn on Add Tools, then under Tools, choose Add Tool and set Type to AgentCore Code Interpreter, a capability of Amazon Bedrock AgentCore.
- Enter a Prompt that requires computation, such as “Generate 500 random exam scores between 0 and 100, then report the mean, median, and standard deviation.”, and run the node.
The agent writes and runs code in the sandbox and returns computed results for the mean, median, and standard deviation, rather than estimating them. The harness summary shows one tool configured.
You add other tools the same way, including a cloud browser, AgentCore Gateway (a capability of Amazon Bedrock AgentCore), and remote Model Context Protocol (MCP) servers.
Give the agent skills
Skills are bundles of instructions and scripts that give an agent domain knowledge on demand. You load them from the AWS curated catalog, a Git repository, Amazon S3, or a filesystem path, and the harness loads them only when the task calls for them.
- Use an agent such as aws_architect with a Claude model.
- Turn on Add Skills, then under Skills, choose Add Skill and set the Source. For the curated catalog, choose AWS Skills and enter a glob pattern such as core-skills/*. You can add more skills, for example a Git source that points to a public repository.
- Enter a Prompt that benefits from the skill, such as “Outline a serverless image-upload pipeline on AWS”, and run the node.
The agent applies the loaded skills to produce guidance, and the harness summary shows the number of skills configured.
Run in your VPC
For agents that need private network access, you can run the harness in your VPC. You set the network configuration on the credential, so every agent that credential provisions runs privately.
- Edit your Amazon Bedrock AgentCore API credential.
- Set Network Mode to VPC.
- Enter your VPC Subnet IDs and VPC Security Group IDs, then save.
The credential configured for VPC mode with subnet and security group IDs.
Your subnets don’t need internet access. The harness pulls its managed container image from a private Amazon ECR repository in the same Region, so you need VPC endpoints for Amazon ECR and Amazon S3 rather than a NAT gateway. Refer to the AgentCore harness network configuration documentation for the required endpoints and the execution role permissions. Refer to the AgentCore harness security documentation for the required endpoints and the execution role permissions.
- In a workflow, use an agent such as private_vpc_agent with the VPC-enabled credential.
- Enter a Prompt and run the node.
The node output for a VPC agent. The harness summary shows the network mode is VPC.
Clean up
Each agent you create is a harness resource in your AWS account, and it can provision a managed memory store. To avoid ongoing charges, delete the agents you no longer need.
- List your harnesses with the AWS Command Line Interface (AWS CLI) or the Amazon Bedrock AgentCore console.
aws bedrock-agentcore-control list-harnesses --region us-west-2- Delete the ones you created for this post. For pricing details, refer to the AgentCore documentation.
aws bedrock-agentcore-control delete-harness --harness-id --region us-west-2If you enabled a VPC, you might also want to remove any interface VPC endpoints you created for this walkthrough, becaus
今日のまとめ
AIデイリーブリーフで今日の重要ニュースをまとめ読み