OpenRouter、チームの AI 支出管理機能を強化
本文の状態
日本語全文を表示中
詳細モードで約21分の本文を読めます。
同じ出来事の情報源
この情報源を基点に整理
OpenRouter Blog
OpenRouter はチームでの AI 利用コスト管理を強化するため、組織ごとのクレジットプール共有、API キーごとの支出制限、メンバー別予算ガードレール、および Activity ダッシュボードによる可視化機能の導入方法を解説した。
Continue in AI NEW LAB
このニュースを、実務の判断につなげる
AI NEW LABで、試したことや先に確認したい条件を共有できます。まずはログインなしで読めます。
AI NEW LABで論点を見るAI深層分析を開く2026年8月11日 07:12
AI深層分析
キーポイント
組織とクレジットプールの設定
管理者は設定画面から組織を作成し、チーム全員で共有するクレジットプールを確立して、個人アカウントとの切り替えを明確にする必要がある。
ワークロード別モデル制限の事前定義
特定の業務負荷に対して使用可能なモデルをスコープするプリセットを設定することで、無秩序なモデル利用を防ぐ仕組みが用意されている。
API キーごとの支出上限設定
各 API キーに対して日次、週次、または月次のリセット機能付きで支出上限を設け、特定のキーによる過度な消費を抑制する。
メンバー別予算とモデル許可リストの適用
ガードレール機能を用いて各メンバーに個別の予算枠を割り当てると同時に、使用可能なモデルのホワイトリストを強制する管理が可能になる。
メンバーの権限制限
メンバーは組織リソースを使用しAPIキーを作成できるが、クレジット購入や請求詳細へのアクセスはできない。
重要な引用
Five controls fix that.
An organization gives everyone one shared credit pool.
Guardrails enforce per-member budgets and model allowlists.
Credits go into one shared pool that every API key in the organization draws from, so you fund the team once at the center instead of topping up per engineer.
編集コメントを表示
編集コメント
本記事は OpenRouter が提供する具体的な管理機能のセットアップ手順を体系的に示しており、チームでの AI コスト管理を実践する上で有用なガイドラインとなる。ただし、これは特定のプラットフォームの利用方法に関する技術解説であり、業界全体を揺るがす新技術の発表ではない点に留意が必要である。
Source Article
元記事を日本語で読む
本文に関係しない購読案内、埋め込み通知、サイト内プロモーションは除いています。
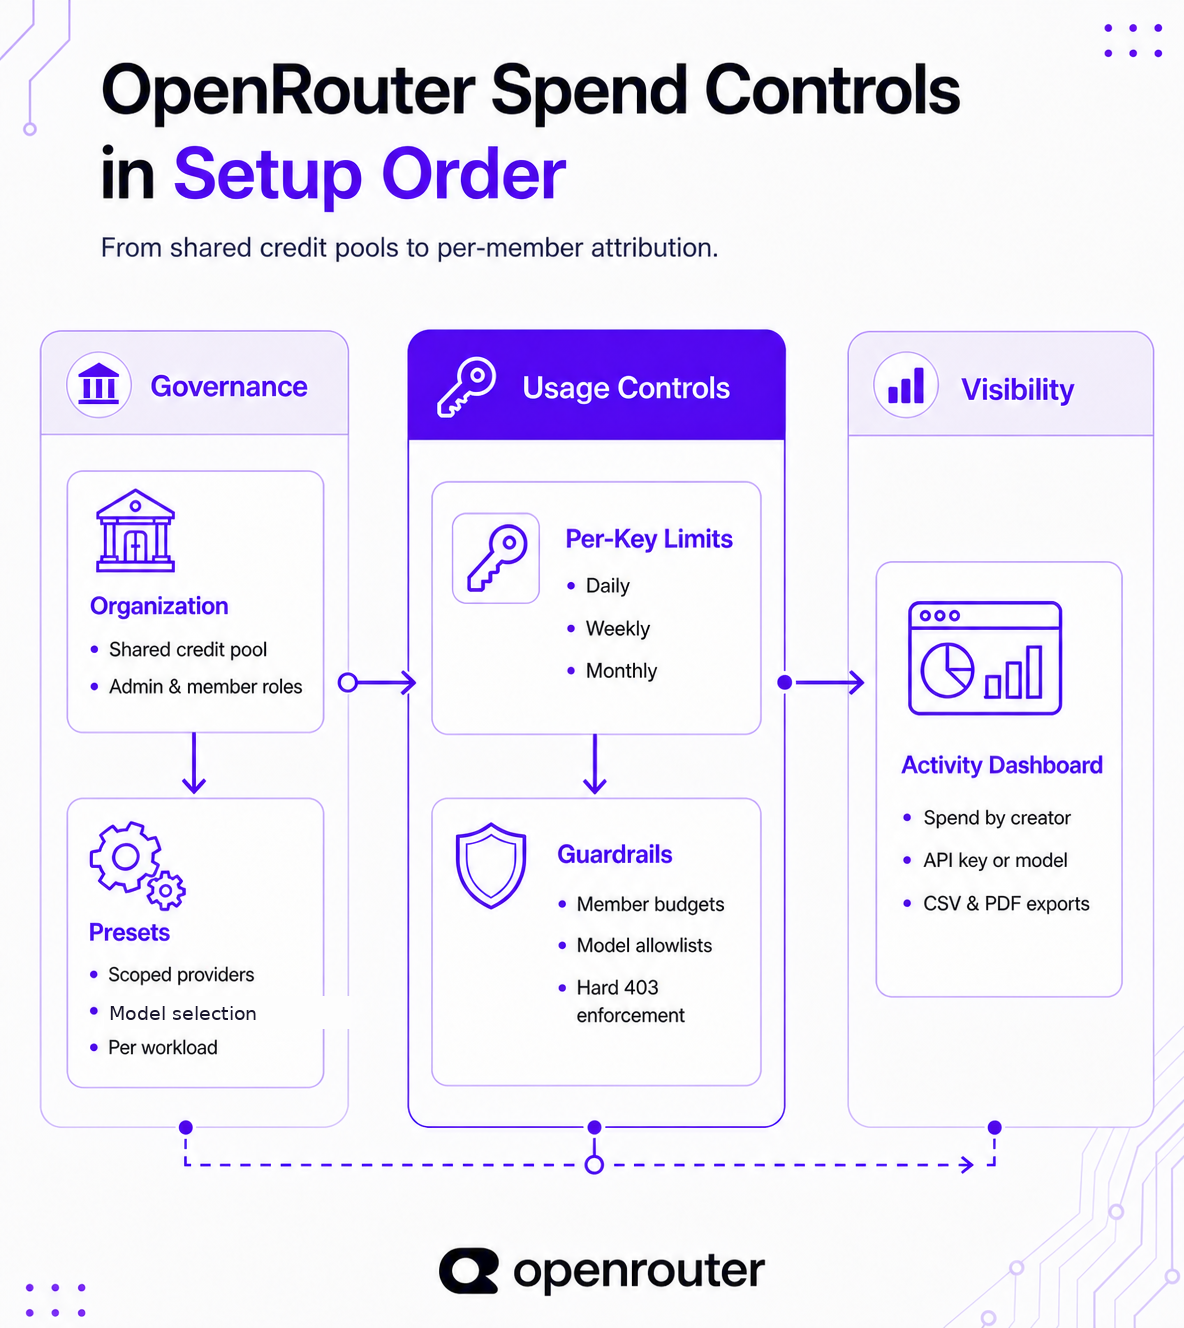
OpenRouter でチームの規模が大きくなるにつれ、API キーの数が増え、モデルへのアクセス範囲が広がることで、「誰がいくら使ったか」を把握するのが難しくなります。その課題を解決する 5 つの制御機能があります。
組織レベルで全メンバーに共通のクレジットプールを提供し、プリセットでワークロードごとに使用可能なモデルを制限します。個別の API キーには支出上限を設定し、ガードレールでは各メンバーの予算と許可されたモデルの一覧を強制します。さらに Activity ダッシュボードを使えば、資金がどこに使われたかを可視化できます。
このガイドでは、以下の順序でこれらすべての設定方法を解説します:組織設定→プリセット→キー制限→ガードレール→Activity での確認です。まだどの制御機能が必要か検討中の方は、まず チームの AI 支出ガバナンス ガイドをお読みください。本ページでは具体的な設定手順に焦点を当てています。
開始前の準備
作業を開始する前に、以下の条件が整っているか確認してください。
- 認証済みのメールアドレスを持つアカウントを使用すること(組織作成にはメール認証が必要です)。
- 請求管理、API キーの発行、メンバーアクセス権限、ガードレールの設定をすべて行えるよう、組織管理者としてセットアップを完了していること。
メンバーリストは事前に計画しておきましょう。組織にはデフォルトで最大 10 人のメンバーまで登録可能ですが、サポートを通じてさらに増やすこともできます。
チームと価格設定を確認してください。従量課金(Pay-as-you-go)には最低利用額の設定はなく、標準的な従量課金アカウントのプラットフォーム手数料 5.5% は、リクエストごとに発生するのではなく、クレジットを購入した時点で適用されます。詳細は Pricing をご覧ください。
ステップ 1: 組織の作成とクレジットプールの設定
Settings > Preferences にアクセスし、Organization セクションを開いて Create Organization をクリックします。組織の詳細を入力したらチームメンバーを招待し、アプリ上部にある org スイッチャーを使って組織コンテキストに切り替えてください。
切り替え後に、スイッチャーに組織名が表示されていることを必ず確認してください。個人アカウントでは、利用状況、API キー、クレジットはすべて個人のアカウントに紐付きますが、組織コンテキスト下ではこれらは共有の組織アカウントに属します。org スイッチャーの利用ミスは、利用状況の帰属に関するエラーの主要な原因の一つです。
課金権限は、招待時にユーザーに割り当てられたロールによって異なります:
- 管理者(Admins): クレジットの購入と課金情報の閲覧が可能です。
- メンバー(Members): 組織リソースの利用や API キーの作成はできますが、クレジット購入や課金詳細へのアクセスはできません。
共有クレジットプールの資金調達
組織コンテキストでいる間に、請求ページ からクレジットを購入できます。購入したクレジットは、組織内のすべての API キーがアクセスする 1 つの共有プールに追加されます。これにより、エンジニアごとに個別にチャージするのではなく、チーム全体を一度だけ中央で資金調達することが可能になります。
既存の個人用クレジットを組織に移行したい場合は、クレジットページ の転送オプションを使用してください。転送には eligibility rules(資格ルール)があり、アカウントの二段階認証の有無やアカウント・メンバーシップの開設期間、直近での購入履歴、転送間のクールダウン期間などが条件として設けられています。もし転送がまだ利用できない場合は、ページ上でその理由が表示されます。なお、請求書払いで課金されている組織への転送は受け付けていません。
ステップ 2: プリセットで対象モデルとプロバイダーを指定する
プリセットは、ワークロードが使用するモデルとプロバイダーを固定する再利用可能な設定です。組織アカウントでは、このプリセットは全メンバー間で共有されます。
プリセットの作成
OpenRouter の Presets Settings にアクセスし、support-bot や internal-search、eval-runner といった各ワークロードパスごとにプリセットを作成してください。
各プリセットでは、以下の設定を行います。
- モデルを 1 つ選択するか、フォールバック用のモデル配列を設定します。
プロバイダーのルーティング設定には、sort を使用して優先順位を指定できます。
プロバイダーの除外・包含ルールも適用可能です。
必要に応じて system、temperature、top_p のパラメータを設定しましょう。
- スラッグは安定した値で保存する。
プリセットはバージョン管理されており、保存されるたびに新しいアクティブなバージョンとして登録され、API リクエストはこのバージョンを参照します。また、バージョン履歴も保持されているため、必要に応じてロールバックが可能です。
リクエストレベルで指定したパラメータは、プリセットの値を上書き(シャドウオーバーライド)します。
| プリセット制御 | 機能 |
|---|---|
| モデル選択 | ワークロードを意図したモデルファミリーに維持する |
| フォールバック配列 | プロバイダーやモデルの障害時にリクエストを稼働状態に保つ |
| プロバイダールーティング(ソート) | 優先する遅延またはコストに基づいてルーティングする |
| プロバイダーの含める/除外 | 承認されたプロバイダーへの実行を制限する |
| プロンプトおよび生成パラメータ | 出力スタイルとばらつきを一定に保つ |
コードからプリセットを参照する
プリセットは、3 つの方法で参照できます。モデルとして @preset/{slug} を指定するか、preset フィールドを別途設けるか、あるいは model@preset/{slug} の形式で記述します。これら 3 つの方式はいずれもサーバー側で解決されるため、どの SDK から利用しても同じプリセットが機能します。
const resp = await fetch('https://openrouter.ai/api/v1/chat/completions', {
  method: 'POST',
  headers: {
    Authorization: `Bearer ${process.env.OPENROUTER_API_KEY}`,
    'Content-Type': 'application/json',
  },
  body: JSON.stringify({
    model: '@preset/support-bot',
    messages: [{ role: 'user', content: 'Summarize this ticket.' }],
  }),
});
API を通じてプリセットを作成または更新する際、保存されるのは設定項目のみです。具体的には、model、temperature、top_p、provider、system、そして tools といったフィールドが対象となります。
「messages」「input」「prompt」「stream」のような一時的なフィールドは無視されます。
プリセットは、明示的に参照されたリクエストに対してのみ影響を及ぼします。キーがバイパスできないモデル制限が必要な場合は、ステップ4でガードレールモデルのホワイトリストを使用してください。
ステップ 3: リミットとリセットでキーごとの支出上限を設定する
各APIキーには、クレジットの上限(limit)とリセット周期(limit_reset)を設定できます。これにより、定期的なスケジュールで各ワークロードに新しい利用枠が割り当てられます。
これらのキーは、キー管理専用の「Management API key」を通じて作成・管理します。
Management API key の作成
Management Keys にアクセスし、Create New Keyをクリックしてください。
管理用 API キーは、/api/v1/keys におけるキー管理や /api/v1/guardrails におけるガードレール管理といった管理操作を担います。ただし、completion エンドポイントを呼び出すことはできないため、プロビジョニングシステムや自動化パイプラインでの利用も安全です。
各サービス、環境、エンジニアごとに 1 つずつキーを作成し、ワークロードごとのアクセス権限と支出を分離して管理しましょう。
制限、リセット、ライフサイクル制御の設定
/api/v1/keys を介してキーの作成または更新を行う際、支出上限とそのリセット方法を自分で制御できます。
| 項目 | 設定内容 |
|---|---|
limit | キーのクレジット上限額 |
limit_reset | 日次、週次、または月次(日次は UTC 時刻の午夜にリセット) |
disabled | true にするとキーが即座に無効化される |
include_byok_in_limit | BYOK の利用料が上限額に含まれるかどうか |
毎日利用可能なクレジットの上限を設定したキーを作成します:
const res = await fetch('https://openrouter.ai/api/v1/keys', {
  method: 'POST',
  headers: {
    Authorization: `Bearer ${process.env.OPENROUTER_MANAGEMENT_KEY}`,
    'Content-Type': 'application/json',
  },
  body: JSON.stringify({
    name: 'support-bot-prod',
    limit: 25,
    limit_reset: 'daily',
  }),
});
上限を厳格化したり、リセット期間を変更するためにキーを更新します:
const res = await fetch(`https://openrouter.ai/api/v1/keys/${keyHash}`, {
  method: 'PATCH',
  headers: {
    Authorization: `Bearer ${process.env.OPENROUTER_MANAGEMENT_KEY}`,
    'Content-Type': 'application/json',
  },
  body: JSON.stringify({ limit: 15, limit_reset: 'weekly' }),
});
支出を停止するか、動作に問題のあるワークロードを遮断するために、キーを即座に無効化します:
await fetch(`https://openrouter.ai/api/v1/keys/${keyHash}`, {
  method: 'PATCH',
  headers: {
    Authorization: `Bearer ${process.env.OPENROUTER_MANAGEMENT_KEY}`,
    'Content-Type': 'application/json',
  },
  body: JSON.stringify({ disabled: true }),
});
利用状況の監視とガバナンスの自動化
各キーは、usage、usage_daily、usage_weekly、usage_monthly、limit_remaining の各フィールドを通じて、またその BYOK 版の対応するフィールドを通じて、それぞれ独自の使用状況を報告します。
これらはcronジョブやバックグラウンドワーカーから定期的に取得し、キーが上限に近づいたら即座に無効化できます。
limit フィールドはキーごとの上限を設けるものであり、個人全体の制限ではありません。メンバーが所有するすべてのキーにわたって適用される制限が必要な場合は、ステップ 4 でメンバーごとに割り当てられたガードレールを使用してください。キーのローテーションやシークレットの管理については、API キー管理ガイド をご覧ください。
ステップ 4: ガードレールでメンバーごとの予算とモデル許可リストを適用する
ガードレールは、メンバーが作成する API キーの数に関わらず、個人レベルでポリシーを強制します。これにより、ステップ 2 で設定したモデルのデフォルト値やステップ 3 のキーごとの上限が、メンバーが回避できない確実な制限として機能します。ガードレールの作成と管理は組織管理者のみが行えます。
ガードレールの作成
設定 > プライバシー に移動し、ガードレール のセクションまでスクロールして新しいガードレールの作成をクリックしてください。
以下の項目を設定します。
- 予算制限: 1 日、1 週間、または 1 ヶ月ごとにリセットされる USD での上限額を指定します。この上限を超えたリクエストは、エラーコード 403 で拒否されます。
適用範囲の設定
組織メンバーに割り当てることで、そのメンバーが持つすべてのキーとチャットセッションをカバーできます。あるいは特定の API キーに対して直接割り当てることも可能で、これにより追加の保護層が設けられます。ただし、ユーザーまたはキーごとに適用できるガードレールは 1 つのみです。
モデルとプロバイダーのホワイトリスト
リストに登録されたモデルとプロバイダーのみが利用可能です。それ以外のものは、たとえキーからリクエストされてもすべてブロックされます。リストを空に設定すれば、すべてのリソースの利用が可能になります。
オプションの安全制御機能
モデルグループごとに「データ保持ゼロ(ZDR)」を設定したり、プロンプトインジェクションやジャイルブレイクを検出したり、機密情報(PII)の自動マスキング・ブロックを行ったり、カスタム正規表現によるコンテンツフィルタリングを実装することもできます。
割り当て前に適用範囲プレビュー機能を使って、実際にどのような制限がかかるかを確認してください。
メンバー別予算の動作について
ガードレールによる予算管理はチーム全体で共有されるものではなく、ユーザーごと、キーごとに個別に適用されます。3 人のメンバーに「1 日あたり$50」の予算を割り当てた場合、各人が独立した枠を獲得します。例えば、アリスが$50 に達するとその後のリクエストはブロックされますが、ボブとキャロルはそれぞれ独自の$50 を引き続き利用可能です。なお、1 人のメンバーが複数のキーを持っている場合、それらの使用料金はすべて合算されてそのメンバーの総額としてカウントされます。
キーレベルの制限とメンバーレベルのガードレールが同時に適用される場合は、より厳しい(低い)方の制限が優先されます。これが、キー単体の制限だけでは実現できない、きめ細やかな予算管理です。
複数のガードレールが重なる場合のポリシー適用
| レイヤー | 解決方法 |
|---|---|
| モデルおよびプロバイダーの許可リスト | 共通部分:すべてのルールで許可されたもののみが許可される |
| データ保持ゼロ(ZDR) | モデルグループごとの OpenRouter 設定 |
| 機密情報制御 | 削除よりもブロックを優先する |
| 予算管理 | ユーザーごとおよびキーごとに独立して評価され、低い制限値が適用される |
プログラムによるガードレールの管理
Management キーを使用して、PATCH /api/v1/guardrails/{id} エンドポイントを通じてガードレールを更新することも可能です。
curl -X PATCH https://openrouter.ai/api/v1/guardrails/$GUARDRAIL_ID \
  -H "Authorization: Bearer $OPENROUTER_MANAGEMENT_KEY" \
  -H "Content-Type: application/json" \
  -d '{
    "limit_usd": 50,
    "reset_interval": "daily",
    "allowed_models": ["anthropic/claude-sonnet-4.6", "openai/gpt-4o-mini"],
    "allowed_providers": ["anthropic", "openai"]
  }'
ホワイトリストにはワイルドカードではなく、モデルの正確なスラッグ(識別子)を指定する必要があります。そのため、モデルポリシーが変更された際には手動での更新が必要です。また、予算が枯渇する前に警告が出る仕組みもありません。リクエストがブロックされると、ユーザーは単に 403 エラーを受け取るだけです。
ガードレールとキーレベルの制限、どちらをいつ使うべきかについては、チームの AI 利用コスト管理 の記事を参照してください。
ステップ 5: アクティビティダッシュボードでチームの利用状況を確認する
Activity にアクセスし、Spend(利用額)、Tokens(トークン数)、Requests(リクエスト数)の 3 つのメトリックカードを確認します。時間範囲を「1 時間」「1 日」「1 週間」「1 ヶ月」「1 年」から選択し、以下の項目でグループ化できます。
- Creator: メンバーごとの利用額を表示します。
- API Key: ステップ 3 で設定した制限に応じたワークロードごとの利用額を紐付けます。
- Model: 予算を最も多く消費しているモデルを確認できます。
組織コンテキストにおけるアクティビティフィードでは、モデル名、コスト、タイミングなどの使用メタデータが全メンバーの分に表示され、API キーでフィルタリングすることも可能です。プロンプトやレスポンスの内容は一切保存されません。また、「Options」ドロップダウンから「Export」を選択し、CSV または PDF を選ぶことでデータをエクスポートできます。
OpenRouter では利用状況が 3 つの場所で報告されますが、それぞれが異なる問いに答えるものです:
| デバイス | 目的 | 場所 |
|---|---|---|
usage オブジェクト | 各 API レスポンスごとのトークン数とコストデータ | API レスポンス本文 |
usage_* キーフィールド | 単一のキーに対する時間ウィンドウごとの合計値 | GET /api/v1/key |
| アクティビティダッシュボード | 支出、トークン数、リクエスト数; グループ化およびエクスポート可能 | openrouter.ai/activity |
Activity 画面に表示される BYOK の利用料金は、プロバイダーのリスト価格を基に推計されたものであり、契約済みの割引額とは異なる場合があります。
セットアップの確認
組織をチームへ引き渡す前に、以下の 4 つの確認項目を実行してください。
事前設定されたパス(@preset/{slug})を介して API を呼び出し、レスポンスに usage.cost が含まれていることを確認してください。すべてのレスポンスには自動的に usage オブジェクトが含まれます。
API キーの上限設定を確認するには、GET /api/v1/key エンドポイントを実行し、呼び出し後に limit_remaining の値が減っていることを確認してください。
ガードレール(予算超過やモデルの許可リスト外など)に違反するリクエストを送信し、403 エラーが返されることを確認してください。
「Open Activity」で活動を確認し、作成者ごとにグループ化して、支出が正しいメンバーに紐付けられているか確認してください。
許可リスト外のリクエストが 403 エラーを返し、アクティビティダッシュボードで各メンバーの支出がそれぞれの名前で表示されれば、設定は完了です。
FAQ
チーム全体の OpenRouter での AI 利用料金を追跡するには?
組織を作成して、すべての使用量を一つの共有クレジットプールに請求させます。その後、「Activity」ダッシュボードを開き、作成者ごとにグループ化することで、メンバーごとの支出を特定できます。
組織コンテキスト内では、アクティビティフィードに各メンバーの使用メタデータ(モデル、コスト、タイミング)が表示されますが、プロンプトやレスポンスは保存されません。
OpenRouter API キーに利用限度額を設定することは可能ですか?
はい、Management API の /api/v1/keys を通じてキーの作成または更新を行う際、limit(クレジット上限)と limit_reset(日次・週次・月次のリセット周期)を設定できます。日次制限は UTC 時間の深夜にリセットされます。この上限は特定の個人ではなく、そのキー自体に適用されるため、1 人のエンジニアが 20 ドルずつのキーを 5 つ保有していれば、1 日の総利用額は 100 ドルまで可能になります。
OpenRouter の組織には最大何人まで参加できるか?
組織のメンバー数はデフォルトで 10 名に制限されています。これを超える必要がある場合はサポートへお問い合わせください。クレジット購入や請求情報の閲覧は管理者のみが可能ですが、一般メンバーはキーの作成と組織リソースの利用が可能です。すべての組織キーからの利用料金は、単一の共有クレジットプールから差し引かれます。
組織メンバー同士は相手の利用状況を確認できるのか?
利用メタデータは、組織コンテキストにおいて活用できます。アクティビティフィードには、各メンバーが使用したモデル、コスト、タイミングのデータが表示され、API キーでフィルタリングしたり、「作成者」ごとにグループ化して個人ごとの支出を把握することも可能です。ただし、プロンプトやレスポンスは保存されないため、このフィードには支出と利用状況のみが含まれ、コンテンツ自体は含まれません。
チームが使用できるモデルを制限できますか?
はい、2 つの方法で制限できます。プリセット(preset)は、@preset/{slug} を介して参照されるトラフィックに対してデフォルトのモデルまたはフォールバックリストを設定するものですが、キーがプリセットをスキップして任意のモデルに直接呼び出すことも可能です。一方、ガードレールモデルの許可リスト(allowlist)は、メンバーまたはキーごとに厳格な制限を設けるもので、許可リスト外のすべてのリクエストはプリセットの有無に関わらず 403 エラーを返します。単なるデフォルト設定ではなく、強制力のある制御が必要な場合にのみガードレールを使用してください。
1 人あたりの日次支出に上限を設定することはできますか?
組織メンバーにガードレール予算を割り当てれば、各メンバーは独自の日次・週次・月次の利用枠を取得できます。すべてのキーを通じた合計支出が上限に達すると、403 エラーでブロックされます。
なお、1 キーあたりの制限は「キー」自体を対象とするものであり、「人」を対象とするものではありません。真の意味での 1 人あたりの予算管理を実現するには、メンバー単位でガードレールを割り当てる必要があります。
OpenRouter の利用には支払いが必要か?最低利用額は設定されているか?
いいえ、従量課金制であり、最低利用額の制限はありません。無料枠も用意されています。標準的な従量課金アカウントでは、クレジット購入時に 5.5% のプラットフォーム手数料がかかりますが、プロバイダー料金の値上げは行いません。したがって、カタログ価格がそのままモデルの利用コストとなります。現在のプランと手数料については、Pricing ページをご確認ください。
OpenRouter の利用状況を確認する方法は?
利用状況は 3 つの場所で確認できます。すべての API レスポンスには、トークン数と費用を含む usage オブジェクトが含まれています。また、GET /api/v1/key エンドポイントでは、コードからポーリング可能なキーごとの利用状況フィールドが取得可能です。さらに、Activity ページ では、支出額・トークン数・リクエスト数を閲覧でき、グループ化や CSV/PDF 形式でのエクスポートもサポートされています。
原文を表示
As your team grows on OpenRouter, more API keys and broader model access make it harder to see who is spending what. Five controls fix that. An organization gives everyone one shared credit pool. Presets scope models per workload. Per-key limits cap spend per key. Guardrails enforce per-member budgets and model allowlists. And the Activity dashboard shows where the money went.
This guide sets them all up, in order: organization, presets, key limits, guardrails, then a check in Activity. If you’re still deciding which controls you need, read the governing team AI spend guide first. This page covers the setup itself.
Before you start
Make sure you have the following in place before you begin:
- Use an account with a verified email (organization creation requires email verification).
- Complete the setup as an organization admin so you can manage billing, API keys, member access, and guardrails.
- Plan your member list in advance. Organizations support up to 10 members by default, with higher limits available through support.
- Review pricing with your team. Pay-as-you-go has no minimum spend, and the 5.5% platform fee for standard pay-as-you-go accounts applies when you buy credits, not per request. See Pricing.
Step 1: Create your organization and pool credits
Go to Settings > Preferences, open the Organization section, and click Create Organization. After entering your organization details, invite team members and switch into organization context using the org switcher at the top of the app.
Confirm the switcher shows your org name before you proceed. In a personal account, usage, API keys, and credits belong to your individual account. In organization context, they belong to the shared organization account. The org switcher is a common source of usage attribution errors.
Billing permissions depend on the role assigned to users during invitation:
- Admins can purchase credits and view billing information.
- Members can use organization resources and create API keys, but can’t purchase credits or access billing details.
Fund the shared credit pool
Purchase credits from the billing page while you’re in organization context. Credits go into one shared pool that every API key in the organization draws from, so you fund the team once at the center instead of topping up per engineer.
If you need to move existing personal credits into the organization, use the transfer option on the credits page. Transfers have eligibility rules (two-factor authentication on your account, account and membership age, recently purchased credits, and cooldowns between transfers), so if a transfer isn’t available yet, the page tells you why. Organizations billed by invoice can’t receive transfers.
Step 2: Scope models and providers with presets
A preset is a reusable configuration that pins which model and providers a workload uses. On organization accounts, presets are shared across all members.
Create the preset
Go to Presets Settings and create a preset per workload path, for example support-bot, internal-search, or eval-runner.
For each preset:
- Choose one model or a fallback model array.
- Configure provider routing preferences with sort.
- Apply provider include/exclude rules.
- Optionally set system, temperature, and top_p.
- Save with a stable slug.
Presets are versioned, with each save designated as the new active version that API requests resolve to, and version history is kept so you can roll back. Request-level parameters shallow-override preset values.
| Preset control | What it does |
|---|---|
| Model selection | Keeps workloads on the intended model families |
| Fallback array | Keeps requests working during provider or model outages |
| Provider routing (sort) | Routes by latency or cost, whichever you prioritize |
| Provider include/exclude | Restricts execution to approved providers |
| Prompt and generation params | Keeps output style and variance consistent |
Reference the preset from code
Reference a preset in three ways: as the model with @preset/{slug}, via a separate preset field, or as model@preset/{slug}. All three resolve server-side, so the same preset works from any SDK.
const resp = await fetch('https://openrouter.ai/api/v1/chat/completions', {
  method: 'POST',
  headers: {
    Authorization: `Bearer ${process.env.OPENROUTER_API_KEY}`,
    'Content-Type': 'application/json',
  },
  body: JSON.stringify({
    model: '@preset/support-bot',
    messages: [{ role: 'user', content: 'Summarize this ticket.' }],
  }),
});
When you create or update a preset through the API, only the configuration fields are stored, such as model, temperature, top_p, provider, system, and tools. Transient fields like messages, input, prompt, and stream are ignored.
A preset only affects requests that explicitly reference it. If you need a model restriction that a key can’t bypass, use a guardrail model allowlist in Step 4 instead.
Step 3: Cap spend per key with limits and resets
You can cap each API key with a credit limit and a limit_reset, so every workload gets a fresh allowance on a recurring schedule. You create and manage these keys through a Management API key, which exists only for key administration.
Create a Management API key
Go to Management Keys and click Create New Key.
A Management API key handles administrative operations, such as key management under /api/v1/keys and guardrail management under /api/v1/guardrails. It can’t call completion endpoints, so it’s safe to use in provisioning systems and automation pipelines. Use it to create one key per service, environment, or engineer, so access and spend stay separate per workload.
Configure limits, resets, and lifecycle controls
When creating or updating a key via /api/v1/keys, you control both the spending cap and how it resets:
| Field | What it sets |
|---|---|
limit | Credit cap for the key |
limit_reset | daily, weekly, or monthly (daily resets at midnight UTC) |
disabled | true disables the key immediately |
include_byok_in_limit | Whether BYOK spend counts toward the limit |
Create a key with a daily credit cap:
const res = await fetch('https://openrouter.ai/api/v1/keys', {
  method: 'POST',
  headers: {
    Authorization: `Bearer ${process.env.OPENROUTER_MANAGEMENT_KEY}`,
    'Content-Type': 'application/json',
  },
  body: JSON.stringify({
    name: 'support-bot-prod',
    limit: 25,
    limit_reset: 'daily',
  }),
});
Update a key to tighten the cap or change the reset period:
const res = await fetch(`https://openrouter.ai/api/v1/keys/${keyHash}`, {
  method: 'PATCH',
  headers: {
    Authorization: `Bearer ${process.env.OPENROUTER_MANAGEMENT_KEY}`,
    'Content-Type': 'application/json',
  },
  body: JSON.stringify({ limit: 15, limit_reset: 'weekly' }),
});
Disable a key immediately to stop spend or cut off a misbehaving workload:
await fetch(`https://openrouter.ai/api/v1/keys/${keyHash}`, {
  method: 'PATCH',
  headers: {
    Authorization: `Bearer ${process.env.OPENROUTER_MANAGEMENT_KEY}`,
    'Content-Type': 'application/json',
  },
  body: JSON.stringify({ disabled: true }),
});
Monitor usage and automate governance
Each key reports its own usage through the fields usage, usage_daily, usage_weekly, usage_monthly, limit_remaining, and their BYOK equivalents. You can poll these from a cron job or background worker and disable a key as it approaches its cap.
The limit field caps the key, not the person. When you need enforcement across all keys belonging to a member, use a member-assigned guardrail in Step 4. For key rotation and secret hygiene, see the API key management guide.
Step 4: Enforce a per-member budget and model allowlist with a guardrail
A guardrail enforces policy at the person level, no matter how many API keys a member creates. It turns Step 2’s model defaults and Step 3’s per-key caps into hard limits that members can’t bypass. Only organization admins can create and manage guardrails.
Create the guardrail
Go to Settings > Privacy, scroll to Guardrails, and click New Guardrail.
Configure the following:
- Budget limit: Set a USD cap with a daily, weekly, or monthly reset. Requests over the cap are rejected with a 403.
- Assignment scope: Assign to an org member (covers all their keys and chat sessions) or to a specific API key (adds an extra layer on top). Only one guardrail is directly assigned per user or key.
- Model and provider allowlists: Only models and providers on the list are permitted. Everything else is blocked, even if a key tries to request it. Leave a list unchecked to allow all.
- Optional safety controls: Zero Data Retention (ZDR) per model group, prompt injection and jailbreak detection, Sensitive Information (PII) redaction or blocking, and custom regex content filters.
Use the eligibility preview to see the effective restrictions before you assign.
How per-member budgets behave
Guardrail budgets are enforced per-user and per-key, not shared across the team. Give 3 members a $50/day guardrail, and each gets their own allowance: Alice hits $50, and her requests are blocked while Bob and Carol each still have their own $50. A member’s spend across all their keys accumulates to that member’s total.
When both a key-level limit and a member-level guardrail apply, the lower limit wins. This is the tight per-member budget that the per-key limit alone can’t give you.
How policies compose when multiple guardrails apply
| Layer | How it resolves |
|---|---|
| Model and provider allowlists | Intersection: only what all rules allow is permitted |
| Zero Data Retention (ZDR) | OR per model group |
| Sensitive information controls | Blocking wins over redaction |
| Budgets | Evaluated independently per-user and per-key; lower limit wins |
Manage guardrails programmatically
You can also update a guardrail with a Management key via PATCH /api/v1/guardrails/{id}:
curl -X PATCH https://openrouter.ai/api/v1/guardrails/$GUARDRAIL_ID \
  -H "Authorization: Bearer $OPENROUTER_MANAGEMENT_KEY" \
  -H "Content-Type: application/json" \
  -d '{
    "limit_usd": 50,
    "reset_interval": "daily",
    "allowed_models": ["anthropic/claude-sonnet-4.6", "openai/gpt-4o-mini"],
    "allowed_providers": ["anthropic", "openai"]
  }'
Allowlists take exact model slugs, not wildcards, so they need upkeep as your model policy changes. And there’s no warning before a budget runs out. Users just get a 403 when a request is blocked. For when to use guardrails versus key-level limits, see governing team AI spend.
Step 5: Read team spend in the Activity dashboard
Open Activity and read the three metric cards (Spend, Tokens, and Requests). Set the time period (1 Hour, 1 Day, 1 Week, 1 Month, or 1 Year), then group:
- Creator shows spend per member.
- API Key maps spend to the workloads you capped in Step 3.
- Model shows which models are consuming the most budget.
In organization context, the Activity feed shows usage metadata for all members, including model, cost, and timing, and can be filtered by API key. Prompts and responses are never stored. You can also export data from the Options dropdown by selecting Export and choosing CSV or PDF.
OpenRouter reports usage in three places, and they answer different questions:
| Surface | Purpose | Where |
|---|---|---|
usage object | Per-response token and cost data on every API response | API response body |
usage_* key fields | Time-windowed totals for a single key | GET /api/v1/key |
| Activity dashboard | Spend, Tokens, Requests; grouped and exportable | openrouter.ai/activity |
BYOK spend shown in Activity is estimated using provider list prices and may differ from your negotiated discounts.
Verify your setup
Before you hand the organization over to your team, run these four checks:
- Make a call through a preset (@preset/{slug}) and confirm usage.cost comes back in the response. Every response includes the usage object automatically.
- Confirm a capped key’s limit_remaining drops after a call via GET /api/v1/key.
- Send a request that violates a guardrail (over budget or off the model allowlist) and confirm it returns a 403.
- Open Activity, group by Creator, and confirm spend maps to the correct member.
Setup is done when requests outside the allowlist return a 403 and the Activity dashboard shows each member’s spend under their name.
FAQ
How do I track AI spend across my team on OpenRouter?
Create an organization so all usage bills to one shared credit pool, then open the Activity dashboard and group by Creator to attribute spend per member. In organization context, the activity feed shows every member’s usage metadata (model, cost, timing); prompts and responses aren’t stored.
Can I set a spending limit on an OpenRouter API key?
Yes. When you create or update a key via the Management API at /api/v1/keys, set a limit (the credit cap) and a limit_reset of daily, weekly, or monthly. Daily limits reset at midnight UTC. The limit caps that key, not the person who holds it, so 5 keys at $20 each let one engineer spend $100 a day.
How many people can be in an OpenRouter organization?
Organizations are capped at 10 members by default. Contact support if you need more. Only admins can purchase credits or view billing, while members create keys and use org resources. All org-key usage draws from one shared credit pool.
Can organization members see each other’s usage?
Yes, the usage metadata. In organization context the Activity feed shows every member’s model, cost, and timing data, and you can filter by API key or group by Creator to attribute spend per person. Prompts and responses are never stored, so the feed carries spend and usage data, not content.
Can I restrict which models my team can use?
Yes, in two ways. A preset sets a default model or fallback list for traffic that references it via @preset/{slug}, but a key can skip the preset and call any model directly. A guardrail model allowlist is a hard restriction per member or per key, and any request outside the allowlist returns a 403 regardless of preset. Use a guardrail when you need enforcement, not just a default.
Can I cap how much one person spends per day?
Yes. Assign a guardrail budget to an org member, and each member gets their own daily, weekly, or monthly allowance. They’re blocked with a 403 when their combined spend across all their keys hits the cap. The per-key limit caps a key, not the person, so use a member-assigned guardrail for a true per-person budget.
Do you have to pay for OpenRouter, and is there a minimum spend?
No. Pay-as-you-go has no minimum spend, and a free tier exists. The platform fee is 5.5% on credit purchases for standard pay-as-you-go accounts, and we don’t mark up provider pricing, so the catalog price is the model cost. See Pricing for current tiers and fees.
How do I see my OpenRouter usage?
You can see usage in three places. Every API response includes a usage object with token counts and cost. GET /api/v1/key returns per-key usage fields you can poll from code. And the Activity page shows Spend, Tokens, and Requests, with grouping and CSV or PDF export.
関連記事
今日のまとめ
AIデイリーブリーフで今日の重要ニュースをまとめ読み