[お知らせ] 本フィードの運用を終了しました
ハメル・フサイン氏は、LLM出力を最適化するライブラリがプロンプトを隠蔽する傾向にあると指摘し、mitmproxyを用いてAPI呼び出しをインターセプトしプロンプトを可視化する手法を提案している。
キーポイント
プロンプト抽象化の課題
guardrailsやDSPyなどのライブラリはプロンプト設計を自動化・隠蔽する傾向があり、最終的な出力プロンプトの取得が困難な場合がある。
プロンプト可視化の重要性
LLMに送信される実際のプロンプトは、ツール内部動作を理解する最速の方法であり、複雑な用語や黒箱化による理解の阻害を避けるべきだ。
mitmproxyによるインターセプト手法
ドキュメントやソースコードを直接読まずに、mitmproxyでAPI呼び出しをインターセプトし、任意のツールから送信されるプロンプトを取得・分析する方法を示す。
LLM抽象化ツールのリスクとプロンプト可視化の重要性
多くのLLMライブラリはプロンプト構築を自動化するが、その内部動作を理解するには送られる実際のプロンプトを確認するのが最速である。可視化により、フレームワークの必要性評価や単純なプロンプト文字列への置き換えが可能になり、不要な複雑さ(accidental complexity)を最小限に抑えられる。
mitmproxyを用いたフレームワーク非依存のAPIインターセプト手法
ソースコードやドキュメントに依存せず、mitmproxyというHTTPSプロキシを環境変数(REQUESTS_CA_BUNDLE, SSL_CERT_FILE, HTTPS_PROXY)でPythonプログラムに設定することで、任意のLLMライブラリが送信するAPI呼び出しとプロンプトを透過的に傍受・ログ出力できる。
Establish a routine
Choose a specific time of day that works best for you, whether it's in the morning or during your lunch break.
影響分析・編集コメントを表示
影響分析
本記事は、LLMツールエコシステムにおける「プロンプト抽象化」トレンドに対する重要な警鐘を発している。開発者に対し、黒箱化したライブラリ内部を深く理解する代わりに、プロンプトの可視化という実証的なアプローチを推奨することで、デバッグ効率と技術的透明性を向上させる可能性が高い。これは複雑なLLMフレームワークの学習コストを下げ、現場での実装信頼性を高める上で意義がある。
編集コメント
高度な抽象化が進むLLMエコシステムにおいて、内部動作の透明性を確保する「プロンプト可視化」のアプローチは実務上極めて有効です。複雑なフレームワークの学習コストを下げ、デバッグを効率化する実用的な知見として注目すべき内容です。
*
背景
あなたに代わってプロンプトを再構成したり構築したりすることで、大規模言語モデル(LLM)の出力を改善することを目指したライブラリが数多く存在します。これらのライブラリは、LLMの出力を以下のように改善することを謳っています:
- より安全な出力(例:guardrails)
- 決定論的な出力(例:guidance)
- 構造化された出力(例:instructor)
- 堅牢な出力(例:langchain)
- …あるいは任意の指標に対して最適化された出力(例:DSPy)。
これらのツールの一部*に共通するテーマは、ユーザーがプロンプト作成(prompting)から自らを切り離すよう促している点です。
**
DSPy: 「これは新しいパラダイムであり、大規模言語モデル(LM)とそのプロンプトは背景に消え去ります……。あなたはプログラムを再コンパイルできますが、DSPyが新しい効果的なプロンプトを作成します。」
guidance 「guidanceは、従来のプロンプト作成と比較して優れた制御と効率を提供するプログラミングパラダイムです……」
プロンプト作成を推奨していないツールでさえ、これらのツールが言語モデルに送信する最終的なプロンプトを取得するのが難しいと感じることがよくあります。これらのツールがLLMに送信するプロンプトは、それらのツールが行っていることを自然言語で記述したものであり、動作を理解する最も速い方法です。**さらに、一部のツールには内部構造を記述するための専門用語(dense terminology)があり、これらがそれらの動作をさらに不明瞭にすることがあります。
以下で説明する理由により、ほとんどの人が以下のマインドセットから恩恵を受けると思います:

このブログ記事では、ドキュメントをくまなく調べたりソースコードを読んだりすることなく、任意のツールからのプロンプト付きAPI呼び出し(API calls)をインターセプトする方法をお見せします。また、以前言及したLLM関連のツールからの例を用いて、mitmproxyの設定と操作方法も解説します。
動機:偶発的複雑さの最小化
抽象化を採用する前に、偶発的複雑さ(accidental complexity)を抱える危険性を考慮することが重要です。この危険性は、プログラミング抽象化と比較してLLM抽象化において顕著です。LLM抽象化では、自然言語でAIと対話するのではなく、コードを書く方向にユーザーを強いることが多く、これはLLMの目的に反する可能性があります:
**
プログラミング抽象化 -> タスクを機械語に変換するために使用できる人間のような言語
LLM抽象化 -> タスクを人間言語に変換するために使用できる理解不能なフレームワーク
— Hamel Husain (@HamelHusain) 2024年2月5日
これは皮肉なコメントですが、ツールを評価する際にこの点を念頭に置く価値はあります。ツールが提供する自動化には主に2つの種類があります:
- コードとLLMのインターリーブ(Interleaving):この自動化を表現するには、タスクを実行するためにコードを実行する必要があるため、多くの場合コードを通じて行うのが最も適しています。例としては、ルーティング、関数の実行、リトライ、チェーンなどが挙げられます。
- プロンプトの再構成と構築(Re-Writing and constructing prompts):意図を表現するには、多くの場合自然言語が最も適しています。ただし例外もあります!例えば、関数の定義やスキーマを自然言語ではなくコードで表現する方が便利な場合があります。
多くのフレームワークは両方のタイプの自動化を提供しています。ただし、2番目のタイプに過度に依存すると悪影響を及ぼす可能性があります。プロンプトを確認することで、以下を判断できます:
- このフレームワークは本当に必要か?
- 最終的なプロンプト(文字列)をそのまま拝借して、フレームワークは捨ててしまうべきか?
- これよりも優れたプロンプト(より短く、意図に合致するなど)を作成できるか?
- これが最善のアプローチか(API呼び出しの回数は適切か)?
私の経験上、プロンプトとAPI呼び出しを確認することは、情報に基づいた意思決定を行うために不可欠です。
LLM API呼び出しのインターセプト(Intercepting LLM API calls)
LLMのAPI呼び出しをインターセプトする方法は多数あります。例えば、ソースコードへのモンキーパッチング(monkey patching)やユーザー向けオプションの発見などが挙げられます。しかし、これらのアプローチはソースコードやドキュメントの品質に大きなばらつきがあるため、私の経験では時間がかかりすぎます。結局のところ、コードの動作を気にせずにAPI呼び出しを確認したいだけなのです!
フレームワークに依存せずにAPI呼び出しを確認する方法は、送信されるAPIリクエストをログに記録するプロキシを設定することです。これは、無料のオープンソースHTTPSプロキシ(HTTPS proxy)であるmitmproxyを使用すると簡単に実行できます。
mitmproxyの設定
これは、目的に合った初心者向けの方法として推奨されるmitmproxyの設定方法です:
- ウェブサイトのインストール手順に従ってください
- ターミナルでmitmwebを実行してインタラクティブUI(interactive UI)を起動します。ログに表示されるインタラクティブUIのURL(http://127.0.0.1:8081/ のような形式)に注意してください。
- 次に、すべてのトラフィックをhttp://localhost:8080でリッスンしているmitproxy経由でルーティングするように、デバイス(つまりノートパソコン)を設定する必要があります。ドキュメントによると:
システムでHTTPプロキシ(HTTP proxy)を設定する方法をウェブ検索することを推奨します。一部のオペレーティングシステムにはグローバル設定があり、一部のブラウザは独自の設定を持ち、その他のアプリケーションは環境変数を使用するなど、方法が異なります。
私の場合、「macOSでプロキシを設定する方法」でGoogle検索したところ、以下の結果が返されました:
Appleメニューを選択 > システム設定、サイドバーでネットワークをクリック、右側のネットワークサービスをクリック、詳細をクリック、その後プロキシをクリックします。
その後、UI内の以下の場所にlocalhostと8080を入力します:
- 次に、http://mitm.itにアクセスすると、HTTPSリクエストをインターセプトするために必要なmitmproxy認証局(Certificate Authority (CA))のインストール手順が表示されます。(ここで手動で実行することもできます。)また、後ほど参照する予定なので、CAファイルの保存場所をメモしておいてください。
- https://mitmproxy.org/ などのウェブサイトにアクセスし、mtimweb UI(私の場合は http://127.0.0.1:8081/ にあります。URL はターミナルのログをご確認ください)に該当する出力が表示されることで、すべてが正常に動作することを確認できます。
- 設定が完了したら、以前ネットワークで有効にしたプロキシ(proxy)を無効にできます。私の Mac では、上記のスクリーンショットで示したプロキシボタンを切り替えることでこれを行っています。これは、不要なノイズを排除するためにプロキシの適用範囲を Python プログラムのみに限定したいからです。
**
Tip
ネットワーク関連のソフトウェアでは、環境変数(environment variables)を設定することで送信リクエストのプロキシ化を許可するのが一般的です。これが、プロキシの適用範囲を特定の Python プログラムに限定する際に使用するアプローチです。ただし、慣れてきたら他の種類のプログラムでも試して、どのような発見があるか確認することをお勧めします!**
Python 用の環境変数
requests および httpx ライブラリがトラフィックをプロキシに送信し、HTTPS 通信に対して CA ファイル(Certificate Authority file)を参照するようにするため、以下の環境変数を設定する必要があります。
**
Important
このブログ記事のコードスニペットを実行する前に、これらの環境変数が設定されていることを確認してください。
import os
CA ファイルの場所
cert_file = '/Users/hamel/Downloads/mitmproxy-ca-cert.pem'
os.environ['REQUESTS_CA_BUNDLE'] = cert_file
os.environ['SSL_CERT_FILE'] = cert_file
os.environ['HTTPS_PROXY'] = 'http://127.0.0.1:8080'
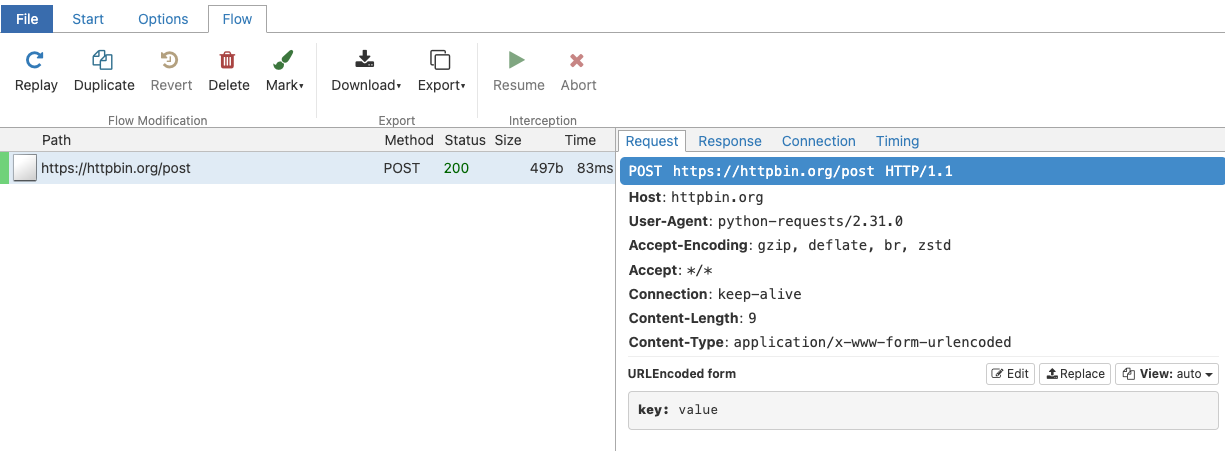
You can do a minimal test by running the following code:
import requests
requests.post('https://httpbin.org/post',
data={'key': 'value'})
<Response [200]>
This will appear in the UI like so:
例
ここからが楽しみどころです。LLM ライブラリ(大規模言語モデルライブラリ)の例をいくつか実行し、その API 呼び出し(Application Programming Interface call)をインターセプトしてみましょう!
Guardrails
Guardrails を使用すると、構造と型を指定でき、それを用いて大規模言語モデルの出力を検証および補正できます。これは guardrails-ai/guardrails README からのハローワールド例です。
from pydantic import BaseModel, Field
from guardrails import Guard
import openai
class Pet(BaseModel):
pet_type: str = Field(description="Species of pet")
name: str = Field(description="a unique pet name")
prompt = """
What kind of pet should I get and what should I name it?
${gr.complete_json_suffix_v2}
"""
guard = Guard.from_pydantic(output_class=Pet, prompt=prompt)
validated_output, *rest = guard(
llm_api=openai.completions.create,
engine="gpt-3.5-turbo-instruct"
)
print(f"{validated_output}")
{
"pet_type": "dog",
"name": "Buddy
ここで何が起こっているのでしょうか?この構造化された出力と検証はどのように機能しているのでしょうか?mitmproxy UI を確認すると、上記のコードが 2 つの LLM API 呼び出しを生成していることがわかります。最初の呼び出しには以下のプロンプトが使用されています。
What kind of pet should I get and what should I name it?
以下に、このドキュメントから抽出する情報と、それを抽出するためのタグを示すXMLを記載します。
<output>
<string name="pet_type" description="Species of pet"/>
<string name="name" description="a unique pet name"/>
</output>
有効なJSONオブジェクトのみを返してください(他のテキストは不要です)。ここで、JSONのフィールドキーは対応するXMLのname属性とし、値は対応するXMLタグで指定された型とします。JSONはXMLの形式(リスト、オブジェクト、特定の型などへのリクエストを含む)に厳密に従う必要があります。正確かつ簡潔にしてください。
期待される動作を示す、単純な(XML、JSON)ペアの例を以下に示します:
<string name='foo' format='two-words lower-case' />=>{'foo': 'example one'}<list name='bar'><string format='upper-case' /></list>=>{"bar": ['STRING ONE', 'STRING TWO', etc.]}<object name='baz'><string name="foo" format="capitalize two-words" /><integer name="index" format="1-indexed" /></object>=>{'baz': {'foo': 'Some String', 'index': 1}}
次に、以下のプロンプトを用いた別の呼び出しが続きます:**
I was given the following response, which was not parseable as JSON.
"{
\"pet_type\": \"dog\",
\"name\": \"Buddy"
Help me correct this by making it valid JSON.
以下に、このドキュメントから抽出する情報と、それを抽出するためのタグを示すXMLを記載します。
<output>
<string name="pet_type" description="Species of pet"/>
<string name="name" description="a unique pet name"/>
</output>
有効なJSONオブジェクトのみを返してください(他のテキストは不要です)。ここで、JSONのフィールドキーは対応するXMLのname属性とし、値は対応するXMLタグで指定された型とします。JSONはXMLの形式(リスト、オブジェクト、特定の型などへのリクエストを含む)に厳密に従う必要があります。正確かつ簡潔にしてください。不明な点がある場合は、nullを入力してください。
犬の鳴き声です。構造化出力(structured output)を取得するために、これほど多くの儀式が必要だとは!このライブラリがXMLスキーマ(XML schemas)を使用していることがわかりました(他のライブラリは関数呼び出し(function calling)を使います)。魔法が解けた今、より良いまたは単純なアプローチを考案できるかどうか検討する価値があります。いずれにせよ、不要な複雑さに巻き込まれることなく仕組みを理解できたのは、大きな収穫です。
Guidance
Guidanceは、プロンプト作成のための制約生成(constrained generation)とプログラミング構文を提供します。チュートリアルのチャット例を見てみましょう:
import guidance
gpt35 = guidance.models.OpenAI("gpt-3.5-turbo")
import re
from guidance import gen, select, system, user, assistant
@guidance
def plan_for_goal(lm, goal: str):
# 以下で使用するヘルパー関数(helper function)です
def parse_best(prosandcons, options):
best = re.search(r'Best=(\d+)', prosandcons)
if not best:
best = re.search(r'Best.*?(\d+)', 'Best= option is 3')
if best:
best = int(best.group(1))
else:
best = 0
return options[best]
# モデルへの一般的な指示
with system():
lm += "You are a helpful assistant."
# ユーザーからの簡単なリクエストをシミュレート
# ここでは 'lm2' を使用している点に注意してください。これらは中間ステップ(intermediate steps)であるため、現在の lm オブジェクトを上書きしたくないからです
with user():
lm2 = lm + f"""\
I want to {goal}
Can you please generate one option for how to accomplish this?
Please make the option very short, at most one line."""
# 複数のオプションを生成します。これは複数の連続する生成リクエスト(generation requests)を意味することに注意してください
n_options = 5
with assistant():
options = []
for i in range(n_options):
options.append((lm2 + gen(name='option', temperature=1.0, max_tokens=50))["option"])
# ユーザーに長所と短所(pros and cons)のコメントを依頼します
with user():
lm2 += f"""\
I want to {goal}
Can you please comment on the pros and cons of each of the following options, and then pick the best option?
"""
for i, opt in enumerate(options):
lm2 += f"Option {i}: {opt}\n"
lm2 += f"""\
Please discuss each option very briefly (one line for pros, one for cons), and end by saying Best=X, where X is the number of the best option."""
# モデルから長所と短所を取得します
with assistant():
lm2 += gen(name='prosandcons', temperature=0.0, max_tokens=600, stop="Best=") + "Best=" + gen("best", regex="[0-9]+")
# ユーザーはここで最良と選択されたものを抽出し、完全な計画を依頼します
# ここでは 'lm' に戻しています。これが最終結果として欲しいものだからです
with user():
lm += f"""\
I want to {goal}
Here is my plan: {options[int(lm2["best"])]}
Please elaborate on this plan, and tell me how to best accomplish it."""
# 計画が生成されます
with assistant():
lm += gen(name='plan', max_tokens=500)
return lm
results = gpt35 + plan_for_goal(goal="もっと本を読む")
system
あなたは役に立つアシスタントです。
user
もっと本を読みたいと思います
私の計画は:毎日30分の集中読書時間を確保することです。
この計画について詳しく説明し、どのように達成するのが最善か教えてください。
assistant
毎日30分の集中読書時間を確保することは、もっと本を読むための素晴らしい計画です。この目標を達成するためのヒントをいくつかご紹介します:
- ルーチンを確立する:朝、昼休みの間など、あなたにとって最も適した一日の特定の時間を選択します。
原文を表示
Background
There are many libraries that aim to make the output of your LLMs better by re-writing or constructing the prompt for you. These libraries purport to make the output of your LLMs:
- safer (ex: guardrails)
- deterministic (ex: guidance)
- structured (ex: instructor)
- resilient (ex: langchain)
- … or even optimized for an arbitrary metric (ex: DSPy).
A common theme among *some* of these tools is they encourage users to disintermediate themselves from prompting.
DSPy: “This is a new paradigm in which LMs and their prompts fade into the background …. you can compile your program again DSPy will create new effective prompts”
guidance “guidance is a programming paradigm that offers superior control and efficiency compared to conventional prompting …”
Even when tools don’t discourage prompting, I’ve often found it difficult to retrieve the final prompt(s) these tools send to the language model. The prompts sent by these tools to the LLM is a natural language description of what these tools are doing, and is the fastest way to understand how they work. Furthermore, some tools have dense terminology to describe internal constructs which can further obfuscate what they are doing.
For reasons I’ll explain below, I think most people would benefit from the following mindset:
In this blog post, I’ll show you how you can intercept API calls w/prompts for any tool, without having to fumble through docs or read source code. I’ll show you how to setup and operate mitmproxy with examples from the LLM the tools I previously mentioned.
Motivation: Minimize accidental complexity
Before adopting an abstraction, its important to consider the dangers of taking on accidental complexity. This danger is acute for LLM abstractions relative to programming abstractions. With LLM abstractions, we often force the user to regress towards writing code instead of conversing with the AI in natural language, which can run counter to the purpose of LLMs:
Programming abstraction -> a human-like language you can use to translate your task into machine codeLLM abstraction -> an unintelligible framework you can use to translate your task into human language
— Hamel Husain (@HamelHusain) February 5, 2024
While this is a cheeky comment, it’s worth keeping this in mind while evaluating tools. There are two primary types of automation that tools provide:
- Interleaving code and LLMs: Expressing this automation is often best done through code, since code must be run to carry out the task. Examples include routing, executing functions, retries, chaining, etc.
- Re-Writing and constructing prompts: Expressing your intent is often best done through natural language. However, there are exceptions! For example, it is convenient to express a function definition or schema from code instead of natural language.
Many frameworks offer both types of automation. However, going too far with the second type can have negative consequences. Seeing the prompt allows you decide:
- Is this framework really necessary?
- Should I just steal the final prompt (a string) and jettison the framework?
- Can we write a better prompt than this (shorter, aligned with your intent, etc)?
- Is this the best approach (do the # of API calls seem appropriate)?
In my experience, seeing the prompts and API calls are essential to making informed decisions.
Intercepting LLM API calls
There are many possible ways to intercept LLM API calls, such as monkey patching source code or finding a user-facing option. I’ve found that those approaches take far too much time since the quality of source code and documentation can vary greatly. After all, I just want to see API calls without worrying about how the code works!
A framework agnostic way to see API calls is to setup a proxy that logs your outgoing API requests. This is easy to do with mitmproxy, an free, open-source HTTPS proxy.
Setting Up mitmproxy
This is an opinionated way to setup mitmproxythat’s beginner-friendly for our intended purposes:
- Follow the installation instructions on the website
- Start the interactive UI by running mitmweb in the terminal. Pay attention to the url of the interactive UI in the logs which will look something like this: Web server listening at http://127.0.0.1:8081/
- Next, you need to configure your device (i.e. your laptop) to route all traffic through mitproxy, which listens on http://localhost:8080. Per the documentation:
We recommend to simply search the web on how to configure an HTTP proxy for your system. Some operating system have a global settings, some browser have their own, other applications use environment variables, etc.
In my case, A google search for “set proxy for macos” returned these results:
choose Apple menu > System Settings, click Network in the sidebar, click a network service on the right, click Details, then click Proxies.
I then insert localhost and 8080 in the following places in the UI:
- Next, navigate to http://mitm.it and it will give you instructions on how to install the mitmproxy Certificate Authority (CA), which you will need for intercepting HTTPS requests. (You can also do this manually here.) Also, take note of the location of the CA file as we will reference it later.
- You can test that everything works by browsing to a website like https://mitmproxy.org/, and seeing the corresponding output in the mtimweb UI which for me is located at http://127.0.0.1:8081/ (look at the logs in your terminal to get the URL).
- Now that you set everything up, you can disable the proxy that you previously enabled on your network. I do this on my mac by toggling the proxy buttons in the screenshot I showed above. This is because we want to scope the proxy to only the python program to eliminate unnecessary noise.
**
Tip
Networking related software commonly allows you to proxy outgoing requests by setting environment variables. This is the approach we will use to scope our proxy to specific Python programs. However, I encourage you to play with other types of programs to see what you find after you are comfortable!
Environment variables for Python
We need to set the following environment variables so that the requests and httpx libraries will direct traffic to the proxy and reference the CA file for HTTPS traffic:
**
Important
Make sure you set these environment variables before running any of the code snippets in this blog post.
import os
# The location of my CA File
cert_file = '/Users/hamel/Downloads/mitmproxy-ca-cert.pem'
os.environ['REQUESTS_CA_BUNDLE'] = cert_file
os.environ['SSL_CERT_FILE'] = cert_file
os.environ['HTTPS_PROXY'] = 'http://127.0.0.1:8080'
You can do a minimal test by running the following code:
import requests
requests.post('https://httpbin.org/post',
data={'key': 'value'})<Response [200]>This will appear in the UI like so:
Examples
Now for the fun part, let’s run through some examples of LLM libraries and intercept their API calls!
Guardrails
Guardrails allows you specify structure and types, which it uses to validate and correct the outputs of large language models. This is a hello world example from the guardrails-ai/guardrails README:
from pydantic import BaseModel, Field
from guardrails import Guard
import openai

class Pet(BaseModel):
    pet_type: str = Field(description="Species of pet")
    name: str = Field(description="a unique pet name")

prompt = """
    What kind of pet should I get and what should I name it?

    ${gr.complete_json_suffix_v2}
"""
guard = Guard.from_pydantic(output_class=Pet, prompt=prompt)

validated_output, *rest = guard(
    llm_api=openai.completions.create,
    engine="gpt-3.5-turbo-instruct"
)

print(f"{validated_output}"){
"pet_type": "dog",
"name": "BuddyWhat is happening here? How is this structured output and validation working? Looking at the mitmproxy UI, I can see that the above code resulted in two LLM API calls, the first one with this prompt:
What kind of pet should I get and what should I name it?


Given below is XML that describes the information to extract from this document and the tags to extract it into.

<output>
    <string name="pet_type" description="Species of pet"/>
    <string name="name" description="a unique pet name"/>
</output>


ONLY return a valid JSON object (no other text is necessary), where the key of the field in JSON is the `name` attribute of the corresponding XML, and the value is of the type specified by the corresponding XML's tag. The JSON MUST conform to the XML format, including any types and format requests e.g. requests for lists, objects and specific types. Be correct and concise.

Here are examples of simple (XML, JSON) pairs that show the expected behavior:
- `<string name='foo' format='two-words lower-case' />` => `{'foo': 'example one'}`
- `<list name='bar'><string format='upper-case' /></list>` => `{"bar": ['STRING ONE', 'STRING TWO', etc.]}`
- `<object name='baz'><string name="foo" format="capitalize two-words" /><integer name="index" format="1-indexed" /></object>` => `{'baz': {'foo': 'Some String', 'index': 1}}`
Followed by another call with this prompt:
I was given the following response, which was not parseable as JSON.

"{\n    \"pet_type\": \"dog\",\n    \"name\": \"Buddy"

Help me correct this by making it valid JSON.

Given below is XML that describes the information to extract from this document and the tags to extract it into.

<output>
    <string name="pet_type" description="Species of pet"/>
    <string name="name" description="a unique pet name"/>
</output>


ONLY return a valid JSON object (no other text is necessary), where the key of the field in JSON is the `name` attribute of the corresponding XML, and the value is of the type specified by the corresponding XML's tag. The JSON MUST conform to the XML format, including any types and format requests e.g. requests for lists, objects and specific types. Be correct and concise. If you are unsure anywhere, enter `null`.
Woof. That’s a whole lot of ceremony to get structured output! We learned that this library’s approach to structured output uses XML schemas (while others use function calling). It’s worth considering if you can fashion a better or simpler approach now that the magic has been lifted. Either way, we now have insight into how it works without dragging you into unnecessary complexity, which is a win.
Guidance
Guidance offers constrained generation and programming constructs for writing prompts. Let’s dive into a chat example from their tutorials:
import guidance
gpt35 = guidance.models.OpenAI("gpt-3.5-turbo")

import re
from guidance import gen, select, system, user, assistant

@guidance
def plan_for_goal(lm, goal: str):

    # This is a helper function which we will use below
    def parse_best(prosandcons, options):
        best = re.search(r'Best=(\d+)', prosandcons)
        if not best:
            best =  re.search(r'Best.*?(\d+)', 'Best= option is 3')
        if best:
            best = int(best.group(1))
        else:
            best = 0
        return options[best]

    # Some general instruction to the model
    with system():
        lm += "You are a helpful assistant."

    # Simulate a simple request from the user
    # Note that we switch to using 'lm2' here, because these are intermediate steps (so we don't want to overwrite the current lm object)
    with user():
        lm2 = lm + f"""\
        I want to {goal}
        Can you please generate one option for how to accomplish this?
        Please make the option very short, at most one line."""

    # Generate several options. Note that this means several sequential generation requests
    n_options = 5
    with assistant():
        options = []
        for i in range(n_options):
            options.append((lm2 + gen(name='option', temperature=1.0, max_tokens=50))["option"])

    # Have the user request pros and cons
    with user():
        lm2 += f"""\
        I want to {goal}
        Can you please comment on the pros and cons of each of the following options, and then pick the best option?
        ---
        """
        for i, opt in enumerate(options):
            lm2 += f"Option {i}: {opt}\n"
        lm2 += f"""\
        ---
        Please discuss each option very briefly (one line for pros, one for cons), and end by saying Best=X, where X is the number of the best option."""

    # Get the pros and cons from the model
    with assistant():
        lm2 += gen(name='prosandcons', temperature=0.0, max_tokens=600, stop="Best=") + "Best=" + gen("best", regex="[0-9]+")

    # The user now extracts the one selected as the best, and asks for a full plan
    # We switch back to 'lm' because this is the final result we want
    with user():
        lm += f"""\
        I want to {goal}
        Here is my plan: {options[int(lm2["best"])]}
        Please elaborate on this plan, and tell me how to best accomplish it."""

    # The plan is generated
    with assistant():
        lm += gen(name='plan', max_tokens=500)

return lmresults = gpt35 + plan_for_goal(goal="read more books")system
You are a helpful assistant.
user
I want to read more books
Here is my plan: Set aside 30 minutes of dedicated reading time each day.
Please elaborate on this plan, and tell me how to best accomplish it.
assistant
Setting aside 30 minutes of dedicated reading time each day is a great plan to read more books. Here are some tips to help you accomplish this goal:
- Establish a routine: Choose a specific time of day that works best for you, whether it's in the morning, during lunch break<span style="background-color: rgba(0.0, 165.0, 0, 0.15); bord
関連記事
今日のまとめ
AI日報で今日の重要ニュースをまとめ読み