Amazon SageMaker HyperPod で大規模 LLM の KV キャッシュ最適化技術「Curvine」
本文の状態
日本語全文を表示中
詳細モードで約18分の本文を読めます。
同じ出来事の情報源
この情報源を基点に整理
AWS Machine Learning Blog
AWS は Amazon SageMaker HyperPod に Curvine を統合し、GPU から CPU、共有 NVMe へ至る階層型 KV キャッシュを実現して、大規模 LLM の推論コストと遅延を大幅に削減した。
Continue in AI NEW LAB
このニュースを、実務の判断につなげる
AI NEW LABで、試したことや先に確認したい条件を共有できます。まずはログインなしで読めます。
AI NEW LABで論点を見るAI深層分析を開く2026年8月12日 23:13
AI深層分析
キーポイント
階層型 KV キャッシュアーキテクチャの実装
AWS は GPU メモリと CPU メモリの限界を超え、共有分散 NVMe プールまでキャッシュ階層を拡張するアーキテクチャを構築した。
Curvine による L2 ティアとしての統合
軽量な分散キャッシュファイルシステムである Curvine を導入し、GPU から CPU、そして共有 NVMe までの L2 ティアとして機能させることに成功した。
推論性能とコストの劇的な改善
テスト環境ではクロス Pod キャッシュヒット率が最大 100% に達し、TTFT は最大 2.7 倍向上して、高価な P5 インスタンスを低コストな G6e インスタンスで代替可能になった。
3段階のKVキャッシュ階層構造
L0(GPU HBM)、L1(ローカルCPUメモリ)、L2(Curvineによる共有クロスノードキャッシュ)という3階層を構築し、キャッシュアウェアなリクエストルーティングを適用する。
大規模モデルにおけるGPUメモリの限界
7BモデルではGPUメモリに余裕があるが、32Bモデルは1つのGPUに重みを収められずKVキャッシュ用の領域が極端に減少するため、オフロードが必要となる。
重要な引用
Running large language model (LLM) inference at scale typically forces a KV cache trade-off: you either pay for oversized GPU instances to accommodate a growing KV cache, or you accept slow time-to-first-token (TTFT)
In this post, we build a tiered KV cache architecture on Amazon SageMaker HyperPod that extends the cache hierarchy beyond GPU and CPU memory into a shared, distributed NVMe pool.
On a test deployment, this achieved up to a 100 percent cross-Pod cache hit rate, up to a 2.7x TTFT improvement
Rather than accepting that each vLLM replica lives in isolation, which is its own GPU blocks, its own CPU spill area, no sharing, we build a three-tier hierarchy: L0 (GPU HBM), L1 (local CPU/host memory), and L2 (Curvine, a shared cross-node cache), and overlay it with cache-aware request routing.
編集コメントを表示
編集コメント
AWS は既存の vLLM の制約を打破するため、外部の分散キャッシュ技術を自社のハイパーポッド環境にシームレスに統合する戦略をとった。これは大規模モデルの実用化において、インフラコストとパフォーマンスのバランスを最適化する重要な一歩となる。
Source Article
元記事を日本語で読む
本文に関係しない購読案内、埋め込み通知、サイト内プロモーションは除いています。
大規模言語モデル(LLM)の推論をスケールして実行する場合、通常は KV キャッシュに関するトレードオフを強いられることになります。つまり、増大する KV キャッシュに対応するために過剰な GPU インスタンスにお金を払うか、同じプロンプトが毎回再計算されることで最初のトークンまでの時間(TTFT)が遅くなるかのどちらかです。
Qwen、Llama、DeepSeek など、広く公開されているファウンデーションモデル(FM)を、各事業部門のエンドポイントや検索拡張生成(RAG)パイプライン、多対話アプリケーション向けに展開するチームにとって、このトレードオフはインフラコストの上昇とユーザー体験の低下という直接的な結果をもたらします。
その根本原因は単純です。生成プロセスにおいて、vLLM は既に処理したすべてのトークンに対するアテンションキーと値を KV キャッシュに保存し、各ステップで再計算しないようにしています。プレフィックスキャッシングはこの仕組みを拡張し、共通のシステムプロンプトなど、先頭部分のトークンを共有するリクエスト間でそのキャッシュを再利用します。
ml.g6e.4xlarge(GPU 当たり 48 GB)のようなコスト効率の高いインスタンスでは、モデル重みとランタイム割り当てを差し引いた後、プレフィックスキャッシングに使えるメモリは限られており、より大規模なモデルや高い同時実行性を要求されるとさらに逼迫します。その結果、長いプロンプトではキャッシュヒット率が低下し、共通のシステムプロンプトが毎回再読み込みされ、水平方向にスケールされた vLLM レプリカそれぞれが孤立したキャッシュを維持することになります。異なるレプリカへのルーティングは、実質的にコールドスタートと同じです。
本稿では、Amazon SageMaker HyperPod 上で Tiered KV キャッシュアーキテクチャを構築し、キャッシュ階層を GPU および CPU メモリから共有分散 NVMe プールまで拡張する方法を紹介します。このアプローチは、HyperPod の機能である「Managed Tiered KV Cache and Intelligent Routing」を基盤とし、軽量な分散キャッシュファイルシステムである Curvine を L2 tier(GPU→CPU→共有 NVMe)として追加することで実現されています。この構成により、レプリカ間での KV キャッシュ再利用がローカルディスクに近い速度で可能になります。
HyperPod Tiered Storage の有効化からノードローカルの NVMe への Curvine ワーカー展開、そしてファイルシステムベースの L2 をサポートする Inference Operator のパッチ適用に至るまで、エンドツーエンドの実装手順を解説します。テスト環境での検証では、約 1,900 トークンのプロンプトにおいて、Pod 間キャッシュヒット率が最大 100% に達し、TTFT(Time To First Token)が最大 2.7 倍改善されました。また、ノード間の L2 リードレイテンシは約 56 ms でした。詳細なベンチマーク手法と結果については「Benchmarking」セクションをご参照ください。
このアーキテクチャを採用することで、従来 P5 インスタンスを必要としていたワークロードを、より低コストな G6e インスタンスで実行可能となり、エンドポイントあたりのコスト削減につながります。具体的な節約額はモデルサイズやトラフィックプロファイルによって異なります。
Solution design
中核となるアイデアは、KVキャッシュを単一のPodの収容範囲を超えて拡張することです。各vLLMレプリカが孤立して動作し、独自のGPUブロックとCPUスプール領域を持ち、共有も行わないという現状を受け入れるのではなく、3段階の階層構造を構築します。具体的には、L0(GPU HBM)、L1(ローカルCPU/ホストメモリ)、そしてL2(Curvine:ノード間共有キャッシュ)とし、これにキャッシュを意識したリクエストルーティングを重ね合わせます。
L0 – GPUプレフィックスキャッシュ。これはvLLMのネイティブなページドアテンション層であり、最もホットなKVブロックを最低のアクセス遅延で保持します。ただし、その容量はモデルウェイト使用後に残ったGPUメモリの範囲に限られます。48 GBのGPUにおいて、bf16形式の7Bモデルではウェイトに約14 GBを使用するため、KVブロック用に30 GB以上が確保され、十分な余裕があります。そのためL0の負荷は最小限です。一方、32Bモデルではウェイトだけで約64 GBを必要とし、単一の48 GB GPUには収まりません。シャード化を行った後でも、KVキャッシュに割り当てられるメモリは大幅に減少するため、キャッシュがすぐに満杯となり、並行処理下で_eviction_が発生します。このように、モデルサイズやトラフィックが増大するにつれて利用可能な余裕が縮小していくことが、GPU外へのキャッシュ拡張が必要となる理由です。
L1 – CPU メモリへのオフロード。 GPU ブロックが退去される際、LMCache がホスト DRAM 内にキャッチしてデータ消失を防ぎます。これは各推論 Pod 内で動作し、InferenceEndpointConfig CRD で enableL1Cache: true を設定すると、SageMaker HyperPod Inference Operator が自動的に管理します。いわば安全網のような役割です。高速で Pod 内に限定され、InstanceMemoryAllocationPercentage でサイズを調整できます(20% から始めることを推奨します)。
L2 – 共有分散 NVMe プール。 ここがレプリカ間での再利用が行われる場所です。Curvine は軽量な分散キャッシュファイルシステムで、G6e/P5 インスタンスに搭載されたローカル NVMe ドライブを単一のネームスペースとしてプールします。FUSE クライアント(ユーザー空間ドライバで、プールを通常のマウントディレクトリとして提示するもの)がこのネームスペースを ReadWriteMany PVC (PersistentVolumeClaim) として各推論 Pod にマウントします。LMCache は fs:// コネクタを通じて読み書きを行うため、分散プールはローカルディレクトリのように見えます。すべての Pod が同じネームスペースにマウントされるため、あるレプリカが書き込んだ KV ブロックは即座に他のレプリカでも読み取ることができます。
Curvine の運用自体はシンプルです。メタデータとジャーナリングを担当するプライマリノード(Curvine のドキュメントでは「マスター」と呼ばれます)は、Amazon Elastic Block Store (Amazon EBS) にデータを永続化して耐久性を確保します。一方、各 GPU ノードで動作するワーカーコンポーネントは、そのノード内の NVMe ストレージ(通常は /opt/dlami/nvme/curvine-data としてマウントされています)にデータを保存します。もしワーカーが停止しても、保持していたキャッシュは再計算されます。KV ブロックは再生成可能なので、データ消失の懸念はありません。
インテリジェントなルーティング – リクエストを適切なレプリカへ。 3 層構成のキャッシュが真価を発揮するのは、リクエストがすでに関連する KV ブロックを保持しているレプリカに届いた場合だけです。HyperPod Inference Operator には、この目的のために 3 つの戦略をサポートする組み込みルーターが含まれています。
| 戦略 | 最適な用途 |
|---|---|
| プレフィックス認識型 (デフォルト) | 多対話、共有システムプロンプト |
| KV 認識型 | 長文書処理、拡張セッション |
| ラウンドロビン | ステートレスバッチ推論、負荷テスト |
ルーターは、プレフィックスツリー(プレフィックス認識型)を維持するか、各ワーカーのキャッシュ状態をクエリして(KV 認識型)、キャッシュヒットが最も発生しやすいレプリカを選択します。この処理は透明性を持って行われ、クライアント側の変更は一切不要です。
これらのコンポーネントはどのように連携するか。Inference Operator は Amazon Elastic Kubernetes Service (Amazon EKS) のアドオンとしてインストールされ、ライフサイクル全体を管理します。vLLM Pod に LMCache サイドカーを追加し、L1 および L2 バックエンドを設定してルーターを展開した後、単一のロードバランサ付きエンドポイントを公開します。
InferenceEndpointConfig のカスタムリソース定義(CRD)で、必要なキャッシュトポロジーを宣言します。具体的には、enableL1Cache や enableL2Cache でキャッシュの階層化を有効にし、l2CacheBackend でバックエンドを設定し、routingStrategy でルーティング戦略を指定します。これにより、Operator が自動的に設定を適用します。
正しい環境変数、ボリュームマウント、ルーティングルールをレンダリングします。
今日の一つの注意点として、CRD の l2CacheBackend フィールドは、ネイティブでは redis または tieredstorage しか受け付けない点です。
Curvine の FUSE マウントをポイント L2 に指定するには、vLLM 内の環境変数 LMCACHE_REMOTE_URL をパッチ適用する必要があります。
コンテナの仕様は、fs://localhost:0/mnt/curvine/l2cache/ に設定します。このパッチの詳細については、実装のステージ 4 で解説します。
リクエストがルーターに到達すると、プレフィックスの一致度が最も高いレプリカへ転送されます。その後、そのレプリカは GPU ブロック(L0)、CPU(L1)、そして共有 NVMe プール(L2)の順でキャッシュを確認します。完全なミスヒットが発生した場合のみ、ゼロから再プリフィルが行われます。
システムプロンプトや共有 RAG コンテキストなど、中程度以上のプロンプト重複があるワークロード(先頭トークンの約 40% が共通する場合など)では、この再プリフィルをスキップすることで TTFT を大幅に削減できます。
図 1 は完全なデータパスを示しています。各 vLLM Pod は、L0 GPU プレフィックスキャッシュと L1 CPU オフロードをスタックしています。その下には、すべての Pod が Curvine 分散ファイルシステム上の L2 ティアを共有しており、これはノードローカルの NVMe からプールされ、FUSE を介して ReadWriteMany でマウントされています。一方、Curvine メタデータノードは Amazon EBS に永続化されます。
HyperPod インテリジェントルーターはその手前に位置し、各リクエストを関連するキャッシュをすでに保持している可能性が最も高いレプリカへ誘導します。
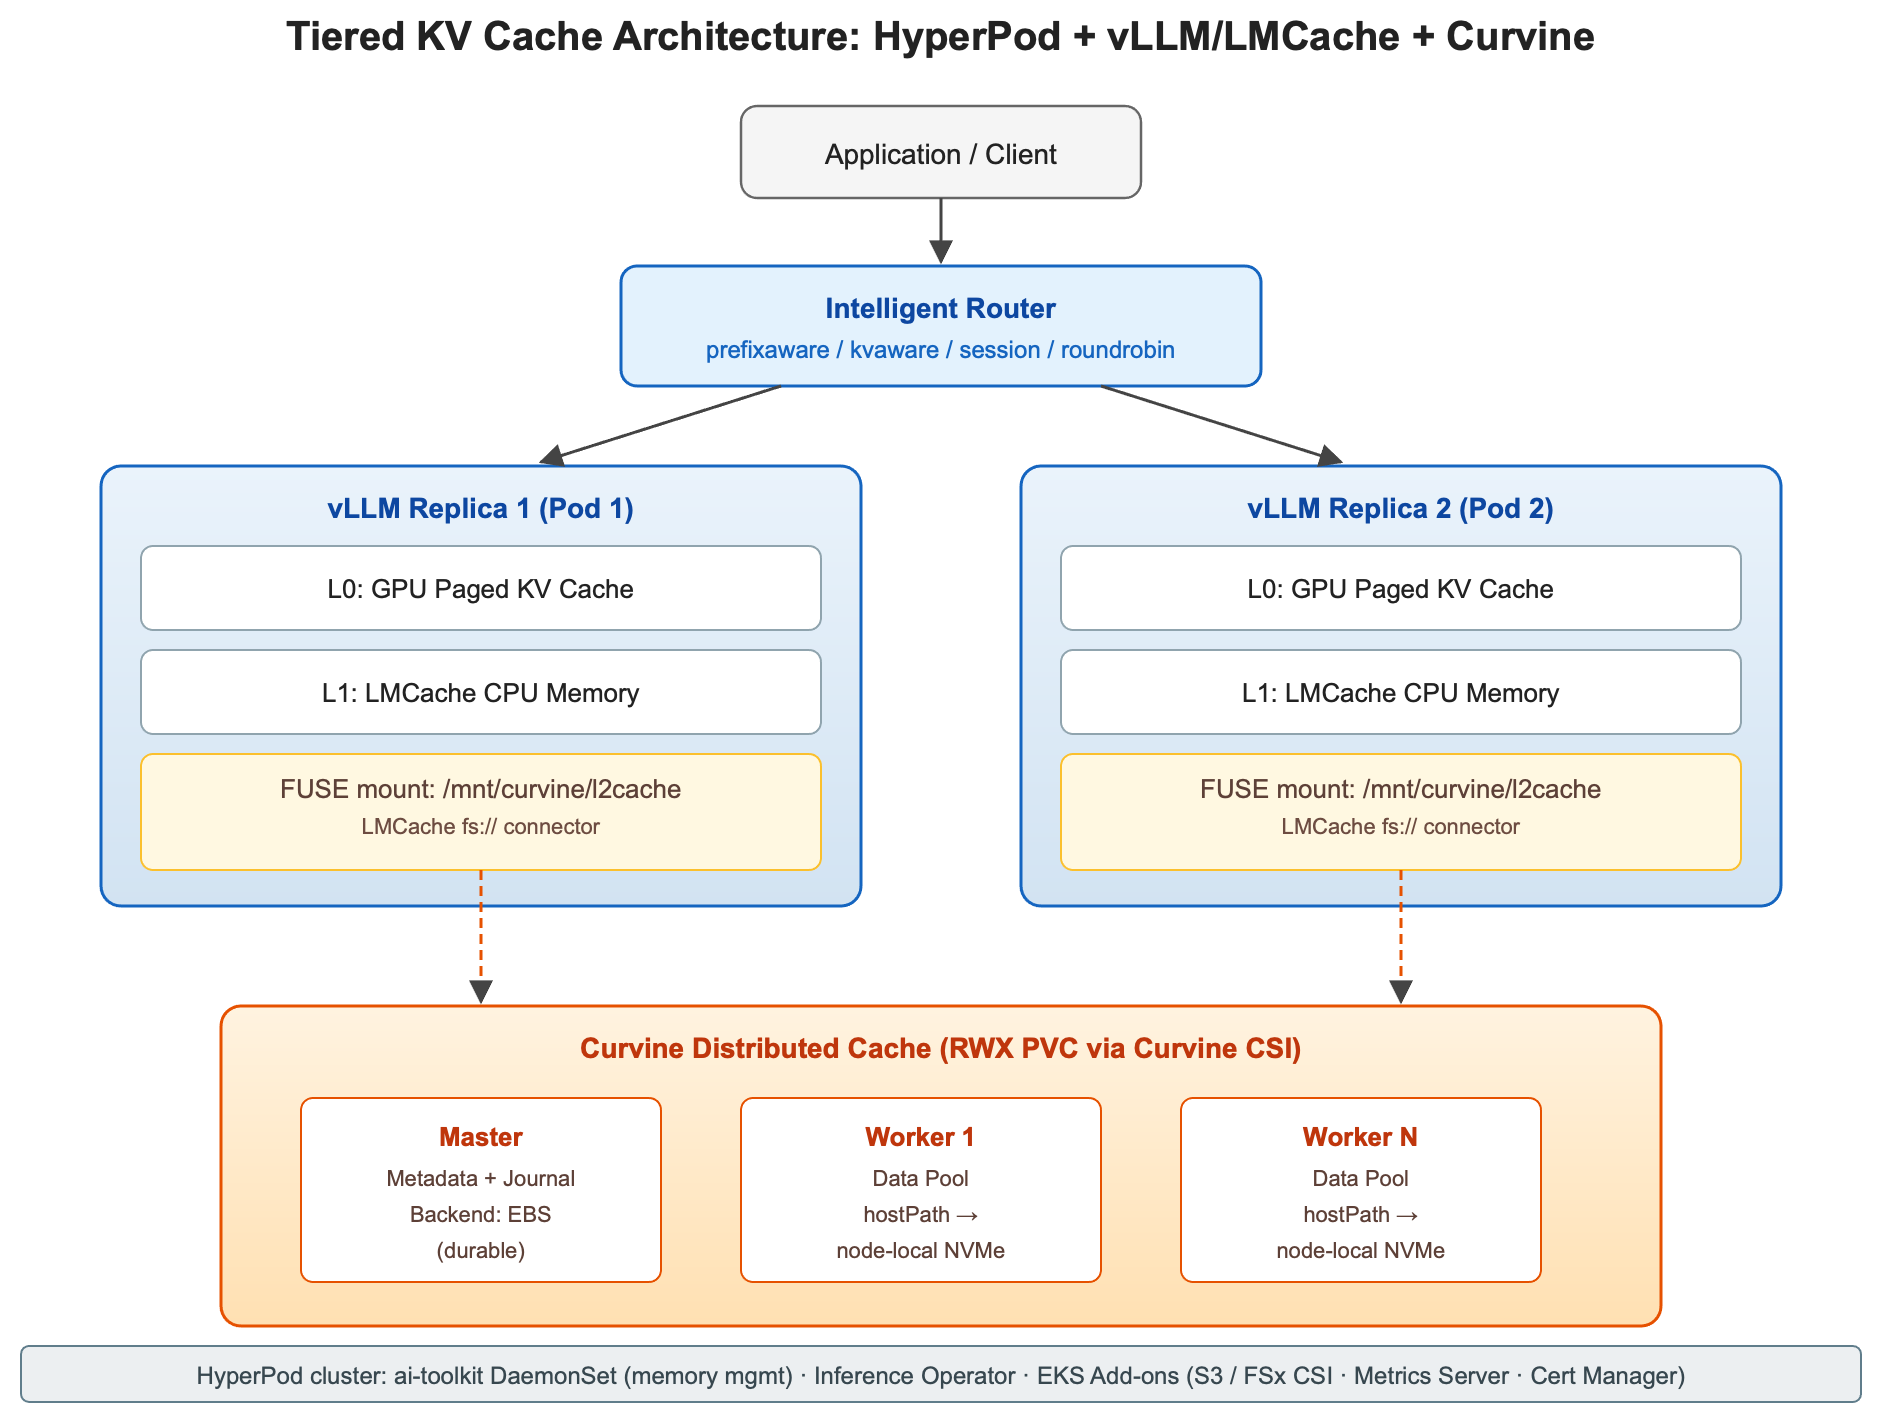
図 1: ティアド KV キャッシュアーキテクチャ
Curvine は、アプリケーションと Amazon Simple Storage Service (Amazon S3) や HDFS、NAS などの基盤ストレージの間に位置する、高性能な分散キャッシュファイルシステムです。クライアントは CLI、SDK、FUSE、または CSI を通じて Curvine にアクセスします。Primary Nodes がメタデータを処理し、Workers はローカルディスクキャッシュを活用して低遅延の I/O を提供します。図 2 は、Curvine のアーキテクチャとその主要コンポーネントを示しています。
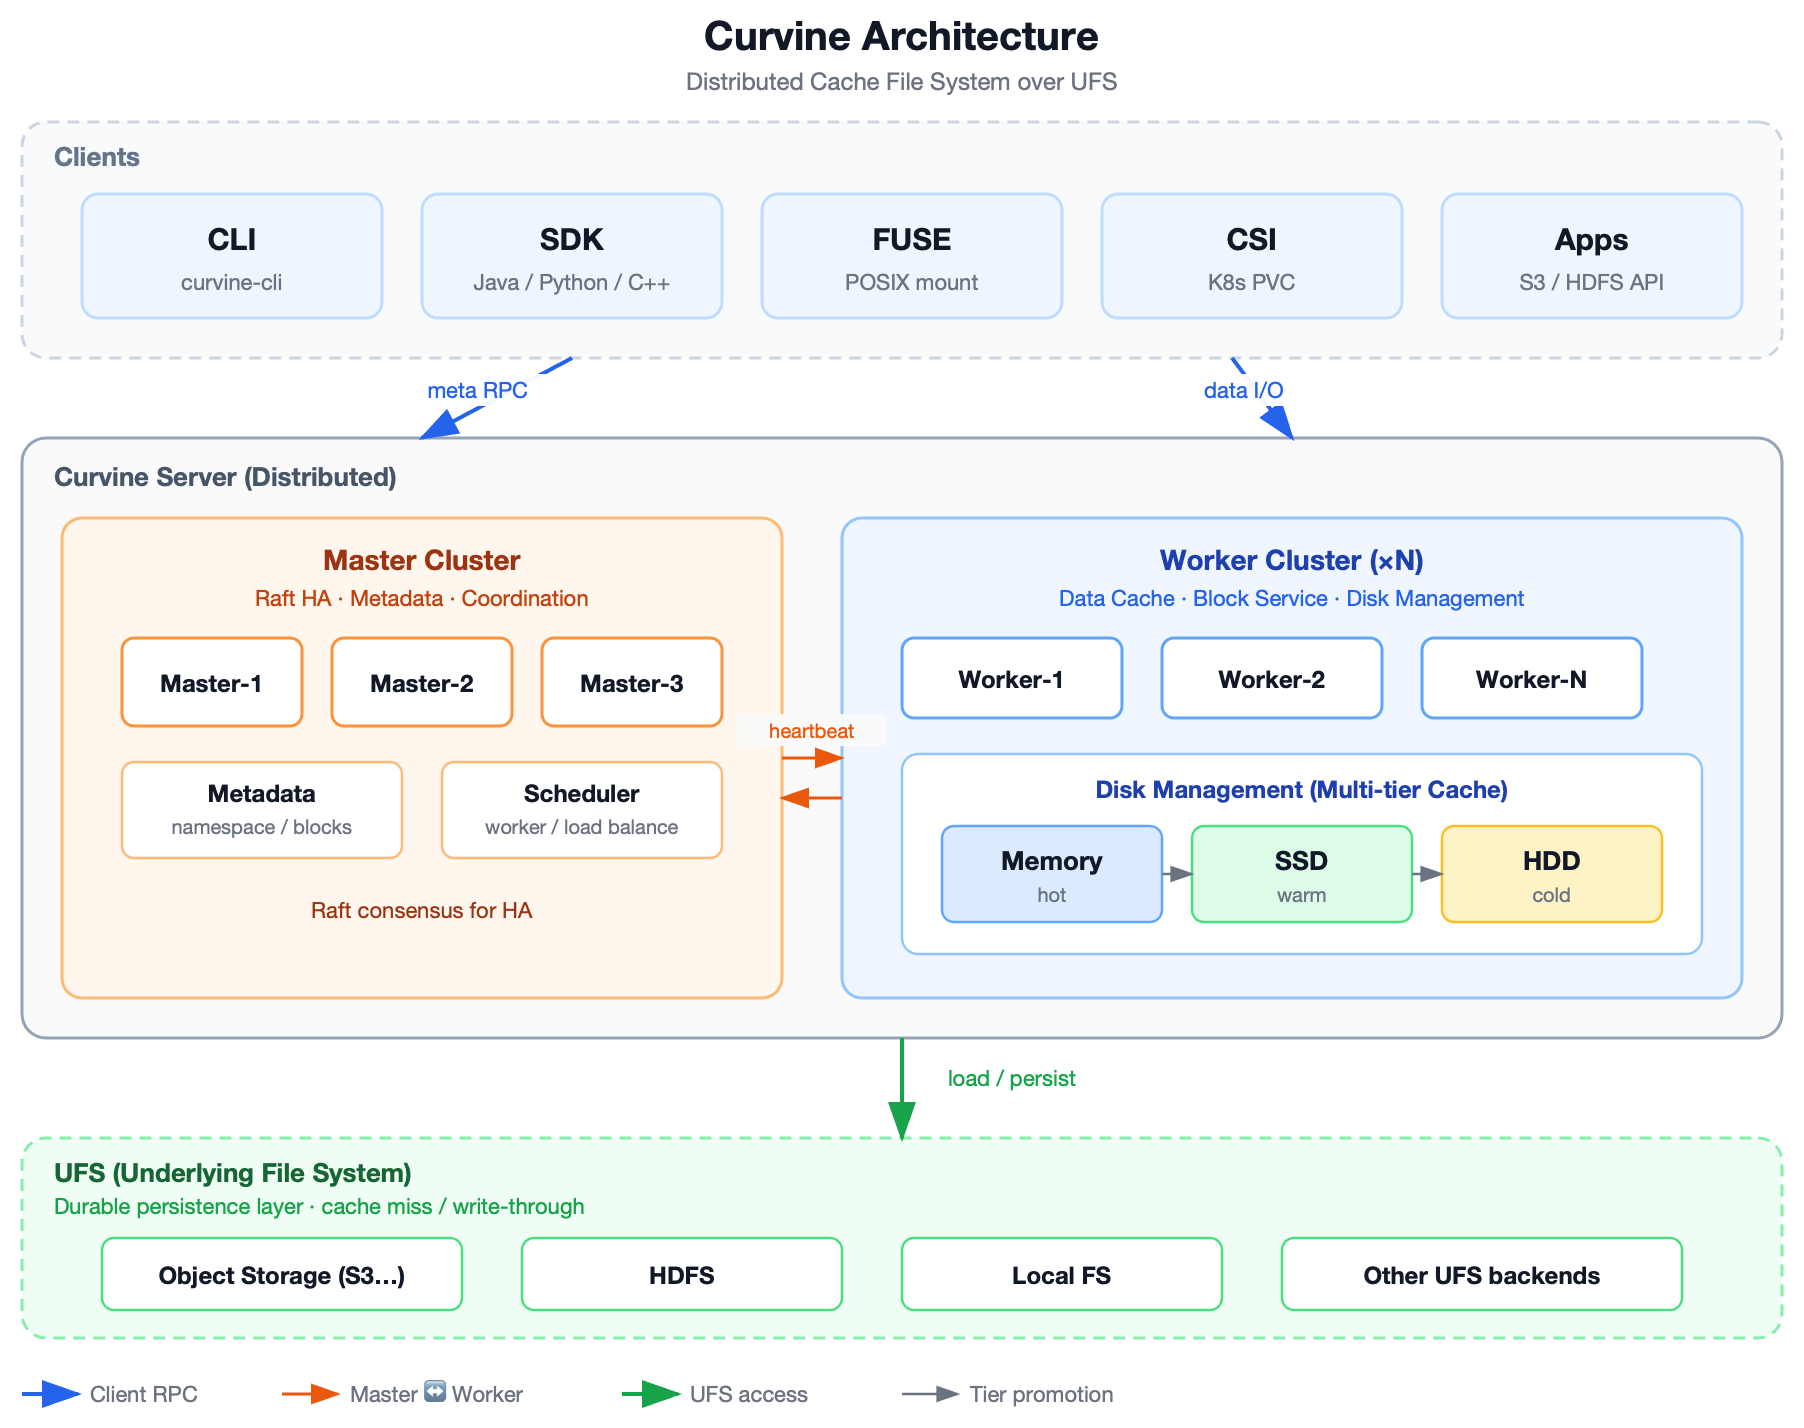
図 2: Curvine のアーキテクチャ
Curvine の動作概要(クラスター全体):
- クライアントは、メタデータに対して Masters に RPC を送信し、データの I/O には Workers にアクセスします。
- Masters はハートビートを通じて Workers を調整し、負荷分散と高可用性 (HA) を実現するためにブロックを配置します。
- Workers はローカルティアへの読み書きを行い、データの温度(ヒート)に応じてデータを昇格または降格させます。
- キャッシュミスが発生した場合やポリシーに基づいて永続化が必要な場合、Curvine は UFS からデータを読み込み、または UFS にダンプします。これにより、耐久性は基盤ストレージに保たれつつ、アクセス速度を Curvine が加速します。
事前準備
Amazon SageMaker HyperPod の Tiered Storage は、推論ワークロード向けにノードローカルのキャッシュ層をプロビジョニングするクラスターレベルの機能です。Tiered Storage が有効になると、SageMaker HyperPod はすべての GPU ノードに ai-toolkit DaemonSet をデプロイし、L1 CPU オフロード用にホストメモリの構成可能な割合(InstanceMemoryAllocationPercentage)を予約します。また、ローカルの NVMe インスタンスストアを /opt/dlami/nvme として公開し、Curvine Workers がこれをプールして共有 L2 ネームスペースを作成できるようにします。Inference Operator は、InferenceEndpointConfig CRD で enableL1Cache と enableL2Cache を設定すると、これらの階層を自動的に利用します。
このチュートリアルでは、Amazon EKS によってオーケストレーションされた SageMaker HyperPod クラスターを想定しています。クラスターの作成には、SageMaker ドキュメントの Orchestrating SageMaker HyperPod clusters with Amazon EKS を参照するか、AWSome Distributed AI リポジトリにある reference templates を使用して AWS CloudFormation で作成してください。少なくとも 2 つの GPU ノードを用意する必要があります。単一ノードでは、ノード間でのキャッシュ再利用を実証することはできません。本稿では例としてクラスター名に hyperpod-cluster-eks、AWS リージョンに米国西部(オレゴン)us-west-2 を使用していますが、ご自身のアカウントでこのソリューションを再現する際は、それぞれご自身のクラスター名とリージョンに置き換えてください。
以下の条件が整っていることを確認してください。
- ローカル NVMe を活用した GPU 容量: SageMaker HyperPod EKS クラスターには、少なくとも 1 つの GPU インスタンスグループが必要です。Curvine が L2 にプールするローカル NVMe を備えた G6e または P5 の利用が推奨されます。
- CLI ツール類: ワークステーション上では、AWS Command Line Interface (AWS CLI) v2(
sagemaker:UpdateClusterおよび eks:CreateAddon への権限が必要)、aws eks update-kubeconfigでクラスターに設定された kubectl、そして Helm v3 を用意してください。 (原文の技術表記:eks:CreateAddon))
EBS のアタッチに AWS Identity and Access Management (IAM) を使用する場合、Curvine メタデータノードが EBS ボリュームをアタッチできるように、EBS CSI ドライバーのロールに対して sagemaker:AttachClusterNodeVolume、sagemaker:DetachClusterNodeVolume、および eks:Describe* の権限を付与してください。また、Amazon Virtual Private Cloud (Amazon VPC) CNI および EBS CSI アドオンは常に最新の状態に保つようにしてください。
モデルの重みについては、本記事では HuggingFace から Qwen2-7B を引き抜くため、バケットは不要です。自分で重みをステージングする場合は、SageMaker HyperPod の実行ロールに読み取り権限が付与された Amazon S3 バケットを使用してください。TLS 証明書は自動的に生成されます。
Tiered Storage は Stage 1 で有効化されます。Inference Operator、Amazon S3 および Amazon FSx CSI ドライバー、Metrics Server、Cert Manager は Stage 2(またはコンソールの Quick Install)でインストールされ、EBS CSI ドライバーと Curvine は Stage 3 でインストールされます。
ステップごとの実装
以下の手順は、5 つのステージに整理された本実装を例として示しています。記載されているクラスター名やリージョンはプレースホルダーですので、各自の環境に合わせて置き換えてください。
Stage 1: HyperPod Tiered Storage の有効化
ティアードストレージはクラスターレベルの切り替えスイッチです。この機能を有効にすると、HyperPod は自動的に ai-toolkit の DaemonSet をすべてのノードへデプロイします。
# Enable on an existing cluster via update-cluster (recommended)
aws sagemaker update-cluster \
  --cluster-name hyperpod-cluster-eks \
  --tiered-storage-config Mode=Enable,InstanceMemoryAllocationPercentage=20 \
  --node-recovery Automatic
API の注意。
--tiered-storage-configだけを指定してupdate-clusterを呼び出すと、ValidationExceptionが返されます。
--node-recovery または --instance-groups の少なくとも一方を指定する必要があります。
このアプローチでは、describe-cluster を実行して現在の NodeRecovery 値を読み取り、それをそのまま返すものです。
これはクラスター設定に何らの副作用も及ぼしません。
InstanceMemoryAllocationPercentage は 20 から 100 の範囲で指定できます。まずは 20 で始め、観測したスループットとヒット率を踏まえて必要に応じて増やしてください。以下のコマンドで確認を行います。
aws sagemaker describe-cluster --cluster-name hyperpod-cluster-eks \
  --query 'TieredStorageConfig'
# Expected: {"Mode": "Enable", "InstanceMemoryAllocationPercentage": 20}

kubectl get ds -n aws-hyperpod ai-toolkit
# Expected:
# NAME        DESIRED  CURRENT  READY  UP-TO-DATE  AVAILABLE  NODE SELECTOR  AGE
# ai-toolkit  2        2        2      2           2                   45s
ステージ 2: Inference Operator と依存関係のインストール
最も手軽な方法は SageMaker コンソールからの「クイックインストール」です。これにより、IAM ロールの作成、S3 CSI、FSx CSI、Metrics Server、Cert Manager、そして Inference Operator のインストールが一度に完了します。CLI を利用する場合は以下の手順になります。
EKS_CLUSTER_NAME=$(aws sagemaker describe-cluster --cluster-name hyperpod-cluster-eks \
  --query 'Orchestrator.Eks.ClusterArn' --output text | cut -d'/' -f2)

for addon in aws-mountpoint-s3-csi-driver aws-fsx-csi-driver metrics-server cert-manager; do
  aws eks create-addon --cluster-name $EKS_CLUSTER_NAME --addon-name $addon --region us-west-2
done

aws eks create-addon \
  --cluster-name $EKS_CLUSTER_NAME \
  --addon-name amazon-sagemaker-hyperpod-inference \
  --configuration-values file://addon-config.json \
  --region us-west-2
ステージ 3: Curvine 分散キャッシュのデプロイ
Curvine をデプロイする前に、いくつかの事前準備が必要です。VPC CNI プラグインと EBS CSI ドライバーを最新バージョンにアップグレードしてください。また、ノード上の IP 消費を防ぐため、Pod Identity に代えて IRSA を使用することをお勧めします。
aws-ebs-csi-dri-role には、事前準備で記載されている EBS-attach 権限を付与してください。これらの権限がないと、SageMaker HyperPod ノードでの EBS アタッチ時に ValidationException が発生します。
最後に、クラスター内に EBS StorageClass(例:ebs-sc)が利用可能か確認してください。実際の名称は kubectl get sc コマンドで確認できます。SageMaker HyperPod の EKS クラスターでは、デフォルトの EBS StorageClass は通常 gp3 です。
後続の Helm インストールでは、この名前を master.storage.meta.storageClass および master.storage.journal.storageClass に使用するか、事前に ebs-sc StorageClass を作成してください。
apiVersion: storage.k8s.io/v1
kind: StorageClass
metadata:
  name: ebs-sc
provisioner: ebs.csi.aws.com
volumeBindingMode: WaitForFirstConsumer
reclaimPolicy: Delete
Curvine CSI のインストール
helm repo add curvine https://curvineio.github.io/helm-charts
helm repo update

helm install curvine-csi curvine/curvine-csi \
  -n curvine --create-namespace \
  --version 0.3.2-alpha \
  --set controller.sidecars.provisioner.image=registry.k8s.io/sig-storage/csi-provisioner:v3.6.0 \
  --set node.sidecars.nodeDriverRegistrar.image=registry.k8s.io/sig-storage/csi-node-driver-registrar:v2.10.0 \
  --set controller.container.securityContext.privileged=true \
  --set node.container.securityContext.privileged=true

kubectl get csidrivers | grep curvine  # confirm driver registered
CSI のインストールでは、StorageClass は自動的に作成されません。手動で別途作成する必要があります。
kubectl apply -f - <<'EOF'
apiVersion: storage.k8s.io/v1
kind: StorageClass
metadata:
  name: curvine-sc
provisioner: curvine
reclaimPolicy: Delete
volumeBindingMode: Immediate
allowVolumeExpansion: true
parameters:
  master-addrs: "curvine-master-0.curvine-master.curvine.svc.cluster.local:8995"
  fs-path: "/l2cache"
  path-type: "DirectoryOrCreate"
EOF

kubectl get sc curvine-sc  # confirm curvine-sc created
Curvine CSI 0.3.x 以降では、3 つの StorageClass パラメータが必要です。master-addrs は Curvine マスター RPC エンドポイントであり、Helm インストールで作成されたサービス DNS と一致している必要があります。マスターコンポーネントに複数のアドレスがある場合は、カンマで区切って指定してください。
レプリカ数、fs-path(Curvine ファイルシステム内のマウントパスプレフィックス)、および path-type(DirectoryOrCreate を指定すると CSI がディレクトリを自動作成します)です。
これらがないと、PVC のプロビジョニングが失敗し、「Parameter 'master-addrs' is required」というエラーが表示されます。
Curvine サーバーのインストール(プライマリコンポーネントとワーカーコンポーネント)
KV キャッシュワークロードにおいては、*node-local NVMe with hostPath* が推奨されるワーカーデータバックエンドです。G6e/P5 インスタンスには NVMe が搭載されており(転送速度は約 3 GB/s)、これにより高いパフォーマンスが実現されます。
原文を表示
Running large language model (LLM) inference at scale typically forces a KV cache trade-off: you either pay for oversized GPU instances to accommodate a growing KV cache, or you accept slow time-to-first-token (TTFT) as identical prompts get recomputed on every request. For teams deploying a broad catalog of publicly available foundation models (FMs), such as Qwen, Llama, DeepSeek, and others, across per-business-line endpoints, Retrieval Augmented Generation (RAG) pipelines, or multi-turn dialogue applications, this trade-off translates directly into higher infrastructure cost and degraded user experience.
The root cause is straightforward. During generation, vLLM stores the attention keys and values for every token it has already processed in a KV cache, so it doesn’t recompute them on each step. Prefix caching extends this by reusing that cache across requests that share the same leading tokens (like a common system prompt). On cost-efficient instances like ml.g6e.4xlarge (48 GB per GPU), once model weights and runtime allocations are accounted for, the memory left for prefix caching is limited, and it tightens further with larger models or higher concurrency. Cache hit rates drop on long prompts, identical system prompts get re-prefilled on every request, and horizontally scaled vLLM replicas each maintain isolated caches. Routing to a different replica is functionally a cold start.
In this post, we build a tiered KV cache architecture on Amazon SageMaker HyperPod that extends the cache hierarchy beyond GPU and CPU memory into a shared, distributed NVMe pool. It builds on two HyperPod capabilities, Managed Tiered KV Cache and Intelligent Routing, and adds Curvine, a lightweight distributed cache filesystem, as the shared L2 tier (GPU to CPU to shared NVMe). With this setup, you can reuse KV cache across replicas at near-local-disk speeds.
We walk through the end-to-end implementation, from enabling HyperPod Tiered Storage to deploying Curvine workers on node-local NVMe to patching the Inference Operator for filesystem-backed L2. On a test deployment, this achieved up to a 100 percent cross-Pod cache hit rate, up to a 2.7x TTFT improvement, and cross-node L2 read latency of about 56 ms for a approximately 1,900-token prompt. See the Benchmarking section for the full methodology and results. With this architecture, workloads that previously required P5 instances can run on lower-cost G6e instances, reducing per-endpoint cost. Actual savings depend on model size and traffic profile.
Solution design
The central idea is to extend the KV cache beyond what fits on a single Pod. Rather than accepting that each vLLM replica lives in isolation, which is its own GPU blocks, its own CPU spill area, no sharing, we build a three-tier hierarchy: L0 (GPU HBM), L1 (local CPU/host memory), and L2 (Curvine, a shared cross-node cache), and overlay it with cache-aware request routing.
L0 – GPU prefix cache. This is vLLM’s native paged-attention layer, holding the hottest KV blocks at the lowest access latency, but its capacity is only whatever GPU memory is left after the model weights. On a 48 GB GPU, a 7B model in bf16 uses around 14 GB for weights, leaving over 30 GB for KV blocks, which is plenty of headroom, so L0 pressure is minimal. A 32B model uses around 64 GB of weights and doesn’t even fit on one 48 GB GPU. Even after sharding, far less memory remains for KV, so the cache fills quickly and evicts under concurrency. That shrinking headroom is exactly why extending the cache off-GPU matters as you scale up model size and traffic.
L1 – CPU memory offload. When GPU blocks are evicted, LMCache catches them in host DRAM before they’re lost. This runs inside each inference Pod and is managed automatically by the SageMaker HyperPod Inference Operator when you set enableL1Cache: true in the InferenceEndpointConfig CRD. Think of it as a safety net. It’s fast, Pod-local, and sized by InstanceMemoryAllocationPercentage (we recommend starting at 20 percent).
L2 – Shared distributed NVMe pool. This is where cross-replica reuse happens. Curvine, a lightweight distributed cache filesystem, pools the local NVMe drives that ship with G6e/P5 instances into a single namespace, which a FUSE client (a user-space driver that presents the pool as an ordinary mounted directory) mounts as a ReadWriteMany PVC (PersistentVolumeClaim) into every inference Pod. LMCache reads and writes through its fs:// connector, so the distributed pool looks like a local directory. Because every Pod mounts the same namespace, a KV block written by one replica is immediately readable by others.
Curvine itself is straightforward to operate: a Primary Node (called the “Master” in Curvine’s documentation) handles metadata and journaling, persisted on Amazon Elastic Block Store (Amazon EBS) for durability, while Worker components run on each GPU node and store data on the node’s NVMe (typically mounted at /opt/dlami/nvme/curvine-data). If a Worker dies, the cache it held is recomputed, no data-loss concern, since these are reproducible KV blocks.
Intelligent routing – getting requests to the right replica. A three-tier cache only delivers its full benefit if requests land on replicas that already hold relevant KV blocks. The HyperPod Inference Operator includes a built-in router that supports three strategies:
| Strategy | Best for |
|---|---|
| prefix-aware (default) | Multi-turn dialogue, shared system prompts |
| kv-aware | Long document processing, extended sessions |
| round-robin | Stateless batch inference, load testing |
The router maintains a prefix tree (prefix-aware) or queries each worker’s cache state (kv-aware) to select the replica most likely to produce a cache hit. This happens transparently, no client-side changes are needed.
How these pieces fit together. The Inference Operator is installed as an Amazon Elastic Kubernetes Service (Amazon EKS) add-on and manages the full lifecycle. It spins up vLLM Pods with LMCache sidecars, configures L1 and L2 backends, deploys the router, and exposes a single load-balanced endpoint. You declare the cache topology you want in the InferenceEndpointConfig CRD (enableL1Cache, enableL2Cache, l2CacheBackend, routingStrategy), and the Operator renders the correct environment variables, volume mounts, and routing rules. The one caveat today: the CRD’s l2CacheBackend field only accepts redis or tieredstorage natively. To point L2 at a Curvine FUSE mount, we patch the LMCACHE_REMOTE_URL environment variable in the vLLM container spec to fs://localhost:0/mnt/curvine/l2cache/. We walk through this patch in Stage 4 of the implementation.
The net effect is a request arrives at the router, gets dispatched to the replica with the best prefix match, that replica checks GPU blocks (L0), then CPU (L1), then the shared NVMe pool (L2). Only on a complete miss does it re-prefill from scratch. For workloads with moderate-to-high prompt overlap (roughly over 40 percent shared leading tokens, for example a common system prompt or shared RAG context), skipping that re-prefill substantially reduces TTFT.
Figure 1 shows the full data path. Each vLLM Pod stacks an L0 GPU prefix cache and an L1 CPU offload. Below them, all Pods share the L2 tier on a Curvine distributed filesystem pooled from node-local NVMe and mounted ReadWriteMany over FUSE, while the Curvine metadata node persists to Amazon EBS. The HyperPod Intelligent Router sits in front, directing each request to the replica most likely to already hold the relevant cache.
Figure 1: Tiered KV cache architecture
Curvine is a high-performance distributed cache file system that sits between applications and underlying storage such as Amazon Simple Storage Service (Amazon S3), HDFS, or NAS. Clients reach it through the CLI, SDK, FUSE, or CSI. Primary Nodes handle metadata, and Workers serve data with local disk cache for low-latency I/O. Figure 2 shows the Curvine architecture and its key components.
Figure 2: Curvine architecture
How Curvine works (cluster view):
- Clients send metadata RPC to Masters and data I/O to Workers.
- Masters coordinate Workers using heartbeats and place blocks for load balance and HA.
- Workers read/write local tiers and promote/demote data by heat.
- On miss or policy-driven persistence, Curvine loads from / dumps to UFS, so durability stays on the underlying store while Curvine accelerates access.
Prerequisites
Amazon SageMaker HyperPod Tiered Storage is a cluster-level capability that provisions a node-local cache tier for inference workloads. After Tiered Storage is active, SageMaker HyperPod deploys the ai-toolkit DaemonSet on every GPU node, reserves a configurable share of host memory (InstanceMemoryAllocationPercentage) for the L1 CPU offload, and exposes the local NVMe instance store under /opt/dlami/nvme so that Curvine Workers can pool it into a shared L2 namespace. The Inference Operator consumes these tiers automatically when enableL1Cache and enableL2Cache are set on the InferenceEndpointConfig CRD.
This walkthrough assumes a SageMaker HyperPod cluster orchestrated by Amazon EKS. To create one, follow Orchestrating SageMaker HyperPod clusters with Amazon EKS in the SageMaker documentation, or with AWS CloudFormation, using the reference templates on the AWSome Distributed AI repository. Provision at least two GPU nodes. A single node can’t demonstrate cross-node reuse. Throughout this post we use the cluster name hyperpod-cluster-eks and the US West (Oregon) AWS Region (us-west-2) as examples, replace them with your own cluster name and Region to reproduce this solution in your account.
Verify the following are in place:
- GPU capacity with local NVMe: A SageMaker HyperPod EKS cluster with at least one GPU instance group. G6e or P5 is recommended for their local NVMe, which Curvine pools into L2.
- CLI tooling: On your workstation: AWS Command Line Interface (AWS CLI) v2 (with permissions for sagemaker:UpdateCluster and eks:CreateAddon), kubectl configured against the cluster with aws eks update-kubeconfig, and Helm v3.
- AWS Identity and Access Management (IAM) for EBS attach: Grant the EBS CSI driver role sagemaker:AttachClusterNodeVolume, sagemaker:DetachClusterNodeVolume, and eks:Describe* so the Curvine metadata node can attach its EBS volume. Keep the Amazon Virtual Private Cloud (Amazon VPC) CNI and EBS CSI add-ons current.
- Model weights: this post pulls Qwen2-7B from HuggingFace, so no bucket is required. To stage weights yourself, use an Amazon S3 bucket with the SageMaker HyperPod execution role granted read access. TLS certificates are generated automatically.
Tiered Storage is enabled in Stage 1. The Inference Operator, Amazon S3 and Amazon FSx CSI drivers, Metrics Server, and Cert Manager are installed in Stage 2 (or through console Quick Install), the EBS CSI driver and Curvine in Stage 3.
Step-by-step implementation
The following procedure uses this implementation as a worked example, organized into five stages. Cluster names and Regions shown are placeholders, substitute your own.
Stage 1: Enable HyperPod Tiered Storage
Tiered Storage is a cluster-level toggle. Once Tiered Storage is active, HyperPod automatically deploys the ai-toolkit DaemonSet to every node.
# Enable on an existing cluster via update-cluster (recommended)
aws sagemaker update-cluster \
  --cluster-name hyperpod-cluster-eks \
  --tiered-storage-config Mode=Enable,InstanceMemoryAllocationPercentage=20 \
  --node-recovery Automatic
API note. Calling update-cluster with --tiered-storage-config alone returns ValidationException. At least one of --node-recovery or --instance-groups must also be supplied. The approach is to read the current NodeRecovery value by running describe-cluster and pass it back unchanged. This has no side effect on the cluster configuration.
InstanceMemoryAllocationPercentage accepts 20–100. Begin at 20 and increase as needed based on observed throughput and hit rate. Verify with the following commands:
aws sagemaker describe-cluster --cluster-name hyperpod-cluster-eks \
  --query 'TieredStorageConfig'
# Expected: {"Mode": "Enable", "InstanceMemoryAllocationPercentage": 20}

kubectl get ds -n aws-hyperpod ai-toolkit
# Expected:
# NAME        DESIRED  CURRENT  READY  UP-TO-DATE  AVAILABLE  NODE SELECTOR  AGE
# ai-toolkit  2        2        2      2           2                   45s
Stage 2: Install the Inference Operator and dependencies
The most convenient approach is Quick Install in the SageMaker console, which provisions the IAM role and installs S3 CSI, FSx CSI, Metrics Server, Cert Manager, and the Inference Operator in one action. The CLI alternative:
EKS_CLUSTER_NAME=$(aws sagemaker describe-cluster --cluster-name hyperpod-cluster-eks \
  --query 'Orchestrator.Eks.ClusterArn' --output text | cut -d'/' -f2)

for addon in aws-mountpoint-s3-csi-driver aws-fsx-csi-driver metrics-server cert-manager; do
  aws eks create-addon --cluster-name $EKS_CLUSTER_NAME --addon-name $addon --region us-west-2
done

aws eks create-addon \
  --cluster-name $EKS_CLUSTER_NAME \
  --addon-name amazon-sagemaker-hyperpod-inference \
  --configuration-values file://addon-config.json \
  --region us-west-2
Stage 3: Deploy the Curvine distributed cache
Several prerequisites must be in place before deploying Curvine. Upgrade the VPC CNI plugin and the EBS CSI driver to a current version, with IRSA preferred over Pod Identity to avoid additional IP consumption on nodes. Grant the aws-ebs-csi-dri-role the EBS-attach permissions listed in Prerequisites (without them, EBS attach on SageMaker HyperPod nodes returns ValidationException). Finally, verify an EBS StorageClass (for example ebs-sc) is available in the cluster. Check the actual name with kubectl get sc. On SageMaker HyperPod EKS clusters the default EBS StorageClass is often gp3. Use that name for master.storage.meta.storageClass and master.storage.journal.storageClass in the Helm install that follows, or create an ebs-sc StorageClass first:
apiVersion: storage.k8s.io/v1
kind: StorageClass
metadata:
  name: ebs-sc
provisioner: ebs.csi.aws.com
volumeBindingMode: WaitForFirstConsumer
reclaimPolicy: Delete
Install the Curvine CSI
helm repo add curvine https://curvineio.github.io/helm-charts
helm repo update

helm install curvine-csi curvine/curvine-csi \
  -n curvine --create-namespace \
  --version 0.3.2-alpha \
  --set controller.sidecars.provisioner.image=registry.k8s.io/sig-storage/csi-provisioner:v3.6.0 \
  --set node.sidecars.nodeDriverRegistrar.image=registry.k8s.io/sig-storage/csi-node-driver-registrar:v2.10.0 \
  --set controller.container.securityContext.privileged=true \
  --set node.container.securityContext.privileged=true

kubectl get csidrivers | grep curvine  # confirm driver registered
The CSI install doesn’t create a StorageClass automatically. One must be created manually:
kubectl apply -f - <<'EOF'
apiVersion: storage.k8s.io/v1
kind: StorageClass
metadata:
  name: curvine-sc
provisioner: curvine
reclaimPolicy: Delete
volumeBindingMode: Immediate
allowVolumeExpansion: true
parameters:
  master-addrs: "curvine-master-0.curvine-master.curvine.svc.cluster.local:8995"
  fs-path: "/l2cache"
  path-type: "DirectoryOrCreate"
EOF

kubectl get sc curvine-sc  # confirm curvine-sc created
Curvine CSI 0.3.x and later requires three StorageClass parameters: master-addrs (the Curvine master RPC endpoint, which must match the service DNS created by the Helm install, and comma-separate multiple addresses if the master component has replicas), fs-path (the mount-path prefix inside the Curvine filesystem), and path-type (DirectoryOrCreate lets the CSI create the directory automatically). Without them, PVC provisioning fails with Parameter 'master-addrs' is required.
Install the Curvine server (Primary + Worker components)
For KV cache workloads, *node-local NVMe with hostPath* is the recommended Worker data backend: G6e/P5 instances ship with NVMe (approximately 3 GB/s), which delivers far higher per
今日のまとめ
AIデイリーブリーフで今日の重要ニュースをまとめ読み