Amazon Quick Flowsで反復作業を自動化
AWSは、Amazon Quick Flowsを通じて自然言語で記述するだけでコーディング不要のAIワークフローを構築できる機能を提供し、定型業務の自動化とチーム生産性の向上を目指す。
キーポイント
Amazon Quick Flowsの概要
自然言語でタスクを記述するだけで、AIが自動的にワークフローを構築・実行する機能であり、MLやコーディングの専門知識を必要としない。
Amazon Quickとの統合
Quick Flowsは「Amazon Quick」エコシステムの一部であり、データ分析、タスク自動化、自然言語によるインサイト取得をシームレスに連携させる。
実用的なユースケース
財務分析ツールや従業員オンボーディングなど、具体的な業務シナリオを例に、ユーザーが独自のAIワークフローを作成・共有する方法を示している。
影響分析・編集コメントを表示
影響分析
この発表は、AI活用における技術的ハードルを大幅に下げ、現場の業務効率化を促進する可能性を秘めている。特にML専門家がいない組織でも、定型業務の自動化が可能になるため、AWSエコシステム内のAI採用拡大に寄与する。しかし、既存の自動化ツール(Step Functionsなど)との差別化や、生成AI特有の不確実性への対応が課題となる。
編集コメント
AWSが「Amazon Quick」という新ブランドでAI機能をパッケージ化し、自然言語による操作を標準化する動きは、AIツールの民主化を進める重要な一歩である。ただし、生成AIの出力品質管理と既存AWSサービスの統合度合いが今後の鍵となる。
典型的な月曜日の朝を想像してみてください。複数の異なるシステムからデータを手動でコピーして週次レポートを作成し、さらに異なる関係者のためにフォーマットを整える作業です。この単一のタスクに数時間がかかり、より戦略的な業務に充てるべき時間が失われます。チーム全体でこの作業を繰り返すと、こうした反復業務はあっという間に膨大な時間になります。
Amazon Quick Flows は、AI ワークフローを用いてこれらのタスクを自動化します。Quick Flows を利用すれば、コーディングや機械学習(ML)の専門知識がなくても、自然言語を使ってインテリジェントなワークフローを作成できます。自動化したい内容を記述するだけで、Quick Flows がそれを構築してくれます。本稿では、財務分析ツールの作成から始まり、高度な従業員オンボーディングの自動化へと進む、最初の AI 駆動型ワークフローの構築方法をご紹介します。
Amazon Quick Flows とは?
Amazon Quick Flows は、Amazon Quick の一部です。これはデータ分析、タスクの自動化、自然言語による会話を通じたインサイト取得を支援する一連の AI 駆動機能のコレクションです。本稿では、特にタスク自動化のための Quick Flows に焦点を当てます。
Quick Flows を使えば、個人およびチームの生産性向上のために、日常業務を自動化されたワークフローに変換できます。Amazon Quick 内で利用可能なデータ、インサイト、アクションを活用して、目的に特化した AI ワークフローを作成、カスタマイズ、共有することができます。
前提条件
最初のフローを構築する前に、Amazon Quickが有効化され、Quick Flowsにアクセスする権限を持つアクティブなAWSアカウントを準備してください。セットアップ手順については、Amazon Quickユーザーガイドを参照してください。
*注: Amazon Quickは生成AIを使用しています。特定の出力、応答、および生成されたコンテンツは、例示されている内容と異なる場合があります。これらの相違は正常であり期待されるものです。正確な出力の一致ではなく、概念と利点を理解することに焦点を当ててください。
最初のフローの構築
この例では、Webからリアルタイムの市場データを収集し、主要な指標を分析して、情報に基づいてプロフェッショナルな要約を作成する財務パフォーマンスアナライザーを構築します。
1. Quick Flowsへの移動
ブラウザを開き、Quickにログインします。その後、Quick Flowsに移動してください。フロー作成インターフェースが表示され、ワークフローを記述するためのテキストエリアと、作業を開始するためのサンプルプロンプトが表示されます。
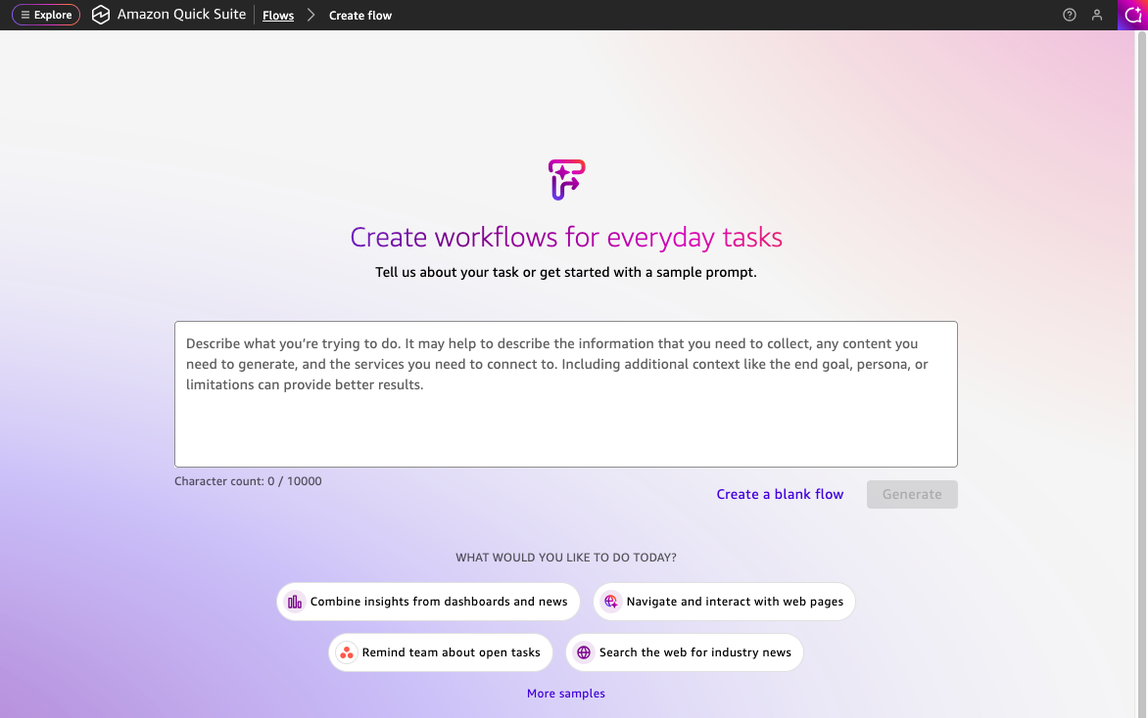
*図1: 自然言語でワークフローを記述するQuick Flowsの作成インターフェース*
2. プロンプトの入力
テキストエリアに以下のプロンプトを入力します:
4つの主要なコンポーネントを持つツールを設計することで、包括的な企業の財務調査データを収集するフローを作成します:(1) リアルタイム市場データ(リアルタイム・マーケット・データ)では、現在の株価と日次変動を取得し、(2) 財務指標分析(フィナンシャル・メトリクス・アナリシス)では、P/E 倍率、時価総額、収益といった主要な比率を取得し、(3) ニュースインテリジェンス(ニュース・インテリジェンス)では、最近の財務見出しや市場を動かす出来事を収集し、(4) プロフェッショナル分析(プロフェッショナル・アナリシス)では、アナリストの推奨事項と評価をまとめます。これらはすべて、会社名またはティッカーシンボルの入力をトリガーとして動作します。
Quick Flows は、会社名を入力として受け取り、完全な財務状況の画像を返すワークフローを正確に理解しています。
*クイックヒント**: *チャットエージェントとの会話から直接フローを作成することもできますあなたの会話 Quick のチャットエージェントとの対話から。すでにエージェントとタスクやプロセスについて議論している場合、最初から作り直すことなく、その会話をフローに変換できます。
3. フローの生成
Generate(生成)ボタンを選択します。Quick Flows はプロンプトを分析し、利用可能な機能に要件のマッピングを行います。Web 検索からデータを収集し、AI 分析を使用して主要な財務指標を抽出し、結果を構造化されたレポートにフォーマットする必要があることを特定します。AI はあなたの要件を処理し、必要な特定のステップを識別し、それらを接続されたフローに組み立てます。
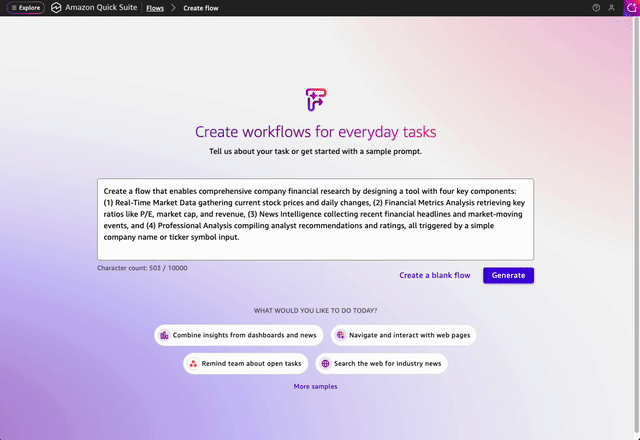
Figure 2: ナチュラルランゲージプロンプトからワークフローを生成する Quick Flows
4. フローの実行
生成が完了した後、すぐにフローをテストできます。会社名やティッカーシンボル(例:*Amazon* や *AMZN*)を入力し、Run を選択してください。フローがトポロジカル順序(位相順序)に従って各ステップを実行し、市場データの収集、指標の分析、ニュースの取得、そして最終的な分析のコンパイルを行う様子を確認できます。
結果を確認した後、フローと直接チャットして出力を洗練させることができます。例えば、特定の指標に焦点を当てるよう指示したり、分析の深さを調整したり、結果の書式を異なる形式に変更したりすることができます。フローはリクエストを理解し、それに応じて出力を変更できます。
5. エディタでフローを洗練させる
最初のラン後、エディタビューに移動して、Quick Flows が単一のプロンプトからどのようにワークフローを構築したかを確認します。各ステップが視覚的に配置され、それらの間の接続と、データが入力から各コンポーネントを経て最終出力に至るまでの流れが示されます。
フローは、会社名またはティッカーシンボルを入力する text input(テキスト入力)ステップから始まります。
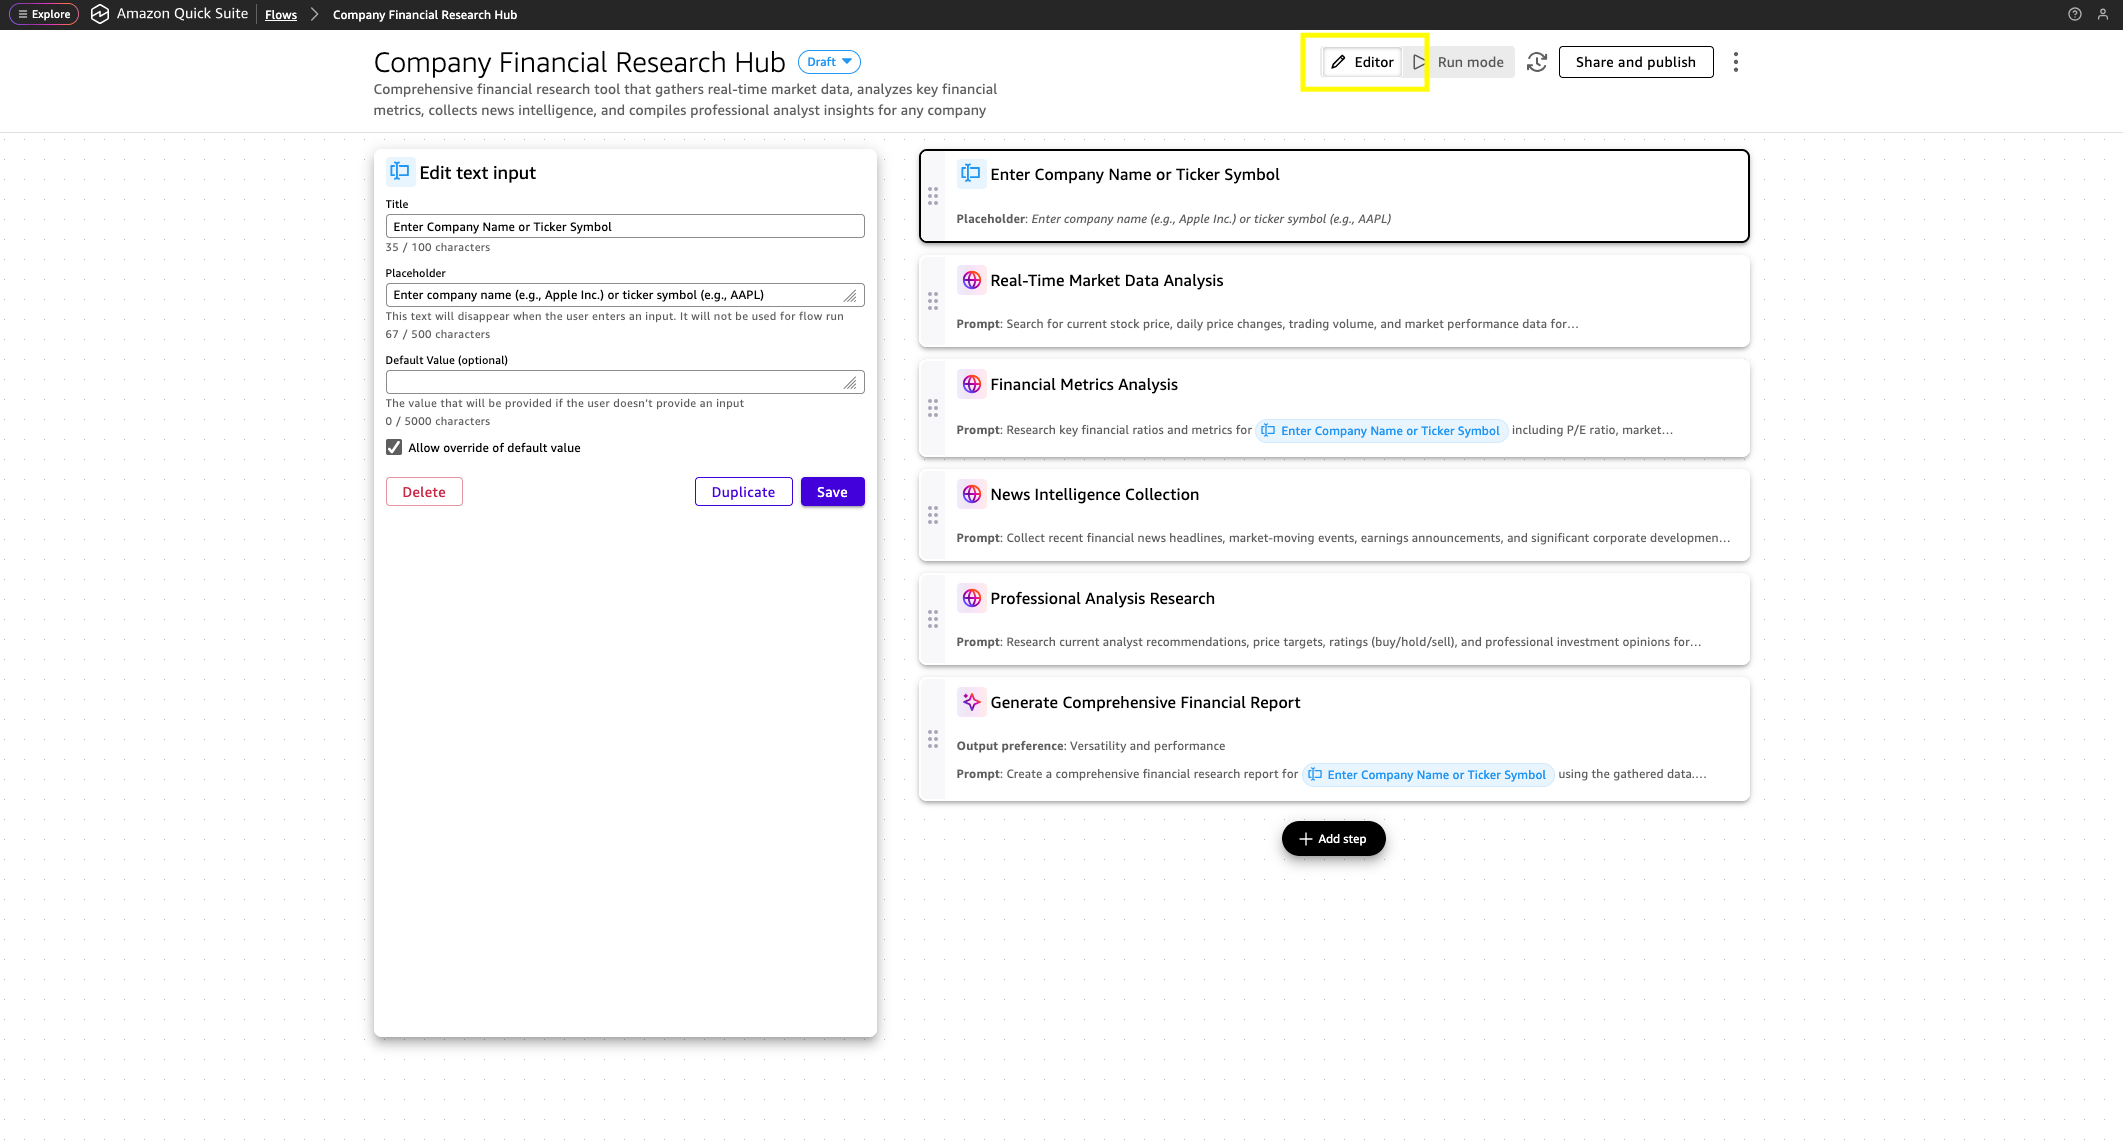
Figure 3: 入力ステップが選択された状態のワークフロー内の各ステップを示す Flow エディタ。
このフローは市場データを扱うため、Quick Flows は Quick の組み込み ウェブ検索 機能を用いて、各調査ステップを自動的に設定しました。これは静的なデータに依存するのではなく、ウェブからリアルタイムの情報を収集します。
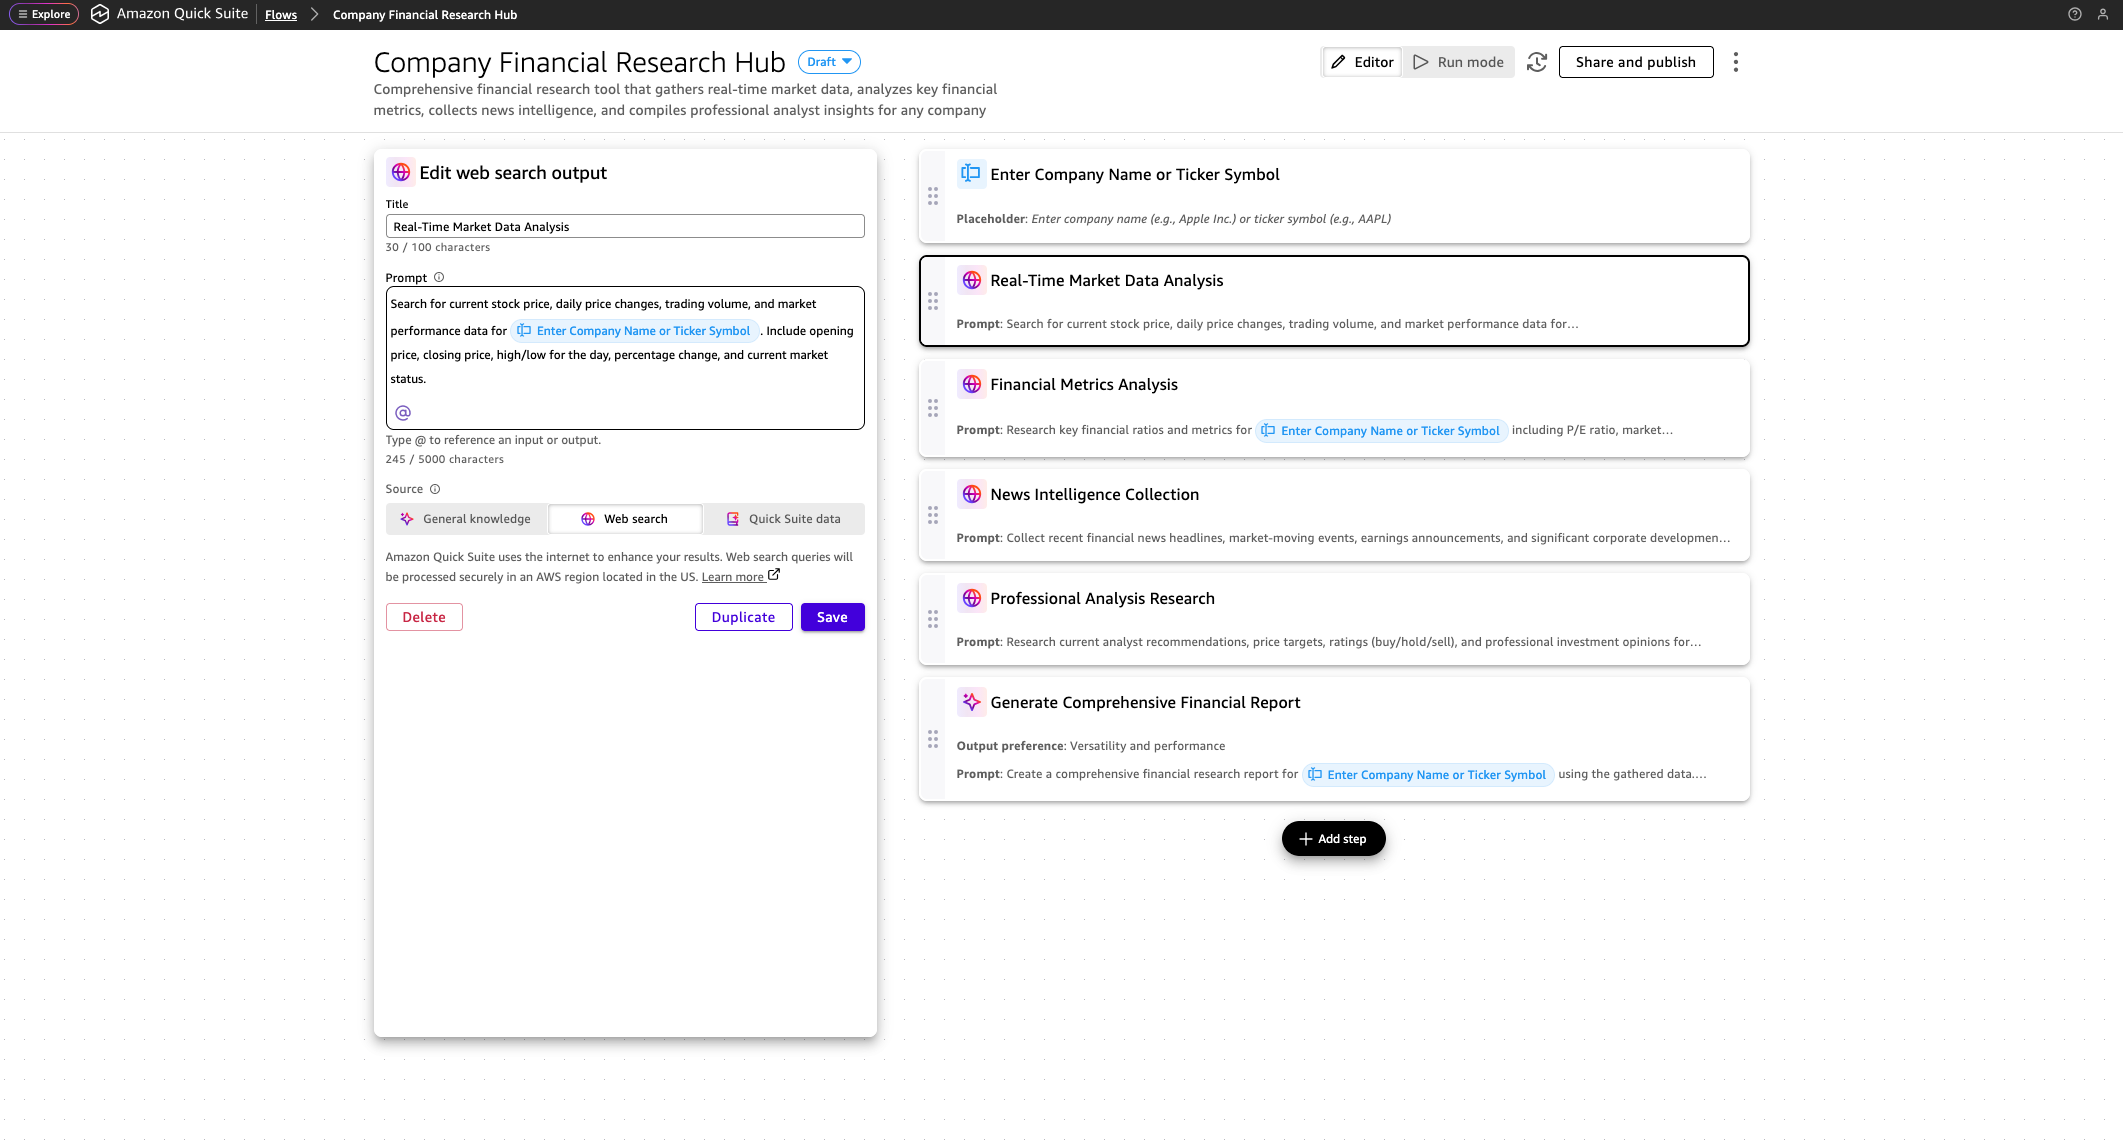
*図 4: ウェブ検索ステップが選択された状態のワークフロー内の各ステップを示すフローエディタ。*
異なるウェブ検索により、そのステップのプロンプトに基づいて要求された関連データを収集します。
最後のステップでは、一般知識 ステップを使用して、フローが収集したすべての情報を統合します。このステップは、以前のステップから市場データ、財務指標、ニュース見出し、アナリスト評価を取得し、財務レポートをまとめます。
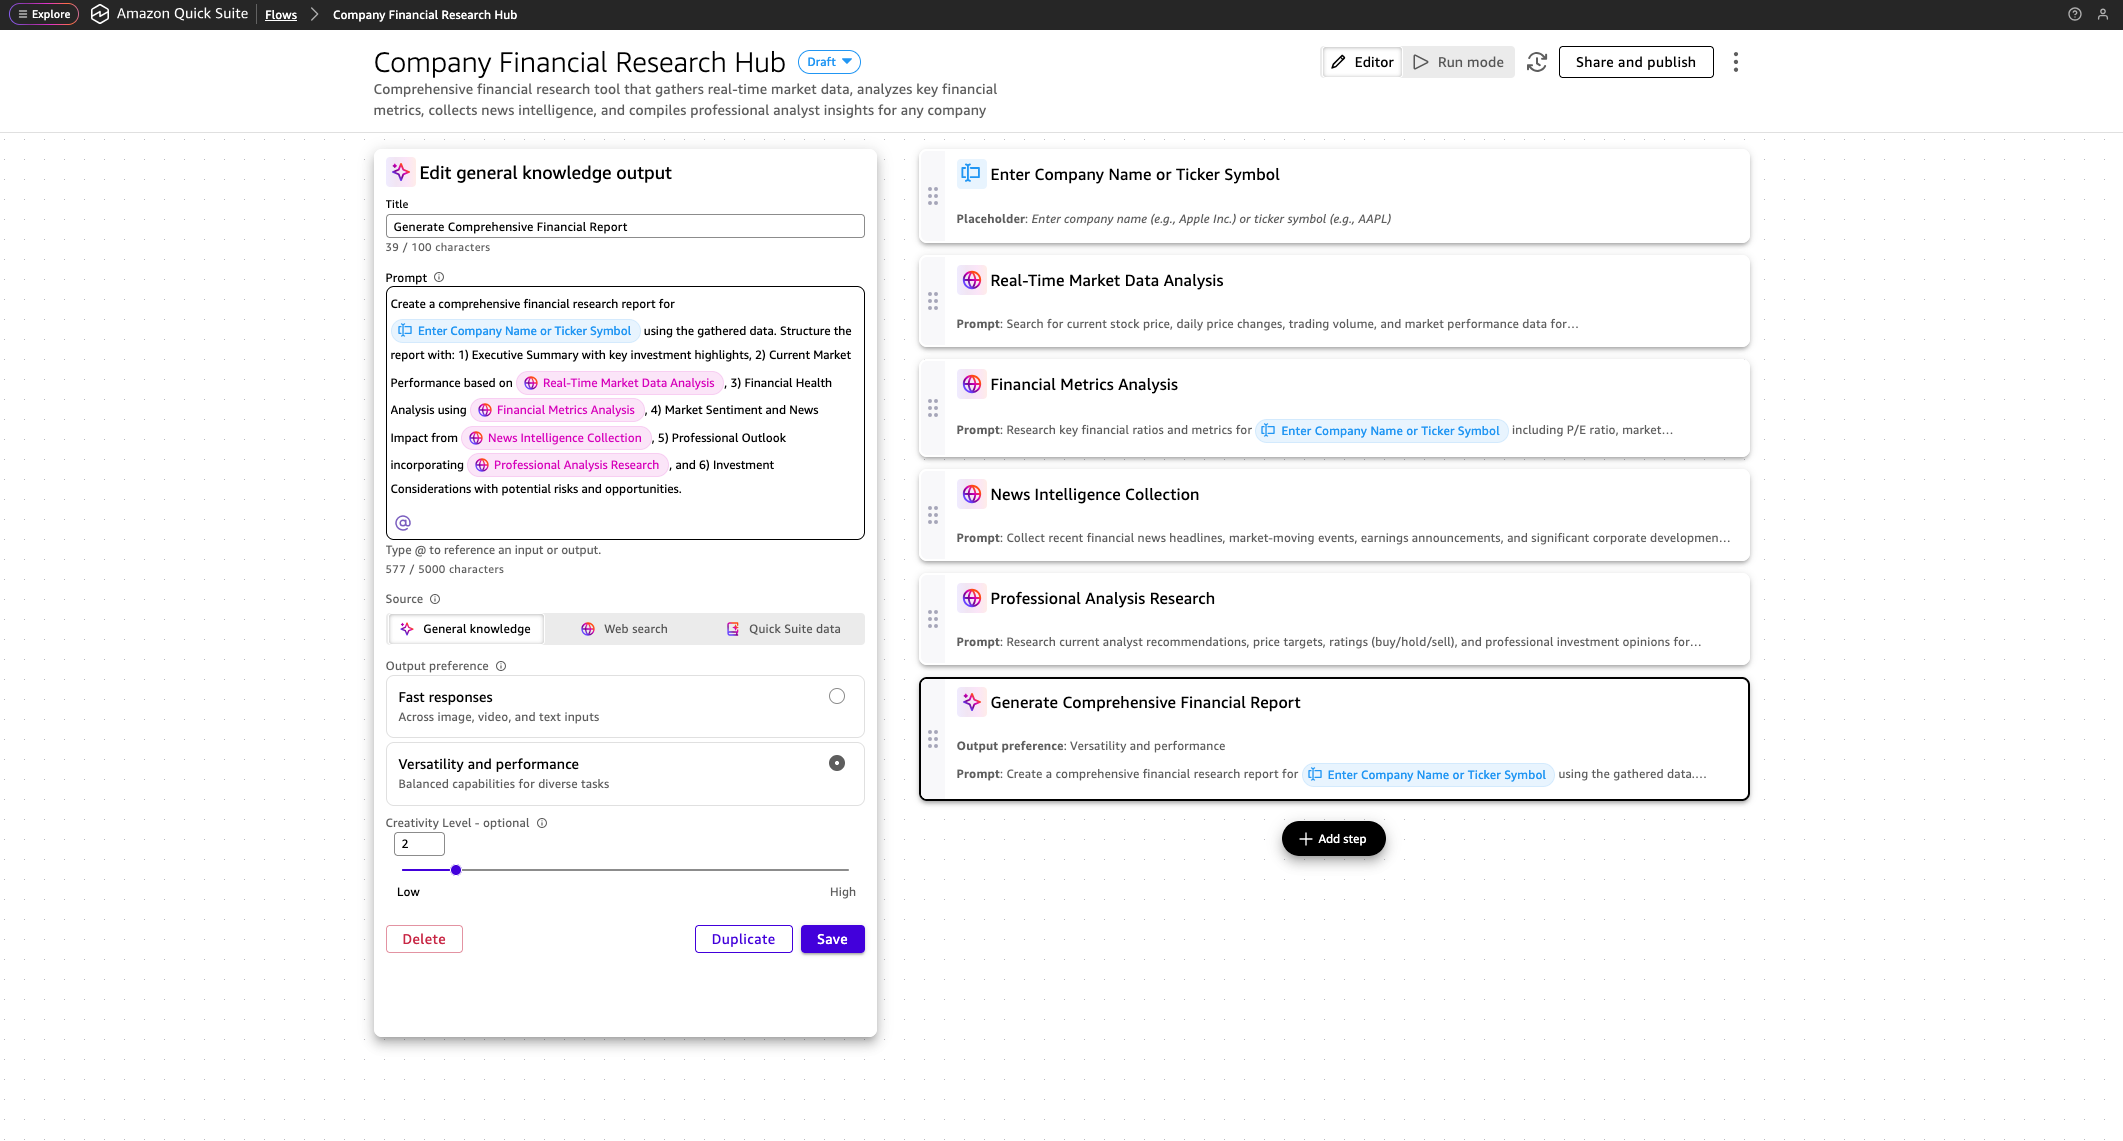
*図 5: 一般知識ステップが選択された状態のワークフロー内の各ステップを示すフローエディタ。*
ここから、ニーズに合わせてフローをカスタマイズできます。レポートをチームにメールで送信するステップを追加したり、Slack に投稿したり、SharePoint 内のファイルに保存したり、出力を PDF または Microsoft Word ドキュメントとしてエクスポートすることができます。この情報は時間とともに変化する可能性があるため、フローを定期的に実行するようにスケジュール設定することを検討してください。
主要な概念の理解
最初のフローを構築したところで、先ほど使用した構成要素について説明します。ステップは、フロー内で特定の機能を実行する個別のコンポーネントです。ステップは、完全なフローを作成するために連鎖して組み合わせる基本的な単位です。
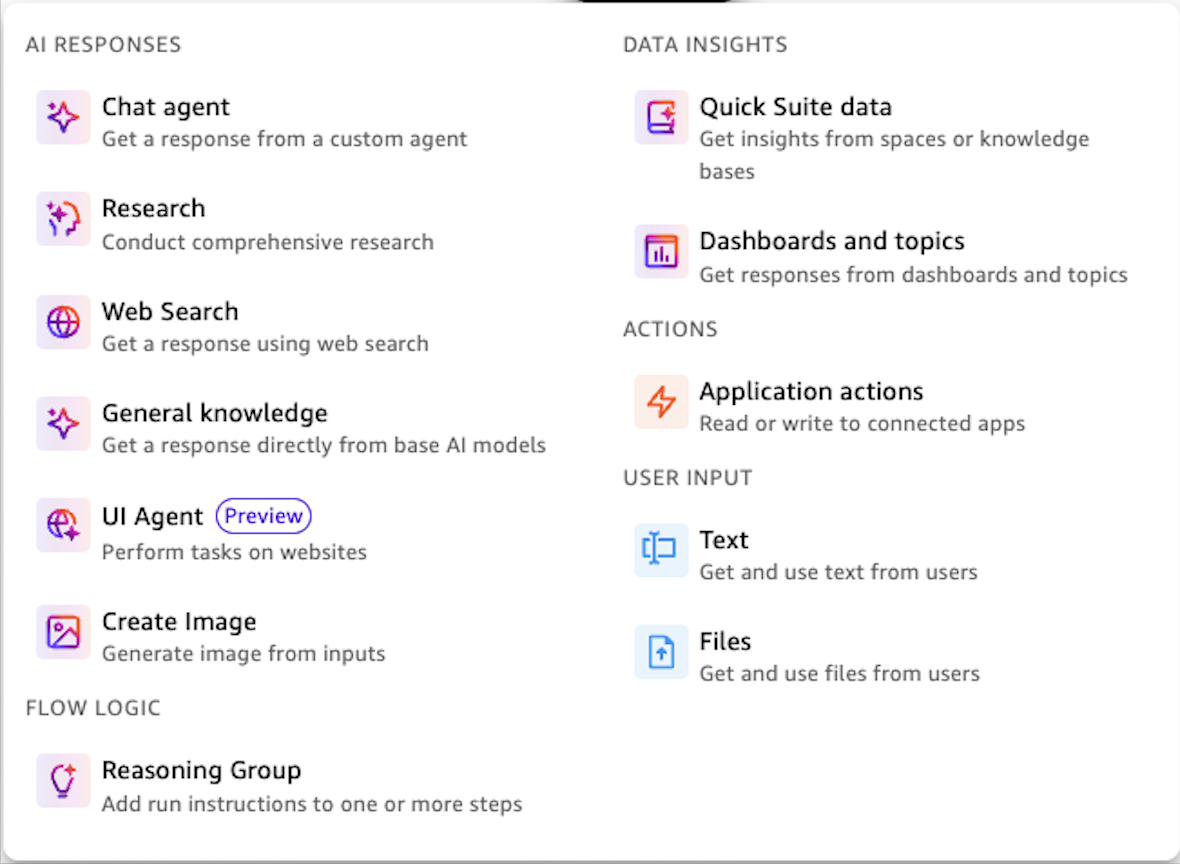
*図 6: Quick Flows は、ワークフローを構築するために組み合わせるための5つのカテゴリのステップ(AI レスポンス、フローロジック、データインサイト、アクション、ユーザー入力)を提供します。
Quick Flows はステップを以下の5つのカテゴリに整理しています。
- AI の応答は、出力の生成、テキストからの画像作成、カスタムエージェントのプロンプト提供、ウェブ検索、Quick Research の呼び出し、およびウェブサイト上でのタスク実行を行います。
- フローロジックは、条件、ループ、または検証を定義する推論グループを用いてワークフローの実行を制御します。
- データインサイトは、スペースやナレッジベース内の会社データから情報を取得するか、ダッシュボードやトピックからの分析を行います。
- アクションは、事前構築またはカスタムのインテグレーションを通じて、接続された外部システムやアプリケーションで読み取りまたは書き込み操作を実行します。
- ユーザー入力により、テキストフィールドやファイルアップロードを通じてユーザーから情報を収集し、ワークフローを開始してコンテキストを提供します。
Quick Flows は、データが保存されている場所 wherever において会社のデータと連携します。Amazon Quick を使用してスプレッドシートやデータベースを接続し、SharePoint、OneDrive、Google Drive、または Amazon Simple Storage Service (Amazon S3) などのドキュメントストアをインテグレーションを通じて接続し、専用またはカスタムのインテグレーションを通じてアクションを実行できます。
基本を超えて:従業員オンボーディングの自動化
最初のフローを構築し、基礎を理解したところで、より複雑なシナリオに取り掛かる時が来ました。この例では、条件分岐ロジックやシステム統合といった高度な機能を示し、先ほど学んだ同じ原則がどのように多段階のビジネスプロセスを自動化できるかを説明します。例えば、今週3人の新入社員を迎える人事(HR)スペシャリストになったと想像してください。各従業員について、人事情報システムに従業員レコードを作成し、会社ポリシーを参照したパーソナライズされた歓迎メールを書き、情報技術(IT)部門と連携してバッジの作成、機器の手配、メールアカウントの設定を行う必要があります。これらの手動タスクは週に数時間にも及び、戦略的な優先事項から目を離す原因となります。以下の例では、これらのオンボーディングタスクを自動化するフローの構築手順を示します。
従業員オンボーディング例の前提条件
この従業員オンボーディングの例は、Quick Flows の高度な機能を示すものです。現在、概念として追うことで、セットアップなしでアプローチを理解することができます。この特定の例を実際に体験したい場合は、以下のオプションのワークショップセットアップ手順に従って、シミュレートされた HR および IT システムを持つ独自の AWS アカウントでこれを構築できます。完了までには約 30 分かかります。
このフローを自身の AWS アカウントで構築したい場合は、Amazon Quick 完全ガイド ワークショップの手順に従ってセットアップを行ってください。
- まず、セルフペースのセットアップ手順に従ってワークショップインフラストラクチャを展開します。これにより、フローが統合する基盤となる AWS リソースと、シミュレートされた HR(人事)および IT システムが作成されます。
- 次に、Flows モジュール内の手順に従ってください。前提条件の手順も含みます。
これらのセットアップ手順を完了すると、従業員オンボーディングフローの構築と実行が可能になります。ワークショップではサンプルの従業員データと段階的なテスト手順が提供されているため、自動化が実際にどのように機能するかを正確に確認できます。
従業員オンボーディングワークフローの理解
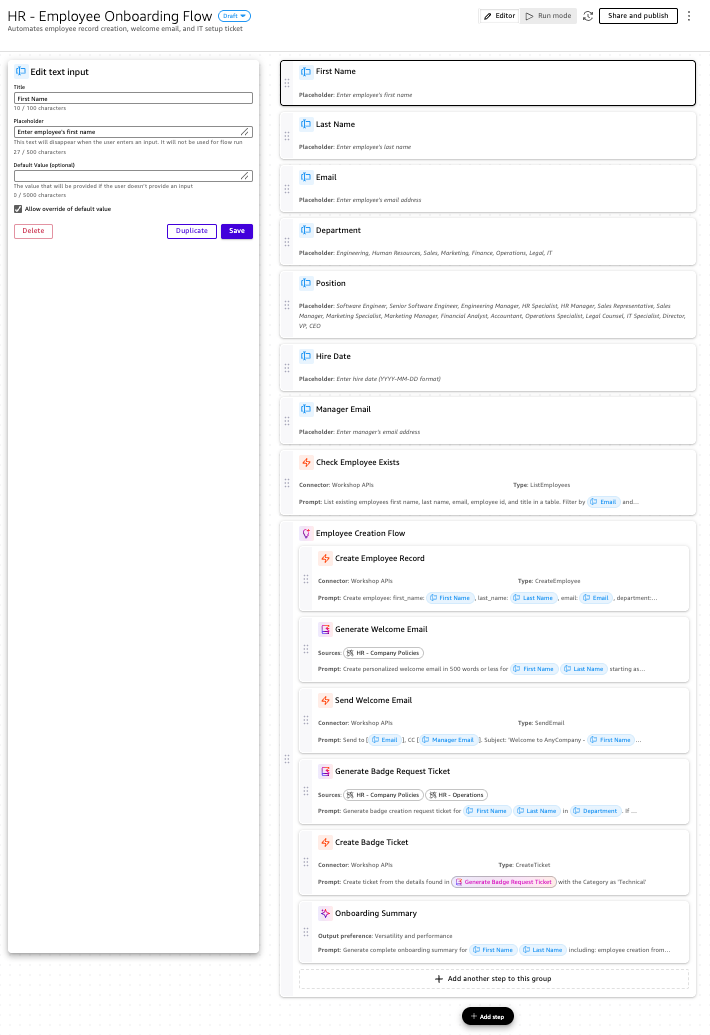
*図 7: 従業員オンボーディングワークフローは、推論グループ(reasoning groups)を使用して条件分岐ロジックを作成し、システム内に従業員が既に存在するかどうかに基づいて異なるステップを実行します*
ワークフローは、入力データの収集やデータ取得からアクションの実行に至るまでの一連のステップを表します。まず、テキスト入力フィールド(名、姓、メールアドレス)を通じて従業員情報を収集することから始まります。次に、アクションステップを使用してワークショップの従業員情報 API を呼び出します。このステップでは、従業員のメールアドレスがシステムに登録されているかどうかを判定します。このフロー内の「推論グループ」は、日常の論理における if-then 文のような役割を果たします。これは分岐点と考えることができます:従業員が既に存在する場合はワークフローは終了し、存在しない場合はワークフローが続行され、レコードが作成されます。このフローでは、推論グループが前のステップで見つかった新しい従業員のメールアドレスを評価し、2 つの可能な実行パスを作成します。従業員が存在する場合、レコードは既に作成されているためワークフローは終了します。従業員が存在しない場合、フローは推論グループ内の 6 つの連続するステップを実行します。これらは、従業員レコードの作成、ウェルカムメールの生成、ウェルカムメールの送信、バッジリクエストチケットの生成、バッジリクエストチケットの作成、オンボーディング結果の要約です。
自然言語を用いた従業員オンボーディングフローの作成
次に、自然言語のプロンプトを使用してフローを作成します。フローに実行してほしい内容を自然言語で記述すると、Amazon Quick Flows がその説明を解釈し、ワークフローを自動的に作成します。
Amazon Quickのフローに移動し、フローの作成を選択します。フロー作成インターフェースでは、自然言語でフローを記述するオプションが表示されます。以下の例のようなプロンプトを入力します。
*新しい従業員のオンボーディングフローを作成し、新規採用者の情報を収集し、システム内に既に存在するか確認し、新規であれば従業員レコードを作成し、会社ポリシーに基づいてパーソナライズされたウェルカムメールを生成し、マネージャーをCCに入れてそのメールを送信し、バッジと機器のセットアップ用のITチケットを作成し、完了したすべてのアクションのサマリーを提供する。*
このプロンプトはワークショップで実際に使用された本物のプロンプトの簡略化版であることに注意してください。完全な詳細なプロンプトおよび手動の手順別手順については、日常業務の自動化ガイドを参照してください。このガイドには、詳細な自然言語プロンプトと手動のフロー構築手順の両方が記載されています。
Quick Flows 用の効果的なプロンプトの書き方
あなたのプロンプトには、4 つの要素を含める必要があります。それは、「従業員の詳細情報を収集する」という情報の取得、「既に存在するか確認する」という判断、「従業員レコードを作成する」というアクション、そして「パーソナライズされたウェルカムメールを生成する」というコンテンツの作成です。例のプロンプトを見ると、異なるフレーズがワークフローのコンポーネントにどのようにマッピングされるかがわかります。「従業員オンボーディングフローを作成する」というフレーズは目標を示しています。「新規入社の情報を収集する」は、フローがユーザーからデータを取得する必要があることを示し、入力ステップに変換されます。「従業員レコードを作成する」「メールを送信する」「IT チケットを作成する」といった操作を説明すると、外部システムを変更するアクションが記述され、これらは Quick 統合と連携するアクションステップになります。「会社ポリシーを使用してパーソナライズされたウェルカムメールを生成する」といったフレーズは、フローが組織の知識にアクセスしてコンテンツを生成する必要があることを示しています。これらはスペース、ナレッジベース、ダッシュボード、またはトピックに接続する出力ステップになります。「既に存在するか確認する」や「新規の場合」といった言語からは分岐ロジックが生まれます。これらのフレーズは条件付きロジックを示唆し、Quick Flows に対してステップを実行するかどうか、または何回実行するかを決定する推論グループを追加させるよう促します。
構成要素の理解
フローは、自動化を作成するために連携する主要なコンポーネントの 4 つのグループで構成されています。
入力コンポーネントは、フローが操作に必要な情報を収集する場所です。従業員のオンボーディングの例では、これらは氏名やメールアドレスなどの従業員詳細情報を収集するテキスト入力ステップです。
ロジックコンポーネントは、フローの分岐や決定を制御します。推論グループステップは、他のステップがいつどのように実行されるべきかを自然言語で定義します。オンボーディングフローにおいて、推論グループには「@Email が @Check Employee Exists の結果に見つからない場合に実行」という指示が含まれています。これにより、ワークフローのロジックを制御して重複する従業員の作成を防ぎます。
AI レスポンスおよびデータインサイトコンポーネントは、基盤となるデータを使用してコンテンツやレスポンスを生成します。このフローには、スペース内に保存された従業員情報を組み合わせてパーソナライズされたウェルカムメールを準備するステップが含まれています。
アクションコンポーネントは、フローを外部システムに接続し、リアルタイムでアクションを実行します。オンボーディングフローでは、これらのステップが HR システムに従業員レコードを作成し、組織のメールサービスを通じてメールを送信し、IT システムでチケットを生成します。各アクションステップは、接続するシステム、実行する操作、およびそれらのシステムを呼び出すために必要なデータを指定します。
ワークフロー内の各ステップは変数を作成します。変数は、他の部分の情報を保持するラベル付きコンテナです。変数は重要で、ステップ間で情報を渡すことができます。例えば、「First Name」フィールドに「John Doe」と入力すると、その情報はワークフロー全体で「@First Name」として利用可能になります。変数がなければ、各ステップは孤立して動作し、以前のステップからのデータを使用できません。変数は、情報が1つのステップから別のステップに流れるための接着剤のような役割を果たします。以下の画像は、以前作成したワークフローの「Create Employee Record」ステップからのものです。プロンプト内の青色で強調されたテキストに注目してください。これらは他のステップから参照される変数です。プロンプトは次のように記述されています。「Create employee: first_name: @First Name, last_name: @Last Name, email: @Email …」ここで、参照される変数が「CreateEmployee」APIへの入力として使用されています。
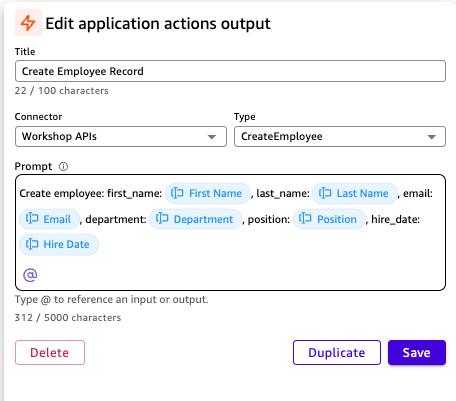
*図 8: 以前のステップからの変数が@記号を使用して参照される方法を示す、従業員オンボーディングフロー内の「Create Employee Record」ステップ。
自動化構築時のクイックヒント
Amazon Quick Flowsの堅固な基盤ができたので、タスクの自動化を開始する準備が整いました。フローを構築し始める際に役立つヒントをいくつか紹介します。
ヒント 1: まずプロンプトをテストします。</stro
原文を表示
Consider a typical Monday morning: you’re manually copying data from several different systems to create a weekly report, then formatting it for different stakeholders. This single task can consume several hours that could be spent on more strategic work. Multiply this across your team, and these repetitive tasks add up quickly.
Amazon Quick Flows automates these tasks using AI workflows. With Quick Flows, you create intelligent workflows using natural language—no coding or machine learning (ML) expertise required. You describe what you want automated, and Quick Flows builds it for you. This post shows you how to build your first AI-powered workflow, starting with a financial analysis tool and progressing to an advanced employee onboarding automation.
What is Amazon Quick Flows?
Amazon Quick Flows is part of Amazon Quick, a collection of AI-powered features that work together to help you analyze data, automate tasks, and get insights through natural language conversations. This post focuses specifically on Quick Flows for task automation.
With Quick Flows, you turn your everyday tasks into automated workflows for individual and team productivity. You create, customize, and share purpose-built AI workflows using your data, insights, and actions available within Amazon Quick.
Prerequisites
Before building your first flow, ensure that you have an active AWS account with Amazon Quick enabled with permissions to access Quick Flows. For setup instructions, see the Amazon Quick User Guide.
*Note: Amazon Quick uses generative AI. The specific outputs, responses, and generated content might vary from the examples shown. These variations are normal and expected. Focus on understanding the concepts and benefits rather than matching exact outputs.*
Build your first flow
In this example, you build a Financial Performance Analyzer that gathers real-time market data from the web, analyzes key metrics, and compiles a professional summary based on the information.
1. Navigate to Quick Flows
Open your browser, and log in to Quick. Then go to Quick Flows. The flow creation interface appears with a text area to describe your workflow and sample prompts to get you started.
*Figure 1: The Quick Flows creation interface where you describe your workflow in natural language*
2. Enter your prompt
In the text area, enter the following prompt:
*Create a flow that gathers comprehensive company financial research by designing a tool with four key components: (1) Real-Time Market Data gathering current stock prices and daily changes, (2) Financial Metrics Analysis retrieving key ratios like P/E, market cap, and revenue, (3) News Intelligence collecting recent financial headlines and market-moving events, and (4) Professional Analysis compiling analyst recommendations and ratings, each triggered by a company name or ticker symbol input.*
Quick Flows now knows exactly what you want: a workflow that takes a company name as input and returns a complete financial picture.
*Quick Tip**: *You can also create flows directly from your conversations with chat agents in Quick. If you’re already discussing a task or process with an agent, you can convert that conversation into a flow without starting from scratch.
3. Generate your flow
Select the Generate button. Quick Flows analyzes your prompt and maps your requirements to available capabilities. It identifies that it must gather data from web search, extract key financial metrics using AI analysis, and format the results into a structured report. The AI works through your requirements, identifies the specific steps needed, and assembles them into a connected flow.
*Figure 2: Quick Flows generating your workflow from the natural language prompt*
4. Run your flow
After the generation completes, you can test your flow immediately. Enter a company name or ticker symbol (like *Amazon* or *AMZN*) and select Run. Watch as the flow executes each step in topological order, gathering market data, analyzing metrics, collecting news, and compiling the final analysis.
After reviewing the results, you can chat directly with the flow to refine the output. For example, you might ask it to focus on specific metrics, adjust the analysis depth, or format the results differently. The flow understands your requests and can modify its output accordingly.
5. Refine the flow in the editor
After your first run, go into the editor view to see how Quick Flows built your workflow from a single prompt. Each step is laid out visually, showing the connections between them and how data moves from your input through each component to the final output.
Your flow starts with a text input step where you enter a company name or ticker symbol.
*Figure 3: The Flow editor showing each step in the workflow with the input step selected. *
Because this flow works with market data, Quick Flows automatically configured each research step with the built-in web search functionality of Quick. It gathers real-time information from the web rather than relying on static data.
*Figure 4: The Flow editor showing each step in the workflow with the web search step selected. *
Different web searches gather relevant data that you requested based on the prompt for the step.
The final step uses a general knowledge step to synthesize everything that the flow gathered. It takes the market data, financial metrics, news headlines, and analyst ratings from previous steps and compiles a financial report.
*Figure 5: The Flow editor showing each step in the workflow with the general knowledge step selected. *
From here, you can customize the flow to fit your needs. You can add a step to email the report to your team, post it to Slack, save it to a file in SharePoint, or export the output as a PDF or Microsoft Word document. Given this information changes over time, you might want to schedule your flow to run periodically.
Understanding key concepts
Now that you’ve built your first flow, here are the building blocks that you just used. A step is a discrete component that performs a specific function within a flow. Steps are the fundamental units that you chain together to create a complete flow.
*Figure 6: Quick Flows offers five categories of steps—AI responses, flow logic, data insights, actions, and user input—that you combine to build workflows.*
Quick Flows organizes steps into five categories:
- AI responses generate outputs, create images from text, prompt custom agents, search the web, invoke Quick Research, and perform tasks on websites.
- Flow logic controls workflow execution with reasoning groups that define conditions, loops, or validations.
- Data insights retrieve information from your company data in spaces and knowledge bases or analytics from dashboards and topics.
- Actions perform read or write operations in connected external systems and applications through pre-built or custom integrations.
- User input gathers information from users through text fields or file uploads to initiate and provide context for your workflow.
Quick Flows works with your company data wherever it lives. You can connect spreadsheets and databases using Amazon Quick, document stores, such as SharePoint, OneDrive, Google Drive, or Amazon Simple Storage Service (Amazon S3) through integrations, and take action through purpose built or custom integrations.
Beyond the basics: Employee onboarding automation
Now that you’ve built your first flow and understand the fundamentals, it’s time to tackle a more complex scenario. This example demonstrates advanced capabilities like conditional logic and system integrations, showing how the same principles that you just learned can automate multi-step business processes. Imagine you’re a human resources (HR) specialist with three new employees joining this week. For each one, you must create employee records in your HR information system, write personalized welcome emails that reference company policies, and coordinate with information technology (IT) for badge creation, equipment ordering, and email setup. These manual tasks add up to hours each week that take you away from strategic priorities. The following example walks you through building a flow that automates these onboarding tasks.
Prerequisites for the employee onboarding example
This employee onboarding example demonstrates advanced Quick Flows capabilities. You can follow along conceptually right now to understand the approach with no setup required. For hands-on experience with this specific example, the following optional workshop setup instructions helps you build this in your own AWS account with simulated HR and IT systems. It will take approximately 30 minutes to complete.
If you want to build this flow in your own AWS account, complete the setup steps from the A Complete Guide to Amazon Quick workshop:
- First, deploy the workshop infrastructure by following the self-paced setup instructions. This creates the foundational AWS resources and simulated HR and IT systems that your flow will integrate with.
- Second, follow the instructions within the Flows module, including the prerequisite instructions.
After you complete these setup steps, you can build and execute the employee onboarding flow. The workshop provides sample employee data and step-by-step testing instructions, so you can see exactly how the automation works in practice.
Understanding the employee onboarding workflow
*Figure 7: The employee onboarding workflow uses reasoning groups to create conditional logic, executing different steps based on whether an employee already exists in the system*
The workflow represents the sequence of steps from input collection and data retrieval to executing actions. It begins by collecting employee information through text input fields (first name, last name, email address). Next, the flow calls the workshop’s employee information API using an action step. This step determines if the employee’s email address is registered in the system. A reasoning group in this flow works like an if-then statement in everyday logic. Think of it as a fork in the road: if the employee already exists, the workflow ends; if they don’t exist, the workflow continues and creates their records. In this flow, the reasoning group evaluates whether the email for the new employee was found in the previous step, creating two possible execution paths. If the employee exists, the workflow ends because the record has already been created. If the employee doesn’t exist, the flow executes six sequential steps within the reasoning group: create the employee record, generate a welcome email, send the welcome email, generate a badge request ticket, create the badge request ticket, and summarize the onboarding results.
Creating the employee onboarding flow with natural language
Next, create your flow using a natural language prompt. You can describe what you want your flow to do in natural language, and Amazon Quick Flows interprets your description and automatically creates the workflow for you.
Navigate to the flows in Amazon Quick and select Create Flow. In the flow creation interface, you see an option to describe your flow in natural language. Enter a prompt similar to the following example:
*Create an employee onboarding flow that collects new hire information, checks if they already exist in our system, creates their employee record if they’re new, generates a personalized welcome email using our company policies, sends the email with their manager CC’d, creates IT tickets for badge and equipment setup, and provides a summary of all actions completed.*
Note that this prompt is a simplified version of the actual prompt used in the workshop. For the complete, detailed prompt and manual step-by-step instructions, refer to the workshop’s automating daily tasks guide, which provides both the detailed natural language prompt and manual flow construction steps.
How to write effective prompts for Quick Flows
Your prompt should include four elements: what information to collect (“gather employee details”), what decisions to make (“check if they already exist”), what actions to take (“create employee record”), and what content to generate (“personalized welcome email”). Looking at the example prompt, you can see how different phrases map to workflow components. The phrase “Create an employee onboarding flow” states the goal. “Collects new hire information” signals that the flow must gather data from users, which translates to input steps. When you describe operations like “creates their employee record,” “sends the email,” and “creates IT tickets,” you’re describing actions that modify external systems. These become action steps that integrate with your Quick integrations. Phrases like “generates a personalized welcome email using our company policies” indicate that the flow must produce content by accessing organizational knowledge. These become output steps that connect to spaces, knowledge bases, dashboards, or topics. Branching logic emerges from language like “checks if they already exist” and “if they’re new.” These phrases suggest conditional logic, prompting Quick Flows to add reasoning groups that determine if steps should execute or how many times.
Understanding the building blocks
Your flow consists of four main groups of components that work together to create the automation.
Input components are where your flow gathers the information that it needs to operate. In the employee onboarding example, these are text input steps that collect employee details like first name, last name, and email address.
Logic components control flow decisions or branches. The reasoning group step uses natural language to define when and how other steps should run. In the onboarding flow, the reasoning group contains the instruction *“Run if @Email is not found in @Check Employee Exists results.”* This alleviates duplicate employee creation by controlling the logic of the workflow.
AI response and data insights components produce content and responses using your underlying data. The flow includes steps that prepare personalized welcome emails by combining employee information stored within a space.
Action components connect your flow to external systems and perform actions in real time. In the onboarding flow, these steps create employee records in HR systems, send emails through your organization’s email service, and generate tickets in IT systems. Each action step specifies what system to connect to, what operation to perform, and the data required to call those systems.
Each step in your workflow creates a variable—a labeled container that holds information for other parts of your flow. Variables are important because they let you pass information between steps. For example, when someone enters “John Doe” in the First Name field, that information becomes available as “@First Name” throughout your entire workflow. Without variables, each step would operate in isolation, unable to use data from previous steps. Variables serve as the connective tissue that lets information flow from one step to another. In the following image from the “Create Employee Record” step from the workflow created previously, notice the blue highlighted text in the prompt. These are variables referenced from other steps. The prompt is written as follows: “Create employee: first_name: @First Name, last_name: @Last Name, email: @Email …”, where the referenced variables are used as input to the “CreateEmployee” API.
*Figure 8: The “Create Employee Record” step within the employee onboarding flow showing how variables from previous steps are referenced using the @ symbol.*
Quick tips when building your automations
Now that you have a solid foundation for Amazon Quick Flows, you’re ready to begin automating your tasks. Here are some tips to help you get started when building flows.
Tip 1: Test your prompts first.</stro
関連記事
今日のまとめ
AI日報で今日の重要ニュースをまとめ読み