Amazon SageMaker AI で BoltzGen を活用し、タンパク質設計を加速
AWS は、Amazon SageMaker AI を活用した BoltzGen のデプロイにより、タンパク質結合体設計の計算リソース管理を自動化し、研究開発の効率化とコスト削減を実現する具体的な手法を発表しました。
キーポイント
SageMaker AI によるエンドツーエンドのインフラ自動化
GPU インスタンスのプロビジョニングからデータ移動、結果の格納、リソース解放までを SageMaker AI が管理し、研究者はインフラ運用に時間を割かずに設計イテレーションに集中できる。
計算コストと時間の劇的な削減
オンデマンド課金(秒単位)によりアイドルコストを排除し、2 時間の設計実行で約 1.50 ドルという低コストを実現。また、ステップレベルのキャッシング機能により反復ワークフローでの費用対効果を向上させる。
スケーラブルな研究環境の実現
迅速な検証から本番バッチ処理まで対応可能な構成を提供し、学術機関や製薬企業の R&D 部門がタンパク質結合体設計や治療用タンパク質工学を効率的に実施できる。
影響分析・編集コメントを表示
影響分析
この発表は、AI を活用した創薬やタンパク質工学の分野において、計算リソースの複雑な管理という最大の障壁を解消する重要な一歩です。AWS のマネージドサービスを活用することで、小規模な研究ラボから大企業までが、高価な GPU インフラを専門知識なしに効果的に利用できるようになり、創薬プロセスのスピードアップと民主化に寄与します。
編集コメント
創薬分野における生成 AI の実用化において、インフラ運用の負担をいかに減らすかが鍵となりますが、本記事はその具体的な解決策とコストメリットを明確に示しており、業界にとって非常に価値のある情報です。
BoltzGen を Amazon SageMaker AI で利用することで、GPU 計算インフラをエンドツーエンドで管理し、タンパク質結合体設計を加速できます。BoltzGen は拡散に基づく生成モデルであり、特定の生体分子ターゲットに結合する能力を持つタンパク質やペプチドを設計します。典型的な設計キャンペーンには、バックボーン生成、逆折りたたみ(inverse folding)、構造検証、候補のランク付けなど、複数の GPU 集約型ステップが含まれます。数百、数千、あるいは数百万もの設計候補に対してこれらのステップを実行すると、インスタンスのプロビジョニング、ステップ間でのデータ移動、コスト追跡などの運用オーバーヘッドが生じます。SageMaker AI は、インスタンスのプロビジョニングから結果の提供、リソースのクリーンアップに至るまでの計算ライフサイクルを管理するため、インフラストラクチャの運用ではなく設計の反復に集中できます。
本稿では、SageMaker AI 上で BoltzGen をデプロイし、エンドツーエンドのタンパク質設計実験を実行する方法を示します。ウォークスルーが完了する頃には、迅速な検証実行から生産バッチ処理までスケール可能な動作セットアップが整います。このセットアップは研究の異なる段階に対応する 2 つの実行モードを提供し、反復ワークフロー中の計算コストを削減するためにステップレベルのキャッシュ機能を利用します。
このチュートリアルは、タンパク質結合体設計、治療用タンパク質工学、あるいは新規タンパク質アーキテクチャのいずれに取り組んでいても、学術研究ラボ、バイオテックスタートアップ、製薬企業の R&D グループ、教育プログラムに適用されます。
SageMaker AI が解決するタンパク質設計のボトルネック
BoltzGen キャンペーン内の各ステップは GPU ハードウェア上で実行され、一度に 1 つの設計仕様を処理します。リポジトリのベンチマークデータに基づくと、4-GPU インスタンス(ml.g5.12xlarge)において、1,000 サンプルのキャンペーンを完了するには約 375 時間かかります。このインフラストラクチャを運用するには、CUDA 環境の構築(例:CUDA ドライバのインストールとツールキットの設定)、GPU インスタンスのライフサイクル調整、ステップ間のデータパイプライン構築、および長時間実行ジョブからの障害回復が必要です。
SageMaker AI はこれらのボトルネックをすべて直接的に解決します。ジョブを送信すると、SageMaker AI が GPU インスタンスをプロビジョニングし、コンテナ内で BoltzGen を実行します。結果は Amazon Simple Storage Service(Amazon S3)に書き込まれ、処理が完了するとインスタンスが解放されます。課金は秒単位で行われるため、アイドル状態の GPU にかかるコストはありません。ml.g4dn.xlarge での 2 時間の設計実行は、オンデマンド価格に基づき約 1.50 ドルです。
実装では、単一インスタンス内でのマルチ GPU 並列化と、パイプラインを跨ぐマルチインスタンスのスケーリングをサポートしています。パイプラインモードでは、各ステップの出力が Amazon S3 にキャッシュされ、有効期限は 7 日間です。そのため、フィルタリングパラメータを反復して調整する際、計算コストの約 90% を占める設計生成ステップは再実行されません。
リポジトリ内のセットアップスクリプトはコンテナを構築し、Amazon Elastic Container Registry (Amazon ECR) にプッシュします。また、作業例により、数分で最初の設計ジョブを送信できます。10 件の候補で設計仕様を検証するのと同じ設定が、より大規模なキャンペーンにもスケーリング可能です。変更されるのはパラメータ値のみです。ml.g4dn(最もコスト効率の高い T4 GPU)から ml.g6e(NVIDIA L40S GPU)まで幅広いインスタンスタイプを提供しており、処理能力と予算のバランスを柔軟に調整できます。
BoltzGen が提供する機能
BoltzGen は、広範な生体分子ターゲットに結合するタンパク質やペプチドを設計するための全原子生成モデルです。このモデルは拡散プロセスを通じて結合体のバックボーン構造を生成し、その後、逆折りたたみモデルである BoltzIF を用いてアミノ酸配列を生成します。さらに、Boltz2 折りたたみ予測を用いて構造を検証します。
実装は、GitHub の Boltzgen on SageMaker リポジトリ で利用可能です。このリポジトリにはセットアップスクリプト、両方の実行モード、マルチ GPU およびマルチインスタンスのスケーリングサポート、そしてクイックスタートガイドが含まれています。
2 つの実行モード
実装では、研究の異なる段階に最適化された 2 つの実行モードを提供しています。これにより、最初は迅速な実験から始め、必要に応じて本番環境向けのワークフローへと移行できます。
SageMaker AI processing jobs は、迅速な実験のための直接バッチ実行を提供します。ジョブを提出すると、SageMaker AI が GPU インスタンスをプロビジョニングし、コンテナを実行して完了後にインスタンスを終了させます。単一の Python スクリプトで全体のワークフローがトリガーされ、多段階のオーケストレーションは不要です。スケーリングアップする前に設計仕様を検証することが目的である初期段階の研究においては、processing jobs はセットアップ時間を最小限に抑えます。
SageMaker AI Pipelines は、ステップレベルのキャッシュ機能、自動スケーリング、および SageMaker AI Studio での可視化モニタリングを備えた、5 つのステップからなるオーケストレーションワークフローを提供します。本番環境のワークロードでは、高価な計算ステップを再実行せずにパラメータの反復処理が可能となります。各ステップ(設計、逆折叠、折りたたみ、分析、フィルタリング)は独立してスケーリングでき、入力に変更がない場合はキャッシュされた結果が再利用されます。
両方のモードは同じワークフローに従います。Amazon ECR からのコンテナがプロビジョニングされた GPU インスタンス上で実行され、BoltzGen が設計仕様を処理し、SageMaker AI は計算リソースをシャットダウンする前に結果を Amazon S3 に保存します。
Getting started
始めるには、AWS アカウント、ローカルにインストールされたいくつかのツール、およびデータを格納するための Amazon S3 バケットが必要です。以下のセクションでは、各前提条件について順を追って説明し、その後、最初のタンパク質設計実験へのガイドを行います。
Prerequisites
課金が有効化されたアクティブな AWS アカウントを有していること、AWS Command Line Interface (AWS CLI) がインストールされ、設定済み(aws configure)であることを確認してください。ターゲットの AWS リージョン(例:us-east-1)において、GPU インスタンス(ml.g4dn.xlarge 以上など)に対して十分なサービスクォータ(本ウォークスルーでは 1 など)が確保されていることを検証してください。
次に、SageMaker AI 用の AWS Identity and Access Management (IAM) 実行ロールを作成します。AmazonSageMakerFullAccess マネージドポリシーをアタッチし、データバケットに対する Amazon S3 の読み取り/書き込みアクセス権限と、BoltzGen コンテナイメージに対する Amazon ECR のプル権限を付与してください。
ローカルマシンでは、pip を備えた Python 3.11 以降、最新の Boto3 および SageMaker SDK (pip install boto3 sagemaker)、およびコンテナイメージの構築用の Docker をインストールします。最後に、対象リージョンに Amazon S3 バケットを作成してください:
aws s3 mb s3://amzn-s3-demo-bucket --region
最初のタンパク質設計の実行
最もスムーズなセットアップ体験を得るためには、Amazon SageMaker Studio または Amazon SageMaker ノートブック インスタンスの使用を推奨します。これらの環境には、AWS 認証情報、SageMaker SDK、および Docker サポートが事前に設定されています。
SageMaker AI Studio の起動
まず、セットアップと実験コマンドを実行する SageMaker AI Studio を開きます。
- SageMaker AI コンソールを開く。
- 左側のナビゲーションから Studio を選択する。
- 新しい Studio ドメインを作成する(存在しない場合)か、既存のものを開き、AWS CLI を使用してローカルモードで Docker アクセスを有効化する。
- インスタンス (例: ml.m5.2xlarge) で JupyterLab スペースを起動する。
- ml.g4dn.xlarge および ml.g5.xlarge の処理ジョブ使用量に対するクォータ制限を 0 より大きく引き上げる。
リポジトリのクローン
セットアップスクリプト、両方の実行モード、および例示設計仕様を含む、SageMaker AI 上の BoltzGen コードをダウンロードしてください。
git clone https://github.com/aws-samples/sample-biofm-quickstart.git
cd sample-biofm-quickstart/models/boltzgen/inference/amazon-sagemaker/boltzgen-on-sagemaker-processing-job-cli
コンテナイメージのビルドとプッシュ
コンテナイメージには、BoltzGen とその依存関係、および GPU ドライバーが含まれています。一度ビルドして、実験全体で再利用できます。リージョンを設定し、ビルドスクリプトを実行してください:
export AWS_REGION=
./sagemaker/build_and_push.sh
AWS 認証情報の設定
SageMaker AI は、計算リソースのプロビジョニングと結果の Amazon S3 への保存のために、AWS アカウントの詳細を必要とします。環境テンプレートをコピーして設定を入力してください:
cp sagemaker/pipeline/.env.example sagemaker/pipeline/.env
vim sagemaker/pipeline/.env
例示 .env ファイル:
AWS_REGION=us-east-1
AWS_S3_BUCKET=amzn-s3-demo-bucket
AWS_ROLE_ARN=arn:aws:iam:::role/SageMakerExecutionRole
AWS_IMAGE_URI=.dkr.ecr..amazonaws.com/boltzgen-sagemaker:latest
これで、2 つのオプションから最初の設計ジョブを実行する準備が整いました:
オプション A: 単一の処理ジョブで全ステップをクイックに実験:
python sagemaker/run_processing_job.py \
  --design-spec example/vanilla_protein/1g13prot.yaml \
  --s3-bucket amzn-s3-demo-bucket \
  --instance-type ml.g4dn.xlarge \
  --num-designs 10 \
  --budget 2 \
  --wait
拡散モデルを使用して、逆折りたたみ、再折りたたみ、分析、フィルタリングを経る生バックボーン構造である 10 の中間候補設計を生成します。実際の実行では、この数は 10,000 から 60,000 とはるかに多いべきです。最終的に多様性を最適化した出力セットには 2 つの設計が含まれます。つまり、10 の中間設計のうち、品質と配列の多様性の両方で最適化された 2 つのみが出力フォルダに格納されます。
オプション B: パイプライン内で異なるステップをオーケストレーションする、より本番環境に近いワークフローです。
パイプラインディレクトリへ移動:
cd sagemaker/pipeline
パイプラインを作成:
python run_pipeline.py --config pipeline_config.yaml create
設計仕様で実行:
python run_pipeline.py --config pipeline_config.yaml run
ステータスを確認(Amazon Resource Name (ARN) を実行 ARN に置き換えてください):
python run_pipeline.py --region us-east-1 status --execution-arn
結果のダウンロード
処理ジョブの場合:
aws s3 sync s3://amzn-s3-demo-bucket/boltzgen/output/boltzgen-TIMESTAMP ./results
パイプラインの場合:
aws s3 sync s3://amzn-s3-demo-bucket/boltzgen-pipeline/output/TIMESTAMP ./results
出力ディレクトリには複数のサブディレクトリが含まれています。final_ranked_designs/ には、予測結合親和性に基づいてランク付けされた上位の設計が格納されています。intermediate_designs/ には生成された候補構造が含まれています。metrics/ には、平均二乗偏差(RMSD)や接触スコアなどの構造解析データが保存されています。また、job_metadata.json ファイルには、完全なジョブパラメータとステータスが記録されています。
以下に、--num-designs 100 --budget 10 を指定して 1G13 ターゲットに対して実行した際の出力構造を示すディレクトリツリーを記載します:
results/1g13prot/
├── final_ranked_designs/
│ ├── final_10_designs/ # 多様性と品質に基づいて選択された上位設計 (.cif)
│ ├── intermediate_ranked_10_designs/ # 品質スコアでランク付けされた上位設計 (.cif)
│ ├── all_designs_metrics.csv # すべての設計に対する完全なメトリクステーブル
│ ├── final_designs_metrics_10.csv # 最終的に選択された設計のメトリクス
│ └── results_overview.pdf # フィルタリング基準とプロットを含むサマリーレポート
├── intermediate_designs/ # 生成されたすべてのバックボーン構造 (.cif)
├── intermediate_designs_inverse_folded/ # 配列設計および再折りたたみ後の構造
└── config/ 再現性のために使用されたステップ構成
BoltzGen は生成されたすべての設計を自動的にフィルタリングし、ランク付けします。各設計は、リフォールディング後の RMSD が 2.5 オングストローム未満であり、アミノ酸組成がバランスしているなどの構造的品質の閾値に合格してから、ランキング段階に進みます。今回の実行では、100 の設計のうち 3 つがすべてのフィルタを通過しました。その後、パイプラインは複合的な品質スコアに基づいて設計をランク付けし、多様性最適化を適用して最終セットを選択します。
以下の表には、主要な指標を持つ上位 5 つの設計を示しています。高い design_ptm および design_iptm スコアは、より大きな構造的自信と結合強度を示します。低い filter_rmsd は、リフォールディング後のより優れた構造的精度を意味し、高い delta_sasa はより広い結合界面を示します。
id
Rank
design_ptm
design_iptm
filter_rmsd
delta_sasa
1g13prot_24
1
0.760
0.304
2.24
584.7
1g13prot_37
2
0.732
0.275
1.98
657.4
1g13prot_21
3
0.748
0.159
2.49
535.7
1g13prot_06
4
0.736
0.426
1.34
1598.0
1g13prot_59
5
0.763
0.527
1.05
2369.0
各最終設計は、ランクプレフィックス(例:rank001_1g13prot_24.cif)付きの .cif 構造ファイルとして保存され、下流の解析または実験的検証に備えています。
最初のエクスペリメントが完了しましたので、以下のセクションでは、SageMaker AI 上の BoltzGen が内部でどのように動作するかを解説し、特定のニーズに合わせてアーキテクチャを最適化する方法を探ります。
仕組みの理解
両方の実行モード背後にあるアーキテクチャとスケーリング機能を理解することで、適切なインスタンスタイプを選択し、単一インスタンス構成とマルチインスタンス構成の間で判断できるようになります。また、コスト削減のためにキャッシングを最大限に活用する方法も把握できます。
アーキテクチャ
処理ジョブモード(単一ステップバッチ)では、SageMaker AI が、ジョブの提出後に、インスタンスのプロビジョニング、コンテナの実行、Amazon S3 におけるデータ移動、およびクリーンアップを調整します。ワークフローは以下の手順に従います:
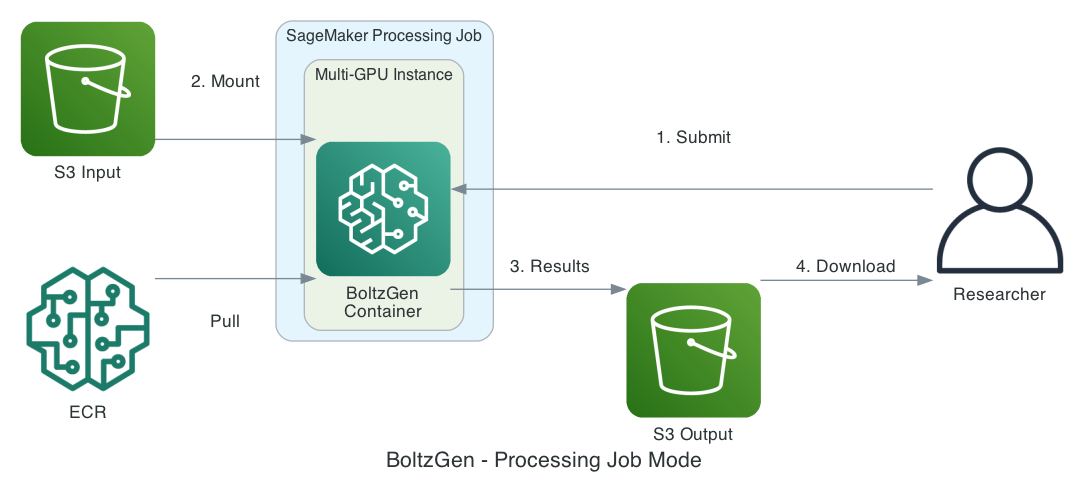
- 設計仕様(YAML)と参照構造ファイルを準備します。
- ファイルを Amazon S3 にアップロードします。SageMaker AI は、Amazon S3 の入力データをコンテナにマウントします。
- BoltzGen が設計を行い、結果を再び Amazon S3 に書き込みます。
- 最終結果を Amazon S3 からダウンロードします。
パイプラインモード(5 ステップワークフロー)では、パイプラインは 5 つの連続するステップを実行し、各ステップを個別にスケーリングできます:
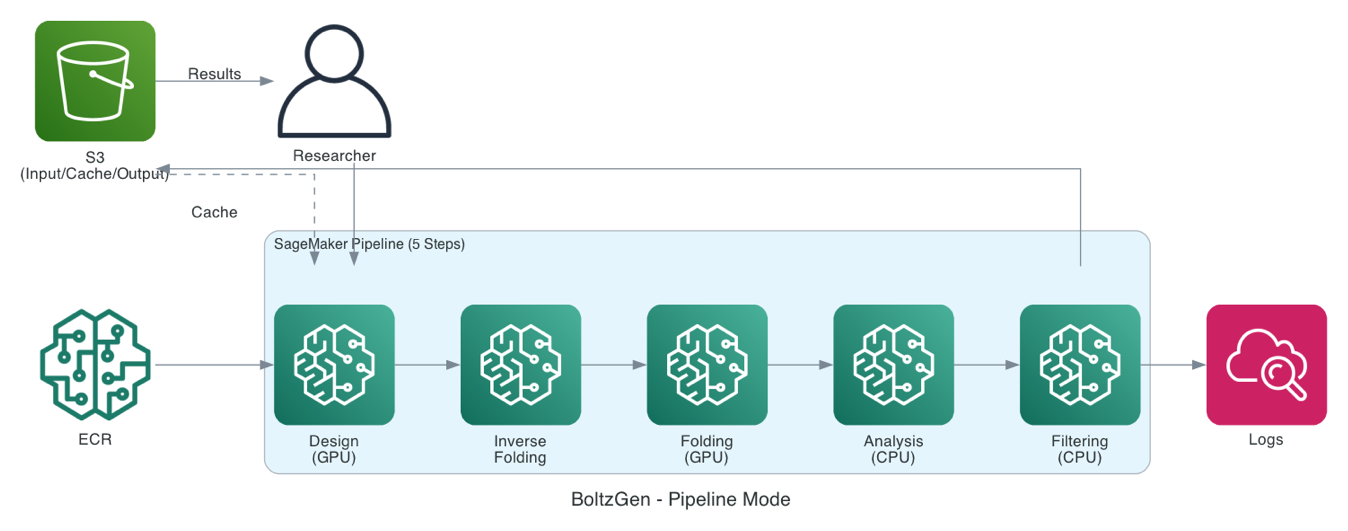
- デザイン (GPU): Diffusion モデルが結合体バックボーン構造を生成します。
- 逆フォールディング (GPU): BoltzIF がアミノ酸配列を生成します。
- フォールディング (GPU): Boltz2 が複合体構造を検証します。
- 解析 (CPU): 構造的指標(RMSD、溶媒アクセス表面積 (SASA)、および接触点)を計算します。
- フィルタリング (CPU): 上位の設計案をランク付けし選択します。
あなたのパイプラインは、各ステップの出力を Amazon S3 にキャッシュし、有効期限を 7 日に設定しています。入力に変更がない場合、キャッシュされた結果が自動的に再利用されるため、フィルタリングパラメータの反復処理を行う際にも、コストのかかる設計生成ステップは完全にスキップされます。
GPU およびインスタンス間でのスケーリング
SageMaker AI 上の BoltzGen は、コストとスループットをバランスさせるのに役立つ 2 つの補完的なスケーリング戦略をサポートしています。
マルチ GPU 並列化は、ラウンドロビンスケジューリングを通じて単一インスタンス内の GPU 間で設計仕様を分散します。各 GPU は、Python の組み込み並列処理ライブラリである ProcessPoolExecutor を使用して割り当てられた仕様を独立して処理し、ProgressTracker クラスによるスレッドセーフな進捗追跡を行います。GPU の検出は nvidia-smi を通じて自動的に行われます。
例えば、4 つの GPU を備えた ml.g5.12xlarge インスタンスでは、10 件の設計仕様が以下のように分散されます:
10 件の設計仕様 -> GPU0: 仕様 0,4,8 | GPU1: 仕様 1,5,9 | GPU2: 仕様 2,6 | GPU3: 仕様
原文を表示
BoltzGen on Amazon SageMaker AI accelerates protein binder design by managing GPU compute infrastructure end to end. BoltzGen is a diffusion-based generative model that designs proteins and peptides capable of binding to specific biomolecular targets. A typical design campaign involves multiple GPU-intensive steps: backbone generation, inverse folding, structural validation, and candidate ranking. Running these steps across hundreds, thousands, or even millions of design candidates introduces operational overhead in provisioning instances, moving data between steps, and tracking costs. SageMaker AI manages this compute lifecycle from instance provisioning through result delivery and resource cleanup, so you can focus on design iteration rather than infrastructure operations.
In this post, we demonstrate how to deploy BoltzGen on SageMaker AI and run an end-to-end protein design experiment. By the end of the walkthrough, you have a working setup that scales from quick validation runs to production batch processing. The setup offers two execution modes for different stages of research and uses step-level caching to reduce compute expenses during iterative workflows.
This walkthrough applies to academic research labs, biotech startups, pharmaceutical R&D groups, and educational programs, whether you work in protein binder design, therapeutic protein engineering, or de novo protein architecture.
How SageMaker AI addresses protein design bottlenecks
Each step in a BoltzGen campaign runs on GPU hardware and processes one design specification at a time. On a 4-GPU instance (ml.g5.12xlarge), a campaign of 1,000 samples takes approximately 375 hours to complete, based on the repository’s benchmark data. Operating this infrastructure involves building CUDA environments (e.g. install CUDA driver and setup toolkit), coordinating GPU instance lifecycles, constructing data pipelines between steps, and recovering from failures in long-running jobs.
SageMaker AI addresses each of these bottlenecks directly. After you submit a job, SageMaker AI provisions GPU instances and executes BoltzGen inside the container. It writes results to Amazon Simple Storage Service (Amazon S3) and releases the instances when processing completes. Billing is per-second, so there are no idle GPU costs. A 2-hour design run on ml.g4dn.xlarge costs approximately $1.50 based on on-demand pricing.
The implementation supports multi-GPU parallelization within a single instance and multi-instance scaling across a pipeline. In pipeline mode, each step’s output is cached in Amazon S3 with a 7-day expiry, so when you iterate on filtering parameters, the design generation step that accounts for approximately 90 percent of compute cost does not re-run.
Setup scripts in the repository build the container and push it to Amazon Elastic Container Registry (Amazon ECR), and working examples let you submit your first design job within minutes. The same configuration that validates a design specification with 10 candidates scales to larger campaigns — only the parameter values change. Instance types ranging from ml.g4dn (lowest cost T4 GPUs) to ml.g6e (NVIDIA L40S GPUs) give you flexibility for matching throughput to budget.
What BoltzGen offers
BoltzGen is an all-atom generative model for designing proteins and peptides that can bind to a wide range of biomolecular targets. The model generates binder backbone structures through a diffusion process. It then uses an inverse folding model called BoltzIF to generate amino acid sequences and validates structures with Boltz2 folding predictions.
The implementation is available in the Boltzgen on SageMaker repository on GitHub. The repository includes setup scripts, both execution modes, multi-GPU and multi-instance scaling support, and a quick start guide.
Two execution modes
We provided two execution modes in our implementation, optimized for different stages of research, so you start with quick experiments and graduate to production workflows as needs grow.
SageMaker AI processing jobs provide direct batch execution for quick experiments. After submitting a job, SageMaker AI provisions the GPU instance, runs the container, and shuts down the instance when complete. A single Python script triggers the entire workflow, without multi-step orchestration. For early-stage work where the goal is to test design specifications before scaling up, processing jobs minimize setup time.
SageMaker AI Pipelines provide a 5-step orchestrated workflow with step-level caching, automatic scaling, and visual monitoring in SageMaker AI Studio. Production workloads benefit from parameter iteration without re-running expensive compute steps. Each step (design, inverse folding, folding, analysis, filtering) can be scaled independently, and cached results are reused when inputs have not changed.
Both modes follow the same workflow. The container from Amazon ECR runs on a provisioned GPU instance, BoltzGen processes the design specification, and SageMaker AI stores results in Amazon S3 before shutting down compute resources.
Getting started
To get started, you need an AWS account, a few tools installed locally, and an Amazon S3 bucket for your data. The following sections walk you through each prerequisite and then guide you through your first protein design experiment.
Prerequisites
Make sure you have an active AWS account with billing enabled and the AWS Command Line Interface (AWS CLI) installed and configured (aws configure). Verify that you have sufficient service quotas (for example, 1 for this walkthrough) for GPU instances (ml.g4dn.xlarge or higher) in your target AWS Region (such as us-east-1).
Next, create an AWS Identity and Access Management (IAM) execution role for SageMaker AI. Attach the AmazonSageMakerFullAccess managed policy, grant Amazon S3 read/write access to your data bucket, and grant Amazon ECR pull permissions for the BoltzGen container image.
On your local machine, install Python 3.11+ with pip, the latest Boto3 and SageMaker SDK (pip install boto3 sagemaker), and Docker for building container images. Finally, create an Amazon S3 bucket in your target Region:
aws s3 mb s3://amzn-s3-demo-bucket --region Running your first protein design
For the most streamlined setup experience, we recommend Amazon SageMaker Studio or an Amazon SageMaker notebook instance. These environments come preconfigured with AWS credentials, the SageMaker SDK, and Docker support.
Launch SageMaker AI Studio
Start by opening SageMaker AI Studio, where you run the setup and experiment commands.
- Open the SageMaker AI console.
- Choose Studio from the left navigation.
- Create a new Studio domain (if one does not exist) or open an existing one, enable Docker Access through local mode using AWS CLI.
- Launch a JupyterLab space with an instance (for example, ml.m5.2xlarge).
- Raise quota limits for ml.g4dn.xlarge and ml.g5.xlarge processing job usage to greater than 0.
Clone the repository
Download the BoltzGen on SageMaker AI code, which includes setup scripts, both execution modes, and example design specifications.
git clone https://github.com/aws-samples/sample-biofm-quickstart.git
cd sample-biofm-quickstart/models/boltzgen/inference/amazon-sagemaker/boltzgen-on-sagemaker-processing-job-cliBuild and push the container image
Your container image packages BoltzGen with its dependencies and GPU drivers. Build it once and reuse it across experiments. Set your region and run the build script:
export AWS_REGION=
./sagemaker/build_and_push.shConfigure AWS credentials
SageMaker AI needs your AWS account details to provision compute resources and store results in Amazon S3. Copy the environment template and fill in your settings:
cp sagemaker/pipeline/.env.example sagemaker/pipeline/.env
vim sagemaker/pipeline/.envExample .env:
AWS_REGION=us-east-1
AWS_S3_BUCKET=amzn-s3-demo-bucket
AWS_ROLE_ARN=arn:aws:iam:::role/SageMakerExecutionRole
AWS_IMAGE_URI=.dkr.ecr..amazonaws.com/boltzgen-sagemaker:latestNow you’re ready to run your first design job with two options:
Option A: Quick experiment with all steps in a single processing job:
python sagemaker/run_processing_job.py \
--design-spec example/vanilla_protein/1g13prot.yaml \
--s3-bucket amzn-s3-demo-bucket \
--instance-type ml.g4dn.xlarge \
--num-designs 10 \
--budget 2 \
--waitYou have 10 intermediate candidate designs to generate using the diffusion model, which are the raw backbone structures going through inverse folding, refolding, analysis and filtering. In practice, this number should be much higher like 10,000 to 60,000 for real runs. The final diversity-optimized output set has two designs. So out of the 10 intermediate designs, only the two optimized for both quality and sequence diversity end up in your output folder.
Option B: A more production-like workflow that orchestrates different steps in a pipeline.
Change to pipeline directory:
cd sagemaker/pipelineCreate the pipeline:
python run_pipeline.py --config pipeline_config.yaml createRun with design specifications:
python run_pipeline.py --config pipeline_config.yaml runCheck status (replace the Amazon Resource Name (ARN) with the execution ARN):
python run_pipeline.py --region us-east-1 status --execution-arn Download results
For processing job:
aws s3 sync s3://amzn-s3-demo-bucket/boltzgen/output/boltzgen-TIMESTAMP ./resultsFor pipeline:
aws s3 sync s3://amzn-s3-demo-bucket/boltzgen-pipeline/output/TIMESTAMP ./resultsThe output directory contains several subdirectories. final_ranked_designs/ holds the top designs ranked by predicted binding affinity. intermediate_designs/ contains the generated candidate structures. metrics/ stores structural analysis data including root-mean-square deviation (RMSD) and contact scores. A job_metadata.json file records the complete job parameters and status.
The following directory tree shows the output structure from a run with --num-designs 100 --budget 10 against the 1G13 target:
results/1g13prot/
├── final_ranked_designs/
│   ├── final_10_designs/                   # Top designs selected for diversity and quality (.cif)
│   ├── intermediate_ranked_10_designs/     # Top designs ranked by quality score (.cif)
│   ├── all_designs_metrics.csv             # Full metrics table for all designs
│   ├── final_designs_metrics_10.csv        # Metrics for final selected designs
│   └── results_overview.pdf                # Summary report with filtering criteria and plots
├── intermediate_designs/                   # All generated backbone structures (.cif)
├── intermediate_designs_inverse_folded/    # Structures after sequence design and refolding
└── config/                                 # Step configurations used for reproducibility
BoltzGen automatically filters and ranks all generated designs. Each design must pass structural quality thresholds—including refolding RMSD below 2.5 Angstrom and balanced amino acid composition—before entering the ranking stage. In this run, 3 out of 100 designs passed all filters. The pipeline then ranks designs by a composite quality score and applies diversity optimization to select the final set.
The following table shows the top five designs with key metrics. Higher design_ptm and design_iptm scores indicate greater structural confidence and binding strength. Lower filter_rmsd indicates better structural accuracy after refolding, and higher delta_sasa indicates a larger binding interface.
id
Rank
design_ptm
design_iptm
filter_rmsd
delta_sasa
1g13prot_24
1
0.760
0.304
2.24
584.7
1g13prot_37
2
0.732
0.275
1.98
657.4
1g13prot_21
3
0.748
0.159
2.49
535.7
1g13prot_06
4
0.736
0.426
1.34
1598.0
1g13prot_59
5
0.763
0.527
1.05
2369.0
Each final design is saved as a .cif structure file with a rank prefix (for example, rank001_1g13prot_24.cif), ready for downstream analysis or experimental validation.
Now that your first experiment is complete, the following sections explore how BoltzGen on SageMaker AI works under the hood so you can optimize the architecture for your specific needs.
How it works
Understanding the architecture and scaling capabilities behind both execution modes helps you choose the right instance type and decide between single-instance and multi-instance configurations. It also helps you take full advantage of caching to reduce costs.
Architecture
With processing-job mode (single-step batch), SageMaker AI coordinates instance provisioning, container execution, Amazon S3 data movement, and cleanup after you submit your job. Your workflow follows these steps:
- Prepare a design specification (YAML) and reference structure files.
- Upload your files to Amazon S3. SageMaker AI mounts the Amazon S3 input data to your container.
- BoltzGen generates designs and writes results back to Amazon S3.
- Download your final results from Amazon S3.
In pipeline mode (5-step workflow), your pipeline runs five sequential steps, each of which you can scale separately:
- Design (GPU): Diffusion model generates binder backbone structures.
- Inverse folding (GPU): BoltzIF generates amino acid sequences.
- Folding (GPU): Boltz2 validates complex structures.
- Analysis (CPU): Calculates structural metrics (RMSD, solvent-accessible surface area (SASA), and contacts).
- Filtering (CPU): Ranks and selects top designs.
Your pipeline caches each step’s output in Amazon S3 with 7-day expiry. When inputs haven’t changed, cached results are reused automatically, so when you iterate on filtering parameters, the expensive design generation step is skipped entirely.
Scaling across GPUs and instances
BoltzGen on SageMaker AI supports two complementary scaling strategies that help you balance cost and throughput.
Multi-GPU parallelization distributes design specifications across GPUs within a single instance through round-robin scheduling. Each GPU processes its assigned specifications independently using ProcessPoolExecutor (Python’s built-in parallel processing library), with thread-safe progress tracking through a ProgressTracker class. GPU detection is automatic through nvidia-smi.
For example, on an ml.g5.12xlarge instance with 4 GPUs, 10 design specifications are distributed as follows:
10 design specs -> GPU0: specs 0,4,8 | GPU1: specs 1,5,9 | GPU2: specs 2,6 | GPU3: spec
関連記事
今日のまとめ
AI日報で今日の重要ニュースをまとめ読み