Amazon S3 の Amazon QuickSight キーベースにおける機密ドキュメントへのアクセス制限機能の追加
Amazon Quick は、機密文書に対するドキュメントレベルのアクセス制御リスト(ACL)機能を追加し、組織がコンプライアンス要件を満たしながら大規模な文書ライブラリを AI 検索に安全に統合できるようになった。
キーポイント
ドキュメントレベルの権限管理の実装
ナレッジベース全体ではなく、個々の文書やフォルダ単位でユーザーやグループへのアクセスを制限・許可する機能を提供し、より細粒度なセキュリティ制御を実現します。
2 つの ACL 設定方法
組織の運用ニーズに合わせて、フォルダベースの権限構造に最適な「グローバル ACL 設定ファイル」と、個々の文書メタデータを活用する「ドキュメントレベルメタデータファイル」の 2 種類から選択可能です。
クエリ時の自動評価と適用
ユーザーが質問した際、Quick はそのユーザーの ID を ACL 設定と比較し、承認されたコンテンツのみを回答として表示するため、権限外の情報が漏洩するリスクを排除します。
IAM ポリシーとワークフロー連携
ナレッジベース作成時にアクセス可能な S3 バケットを IAM ポリシーで制御し、チャットや自動化されたワークフロー(Flows)を通じて設定の検証と維持管理を行います。
影響分析・編集コメントを表示
影響分析
この機能強化は、大規模な文書データを扱う企業において、AI ツールの導入とセキュリティコンプライアンスの両立という長年の課題に対する決定的な解決策となります。これにより、組織は機密性の高いドキュメントを恐れることなく、迅速かつ安全に AI 検索・チャットボットを活用できるようになり、データガバナンス体制を強化したまま業務効率化を進めることが可能になります。
編集コメント
AI ツールの普及に伴い、セキュリティ懸念が導入の最大の障壁となることが多く、このドキュメントレベルでの厳格な制御機能は、その障壁を大きく取り払う重要な一歩です。特に金融や医療など規制の厳しい業界において、Quick の実用範囲を劇的に広げる機能と言えます。
機密文書へのアクセス制限を必須とする組織では、大規模なリポジトリ全体にわたって従業員が回答を見つけるのを支援するために、AI 駆動の検索およびチャット機能への依存が高まっています。ナレッジベースレベルでアクセスを制御する粗粒度の権限は多くのチームにとって効果的ですが、機密文書については、特定の文書やフォルダを承認されたチーム、個人、またはシステムにのみ制限するためのより細粒度の制御が必要です。
Amazon Quick 内の Amazon Simple Storage Service (Amazon S3) ナレッジベースに対するドキュメントレベルのアクセス制御リスト(ACL)サポートにより、そのような細粒度の制御が可能になります。機密な S3 ドキュメントを、それらを表示すべきユーザーとグループにのみ制限し、文書またはフォルダレベルで管理できます。ユーザーが質問を行った際、Quick はそのユーザーの身元を ACL 設定に対して評価し、表示権限を持つコンテンツのみを提示します。これらの制御を実装することで、コンプライアンスおよびデータガバナンス要件を満たしつつ、ドキュメントライブラリ全体を安全に Quick に取り込むことができます。
本記事では、Amazon Quick の S3 ナレッジベースに対する ドキュメントレベル ACL の設定方法について解説します。チャットおよび自動化されたワークフロー全体でドキュメントレベルの権限を強制する ACL 設定の設定と検証方法を学びます。本記事では以下の内容を扱います:
- IAM ポリシー割り当てを使用して、知識ベースの作成にユーザーがアクセスできる S3 バケットを制御する
- アクセス制御構造の計画
- 2 つの ACL 設定方法(グローバル ACL ファイルとドキュメントレベルのメタデータファイル)の選択
- ユーザーおよびグループに対する権限の設定
- チャットおよび ACL 対応フローを通じて、アクセス制御が正しく機能していることを検証する
- 時間経過に伴う ACL 設定の更新と維持
Quick における S3 ACL の仕組み
Amazon Quick では、S3 ACL(Access Control List:アクセス制御リスト)機能を使用して、ドキュメントにアクセス権限を付与できます。これにより、チャットの回答には、あなたが閲覧を許可されたコンテンツのみが含まれるようになります。個々のユーザーまたはグループに対して、標準的な ALLOW(許可)および DENY(拒否)ポリシーを指定することで、誰がどのドキュメントにアクセスできるかを定義し、Quick はクエリ実行時にこれらの権限を強制します。
ACL の設定には 2 つの方法があり、それぞれ異なる運用ニーズに適しています:
- グローバル ACL 設定ファイル(ACL.json など) – フォルダ(プレフィックス)レベルでのアクセス権限を指定する、単一の集中管理ファイルです。組織の権限構造が安定しており、フォルダベースで管理されている場合にこの方法を使用してください。
- ドキュメントレベルのメタデータファイル – 各ドキュメントごとに個別に配置され、そのドキュメント固有のアクセス制御エントリを含むメタデータファイルです。権限変更が頻繁な場合、影響を受けるドキュメントのみを再インデックスすればよく、フォルダ構造全体を再処理する必要がないため、この方法を使用してください。
権限の変更頻度と必要な粒度に応じてアプローチを選択してください:
考慮事項
グローバル ACL ファイル
ドキュメントレベルのメタデータ
権限の粒度
フォルダ(S3 プレフィックス)レベル
個別ドキュメントレベル
管理オーバーヘッド
維持すべきファイルは1つだけ
ドキュメントごとにメタデータファイルが1つ必要
権限変更時の再インデックス範囲
影響を受けるプレフィックス全体
影響を受けたドキュメントのみ
推奨される用途
安定したフォルダベースのアクセス構造
頻繁に変更されるドキュメントごとの権限
リインデックス範囲の理解
選択したメソッドのリインデックス範囲には、実務上の重要な意味合いがあります。グローバル ACL(アクセス制御リスト)アプローチでは、権限の変更が影響を受けるプレフィックス全体のフルリインデックスをトリガーします。組織で頻繁な権限更新が必要な場合は、ドキュメントレベルのメタデータファイルの使用を検討してください。この方法では、フォルダ構造全体ではなく、影響を受けたドキュメントのみが再インデックスされます。
デフォルト拒否動作
Quick で S3 ナレッジベースに ACL を有効化すると、ACL 設定に明示的にリストされていないドキュメントまたはプレフィックスは、デフォルトで拒否されます。この「デフォルト拒否」アプローチ(「フェイルクローズド」とも呼ばれ、明示的なルールが存在しない場合にシステムがアクセスを拒否する状態になることを意味します)により、ACL を設定した場合は、ユーザーに到達させたいすべてのプレフィックスまたはドキュメントに対してアクセス権限を明示的に付与する必要があります。
例えば、S3 バケットに 3 つのフォルダ(/finance/、/legal/、/policies/)があり、ACL ファイルで /finance/ と /policies/ へのアクセスのみが許可されている場合、/legal/ フォルダとその内容は、DENY ルールが存在しなくても自動的にすべてのユーザーに対して拒否されます。
IAM が使用する 暗黙的拒否モデル も同じ仕組みです。Quick は明示的に許可しない限りアクセスを拒否します。ACL を設定することで、アクセスに対する明示的な制御が可能となり、意図せず情報が公開されることはありません。
ユーザーまたはグループが、同じドキュメントまたはプレフィックスに対して ALLOW エントリと DENY エントリの両方を持っている場合、DENY が常に優先されます。これは、チームやグループに対して広範な ALLOW ルールを適用し、その後、特定のリソースへのアクセスを制限するためにターゲットを絞った DENY エントリを適用することで、ACL 構成全体を再構築することなく、きめ細やかな制御を実現できることを意味します。
前提条件
開始する前に、以下の事項が揃っていることを確認してください:
- Amazon Quick が有効化された AWS アカウント。Quick アカウントをお持ちでない場合は、「Amazon Quick の始め方」をご参照ください。
- インデックス化するドキュメントを含む Amazon S3 バケット。
- アクセス制御リスト (ACL) をどのように構成したいかという構想。以下のセクションで、これらのファイルの作成方法について説明します。
- ACL ファイル内のアイデンティティと一致する電子メールアドレスを持つユーザーが Quick にプロビジョニングされていること。ユーザーのプロビジョニングの詳細については、「Amazon Quick におけるユーザーアクセスの管理」をご覧ください。
- IAM ポリシー割り当てやナレッジベースの作成を構成するための Quick 管理者権限。
- IAM の概念および基本的な JSON 構文に関する知識。
- ACL 設定を検証するためのテスト用または本番環境外のナレッジベース。ACL の有効化は元に戻せない操作であるため、本番環境で有効化する前に設定を確認してください。
知識ベース作成における S3 バケットアクセスの制御
ドキュメントレベルの ACL は、ユーザーが知識ベース内でアクセスできるドキュメントを制御しますが、最初に誰が知識ベースを作成できるかを制御するものではありません。この区別を常に念頭に置いてください。組織に、常に ACL の適用が必要となる S3 バケット(例えば、機密性の高い人事文書や法的文書を含むバケットなど)がある場合、そのようなバケットに対して知識ベースを作成できるのは承認された管理者のみであることを確認する必要があります。この制御がない場合、Quick ユーザーは ACL を有効にせずに同じバケット上に新しい知識ベースを作成でき、ドキュメントレベルのアクセス制御を完全に迂回してしまう可能性があります。このセクションでは、これらの制御を実装する方法について説明します。
Quick における IAM ポリシー割り当てを使用すると、特定のユーザーまたはグループが知識ベース作成のためにアクセスできる S3 バケットを制限することで、この課題を解決できます。例えば、ACL の適用が必要なバケットを、セットアップ時に常に ACL を有効にする少数の信頼された管理者に限定したり、ACL が不要な非機密性のバケットに対してはより広範な知識ベース作成を許可したり、特定のユーザーにアクセス権限を与えないことで、特定のバケットからの知識ベース作成自体をブロックしたりすることが可能です。
注: Quick を通じて割り当てられた IAM ポリシーは、AWS リソースレベルのポリシーよりも優先されます。割り当てる前に、IAM ポリシーがアクセス要件を満たしていることを確認してください。
この手順は任意です。ただし、インテリジェンスベースの作成を制限する IAM ポリシー割り当てがない場合、S3 バケットへのアクセス権を持つ Quick ユーザーは、ACL(アクセス制御リスト)を有効にせずにその同じバケット上に別のインテリジェンスベースを作成でき、結果としてドキュメントレベルのアクセス制御を回避することになります。このリスクが貴組織に適用されるかどうかを、このセクションをスキップする前に検討してください。
ステップ 1: IAM で S3 アクセスポリシーを作成する
IAM コンソールで、割り当てられたユーザーがアクセスできる S3 バケットを指定する IAM ポリシーを作成します。以下の例のポリシーは、2 つの特定のバケットへのアクセス権を付与します。
{
  "Version": "2012-10-17",
  "Statement": [
    {
      "Effect": "Allow",
      "Action": "s3:ListAllMyBuckets",
      "Resource": "arn:aws:s3:::*"
    },
    {
      "Effect": "Allow",
      "Action": [
        "s3:ListBucket",
        "s3:ListBucketVersions",
        "s3:GetBucketLocation"
      ],
      "Resource": [
        "arn:aws:s3:::amzn-s3-demo-bucket1",
        "arn:aws:s3:::amzn-s3-demo-bucket2"
      ]
    },
    {
      "Effect": "Allow",
      "Action": [
        "s3:GetObject",
        "s3:GetObjectVersion"
      ],
      "Resource": [
        "arn:aws:s3:::amzn-s3-demo-bucket1/*",
        "arn:aws:s3:::amzn-s3-demo-bucket2/*"
      ]
    }
  ]
}
amzn-s3-demo-bucket1 および amzn-s3-demo-bucket2 を、アクセス権を付与したい S3 バケットの名前に置き換えてください。
ステップ 2:Quick でポリシーを割り当てる
IAM ポリシーを作成した後、管理コンソールを通じて Quick のユーザーまたはグループにこのポリシーを割り当てます。
Quick でポリシーを割り当てる手順は以下の通りです:
- Quick 管理コンソールの「権限」セクションで、「IAM ポリシーの割り当て」を選択します。

- 「新しい割り当てを追加」を選択します。
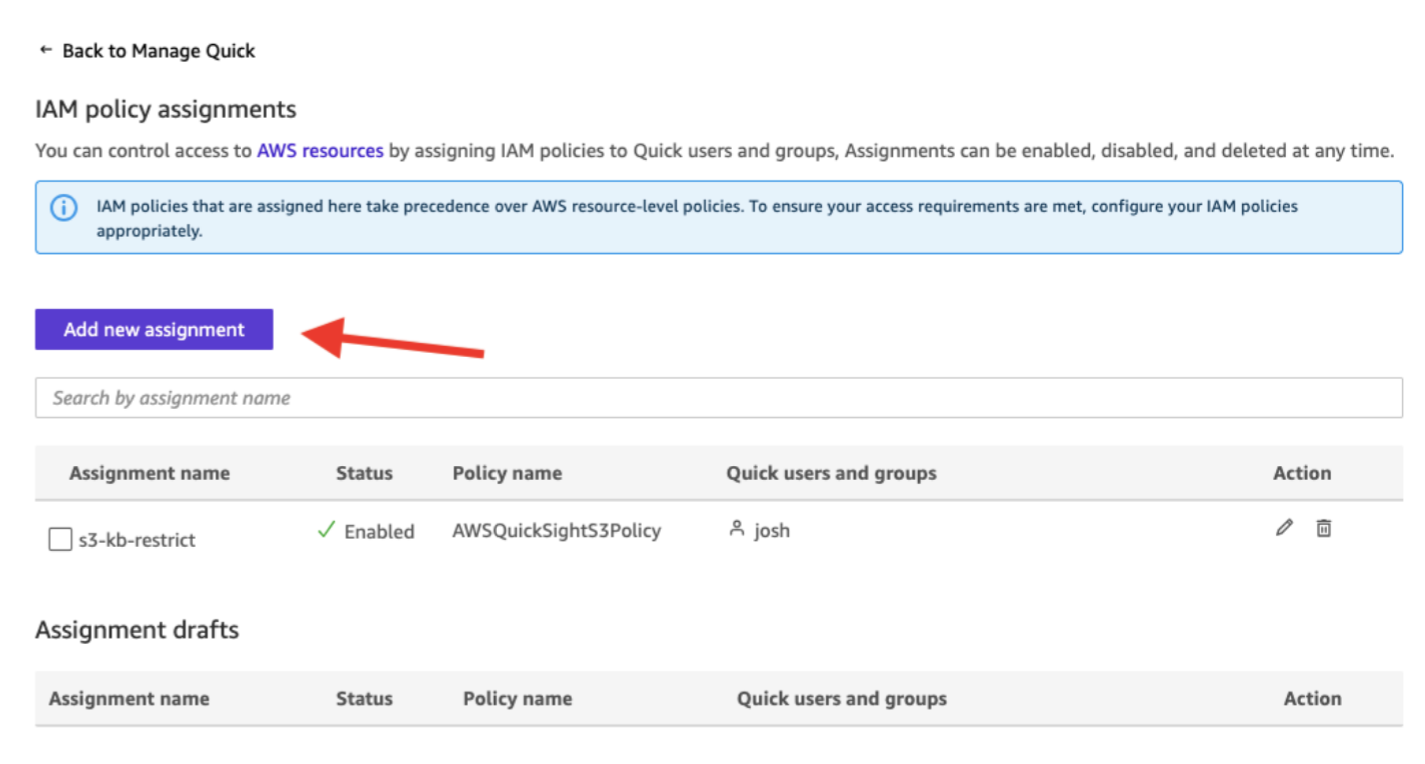
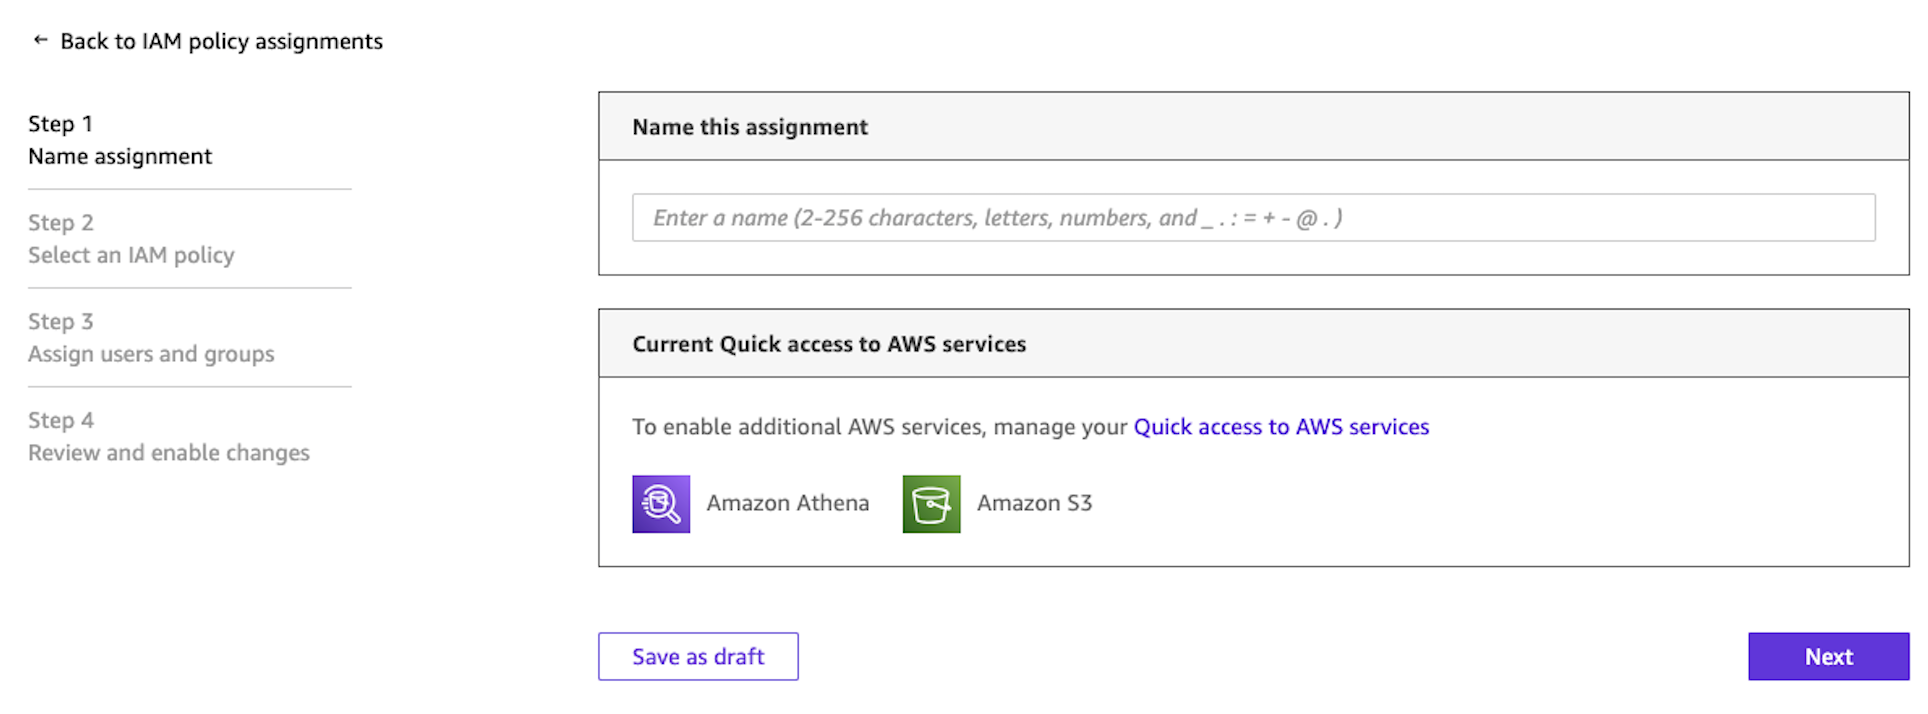
- 割り当ての名前を入力します(例:s3-kb-restrict)。
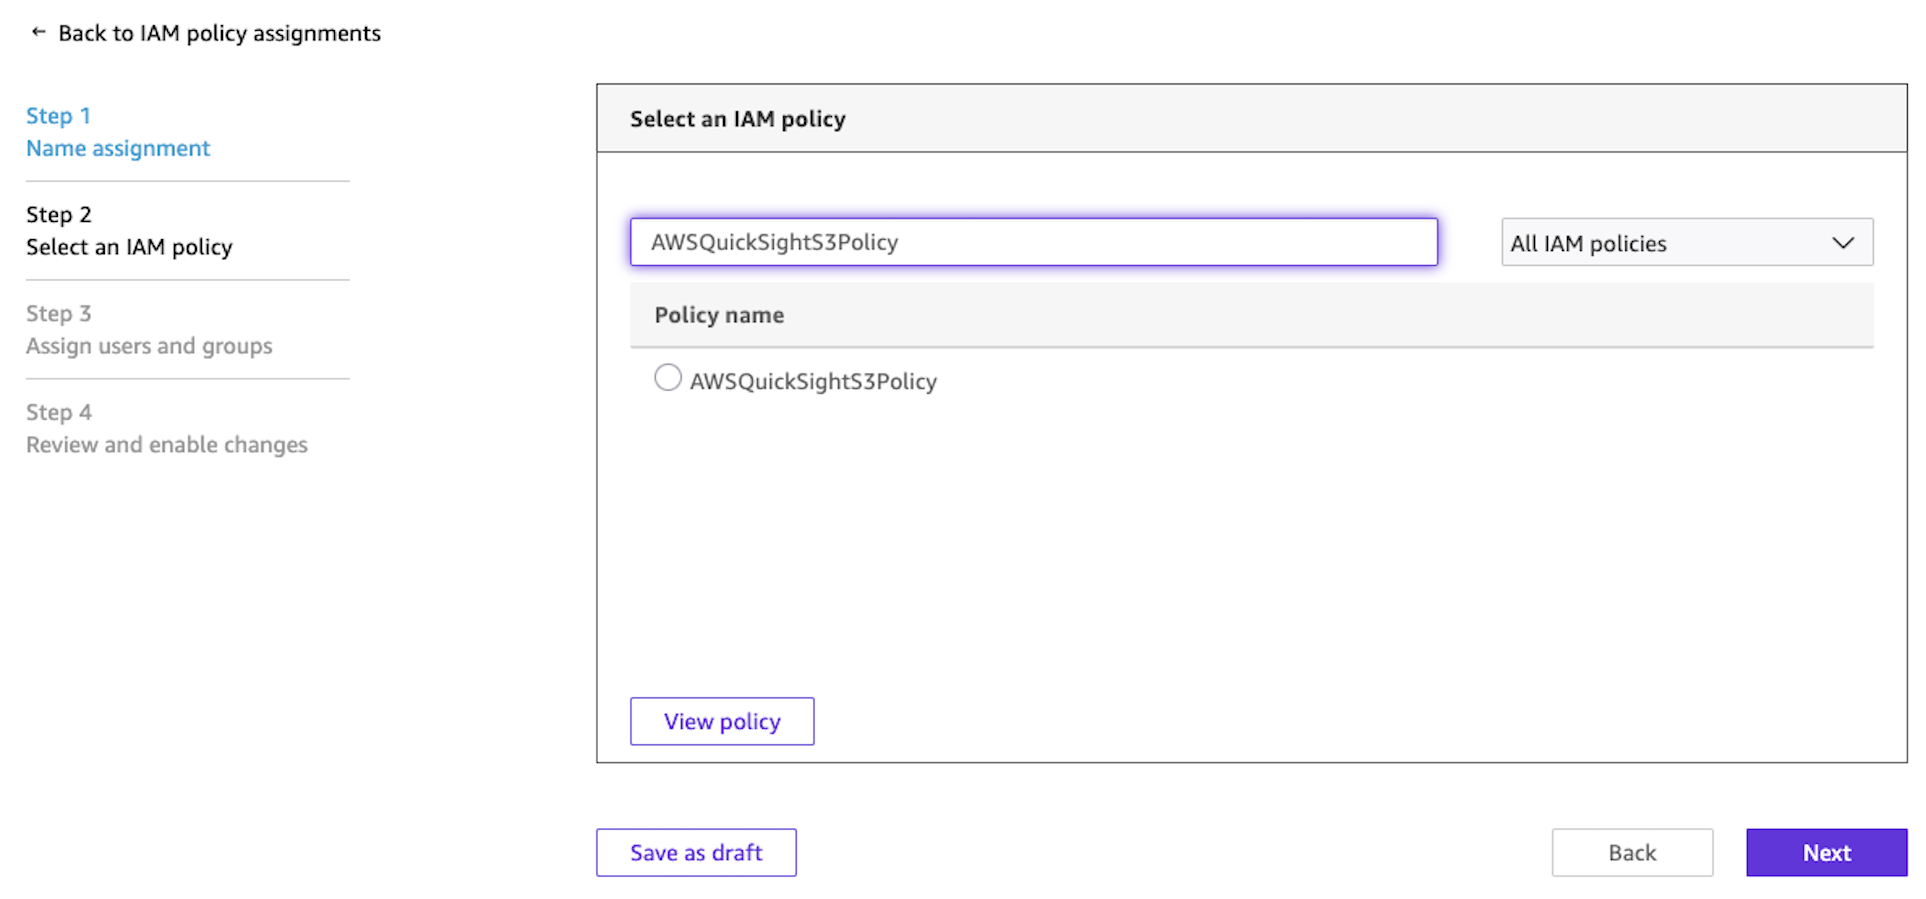
- 「IAM ポリシーの選択」ページで、ステップ 1 で作成した IAM ポリシーを検索して選択し、「次へ」を選択します。
- 「ユーザーとグループの割り当て」ページで、以下のいずれかを選択します:
「ユーザーとグループへの割り当て」を選択すると、現在のユーザーおよび将来追加されるユーザーにポリシーが適用されます。
- ポリシーを割り当てる特定のユーザーまたはグループを検索して選択します。
- 「次へ」を選択します。
- 「変更の確認と有効化」ページで、割り当ての詳細を確認し、「保存して有効化」を選択します。

IAM ポリシー割り当てを通じて明示的にアクセス権限が付与されていないユーザーは、制限された S3 バケットを使用してナレッジベースを作成できません。ただし、共有されたナレッジベースには引き続きアクセスできます。この制限はナレッジベースの作成のみを対象としています。IAM ポリシー割り当てにより、各ナレッジベース内で設定するドキュメントレベルの ACL(Access Control List: アクセス制御リスト)を補完する、管理制御の層が提供されます。
詳細については、Amazon Quick のドキュメントにある IAM ポリシー割り当てによる Amazon S3 バケットアクセスの制限 をご覧ください。
アクセス制御構造の計画
ACL ファイルを作成する前に、アクセス制御構造を決定してください。Quick は設定した権限を強制しますが、どのドキュメントに誰がアクセスできるかを決定し、対応する ACL ファイルを構築するのは利用者自身です。
まず、組織のアクセス要件をマッピングすることから始めます。どのチーム、ロール、または個人が、どのドキュメントセットにアクセスする必要があるかを特定します。次に、ACL(アクセス制御リスト)メソッドを選択します:単一のグローバル ACL ファイルか、ドキュメントレベルのメタデータファイル内の ACL エントリです。最後に、アイデンティティを整合させます。ACL ファイル内のユーザー名とグループ名は、Quick ユーザーのメールアドレスとグループ名と一致している必要があります(メールマッチングは大文字小文字を区別しませんが、グループ名は正確に一致させる必要があります)。グループメンバーシップは、IAM Identity Center などのアイデンティティプロバイダー(IdP)で管理され、Quick と同期されますが、ACL ファイル自体内では管理されません。
以下の例は、一般的なアクセスパターンと、それらをどのように構造化するかを示しています。
アクセスパターン メソッド 構成例
チーム全体のフォルダアクセス グローバル ACL ファイル s3://amzn-s3-demo-bucket/finance/ 上のグループ finance-team に ALLOW を付与
会社全体の読み取りアクセス グローバル ACL ファイル s3://amzn-s3-demo-bucket/policies/ 上のグループ all-employees に ALLOW を付与
単一ユーザーのドキュメントアクセス ドキュメントレベルのメタデータ roadmap-2026.pdf 上の user vp-eng@example.com に ALLOW を付与
制限されたフォルダ(デフォルトで拒否) グローバル ACL ファイル s3://amzn-s3-demo-bucket/legal/ 上のグループ legal-team に ALLOW を付与(他のプレフィックスはデフォルトで拒否される)
組み合わせアプローチ 両方のメソッド グローバル ACL で s3://amzn-s3-demo-bucket/hr/ 上の hr-team に ALLOW を付与 + メタデータファイルで特定のファイル上の manager@example.com に ALLOW を付与
オプション 1:グローバル ACL ファイルを使用したアクセス設定
 image 開始前に: ナレッジベースでドキュメントレベルの ACL(Access Control List、アクセス制御リスト)を有効化すると、これは一度きりの操作となり、元に戻すことはできません。後から ACL 機能を削除する必要がある場合は、ACL を含まない新しいナレッジベースを作成する必要があります。この設定は有効化後に無効にできないため、本番環境ではないナレッジベースで ACL 構成を事前にテストしてください。
グローバル ACL ファイルは、S3 プレフィックスとアクセス制御エントリをマッピングする単一の JSON ファイルです。このファイルを S3 バケットのルートディレクトリにアップロードします。ファイル名が acl.json でなくても構いません。
グローバル ACL ファイルの構造
このファイルは、各エントリが S3 プレフィックスとそれに関連するアクセス制御エントリを指定する JSON 配列です。
各 aclEntries アイテムには以下の要素が含まれます:
- Name – ユーザーのメールアドレスまたはグループ名です。これは Quick 内のアイデンティティと完全に一致している必要があります。例えば、IAM Identity Center のユーザーのメールやグループなどです。
- Type – USER(ユーザー)または GROUP(グループ)のいずれかです。
- Access – ALLOW(許可)または DENY(拒否)のいずれかです。
なお、このファイルに記載されていないプレフィックスは、デフォルトで拒否されます。
原文を表示
Organizations that must restrict access to sensitive documents increasingly rely on AI-driven search and chat to help employees find answers across large repositories. Coarse-grained permissions that control access at the knowledge base level work well for many teams, but sensitive documents require more granular control to restrict specific documents or folders to authorized teams, individuals, or systems.
Document-level access control list (ACL) support for Amazon Simple Storage Service (Amazon S3) knowledge bases in Amazon Quick gives you that fine-grained control. You restrict sensitive S3 documents to only the users and groups who should see them, at the document or folder level. When a user asks a question, Quick evaluates their identity against your ACL configuration and only surfaces content that they’re authorized to view. With these controls in place, you can safely bring your full document library into Quick while meeting your compliance and data governance requirements.
In this post, we walk through how to configure document-level ACLs for your S3 knowledge base in Amazon Quick. You will learn how to set up and verify an ACL configuration that enforces document-level permissions across chat and automated workflows. The post covers:
- Controlling which S3 buckets users can access for knowledge base creation using IAM policy assignments
- Planning your access control structure
- Choosing between two ACL configuration methods (Global ACL file and document-level metadata files)
- Setting up permissions for users and groups
- Verifying that your access controls work correctly through chat and ACL-aware Flows
- Updating and maintaining your ACL configuration over time
How S3 ACL works in Quick
You can use the S3 ACL feature in Amazon Quick to attach access permissions to your documents so that chat responses only include content that you’re authorized to view. You specify who can access what documents using standard ALLOW and DENY policies for individual users or groups, and Quick enforces these permissions at query time.
There are two ways to configure ACLs, each suited to different operational needs:
- Global ACL configuration file (such as ACL.json) – A single centralized file that specifies access permissions at the folder (prefix) level. Use this method when your organization has stable, folder-based permission structures.
- Document-level metadata files – Individual metadata files alongside each document that contain per-document access control entries. Use this method when permissions change frequently, because only affected documents need to be reindexed rather than entire folder structures.
Choose your approach based on how often permissions change and how granular you need them to be:
Consideration
Global ACL File
Document-level metadata
Permission granularity
Folder (S3 prefix) level
Individual document level
Management overhead
Single file to maintain
One metadata file per document
Reindex scope on permission change
Entire affected prefix
Only the affected document(s)
Recommended for
Stable folder-based access structures
Frequently changing per-document permissions
Understanding reindex scope
The reindex scope of your chosen method has meaningful operational implications. With the global ACL approach, a permission change triggers a full reindex of the affected prefix. If your organization requires frequent permission updates, consider using document-level metadata files instead, where only the affected documents are reindexed rather than entire folder structures.
Deny-by-default behavior
When you enable ACLs on an S3 knowledge base in Quick, a document or prefix not explicitly listed in your ACL configuration is denied by default. This deny-by-default approach (sometimes called “fail closed,” meaning the system defaults to denying access when no explicit rule exists) means that if you configure ACLs, you must explicitly grant access to every prefix or document you want users to reach.
For example, if your S3 bucket has three folders (/finance/, /legal/, and /policies/) and your ACL file only grants access to /finance/ and /policies/, the /legal/ folder and its contents are automatically denied to everyone, even if no DENY rule exists for it.
The implicit deny model used by IAM works the same way. Quick denies access unless you explicitly grant it. When you configure ACLs, you have explicit control over access and nothing is inadvertently exposed.
If a user or group has both an ALLOW and a DENY entry for the same document or prefix, the DENY always takes precedence. This means that you can use broad ALLOW rules for a team or group and then apply targeted DENY entries to restrict access to specific resources, giving you fine-grained control without having to restructure your entire ACL configuration.
Prerequisites
Before you begin, verify that you have the following:
- An AWS account with Amazon Quick enabled. If you don’t have a Quick account, refer to Getting started with Amazon Quick.
- An Amazon S3 bucket containing the documents you want to index.
- An idea of how you want to structure your access control lists. The following sections explain how to create these files.
- Users provisioned in Quick with email addresses that match the identities in your ACL files. For details on provisioning users, see Managing user access in Amazon Quick.
- Quick admin access for configuring IAM policy assignments and knowledge base creation.
- Familiarity with IAM concepts and basic JSON syntax.
- A test or non-production knowledge base for validating your ACL configuration. Enabling ACLs is a one-way operation that cannot be reversed, so verify your setup before enabling it in production.
Controlling S3 bucket access for knowledge base creation
Document-level ACLs control which documents users can access within a knowledge base, but they don’t control who can create knowledge bases in the first place. Keep this distinction in mind. If your organization has S3 buckets that should always require ACLs (for example, a bucket containing sensitive HR or legal documents), you want to verify that only authorized administrators can create knowledge bases against those buckets. Without this control, a Quick user can create a new knowledge base on the same bucket without turning on ACLs, bypassing your document-level access controls entirely. This section describes how to implement these controls.
IAM policy assignments in Quick let you solve this by restricting which S3 buckets specific users or groups can access for knowledge base creation. For example, you can limit ACL-sensitive buckets to a small set of trusted administrators who will always turn on ACLs during setup, allow broader knowledge base creation for non-sensitive buckets where ACLs aren’t required, or block certain buckets from knowledge base creation entirely by not granting users access to them.
Note: IAM policies assigned through Quick take precedence over AWS resource-level policies. Confirm that your IAM policies meet your access requirements before assigning them.
This step is optional. However, be aware that without IAM policy assignments restricting knowledge base creation, any Quick user with access to an S3 bucket could create a separate knowledge base on that same bucket without enabling ACLs, effectively bypassing your document-level access controls. Consider whether this risk applies to your organization before skipping this section.
Step 1: Create an S3 access policy in IAM
Create an IAM policy in the IAM console that specifies which S3 buckets the assigned users can access. The following example policy grants access to two specific buckets:
{
"Version": "2012-10-17",
"Statement": [
{
"Effect": "Allow",
"Action": "s3:ListAllMyBuckets",
"Resource": "arn:aws:s3:::*"
},
{
"Effect": "Allow",
"Action": [
"s3:ListBucket",
"s3:ListBucketVersions",
"s3:GetBucketLocation"
],
"Resource": [
"arn:aws:s3:::amzn-s3-demo-bucket1",
"arn:aws:s3:::amzn-s3-demo-bucket2"
]
},
{
"Effect": "Allow",
"Action": [
"s3:GetObject",
"s3:GetObjectVersion"
],
"Resource": [
"arn:aws:s3:::amzn-s3-demo-bucket1/*",
"arn:aws:s3:::amzn-s3-demo-bucket2/*"
]
}
]
}Replace amzn-s3-demo-bucket1 and amzn-s3-demo-bucket2 with the names of the S3 buckets that you want to grant access to.
Step 2: Assign the policy in Quick
After creating the IAM policy, assign it to Quick users or groups through the admin console.
To assign the policy in Quick:
- In the Quick admin console, under Permissions, choose IAM policy assignments.
- Choose Add new assignment.
- Enter a name for the assignment (for example, s3-kb-restrict).
- On the Select an IAM policy page, search for and select the IAM policy you created in Step 1. Choose Next.
- On the Assign users and groups page, choose one of the following:
Select Assign to users and groups to apply the policy to current and future users.
- Search for and select specific users or groups to assign the policy to.
- Choose Next.
- On the Review and enable changes page, verify your assignment details and choose Save and enable.
Users who aren’t explicitly granted access through an IAM policy assignment can’t use the restricted S3 buckets to create knowledge bases. A user can still access a knowledge base shared with them. The restriction only applies to knowledge base creation. The IAM policy assignment gives you a layer of administrative control that complements the document-level ACLs you configure within each knowledge base.
For more details, see Restrict Amazon S3 bucket access with IAM policy assignments in the Amazon Quick documentation.
Planning your access control structure
Before creating your ACL files, determine your access control structure. Quick enforces the permissions you configure, but it’s up to you to decide who should have access to which documents and to build the corresponding ACL files.
Start by mapping your organizational access needs. Identify which teams, roles, or individuals need access to which document sets. Then choose your ACL method: a single global ACL file or ACL entries in metadata files at the document-level. Finally, align your identities. The user and group names in your ACL files must match the email addresses and group names of your Quick users (email matching is case-insensitive, but group names must match exactly). Group membership is managed in your Identity provider (IdP), such as IAM Identity Center, and synced with Quick, not in the ACL files themselves.
The following examples illustrate common access patterns and how you might structure them.
Access pattern
Method
Example configuration
Team-wide folder access
Global ACL file
ALLOW group finance-team on s3://amzn-s3-demo-bucket/finance/
Company-wide read access
Global ACL file
ALLOW group all-employees on s3://amzn-s3-demo-bucket/policies/
Single-user document access
Document-level metadata
ALLOW user vp-eng@example.com on roadmap-2026.pdf
Restricted folder (deny-by-default)
Global ACL file
ALLOW group legal-team on s3://amzn-s3-demo-bucket/legal/ (other prefixes denied by default)
Combined approach
Both methods
Global ACL ALLOWs hr-team on s3://amzn-s3-demo-bucket/hr/ + metadata file ALLOWs manager@example.com on a specific file
Option 1: Configure access using a Global ACL file
Before you begin: Enabling document-level ACLs on a knowledge base is a one-way operation and can’t be reversed. If you need to remove ACL functionality later, you must create a new knowledge base without ACLs. Test your ACL configuration on a non-production knowledge base first, because this setting can’t be turned off after it’s enabled.
The global ACL file is a single JSON file that maps S3 prefixes to access control entries. Upload this file to the root of your S3 bucket. The file doesn’t need to be named acl.json.
Global ACL file structure
The file is a JSON array where each entry specifies an S3 prefix and its associated access control entries.
Each aclEntries item includes:
- Name – The user email address or group name. This must match the identity within Quick exactly. For example, a user’s email or group from IAM Identity Center.
- Type – Either USER or GROUP.
- Access – Either ALLOW or DENY.
Remember, prefixes not listed in this file are denied by
関連記事
今日のまとめ
AI日報で今日の重要ニュースをまとめ読み