Deep Agentsを使用したマルチエージェントアプリケーションの構築
LangChain の Deep Agents は、コンテキストバloat(文脈の肥大化)を解決し、専門性と並列処理を可能にするサブエージェントとスキル機能を通じて、複雑なマルチエージェントシステム構築を容易化する新アプローチを提供する。
キーポイント
コンテキストバloat の解消
エージェントの文脈ウィンドウが埋まることで性能が低下する「ダムゾーン」を防ぐため、サブエージェントに作業を委譲して主エージェントの文脈を保護する。
専門化と並列処理
ドメイン特化型の指示やツールを持つサブエージェントを使用することで、異なるモデルでの実行や並列処理によるレイテンシ削減を実現する。
2 つの主要プリミティブ
「subagents(隔離されたエージェントへの委任)」と「skills(段階的な機能開示)」という 2 つの仕組みにより、複雑なタスクを構造化して管理する。
汎用サブエージェント
主エージェントと同じ能力を持つビルトインの汎用サブエージェントを提供し、特別な設定なしに文脈分離を実現できる機能も備えている。
サブエージェントの設計原則
明確な説明と詳細なシステムプロンプト、そして必要最小限のツールセットを持つことで、メインエージェントが効率的にタスクを委任しコンテキストを最適化できます。
スキルによる段階的開示
SKILL.mdファイルを用いて専門機能を定義し、記述のみを常に保持して必要な時に詳細を読み込むことで、コンテキストウィンドウの効率とスケーラビリティを向上させます。
スキルとサブエージェントの併用
複雑なマルチステップ作業にはコンテキスト分離のためのサブエージェントを、手順や指示の再利用には段階的な開示のためのスキルを使用し、両方を組み合わせて文脈ウィンドウを効果的に管理できます。
影響分析・編集コメントを表示
影響分析
この記事は、単なるツール紹介を超え、大規模言語モデル(LLM)の文脈制限という根本的な課題に対する実用的なアーキテクチャパターンを示しています。開発者が複雑なタスクを安全かつ効率的に分散処理するための設計指針を提供することで、本格的なマルチエージェントシステムの普及と安定化に寄与するでしょう。
編集コメント
LLM の文脈制限という実務上のボトルネックを解決する、非常に現実的なアーキテクチャパターンが提示されています。特に「ダムゾーン」の概念と、それを回避するためのサブエージェント設計は、本格的な AI アプリケーション開発において即座に活用できる知見です。
 image Sydney Runkle と Vivek Trivedy による
複雑なタスクを専門的なエージェントに分担させることは、能力の高い AI システムを構築するための最も効果的なアプローチの一つです。
Deep Agents は、以下の二つのファーストクラスプリミティブ(第一級構文要素)によってこれを容易に実現します:
サブエージェント:孤立したエージェントへの委任
スキル:段階的に機能を開示する機能
本記事では、Deep Agents を用いてマルチエージェントシステムを構築する方法をご紹介します。
サブエージェントの使用:専門的で孤立したワーカー
サブエージェントは、エージェント工学における根本的な問題である「コンテキストの肥大化」に対処します。これは、タスクに取り組む過程でエージェントのコンテキストウィンドウがほぼ満杯になってしまう現象です。
なぜこれが重要なのかというと、Chroma による「コンテキストローテーション(文脈の劣化)」に関する優れた研究により、モデルはコンテキストウィンドウが埋まってくるとタスクを完了できなくなることが示されています。HumanLayer の友人たちは、この高コンテキスト状態を「知能低下ゾーン」と呼んでいます。サブエージェントは、メインエージェントからコンテキストを隔離することで、素早くこの知能低下ゾーンに陥るのを防ぎます。
エージェントが数十回のウェブ検索やファイル読み込みを行うと、コンテキストウィンドウには中間結果で埋め尽くされてしまいます。サブエージェントは独自のコンテキストウィンドウで動作させることで作業を隔離します。したがって、最終回答に至るまでに多くの探索的作業を行う必要がある場合でも、メインエージェントに渡されるのは最終結果のみであり、それを生み出した 20 のツール呼び出しの詳細は伝わりません。
以下が基本的なサブエージェントのアーキテクチャです:
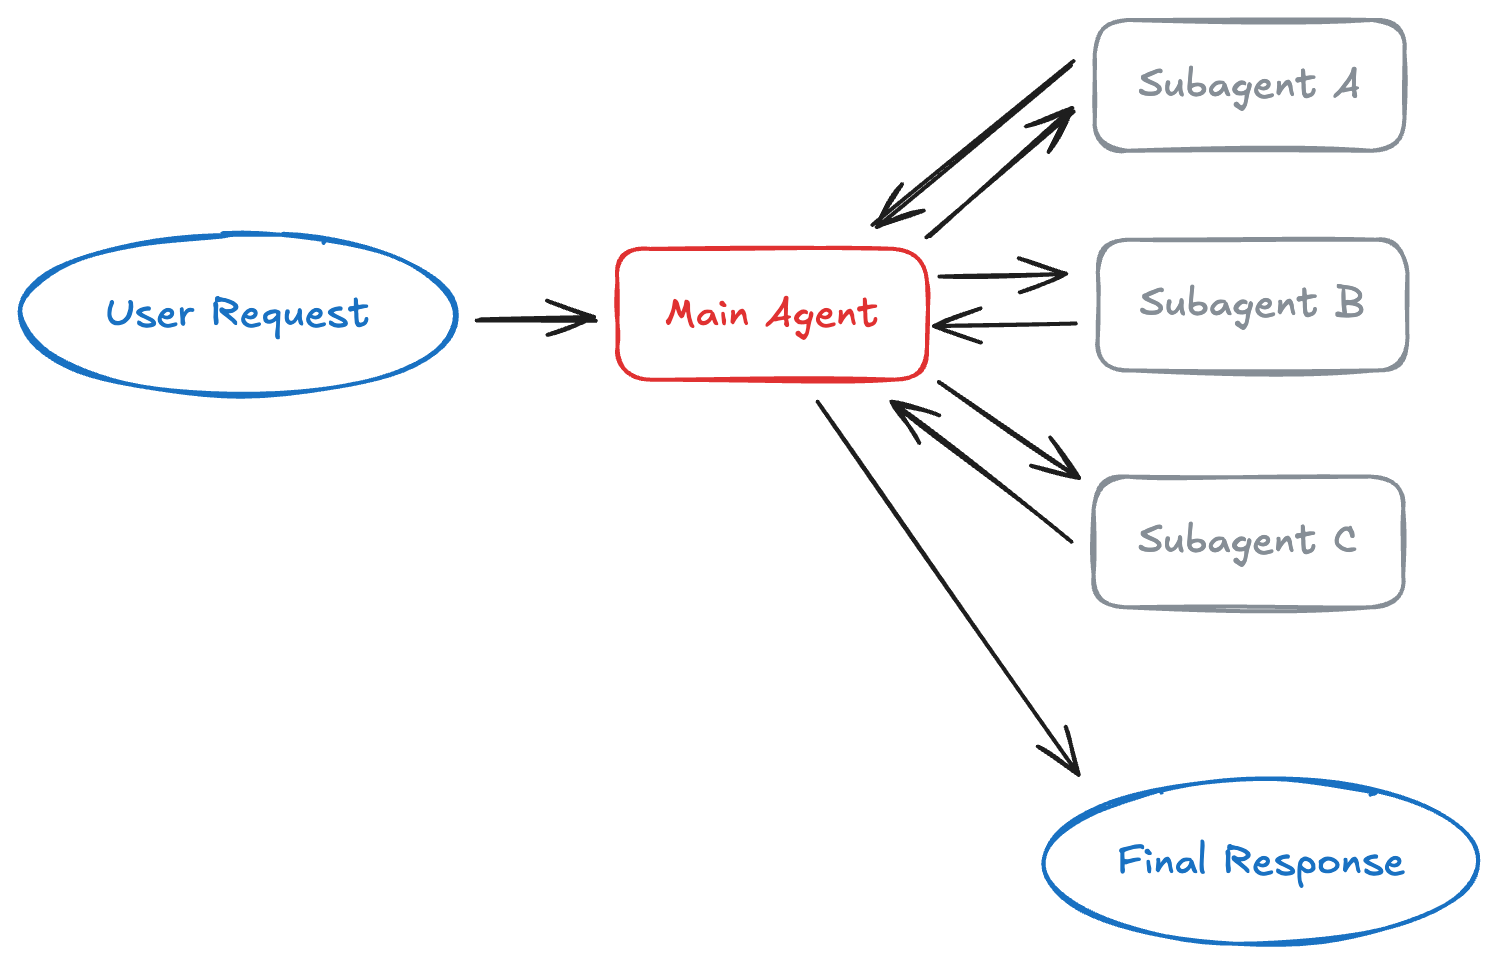 imageサブエージェントの活用タイミング
文脈の維持:複数のステップを要するタスクは、メインエージェントのコンテキスト(例:コードベースの探索)を混乱させる可能性があります。
専門化:ドメイン固有の指示やツールを使用します。異なるチームが開発したサブエージェントは、それぞれ異なる垂直領域に特化できます。
マルチモデル:サブエージェントは、メインエージェントとは異なるモデルを使用できます。例えば、低遅延を実現するために小規模なモデルを選択するなどです。
並列処理:サブエージェントは同時に実行され、その出力をメインエージェントに返すことができます。これにより遅延が削減されます。
サブエージェントの作成
サブエージェントを辞書として定義し、create_deep_agent() に渡します:
from deepagents import create_deep_agent
research_subagent = {
"name": "research-agent",
"description": "Used to research more in depth questions",
"system_prompt": "You are a great researcher",
"tools": [internet_search],
"model": "openai:gpt-4o", # Optional: override main agent model
}
agent = create_deep_agent(
model="claude-sonnet-4-5-20250929",
subagents=[research_subagent]
)
設定の詳細については、サブエージェントのドキュメントをご覧ください。
汎用サブエージェント
Deep Agents には、メインエージェントの機能を模倣する組み込みの汎用サブエージェントが含まれています。このサブエージェントは、同じシステムプロンプト、ツール、モデルを共有します。これは、専門的な動作を持たずにコンテキストを分離したい場合に最適です。
例:メインエージェントが 10 回の Web 検索を実行してコンテキストを埋めるのではなく、汎用サブエージェントに委任できます。具体的には task(name="general-purpose", task="Research quantum computing trends") のように指定し、サブエージェントは内部で全ての検索を行い、要約のみを返します。
サブエージェントのベストプラクティス
明確な記述を作成してください。メインエージェントはこの記述を用いて、どのサブエージェントを呼び出すかを決定します:
✅ 良好例:"財務データを分析し、信頼度スコア付きで投資洞察を生成する"
❌ 不良例:"金融関連の作業を行う"
システムプロンプトは詳細に記述してください。ツールの使用ガイダンスと出力形式の要件を含めます:
research_subagent = {
"name": "research-agent",
"description": "Web 検索を用いて深入りした調査を行い、知見を統合する",
"system_prompt": """あなたは徹底的な研究者です。あなたの役割は以下の通りです:
- 調査質問を検索可能なクエリに分解する
- internet_search を使用して関連情報を検索する
- 包括的かつ簡潔な要約として知見を統合する
- 主張を行う際は出典を明記する
出力形式:
- 要約(2〜3 パラグラフ)
- 主要な発見事項(箇条書き)
- 出典(URL 付き)
コンテキストを清潔に保つため、応答は 500 語以内に抑えてください。""",
"tools": [internet_search],
}
ツールセットを最小限に抑えてください。サブエージェントには必要なツールのみを与えます:
✅ 良好例:焦点を絞ったツールセット
email_agent = {
"name": "email-sender",
# メール関連のみに限定
"tools": [send_email, validate_email],
}
❌ 悪い例:ツールが多すぎる
email_agent = {
"name": "email-sender",
# 焦点が定まっていない
"tools": [send_email, web_search, database_query, file_upload],
}
スキルを活用する:機能の段階的開示(Progressive Disclosure of Capabilities)
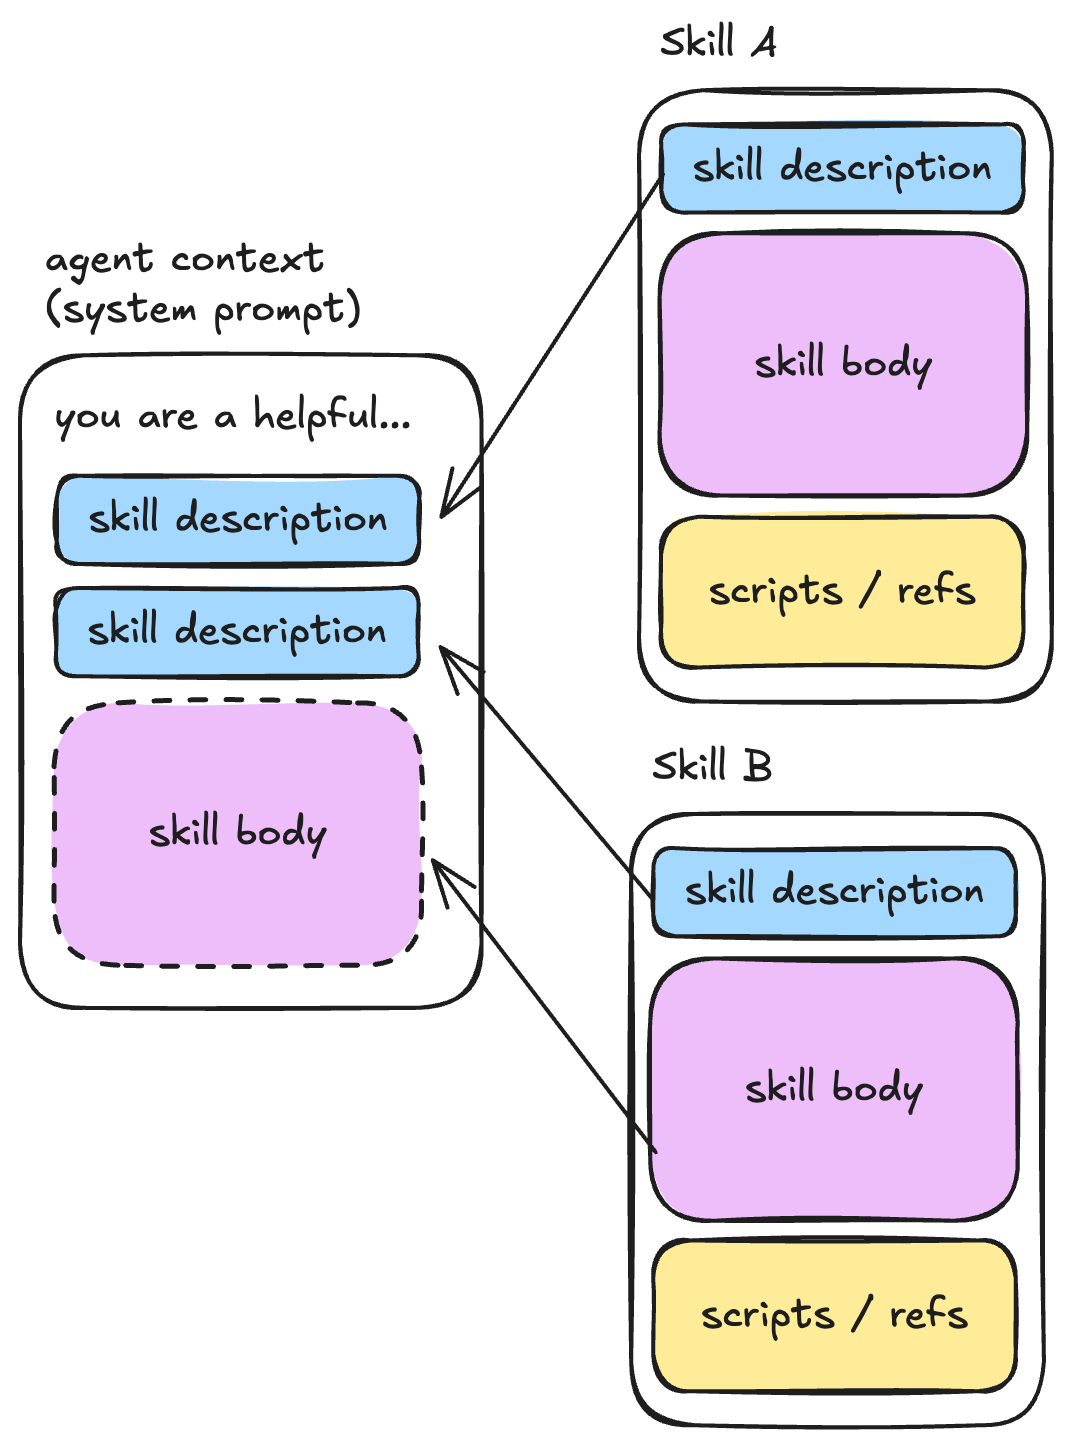
スキルは、段階的開示という異なるパターンを提供します。エージェントに最初から数十個ものツールを与えるのではなく、SKILL.md ファイルの中で専門的な機能を定義します。エージェントはスキルの名前と説明だけを見て、必要に応じて初めて完全な指示を読み込みます。
 imageスキルの説明はコンテキストウィンドウに事前に読み込まれています。スキル本体がロードされるのは、エージェントが説明と以前の文脈に基づいてそのスキルが必要だと判断した時だけです。
キャプション:スキルの説明はコンテキストウィンドウに事前に読み込まれており、スキル本体はエージェントが説明と以前の文脈に基づいてそのスキルが必要だと判断した時にのみロードされます。
スキルの設定
スキルは agentskills.io の仕様を使用します。以下はその構造です:
.deepagents/skills/
├── deploy/SKILL.md
└── review-pr/SKILL.md
各 SKILL.md ファイルには、メタデータを含む YAML フロントマターとメインの本文が含まれています:
name: deploy
description: Deploy to production
version: 1.0.0 # Optional
tags: [deployment, production] # Optional
プロダクションへのデプロイ
ユーザーがデプロイを要求した場合は、以下の手順に従ってください:
- テストを実行する:
npm test - アプリケーションをビルドする:
npm run build - プロダクションにデプロイする:
npm run deploy:prod - デプロイを検証する:ヘルスチェックエンドポイントを確認する
本番環境へのデプロイを行う前には、必ずユーザーの確認を得てください。
エージェントにスキルを追加する
create_deep_agent 関数の skills 引数を使用して、ファイルシステムからスキルを読み込むことができます:
from deepagents import create_deep_agent
from deepagents.backends import FilesystemBackend
agent = create_deep_agent(
model="claude-sonnet-4-5-20250929",
backend=FilesystemBackend(root_dir="/"),
skills=[".deepagents/skills"],
)
これでエージェントはあなたのスキルを認識します。詳細な指示が必要な場合、エージェントは SKILL.md ファイル全体を読み込みます。
StateBackend や StoreBackend などの他のバックエンドを使用することもでき、その場合はファイル仕様を指定してエージェントを呼び出します:
from deepagents.middleware.filesystem import FileData
デフォルトのバックエンドは StateBackend です
agent = create_deep_agent(
model="anthropic:claude-sonnet-4-20250514",
skills=["/skills/"],
)
skill_content = """
name: deploy
...
"""
スキルと仮想ファイルを使用してエージェントを呼び出す
result = agent.invoke({
"messages": [HumanMessage(content="Research the latest Python releases")],
"files": {
"/skills/web-research/SKILL.md": FileData(
content=skill_content.split("\n"),
created_at="2024-01-01T00:00:00Z",
modified_at="2024-01-01T00:00:00Z",
),
},
})
適切なパターンの選択
以下に、ガイドとなる簡単な質問リストを示します:
~する必要がある場合
~を使用してください
両方とも?
複雑で多段階の作業を委任する場合
コンテキスト分離のためのサブエージェント(Subagents)
手順や指示の再利用
段階的開示のためのスキル
特定のタスクに特化したツールの提供
焦点を絞ったツールセットを持つサブエージェント
✅
複数のエージェント間で機能を共有
スキル(単なるファイルです)
✅
大規模なツールセットとの連携
トークンの肥大化を防ぐためのスキル
なお、これは二者択一の選択である必要はありません。
多くのシステムでは両方を併用しています。スキルは手順を定義し、サブエージェントは複雑な多段階の作業を実行します。あなたのサブエージェントは、コンテキストウィンドウを効果的に管理するためにスキルを利用できます!
次のステップ
Deep Agents におけるマルチエージェントパターンについてさらに詳しく知りたい場合は、以下のドキュメントをご覧ください。
サブエージェントのドキュメント - 詳細な API リファレンスと例
スキルのドキュメント - 詳細な API リファレンスと例
マルチエージェントパターンのガイド - パターン選択に関する一般的なガイダンス
重要な洞察:マルチエージェントパターンは複雑である必要はありません。適切な抽象化(配管用のミドルウェア、呼び出しのためのツール呼び出し)があれば、それらは機能する高度なシステムに組み立てられる単純なビルディングブロックになります。
コンテキスト管理のためにサブエージェントから始め、段階的開示のためにスキルを追加し、そこから構築を進めてください。
原文を表示
imageBy Sydney Runkle and Vivek Trivedy
Breaking down complex tasks across specialized agents is one of the most effective approaches to building capable AI systems.
Deep Agents makes this easy with two first-class primitives:
subagents: delegating to isolated agents
skills: progressively disclosing capabilities
In this post, we'll show you how to build multi-agent systems with Deep Agents.
Using Subagents: Specialized, Isolated Workers
Subagents tackle a fundamental problem in agent engineering: context bloat. This is when an agent’s context window becomes close to full as it works on a task.
Why is this important? There’s great work from Chroma on context rot showing that models struggle to complete tasks as their context window gets filled. Our friends at HumanLayer call this high context regime the “dumb zone”. Subagents isolate context from the main agent to help avoid quickly entering the dumb zone.
When your agent makes dozens of web searches or file reads, the context window fills with intermediate results. Subagents isolate work by running with their own context window. So if the subagent is doing a lot of exploratory work before coming with its final answer, the main agent still only gets the final result, not the 20 tool calls that produced it.
Here’s a look at the basic subagents architecture:
imageWhen to Use Subagents
Context Preservation: A task requiring multiple steps can clutter the main agent's context (ex: codebase exploration).
Specialization: Use domain specific instructions or tools. Subagents developed by distinct teams can specialize in different verticals.
Multi-Model: Subagents can use different models than the main agent. For example, choosing a smaller model for lower latency.
Parallelization: Subagents can run simultaneously and return their outputs to the main agent. This reduces latency.
Creating Subagents
Define subagents as dictionaries and pass them to create_deep_agent():
from deepagents import create_deep_agent
research_subagent = {
"name": "research-agent",
"description": "Used to research more in depth questions",
"system_prompt": "You are a great researcher",
"tools": [internet_search],
"model": "openai:gpt-4o", # Optional: override main agent model
}
agent = create_deep_agent(
model="claude-sonnet-4-5-20250929",
subagents=[research_subagent]
)
See the subagents documentation for configuration details.
The General-Purpose Subagent
Deep Agents include a built-in general-purpose subagent that mirrors your main agent's capabilities. It has the same system prompt, tools, and model. This is perfect for context isolation without specialized behavior.
Example: Instead of your main agent making 10 web searches and filling its context, it can delegate to the general-purpose subagent with task(name="general-purpose", task="Research quantum computing trends"). The subagent performs all searches internally and returns only a summary.
Best Practices for Subagents
Write clear descriptions. Your main agent uses descriptions to decide which subagent to call:
✅ Good: "Analyzes financial data and generates investment insights with confidence scores"
❌ Bad: "Does finance stuff"
Keep system prompts detailed. Include tool usage guidance and output format requirements:
research_subagent = {
"name": "research-agent",
"description": "Conducts in-depth research using web search and synthesizes findings",
"system_prompt": """You are a thorough researcher. Your job is to:
- Break down the research question into searchable queries
- Use internet_search to find relevant information
- Synthesize findings into a comprehensive but concise summary
- Cite sources when making claims
Output format:
- Summary (2-3 paragraphs)
- Key findings (bullet points)
- Sources (with URLs)
Keep your response under 500 words to maintain clean context.""",
"tools": [internet_search],
}
Minimize tool sets. Only give subagents the tools they need:
✅ Good: Focused tool set
email_agent = {
"name": "email-sender",
# Only email-related
"tools": [send_email, validate_email],
}
❌ Bad: Too many tools
email_agent = {
"name": "email-sender",
# Unfocused
"tools": [send_email, web_search, database_query, file_upload],
}
Using Skills: Progressive Disclosure of Capabilities
Skills provide a different pattern: progressive disclosure. Instead of giving your agent dozens of tools upfront, you define specialized capabilities in SKILL.md files. Your agent sees skill names and descriptions, then reads the full instructions only when needed.
imageSkill descriptions are pre-loaded into the context window. The skill body is only loaded when the agent decides the skill is needed based on the description and previous context.Caption: skill descriptions are pre-loaded into the context window. The skill body is only loaded when the agent decides the skill is needed based on the description and previous context.
Setting Up Skills
Skills use the agentskills.io spec. Here's the structure:
.deepagents/skills/
├── deploy/SKILL.md
└── review-pr/SKILL.md
Each SKILL.md file has YAML frontmatter with metadata and a main body:
name: deploy
description: Deploy to production
version: 1.0.0 # Optional
tags: [deployment, production] # Optional
Deploy to Production
When the user asks to deploy, follow these steps:
- Run tests:
npm test - Build the application:
npm run build - Deploy to production:
npm run deploy:prod - Verify deployment: Check the health endpoint
Always confirm with the user before deploying to production.
Adding Skills to Your Agent
Use the skills argument to create_deep_agent to load skills from the filesystem:
from deepagents import create_deep_agent
from deepagents.backends import FilesystemBackend
agent = create_deep_agent(
model="claude-sonnet-4-5-20250929",
backend=FilesystemBackend(root_dir="/"),
skills=[".deepagents/skills"],
)
The agent now sees your skills. When it needs detailed instructions, it reads the full SKILL.md file.
You can also use other backends (such as a StateBackend or StoreBackend), then invoke the agent with a files specification:
from deepagents.middleware.filesystem import FileData
default backend is a StateBackend
agent = create_deep_agent(
model="anthropic:claude-sonnet-4-20250514",
skills=["/skills/"],
)
skill_content = """
name: deploy
...
"""
Invoke the agent with the skill and virtual files
result = agent.invoke({
"messages": [HumanMessage(content="Research the latest Python releases")],
"files": {
"/skills/web-research/SKILL.md": FileData(
content=skill_content.split("\n"),
created_at="2024-01-01T00:00:00Z",
modified_at="2024-01-01T00:00:00Z",
),
},
})
Choosing the Right Pattern
Here’s a quick set of questions to guide you:
When you need to...
Use...
Both?
Delegate complex, multi-step work
Subagents for context isolation
Reuse procedures or instructions
Skills for progressive disclosure
Provide specialized tools for specific tasks
Subagents with focused tool sets
✅
Share capabilities across multiple agents
Skills (they’re just files)
✅
Work with large tool sets
Skills to avoid token bloat
Note, this doesn’t have to be an either-or decision.
Many systems use both. Skills define procedures; subagents execute complex multi-step work. Your subagents can use skills to effectively manage their context windows!
Next Steps
To learn more about multi-agent patterns in Deep Agents, check out our:
Subagents documentation - Detailed API reference and examples
Skills documentation - Detailed API reference and examples
Multi-agent patterns guide - General guidance on choosing patterns
The key insight: multi-agent patterns don't have to be complicated. With the right abstractions (middleware for plumbing, tool calling for invocation), they become simple building blocks you can compose into capable, sophisticated systems.
Start with subagents for context management, add skills for progressive disclosure, and build from there.
関連記事
今日のまとめ
AI日報で今日の重要ニュースをまとめ読み