AI検索:あなたのエージェントのための検索プリミティブ
Cloudflareはエージェント開発向けのプラグアンドプレイ検索基盤「AI Search」を公開し、ハイブリッド検索と動的名前空間管理によりエージェントのコンテキスト取得を最適化する。
キーポイント
ハイブリッド検索の実装
セマンティック検索とキーワード(BM25)検索を並列実行し、結果を融合することで精度の高い取得を実現する。
組み込みストレージと自動インデックス
R2バケットや外部データソースの事前設定不要で、API経由でのファイルアップロード時に自動インデックス化が行われる。
エージェント特化の動的スケーリング
WorkersやAgents SDK経由で実行時に名前空間を生成・削除でき、エージェントや顧客ごとに独立した検索コンテキストをデプロイなしで構築可能。
実務シナリオの提供
製品ドキュメントと顧客履歴を統合するカスタマーサポートエージェントの実装コード例を提供し、開発者の実装負荷を可視化している。
動的な顧客別AI検索インスタンスの作成
namespace bindingを用いて顧客ごとにAI Searchインスタンスを動的に作成でき、各インスタンスはR2とVectorizeを活用した独立したストレージとベクターインデックスを保持します。
解決履歴の蓄積と再利用
問題解決後にエージェントが対応内容を要約して保存する仕組みにより、再訪顧客の過去の試行履歴を検索可能にし、サポート効率を向上させます。
エージェントSDKとWorkers AIの統合
`AIChatAgent`を拡張したエージェントは初回接触時に顧客インスタンスを自動生成し、Workers AI(Kimi K2.5)を用いて会話文脈に基づきツール呼び出しを動的に判断します。
影響分析・編集コメントを表示
影響分析
Cloudflareはエージェント開発のボトルネックである「検索/取得」をプラットフォームレベルで標準プリミティブとして提供した。これにより開発者はインフラ構築に費やす時間を削減でき、エージェントのロジックとコンテキスト管理に集中できる。業界全体として、RAG基盤のマネージドサービス化とエージェント特化型ツールの競争がさらに激化する兆候である。
編集コメント
マネージドRAG基盤のエージェント特化型進化は、開発者の実装負荷を劇的に軽減するが、ベンダーロックインのリスクも伴う。今後は検索精度の評価基準とコスト最適化が競争の鍵となるだろう。
すべてのエージェントに検索機能が必要です:コーディングエージェントはリポジトリ全体にある数百万のファイルを検索します。サポートエージェントは顧客チケットや社内ドキュメントを検索します。さらに、エージェントのメモリ、つまり過去のやり取りを想起する能力でさえ、根本的には検索問題です。ユースケースは異なりますが、根本的な問題は同じです:適切なタイミングでモデルに正しい情報を提供すること。
検索機能を自分で構築する場合、ベクトルインデックス(vector index)、ドキュメントを解析してチャンク化するインデックス作成パイプライン(indexing pipeline)、データ変更時にインデックスを更新する仕組みが必要です。キーワード検索(keyword search)も必要な場合、それには別のインデックスと上位の融合ロジック(fusion logic)が必要です。さらに、各エージェントが独自の検索可能なコンテキストを必要とする場合、それらすべてをエージェントごとに設定することになります。
AI Search(旧名:AutoRAG)は、必要なプラグアンドプレイの検索プリミティブ(plug-and-play search primitive)です。動的にインスタンスを作成し、データを与えて検索できます——Worker、Agents SDK、またはWrangler CLIから。以下が今回提供する機能です:
ハイブリッド検索(Hybrid search)。1つのクエリでセマンティックマッチング(semantic matching)とキーワードマッチングの両方を有効にします。ベクトル検索(Vector search)とBM25が並列で実行され、結果が融合されます。(当ブログの検索機能は現在AI Searchによって駆動されています。右上の虫眼鏡アイコンをクリックしてお試しください。)
内蔵ストレージとインデックス(Built-in storage and index)。新しいインスタンスには、独自のストレージとベクトルインデックス(vector index)が付属します。APIを介してファイルを直接インスタンスにアップロードすると、自動的にインデックスが作成されます。設定するR2バケット(R2 bucket)も、最初に接続する外部データソースも不要です。新しいai_search_namespacesバインディング(ai_search_namespaces binding)により、Workerから実行時にインスタンスの作成と削除が可能になり、再デプロイすることなく、エージェントごと、顧客ごと、または言語ごとにインスタンスを立ち上げることができます。
また、ドキュメントにメタデータ(metadata)を付与してクエリ時にランキングをブーストしたり、1回の呼び出しで複数のインスタンスにまたがってクエリを実行することもできるようになりました。
それでは、これが実際にどのような意味を持つのか見ていきましょう。
実例:カスタマーサポートエージェント
共有製品ドキュメントと、過去の解決策のような顧客ごとの履歴という2種類の知識を検索するサポートエージェントの動作を追ってみましょう。製品ドキュメントはコンテキストウィンドウ(context window)に収まりきらず、各顧客の履歴は解決された問題ごとに成長するため、エージェントは関連する情報を取得するために検索機能が必要です。
AI SearchとAgents SDKを使用した場合、以下のような構成になります。まずプロジェクトのスケルトンを作成しましょう:
npm create cloudflare@latest -- --template cloudflare/agents-starter
まず、AI SearchのネームスペースをWorkerにバインドします:
// wrangler.jsonc
{
"ai_search_namespaces": [
{ "binding": "SUPPORT_KB", "namespace": "support" }
],
"ai": { "binding": "AI" },
"durable_objects": {
"bindings": [
{ "name": "SupportAgent", "class_name": "SupportAgent" }
]
}
}
共有製品ドキュメントがproduct-docという名前のR2バケット(R2 bucket)に格納されていると仮定します。Cloudflareダッシュボード(Cloudflare Dashboard)のサポートネームスペース内で、そのバケットをバックエンドとする一時的なAI Searchインスタンス(product-knowledgeという名前)を作成できます:

これが共有ナレッジベース(shared knowledge base)です。すべてのエージェントが参照できるドキュメントとなります。
顧客が新しい問題を報告してきた際、すでに試された対策を知っているだけで、関係者の時間を大幅に節約できます。これを追跡するには、顧客ごとにAI Searchインスタンスを作成します。問題が解決するたびに、エージェントはエラーの原因と修正方法を要約して保存します。時間が経つにつれて、過去の解決策を検索可能なログとして蓄積していくことができます。名前空間バインディング(namespace binding)を使用してインスタンスを動的に作成できます:
// 顧客が最初にアクセスした際に、顧客ごとのインスタンスを作成する
await env.SUPPORT_KB.create({
id: customer-${customerId},
index_method:{ keyword: true, vector: true }
});
各インスタンスには、R2とVectorizeによって駆動する組み込みストレージ(storage)とベクトルインデックス(vector index)が自動的に割り当てられます。インスタンスは空の状態から始まり、時間とともにコンテキスト(context)を蓄積していきます。次回顧客がアクセスした際には、すべてのデータが検索可能になります。
数名の顧客が追加された後の名前空間(namespace)は以下のようになります:
namespace: "support"
├── product-knowledge (R2をソースとして使用し、すべてのエージェントで共有)
├── customer-abc123 (管理対象ストレージ、顧客ごと)
├── customer-def456 (管理対象ストレージ、顧客ごと)
└── customer-ghi789 (管理対象ストレージ、顧客ごと)
次にエージェント本体です。これはAgents SDKのAIChatAgentを拡張し、2つのツールを定義しています。Workers AI経由でKimi K2.5を大規模言語モデル(LLM)として使用しています。モデルは会話内容に基づき、ツールを呼び出すタイミングを判断します:
import { AIChatAgent, type OnChatMessageOptions } from "@cloudflare/ai-chat";
import { createWorkersAI } from "workers-ai-provider";
import { streamText, convertToModelMessages, tool, stepCountIs } from "ai";
import { routeAgentRequest } from "agents";
import { z } from "zod";
export class SupportAgent extends AIChatAgent {
async onChatMessage(_onFinish: unknown, options?: OnChatMessageOptions) {
// クライアントはリクエストボディ経由でcustomerIdを渡します
// (Agent SDKのsendMessage({ body: { customerId } })を使用)
const customerId = options?.body?.customerId;
// 顧客が最初にアクセスした際に、顧客ごとのインスタンスを作成する。
// 各インスタンスには独自のストレージとベクトルインデックスが割り当てられる。
if (customerId) {
try {
await this.env.SUPPORT_KB.create({
id: customer-${customerId},
index_method: { keyword: true, vector: true }
});
} catch {
// インスタンスは既に存在する
}
}
const workersai = createWorkersAI({ binding: this.env.AI });
const result = streamText({
      model: workersai("@cf/moonshotai/kimi-k2.5"),
      system: `サポートエージェントとして振る舞ってください。回答する前にsearch_knowledge_baseを使用して
        関連するドキュメントを検索してください。検索結果には、
        製品ドキュメントとこの顧客の過去の
        解決策が含まれます。失敗した修正の繰り返しを避け、
        問題の再発を認識するためにこれらを使用してください。問題が
        解決された場合、回答する前にsave_resolutionを呼び出してください。`,
      // this.messagesは会話履歴全体であり、自動的に
      // AIChatAgentによって再接続時にも永続化されます
      messages: await convertToModelMessages(this.messages),
      tools: {
        // ツール1:共有製品ドキュメントとこの
        // 顧客の過去の解決策を単一の呼び出しで横断的に検索
        search_knowledge_base: tool({
          description: "製品ドキュメントと顧客履歴を検索",
          inputSchema: z.object({
            query: z.string().describe("検索クエリ"),
          }),
          execute: async ({ query }) => {
            // 常に製品ドキュメントを検索し、
            // 利用可能な場合は顧客履歴も含めます
            const instances = ["product-knowledge"];
            if (customerId) {
              instances.push(`customer-${customerId}`);
            }
            return await this.env.SUPPORT_KB.search({
              query: query,
              ai_search_options: {
                // 古いドキュメントより新しいドキュメントを優先
                boost_by: [
                  { field: "timestamp", direction: "desc" }
                ],
                // 両方のインスタンスを同時に検索
                instance_ids: instances
              }
            });
          }
        }),

        // ツール2:問題を解決した後、エージェントは保存を行います
        // 将来のエージェントが完全なコンテキストを持てるように
        save_resolution: tool({
          description:
            "顧客の問題を解決した後に解決策の概要を保存",
          inputSchema: z.object({
            filename: z.string().describe(
              "短い説明的なファイル名、例:'billing-fix.md'"
            ),
            content: z.string().describe(
              "問題の内容、原因、および解決方法"
            ),
          }),
          execute: async ({ filename, content }) => {
            if (!customerId) return { error: "No customer ID" };
            const instance = this.env.SUPPORT_KB.get(
              `customer-${customerId}`);
            // uploadAndPollはインデックス作成が完了するまで待機し、
            // 次のクエリ前に解決策が検索可能になります
            const item = await instance.items.uploadAndPoll(
              filename, content);
            return { saved: true, filename, status: item.status };
          }
        }),
      },
      // エージェントのツール使用ループ(agentic tool-use loops)を10ステップで制限
      stopWhen: stepCountIs(10),
      abortSignal: options?.abortSignal,
    });
return result.toUIMessageStreamResponse();
}
}
// route requests to the SupportAgent durable object
export default {
async fetch(request: Request, env: Env) {
return (
(await routeAgentRequest(request, env)) ||
new Response("Not found", { status: 404 })
);
}
} satisfies ExportedHandler;
これにより、モデルは検索すべき時と保存すべき時の判断を行います。検索時には、製品ナレッジとこの顧客の過去の解決策を合わせてクエリします。問題が解決されると、将来の会話ですぐに検索可能なサマリーを保存します。
How AI Search finds what you're looking for
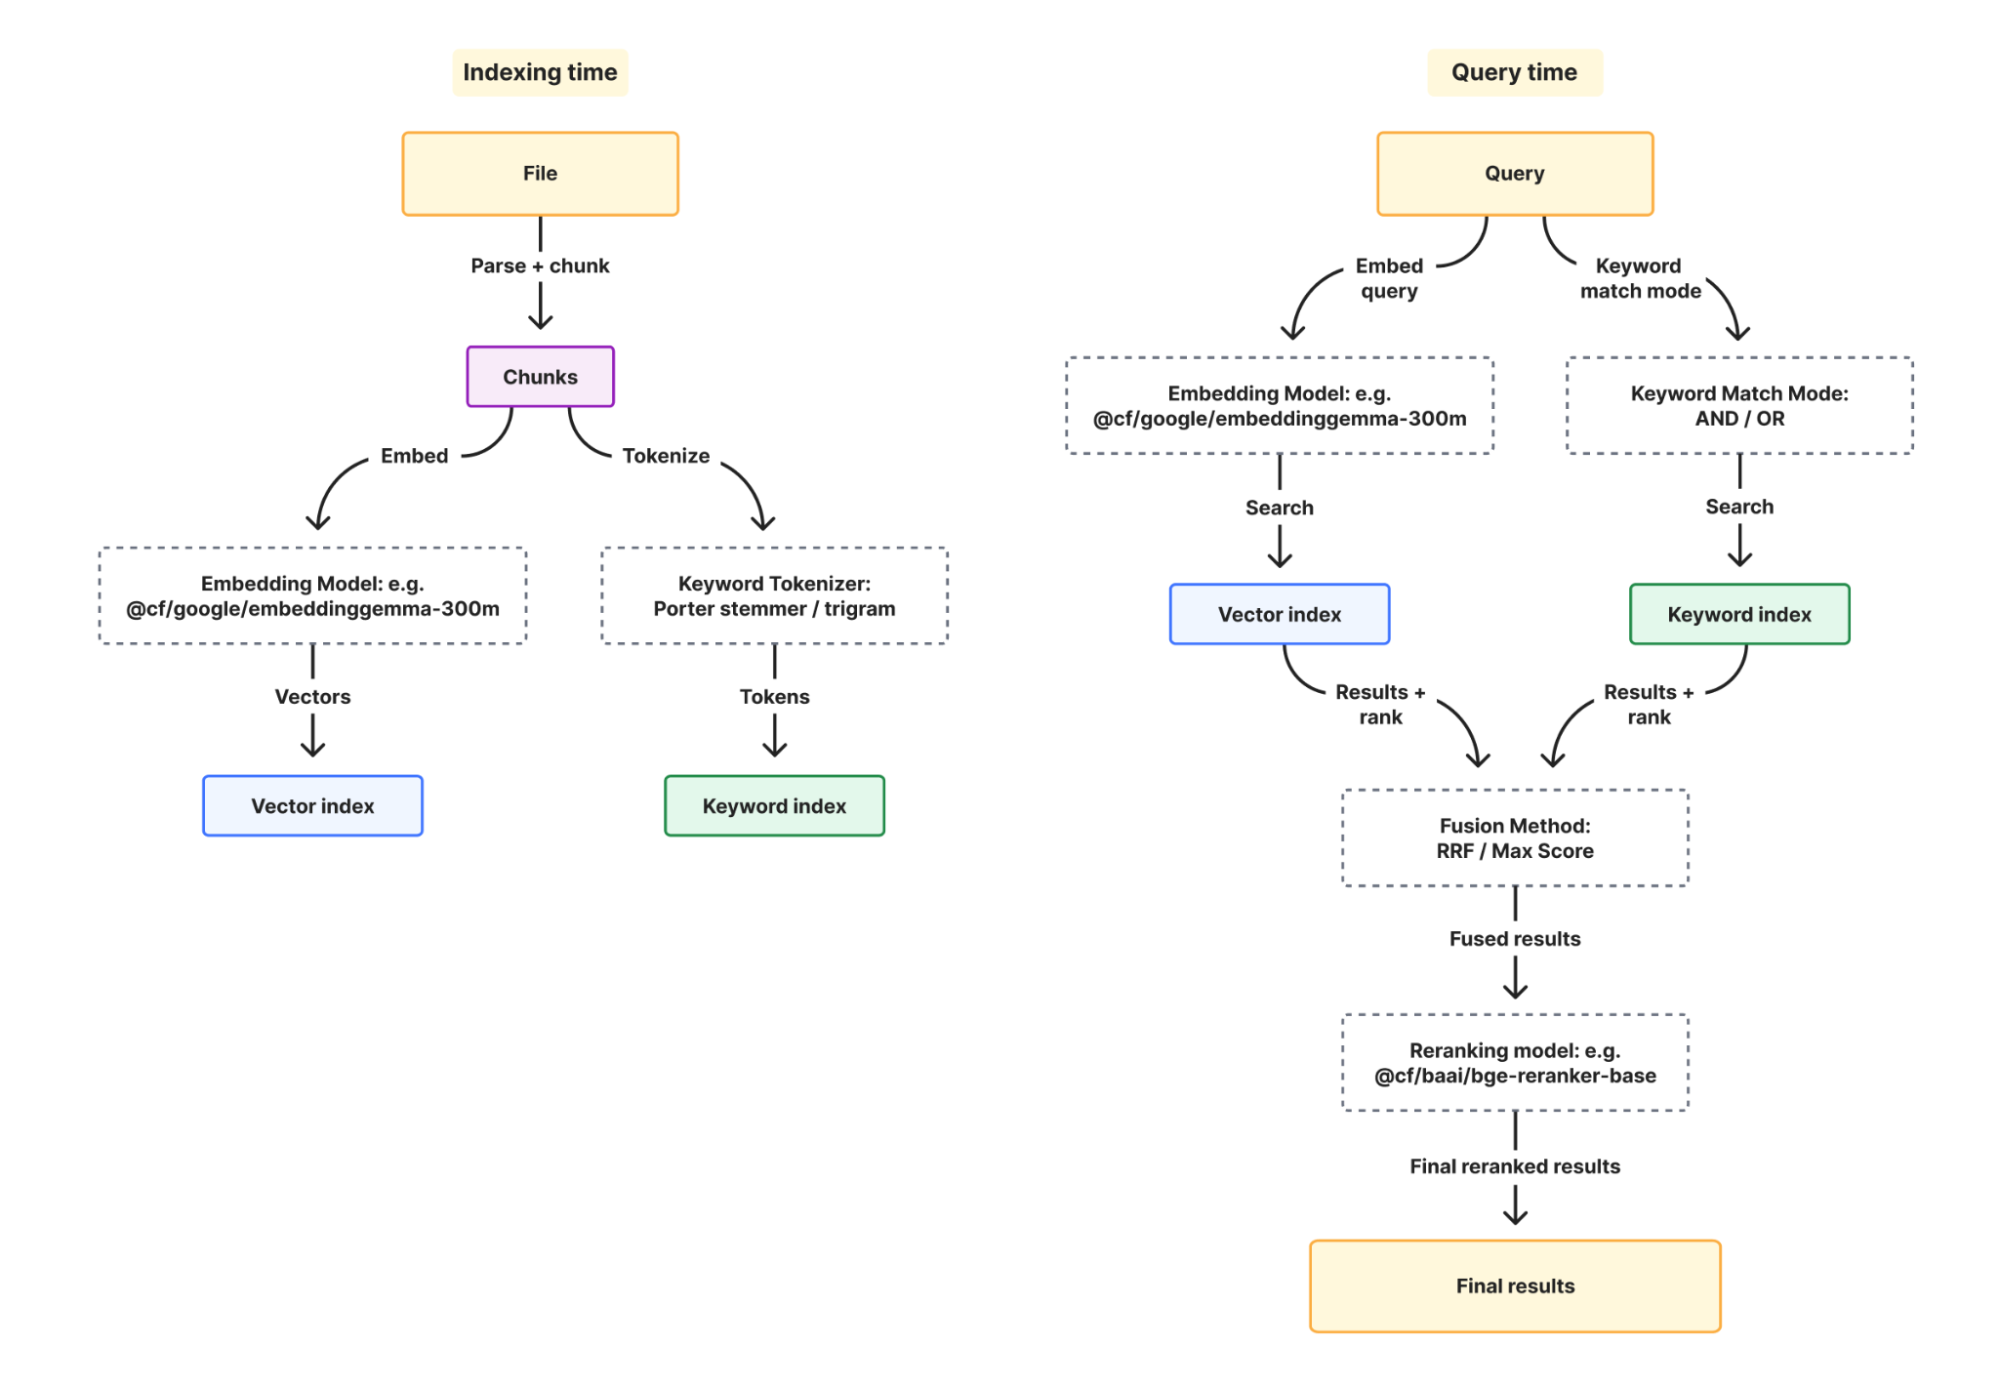
内部では、AI Search がマルチステップの検索パイプラインを実行しており、各ステップはすべて設定可能です。
Hybrid Search: search that understands intent and matches terms
これまで AI Search はベクトル検索(vector search)のみを提供していました。ベクトル検索は意図の理解に優れていますが、詳細な情報が抜け落ちる場合があります。「ERR_CONNECTION_REFUSED timeout」というクエリの場合、エンベッディング(embedding)は接続障害という広い概念を捉えます。しかしユーザーは一般的なネットワークドキュメントを探しているのではなく、「ERR_CONNECTION_REFUSED」に言及している特定の文書を探しています。ベクトル検索はトラブルシューティングに関する結果を返すかもしれませんが、その正確なエラー文字列を含むページが上位に表示されないこともあります。
このギャップを埋めるのがキーワード検索(keyword search)です。AI Search は現在、最も広く使用されている検索スコアリング関数の一つである BM25 をサポートしています。BM25 は、クエリ用語が文書内でどの程度出現するか、その用語がコーパス全体でどれだけレアか、そして文書の長さを基にスコアを計算します。特定の用語への一致にはボーナスを付与し、一般的なフィラーワードにはペナルティを科し、文書の長さで正規化します。「ERR_CONNECTION_REFUSED timeout」を検索すると、BM25 は実際に「ERR_CONNECTION_REFUSED」という用語を含む文書を見つけます。ただし、BM25 は同じ問題を説明している可能性が高い「troubleshooting network connections」に関するページを見逃すことがあります。ここでベクトル検索が真価を発揮し、両方が必要な理由となります。
ハイブリッド検索(hybrid search)を有効にすると、ベクトル検索と BM25 が並列で実行され、結果が融合され、オプションとして再ランク付けされます:
BM25 の新しい設定と、それらがどのように連携するかを見ていきましょう。
トークナイザー(Tokenizer)は、インデックス作成時に文書がどのようマッチング可能な用語に分割されるかを制御します。ポーターステム法(Porter stemmer)(オプション: porter)は単語を語幹に分解するため、「running」が「run」と一致します。トリグラム(Trigram)(オプション: trigram)は文字列のサブストリングに一致するため、「conf」が「configuration」と一致します。ドキュメントのような自然言語コンテンツには porter を、部分一致が重要となるコードには trigram を使用できます。
キーワードマッチモード(Keyword match mode)は、クエリ実行時に BM25 のスコアリング対象となる文書を制御します。AND は文書内にすべてのクエリ用語の出現を要求し、OR は少なくとも 1 つの一致を含むものをすべて含みます。
検索クエリ実行時、ベクトル結果とキーワード結果が最終的な結果リストにどのように結合されるかを制御します。逆順順位融合(Reciprocal Rank Fusion、オプション: rrf)はスコアではなく順位位置で結合するため、互換性のない2つのスコアリング尺度を比較するのを防ぎます。一方、最大融合(Max Fusion、オプション: max)はより高いスコアを採用します。
(オプション)再ランク付け(Reranking)は、クエリとドキュメントをペアとして評価して結果に再スコアリングを行うクロスエンコーダー処理(cross-encoder pass)を追加します。これにより、適切な用語は持っているものの質問に答えていない結果を捕捉するのに役立ちます。
各オプションには省略時の合理的なデフォルト値が設定されています。新しいインスタンスを作成する際、必要な項目を柔軟に構成できます:
const instance = await env.AI_SEARCH.create({
  id: "my-instance",
  index_method: { keyword: true, vector: true },
  indexing_options: {
    keyword_tokenizer: "porter"
  },
  retrieval_options: {
    keyword_match_mode: "or"
  },
  fusion_method: "rrf",
  reranking: true,
  reranking_model: "@cf/baai/bge-reranker-base"
});
Boost relevance: surface what matters
検索結果の関連性を高め、重要な情報を前面に出します
検索(Retrieval)は関連する結果を返しますが、関連性だけでは常に十分ではありません。例えばニュース検索において、先週の記事と3年前の記事がともに「選挙結果」というキーワードに対して意味的に関連していても、多くのユーザーはおそらく最新の記事を求めています。ブースティング(Boosting)により、ドキュメントのメタデータに基づいてランキングを調整することで、検索の上にビジネスロジックを層状に重ねることができます。
あなたはタイムスタンプ(すべての項目に組み込み済み)または定義した任意のカスタムメタデータフィールドに基づいてブーストを適用できます。
// boost high priority docs
const results = await instance.search({
  query: "deployment guide",
  ai_search_options: {
    boost_by: [
      { field: "timestamp", direction: "desc" }
    ]
  }
});
Cross-instance search: query across boundaries
境界を越えた検索:インスタンス間でのクエリ
サポートエージェントの例では、製品ドキュメントと顧客解決履歴は設計上、別々のインスタンスに格納されています。しかし、エージェントが質問に回答する際には、両方の場所からのコンテキストを同時に必要とします。クロスインスタンス検索(Cross-instance search)がない場合、2つの別々の呼び出しを行い、結果を自分でマージする必要があります。
namespaceバインディング(namespace binding)は、この処理を行う search() メソッドを公開しています。インスタンス名の配列を渡すと、1つのランク付けされたリストが返されます:
const results = await env.SUPPORT_KB.search({
  query: "billing error",
  ai_search_options: {
    instance_ids: ["product-knowledge", "customer-abc123"]
  }
});
結果はインスタンス間でマージされ、ランク付けされます。エージェントは、共有ドキュメントと顧客解決履歴が別々の場所に格納されていることを知る必要も気にする必要もありません。
How AI Search instances work
これまでAI Searchが適切な結果をどのように見つけるかについて解説しました。次に、検索インスタンスの作成と管理方法を紹介します。
このリリース以前にAI Searchを利用したことがある方なら、セットアップの流れをご存知でしょう:R2バケット(R2 bucket)を作成し、AI Searchインスタンスにリンクします。AI SearchがサービスAPIトークン(service API token)を生成してくれるので、アカウント上にプロビジョニングされたVectorizeインデックス(Vectorize index)をあなたが管理します。オブジェクトのアップロードには、R2への書き込みと、同期ジョブ(sync job)が実行されてそのオブジェクトがインデックスされるまでの待機が必要です。
現在作成される新しいインスタンスは動作が異なります。create()を呼び出すと、インスタンスにはストレージとベクトルインデックス(vector index)が組み込まれた状態で提供されます。ファイルをアップロードすると、そのファイルは即座にインデックス処理へ送信され、uploadAndPoll() API 1つでアップロードとインデックス状態のポーリング(polling)が可能です。完了後、インスタンスに対して即座に検索を実行でき、外部依存関係を別途接続する必要はありません。
              const instance = env.AI_SEARCH.get("my-instance");

// インデックス処理の完了を待ってアップロード
const item = await instance.items.uploadAndPoll("faq.md", content, {
  metadata: { category: "onboarding" }
});
console.log(item.status); // "完了"

// インデックス処理完了後、即座に検索
const results = await instance.search({
  // パラメータ query を使用する以外の、ユーザーのクエリを渡す代替方法
  messages: [{ role: "user", content: "onboarding guide" }],
});
各インスタンスは、1つの外部データソース(external data source)(R2バケットまたはウェブサイト)に接続し、同期スケジュール(sync schedule)で実行することもできます。これは提供された組み込みストレージ(built-in storage)と併存させることができます。サポートエージェントの例では、製品知識は共有ドキュメント用のR2バケットによってバックアップされていますが、各顧客のインスタンスはオンザフライ(on the fly)でアップロードされたコンテキストのために組み込みストレージを使用します。
## Namespaces: 実行時(runtime)に検索インスタンスを作成する
ai_search_namespacesは、実行時(runtime)に検索インスタンスを動的に作成するために活用できる新しいバインディング(binding)です。これは、AIバインディングを通じてAI Searchにアクセスしていた以前のenv.AI.autorag() APIを置き換えるものです。従来のバインディングは、Workers互換性日付(Workers compatibility dates)を使用して引き続き動作します。
              // wrangler.jsonc
{
  "ai_search_namespaces": [
    { "binding": "AI_SEARCH", "namespace": "example" },
  ]
}
このnamespaceバインディング(binding)は、ネームスペースレベル(namespace level)でcreate()、delete()、list()、search()などのAPIを提供します。インスタンスを動的に作成する場合(例:エージェントごと、顧客ごと、テナントごと)、これを使用するバインディングとなります。
              // インスタンスの作成
const instance = await env.AI_SEARCH.create({
  id: "my-instance"
});

// インスタンスおよびすべてのインデックスデータを削除
await env.AI_SEARCH.delete("old-instance");
## Pricing: 新しいインスタンスの料金
今日以降に作成される新しいインスタンスには、組み込みストレージ(built-in storage)とベクトルインデックス(vector index)が自動的に付与されます。
これらのインスタンスは、AI検索(AI Search)が以下の制限を設けて公開ベータ版を提供している間、無料でご利用いただけます。ウェブサイトを経済データソースとして使用する際、ブラウザ実行(Browser Run、旧:Browser Rendering)を使用したWebサイトクロールも組み込みサービスとなったため、別途請求されることはありません。ベータ終了後は、各基盤コンポーネントごとに個別に課金するのではなく、AI検索(AI Search)を単一サービスとして統一された価格で提供することを目指しています。ワーカーAI(Workers AI)およびAIゲートウェイ(AI Gateway)の使用料は引き続き個別に課金されます。
課金開始前に少なくとも30日前にお知らせし、価格の詳細をお伝えします。
制限\nWorkers Free\nWorkers Paid\nアカウントあたりのAI検索(AI Search)インスタンス数\n100\n5,000\nインスタンスあたりのファイル数\n100,000\n1Mまたはハイブリッド検索の場合500K\n最大ファイルサイズ\n4MB\n4MB\n月間クエリ数\n20,000\n無制限\n1日あたりのクロール最大ページ数\n500\n無制限
既存のインスタンスはどうなりますか?
このリリース以前にインスタンスを作成された場合、それらは今日と同じように引き続き動作します。R2バケット(R2 buckets)、ベクトルインデックス(Vectorize indexes)、ブラウザ実行(Browser Run)の使用量はアカウントに残り、従来通り課金されます。既存のインスタンスのマイグレーション詳細については近日中にお知らせします。
\n 今すぐ始める\n \n \n \n
検索はエージェントが行う最も基本的な機能の一つです。AI検索(AI Search)を利用すれば、そのためのインフラを構築する必要はありません。インスタンスを作成し、データを渡すだけで、エージェントが検索を実行してくれます。
以下のコマンドを実行して最初のインスタンスを作成し、今すぐ始めましょう:
\nnpx wrangler ai-search create my-search\n
\nn ドキュメントをチェックし、Cloudflare Developer Discordであなたが構築しているものを教えてください。\n
\n  image
image
原文を表示
Every agent needs search: Coding agents search millions of files across repos. Support agents search customer tickets and internal docs. Even an agent's memory, its ability to recall past interactions, is fundamentally a search problem. The use cases are different, but the underlying problem is the same: get the right information to the model at the right time.
If you're building search yourself, you need a vector index, an indexing pipeline that parses and chunks your documents, and something to keep the index up to date when your data changes. If you also need keyword search, that's a separate index and fusion logic on top. And if each of your agents needs its own searchable context, you're setting all of that up per agent.
AI Search (formerly AutoRAG) is the plug-and-play search primitive you need. You can dynamically create instances, give it your data, and search — from a Worker, the Agents SDK, or Wrangler CLI. Here's what we're shipping:
Hybrid search. Enable both semantic and keyword matching in the same query. Vector search and BM25 run in parallel and results are fused. (The search on our blog is now powered by AI Search. Try the magnifying glass icon to the top right.)
Built-in storage and index. New instances come with their own storage and vector index. Upload files directly to an instance via API and they're indexed. No R2 buckets to set up, no external data sources to connect first. The new ai_search_namespaces binding lets you create and delete instances at runtime from your Worker, so you can spin up one per agent, per customer, or per language without redeployment.
You can now also attach metadata to documents and use it to boost rankings at query time, and query across multiple instances in a single call.
Now, let's look at what this means in practice.
In action: Customer Support Agent
Let's walk through a support agent that searches for two kinds of knowledge: shared product docs, and per-customer history like past resolutions. The product docs are too large to fit in a context window, and each customer's history grows with every resolved issue, so the agent needs retrieval to find what's relevant.
Here's what that looks like with AI Search and the Agents SDK. Start by scaffolding a project:
npm create cloudflare@latest -- --template cloudflare/agents-starter
First, bind an AI Search namespace to your Worker:
// wrangler.jsonc
{
"ai_search_namespaces": [
{ "binding": "SUPPORT_KB", "namespace": "support" }
],
"ai": { "binding": "AI" },
"durable_objects": {
"bindings": [
{ "name": "SupportAgent", "class_name": "SupportAgent" }
]
}
}
Let's say your shared product documentation lives in an R2 bucket called product-doc. You can create a one-off AI Search instance (named product-knowledge) backed by the bucket on the Cloudflare Dashboard within the support namespace:
image
That's your shared knowledge base, the docs every agent can reference.
When a customer comes back with a new issue, knowing what's already been tried saves everyone time. You can track this by creating an AI Search instance per customer. After each resolved issue, the agent saves a summary of what went wrong and how it was fixed. Over time, this builds up a searchable log of past resolutions. You can create instances dynamically using the namespace binding:
// create a per-customer instance when they first show up
await env.SUPPORT_KB.create({
id: customer-${customerId},
index_method:{ keyword: true, vector: true }
});
Each instance gets its own built-in storage and vector index — powered by R2 and Vectorize. The instance starts empty and accumulates context over time. Next time the customer comes back, all of it is searchable.
Here's what the namespace looks like after a few customers:
namespace: "support"
├── product-knowledge (R2 as source, shared across all agents)
├── customer-abc123 (managed storage, per-customer)
├── customer-def456 (managed storage, per-customer)
└── customer-ghi789 (managed storage, per-customer)
Now the agent itself. It extends AIChatAgent from the Agents SDK and defines two tools. We're using Kimi K2.5 as the LLM via Workers AI. The model decides when to call the tools based on the conversation:
import { AIChatAgent, type OnChatMessageOptions } from "@cloudflare/ai-chat";
import { createWorkersAI } from "workers-ai-provider";
import { streamText, convertToModelMessages, tool, stepCountIs } from "ai";
import { routeAgentRequest } from "agents";
import { z } from "zod";
export class SupportAgent extends AIChatAgent<Env> {
async onChatMessage(_onFinish: unknown, options?: OnChatMessageOptions) {
// the client passes customerId in the request body
// via the Agent SDK's sendMessage({ body: { customerId } })
const customerId = options?.body?.customerId;
// create a per-customer instance when they first show up.
// each instance gets its own storage and vector index.
if (customerId) {
try {
await this.env.SUPPORT_KB.create({
id: customer-${customerId},
index_method: { keyword: true, vector: true }
});
} catch {
// instance already exists
}
}
const workersai = createWorkersAI({ binding: this.env.AI });
const result = streamText({
model: workersai("@cf/moonshotai/kimi-k2.5"),
system: `You are a support agent. Use search_knowledge_base
to find relevant docs before answering. Search results
include both product docs and this customer's past
resolutions — use them to avoid repeating failed fixes
and to recognize recurring issues. When the issue is
resolved, call save_resolution before responding.`,
// this.messages is the full conversation history, automatically
// persisted by AIChatAgent across reconnects
messages: await convertToModelMessages(this.messages),
tools: {
// tool 1: search across shared product docs AND this
// customer's past resolutions in a single call
search_knowledge_base: tool({
description: "Search product docs and customer history",
inputSchema: z.object({
query: z.string().describe("The search query"),
}),
execute: async ({ query }) => {
// always search product docs;
// include customer history if available
const instances = ["product-knowledge"];
if (customerId) {
instances.push(customer-${customerId});
}
return await this.env.SUPPORT_KB.search({
query: query,
ai_search_options: {
// surface recent docs over older ones
boost_by: [
{ field: "timestamp", direction: "desc" }
],
// search across both instances at once
instance_ids: instances
}
});
}
}),
// tool 2: after resolving an issue, the agent saves a
// summary so future agents have full context
save_resolution: tool({
description:
"Save a resolution summary after solving a customer's issue",
inputSchema: z.object({
filename: z.string().describe(
"Short descriptive filename, e.g. 'billing-fix.md'"
),
content: z.string().describe(
"What the problem was, what caused it, and how it was resolved"
),
}),
execute: async ({ filename, content }) => {
if (!customerId) return { error: "No customer ID" };
const instance = this.env.SUPPORT_KB.get(
customer-${customerId}
);
// uploadAndPoll waits until indexing is complete,
// so the resolution is searchable before the next query
const item = await instance.items.uploadAndPoll(
filename, content
);
return { saved: true, filename, status: item.status };
}
}),
},
// cap agentic tool-use loops at 10 steps
stopWhen: stepCountIs(10),
abortSignal: options?.abortSignal,
});
return result.toUIMessageStreamResponse();
}
}
// route requests to the SupportAgent durable object
export default {
async fetch(request: Request, env: Env) {
return (
(await routeAgentRequest(request, env)) ||
new Response("Not found", { status: 404 })
);
}
} satisfies ExportedHandler<Env>;
With this, the model decides when to search and when to save. When it searches, it queries product-knowledge and this customer's past resolutions together. When the issue is resolved, it saves a summary that's immediately searchable in future conversations.
How AI Search finds what you're looking for
Under the hood, AI Search runs a multi-step retrieval pipeline, in which every step is configurable.
Hybrid Search: search that understands intent and matches terms
Until now, AI Search only offered vector search. Vector search is great at understanding intent, but it can lose specifics. In a query "ERR_CONNECTION_REFUSED timeout," the embedding captures the broad concept of connection failures. But the user isn't looking for general networking docs. They're looking for the specific document that mentions “ERR_CONNECTION_REFUSED”. Vector search might return results about troubleshooting without ever surfacing the page that contains that exact error string.
Keyword search fills that gap. AI Search now supports BM25, one of the most widely used retrieval scoring functions. BM25 scores documents by how often your query terms appear, how rare those terms are across the entire corpus, and how long the document is. It rewards matches on specific terms, penalizes common filler words, and normalizes for document length. When you search "ERR_CONNECTION_REFUSED timeout", BM25 finds documents that actually contain "ERR_CONNECTION_REFUSED" as a term. However, BM25 may miss a page about “troubleshooting network connections” even though it may be describing the same problem. That's where vector search shines, and why you need both.
When you enable hybrid search, it runs vector and BM25 in parallel, fuses the results, and optionally reranks them:
image
Let's take a look at the new configurations for BM25, and how they come together.
Tokenizer controls how your documents are broken into matchable terms at index time. Porter stemmer (option: porter) stems words so "running" matches "run." Trigram (option: trigram) matches character substrings so "conf" matches "configuration." You can use porter for natural language content like docs, and trigram for code where partial matches matter.
Keyword match mode controls which documents are candidates for BM25 scoring at query time. AND requires all query terms to appear in a document, OR includes anything with at least one match.
Fusion controls how vector and keyword results are combined into the final list of results during query time. Reciprocal rank fusion (option: rrf) merges by rank position rather than score, which avoids comparing two incompatible scoring scales, whereas max fusion (option: max) takes the higher score.
(Optional) Reranking adds a cross-encoder pass that re-scores results by evaluating the query and document together as a pair. It can help catch cases where a result has the right terms but isn't answering the question.
Every option has a sane default when omitted. You have the flexibility to configure what matters whenever you create a new instance:
const instance = await env.AI_SEARCH.create({
id: "my-instance",
index_method: { keyword: true, vector: true },
indexing_options: {
keyword_tokenizer: "porter"
},
retrieval_options: {
keyword_match_mode: "or"
},
fusion_method: "rrf",
reranking: true,
reranking_model: "@cf/baai/bge-reranker-base"
});
Boost relevance: surface what matters
Retrieval gets you relevant results, but relevance alone isn't always enough. For example, in a news search, an article from last week and an article from three years ago might both be semantically relevant to "election results," but most users probably want the recent one. Boosting lets you layer business logic on top of retrieval by nudging rankings based on document metadata.
You can boost on timestamp (built in on every item) or any custom metadata field you define.
// boost high priority docs
const results = await instance.search({
query: "deployment guide",
ai_search_options: {
boost_by: [
{ field: "timestamp", direction: "desc" }
]
}
});
Cross-instance search: query across boundaries
In the support agent example, product documentation and customer resolution history live in separate instances by design. But when the agent is answering a question, it needs context from both places at once. Without cross-instance search, you'd make two separate calls and merge the results yourself.
The namespace binding exposes a search() method that handles this for you. Pass an array of instance names and get one ranked list back:
const results = await env.SUPPORT_KB.search({
query: "billing error",
ai_search_options: {
instance_ids: ["product-knowledge", "customer-abc123"]
}
});
Results are merged and ranked across instances. The agent doesn't need to know or care that shared docs and customer resolution history live in separate places.
How AI Search instances work
So far we've covered how AI Search finds the right results. Now let's look at how you can create and manage your search instances.
If you used AI Search before this release, you know the setup: create an R2 bucket, link it to an AI Search instance, AI search generates a service API token for you, and you manage the Vectorize index that gets provisioned on your account. Uploading an object requires you to write to R2 and then wait for a sync job to run to have the object indexed.
New instances created now work differently. When you call create(), the instance comes with its own storage and vector index built-in. You can upload a file, the file is sent to index immediately, and you can poll for indexing status all with one uploadAndpoll() API. Once completed, you can search the instance immediately, and there are no external dependencies to wire together.
const instance = env.AI_SEARCH.get("my-instance");
// upload and wait for indexing to complete
const item = await instance.items.uploadAndPoll("faq.md", content, {
metadata: { category: "onboarding" }
});
console.log(item.status); // "completed"
// immediately search after indexing is completed
const results = await instance.search({
// alternative way to pass in users' query other than using parameter query
messages: [{ role: "user", content: "onboarding guide" }],
});
Each instance can also connect to one external data source (an R2 bucket or a website) and run on a sync schedule. It can exist alongside the provided built-in storage. In the support agent example, product-knowledge is backed by an R2 bucket for shared documentation, while each customer's instance uses built-in storage for context uploaded on the fly.
Namespaces: create search instances at runtime
The ai_search_namespaces is a new binding you can leverage to dynamically create search instances at runtime. It replaces the previous env.AI.autorag() API, which accessed AI Search through the AI binding. The old bindings will continue to work using Workers compatibility dates.
// wrangler.jsonc
{
"ai_search_namespaces": [
{ "binding": "AI_SEARCH", "namespace": "example" },
]
}
The namespace binding gives you APIs like create(), delete(), list(), and search() at the namespace level. If you’re creating instances dynamically (e.g. per agent, per customer, per tenant), this is the binding to use.
// create an instance
const instance = await env.AI_SEARCH.create({
id: "my-instance"
});
// delete an instance and all its indexed data
await env.AI_SEARCH.delete("old-instance");
Pricing for new instances
New instances created as of today will get built-in storage and a vector index automatically.
These instances are free to use while AI Search is in open beta with the limits listed below. When using the website as a data source, website crawling using Browser Run (formerly Browser Rendering) is also now a built-in service, meaning that you won’t be billed for it separately. After beta, the goal is to provide unified pricing for AI Search as a single service, rather than billing separately for each underlying component. Workers AI and AI Gateway usage will continue to be billed separately.
We'll give at least 30 days notice and communicate pricing details before any billing begins.
Limit
Workers Free
Workers Paid
AI Search instances per account
100
5,000
Files per instance
100,000
1M or 500K for hybrid search
Max file size
4MB
4MB
Queries per month
20,000
Unlimited
Maximum pages crawled per day
500
Unlimited
What about existing instances?
If you created instances before this release, they continue to work exactly as they do today. Your R2 buckets, Vectorize indexes, and Browser Run usage remain on your account and are billed as before. We'll share migration details for existing instances soon.
Get started today
Search is one of the most fundamental things an agent can do. With AI Search, you don't have to build the infrastructure to make it happen. Create an instance, give it your data, and let your agents search it.
Get started today by running this command to create your first instance:
npx wrangler ai-search create my-search
Check out the docs and come tell us what you're building on the Cloudflare Developer Discord.
image
関連記事
今週は特大号
シモン・ウィルソンは、今週のニュースレターでAI生成画像やブログ記事5本、そして「Agentic Engineering Patterns」の新しい章を公開した。
Vercel AI GatewayでDeepSeek V4の利用が可能に
Vercel AI GatewayはDeepSeek V4(Pro/Flash)を提供開始した。両モデルは100万トークンコンテキストを標準搭載し、Proはエージェント型コーディングや数学推論に特化している。
Metaは従業員のキー入力を記録し、AIモデルの学習に使用する
Metaは、従業員のマウス操作やクリックをデータに変換する社内ツールを開発し、このデータをAIモデルの学習に活用すると発表した。