SageMaker Unified StudioとS3を用いた非構造化データによるLLMファインチューニングの加速
AWSは、Amazon SageMaker Unified StudioとAmazon S3の統合を活用し、非構造化データを用いたLlama 3.2 11B Vision Instructモデルのファインチューニングによる視覚的質問応答タスクの精度向上プロセスを実証した。
キーポイント
SageMakerとS3の統合による非構造化データ活用
Amazon SageMaker Unified StudioとAmazon S3汎用バケットの統合により、S3に保存された非構造化データを機械学習やデータ分析ユースケースで簡単に利用できるようになった。
Llama 3.2 Visionモデルのファインチューニング実証
SageMaker JumpStartからアクセス可能なLlama 3.2 11B Vision Instructモデルを、DocVQAデータセットを用いてファインチューニングし、視覚的質問応答タスクの精度向上を実証した。
データサイズに応じた性能評価
1,000、5,000、10,000画像の異なるデータセットサイズで3つのファインチューニングモデルを作成し、SageMakerのサーバーレスMLflowで実験を追跡し精度改善を測定した。
エンドツーエンドのワークフロー統合
データ取り込み、モデル開発、メトリクス評価の全プロセスをAmazon SageMaker Unified Studioでオーケストレーションする統合ワークフローを構築した。
データディレクトリの作成
コードでデータ保存用のディレクトリを作成し、既存の場合は上書きしないように設定している。
データセットの読み込みと保存
HuggingFaceのDocumentVQAデータセットから最初の10,000行をトレーニングデータとして読み込み、ローカルに保存している。
SageMaker Unified Studioでのデータプロジェクト管理
プロジェクト内でS3データにアクセスするには、アクセスロールを作成し、データをプロジェクトに追加する必要がある。データプロデューサーはS3バケットをプロジェクトカタログに追加し、SageMakerカタログに公開することで、他のプロジェクトで利用可能になる。
影響分析・編集コメントを表示
影響分析
この記事は、AWSが提供するMLプラットフォームの統合性と実用性を実証する技術デモンストレーションであり、非構造化データ活用とマルチモーダルLLMのファインチューニングという現在のAIトレンドに対応した実践的なソリューションを示している。ただし、特定のAWSサービスに特化した内容であり、業界全体への直接的な変革的影響は限定的と言える。
編集コメント
AWSのMLサービス統合の実用例として参考になるが、営業色が強く独立した技術革新の報告ではない。非構造化データ活用とVQAという実用的なユースケースに焦点を当てている点は評価できる。
昨年、Amazon SageMaker Unified Studio と Amazon S3 の汎用バケット間の統合をAWS が発表しました。この統合により、チームは Amazon Simple Storage Service (Amazon S3) に保存された構造化されていないデータを、機械学習 (ML) およびデータ分析ユースケースで容易に利用できるようになりました。
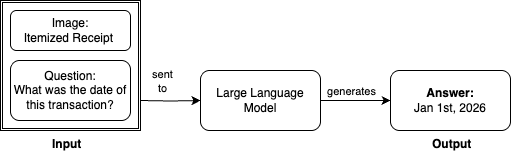
本記事では、Amazon SageMaker Unified Studio を用いて、Llama 3.2 11B Vision Instruct を視覚的質問応答 (VQA) のためにファインチューニングする際、S3 汎用バケットを Amazon SageMaker Catalog と統合する方法を示します。このタスクでは、入力画像と質問を大規模言語モデル (LLM: Large Language Model) に与え、回答を取得します。例えば、明細書から取引日付を特定するように問いかける場合:
このデモンストレーションでは、Amazon SageMaker JumpStart を使用して、Llama 3.2 11B Vision Instruct モデルにアクセスします。このベースモデルは、そのままの状態で DocVQA データセットにおいて、平均正規化レベンシュタイン類似度 (ANLS) スコア 85.3% を達成します。ANLS は、モデルの視覚的質問応答タスクにおける性能を評価するために使用される指標であり、モデルが予測した回答と正解(グランドトゥルース)との類似度を測定するものです。85.3% という数値は強力なベースライン性能を示していますが、より高い精度と厳密さが求められるタスクにおいては、このレベルが最も効率的であるとは限りません。
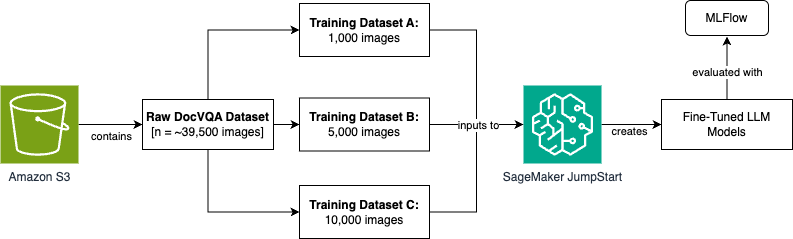
モデルの性能をファインチューニングによって向上させるため、Hugging Face の DocVQA データセット を使用します。このデータセットには 39,500 行のトレーニングデータが含まれており、それぞれに入力画像、質問、および対応する期待される回答が用意されています。ここでは、異なるデータセットサイズ(1,000 枚、5,000 枚、10,000 枚)を用いて、3 つのファインチューニング済みモデルバージョンを作成します。その後、Amazon SageMaker の完全管理型サーバーレス MLflow を使用して実験を追跡し、精度の向上を測定します。
完全なエンドツーエンドのデータ取り込み、モデル開発、およびメトリクス評価のプロセスは、Amazon SageMaker Unified Studio を用いてオーケストレーションされます。以下に、本シナリオで順を追って説明する高レベルなプロセスフロー図を示します。このブログ記事全体を通じて、この内容について詳しく解説していきます。
このプロセスフローを実現するために、Amazon SageMaker Unified Studio を用いてデータ取り込み、データ前処理、モデルトレーニング、および評価を行うアーキテクチャを構築します。各ステップについては、以下のセクションで詳しく説明します。
本演習全体で使用し参照される Jupyter ノートブックは、この GitHub リポジトリ で確認できます。
前提条件
組織が Amazon SageMaker Unified Studio と Amazon S3 汎用バケット間の新しい統合を利用できるように準備するためには、以下の前提条件を完了する必要があります。なお、これらの手順は Identity Center ベースのドメイン 上で行われます。
- AWS アカウントを作成します。
- クイックセットアップを使用して、Amazon SageMaker Unified Studio ドメインを作成します。
- この投稿で示すシナリオをモデル化するために、SageMaker Unified Studio ドメイン内に 2 つのプロジェクトを作成します。1 つはデータプロデューサーのペルソナ用、もう 1 つはデータコンシューマーのペルソナ用です。最初のプロジェクトでは、Amazon S3 バケット内のデータセットを発見してカタログ化します。2 つ目のプロジェクトでは、そのデータセットを消費して、大規模言語モデル(LLM: Large Language Model)の 3 つの反復版をファインチューニングします。詳細については「プロジェクトの作成」をご覧ください。
- データコンシューマーのプロジェクトには、実験および評価に使用される実行中の SageMaker マネージド MLflow サーバーレスアプリケーションへのアクセス権限が必要です。詳細については、サーバーレス MLflow アプリケーションの作成に関する手順をご覧ください。
- 機械学習開発ユースケースで使用する生データセットを事前に格納した Amazon S3 バケットを用意する必要があります。このブログ投稿では、視覚的質問応答(VQA: Visual Question Answering)ユースケースをファインチューニングするために、Hugging Face の DocVQA データセットを使用します。
- 学習ジョブに p4de.24xlarge コンピューティングリソースを使用するためのサービスクォータ増量リクエストが必要です。詳細については「クォータの増量をリクエストする」をご覧ください。
アーキテクチャ
本投稿全体で構築する参照アーキテクチャは以下の通りです:
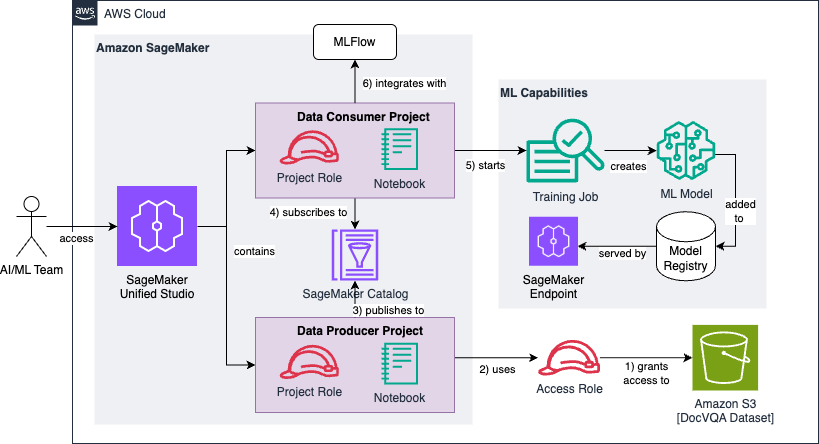
アーキテクチャ図は、以下のセクションで順次確認していく6 つの高レベルステップに分割できます。
まず、生データかつ非構造化の DocVQA データセットを格納した既存の Amazon S3 バケットに対して読み取り権限を付与する IAM アクセスロールを作成して設定します。
データプロデューサープロジェクトは、このアクセスロールを使用してデータセットを検索し、プロジェクトカタログに追加します。
データプロデューサープロジェクトは、オプションのメタデータを付加してデータセットを拡張し、SageMaker Catalog へ公開します。
データコンシューマープロジェクトは、公開されたデータセットを購読し、機械学習モデルの開発(またはファインチューニング)を担当するプロジェクトチームが利用可能にします。
データコンシューマープロジェクトはデータを前処理し、異なるサイズ(1k、5k、10k 枚の画像)の3 つのトレーニングデータセットに変換します。各データセットは、ベースとなる大規模言語モデルをファインチューニングするために使用されます。
MLflow を用いて、3 つのモデルの平均正規化レベンシュタイン類似度(ANLS)という成功指標に対する実験および評価結果を追跡・管理します。
ソリューションのウォークスルー
前述した通り、視覚的質問応答タスクには Hugging Face の DocVQA データセットを使用することを選択します。組織のシナリオでは、この生データセットは ML ユースケースに関連するあらゆる非構造化データとなり得ます。例としては、カスタマーサポートのチャットログ、社内文書、製品レビュー、法的契約書、研究論文、ソーシャルメディア投稿、メールアーカイブ、センサーデータ、金融取引記録などが挙げられます。
Jupyter notebook の前提条件セクションでは、Hugging Face の Datasets API を使用して Amazon S3 バケットに事前にデータを格納しています:
import os
from datasets import load_dataset
データディレクトリの作成
os.makedirs("data", exist_ok=True)
学習用スプリット(最初の 10,000 行)の読み込みと保存
train_data = load_dataset("HuggingFaceM4/DocumentVQA", split="train[:10000]", cache_dir="./data")
train_data.save_to_disk("data/train")
検証用スプリット(最初の 100 行)の読み込みと保存
val_data = load_dataset("HuggingFaceM4/DocumentVQA", split="validation[:100]", cache_dir="./data")
val_data.save_to_disk("data/validation")
データセットを取得した後、前提条件としてこれを Amazon S3 バケットに同期します。これは、前述のアーキテクチャ図の右下セクションに示されているバケットを表しています。
ここで、Amazon SageMaker Unified Studio でデータを取り扱い始める準備が整いました。まずはデータプロデューサープロジェクトから始めます。Amazon SageMaker Unified Studio におけるプロジェクトとは、特定のドメイン内にある境界線であり、そこでビジネスユースケースについて他者と協力して作業を行うことができます。Amazon S3 のデータをプロジェクトに持ち込むには、まずデータの アクセス を追加し、その後データをプロジェクトに追加する必要があります。本稿では、このプロセスを円滑に進めるためにアクセスロールを使用するアプローチを採用します。*詳細は *Amazon S3 データの追加* をご覧ください。*
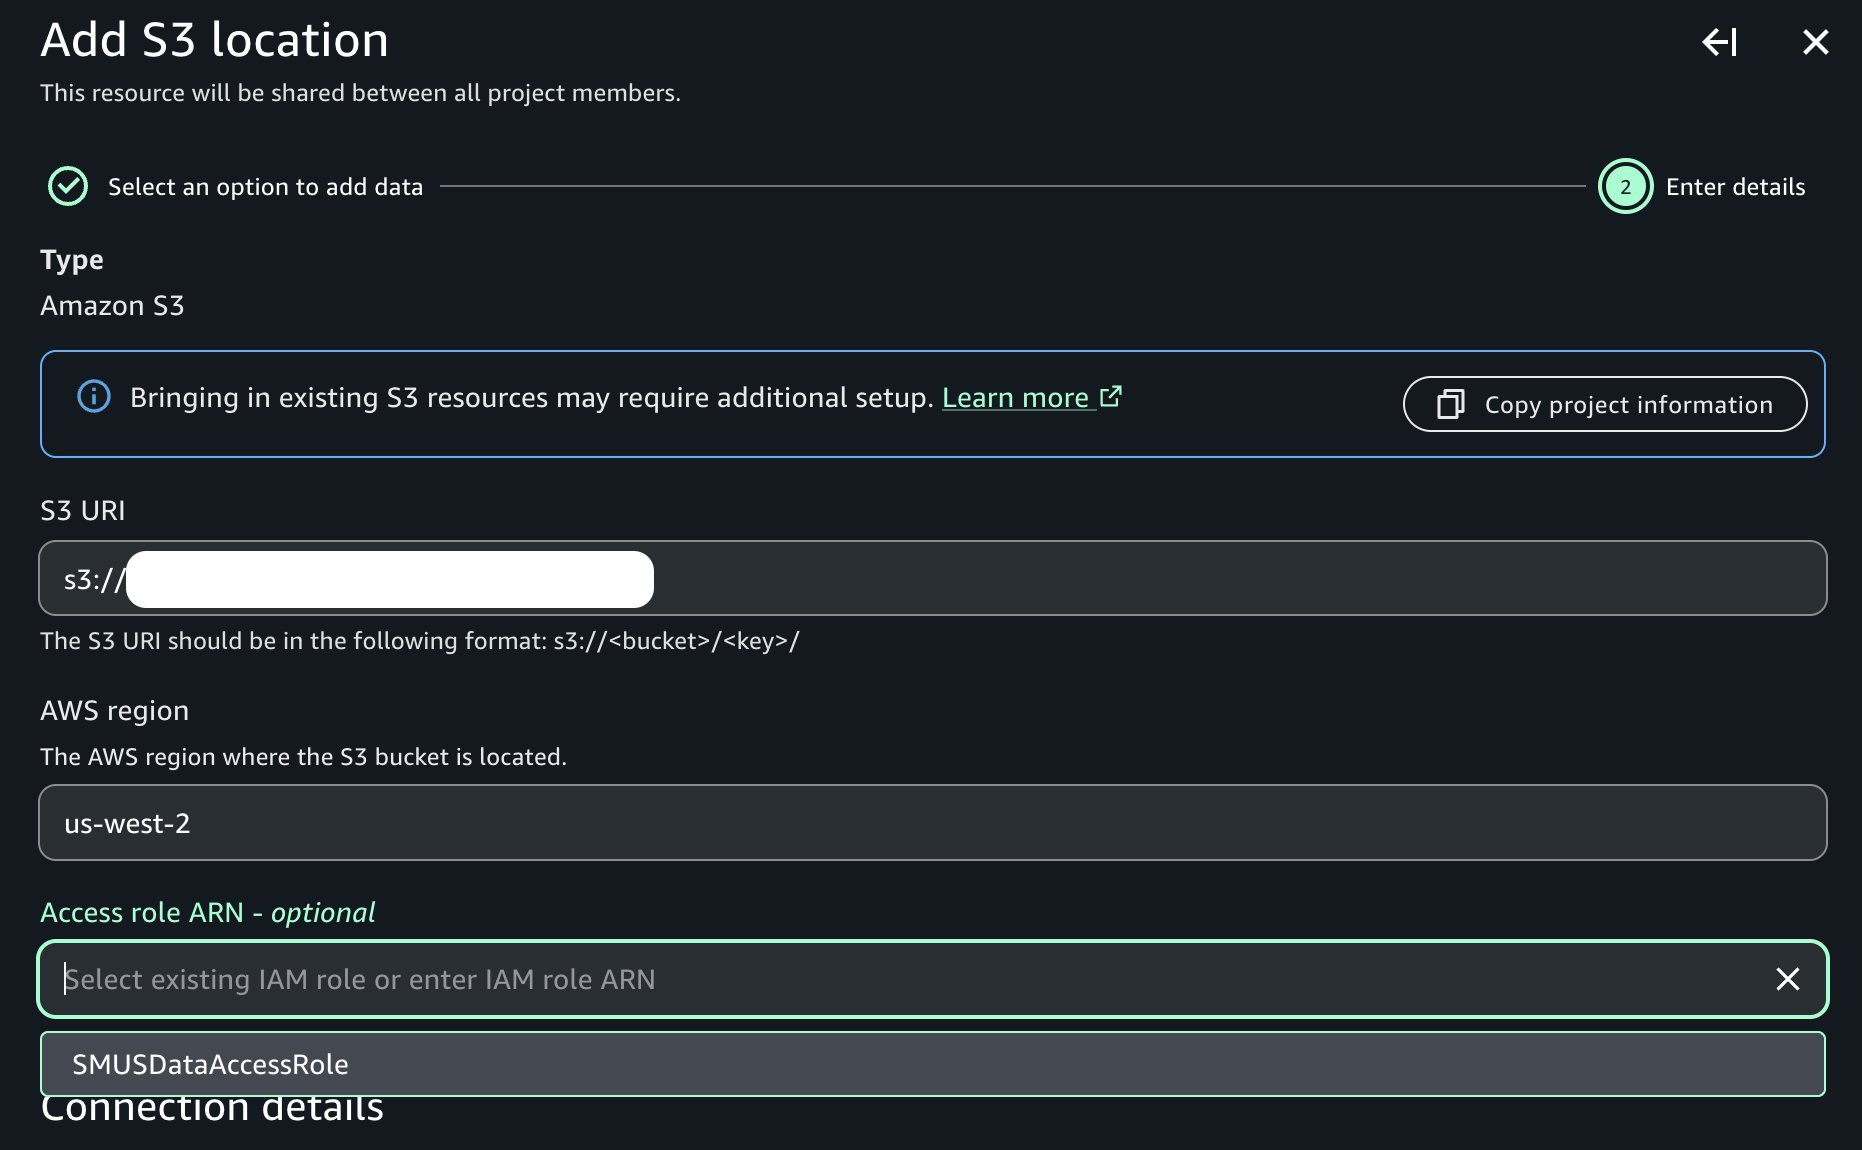
先に参照したドキュメントの手順に従ってアクセスロールを作成した後、データセットの発見とカタログ化を進めることができます。データプロデューサープロジェクトでは、「Data」→「Add data」→「Add S3 location」へ移動します:
生のデータを含む Amazon S3 バケットの名前と対応するプレフィックスを入力し、事前に作成した必須のアクセスロールが含まれたアクセスロールドロップダウンリストが表示されている点に注意してください:
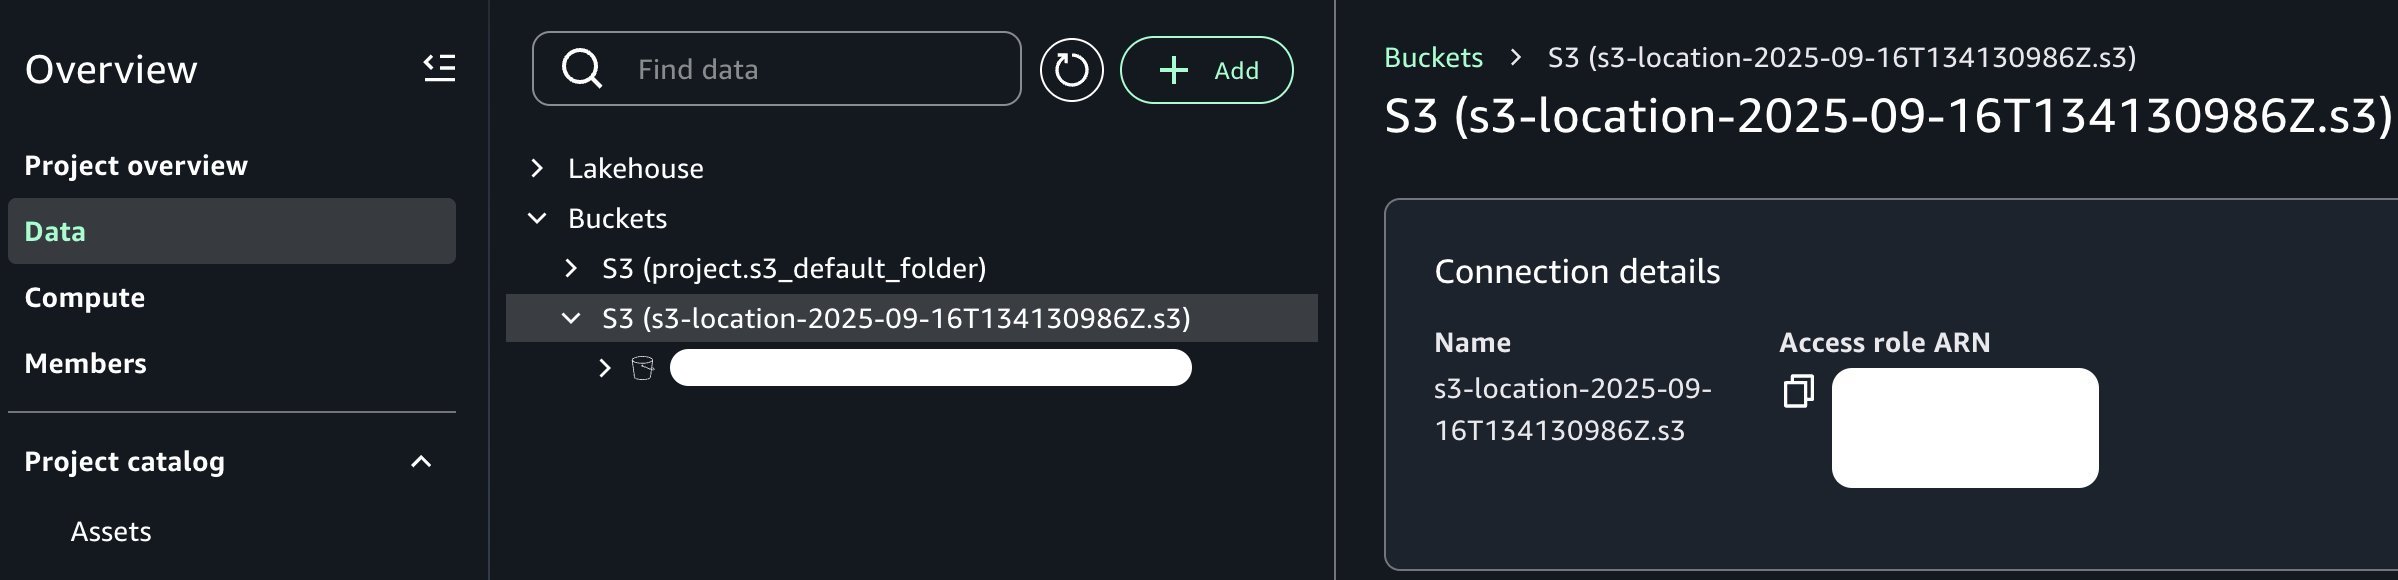
追加後、以下の画像に示す通り、プロジェクトカタログに新しい Amazon S3 バケットが表示されるようになりました。
データプロデューサーの視点から見ると、データセットはすでにプロジェクトコンテキスト内で利用可能になっています。組織や要件によっては、このデータ資産をさらに充実させる必要があるかもしれません。例えば、追加のデータソースと結合したり、ビジネス固有の変換を適用したり、データ品質チェックを実装したり、特徴量エンジニアリングパイプラインを通じて派生特徴量を作成したりすることが可能です。しかし、本稿の目的上、Amazon S3 の汎用バケットと Amazon SageMaker Unified Studio(以下、SageMaker Unified Studio)との統合という核心ポイントに焦点を当てるため、データセットは現在の形式のまま使用します。
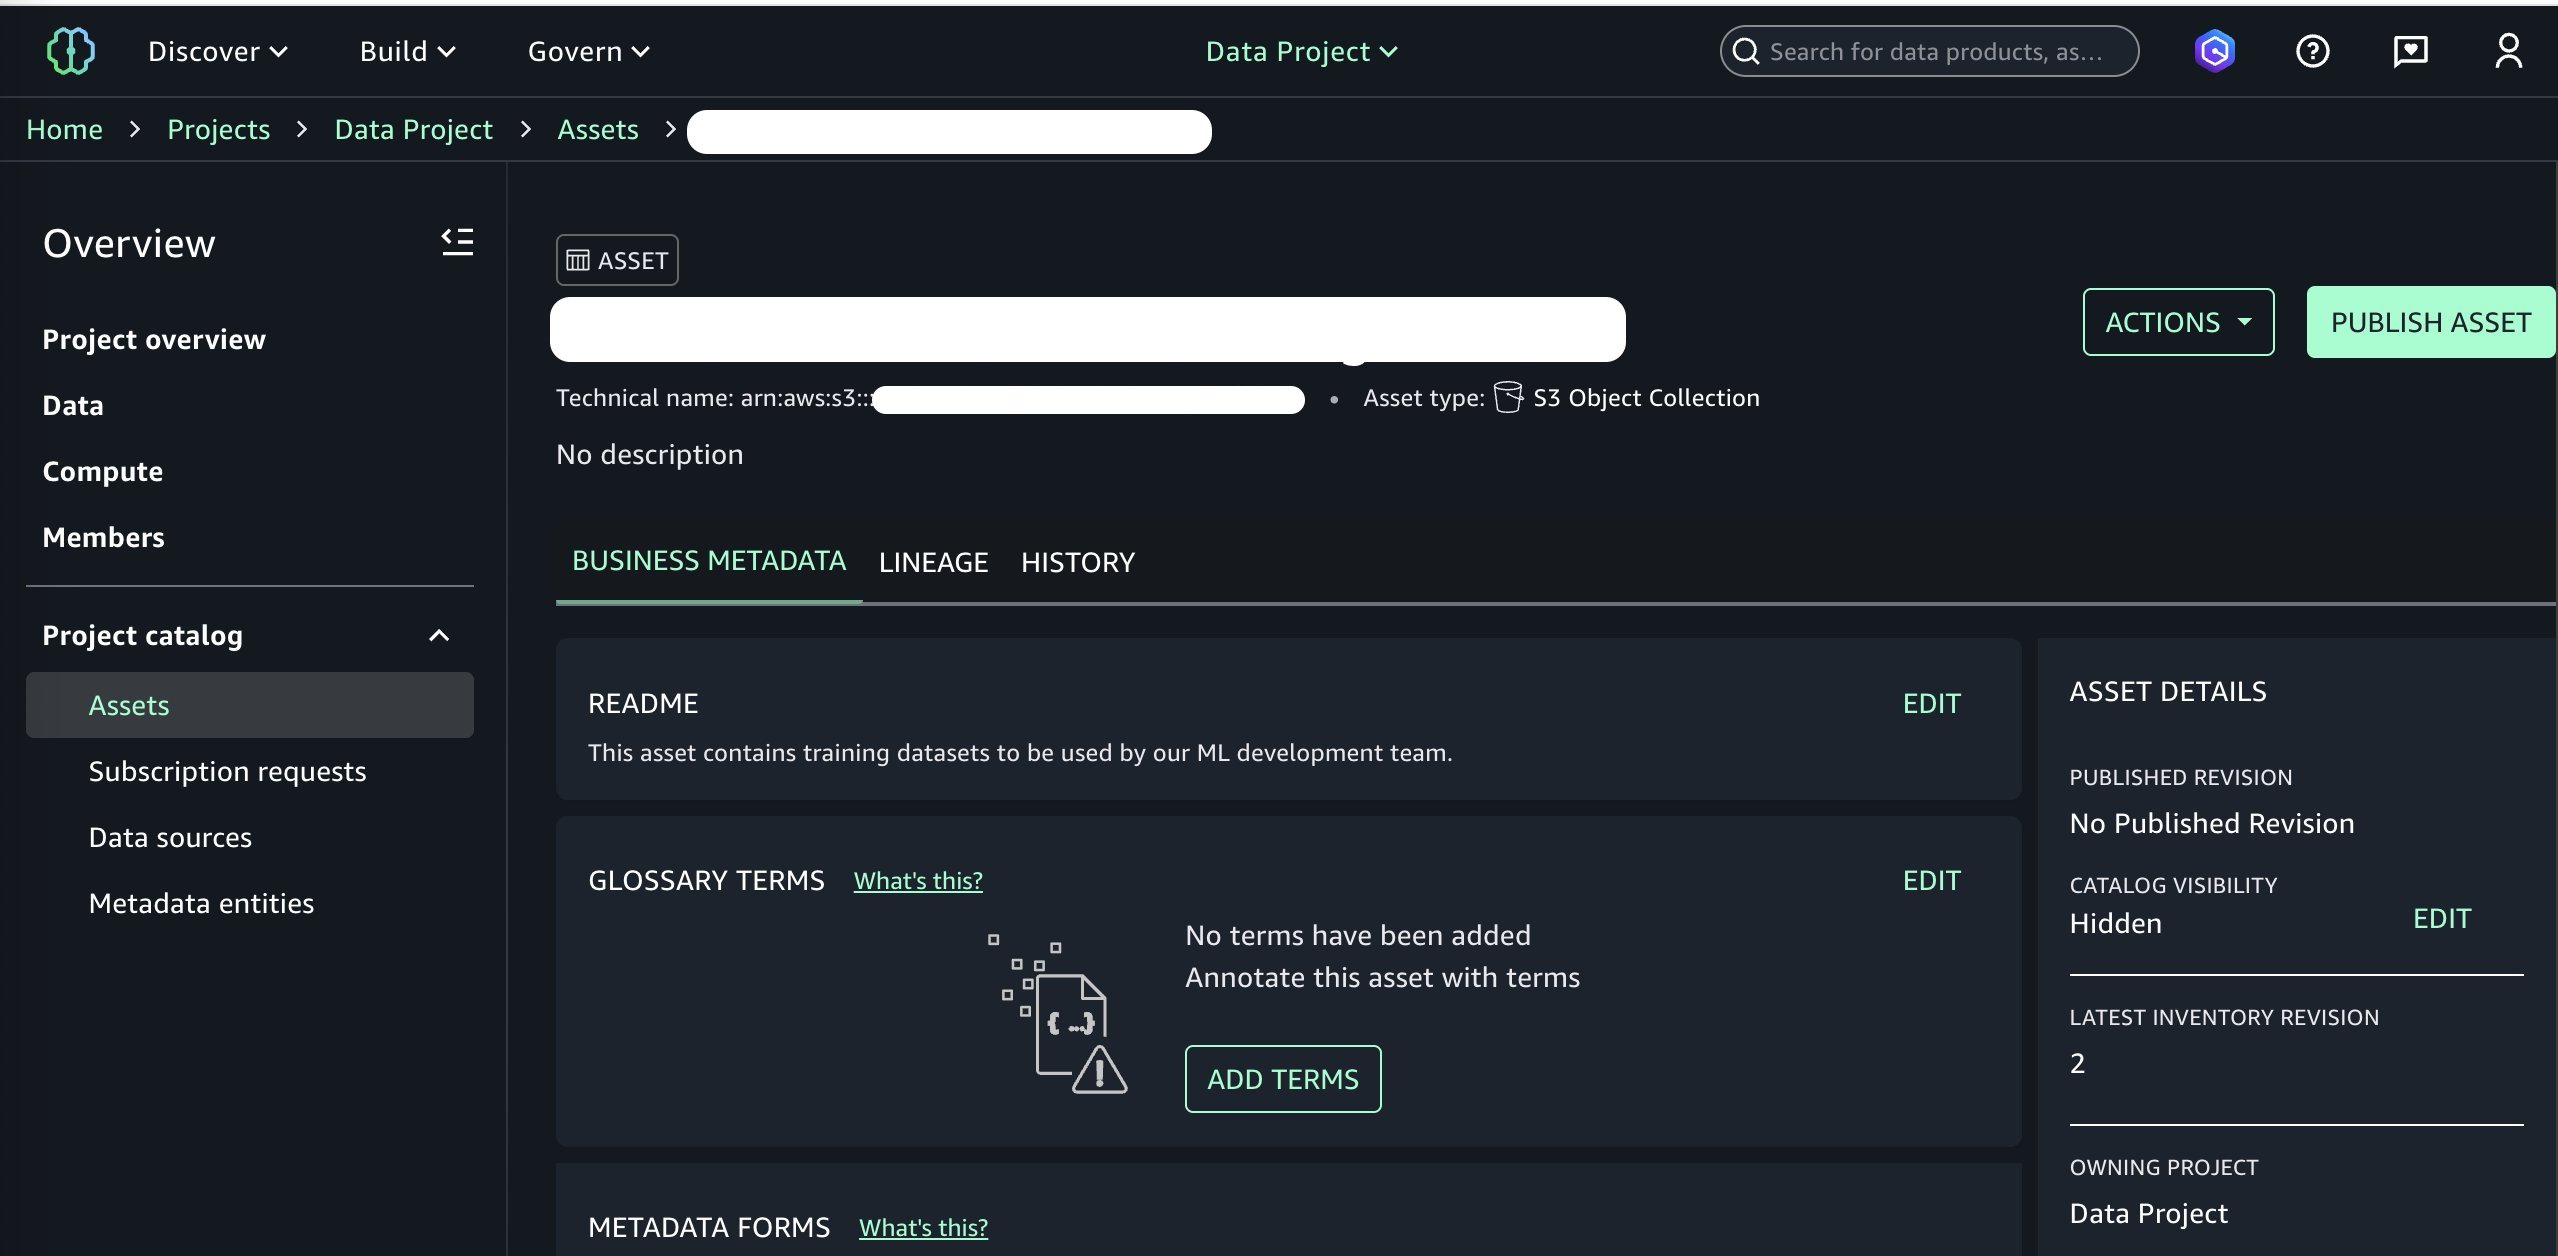
これで、このバケットを SageMaker Catalog に公開する準備が整いました。README ファイル、用語集の用語、その他のデータタイプなどの オプションのビジネスメタデータ を追加できます(注:SageMaker Unified Studio のユーザーガイドでは「create-metadata-form」として記載されています)。ここでは簡潔にするため、シンプルな README だけを追加し、他のメタデータフィールドはスキップします。その後、「Actions」メニューから Publish to Catalog(カタログへの公開)を選択して公開処理を続行します。
至此、データアセットを SageMaker Catalog に追加し、ドメイン内の他のプロジェクトから利用可能な状態になりました。次に、データ利用者ペルソンの視点に切り替え、利用者プロジェクトを選択すると、新しく公開されたデータアセットを購読できるようになります。詳細については、Amazon SageMaker Unified Studio でのデータプロダクトの購読をご参照ください。
これで、機械学習(ML)モデルを構築する利用者プロジェクト内でデータアセットの購読が完了しました。これにより、Amazon SageMaker Unified Studio 内の管理された JupyterLab IDE でデータの利用を開始できます。Amazon SageMaker Unified Studio の JupyterLab ページは、プロジェクト内でのデータ統合、分析、または機械学習の実行時に使用できる、JupyterLab インタラクティブ開発環境(IDE)を提供します。
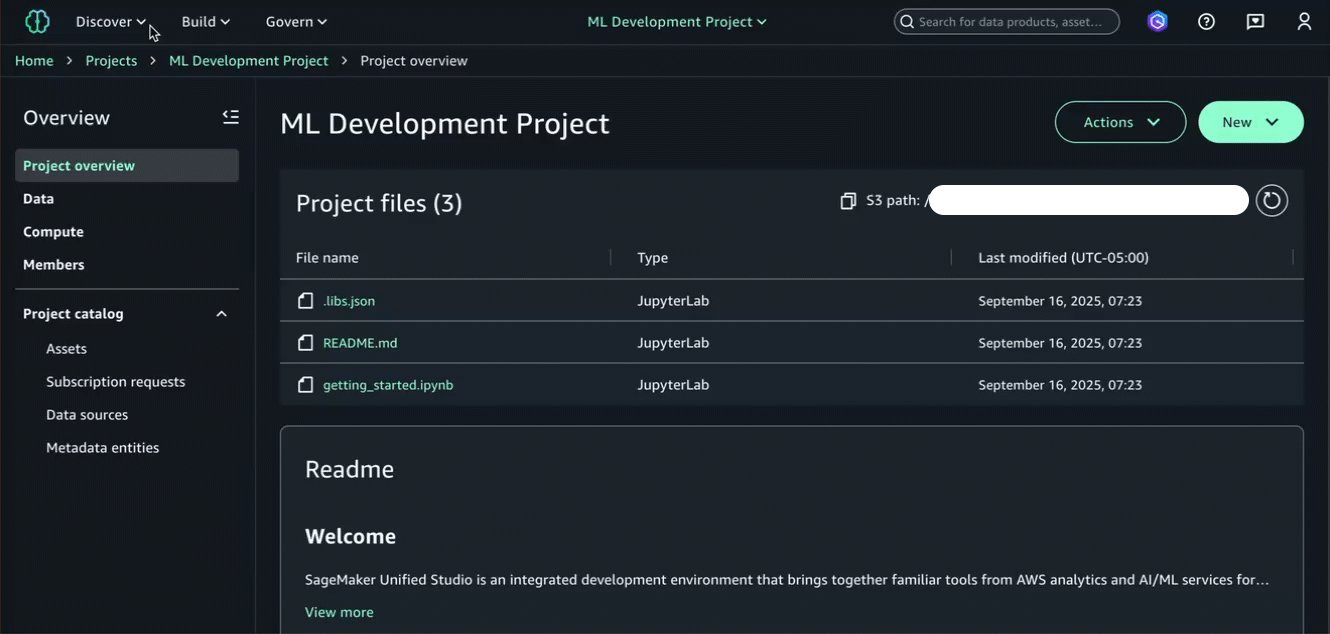
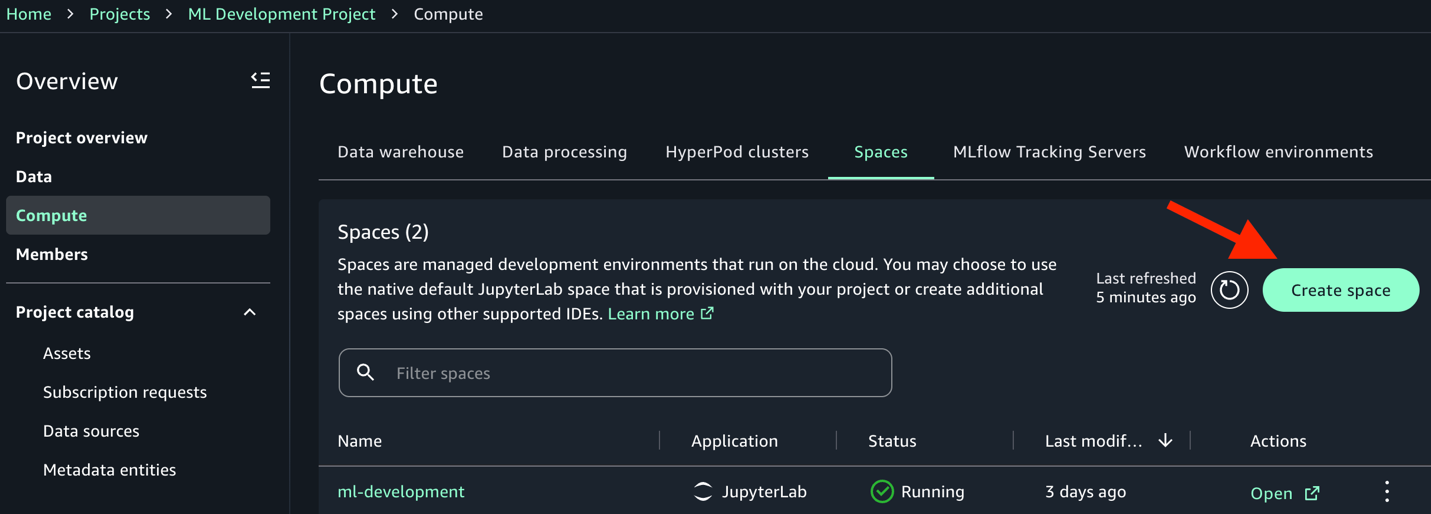
ML 開発プロジェクトでは、Compute → Spaces → Create space オプションに移動し、Application (スペースタイプ) メニューで JupyterLab を選択して、新しい JupyterLab IDE を起動してください。
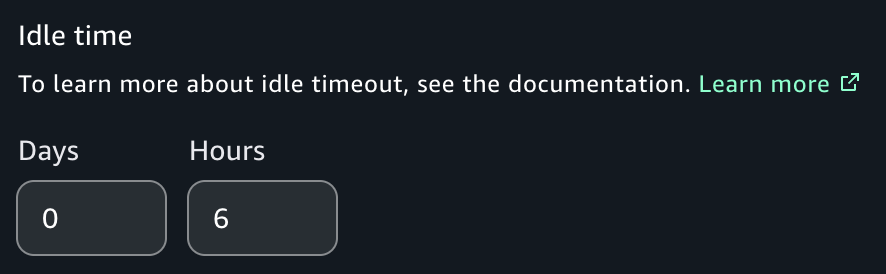
例のノートブックにある一部のモデルは、ml.p4de.24xlarge インスタンスタイプを使用してトレーニングすると 4 時間以上かかる場合があります。そのため、エラーを回避し、ノートブックが完了するまで実行できるようにするために、アイドル時間を 6 時間に設定することを推奨します。また、初めてノートブックを最初から最後まで実行する場合は、データセットを微調整プロセス中に完全に取り込むことができるように、スペースのストレージを 100 GB に設定してください。詳細は *新しいスペースの作成* をご覧ください。
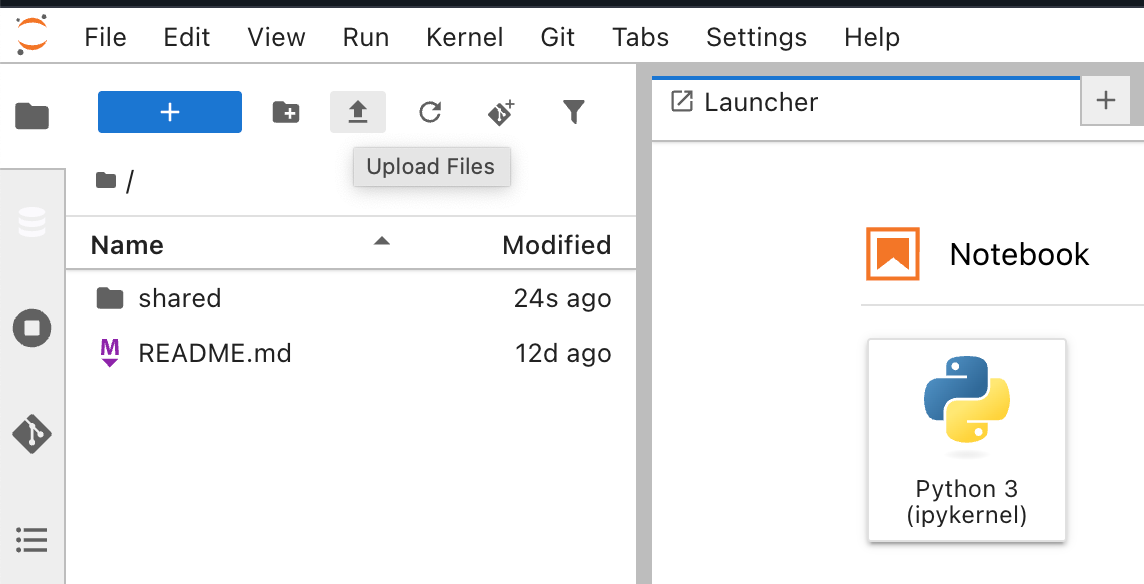
スペースが作成され、実行されている状態になったら、開くボタンを選択して JupyterLab IDE を起動します。読み込み後、ファイルのアップロード機能を使用して、サンプルの Jupyter ノートブックをスペースにアップロードします。
これで ML 開発プロジェクトで公開されたデータセットを購読したので、モデル開発ワークフローを開始できます。これには、Amazon S3 アクセスグラントを使用してバケットからデータセットを取得し、微調整用に準備し、モデルをトレーニングするという 3 つの主要なステップが含まれます。
受給者は、AWS コマンドラインインターフェース(AWS CLI)、AWS SDK、および Amazon S3 REST API を使用して Amazon S3 データにアクセスできます。さらに、Amazon S3 Access Grants を呼び出すために、AWS の Python および Java プラグインを使用することも可能です。簡潔さのため、ノートブックおよび以下のコードでは AWS CLI 方式を採用します。また、参考のためにノートブックの付録セクションに、Python の boto3-s3-access-grants-plugin を使用したサンプルも記載しています。
このプロセスには 2 つのステップが含まれます:まず s3control CLI モジュールを通じて Amazon S3 コントロールプレーンへの一時的なアクセス認証情報を取得し、次にその認証情報を使用してデータをローカルに同期します。データセットを格納している適切なアカウント ID に合わせて、AWS_ACCOUNT_ID 変数を更新してください。
import json
AWS_ACCOUNT_ID = "123456789" # REPLACE THIS WITH YOUR ACCOUNT ID
S3_BUCKET_NAME = "s3://MY_BUCKET_NAME/" # REPLACE THIS WITH YOUR BUCKET
Get credentials
result = !aws s3control get-data-access --account-id {AWS_ACCOUNT_ID} --target {S3_BUCKET_NAME} --permission READ
json_response = json.loads(result.s)
creds = json_response['Credentials']
セルマジックを使用してプロファイルを構成する
!aws configure set aws_access_key_id {creds['AccessKeyId']} --profile access-grants-consumer-access-profile
!aws configure set aws_secret_access_key {creds['SecretAccessKey']} --profile access-grants-consumer-access-profile
!aws configure set aws_session_token {creds['SessionToken']} --profile access-grants-consumer-access-profile
print("Profile configured successfully!")
!aws s3 sync {S3_BUCKET_NAME} ./ --profile access-grants-consumer-access-profile
上記のコードを実行して成功した出力が得られた後、ローカル環境で S3 バケットにアクセスできるようになります。生のデータセットがローカルで利用可能になったことで、LLM(大規模言語モデル)をファインチューニングするために必要な形式に変換する必要があります。データセットサイズがモデルのパフォーマンスにどのように影響するかを評価するため、異なるサイズの 3 つのデータセット(1,000 枚、5,000 枚、10,000 枚の画像)を作成します。
各トレーニングデータセットには、train ディレクトリと validation ディレクトリが含まれており、それぞれに images サブディレクトリと、トレーニング例を含む metadata.jsonl ファイルを併せて含める必要があります。メタデータファイルの形式は、1 行あたり 3 つのキー/バリューフィールドを含みます:
{"file_name": "images/img_0.jpg", "prompt": "what is the date mentioned in this letter?", "completion": "1/8/93"}
{"file_name": "images/img_1.jpg", "prompt": "what is the contact person name mentioned in letter?", "completion": "P. Carter"}
これらのアーティファクトをAmazon S3にアップロードした後、SageMaker JumpStartを使用して事前学習済みLlama 3.2 11B Vision Instructモデル(英語:pre-trained Llama 3.2 11B Vision Instruct model)にアクセスし、LLMのファインチューニングを行うことができます。評価のために3つの別々のファインチューンされたバリエーションを作成します。異なるデータセットサイズに対して再利用可能にするため、パラメータ化アプローチを用いてtrain()関数を作成しました:
def train(name, instance_type, training_data_path, experiment_name, run):
...
estimator = JumpStartEstimator(
model_id=model_id, model_version=model_version,
environment={"accept_eula": "true"}, # Must accept as true
disable_o
原文を表示
Last year, AWS announced an integration between Amazon SageMaker Unified Studio and Amazon S3 general purpose buckets. This integration makes it straightforward for teams to use unstructured data stored in Amazon Simple Storage Service (Amazon S3) for machine learning (ML) and data analytics use cases.
In this post, we show how to integrate S3 general purpose buckets with Amazon SageMaker Catalog to fine-tune Llama 3.2 11B Vision Instruct for visual question answering (VQA) using Amazon SageMaker Unified Studio. For this task, we provide our large language model (LLM) with an input image and question and receive an answer. For example, asking to identify the transaction date from an itemized receipt:
For this demonstration, we use Amazon SageMaker JumpStart to access the Llama 3.2 11B Vision Instruct model. Out of the box, this base model achieves an Average Normalized Levenshtein Similarity (ANLS) score of 85.3% on the DocVQA dataset. ANLS is a metric used to evaluate the performance of models on visual question answering tasks, which measures the similarity between the model’s predicted answer and the ground truth answer. While 85.3% demonstrates strong baseline performance, this level might not be the most efficient for tasks requiring a higher degree of accuracy and precision.
To improve model performance through fine-tuning, we’ll use the DocVQA dataset from Hugging Face. This dataset contains 39,500 rows of training data, each with an input image, a question, and a corresponding expected answer. We’ll create three fine-tuned model versions using varying dataset sizes (1,000, 5,000, and 10,000 images). We’ll then evaluate them using Amazon SageMaker fully managed serverless MLflow to track experimentation and measure accuracy improvements.
The full end-to-end data ingestion, model development, and metric evaluation process will be orchestrated using Amazon SageMaker Unified Studio. Here is the high-level process flow diagram that we’ll step through for this scenario. We’ll expand on this throughout the blog post.
To achieve this process flow, we build an architecture that performs the data ingestion, data preprocessing, model training, and evaluation using Amazon SageMaker Unified Studio. We break out each step in the following sections.
The Jupyter notebook used and referenced throughout this exercise can be found in this GitHub repository.
Prerequisites
To prepare your organization to use the new integration between Amazon SageMaker Unified Studio and Amazon S3 general purpose buckets, you must complete the following prerequisites. Note that these steps take place on an Identity Center-based domain.
- Create an AWS account.
- Create an Amazon SageMaker Unified Studio domain using quick setup.
- Create two projects within the SageMaker Unified Studio domain to model the scenario in this post: one for the data producer persona and one for the data consumer persona. The first project is used for discovering and cataloging the dataset in an Amazon S3 bucket. The second project consumes the dataset to fine-tune three iterations of our large language model. See Create a project for additional information.
- Your data consumer project must have access to a running SageMaker managed MLflow serverless application, which will be used for experimentation and evaluation purposes. For more information, see the instructions for creating a serverless MLflow application.
- An Amazon S3 bucket should be pre-populated with the raw dataset to be used for your ML development use case. In this blog post, we use the DocVQA dataset from Hugging Face for fine-tuning a visual question answering (VQA) use case.
- A service quota increase request to use p4de.24xlarge compute for training jobs. See Requesting a quota increase for more information.
Architecture
The following is the reference architecture that we build throughout this post:
We can break the architecture diagram into a series of six high-level steps, which we’ll observe throughout the following sections:
- First, you create and configure an IAM access role that grants read permissions to a pre-existing Amazon S3 bucket containing the raw and unprocessed DocVQA dataset.
- The data producer project uses the access role to discover and add the dataset to the project catalog.
- The data producer project enriches the dataset with optional metadata and publishes it to the SageMaker Catalog.
- The data consumer project subscribes to the published dataset, making it available to the project team responsible for developing (or fine-tuning) the machine learning models.
- The data consumer project preprocesses the data and transforms it into three training datasets of varying sizes (1k, 5k, and 10k images). Each dataset is used to fine-tune our base large language model.
- We use MLflow for tracking experimentation and evaluation results of the three models against our Average Normalized Levenshtein Similarity (ANLS) success metric.
Solution walkthrough
As mentioned previously, we will opt to use the DocVQA dataset from Hugging Face for a visual question answering task. In your organization’s scenario, this raw dataset might be any unstructured data relevant to your ML use case. Examples include customer support chat logs, internal documents, product reviews, legal contracts, research papers, social media posts, email archives, sensor data, and financial transaction records.
In the prerequisite section of our Jupyter notebook, we pre-populate our Amazon S3 bucket using the Datasets API from Hugging Face:
import os
from datasets import load_dataset

# Create data directory
os.makedirs("data", exist_ok=True)

# Load and save train split (first 10,000 rows)
train_data = load_dataset("HuggingFaceM4/DocumentVQA", split="train[:10000]", cache_dir="./data")
train_data.save_to_disk("data/train")

# Load and save validation split (first 100 rows)
val_data = load_dataset("HuggingFaceM4/DocumentVQA", split="validation[:100]", cache_dir="./data")
val_data.save_to_disk("data/validation")
After retrieving the dataset, we complete the prerequisite by synchronizing it to an Amazon S3 bucket. This represents the bucket depicted in the bottom-right section of our architecture diagram shown previously.
At this point, we’re ready to begin working with our data in Amazon SageMaker Unified Studio, starting with our data producer project. A project in Amazon SageMaker Unified Studio is a boundary within a domain where you can collaborate with others on a business use case. To bring Amazon S3 data into your project, you must first add access to the data and then add the data to your project. In this post, we follow the approach of using an access role to facilitate this process. *See *Adding Amazon S3 data* for more information.*
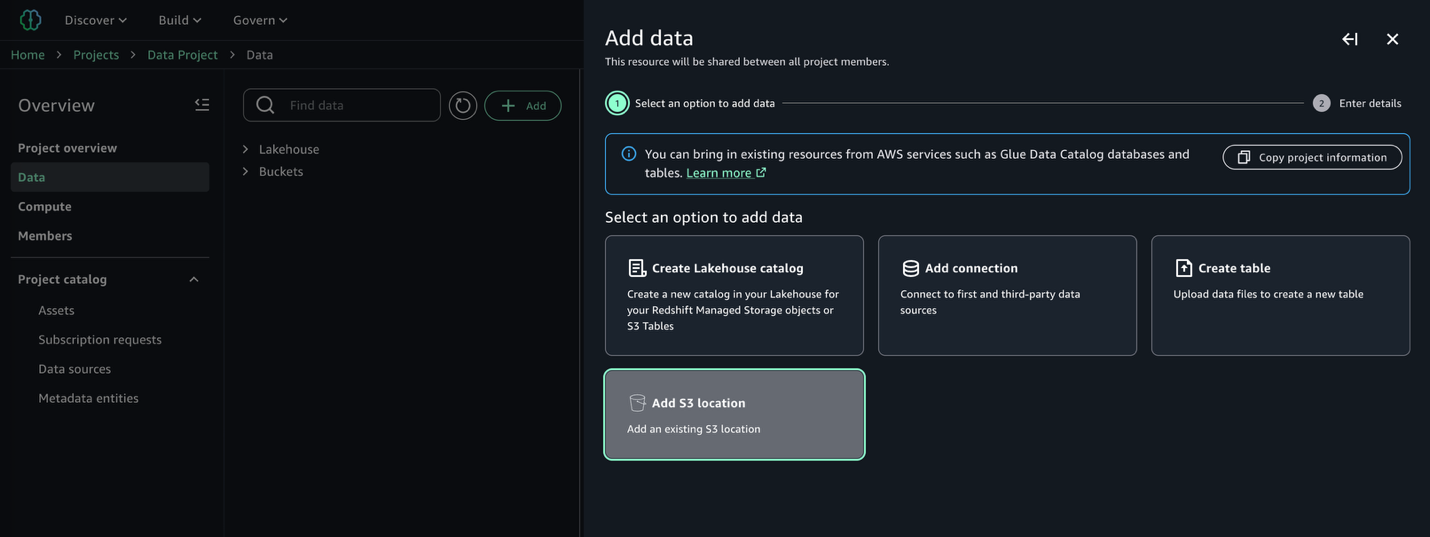
Once our access role is created following the instructions in the documentation referenced previously, we can continue with discovering and cataloging our dataset. In our data producer project, we navigate to the Data → Add data → Add S3 location:
Provide the name of the Amazon S3 bucket and corresponding prefix containing our raw data, and note the presence of the access role dropdown containing the prerequisite access role previously created:
Once added, note that we can now see our new Amazon S3 bucket in the project catalog as shown in the following image:
From the perspective of our data producer persona, the dataset is now available within our project context. Depending on your organization and requirements, you might want to further enrich this data asset. For example, you can join it with additional data sources, apply business-specific transformations, implement data quality checks, or create derived features through feature engineering pipelines. However, for the purposes of this post, we’ll work with the dataset in its current form to keep our focus on the core point of integrating Amazon S3 general purpose buckets with Amazon SageMaker Unified Studio.
We are now ready to publish this bucket to our SageMaker Catalog. We can add optional business metadata such as a README file, glossary terms, and other data types. We add a simple README, skip other metadata fields for brevity, and continue to publishing by choosing Publish to Catalog under the Actions menu.
At this point, we’ve added the data asset to our SageMaker Catalog and it is ready to be consumed by other projects in our domain. Switching over to the perspective of our data consumer persona and selecting the consumer project, we can now subscribe to our newly published data asset. See Subscribe to a data product in Amazon SageMaker Unified Studio for more information.
Now that we’ve subscribed to the data asset in our consumer project where we’ll build the ML model, we can begin using it within a managed JupyterLab IDE in Amazon SageMaker Unified Studio. The JupyterLab page of Amazon SageMaker Unified Studio provides a JupyterLab interactive development environment (IDE) for you to use as you perform data integration, analytics, or machine learning in your projects.
In our ML development project, navigate to the Compute → Spaces → Create space option, and choose JupyterLab in the Application (space type) menu to launch a new JupyterLab IDE.
Note that some models in our example notebook can take upwards of 4 hours to train using the ml.p4de.24xlarge instance type. As a result, we recommend that you set the Idle Time to 6 hours to allow the notebook to run to completion and avoid errors. Additionally, if executing the notebook from end to end for the first time, set the space storage to 100 GB to allow for the dataset to be fully ingested during the fine-tuning process. *See *Creating a new space* for more information.*
With our space created and running, we choose the Open button to launch the JupyterLab IDE. Once loaded, we upload the sample Jupyter notebook into our space using the Upload Files functionality.
Now that we’ve subscribed to the published dataset in our ML development project, we can begin the model development workflow. This involves three key steps: fetching the dataset from our bucket using Amazon S3 Access Grants, preparing it for fine-tuning, and training our models.
Grantees can access Amazon S3 data by using the AWS Command Line Interface (AWS CLI), the AWS SDKs, and the Amazon S3 REST API. Additionally, you can use the AWS Python and Java plugins to call Amazon S3 Access Grants. For brevity, we opt for the AWS CLI approach in the notebook and the following code. We also include a sample that shows the use of the Python boto3-s3-access-grants-plugin in the appendix section of the notebook for reference.
The process includes two steps: first obtaining temporary access credentials to the Amazon S3 control plane through the s3control CLI module, then using those credentials to sync the data locally. Update the AWS_ACCOUNT_ID variable with the appropriate account ID that houses your dataset.
import json

AWS_ACCOUNT_ID = "123456789" # REPLACE THIS WITH YOUR ACCOUNT ID
S3_BUCKET_NAME = "s3://MY_BUCKET_NAME/" # REPLACE THIS WITH YOUR BUCKET

# Get credentials
result = !aws s3control get-data-access --account-id {AWS_ACCOUNT_ID} --target {S3_BUCKET_NAME} --permission READ

json_response = json.loads(result.s)
creds = json_response['Credentials']

# Configure profile with cell magic
!aws configure set aws_access_key_id {creds['AccessKeyId']} --profile access-grants-consumer-access-profile
!aws configure set aws_secret_access_key {creds['SecretAccessKey']} --profile access-grants-consumer-access-profile
!aws configure set aws_session_token {creds['SessionToken']} --profile access-grants-consumer-access-profile

print("Profile configured successfully!")

!aws s3 sync {S3_BUCKET_NAME} ./ --profile access-grants-consumer-access-profile
After running the previous code and getting a successful output, we can now access the S3 bucket locally. With our raw dataset now accessible locally, we need to transform it into the format required for fine-tuning our LLM. We’ll create three datasets of varying sizes (1k, 5k, and 10k images) to evaluate how the dataset size impacts model performance.
Each training dataset contains a train and validation directory, each of which must contain an images subdirectory and accompanying metadata.jsonl file with training examples. The metadata file format includes three key/value fields per line:
{"file_name": "images/img_0.jpg", "prompt": "what is the date mentioned in this letter?", "completion": "1/8/93"}
{"file_name": "images/img_1.jpg", "prompt": "what is the contact person name mentioned in letter?", "completion": "P. Carter"}
With these artifacts uploaded to Amazon S3, we can now fine-tune our LLM by using SageMaker JumpStart to access the pre-trained Llama 3.2 11B Vision Instruct model. We’ll create three separate fine-tuned variants to evaluate. We’ve created a train() function to facilitate this using a parameterized approach, making this reusable for different dataset sizes:
def train(name, instance_type, training_data_path, experiment_name, run):
...
estimator = JumpStartEstimator(
model_id=model_id, model_version=model_version,
environment={"accept_eula": "true"}, # Must accept as true
disable_o
関連記事
今日のまとめ
AI日報で今日の重要ニュースをまとめ読み