AWS、AgentCore エージェントとローカル MCP ツールの連携橋渡し手法を公開
本文の状態
日本語全文を表示中
詳細モードで約17分の本文を読めます。
同じ出来事の情報源
この情報源を基点に整理
AWS Machine Learning Blog
Anthropicが2024年11月に導入したMCP標準を用い、クラウドのAIエージェントとローカルのツールを接続する仕組みの実装方法をAWSが公開した。
AI深層分析を開く2026年8月6日 03:45
AI深層分析
キーポイント
MCP プロトコルのアーキテクチャ課題の解決
Anthropic が導入した MCP は標準的なクライアント・サーバー構造を持つが、リモートクライアントとローカルサーバー間の接続には欠落があった。AWS はこのギャップを WebSocket とネイティブメッセージングによるトンネリングで解消する実装を提供している。
金融分野における実用的なユースケース
財務管理者やアナリストは Excel やローカルファイルを頻繁に使用するが、中央集権型の AI エージェントからこれらのファイルにアクセスできない課題があった。本技術により、クラウド上のエージェントがブラウザのコンテキストとローカルファイルを同時に活用できるようになる。
AWS 内部での実証済み実績
同社によると、同様のアーキテクチャを基盤とした内部生産用 AI アシスタントはローンチから1年間で4万1000件以上の対話を実行しており、本ブログ記事ではその複雑さを簡略化した形で再現し公開している。
完全自己ホスト型の実装可能性
このパターンは AWS 上で完全に自己ホストされ、ユーザー独自のモデルとカスタムツールサーバーを備えた Claude Cowork のような製品でも機能しており、柔軟な導入を可能にする。
4 つの主要コンポーネントによるアーキテクチャ
AgentCore runtime はクラウドでエージェントをホストし、ブラウザ拡張機能は双方向リレーとして動作する。MCP Bridge と MCP サーバーはユーザーのローカル環境に配置され、ネイティブメッセージングとstdioトランスポートを通じて連携する。
重要な引用
The MCP protocol supports two transport mechanisms: stdio (standard I/O for communication between local processes on the same machine) and streamable HTTP transport (HTTP-based communication between remote servers and clients). A missing piece is when the MCP server exists locally and the MCP client is remote.
We bridge the gap between the remote MCP client and the local MCP server by tunneling MCP messages over WebSocket and native messaging.
The browser extension and MCP Bridge act as relays that wrap and unwrap JSON messages from the AgentCore runtime and JSON-RPC messages from the MCP server
When the Strands agent needs to call a tool, it sends an MCP JSON-RPC request wrapped in a JSON envelope back through the WebSocket to the extension.
編集コメントを表示
編集コメント
クラウドとローカルの境界を越えた AI エージェントの実装は、実務におけるデータプライバシーと利便性の両立において重要なステップとなる。特に金融や法務など機密データを扱う分野での活用が期待される技術的基盤である。
Source Article
元記事を日本語で読む
本文に関係しない購読案内、埋め込み通知、サイト内プロモーションは除いています。
エージェントはクラウド上で動作しますが、ユーザーのスプレッドシートは彼らのノートパソコン上にあります。このギャップをどう埋めるか?
Model Context Protocol (MCP) は、2024 年 11 月に Anthropic が導入したオープンソース規格で、AI モデルが外部データやツールに接続する方法を標準化するためのものです。MCP はクライアント・サーバーアーキテクチャを採用しており、Amazon Quick や Claude Code といった AI アプリケーションである MCP ホストが、1 つ以上の MCP サーバーと接続を確立します。このプロトコルは 2 つの転送メカニズムをサポートしています。1 つ目は stdio で、これは同一マシン上のローカルプロセス間の通信に標準入出力を使用するものです。2 つ目はストリーミング可能な HTTP トランスポートで、リモートサーバーとクライアント間の HTTP ベースの通信を指します。しかし、MCP サーバーがローカルに存在し、MCP クライアントが遠隔地にあるというケースでは、この仕組みが機能しないという課題がありました。
このパターンは、主に Excel とローカルファイルで作業する財務マネージャーやアナリストにとって重要です。彼らは中央集権的に展開された AI エージェントを使ってこれらのファイルを操作できながら、ブラウザから文脈も引き出すことができます。これは、Claude Cowork のような製品が支えるパターンと同じです。クラウド上のエージェントが MCP を通じてローカルツールを呼び出しますが、AWS 上で完全にセルフホストされ、独自のモデルとカスタムツールサーバーを備えています。社内部署では、財務向けの生産グレードの AI アシスタントを開発し、ローンチから 1 年以内に 41,000 件以上の会話を実現しました。
この記事では、私たちが内部で構築した仕組みを簡略化して再現します。Amazon Bedrock AgentCore にデプロイされたエージェントは、ユーザーのローカルマシン上で動作する MCP サーバーを利用します。リモートの MCP クライアントとローカルの MCP サーバーをつなぐために、WebSocket とネイティブメッセージングを介して MCP メッセージをトンネリングしています。今後の生産環境向け強化策については「次のステップ」セクションで詳述します。
完全なソースコードは GitHub で公開されています。
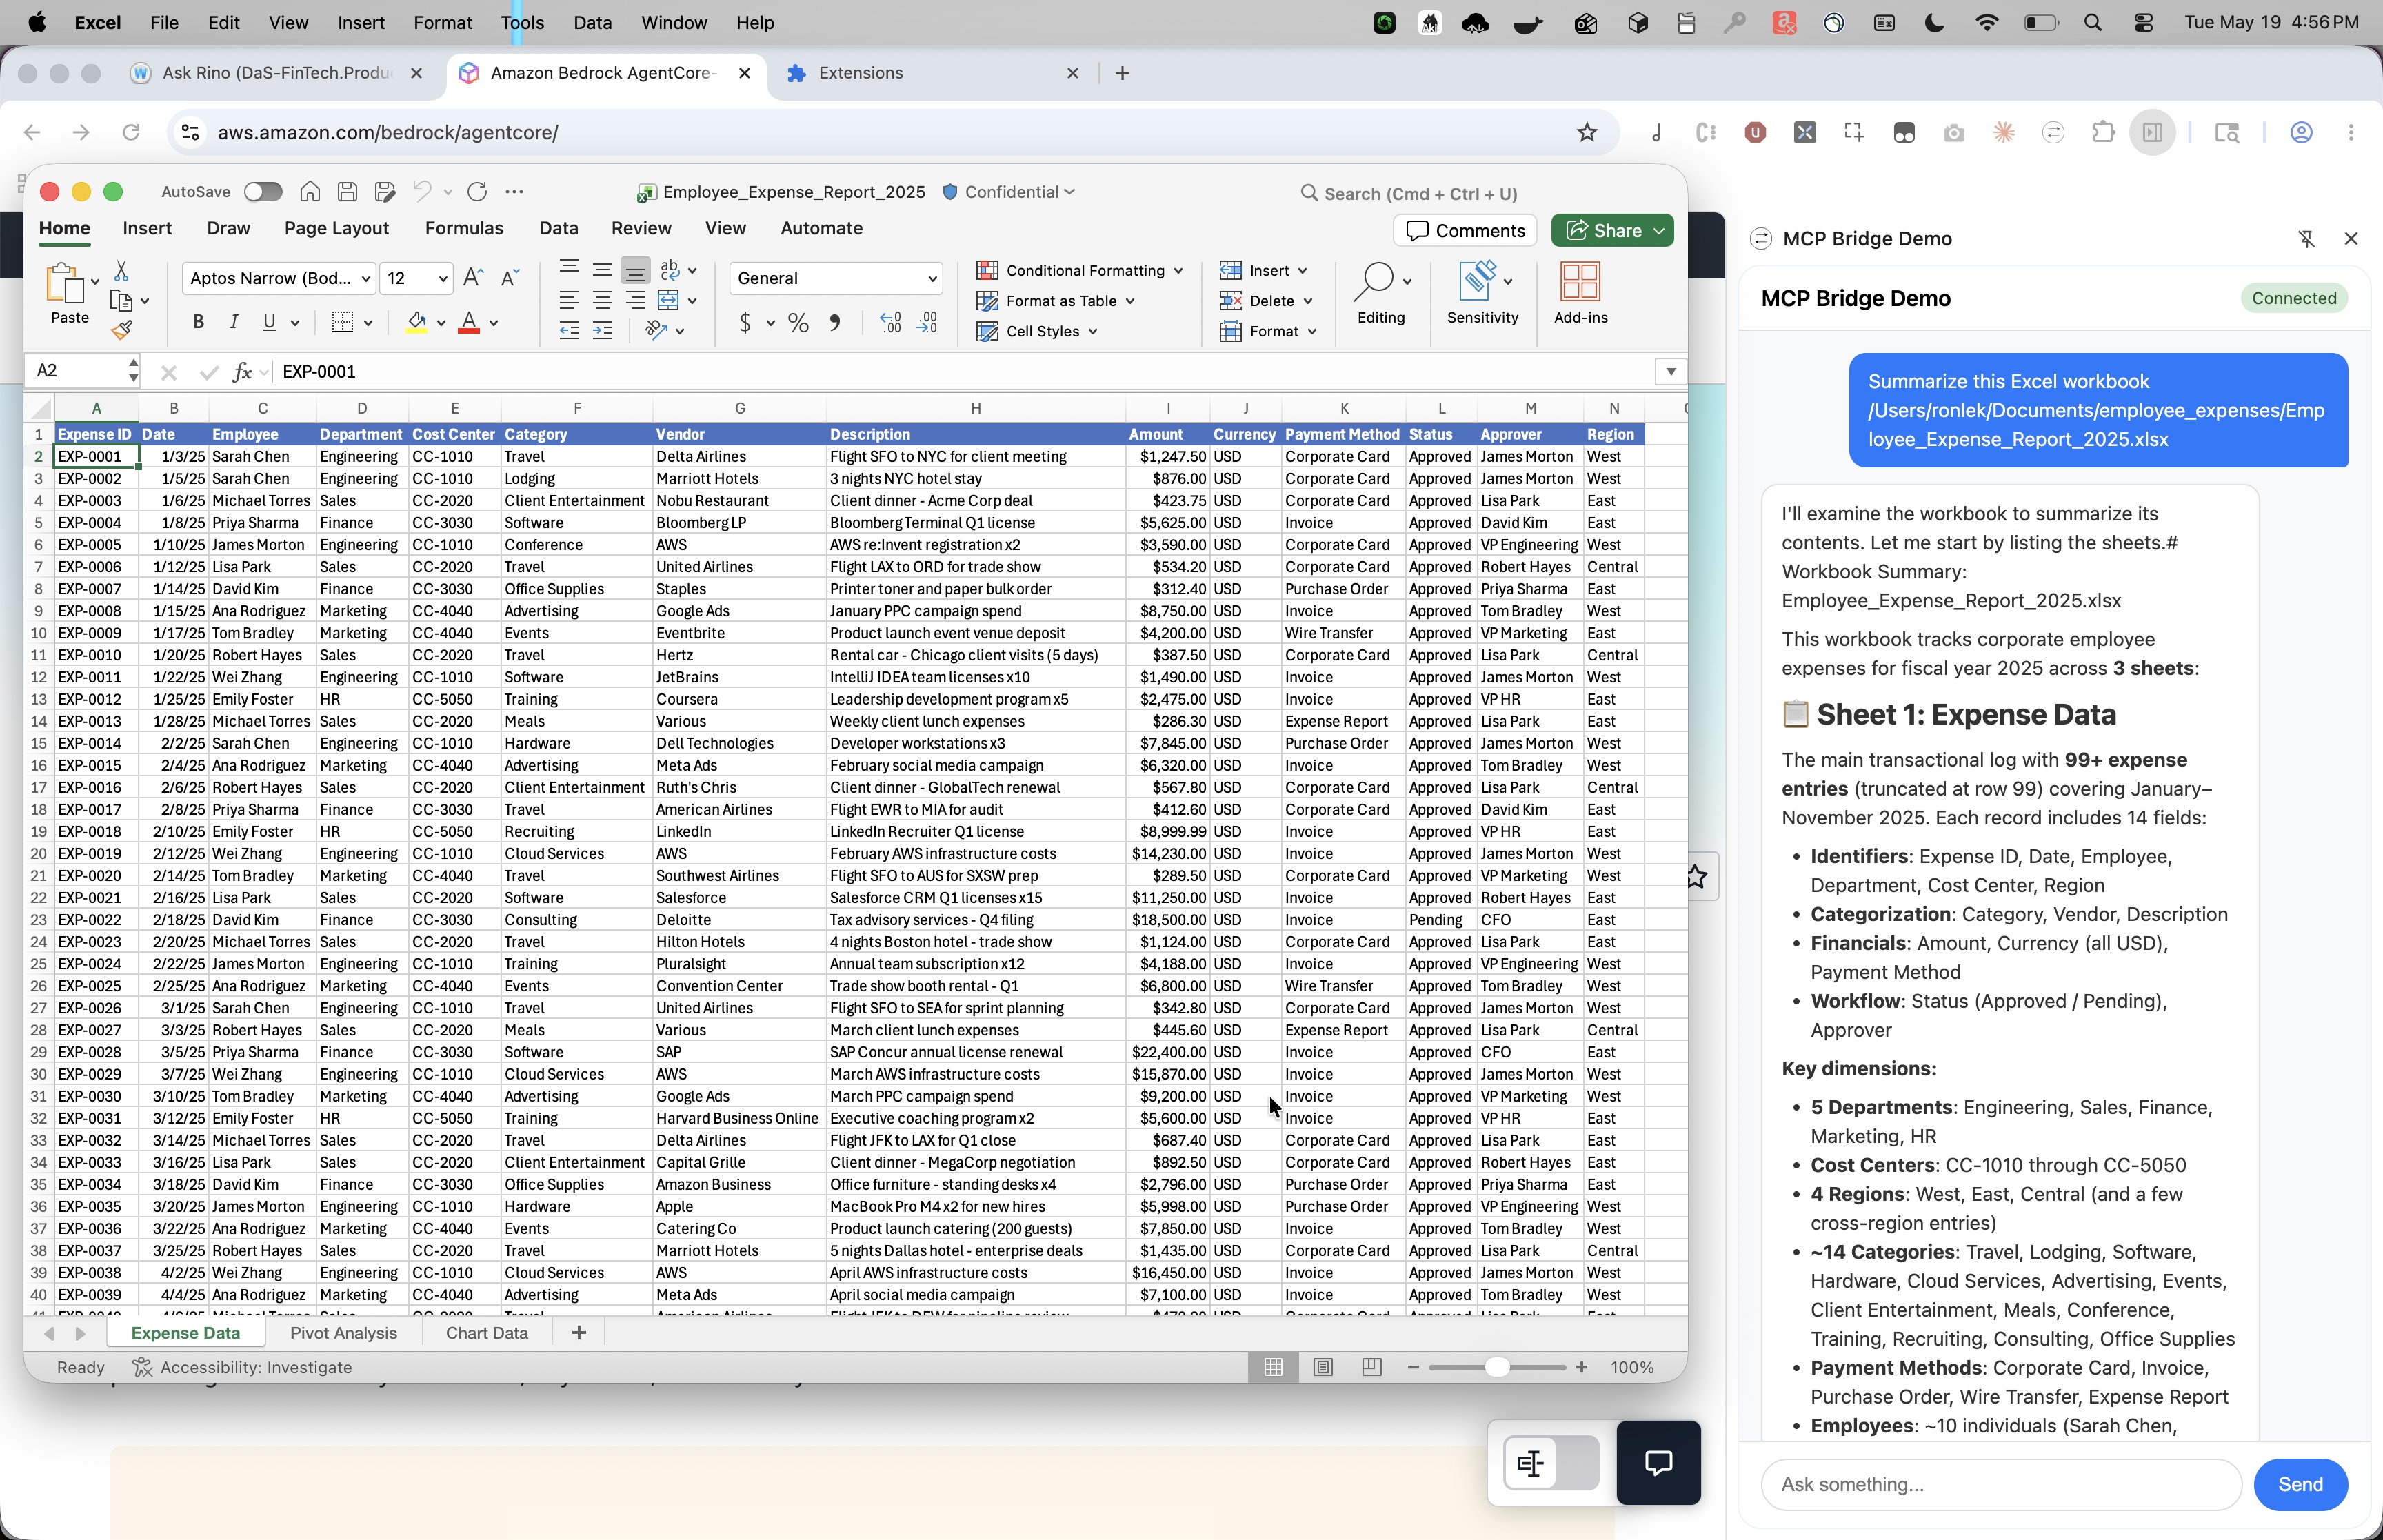
MCP Bridge Demo 拡張機能のサイドパネルで、ローカルの Excel ワークブックを要約しています。クラウドホスト型エージェントは MCP ブリッジを通じてユーザーのマシンから直接ファイルを読み込み、構造化されたサマリーをストリーミングしてサイドパネルに返します。
アーキテクチャ概要
AgentCore ランタイム(Amazon Bedrock AgentCore の機能)を中核としたアーキテクチャには、以下の 4 つのコンポーネントがあります。
- AgentCore ランタイム: クラウド上で Strands エージェント をホストします。エージェントは MCP クライアントとして振る舞い、ツールの検出や呼び出しリクエストを発行します。
- ブラウザ拡張機能: チャットインターフェースを提供し、双方向のリレーヤーとして機能します。AgentCore ランタイム(WebSocket 経由)と MCP Bridge(ネイティブメッセージング経由)の間で MCP メッセージを転送します。
- MCP Bridge: ユーザーのローカルマシン上で動作する FastMCP プロキシ です。ブラウザがネイティブメッセージングホスト登録を通じて起動し、ネイティブメッセージングエンベロープ形式と生の MCP JSON-RPC の間を変換します。
- MCP サーバー: ローカルで動作する標準的な MCP サーバーです。ブリッジと同じ場所に配置されているため、通信には stdio 転送プロトコルが使用されます。
以下の図は、エンドツーエンドのメッセージフローを示しています。ユーザーは拡張機能を通じてメッセージを送信し、署名付き WebSocket を介して AgentCore ランタイムに接続します。Strands エージェントがツールを呼び出す必要がある場合、MCP JSON-RPC リクエストを JSON エンベロープでラップして、WebSocket を経由して拡張機能へ返送します。拡張機能はメッセージをそのままネイティブメッセージングを通じてブリッジへ転送します。ブリッジはエンベロープからラッピングを解除し、JSON-RPC コンテンツを抽出した上で、stdio 経由で MCP サーバーへ転送します。レスポンスはこの逆の経路をたどります。ブリッジは変更されていない MCP サーバーのレスポンスを再度エンベロープに包み込み、拡張機能を経由して AgentCore ランタイムへ中継します。ここでエージェントがツールの結果を受け取り、生成処理を続行します。
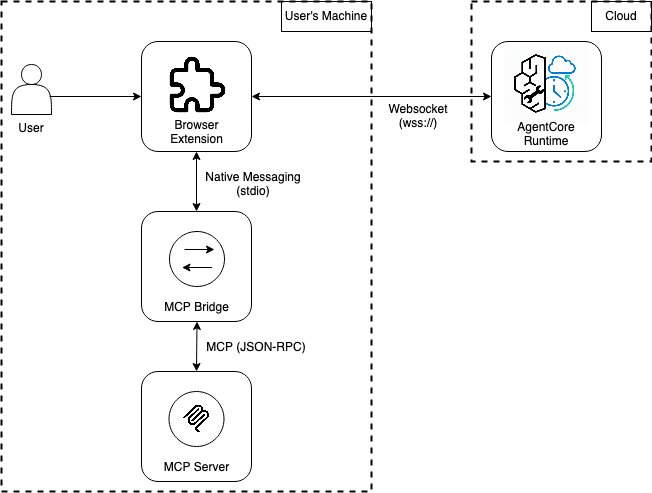
すべてのコンポーネントを示す高レベルのアーキテクチャ図。ブラウザ拡張機能と MCP ブリッジは、AgentCore ランタイムからの JSON メッセージをラップ・アンラップし、MCP サーバーからの JSON-RPC メッセージを処理する中継役として機能します。
以下の表では、エージェントから MCP サーバーへ至る単一のツール呼び出しが、各ホップで 1 つのラッピング層が剥がされていく様子を示しています。
| Hop | 送信元 → 受信元 | メッセージ |
|---|---|---|
| 1 | Agent -> Extension (WebSocket) | {“type”: “mcpbridge”, “content”: {“type”: “mcp”, “payload”: “”}, “session_id”: “session_123”} |
| 2 | Extension -> Bridge (Native Messaging) | {“type”: “mcp”, “payload”: “”} |
| 3 | Bridge → MCP Server (stdio) | {“jsonrpc”: “2.0”, “id”: 1, “method”: “tools/call”, “params”: {“name”: “read_sheet”, “arguments”: {“file_path”: “budget.xlsx”}}} |
AgentCore ランタイムにおける Strands エージェントの仕組み
WebSocket 接続: ブラウザ拡張機能は、署名付き WebSocket URL を介して AgentCore ランタイムに接続します。起動時、サイドパネルはバックグラウンドスクリプトを通じてネイティブブリッジへ署名リクエストを送信し、ネイティブブリッジはユーザーのローカル AWS 認証情報と bedrock-agentcore ソフトウェア開発キット (SDK) を使用して、デプロイされたランタイム ARN にスコープを限定した SigV4 署名付き wss:// URL(有効期限は 5 分)を生成します。その後、サイドパネルはこの URL に対して WebSocket 接続を開きます。認証情報はユーザーの端末から外部へ漏れることもなく、ブラウザ内に入ることもありません。
URL の有効期限切れやネットワークの切断により接続が切れた場合、サイドパネルは自動的に 2 秒後に新しいプレサイン済み URL を要求して再接続します。これにより、通常の使用中にユーザーには有効期限の経過を意識させることはありません。
MCP の初期化: ツールの発見に先立ち、エージェントは標準的な MCP 初期化ハンドシェイク を実行します。まずプロトコルバージョンを指定した initialize リクエストを送信し、サーバーからの機能応答を待ちます。その後、notifications/initialized 通知を送信して初期化プロセスを完了させます。
このハンドシェイクが完了して初めて、サーバーは tools/list や tools/call のリクエストを受け付けるようになります。
ツール発見: ユーザーからのメッセージごとに、エージェントは tools/list を呼び出してツールのスキーマ配列を受け取ります。その後、各スキーマを Strands AgentTool にラップし、その stream() メソッドがブリッジを通じて tools/call リクエストを送信します。MCP サーバーに追加されたツールは、エージェント側のコードを変更することなく、次のリクエストで自動的に利用可能になります。
リクエストとレスポンスの相関付け: エージェントからの各アウトバウンド JSON-RPC リクエストには一意の ID が割り当てられ、(session_id, jsonrpc_id) をキーとして asyncio.Future に登録されます。WebSocket 経由でレスポンスが戻ってくると、待機中の Future と照合されて解決されます。これにより、複数のツール呼び出しを曖昧さなく並行して実行できます。
ネイティブメッセージングはどのように動作するか
ネットワーク権限やメッセージごとのユーザー確認なしに、常駐するローカルプロセスと通信するには拡張機能が必要です。ネイティブメッセージングはまさにその役割を果たします。Chrome と Firefox の両方で、拡張機能のネイティブメッセージングがサポートされています。ブラウザは、起動するバイナリを指定するマニフェストファイルをユーザー端末の特定の場所で検索します。macOS 上の Chrome におけるネイティブメッセージング用マニフェストファイルは以下の通りです。
# Stored at ~/Library/Application\ Support/Google/Chrome/NativeMessagingHosts/com.example.mcp_bridge.json
{
  "name": "com.example.mcp_bridge",
  "description": "MCP Bridge - Routes MCP messages to local servers",
  "path": "/path/to/mcp-bridge-demo/bridge/run_bridge.sh",
  "type": "stdio",
  "allowed_origins": [
    "chrome-extension:///"
  ]
}
拡張機能の起動時に、バックグラウンドスクリプトが chrome.runtime.connectNative("com.example.mcp_bridge") を呼び出してローカルでネイティブアプリを起動します。マニフェストに記載されている run_bridge.sh スクリプトは Python 環境をアクティブ化し、ブリッジを開始します。
#!/bin/bash
cd "/path/to/mcp-bridge-demo/bridge"
source .venv/bin/activate
exec python3 bridge.py
ネイティブメッセージングホストプロセスは、接続が維持される間ずっと稼働し続けます。各メッセージは JSON としてシリアライズされ、UTF-8 でエンコードされた上で、リトルエンディアン形式の 32 ビットメッセージ長によって先頭に付与されます。ネイティブメッセージングホストからの単一メッセージの最大サイズは 1 MB です(ブラウザを誤動作する可能性のあるネイティブアプリケーションから保護するため)。ネイティブメッセージングホストへ送信されるメッセージの最大サイズは 64 MiB です。
MCP ブリッジの仕組み
MCP ブリッジは、2 つの世界間のプロトコル変換器として機能します。一方は Chrome のネイティブメッセージングプロトコル、他方は MCP 標準(stdio を介した JSON-RPC 2.0)です。入力パスでは、stdin から 4 バイトの長さヘッダーを削除し、JSON ボディを解析してエンベロープを展開することで、生の JSON-RPC メッセージを抽出します。出力パスではその逆を行い、JSON-RPC のレスポンスをエンベロープに包み込み、長さヘッダー付きで書き戻します。JSON-RPC コンテンツ自体はそのまま通過します。
内部では、このブリッジは FastMCP プロキシを介して接続された 2 つの並行ループで動作しています。メインループはブラウザからのメッセージを読み取り、それをアンラップして JSON-RPC コンテンツを入力キューに配置します。一度起動され、ブリッジの存続期間中も稼働し続ける FastMCP プロキシはこのキューからメッセージを引き抜き、MCP サーバーサブプロセスへ標準入力(stdin)経由で転送します。同時に、サーバーからの応答を標準出力(stdout)から受け取り、出力キューに配置します。
2 つ目のバックグラウンドループは出力キューから読み込み、各応答を再びエンベロープに包み込んでから、ブラウザが受信できるよう標準出力へ書き出します。この 2 ループ構成により、ブラウザのリクエストタイミングと MCP サーバーの処理速度が切り離されるため、遅いツールの完了を待って次のリクエストを受け付けるまでブリッジがブロックされることはありません。
MCP サーバー自体は、起動時にブリッジによって子プロセスとして生成されたもので、mcp.json ファイルを通じて設定されます。このサーバーはブリックの存続期間中稼働し続け、1 回ごとのリクエストでプロセスを立ち上げるオーバーヘッドはありません。新しい MCP サーバーを追加する際も、設定ファイルへの 1 行の変更だけで済み、配管処理(plumbing)はすべてブリッジが担当します。
# mcp.json
{
  "mcpServers": {
    "excel": {
      "command": "python3",
      "args": ["excel_server.py"]
    }
  }
}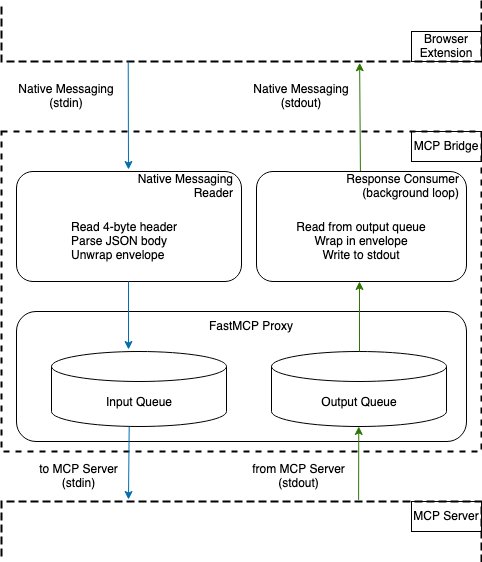
MCP ブリッジの内部アーキテクチャ。MCP ブリッジは、ブラウザ拡張機能からのメッセージを MCP プロトコルに変換し、MCP サーバーへ渡します。I/O キューは FastMCP プロキシサーバーと連携して、ローカルで動作している MCP サーバーへメッセージを転送し、応答をブラウザ拡張機能へ返却します。
前提条件
MCP ブリッジソリューションを展開・テストするには、以下の前提条件が必要です。これらには、ブラウザ拡張機能、AgentCore にデプロイされたエージェント、MCP ブリッジ自体、およびサンプルの Excel MCP サーバーが含まれます。
AWS アカウントと権限
AWS アカウントには Bedrock モデルへのアクセス権限が有効になっている必要があります(本コードでは Claude Opus 4.7 を使用します)。モデルの利用可否はリージョンによって異なります。最新のリストについては、Amazon Bedrock モデルのリージョン互換性 ドキュメントをご参照ください。
AWS Identity and Access Management (IAM) には、Bedrock AgentCore (bedrock-agentcore:*)、AWS CloudFormation、IAM ロールの作成、および S3 に関する権限が必要です。
AWS Command Line Interface (AWS CLI) は認証情報で設定済みである必要があります(aws sts get-caller-identity コマンドで確認できます)。
AWS Cloud Development Kit (AWS CDK) は、対象のリージョンでブートストラップ済み (cdk bootstrap) である必要があります。
ツールとソフトウェア
- Python 3.10 以上
- Node.js 20 以上(AgentCore コマンドラインインターフェース (CLI) の利用に必要)
必要な環境とツール
- Google Chrome(Manifest V3 のサイドパネル対応版)
- Git
インストール
- AgentCore CLI:
npm install -g @aws/agentcore - AWS CDK:
npm install -g aws-cdk
所要時間とコストの見積もり
セットアップには約 15 分かかります(デプロイ、拡張機能のインストール、ブリッジの登録)。
AgentCore ランタイムは、呼び出しごとの課金方式です。アイドル状態でもコストは発生しません。
Bedrock のモデル利用料は、Claude のトークン数に応じた従量課金となります。
その他のコンポーネントはすべてローカルで動作し、追加費用はかかりません。
ソリューションのデプロイ
- リポジトリをクローンします。
git clone https://github.com/aws-samples/sample-mcp-bridge-agentcore.git
cd mcp-bridge-demo- Python の依存関係をインストールします。
chmod +x scripts/setup.sh manifests/install.sh
./scripts/setup.sh- AgentCore へエージェントを作成・デプロイします。
npm install -g @aws/agentcore
cd agent
agentcore create --name McpBridgeAgent --defaults
cd McpBridgeAgent
cp ../agent.py app/McpBridgeAgent/main.py
cp ../mcp_bridge_transport.py app/McpBridgeAgent/
agentcore deploy
出力結果からランタイムの Amazon Resource Name (ARN) をメモするか、agentcore status コマンドを実行してください。
- ブリッジを設定します。
bridge/bridge_config.jsonファイルを編集し、ランタイム ARN を記述します。
{
    "runtime_arn": "arn:aws:bedrock-agentcore:::runtime/",
    "region": "us-east-1",
    "presign_expires": 300
}
ブリッジはローカルの AWS 認証情報を使用して、手動でトークンを管理することなく、自動的にプレサイン付き WebSocket URL を生成します。
Chrome 拡張機能をロードします。chrome://extensions にアクセスしてください。
開発者モードをオンにします。
アンパックされた拡張機能を読み込むを選択し、extension/ ディレクトリを指定します。
カードに表示される拡張機能 ID をメモしておきます。
ネイティブメッセージングブリッジを登録します。
./manifests/install.shこれにより起動スクリプトが作成され、Chrome に登録されます。これによりブラウザからブリッジプロセスを起動できるようになります。
解決策のテスト
ブラウザを再起動し、拡張機能アイコンをクリックしてサイドパネルを開きます。拡張機能は自動的にブリッジから署名付き URL を要求し、AgentCore に接続して利用可能な MCP ツールを検出します。
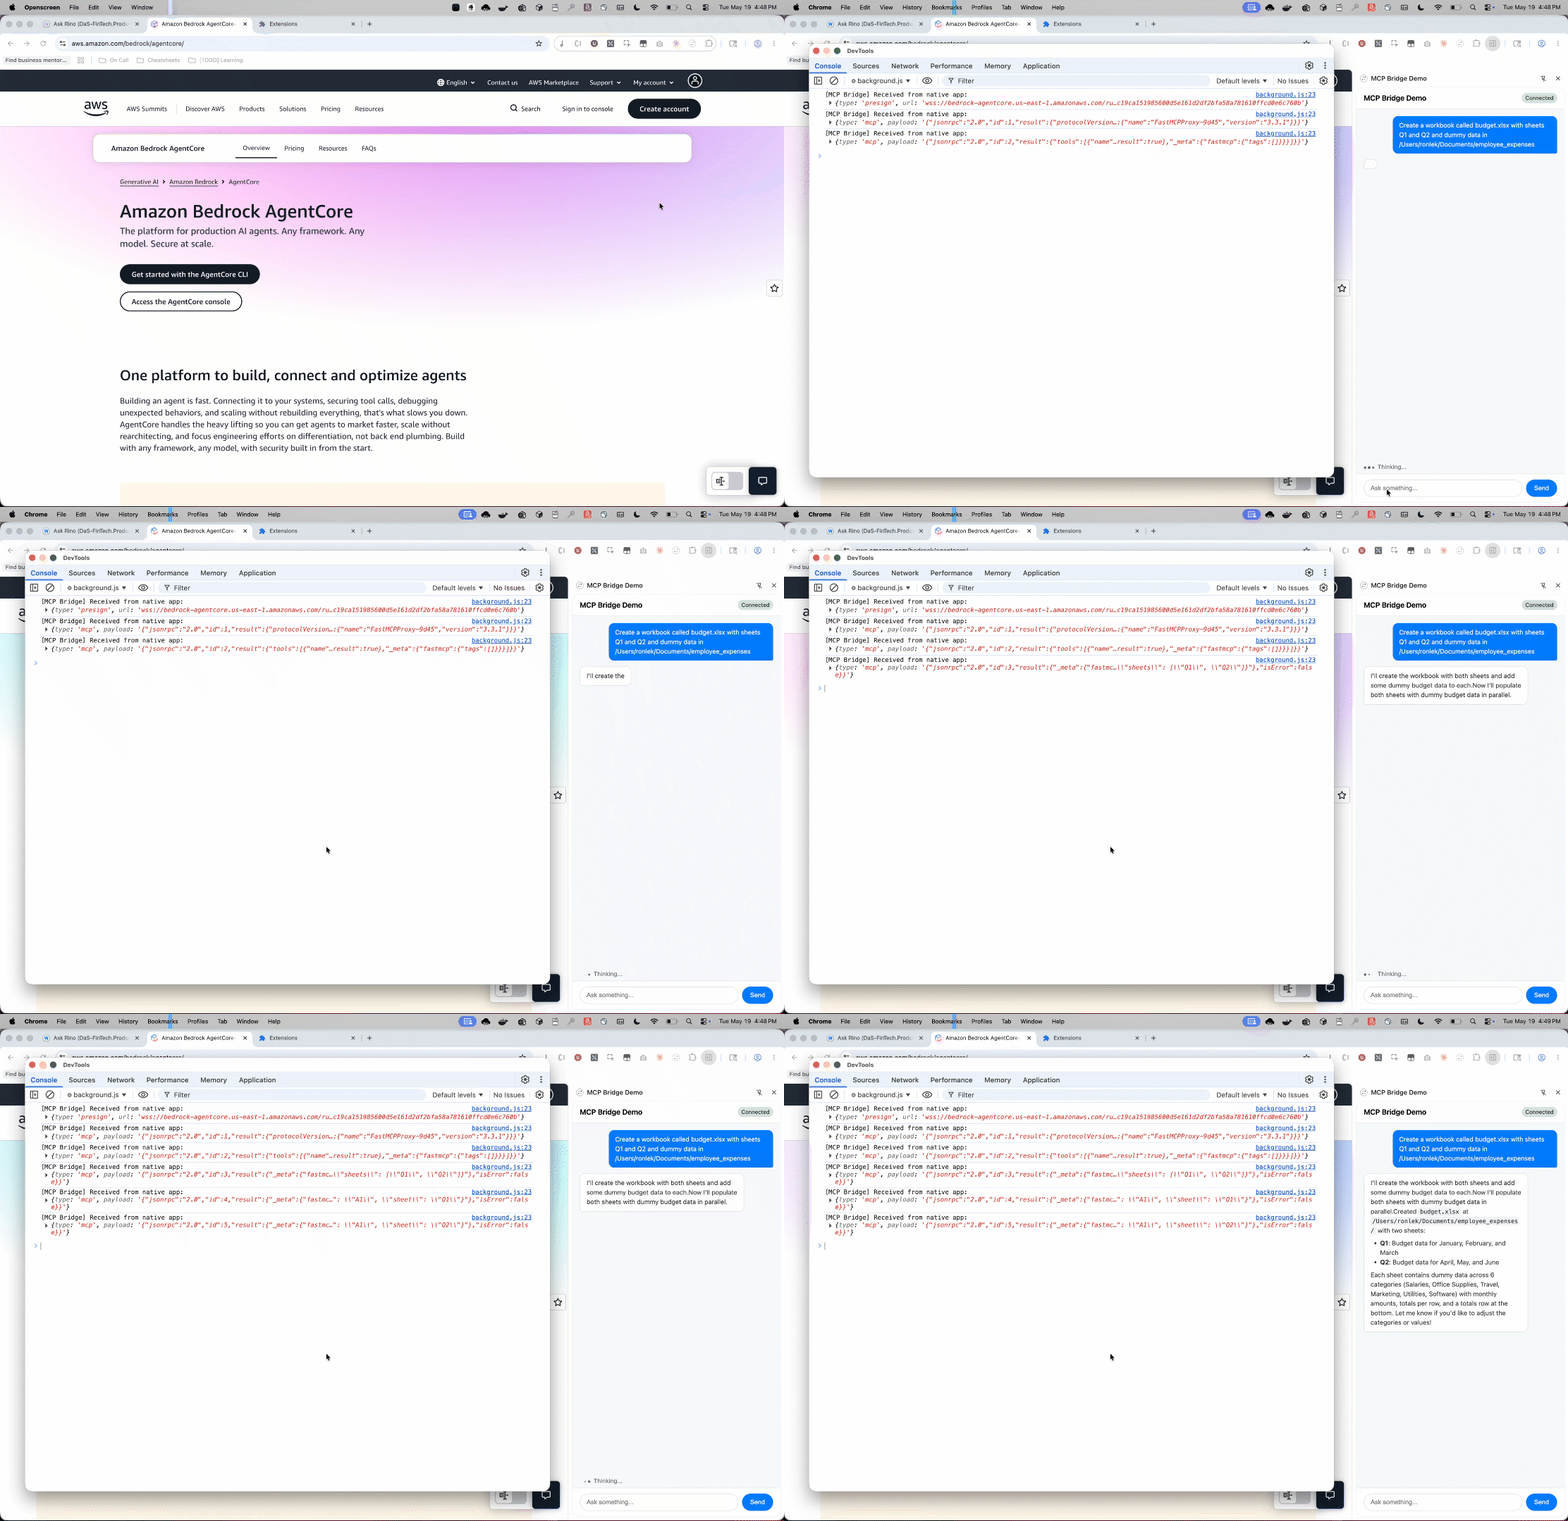
ブラウザ拡張機能はネイティブメッセージングを介して MCP ブリッジに接続し、AgentCore 上で動作するエージェントとサイドパネルの間で MCP メッセージの中継を行います。これは拡張機能の DevTools コンソールに表示される通りです。
追加の実験用クエリ:
"Create a workbook called budget.xlsx with sheets Q1 and Q2"

"Write 'Revenue' in cell A1 of the Q1 sheet in budget.xlsx"

"Read the data from budget.xlsx"
セキュリティに関する考慮事項
本稿では MCP ブリッジの機能実装を主眼に置いているため、セキュリティ対策は以下の範囲に限定しています。
- ネイティブメッセージングの発信元制限: Chrome は、呼び出し元の拡張機能 ID をネイティブメッセージングマニフェスト内の
allowed_originsリストと照合し、明示的にリストされていない拡張機能からの接続を拒否します。
- プレサイン済み URL の有効期限: WebSocket URL は SigV4 署名付きで、5 分後に無効化されます。認証情報はユーザーの端末上に保持され、ブラウザへ送信されることはありません。
- プロセスの分離: 拡張機能、ブリッジ、MCP サーバーはそれぞれ独立した OS プロセスとして動作し、メモリを共有することはありません。
このアーキテクチャ固有の主な攻撃対象領域はブリッジそのものです。ブリッジはクラウドホストされたエージェントからの指示を受け取り、ユーザーのファイルシステム権限に基づいてローカルで実行します。重要な原則は、エージェントがユーザーが明示的に付与した以上のアクセス権を持たないこと、そしてユーザーが常にどのツールをどのような引数で呼び出したかを確認できることです。
本番環境向けシステムでは、コンテンツフィルタリングのために Amazon Bedrock Guardrails の実装に加え、以下の追加のセキュリティ対策を推奨します。
レイヤー
追加するもの
理由
認証
WebSocket の最初のフレームとして JSON Web Token (JWT) ハンドシェイクを要求し、トークンの検証を行う。
原文を表示
Our agent runs in the cloud, but our users’ spreadsheets live on their laptops. How do you bridge that gap?
The Model Context Protocol (MCP) is an open source standard introduced by Anthropic in November 2024 to standardize how AI models connect to external data and tools. MCP follows a client-server architecture where an MCP host, an AI application like Amazon Quick or Claude Code, establishes connections to one or more MCP servers. The MCP protocol supports two transport mechanisms: stdio (standard I/O for communication between local processes on the same machine) and streamable HTTP transport (HTTP-based communication between remote servers and clients). A missing piece is when the MCP server exists locally and the MCP client is remote.
This pattern matters for financial managers and analysts who primarily work with Excel and local files. They can use centrally deployed AI agents to act on those files while also drawing context from their browser. This is the same pattern that powers products like Claude Cowork, a cloud agent calling local tools through MCP, but fully self-hosted on AWS with your own model and custom tool servers. Internally, we built a production-grade AI assistant for finance that has seen over 41,000 conversations within a year since launch.
In this post, we recreate what we built internally in a simplified form. Our agent, deployed on Amazon Bedrock AgentCore, uses MCP servers that run on a user’s local machine. We bridge the gap between the remote MCP client and the local MCP server by tunneling MCP messages over WebSocket and native messaging. We discuss additional production hardening measures in the What’s Next section. The complete source code is available on GitHub.
The MCP Bridge Demo extension summarizing a local Excel workbook. The cloud-hosted agent reads the file directly from the user’s machine through the MCP bridge and streams a structured summary back to the side panel
Architecture overview
The AgentCore runtime, a capability of Amazon Bedrock AgentCore, anchors an architecture with four components:
- AgentCore runtime: Hosts the Strands agent in the cloud. The agent acts as the MCP client, issuing tool discovery and tool invocation requests.
- Browser extension: Provides the chat interface and acts as a bidirectional relay, forwarding MCP messages between the AgentCore runtime (over WebSocket) and the MCP Bridge (over native messaging).
- MCP Bridge: A FastMCP proxy running on the user’s local machine, spawned by the browser through the native messaging host registration. It translates between the native messaging envelope format and raw MCP JSON-RPC.
- MCP Server: A standard MCP server running locally. Because the bridge is co-located, communication uses the stdio transport.
The following diagram shows the end-to-end message flow. The user sends a message through the extension, which connects to the AgentCore runtime over a presigned WebSocket. When the Strands agent needs to call a tool, it sends an MCP JSON-RPC request wrapped in a JSON envelope back through the WebSocket to the extension. The extension relays the message as-is to the bridge through native messaging. The bridge unwraps the envelope, extracts the JSON-RPC content, and forwards it to the MCP server over stdio. The response travels the reverse path. The bridge wraps the unmodified MCP server response back into an envelope and relays it through the extension to the AgentCore runtime, where the agent consumes the tool result and continues generation.
High-level architecture diagram showing all components. The browser extension and MCP Bridge act as relays that wrap and unwrap JSON messages from the AgentCore runtime and JSON-RPC messages from the MCP server
The following table shows a single tool call as it travels from the agent to the MCP server, with each hop stripping one layer of wrapping:
| Hop | Sender → Receiver | Message |
|---|---|---|
| 1 | Agent -> Extension (WebSocket) | {“type”: “mcpbridge”, “content”: {“type”: “mcp”, “payload”: “”}, “session_id”: “session_123”} |
| 2 | Extension -> Bridge (Native Messaging) | {“type”: “mcp”, “payload”: “”} |
| 3 | Bridge → MCP Server (stdio) | {“jsonrpc”: “2.0”, “id”: 1, “method”: “tools/call”, “params”: {“name”: “read_sheet”, “arguments”: {“file_path”: “budget.xlsx”}}} |
How does the Strands agent work in AgentCore runtime
WebSocket connection: The browser extension connects to the AgentCore runtime over a presigned WebSocket URL. On startup, the side panel sends a presign request through the background script to the native bridge, which uses the user’s local AWS credentials and the bedrock-agentcore software development kit (SDK) to generate a SigV4-signed wss:// URL scoped to the deployed runtime ARN (valid for 5 minutes). The side panel opens a WebSocket to that URL. No credentials ever leave the user’s machine or enter the browser. If the connection drops because of URL expiry or network interruption, the side panel automatically requests a fresh presigned URL after 2 seconds and reconnects, making the expiry window invisible to the user during normal use.
MCP initialization: Before discovering tools, the agent performs the standard MCP initialization handshake. It sends an initialize request with the protocol version, waits for the server’s capabilities response, and then sends a notifications/initialized notification. Only after this handshake completes does the server accept tools/list and tools/call requests.
Tool discovery: On each user message, the agent calls tools/list and receives an array of tool schemas. It wraps each schema into a Strands AgentTool whose stream() method sends a tools/call request through the bridge. Tools added to the MCP server are automatically available on the next request with no agent code changes.
Request-response correlation: Each outbound JSON-RPC request from the agent is assigned a unique ID and registered against an asyncio.Future keyed by (session_id, jsonrpc_id). When the response arrives back over the WebSocket, it is matched to the waiting Future and resolved. This allows multiple tool calls to be in flight concurrently without ambiguity.
How does native messaging work
We need the extension to talk to a long-running local process without network permissions or per-message user prompts. Native messaging provides exactly this. Both Chrome and Firefox support native messaging for their extensions. The browser looks for a manifest file at a well-known location on the user’s machine that specifies which binary to launch. The native messaging manifest file for Chrome on macOS is as follows:
# Stored at ~/Library/Application\ Support/Google/Chrome/NativeMessagingHosts/com.example.mcp_bridge.json
{
  "name": "com.example.mcp_bridge",
  "description": "MCP Bridge - Routes MCP messages to local servers",
  "path": "/path/to/mcp-bridge-demo/bridge/run_bridge.sh",
  "type": "stdio",
  "allowed_origins": [
    "chrome-extension:///"
  ]
}
On extension startup, the background script calls chrome.runtime.connectNative("com.example.mcp_bridge") to launch the native app locally. The run_bridge.sh script referenced in the manifest activates the Python environment and starts the bridge:
#!/bin/bash
cd "/path/to/mcp-bridge-demo/bridge"
source .venv/bin/activate
exec python3 bridge.py
The native messaging host process stays alive for the lifetime of the connection. Each message is serialized as JSON, UTF-8 encoded, and preceded with a 32-bit message length in little-endian byte order. The maximum size of a single message from the native messaging host is 1 MB (to protect the browser from misbehaving native applications). The maximum size of a message sent to the native messaging host is 64 MiB.
How does the MCP Bridge work
The MCP Bridge acts as a protocol translator between two worlds: Chrome’s native messaging protocol on one side and the MCP standard (JSON-RPC 2.0 over stdio) on the other. On the inbound path, it strips the 4-byte length header from stdin, parses the JSON body, and unwraps the envelope to extract the raw JSON-RPC message. On the outbound path, it does the reverse: wraps the JSON-RPC response in an envelope and writes it back with the length header. The JSON-RPC content itself passes through untouched.
Internally, the bridge runs two concurrent loops connected through a FastMCP proxy. The main loop reads messages from the browser, unwraps them, and places the JSON-RPC content onto an input queue. The FastMCP proxy, started once and kept alive for the bridge’s lifetime, picks messages off this queue, forwards them to the MCP server subprocess over its stdin, and places responses from the server’s stdout onto an output queue. A second background loop reads from the output queue, wraps each response back into an envelope, and writes it to stdout for the browser to receive. This two-loop design decouples the browser’s request timing from the MCP server’s processing speed so the bridge does not block waiting for a slow tool to finish before accepting the next request.
The MCP server itself is a child process spawned by the bridge on startup, configured through a mcp.json file. It stays running for the bridge’s lifetime with no per-request process overhead. Adding a new MCP server is a one-line config change. The bridge handles the plumbing.
# mcp.json
{
  "mcpServers": {
    "excel": {
      "command": "python3",
      "args": ["excel_server.py"]
    }
  }
}
Internal architecture of the MCP Bridge. The MCP Bridge translates messages from the browser extension into the MCP protocol for the MCP server. I/O queues work with a FastMCP proxy server to forward messages to the locally running MCP server and relay messages back to the browser extension
Prerequisites
The following prerequisites are needed to deploy and test the MCP bridge solution. These cover the browser extension, the agent deployed on AgentCore, the MCP Bridge, and a sample Excel MCP server.
AWS account and permissions
- AWS account with Bedrock model access enabled (the code uses Claude Opus 4.7). Model availability varies by Region. See the Amazon Bedrock model availability documentation for the current list.
- AWS Identity and Access Management (IAM) permissions for Bedrock AgentCore (bedrock-agentcore:*), AWS CloudFormation, IAM role creation, and S3.
- AWS Command Line Interface (AWS CLI) configured with credentials (aws sts get-caller-identity to verify).
- AWS Cloud Development Kit (AWS CDK) bootstrapped in your target Region (cdk bootstrap).
Tools and software
- Python 3.10+.
- Node.js 20+ (for the AgentCore command line interface (CLI)).
- Google Chrome (Manifest V3 side panel support).
- Git.
Install
- AgentCore CLI: npm install -g @aws/agentcore.
- AWS CDK: npm install -g aws-cdk.
Estimated time and cost
- Setup: ~15 minutes (deploy, install extension, and register bridge).
- AgentCore runtime: pay-per-invocation (no idle cost).
- Bedrock model usage: standard per-token pricing for Claude.
- Other components run locally at no additional cost.
Deploying the solution
- Clone the repository.
git clone https://github.com/aws-samples/sample-mcp-bridge-agentcore.git
cd mcp-bridge-demo- Install Python dependencies.
chmod +x scripts/setup.sh manifests/install.sh
./scripts/setup.sh- Create and deploy the agent to AgentCore.
npm install -g @aws/agentcore
cd agent
agentcore create --name McpBridgeAgent --defaults
cd McpBridgeAgent
cp ../agent.py app/McpBridgeAgent/main.py
cp ../mcp_bridge_transport.py app/McpBridgeAgent/
agentcore deploy
Note the runtime Amazon Resource Name (ARN) from the output (or run agentcore status).
- Configure the bridge.Edit bridge/bridge_config.json with your runtime ARN:
{
    "runtime_arn": "arn:aws:bedrock-agentcore:::runtime/",
    "region": "us-east-1",
    "presign_expires": 300
}
The bridge uses your local AWS credentials to generate presigned WebSocket URLs automatically, with no manual token management needed.
- Load the Chrome extension.
Navigate to chrome://extensions.
- Turn on Developer mode.
- Choose Load unpacked, and then select the extension/ directory.
- Note the extension ID displayed on the card.
- Register the native messaging bridge.
./manifests/install.shThis creates a launcher script and registers it with Chrome so the browser can spawn the bridge process.
Testing the solution
Restart the browser and choose the extension icon to open the side panel. The extension automatically requests a presigned URL from the bridge, connects to AgentCore, and discovers available MCP tools.
The browser extension connects to the MCP bridge over native messaging and relays MCP messages between the AgentCore-hosted agent and the side panel, as shown in the extension’s DevTools console
Additional queries to experiment with:
"Create a workbook called budget.xlsx with sheets Q1 and Q2"

"Write 'Revenue' in cell A1 of the Q1 sheet in budget.xlsx"

"Read the data from budget.xlsx"
Security considerations
This post prioritizes demonstrating the MCP bridge functionality and therefore limits security measures to the following:
- Native messaging origin restriction: Chrome checks the calling extension’s ID against the allowed_origins list in the native messaging manifest and rejects connections from extensions not explicitly listed.
- Presigned URL expiration: WebSocket URLs are SigV4-signed and expire after 5 minutes. Credentials remain on the user’s machine and are not sent to the browser.
- Process isolation: The extension, bridge, and MCP server each run in separate operating system processes with no shared memory.
The primary exposure surface unique to this architecture is the bridge itself. It accepts instructions from a cloud-hosted agent and runs them locally with the user’s file system permissions. The key principle is that the agent should not have more access than the user explicitly grants, and the user can always see what tools were invoked and with what arguments.
For a production system, in addition to implementing Amazon Bedrock Guardrails for content filtering, we recommend the following additional security measures:
Layer
What to add
Why
Authentication
Require a JSON Web Token (JWT) handshake as the first WebSocket frame. Verify the toke
今日のまとめ
AIデイリーブリーフで今日の重要ニュースをまとめ読み