LLM を活用したソースコードのセキュリティ強化
本文の状態
日本語全文を表示中
詳細モードで約39分の本文を読めます。
同じ出来事の情報源
この情報源を基点に整理
Claude Blog
Anthropic は、大規模言語モデル(LLM)を活用してソースコードの脆弱性を検出・防止する手法について発表した。
Source Article
元記事を日本語で読む
本文に関係しない購読案内、埋め込み通知、サイト内プロモーションは除いています。
モデルの能力は急速に、かつ不均一に進化しています。私たちはセキュリティチームと協力し、彼ら自身のコードやオープンソースソフトウェアにおける脆弱性の発見と修正に取り組んできましたが、その経験から、モデルを使ってソースコードを保護する方法についてより深い理解を得ることができました。私たちの主な結論:脆弱性の発見は現在容易に並列処理が可能であり、ボトルネックは検証、選別、およびパッチ適用へと移行しています。
この乖離を示す一例として、オープンソースソフトウェアに対する独自のスキャンの一環として、2026 年 5 月 22 日時点で 1,596 の脆弱性を開示しました。そのうち 97 がパッチ適用済みであることが確認されています(私どもの知る限り)。
このガイドでは、Claude Opus を活用して脅威モデルを構築し、コードベース内の脆弱性を発見した上で、それらを検証・選別・パッチ適用する方法について解説します。すべての答えを持っているわけではありませんが、チームがいかにして発見プロセスをスケールさせたか、そして後工程で何が役立ったかをお伝えします。*今日から始めるには、インタラクティブワークフロー用のスキルと自律型スキャンのためのデモハーンチを含む*関連リポジトリをご利用ください。読み進める中で、各ステップを実装するスキルについても言及していきます。
発見と修正のループ
最も多くの脆弱性を発見・修正しているチームは、既存のベストプラクティスの変種に収束しました。これらを 6 つのステップからなる一連の手順として要約しました:
- 脅威モデル:スキャンを開始する前に、何が脆弱性としてカウントされるかを決定してください。
- サンドボックス:エージェントを隔離し、エクスプロイトを実証するためのサンドボックス環境を構築します。
- 発見:モデルにソースコード内の脆弱性を探索させます。
- 検証:どの発見が実際にエクスプロイト可能であるかを独立して確認します。
- トリアージ:発見された事象の重複を排除し、深刻度を割り当てて、修正が必要なものを優先順位付けします。
- パッチ適用:修正を適用し、脆弱性が無効化されたことを確認し、関連するバリエーションも検索します。
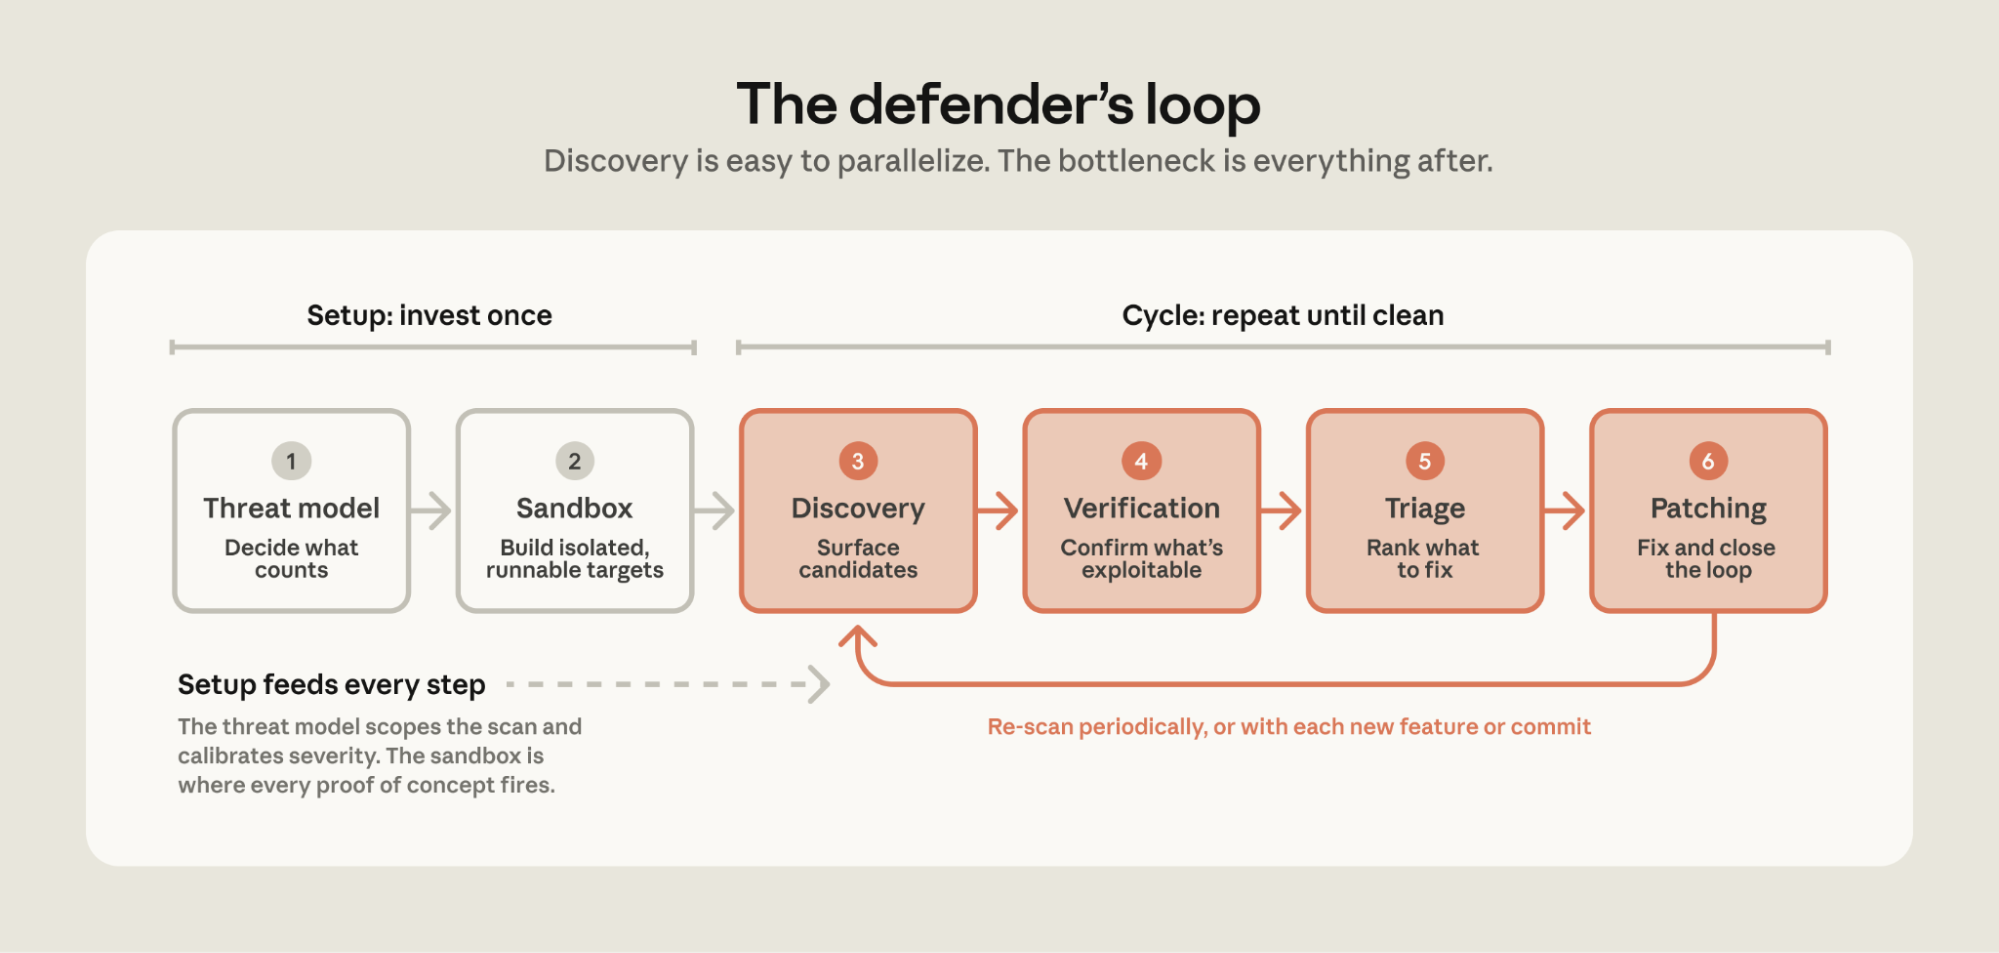
脅威モデリングとサンドボックス化への一度きりの投資が、ディフェンダーのループを駆動します。これは発見、検証、トリアージ、パッチ適用という繰り返しのサイクルであり、ボトルネックは脆弱性の発見ではなく、その後のすべての工程にあります。最初の 2 つのステップ—脅威モデルとサンドボックスの構築—は、残りのループのためのセットアップです。これらは通常、コードベースごとに一度行われ、基盤となるシステムに変更が生じた際に再検討されます。次の 4 つのステップが、ソースに対して実行するループです:発見、検証、トリアージ、そしてパッチ適用。
コードベースに対する最初のスキャンでは、通常、最も多くの脆弱性が見つかります。その後の実行では、単純なものは以前のランで修正されているため、脆弱性の数は減る傾向がありますが、しばしばより複雑なものになります。ただし、*n 回目*の実行で新しい発見がゼロになるとは期待しないでください。モデルは確率的であり、コードが変更されていない場合でも、長いテールにわたって脆弱性が継続して流入することがあります。
コードベースとの最初のイテレーションでは、ループを複数回実行し、ネット新規の発見数とそのシステムに対するリスク許容度に基づいて停止タイミングを判断してください。その最初のイテレーションの後、(1) 定期的に、または (2) コードが意味のある変更を加えたたびにスキャンを継続してください。
次に、各ステップを詳しく解説します。なぜそれが重要なのか、何を生み出すのか、そしてどのように実装するのかについて説明します。
1.脅威モデル:何が脆弱性とみなされるかを定義する
偽陽性の最も一般的な原因は、モデルが信頼境界(trust boundaries)をよく理解していないことです。モデルは、クライアントが破損した値を送信できる、または攻撃者が設定を制御できる可能性があるとしてコードを脆弱とフラグ付けすることがありますが、これらの入力はあなたの環境では*信頼されている*場合があります。逆に、インターネットに公開されたサービスが内部のみのものであると仮定し、真の脆弱性を過少報告することもあります。どちらの場合も、モデルはコードではなく脅威モデルについて誤っています。
あるチームは、発見された事象に共通するパターンに気づきました:モデルは、脅威モデル、システム設計ドキュメント、要件、制約が十分に文書化されているシステムにおいて最も高い性能を発揮します。脅威モデルが明確に定義されている場合、モデルによる発見事項の「90% が実際に悪用可能である」という結果が出ました。
Claude を活用して脅威モデルを構築するには、2 つのステップで行います。
まず、コード、ドキュメント、脆弱性の履歴から基礎を築きます。新しいセキュリティエンジニアに初日に手渡すような情報をモデルに提供します:アーキテクチャドキュメント、ウィキ、エントリーポイント、Git の履歴、過去の脆弱性です。これにより、コードのみから暗黙の知識、トレードオフ、設計決定を推測するという課題を克服できます。次に、システムコンテキスト、資産、エントリーポイント、信頼境界を含む脅威モデルを作成するようモデルに依頼します。最後に、過去のバグをクラスタリングし、関連する脆弱性クラスをリストアップさせます。脅威モデルには、どのような脆弱性に注目すべきか、またどの脆弱性に関心がないのか、そしてその理由も明記させるようにしてください。
あるチームは、過去数百件の CVE およびセキュリティ修正コミットを検証し、それらを「バグの形状」を示すヒントに要約しました。そしてモデルに対して 2 つの質問を行いました:「修正は完全だったか」「他の箇所にも適用されたか」。その結果、1 時間以内に 3 つの悪用可能な問題を見つけ出しました。彼らの言葉では、「過去に何が悪用されてきたか」を問うことは、「このコードベース内の脆弱性を見つけてくれ」と求めることよりも、成功へのはるかに簡単なチートコードになり得ると述べています。
***One team noticed a pattern across their findings: the model performed best on systems with well-documented threat models, system design docs, requirements, and constraints. When the threat model was well-defined, the model's findings "were exploitable 90 percent of the time."*
You can work with Claude to build a threat model in two steps:
First, bootstrap from the code, docs, and vulnerability history.** Feed the model what you would hand a new security engineer on day one: architecture docs, wikis, entry points, git history, and past vulnerabilities. This helps overcome the challenge of inferring implicit knowledge, trade-offs, and design decisions from code alone. Then, ask the model to create a threat model that includes the system context, assets, entry points, and trust boundaries. Finally, have the model cluster past bugs and list the relevant vulnerability classes. Make sure the threat model documents what vulnerabilities you do and don't care about, and why.
***One team reviewed hundreds of past CVE and security-fix commits, distilled them into "bug-shape" hints, and asked the model two questions: was the fix complete, and was it applied everywhere else? They found three exploitable issues in an hour. As they put it: "'What have people exploited in the past' is sometimes a much easier cheat-code towards success than 'find me vulnerabilities in this codebase.'"*
第二に、システムをよく知る人物に対してモデルがインタビューを行うようにしてください。Shostack の 4 つの質問(https://github.com/adamshostack/4QuestionFrame)を検討しましょう:*何を作っているのか?何が失敗する可能性があるか?それに対して何をしているのか?うまくいっているか?*。まずブートストラップステップを実行して、インタビュー対象者がゼロから始めることがないようにします。これにより、脅威モデルをゼロから調査・構築するために数時間を費やすのではなく、草案から開始できます。また、インタビューステップは必須ではありませんが、コードやドキュメントからは得られない文脈を追加することで、脅威モデルの質が向上します。
いくつかの実践手法が大きな違いを生む可能性があります:
- 依存関係のセキュリティポリシーを検討してください。多くのオープンソースプロジェクトは独自のポリシーを公開しています。例えば、vLLM の security.md、SQLite の「暗黒芸術への対抗策」、ImageMagick のセキュリティポリシーなどです。脅威モデルでは、これらを直接考慮し、ゼロからポリシーを再構築する必要はありません。
- 何を信頼するかを明確にしてください。設定ファイルや認証済みクライアントを信頼する場合は、その前提を脅威モデルに明記します。これらの仮定は、悪用不可能なバグと実際の脆弱性を区別するのに役立ちます。
- コードと共に THREAT_MODEL.md を含めてください。リポジトリ内に配置し、コードの変更に応じて更新してください。これにより、探索エージェントが検索前にこの文書を読み、既知の非問題点をスキップできるようになります。
脅威モデルは 2 つの場所で使用されます。1 つ目は「発見」フェーズでのスコープ定義です。コードを分割し、優先順位をつけた上で、対象外となる部分をスキップします。これは、すべてをスキャンすることができない大規模なコードベースにおいて特に有効です。2 つ目は「選別」フェーズでのフィルタリングです。広範囲にスキャンした後、脅威モデルを用いて、システムや環境に応じた深刻度のより適切な評価を行います。
*あるチームが大規模プロジェクトのスキャンを行い、40% の偽陽性率を記録した際、その原因を調査しました。発見された事象は再現可能で、PoC(Proof of Concept)も悪用可能性を示していました。しかし、コードの責任者である開発チームは、これらのバグがプロジェクトの脅威モデルに適合しないとして、すべて偽陽性と却下しました。別のチームの CISO はこれを簡潔にこう述べています:「[このモデルは] コードの文脈については良好だが、我々自身の文脈については不十分だ」*
脅威モデルスキル をお試しください。 これは、本セクションで説明されている 2 つのステップを順に案内します。ブートストラップ(bootstrap)では、コード、CVE(Common Vulnerabilities and Exposures)、および git の履歴から草案を導出し、インタビューでは Shostack の 4 つの質問を通じてシステム所有者がそれを洗練させていきます。出力は THREAT_MODEL.md ファイルとなり、これは発見(Discovery)と選別(Triage)のステップで使用されます。
2. サンクボックス:エージェントを安全に実行し、悪用可能性を検証する
サンクボックスの目的の一つは、システムを保護することです。 モデルが安全かつ自律的に実行できるようにするには、強力な分離層が必要です。これがなければ、エージェントがターゲットを超えてしまい、予期せぬ行動をとる可能性があります。
*あるチームはモデルに対してネットワークアクセスがないと伝えていましたが、実際にはアクセス可能でした。その結果、モデルは GitHub からデータを取得できることを発見しました。別のチームでは、スキャン中にエージェントが GitHub のイシューに回答しているのを観察しました。 どちらの行為も悪意のあるものではありませんでしたが、コードや設定を通じて制約を強制する必要性を示すものでした。
分離レベルは脅威モデルに合わせて調整してください。コードを読み取る発見用エージェントにはコンテナで十分ですが、ターゲットとその PoC(Proof of Concept)はマイクロ VM(Firecracker など)または完全な VM で実行し、外部への通信(egress)をロックダウンして、何らかの形でプロダクションシステムに到達できないようにしてください。また、エージェントに対して認証情報(~/.aws, ~/.ssh, .env 等)が利用可能になることは決してあってはいけません。
サンドボックスへのネットワークアクセスは、セットアップ中のみ許可してください。依存関係をプルし、ビルドし、ツールをインストールし、ターゲットを展開し、既存のテストを実行してすべてが正常に動作することを確認します。その後、環境のスナップショットを取得し、ネットワークアクセスを削除します。スキャン中は、ローカルプロキシを経由してモデル API へのトラフィックのみを許可してください。各実行の開始時にスナップロードを読み込み、すべてのスキャンが同じクリーンな状態から始まるようにします。
サンドボックスのもう一つの目的は、悪用可能性を実証することです。**静的スキャン中、モデルはコードを読み、何が壊れる可能性があるかを仮説立てますが、パスが到達可能かどうかや、補完的な制御が存在するかどうかをテストすることはできません。その結果、モデルは実際には気にする必要のない、悪用不可能なコードの正しさに関するバグを警告する可能性があります。チームがエージェントにコードのコンパイル、テストの実行、概念実証(PoC)の起動を可能にするサンドボックスを構築したところ、悪用不可能な発見は大幅に減少しました。
*ある攻撃的セキュリティチームは、エージェントにテストベッドを与えるハネスを構築しました。その単純な検証ルールとは、「エージェントが概念実証を構築し、テストベッドで実行できる場合にのみ、それは真の陽性結果である」というものです。 6 週間後の評価では、「最大の効果向上要因は、モデルにテストベッドとライブシステムを与え、PoC を実行させることだった」と結論付けられました。
サンドボックスを構築する際は、可能な限りすべての要素を固定し、各実行が同じ環境で同じコードを使用するようにしてください。具体的には、イメージタグ、コミット SHA、依存関係、ビルドコマンドなどを固定します。ローカルコピーをキャッシュしてネットワーク接続不要とし、コンテナを耐久性のあるものにして、複数のテストループで読み込むだけで済むように目指しましょう。
*あるチームのスキャンが脆弱性を検出しましたが、これは実際にはエージェントがデプロイされたバージョンではなく古いバージョンのライブラリをダウンロードしたことが原因でした。この問題は、エンジニアがトランスクリプトを読み込み、異なる依存関係がダウンロードされていることに気づいたことで発見されました。現在は、本番環境と一致するように依存関係を固定した Docker コンテナをビルドしており、検出エージェントと検証エージェントはどちらも攻撃者が利用する可能性のある同じアーティファクト上で動作しています。
サンドボックスは本番環境に忠実であることが重要です。依存関係(キューやデータストアなど)を除外すると、本番環境に存在するバグが過少報告される可能性があります。逆に、本番環境の防御策(WAF や認証ゲートウェイなど)を無視すると、モデルが本番環境ですでに対処済みの攻撃不可能な発見結果を報告することになります。
ただし、クラウド依存関係やデータストア、その他の現実世界の複雑さのために代表例のサンドボックスを構築することが実用的でない場合は、代わりに発見フェーズ(以下)から始めてください。PoC を必ずしもサンドボックスで実行する必要はありません。最先端モデルはソースコードを分析するだけで脆弱性を発見するのが得意です。私たち自身を含むいくつかのチームが、この手法の有効性を見出しています。その代償として検証フェーズに現れます。実行中のターゲットがないため、PoC で発見事項を実証できないからです。そのため、検証にはより多くの時間を割り当ててください。また、発見された件数がそれを正当化するようになった時点で、後からサンドボックスへの投資を行うことも可能です。
参照用サンドボックスについては、harness README.md をご参照ください。**この実装では、エージェントとターゲットは gVisor で隔離されたコンテナ内で実行され、出口トラフィックはモデル API にロックされています。ターゲットは特定のコミットに固定された Dockerfile からビルドされ、setup_sandbox.sh がセットアップフェーズを処理します。
3. 発見:豊富なコンテキスト、短いプロンプト、有用なツールを提供する
発見エージェントに、必要に応じて読み込めるコンテキスト(脅威モデル、アーキテクチャドキュメント、過去のスキャン結果など)へのアクセス権を与えてください。エージェントがあなたの信頼境界とシステムが実際にどのようにデプロイされているかを理解すれば、そのシステム固有の脆弱性をより適切に特定できるようになります。
私たちは、発見フェーズにおいて、より単純なプロンプトを用いることで最先端モデルの性能が向上することを発見しました。直感に反するようですが、より指示的なプロンプトは発見を悪化させます。長いチェックリストはモデルの創造性を低下させ、新規のバグを fewer 生じさせる傾向があります。以下に、発見フェーズで役立ったいくつかのプロンプティングのヒントを示します:
- 目的と文脈を提示してください。「なぜ」スキャンするのか、「何を」目指しているのか、どのような発見が重要なのか、どのシステムを対象としているのかを明確にし、「脆弱性をどのようにスキャンするか」という手法についてはモデルに任せてください。最先端のモデルはセキュリティタスクにおいてますます優秀になっており、過度に具体的な指示を出すことで、モデルが取り組む範囲が狭まってしまう可能性があります。
- 特定の脆弱性クラスについて問い合わせることを試みてください。特定の種類の脆弱性に焦点を当てたい場合、過去の CVE やコードベースで使用されている言語に基づいてガイドしてほしい場合は、その旨を述べてください。脆弱性クラスの定義、その動作、およびそれが発生しやすい場所を説明することで、モデルがコードベース内でそれを認識できるようになります。
- 出力形式を定義してください。事前定義されたフィールドを持つ構造化レポートを求め、モデルの推論が各フィールドに基づいて積み重えられるように順序付けてください。例として、根拠(rationale)、発見内容(finding)、影響度(impact)、深刻度(severity)などのフィールドがあります。弱い発見に対しては早期に終了できる「脱出経路」も設けてください。
- モデルにコードベースを検索・閲覧するためのツールを提供してください。grep や glob などが該当します。また、チームが使用するセキュリティ特化型のツール、例えば静的解析スキャナ(SAST scanners)やファズャー(fuzzers)の利用も許可してください。特定のタスクに必要なツールをモデルに問いかけ、それらを利用可能にしてください。最後に、必要に応じてモデル自身がツールを作成できるようにしてください。最近の最先端モデルは、必要なツールを自ら作成する能力がますます高まっています。
***ソースコードに加えて、あるペネトレーションテストチームは、発見エージェントにリクエストの送信、レスポンスの確認、トラフィックログの照会を行うツールを提供しました。その結果、エージェントはパスが到達可能かどうかを推測する必要がなくなり、実行中のアプリケーションに対して各候補を順次テストできるようになり、真陽性率をほぼ 100 パーセントまで向上させることができました。
モデルにシステム全体を一度走査させ、攻撃対象領域、エンドポイント、またはコンポーネントなどによって探索空間を分割してください。その後、これらの分割された領域を並列発見エージェントに供給して、同じ浅いバグに収束しないようにします。最後に、分割レベルでの発見結果を文脈として取り込み、脆弱性を検索するシステムレベルの走査を実行します。
ブルートフォースによる探索を試みたチームはすぐにリターンの逓減に直面しました。あるチームからは「当初は単に水平方向のスケーリングを行い、より多くのエージェントを送信しましたが、限定的な結果しか得られませんでした」という声がありました。別のチームは注力領域と並列エージェントの数を増やして「多数の問題」を発見しましたが、それらの多くは互いに重複するものでした。
ターゲットを実行できるサンドボックスがある場合は、発見エージェントに対して発見内容の PoC(Proof of Concept)を構築させるよう依頼してください。例えば、スクリプト、クラッシュを引き起こす入力、または失敗するテストなどです。PoC を構築することで、エージェントは反復して発見内容を特定しやすくになり、その成果物は検証エージェントが評価するための具体的な証拠となります。ただし、エージェントが再現できない発見についても報告可能であり、「未証明」とフラグを立てておくことで、リコール(検出率)を高く維持できます。
vuln-scan skill は、この段階で役立ちます。これはあなたの THREAT_MODEL.md を読み込み、対象を焦点領域に分割し、各領域ごとに並列レビューエージェントを展開します。出力は構造化された発見事項であり、次のステップで直接消費されます。
4. 検証:非実装可能な発見事項のフィルタリング
発見(Discovery)は再現率(recall)の最適化を目指しますが、検証(Verification)は精度(precision)の最適化を目指します。つまり、発見では可能な限り多くの脆弱性、たとえ可能性が低いものでも見つけるべきであり、検証では実際に悪用できない発見事項を除外すべきです。エージェントが同じステップでこの両方を行おうとすると、自己検閲を起こし、実装可能な真陽性(true positives)を除外してしまう可能性があります。私たちはこれを苦い経験から学びました。発見エージェントに発見事項の検証も依頼したところ、それらは別の検証ステップであれば確認されたはずの実装可能な真陽性をフィルタリングしてしまいました。
検証者エージェントは発見者エージェントとは独立している必要があります。検証者は共有ファイルシステムや会話履歴を持たない新しいコンテナで実行してください。もし検証者が発見者エージェントの推論に晒されると、単に主張をテストするのではなく、同意してしまう可能性があります。したがって、検証者には(1)概念実証または書かれた発見事項と、(2)コードベースのみを与え、発見者が見落とした緩和策(例えば、上位層でのバリデーション、認証ゲート、型制約、または到達不能なコードなど)を検索できるようにしてください。
単一の検証パスでも非悪用可能な発見が多すぎる場合は、複数の独立した検証器を実行してみてください。これらは異なる角度から検討したり、異なるモデルで実行したりできます。その後、多数決を採用します。また、発見エージェントと検証エージェントの結果の間を決定する別の審判者を設けることも検討してください。
検証エージェントに対して、発見エージェントの発見を反証するようプロンプトしてください。検証者は各発見が偽陽性であると仮定し、その発見が誤りである理由を検索します。検証エージェントが発見が真陽性かどうかを判断するために使用できる明確な基準を含めてください。これは、発見エージェントの出力に PoC(Proof of Concept:概念実証)が含まれていない場合に特に重要です。手動レビューにかかる負担を減らすために、非悪用可能な発見をできるだけ多く除外することを目標とします。
***私たちが協力してきたチーム全体において、敵対的検証器を追加することで、発見フェーズからの非悪用発見の割合がおよそ半分になりました。その検証器に、悪用の証明となる概念実証(PoC)も構築するよう要求したことで、偽陽性率はほぼゼロまで低下しました。これら 2 つのステップを組み合わせることで、下流のトリアージとパッチ適用の負荷が大幅に軽減されました。
サンドボックス内で本番環境を十分に再現できる場合(手順 2 を参照)、検証エージェントに対して再現可能な概念実証(PoC)を構築・実行するようプロンプトしてください。PoC が機能すれば、その発見は悪用可能であると結論付けられます。ただし、逆は成り立ちません。動作する PoC を作成できないことが、偽陽性であることの証明にはなりません。
あるチームは、オープンソースパッケージをスキャンする際に、ループを閉じるための検証ステップを構築しました。具体的には、パッケージのスキャンを行い、概念実証(PoC)を生成した上で、そのパッケージを使用して PoC をトリガーするモックアプリケーションを展開します。彼らの見解は以下の通りです:「検証が最大のボトルネックであり、PoC がその検証である」。
5. トリアージ:根本原因による重複排除と、前提条件および影響度に基づく優先順位付け
検証が発見が実際に悪用可能であることを確認する一方で、トリアージはパッチ適用の優先度を評価します。以前は発見に多くの労力が必要だったため、バグを発見したエンジニア自身がトリアージを行っていました。しかし現在では、昼食前にモデルが数百件の候補を見つけられるようになったことで、トリアージがボトルネックとなっています。
適切なトリアージはアラート疲労を防ぐために役立ちます。重複しているものや深刻度が過大評価されたバグを多数提出すると、製品エンジニアたちはそれらを読み続けるのをやめてしまう可能性があります。即時パッチが必要なものさえも例外ではありません。オープンソースのメンテナは特に、自社のソフトウェアに依存する多くの異なるユーザーから報告が寄せられるため、トリアージされていない発見によって圧倒される可能性が高いです。
複数のチームが同じ教訓を共有しました:「非悪用可能なものが大半を占める発見の山を製品エンジニアに送れば、彼らはレポートへの信頼を失い、あきらめてしまう」。また、下流のエンジニアたちを圧倒しないよう、重要度が高く深刻な発見を優先しています。他のチームは、既存のバックログ(過去のスキャナやモデルからの未解決項目、バグ報奨金プログラムでの受付分など)に対してモデルを活用することで成功を収め、数日で数百件の古くなったアイテムを解消しました。
発見事項の重複排除には、根本原因を検討してください。スキャナは、1 つのバグを複数の呼び出しサイトでフラグ付けしたり、単一の根本原因の複数の症状を報告したりすることがよくあります。ここに実用的なアプローチを示します:まず、安価で決定論的なパスを実行します。同じファイル、同じカテゴリ、脆弱性のある行番号が互いに 10 行以内にあるものを対象とします。次に、残った事項に対してモデルが定性的ルールを適用させます。
- 重複として扱う:根本原因は同じだが表現が異なるもの;複数の呼び出しサイトで報告された同一の脆弱性;エンドポイントごとに報告されるグローバル保護(認証チェックなど)の欠如;または、同じパス内で原因とその結果が両方フラグ付けされているもの。
- 個別の事項として扱う:同じファイル内の異なる脆弱性クラス;異なる変数が異なるシンクに到達するもの;1 つのヘルパー関数内に存在する 2 つの独立したバグ;2 つのエンドポイントで同一のチェックが欠落しているが、それぞれに独自の修正が必要となる場合。
もしあなたのハーン(検証環境)が各発見事項に対して PoC(Proof of Concept:概念実証)とパッチを生成する場合、もう一つの重複排除のアプローチとして、ある発見事項に対するパッチが他の発見事項の PoC も無力化するかを確認する方法があります。
重複排除後、以下の基準に基づいて各発見事項の重大度を評価してください:
- リーチアビリティ。攻撃者は実際のエントリーポイントからこのコードに到達できるのか、それとも内部コードやエンドポイントからのみ到達可能なのか。
- 攻撃者の制御。信頼できない入力がシンク(終点)まで無傷で到達するのか、それともその上流で何らかのサニタイズや制約が加えられるのか。
- 事前条件。バグが発動するために何が整っている必要があるのか:デフォルトではない設定、特定の特徴フラグ、攻撃者が狙うべき限られた時間窓など。
- 認証。未認証の攻撃者でもこれを発動できるのか、それともログイン済みユーザーや管理者権限が必要なのか。
- 読み取り vs 書き込み。攻撃者はデータを閲覧するだけか、それとも変更も可能か。
- ブラストレイディアス(影響範囲)。PoC が実行された場合、誰が影響を受けるのか?一人のユーザーか全ユーザーか、一つのテナントかプラットフォーム全体か、ユーザランドかカーネルか。
この評価基準をスコアに変換するには、モデルに severity を割り当てる前に各質問への回答を書き出させること。証拠を先に確認させることで、モデルがバグクラス(「SQL インジェクションだからクリティカル」など)にアンカーしてしまい、それに合わせて severity を過大評価するのを防ぐことができる。出発点として:事前条件ゼロで未認証の遠隔アクセスが可能ならクリティカルまたは高リスク、事前条件が一つまたは二つ、あるいは認証が必要なパスなら中リスク、三つ以上、またはローカルのみなら低リスクとする。これらの閾値は自社のシステムに合わせて調整すること。
モデルは文脈が不十分なために深刻度を過大評価する可能性があります。攻撃者が実際に制御できる入力や、それを補う対策が見えない場合があります。前者の例として、認証されていないリクエストによってトリガーされる SQL インジェクションは重大ですが、管理者のみがアクセス可能な設定ファイルからトリガーされる場合は問題にならないことがあります。後者の例では、ソースコードだけでは見えないアップストリームの WAF や認証機能が攻撃を防いでいる場合もあります。
解決策は、トリアージ段階で脅威モデルを提供し、システム内でどの種類の脆弱性に注目すべきか、あるいは気にする必要がないかをモデルに伝えることです。例えば、「認証されたクライアントを信頼している」と明確化することで、重大な問題のクラス全体を簡略化したり除外したりできます。
*あるチームでは、検証できる根拠や脅威モデルの一部として何が期待されるかという文脈がなければ、モデルは過度に自信を持っていることが多く、その対策として発見エージェントと同じ脅威モデルをトリアージエージェントにも提供しました。*
トリアージスキル をお試しください。 これは検証とトリアジの両方を行います:各発見事項に対する複数投票による検証、実行間での重複排除、派生する攻撃可能性に基づく再ランク付け。出力は生のデータダンプではなく、短く、ランク付けされ、責任者が明確なリストとなります。
*One team found the model is often overconfident unless grounded in something to verify, or has more context on whether something is expected as part of the threat model. Their fix was to give the triage agent the same threat model the discovery agent gets.*
Try the triage skill. It does both verification and triage: multi-vote verification per finding, deduplication across runs, and re-ranking by derived exploitability. The output is a short, ranked, owned list instead of a raw dump.
6. パッチ適用:ループを閉じ、次のサイクルのための文脈を改善する
パッチ適用は脆弱性を修正し、ループを完了させる段階です。また、検証された発見結果に基づいて脅威モデルを改善し、信頼境界やより厳重な検討が必要なコンポーネントを更新するとともに、過去の発見結果を次のスキャンの文脈にフィードバックします。各サイクルを通じてコードベースが強化され、次回のスキャンはより情報に基づいたものになります。
パッチ適用の前には、既存のコードで失敗する新しいテストを作成してください。その後、修正を実装し、その同じテストが他の機能を壊さずに成功することを確認します。(はい、これはテスト駆動開発です)もしテストを追加しなければ、修正が静かに後退(レグレス)し、バグが実際に存在したことを事後に証明するのが困難になる可能性があります。
*あるペネトレーションテスターは、生成されたパッチが不整合であることを見つけました—一部は良好で、一部は不良でした。しかし、ハーン(枠組み)がモデルに対して、修正済みコードに対して概念実証を再実行することでパッチを検証するよう指示したことで状況が変わりました。モデルに反復するためのフィードバックを与えることで、パッチの品質が飛躍的に向上し、人間のレビューにかかる時間を節約できました。*
モデルは、根本原因ではなく特定の呼び出し箇所でのみ発見された問題に狭く対応する可能性があります。単純にモデルに対して根本原因の特定と修正を指示するだけで効果的な場合があります。その後、モデルには 2 つのレベルでバリエーションを検出させます:(1) 同じパターン——同じ不具合コードのコピーや他の呼び出し箇所が他にある場合、(2) 同じクラス——SQL インジェクション脆弱性が 1 つあるコードベースは、より多くの SQL インジェクション脆弱性を抱えている傾向があるというものです。検証された発見結果とパッチを適用して脅威モデルを更新し、ループを閉じます。
パッチをリリースする前に、敵対的チェックを実行してください。新しい発見エージェントに攻撃者としてパッチを検査させ、パッチが包括的であることを確認します。その後、生成されたパッチが過度に侵入的すぎる場合に備えて簡素化します。最小限のパッチはレビューが容易で、新たなバグを導入する可能性も低くなります。根本原因を修正するための最小限の変更を指示してください——リファクタリングも、ついでに行うクリーンアップも、書式変更も不要です。
*あるチームが最も一般的なパッチの失敗について語ったこと:「推奨されるパッチは可能な限り制限的になりがちで、他のサービスとの接続を切断するほどになることがあります。問題は解決しますが、そのサービスが最初に動作するために必要な依存関係を壊してしまいます。」*
各パッチは、最も安価なものから順にチェックの階段(ladder of checks)に対して検証できます:
- Build. パッチのコンパイルに成功し、新しいテストもパスします。
- Try to reproduce. 元の PoC が動作しなくなることを確認します。これにより、効果のないパッチを検出できます。
- Check for regressions. 既存のテストスイートが依然としてパスすることを確認します。これにより、破損したパッチや過度に制限的なパッチを検出できます。
- Re-attack. 新しい発見エージェントが敵対的チェックを実行します。これにより、不完全なパッチを検出できます。
最後に、モデルがパッチを記述できる一方で、人間がその責任を負う必要があります。生成されたパッチは予測可能な方法で失敗する可能性があります—例えば、根本原因ではなく症状のみを修正したり、正当な入力をブロックしたり、依存サービスへのアクセスを削除したりすることです。目標は、各パッチを可能な限り検証し、人間のレビューに必要な労力を最小限に抑えることです。また、モデルが気づいていない微妙な点(例:新しい変更の導入、コードスタイル)に開発チームが集中できるよう支援し、パッチに対するレビューと更新を最小限に抑えることも目標です。
patch skill をお試しください。これはトリアージ出力を受け取り、各発見に対して候補となる diff を生成し、独立したレビューエージェントがそれぞれをチェックします。
Getting started
Try running the loop yourself. Clone defending-code-reference-harness and run /quickstart in Claude Code. It walks you through an interactive workflow, from threat modeling to scanning to triage, on a demo target. The repo also includes an autonomous harness and a /customize skill to update the harness for your environment.
Then, run it on your own code. Pick a service or package. Bootstrap a threat model from the code and docs, and go through the interview. Invest in building a sandbox of your environment. Scan. Verify the findings with an independent agent. Triage based on your criteria and review everything rated high and above. Patch. Then re-scan periodically.
Your first scan will surface more findings than you'd expect. Most will require verification and triage. Budget for the pipeline *after* the scan before you budget for more scanning.
Some resources you might find helpful:
- Claude Security:エージェント型脆弱性検出とパッチ適用を担う Anthropic の管理型製品。
- defending-code-reference-harness:対話型ワークフロー用のスキルや、自律実行向けのデモハーンチを提供するコンパニオンリポジトリ。
- claude-code-security-review action:プルリクエストごとに Claude をセキュリティレビュアーとして機能させる GitHub アクション。
- Threat Intelligence Enrichment Agent:脅威インテリジェンスフィードに対して、侵害指標(IOC)を強化するエージェントを構築するためのクックブック。
- Vulnerability Detection Agent:脅威モデルの構築、脆弱性のスキャン、および構造化レポートへの発見事項のトリアージを行うエージェントを構築するためのクックブック。
今後の展望
モデルがコード内の 脆弱性を発見し、悪用する ことが容易になってきていると考えています。したがって、防衛者としての私たちの役割は、敵対者がそれらを悪用する前に、自社のコード内の脆弱性を発見して修正することです。一部のチームでは、ハーンチをイベントに接続するところまで進んでいます。具体的には、バグ報奨金レポートが自動的な変異解析トリガーとなり、セキュリティレビューがスキャンと候補となる発見事項の添付をトリガーしたり、確認された脆弱性が静的解析ツールを更新して将来の再発を防いだりしています。
この取り組みは極めて重要で、 stakes(賭け事)も高いものです。しかし、適切に行われれば、これはより大きく、より希望に満ちた転換の始まりとなります。そこでは、攻撃者が脆弱性を悪用する前に、それを発見して修正することが可能になるのです。
サイバーセキュリティに関する私たちの取り組みに引き続き関心をお持ちいただける場合は、こちらからメールマガジンの購読をご登録ください。
謝辞
本稿はユージン・ヤンとヘナ・ダッタニが執筆し、マイケル・モラッシュ、アベル・リビンク、ジャスティン・ヤング、ベン・モリス、デビッド・ドワーケン、ハスナン・ラクァニーの各氏からの寄稿を含んでいます。本取り組みは、Anthropic においてセキュリティ分野でモデルを活用してきた私たちの経験と、パートナーおよび顧客の皆様から共有いただいた貴重な知見に基づいており、これらに対して深く感謝申し上げます。
原文を表示
Model capabilities are advancing quickly, and unevenly. We’ve been working with security teams to find and fix vulnerabilities in their own code and open source software, and the work has given us a better understanding of how to use models to secure source code. Our primary takeaway: discovery is now straightforward to parallelize, and the bottleneck has shifted to verification, triage, and patching.
To give some indication of this discrepancy, as part of our own scanning of open source software, as of May 22, 2026, we had disclosed 1,596 vulnerabilities. To our knowledge, 97 of these have been patched.
This guide walks through how you can work with Claude Opus to build a threat model, discover vulnerabilities in your codebase, then verify, triage, and patch them. While we don’t have all the answers, we’ll share how teams have scaled discovery and what’s helped in the later stages. *Get started today with the *accompanying repo which includes skills for interactive workflows and a demo harness for autonomous scanning; we’ll call out the skill that implements each step as you read.
The find-and-fix loop
Teams finding and fixing the most vulnerabilities converged on a variation of existing best practices. We’ve distilled them into a sequence of six steps:
- Threat model: Decide what counts as a vulnerability before you start scanning.
- Sandbox: Build a sandbox environment to isolate agents and prove exploits.
- Discovery: Have models look for vulnerabilities in your source code.
- Verification: Independently confirm which findings are actually exploitable.
- Triage: Deduplicate findings, assign severity, and prioritize what needs fixing.
- Patching: Apply the fix, confirm the vulnerability is nullified, and search for variants.
The first two steps—building a threat model and a sandbox—are the setup for the rest of the loop. These are typically done once per codebase and revisited when the underlying system changes. The next four steps are the loop you’ll run against the source: discover, verify, triage, and patch.
The first run on a codebase typically has the highest number of findings. Subsequent runs tend to have fewer—though often more complex—vulnerabilities, as the simpler ones were patched in prior runs. However, don’t expect the *nth* run to have zero new findings. Models are stochastic, and a large codebase can have a long tail of vulnerabilities that continue to trickle in even when the code is unchanged.
On your first iteration with a codebase, you should run the loop multiple times, deciding when to stop based on the number of net-new findings and your risk tolerance for that system. After that first iteration, continue to scan (1) periodically or (2) whenever the code meaningfully changes.
Next, we’ll walk through each step in detail, explaining why it matters, what it produces, and how to implement it.
1. Threat model: Define what counts as a vulnerability
The most common cause of false positives is that the model lacks a good understanding of your trust boundaries. The model might flag code as vulnerable because it assumes a client could send corrupted values or an attacker could control the config, even though these inputs are *trusted* in your environment. Conversely, the model might assume that an internet-facing service is internal-only and thus under-report true vulnerabilities. In both cases, the model is wrong about the threat model, not the code.
One team noticed a pattern across their findings: the model performed best on systems with well-documented threat models, system design docs, requirements, and constraints. When the threat model was well-defined, the model's findings "were exploitable 90 percent of the time."
You can work with Claude to build a threat model in two steps:
First, bootstrap from the code, docs, and vulnerability history. Feed the model what you would hand a new security engineer on day one: architecture docs, wikis, entry points, git history, and past vulnerabilities. This helps overcome the challenge of inferring implicit knowledge, trade-offs, and design decisions from code alone. Then, ask the model to create a threat model that includes the system context, assets, entry points, and trust boundaries. Finally, have the model cluster past bugs and list the relevant vulnerability classes. Make sure the threat model documents what vulnerabilities you do and don’t care about, and why.
One team reviewed hundreds of past CVE and security-fix commits, distilled them into "bug-shape" hints, and asked the model two questions: was the fix complete, and was it applied everywhere else? They found three exploitable issues in an hour. As they put it: "'What have people exploited in the past' is sometimes a much easier cheat-code towards success than 'find me vulnerabilities in this codebase.'"
Second, have the model interview someone who knows the system well. Consider Shostack's four questions: *What are we building? What can go wrong? What are we doing about it? Did we do a good job?* Run the bootstrap step first so the interviewee isn’t starting from scratch. This way, instead of spending hours researching and building a threat model from scratch, they can start from a draft. And while the interview step is optional, it adds context the model can’t get from the code or docs, which improves the threat model.
A few practices can make a big difference:
- Consider your dependencies’ security policies. Many open-source projects publish one. For example, vLLM’s security.md, SQLite's "Defense Against the Dark Arts", and ImageMagick's security policy. Your threat model should consider them directly instead of rebuilding a policy from scratch.
- Name what is trusted. If you trust config files or authenticated clients, document it in the threat model. These assumptions help separate non-exploitable bugs from actual exploits.
- Include a THREAT_MODEL.md with the code. Have it in the repo and update it as code changes. The discovery agent can then read it before searching, skipping known non-issues.
You’ll use the threat model in two places. In discovery, as scope: partition the code, prioritize targets, and skip what is out of scope. This helps with large codebases you cannot scan entirely. In triage, as a filter: after scanning broadly, use the threat model to better calibrate severity to your system and environment.
One team scanning a large project had a 40% false positive rate and dug into why. The findings were reproducible and the PoCs proved exploitability. But the dev team who owned the code dismissed them as false positives because the bugs didn't fit the project's threat model. Another team's CISO put it succinctly: "[The model has] good context of the code, but not good context of us."
Try the threat-model skill. It walks through both steps described in this section—bootstrap derives a draft from your code, CVEs, and git history, and interview walks a system owner through Shostack’s four questions to refine it. The output is a THREAT_MODEL.md file which is used in the Discovery and Triage steps.
2. Sandbox: Run agents safely and verify exploitability
One purpose of the sandbox is to protect your systems. To enable models to run safely and autonomously, you need a strong isolation layer. Without it, the agent may overshoot the target and do something unexpected.
One team told the model it had no network access—when it actually did—and the model discovered it could fetch from GitHub anyway. Another team observed an agent answer a GitHub issue mid-scan. Neither action was malicious, but both demonstrated the need to enforce constraints via code and configuration.
Match the isolation to your threat model. Containers are fine for the discovery agent reading code, but run the target and its PoCs in a microVM (like Firecracker) or a full VM with egress locked down so nothing can reach your production systems. And never have credentials (~/.aws, ~/.ssh, .env) available to the agent.
Give the sandbox network access only while you’re setting it up. Pull the dependencies, build, install tools, deploy the target, and run the existing tests to confirm everything works. Then, snapshot the environment and remove its network access. During scanning, allow traffic only to the model API, routed through a local proxy. Load the snapshot at the start of each run so every scan begins from the same clean slate.
Another purpose of the sandbox is to prove exploitability. During static scanning, the model reads code and hypothesizes what might break, but it cannot test if a path is reachable or if there's a compensating control. As a result, the model might flag unexploitable code-correctness bugs that you don’t actually care about. When teams built a sandbox where the agent could compile code, run tests, and detonate a proof of concept, non-exploitable findings dropped significantly.
One offensive-security team built a harness that gives the agent a test bed, with a simple verification rule: it’s only a true positive if the agent can build a proof of concept and run it on the test bed. Their assessment after six weeks was that "the biggest efficacy lever has been giving the model test beds, live systems, and running the PoCs."
When building sandboxes, pin as much as you can so every run uses the same code in the same environment: image tags, commit SHAs, dependencies, and build commands. Cache a local copy so the build requires no network, and aim for the container to be durable so multiple testing loops can just load it.
One team's scan flagged a vulnerability that turned out to be a byproduct of the agent downloading an older version of the library instead of what was actually deployed. This was caught by an engineer who read the transcript and spotted that a different dependency was being downloaded. They now build Docker containers with dependencies pinned to match production, so the finding agent and the verification agent operate on the same artifacts an attacker would.
It’s important to build sandboxes that are faithful enough to production. Excluding dependencies (like a queue or datastore) can lead to under-reporting bugs that may exist in production. Conversely, ignoring production defenses (like a WAF or auth gateway) leads to the model reporting unexploitable findings that your prod environment already mitigates.
Nonetheless, if building a representative sandbox is impractical because of cloud dependencies, data stores, or other real-world complexities, start with the discovery step (below) instead. You don’t necessarily need to run PoCs in a sandbox. Frontier models are good at finding vulnerabilities from just analyzing source code. Several teams, including our own, have found this effective. The trade-off is in the verification phase, where without a running target we can’t prove findings with a PoC, so budget more time for verification. You can also invest in the sandbox later, once the volume of findings justifies it.
Refer to the harness README.md for a reference sandbox. In this implementation, agents and targets run in gVisor-isolated containers with egress locked to the model API. The target is built from a Dockerfile pinned to a specific commit, with setup_sandbox.sh handling the setup phase.
3. Discovery: Provide rich context, shorter prompts, and useful tools
Give the discovery agent access to context it can load as needed, such as the threat model, architecture docs, and results of past scans. When the agent understands your trust boundaries and how the system is actually deployed, it can better identify vulnerabilities specific to your system.
We’ve found frontier models to benefit from increasingly simple prompts during the discovery phase. Counterintuitively, more prescriptive prompts make discovery worse—long checklists tend to reduce the model’s creativity and generate fewer novel bugs. Here are some prompting tips that helped in the discovery phase:
- Provide the goal and context. Indicate the “why” and “what”—why you’re scanning, what a finding that matters looks like, what system is being scanned—and leave “how to scan for vulnerabilities" to the model. Frontier models are increasingly good at security tasks and being overly prescriptive can narrow what they try.
- Try asking for a specific vulnerability class. If you’d like to focus on a specific type of vulnerability guided by prior CVEs or the codebase’s language, say that. Describe the vulnerability class, what it does and where it tends to live, so the model can recognize it in your codebase.
- Define the output. Ask for a structured report with predefined fields, and order them so the model’s reasoning builds on each field. Example fields include rationale, finding, impact, severity, etc. Include an escape hatch so the model can exit early for weak findings.
Give the model tools to search through and read the codebase, such as grep, glob, etc. Also let the model use security-specific tools your team might use such as SAST scanners or fuzzers. Ask the model what tools are needed for a specific task and make them available. Finally, let the model build tools as needed: recent frontier models are increasingly good at writing the tools they need.
In addition to source code, one pentesting team gave the discovery agent tools to send requests, check the responses, and query traffic logs. As a result, the agent didn’t need to guess whether a path could be reached and could test each candidate against the running application as it went, improving their true-positive rate to nearly 100 percent.
Have the model do a first pass over the system to partition the search space, such as by attack surface, endpoint, or component. Then, feed those partitions to parallel discovery agents so they don’t converge on the same shallow bugs. Finally, run a system-level pass that takes the partition-level findings as context to search for vulnerabilities.
Teams that tried to brute-force discovery quickly hit diminishing returns. From one team: "We initially tried to just horizontally scale and send more agents, but saw limiting returns." Another increased the number of focus areas and parallel agents and got "tons of issues", most of them duplicates of each other.
If you have a sandbox to run the target, ask the discovery agent to build a PoC of the finding, such as a script, a crashing input, or a failing test. Building the PoC helps the agent iterate and pin down the finding, and the artifact gives the verification agent concrete evidence to evaluate. Nonetheless, findings the agent can’t reproduce can still be reported, flagged as unproven, so you keep recall high.
The vuln-scan skill is helpful in this stage. It reads your THREAT_MODEL.md, partitions the target into focus areas, and fans out parallel review agents per area. The output is structured findings the next steps consume directly.
4. Verification: Filter out non-exploitable findings
Discovery optimizes for recall; verification optimizes* for precision*. In other words, discovery should find as many vulnerabilities as possible—even unlikely ones—and verification should exclude findings that are not actually exploitable. When an agent tries to do *both* in the same step, it can self censor and exclude exploitable true positives. We learned this the hard way, where asking discovery agents to also verify findings led to them filtering out true positives that a separate verification step would have confirmed.
The verifier agent should be independent from the discovery agent. Run the verifier in a fresh container without a shared filesystem or conversation history. If the verifier is exposed to the discovery agent’s reasoning, it may simply agree instead of testing the claim. Thus, give the verifier only (1) the proof of concept or written finding and (2) the codebase, so it can search for mitigations the finder missed (e.g., upstream validation, auth gates, type constraints, or unreachable code).
If a single verification pass still lets too many unexploitable findings through, try running multiple independent verifiers. They can consider different angles or run with different models. Then, take the majority vote. Also consider having a separate judge to decide between the discovery and verification agents’ results.
Prompt the verification agent to disprove the discovery agent’s findings. Have the verifier assume each finding is a false positive and search for reasons the finding is wrong. Include clear criteria that the verifier agent can use to determine if the finding is a true positive. This matters most when the discovery agent’s output doesn’t include a PoC. Aim to exclude as many non-exploitable findings as possible to reduce effort on manual reviews.
Across the teams we’ve worked with, adding an adversarial verifier roughly halved the rate of non-exploitable findings from the discovery phase. Requiring that verifier to also build a proof of concept confirming the exploit brought the false positive rate to near zero. Together, these two steps helped to reduce the downstream triage and patching load significantly.
If you’re able to sufficiently reproduce your production environment in a sandbox (see step 2), prompt the verifier agent to build and execute a reproducible proof of concept (PoC). If the PoC works, you can conclude the finding is exploitable. Note that the inverse isn’t true—failure to produce a working PoC is not proof of a false positive.
One team scanning open-source packages built a verification step that helped to close the loop: scan the package, generate a proof of concept, then deploy a mock application that uses the package and triggers the PoC. Their take was that: "Validation is the biggest holdup and the PoC is the validation."
5. Triage: Deduplicate by root cause, rank by preconditions and impact
While verification confirms a finding is exploitable, triage assesses patching priority. Previously, when discovery took more effort, the engineer who found the bug also triaged it. Now, with models capable of finding a hundred candidates before lunch, triage has become the bottleneck.
Proper triage helps prevent alert fatigue. If you submit too many bugs that are duplicated or have an inflated severity, product engineers may stop reading them, even the ones that need immediate patching. Open source maintainers are especially likely to be overwhelmed by untriaged findings since they receive reports from many different users that rely on their software.
Multiple teams shared the same lesson: if we send product engineers a pile of findings where a majority are non-exploitable, they will lose trust in the reports and give up. They also prioritize critical and high findings to avoid overwhelming the engineers downstream. Other teams found a win by pointing the model at their existing backlog—open findings from prior scanners, prior models, bug-bounty intake—and cleared hundreds of stale items in days.
To deduplicate findings, consider the root cause. Scanners often flag one bug at multiple call sites or report multiple symptoms of a single root cause. Here’s one practical approach: First, use a cheap deterministic pass: same file, same category, vulnerability line numbers within ten lines of each other. Then, have a model apply qualitative rules to what remains:
- Treat as duplicate: the same root cause worded differently; the same vulnerability reported at multiple call sites; a missing global protection (like an auth check) reported per endpoint; or a cause and its consequence flagged in the same path.
- Treat as distinct: different vulnerability classes in the same file; different variables reaching different sinks; two independent bugs inside one helper; the same missing check on two endpoints, but each requires its own fix.
If your harness generates PoCs and patches for each finding, another approach to deduplicate findings is to check if the patch for one finding also disarms the PoCs of others.**
After deduplication, rate the severity of each finding based on:
- Reachability. Can an attacker reach this code from a real entry point, or is it only reachable from internal code and endpoints?
- Attacker control. Does untrusted input reach the sink intact, or does something upstream sanitize or constrain it?
- Preconditions. What has to be in place for the bug to trigger: a non-default setting, a specific feature flag, a narrow time window the attacker has to hit?
- Authentication. Can an unauthenticated attacker trigger it, or does it require a logged-in user or an admin?
- Read vs. write. Can the attacker only read data, or also modify it?
- Blast radius. If the PoC fires, who is affected? One user or all users, one tenant or the platform, userland or the kernel?
To turn the rubric into a score, have the model write out its answer to each question before assigning a severity. Going through the evidence first keeps the model from anchoring on the bug class (“SQL injection, so critical”) and then inflating the severity to match. As a starting point: zero preconditions with unauthenticated remote access is critical or high severity. One or two preconditions, or an authenticated path, is medium. Three or more, or local-only, is low. Adjust the thresholds to your system.
Models may inflate severity because they have insufficient context. They may not know what inputs an attacker actually controls, or they cannot see compensating controls. As an example of the former, a SQL injection is critical if triggered by an unauthenticated request but a non-issue if triggered by an admin-only config file. For the latter, upstream WAF or authentication that prevent exploits may not be visible from the source code alone.
The solution is to provide a threat model during triage that tells the model which types of vulnerabilities you do and don’t care about in your system. For example, clarifying that "we trust authenticated clients" can simplify or remove a whole class of criticals.
One team found the model is often overconfident unless grounded in something to verify, or has more context on whether something is expected as part of the threat model. Their fix was to give the triage agent the same threat model the discovery agent gets.
Try the triage skill.** It does both verification and triage: multi-vote verification per finding, deduplication across runs, and re-ranking by derived exploitability. The output is a short, ranked, owned list instead of a raw dump.
6. Patching: Close the loop and improve context for the next cycle
Patching is where you close the loop and fix the vulnerabilities. It also helps to improve the threat model based on verified findings—updating trust boundaries or components that need more scrutiny—and feed past findings into the next scan’s context. Each cycle hardens the codebase and makes the next scan better informed.
Before patching, write a new test that fails with the existing code. Then, implement the fix and confirm the same test now passes without breaking anything else. (Yes, it’s test-driven development). If you don't add a test, the fix can silently regress and it can be hard to retroactively prove the bug was real.
One pentester found that their generated patches were inconsistent—some good, some bad—until the harness told the model to validate patches by re-running the proof of concept against the patched code. By giving the model feedback to iterate against, patch quality jumped, saving time on human review.
Models may narrowly address findings at a specific call site instead of the root cause. Simply prompting the model to identify and fix the root cause can be effective. Then, have the model look for variants at two levels: (1) same pattern, where there are other call sites or copies of the same buggy code elsewhere, and (2) same class, where a codebase with one SQL injection vulnerability tends to have more SQL injection vulnerabilities. Update the threat model with the validated findings and patches to close the loop.
Before you ship the patch, run an adversarial check. Have a new discovery agent probe the patch as an attacker to confirm the patch is comprehensive. Then, simplify the generated patch to address patches that are too invasive. Minimal patches are easier to review and less likely to introduce new bugs. Prompt for the smallest change that fixes the root cause—no refactoring, no drive-by cleanups, no reformatting.
One team on their most common patch failure: "The recommended patches tend to be as restrictive as possible, to the point that they would break connections with other services. It would address the issue, but break the dependencies that allow the service to work in the first place."
You can validate each patch against a ladder of checks, starting with the cheapest:
- Build. The patch compiles and the new tests pass.
- Try to reproduce. The original PoC should stop working. This catches ineffective patches.
- Check for regressions. The original test suite still passes. This catches broken or over-restrictive patches.
- Re-attack. A fresh discovery agent runs an adversarial check. This catches incomplete patches.
Finally, while the model can write the patch, a human still needs to own it. Generated patches can fail in predictable ways—fixing the symptom instead of the root cause, blocking legitimate input, or removing access to a dependent service. The goal is to validate each patch as much as possible so human review requires less effort. The goal is to help the dev team focus on nuances the model might be unaware of (e.g., incoming changes, code style) with minimal review and updates needed to patches.
Try the patch skill. It consumes the triage output and generates a candidate diff per finding, with an independent reviewer agent checking each one.
Getting started
Try running the loop yourself. Clone defending-code-reference-harness and run /quickstart in Claude Code. It walks you through an interactive workflow, from threat modeling to scanning to triage, on a demo target. The repo also includes an autonomous harness and a /customize skill to update the harness for your environment.
Then, run it on your own code. Pick a service or package. Bootstrap a threat model from the code and docs, and go through the interview. Invest in building a sandbox of your environment. Scan. Verify the findings with an independent agent. Triage based on your criteria and review everything rated high and above. Patch. Then re-scan periodically.
Your first scan will surface more findings than you’d expect. Most will require verification and triage. Budget for the pipeline *after* the scan before you budget for more scanning.
Some resources you might find helpful:
- Claude Security: Anthropic’s managed product for agentic vulnerability detection and patching.
- defending-code-reference-harness: Companion repo with skills for interactive workflows and a demo harness for autonomous runs.
- claude-code-security-review action: Github action with Claude as a security reviewer on every pull request.
- Threat Intelligence Enrichment Agent: Cookbook to build an agent that enriches indicators of compromise against threat intel feeds.
- Vulnerability Detection Agent: Cookbook to build an agent that builds a threat-model, scans for vulnerabilities, and triages findings into a structured report.
Moving forward
We believe it’s getting easier for models to find and exploit vulnerabilities in code. Thus, our work as defenders is to find and fix the vulnerabilities in our code before adversaries exploit them. Some teams have gone as far as connecting their harnesses to events, where a bug bounty report triggers an automated variant analysis, a security review triggers scanning and has candidate findings attached, or a verified vulnerability updates the static analysis tooling to prevent it in the future.
The work is critical and high stakes. But done right, it’s the start of a larger, more hopeful shift, where we’ll be *able *to find and fix vulnerabilities before attackers exploit them.
If you’d like to stay connected to our work on cybersecurity, please sign up to our mailing list, here.
Acknowledgements
Written by Eugene Yan and Henna Dattani, with contributions from Michael Molash, Abel Ribbink, Justin Young, Ben Morris, David Dworken, and Hasnain Lakhani. This work draws upon our experiences working with models for security at Anthropic and the valuable insights shared by our partners and customers, for which we’re deeply grateful.
News to Guide
ニュースの次に確認する
発表内容を、現在の料金や仕様と照らし合わせられる関連ガイドです。
今日のまとめ
AIデイリーブリーフで今日の重要ニュースをまとめ読み