Atlassian Confluence Cloud と Amazon Quick の統合を発表
AWS は、Atlassian Confluence Cloud と Amazon Quick を統合する新機能を発表し、自然言語によるドキュメント検索と管理を可能にする実用的なガイドを提供した。
キーポイント
コンテキストスイッチの削減
Confluence のドキュメントと他システム(S3, JIRA など)のデータを連携させ、ツール間の移動なしで自然言語クエリによる検索・更新を可能にする。
Quick 統合の 3 つのアプローチ
組み込みコネクタ、カスタム REST API(OpenAPI)、および MCP サーバーを利用した動的ツール発見の 3 つの方法で外部システムと接続できる。
アクションとナレッジベースの構築
本稿では特に、構造化データや非構造化ドキュメントをインデックスする「ナレッジベース」と、タスクを実行する「アクション」の設定手順に焦点を当てている。
エンタープライズ技術スタックとの統合
社内 Wiki、イントラネット、ビジネスクリティカルなアプリケーション、AWS データサービスなど、既存の技術環境とシームレスに連携する仕組みを解説している。
影響分析・編集コメントを表示
影響分析
この発表は、エンタープライズ環境における AI エージェントの実用性を高める重要な一歩であり、情報探索とタスク実行の境界を曖昧にすることで業務効率を劇的に向上させる可能性があります。特に、既存の Atlassian および AWS ツールチェーンを持つ企業にとって、追加の開発コストを抑えつつ RAG(検索拡張生成)やエージェント機能を実装できる道筋を示しており、即戦力となる技術的価値が高いです。
編集コメント
単なるドキュメント検索の枠を超え、アクション実行を可能にする「Quick」の進化は、エンタープライズ AI の次のステップを示唆しています。特に MCP プロトコルのサポート追加は、カスタムツール開発のハードルを下げる画期的な動きと言えます。
チームは、Atlassian Confluence Cloud と Amazon Quick を統合することで、複数のシステムを行き来することなくドキュメントを検索・管理できます。ドキュメントが Confluence に保存されている一方で、関連データが他のシステムに存在する場合、チームはツール間の切り替えや文脈の再検索、手動での情報収集に時間を浪費してしまいます。これらの中断は意思決定を遅らせ、利用可能な知識と実行可能なインサイトの間にギャップを生み出します。Confluence Cloud との直接統合により、Quick インターフェースから自然言語クエリで Confluence のコンテンツを検索可能になることで、文脈の切り替えを削減できます。チームは Confluence ページに対してクエリを実行し、ドキュメントを取得・更新しながら、Amazon Simple Storage Service (Amazon S3)、Atlassian JIRA、またはその他のビジネスアプリケーションなど、他の統合システムからのデータにもアクセスできます。
本記事では、Quick と Confluence Cloud の統合設定方法について解説します。これには、セマンティック検索用のナレッジベースの作成、Confluence ページの照会や管理を行うアクションの設定、および Quick Spaces におけるリソースの整理が含まれます。Quick は、社内ナレッジリポジトリや企業イントラネットから、ビジネスに不可欠なアプリケーション、AWS データサービスに至るまでの、現在のエンタープライズ技術スタックと統合されます。これらの統合は 3 つのカテゴリーに分類されます:接続されたアプリケーション間でタスクを実行するためのアクション、ドキュメントやウィキなどの非構造化コンテンツをインデックス化するナレッジベース、および Amazon Redshift のような構造化データソースに対する自然言語クエリ用のトピックとデータセットです。本記事では、ナレッジベースとアクションの設定に焦点を当てます。
*Actions* は、プロンプトまたはクエリの時点で Quick を外部システムに接続します。Quick 内で直接、読み取り、書き込み、タスクの自動化を行うことができます。アクション統合を設定する方法は以下の 3 つです:
- 組み込みコネクタ(Confluence Cloud、Jira、Salesforce などの人気ツール向けの事前構築済み・設定駆動型統合機能)を介して
- OpenAPI 仕様を使用したカスタム REST API を用いて(自社またはサードパーティの API に接続する場合)
- Model Context Protocol サーバー(MCP)(カスタムまたはサードパーティの MCP サーバーから動的なツール検出を可能にする、柔軟で標準ベースのアプローチ)を介して
Confluence Cloud などの一部のサービスは複数の統合パスをサポートしています。本記事では、組み込みコネクタを使用したアクション統合の設定に焦点を当てます。
*ナレッジベース* は、ユーザーがクエリを実行する前にコンテンツをインデックス化します。ナレッジベースを作成すると、Quick が Confluence Cloud や JIRA などの外部システムに接続し、ドキュメントやウィキを取得して検索可能なインデックスを構築します。ユーザーが質問をすると、Quick はリアルタイムで外部システムに接続するのではなく、この事前に構築されたインデックスから関連情報を取得します。このアプローチにより、非構造化コンテンツが自然言語クエリを通じて即座に検索可能になります。
アクションとナレッジベースを組み合わせることで、エンタープライズデータとワークフローを Quick へ柔軟かつ補完的な方法で取り込むことができます。
前提条件
Confluence 統合を設定する前に、以下の事項が揃っていることを確認してください:
- Atlassian Confluence Cloud および、OAuth 2.0 アプリケーションの作成と API スコープの管理を行うための管理者権限を持つ開発者アカウント
- Amazon Quick のサブスクリプション: インテグレーションを作成するには Quick Enterprise、既存のインテグレーションを利用するには Quick Professional
- Quick にアクセスし、インテグレーションを作成するための適切な AWS Identity and Access Management (IAM) 権限を付与された AWS アカウント
本記事で説明するインテグレーションは、AWS の共有責任モデルに従っています。AWS がインフラストラクチャおよび基盤サービスのセキュリティを管理し、お客様には OAuth 権限の設定、API スコープの管理、権限設定を通じて Confluence コンテンツへのアクセス制御、および組織のデータガバナンスポリシーとの整合性の検証が責任として課されます。
Amazon Quick は、本インテグレーション全体を通じてデータのセキュリティを維持しており、保存時および転送時の暗号化を実施しています。詳細については、Quick における AWS セキュリティをご覧ください。
ソリューションの概要
メリットを理解していただいたところで、Quick で Confluence Cloud の統合を作成し、Confluence のコンテンツを同期するためのナレッジベースとアクションを設定し、権限を構成し、自然言語クエリを通じて Confluence クラウドスペースと対話する方法をご説明します。最終的には、Confluence の ウィキページ のコンテンツを活用して、有意義なインサイトを創出できるようになります。
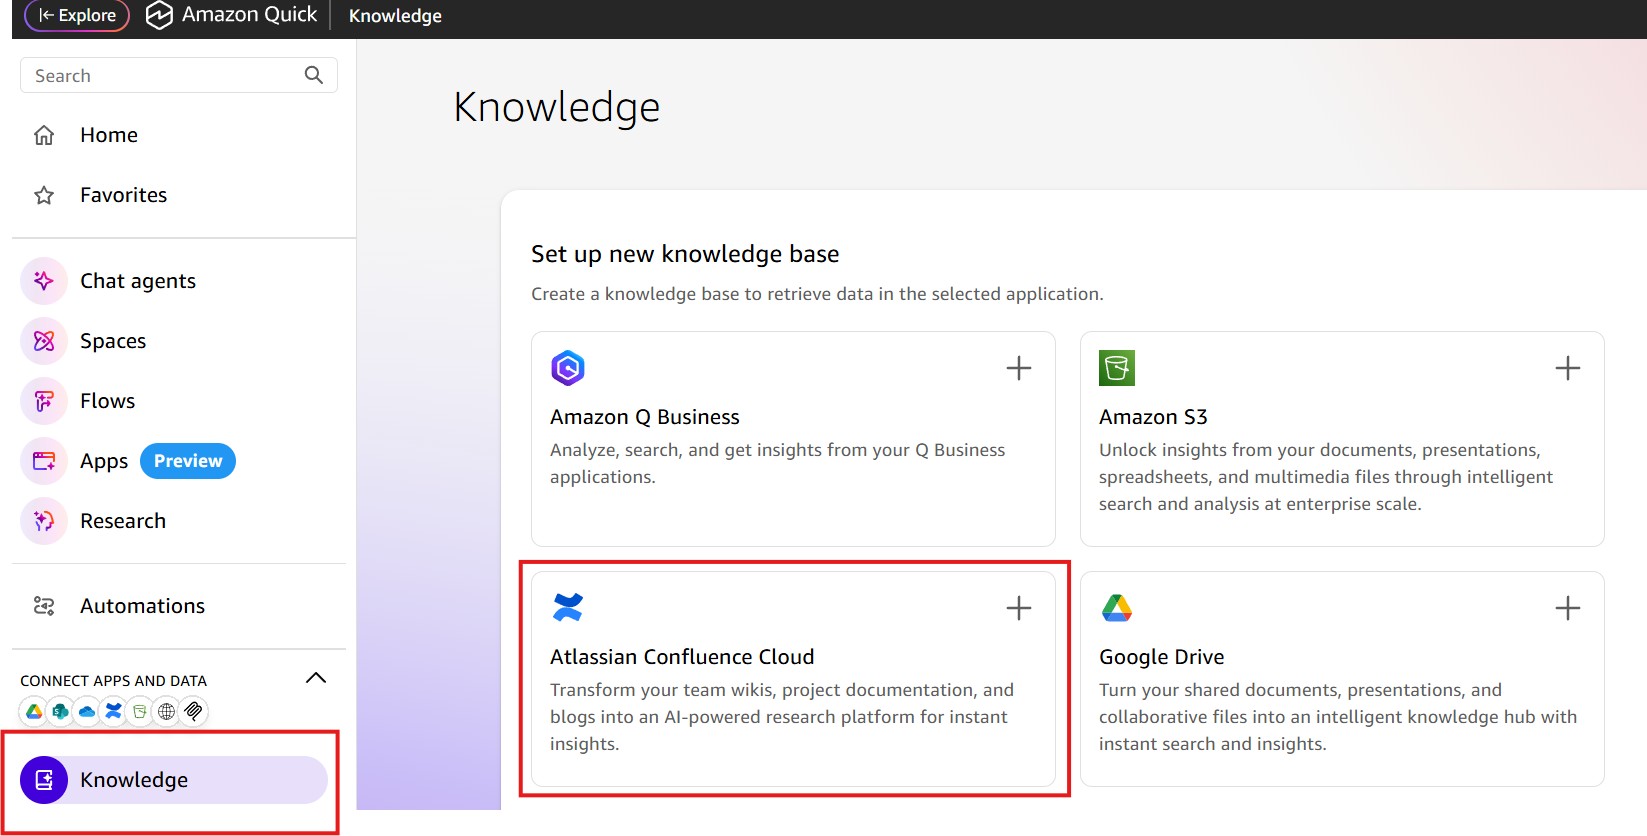
Atlassian Confluence Cloud ナレッジベースの作成
Quick におけるナレッジベースとは、データソースから取得した文書やコンテンツを整理・索引化したもので、生成 AI を活用した検索および質問応答機能を強化するために Quick が最適化されたものです。ナレッジベース統合機能を使用することで、外部ソースからの情報を検索可能なリポジトリとして作成できます。
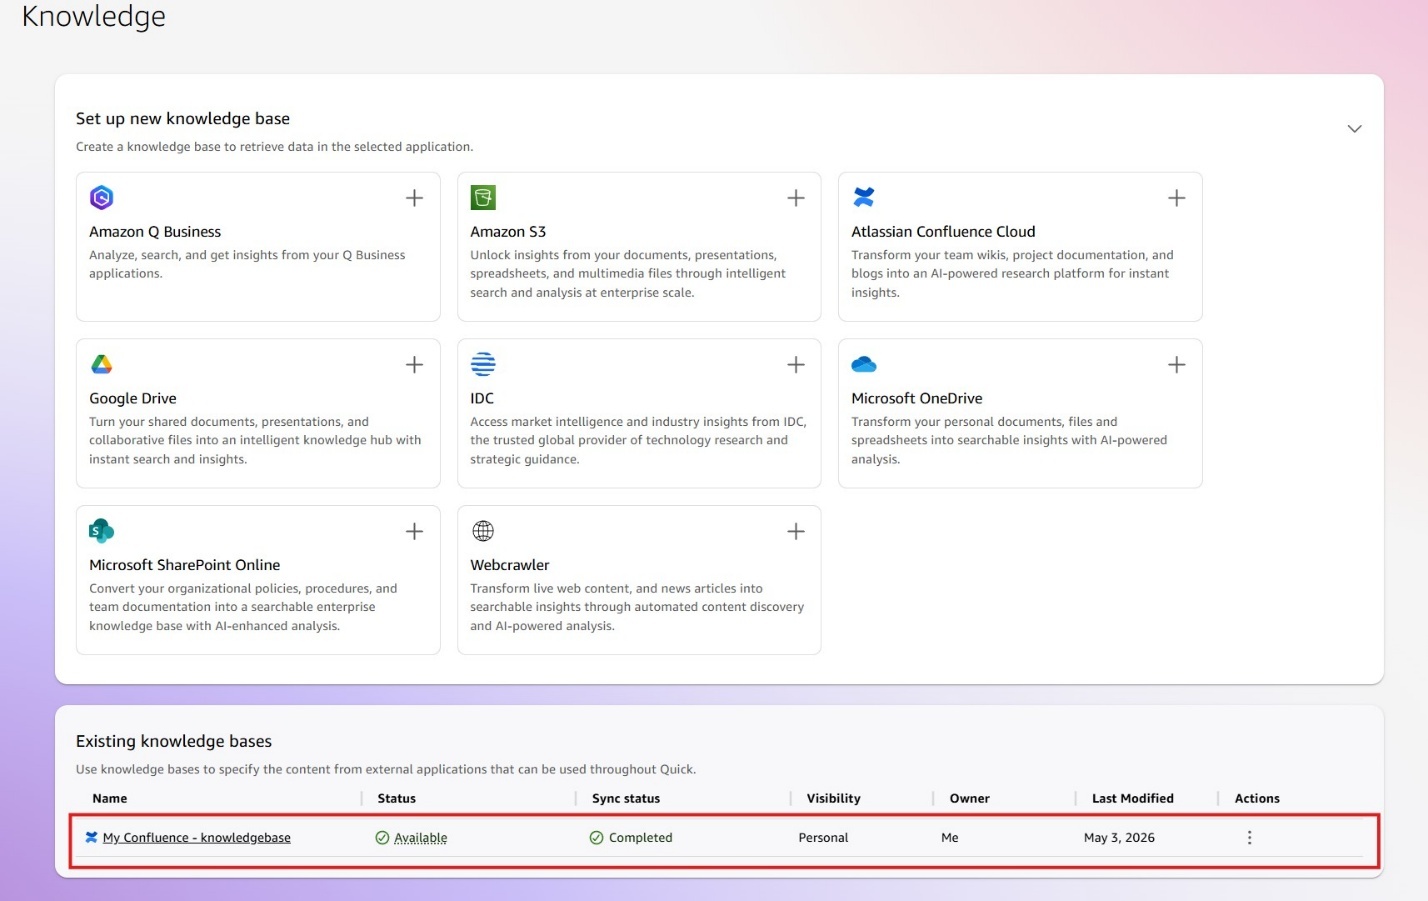
Quick コンソールでKnowledgeボタンを選択し、新しい統合を設定します。Set up new knowledge baseセクションにて、Atlassian Confluence Cloud カード内のプラス (+) アイコンをクリックしてください。Atlassian Confluence Cloud カードは、Amazon S3 や Atlassian Jira Cloud など、他の利用可能なナレッジベース統合カードと共に表示されます。
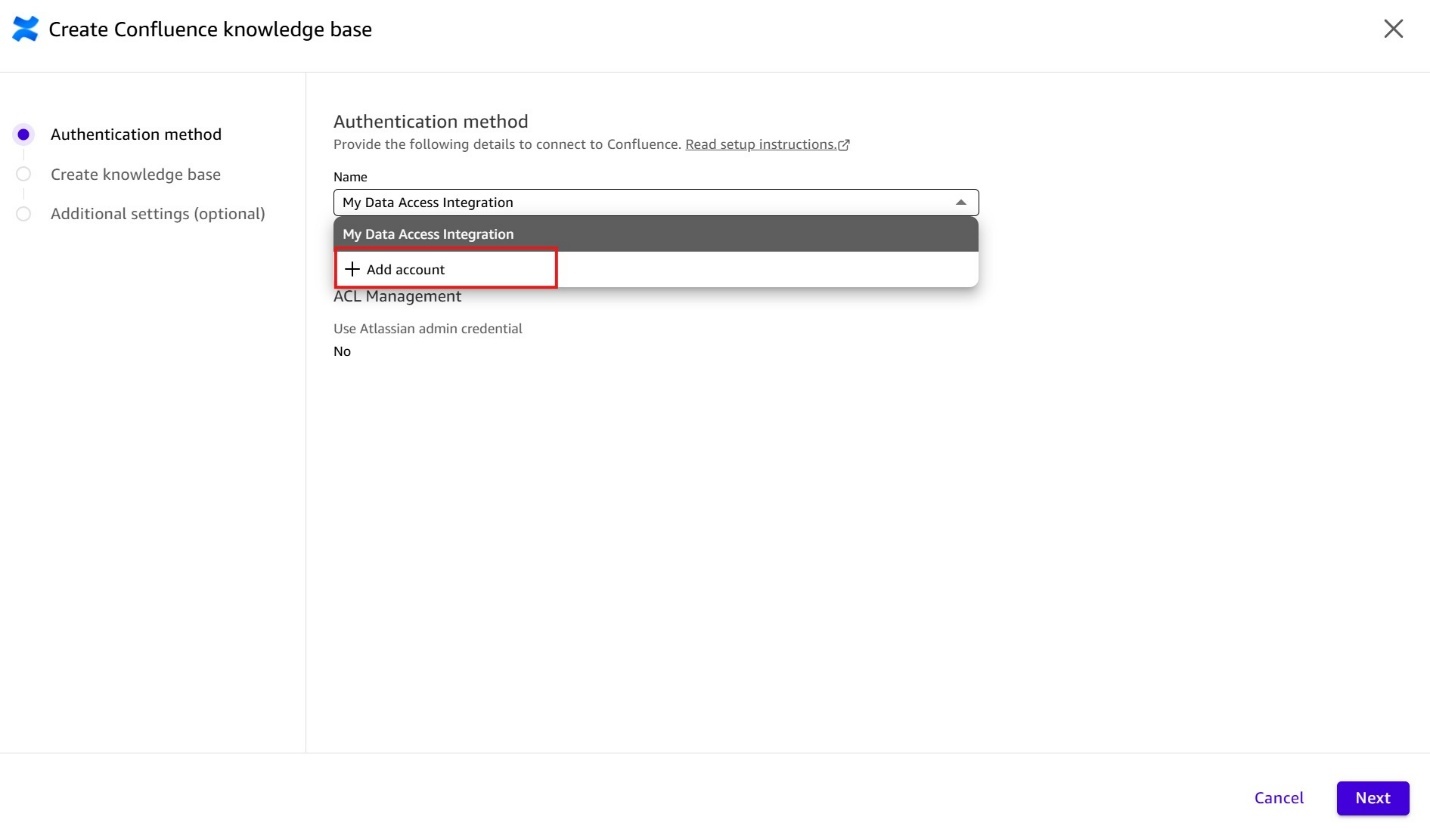
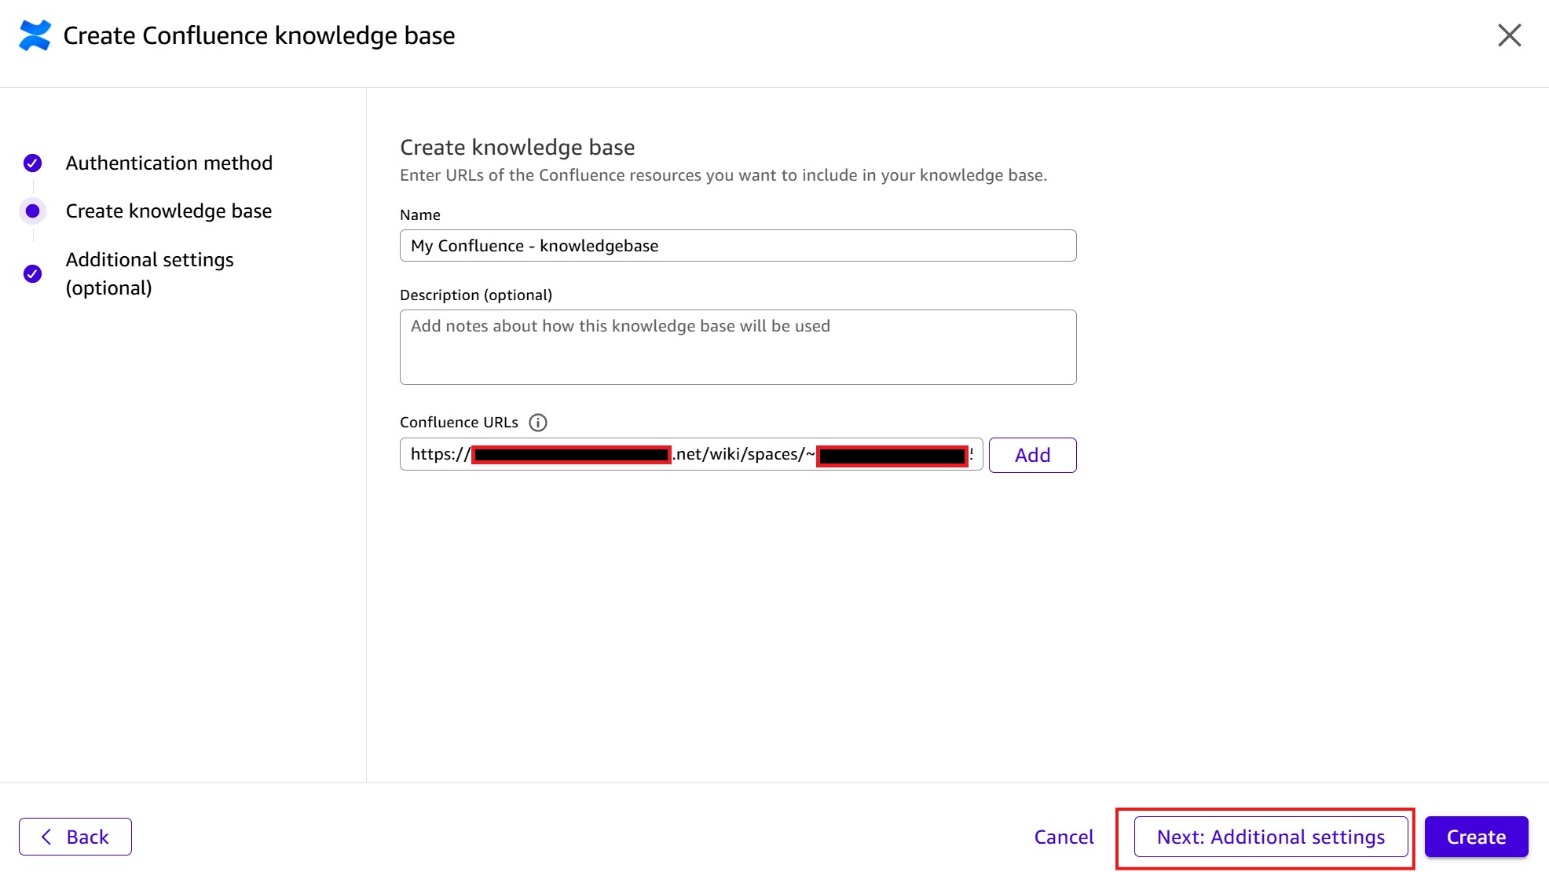
Create Confluence Knowledge baseページにて、My Data Access Integrationドロップダウンメニューを選択し、Add accountをクリックして、Confluence Cloud インスタンスを接続します。
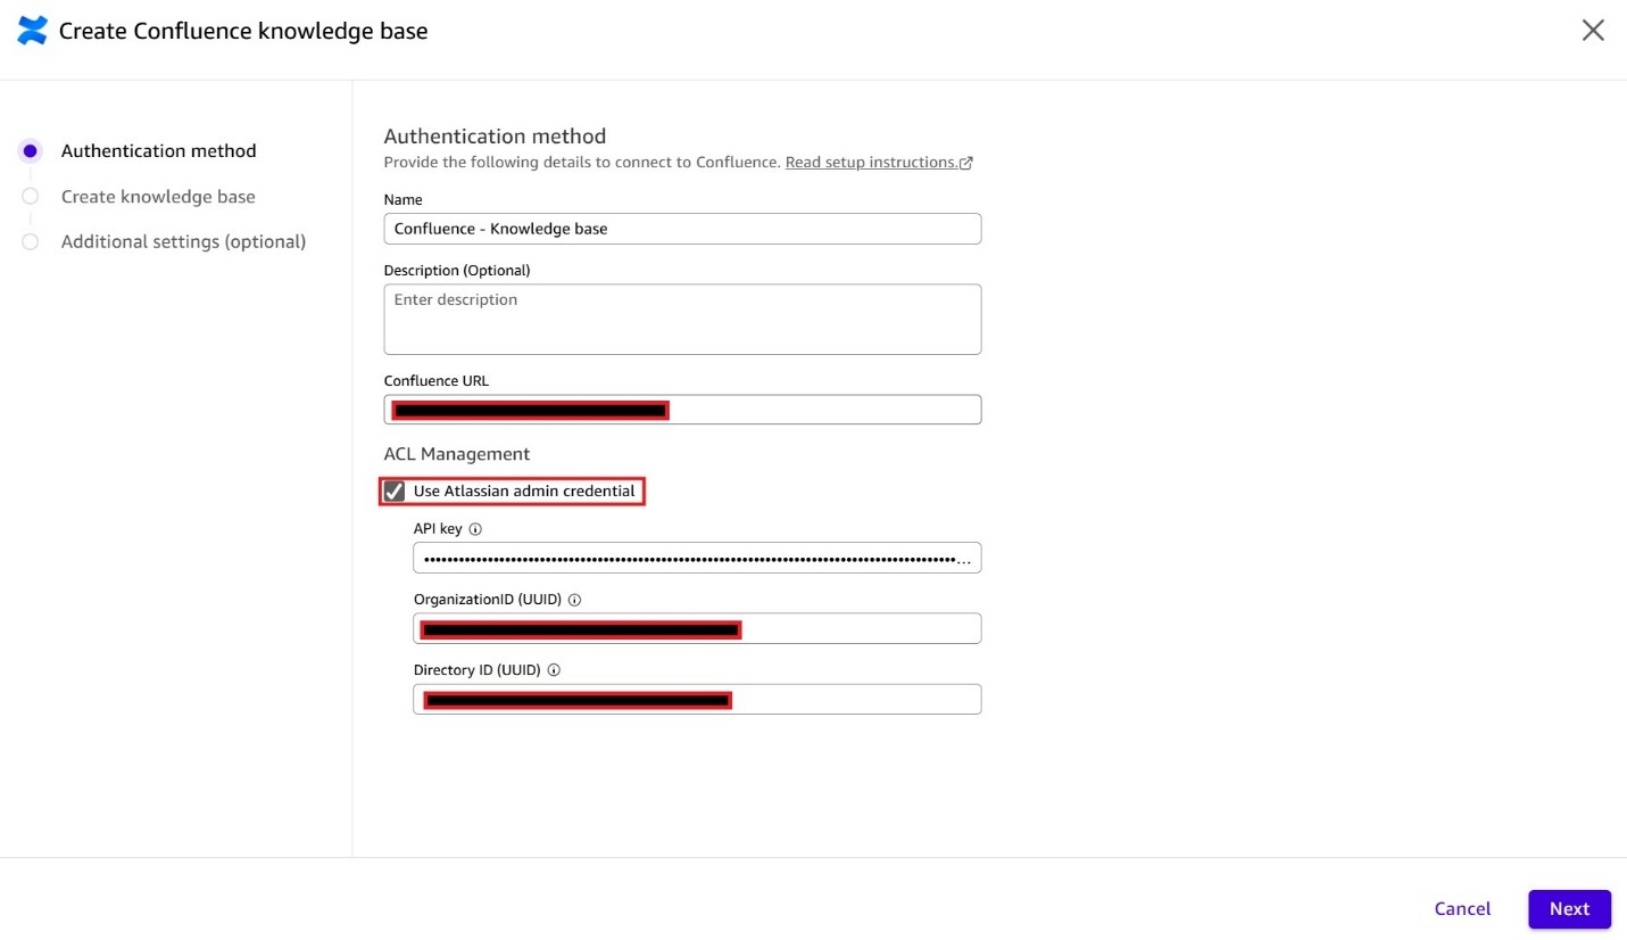
認証方法画面で、Confluence URLテキストボックスに Confluence の基本 URL を入力してください。Confluence Cloud の URL は、.atlassian.net で終わる基本 URL である必要があります(例:yourinstance.atlassian.net)。
Confluence Cloud を Quick のナレッジベースに接続するには、管理者の関与は不要です。Confluence URL を入力し、OAuth 権限プロンプトを受け入れれば、Quick が認証処理を代行します。API キーや管理コンソールへのアクセス、IT 部門の関与がなくても、誰でもこの設定を独立して行うことができます。
ドキュメントレベルでのアクセス制御(ACL: Access Control List)は、Quick にユーザーごとの Confluence 権限を適用させたい組織向けのオプション機能です。これにより、ユーザーは自分が既にアクセス権限を持つコンテンツからの回答のみを表示できるようになります。ACL の有効化には、Atlassian 管理者の認証情報(API キー、Organization ID、Directory ID)が必要です。
詳細については、「ドキュメントレベルでのアクセス制御」をご覧ください。ACL を有効化しない場合、アクセス権限はナレッジベースレベルで管理されます。ナレッジベースへのアクセス権を持つユーザーであれば、その内部のすべてのコンテンツからインサイトを得ることができます。
本ブログ記事では、ACL 有効化済み接続を使用しています。
ドキュメントレベルのアクセス制御を有効にするには、ACL Management の下の Use Atlassian admin credential チェックボックスにチェックを入れ、API Key, Organization ID and Directory ID フィールドに入力してください。これらの Atlassian 管理者認証情報を取得する方法については、こちら をご覧ください。
有効化すると、Amazon Quick はユーザーのアクセス権限をリアルタイムで検証し、以下の Confluence ACL リソースをクロールします:
- スペース – デフォルトでは、スペースの権限はスペース内のすべてのドキュメントに適用されます。
- ページ – ページは特定のユーザーやグループに対して制限できます。ネストされたページは親ページの制限を引き継ぎ、独自の制限を持つこともできます。
- ブログ – ブログ投稿は、そのスペース内の特定のユーザーやグループに対して制限できます。
- アタッチメント – ページまたはブログ投稿に添付されたファイルは、親ドキュメントのアクセス制御を引き継ぎます。
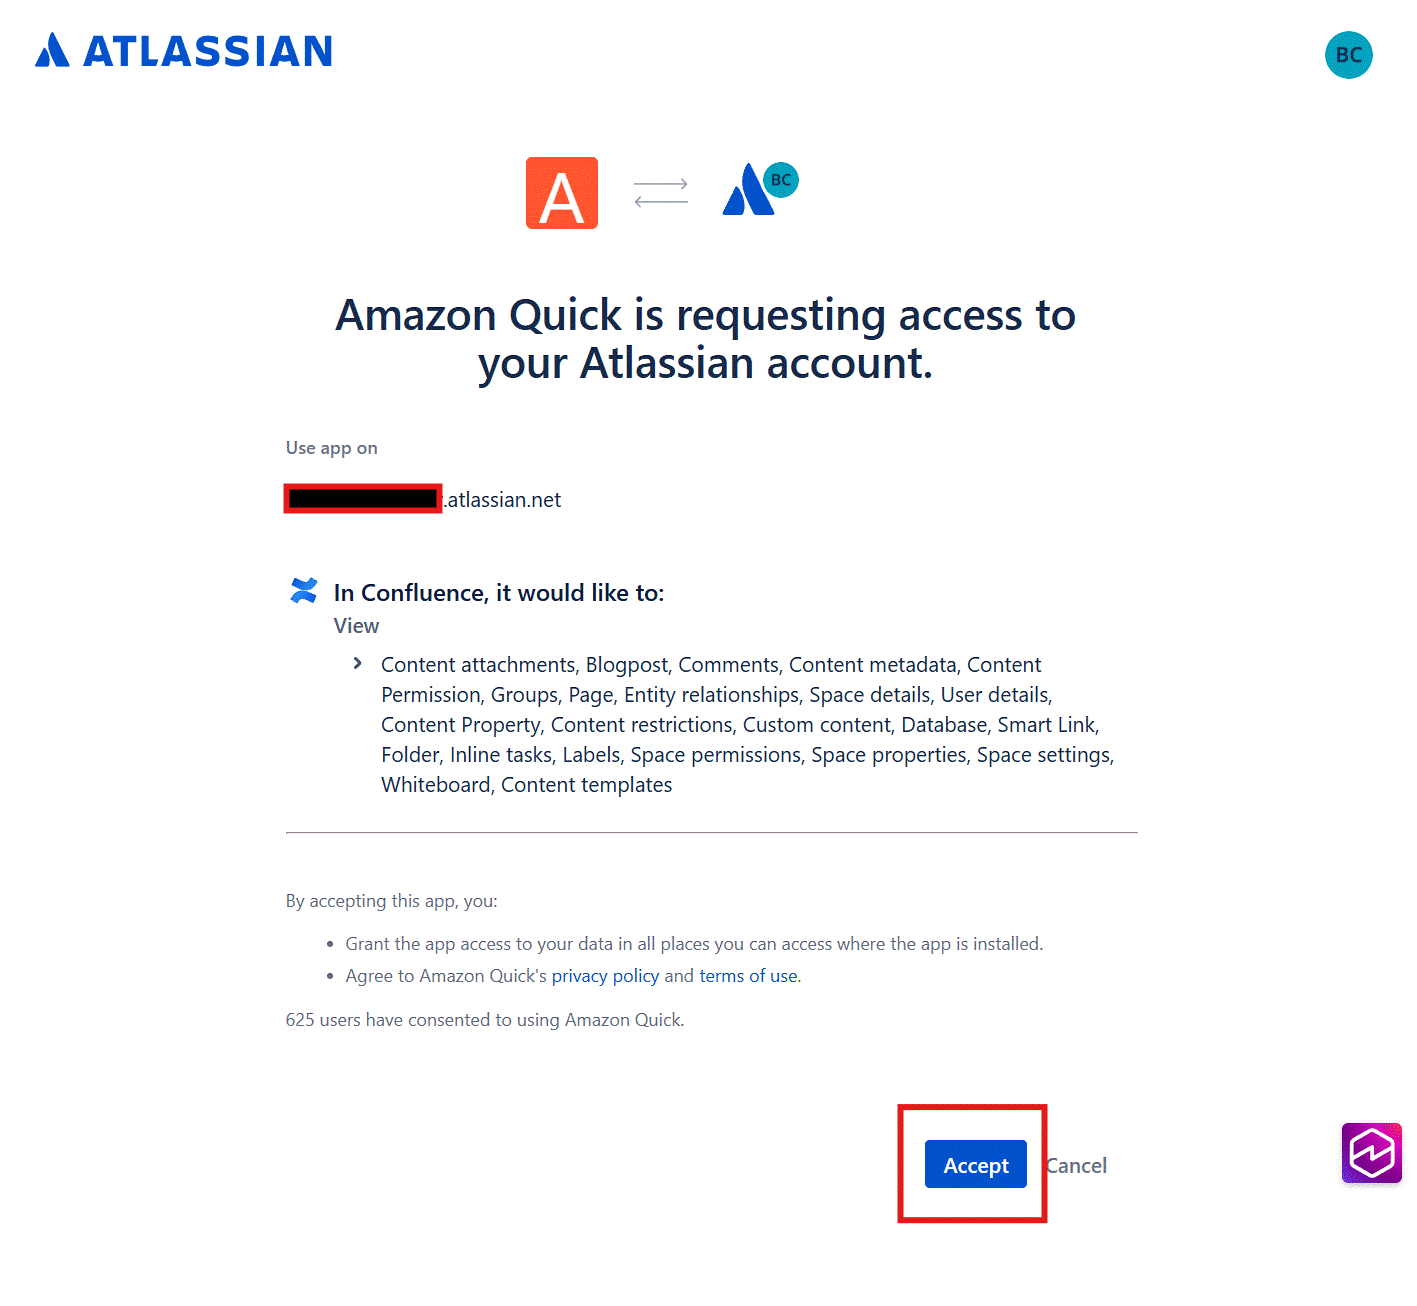
Amazon Quick から Atlassian アカウントへのアクセス要求ポップアップウィンドウが表示された場合は、リストされている権限を確認し、Accept を選択して承認およびサインインプロセスを完了してください。
サインイン後、ナレッジベースの記述的な名前を入力し、スペースキーを含む Confluence URL(例:yourinstance.atlassian.net/wiki/spaces/SPACEKEY)を提供してください。
追加を選択して次に進むと、追加設定画面でナレッジベースの設定が完了します。
ナレッジベースの作成に成功すると、既存のナレッジベースセクションに表示されます。ステータス列には、ナレッジベースの現在の同期状態が表示されます。
Quick で正常に作成されたナレッジベースは、Confluence Cloud の利用可能なコンテンツと同期されます。同期が完了すると、ステータスフィールドが利用可能に変更されます。
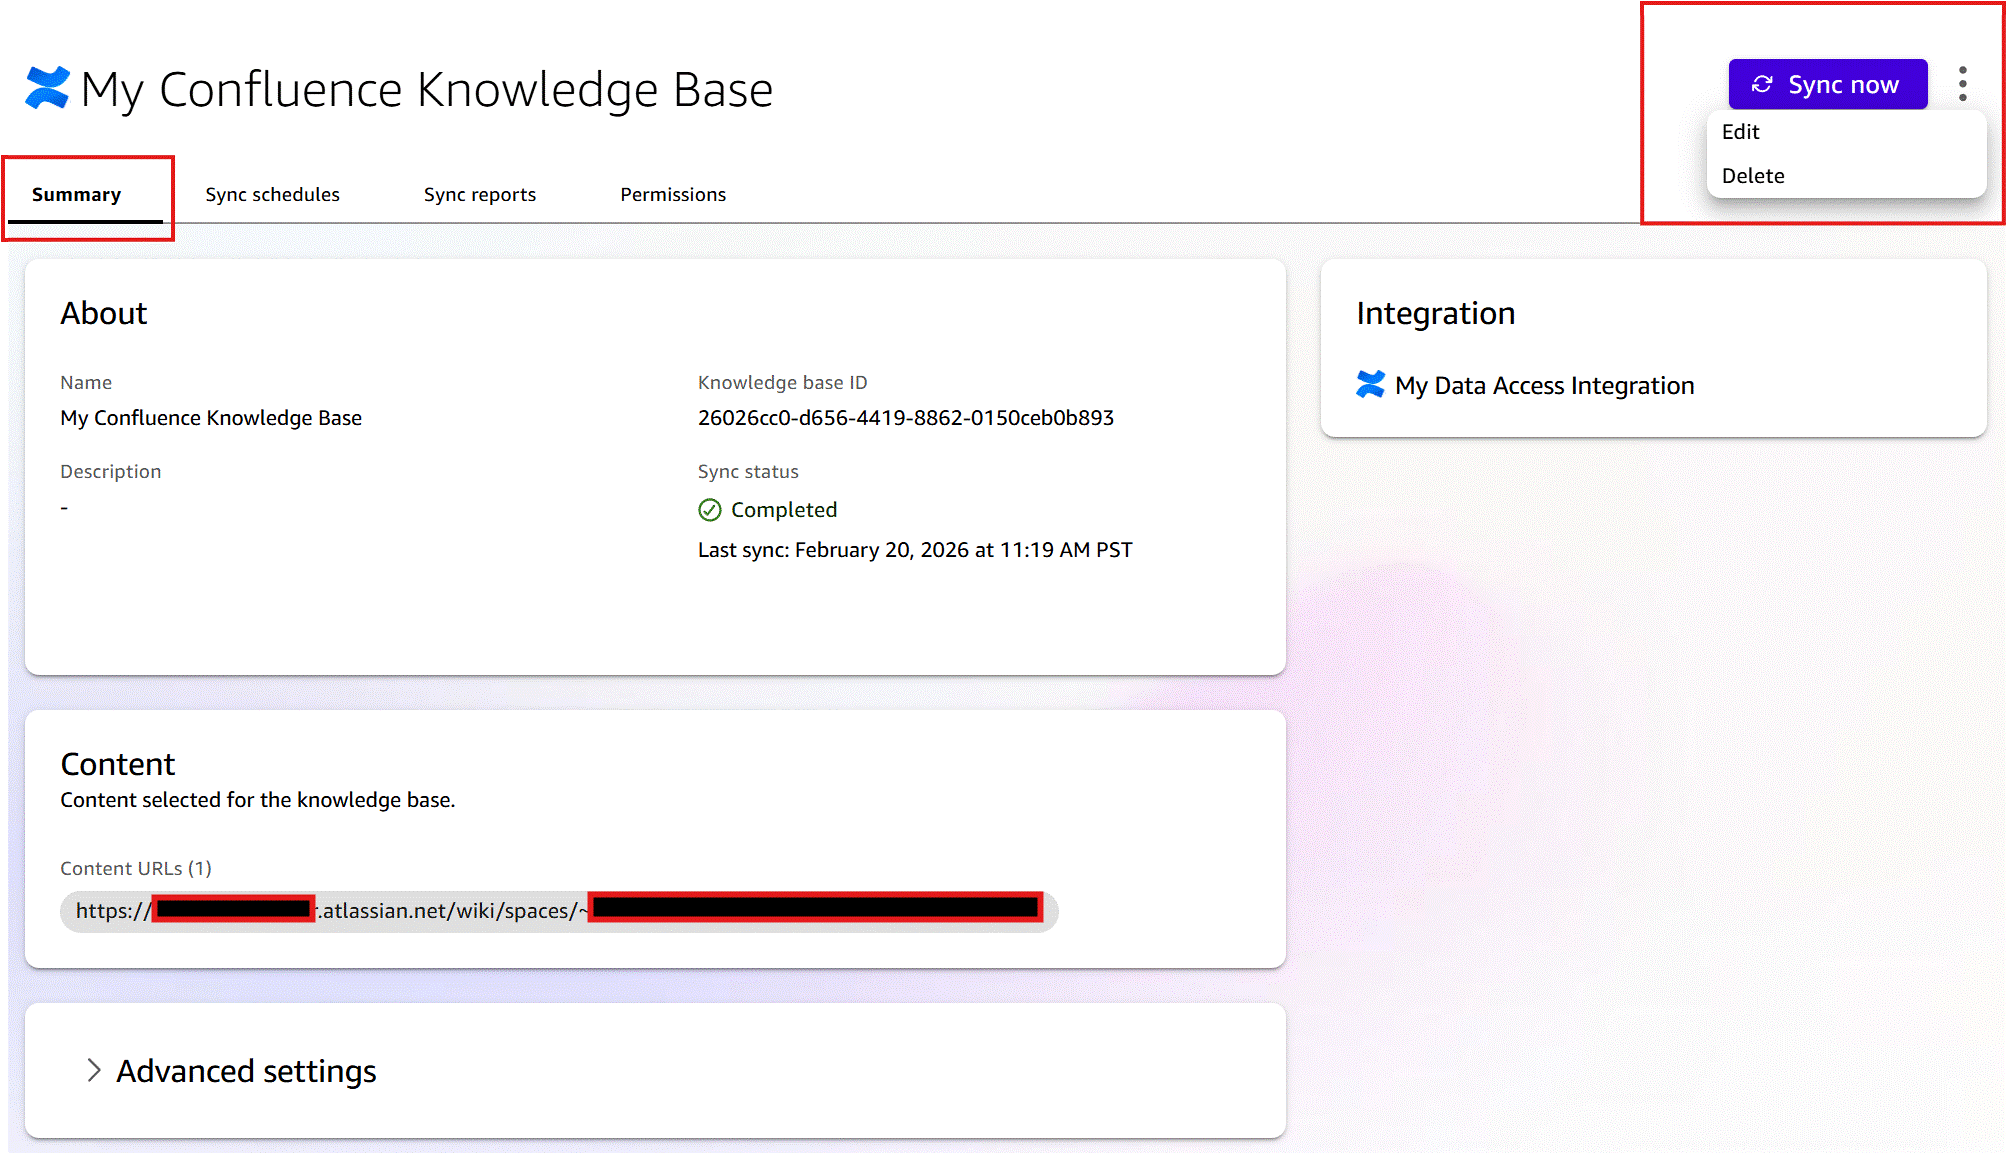
ナレッジベースの詳細については、アクション列の省略記号(…)ボタンを選択してナレッジベースを表示を選択してください。

ナレッジベースの詳細ページでは、そのナレッジベースの概要、同期スケジュール、同期レポート、および権限を表示できます。
知識ベース詳細ページの概要タブには、知識ベースの状態、最終更新時刻、および Quick がクロールしたコンテンツ URL が表示されます。今すぐ同期を選択して手動で更新を実行したり、編集を選択して追加のコンテンツ URL の追加やその他の高度なインデックス設定など、知識ベースの設定を変更したりできます。
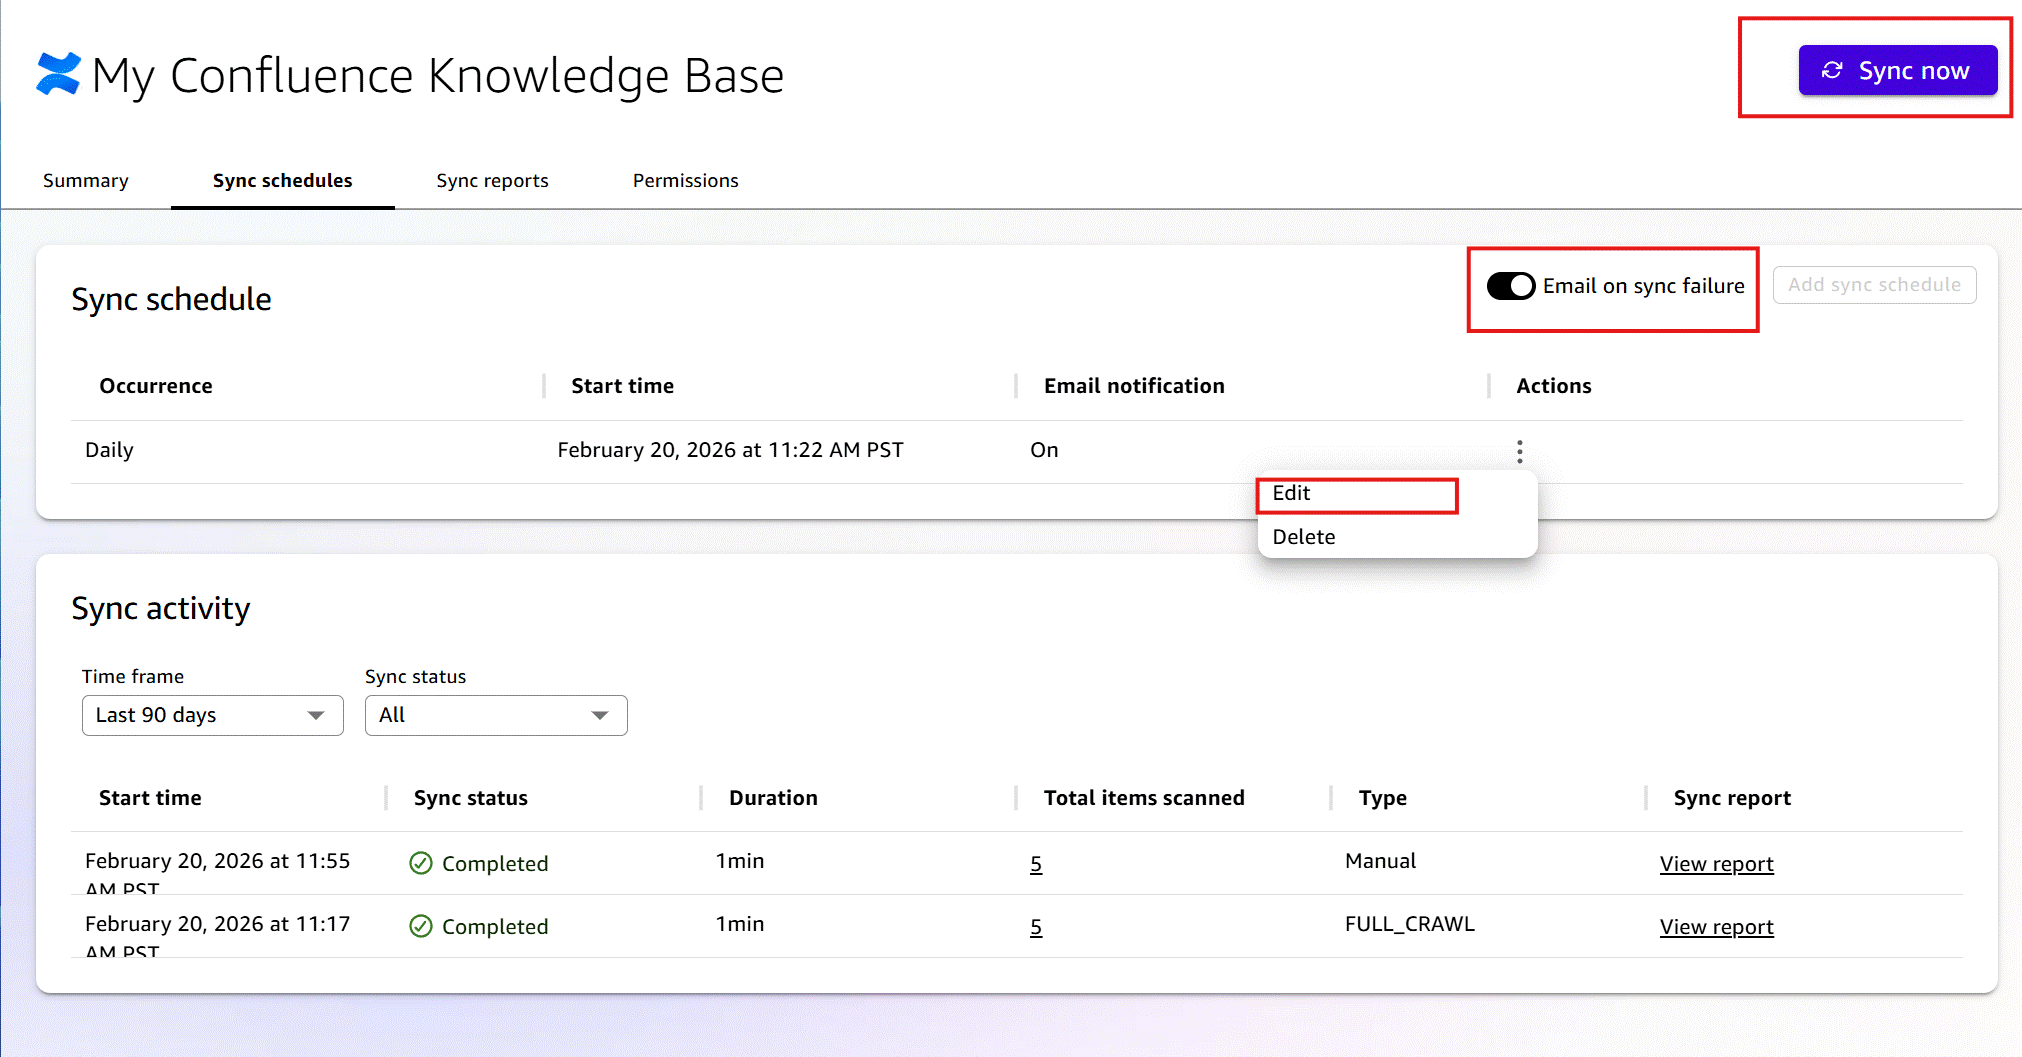
同期スケジュールタブには、現在の同期スケジュールと更新履歴が表示されます。新しいスケジュールの追加を選択して現在のスケジュールを変更したり、今すぐ同期を選択してオンデマンドで更新を実行したりできます。
同期レポートタブでは、Quick が同期または更新した項目と、スキップまたは失敗した項目の概要を確認できます。ここでは、同期結果の詳細分析のために詳細な CSV レポートをダウンロードすることも可能です。
画像読み込みを遅延設定し、左揃え・フルサイズ・画像 ID 131273 のクラスとスタイル(上下左右の余白 10px、グレーの枠線)を設定した画像。ソース URL: https://d2908q01vomqb2.cloudfront.net/f1f836cb4ea6efb2a0b1b99f41ad8b103eff4b59/2026/05/09/ML-1995111.jpeg。代替テキスト:Amazon Quick における Confluence ナレッジベースの同期に関する「同期アイテムサマリー」のスリーンショット。「利用可能なアイテム」パネルにはドーナツチャートが表示され、オレンジ色で追加された 7 アイテムを示し、凡例では未変更(青)、変更あり(紫)、追加(橙)が示されている。「利用できないアイテム」パネルは 0 アイテムであり、削除(濃紺)、失敗(赤)、スキップ(黄)の凡例がある。この画像は、Confluence の 7 アイテムを正常に追加した完全同期が成功した様子を示している。
原文を表示
Teams can integrate Atlassian Confluence Cloud with Amazon Quick to search and manage documentation without switching between multiple systems. When documentation lives in Confluence, but related data sits in other systems, teams waste time switching tools, re-searching for context, and manually gathering information. These interruptions slow decisions and create gaps between available knowledge and actionable insights. The direct integration with Confluence Cloud reduces context switching by making your Confluence content searchable through natural language queries directly from the Quick interface. Teams can query Confluence pages, retrieve documentation, and update content while accessing data from other integrated systems such as Amazon Simple Storage Service (Amazon S3), Atlassian JIRA, or other business applications.
In this post, you will learn how to set up the Confluence Cloud integration with Quick. This includes creating a knowledge base for semantic search, setting up Actions to query and manage Confluence pages, and organizing resources in Quick Spaces. Quick integrates with your current enterprise technology stack, from internal knowledge repositories and corporate intranets to business-critical applications and AWS data services. These integrations span three categories: Actions for executing tasks across connected applications, knowledge bases for indexing unstructured content like documents and wikis, and Topics and Datasets for natural language querying over structured data sources like Amazon Redshift. This post focuses on setting up Knowledge bases and Actions.
*Actions* connect Quick to external systems at the time of prompt or query. You can read, write, and automate tasks directly within Quick. There are three ways to set up an Action integration:
- Through a built-in connector (a pre-built, configuration-driven integration for popular tools like Confluence Cloud, Jira, and Salesforce)
- Using a custom REST API using an OpenAPI specification (for connecting your own or third-party APIs)
- Through an Model Context Protocol server (MCP) (a flexible, standards-based approach that allows dynamic tool discovery from custom or third-party MCP servers).
Some services, like Confluence Cloud, support multiple integration paths. This post will focus on setting up an action integration using the built-in connector.
*Knowledge bases* index content before users query it. When you create a knowledge base, Quick connects to external systems like Confluence Cloud or JIRA, retrieves your documents and wikis, and builds a searchable index. When users ask questions, Quick retrieves relevant information from this pre-built index rather than connecting to the external system in real time. This approach makes unstructured content instantly searchable through natural language queries.
Together, Actions and knowledge bases give you flexible, complementary ways to bring your enterprise data and workflows into Quick.
Prerequisites
Before you set up Confluence integration, make sure that you have the following:
- Atlassian Confluence Cloud and developer account with administrator permissions to create OAuth 2.0 applications and manage API scopes
- Amazon Quick subscription: Quick Enterprise (to create integrations) or Quick Professional (to use existing integrations)
- AWS account with appropriate AWS Identity and Access Management (IAM) permissions to access Quick and create integrations
The integration in this post follows the AWS shared responsibility model: AWS manages the security of the infrastructure and underlying services, while you’re responsible for configuring OAuth permissions, managing API scopes, controlling access to your Confluence content through the permission settings, and verifying alignment with your organization’s data governance policies.
Amazon Quick maintains security of data throughout this integration with encryption at rest and in transit. For more information, see AWS security in Quick.
Solution overview
Now that you understand the benefits, you will now create the Confluence Cloud integration in Quick, create knowledge bases and actions to sync your Confluence content, configure permissions, and interact with your Confluence cloud space through natural language queries. By the end, you can use the content in your Confluence wiki pages to create meaningful insights.
Creating the Atlassian Confluence Cloud knowledge base
A knowledge base in Quick is an organized, indexed collection of documents or content from data sources that Quick improves on for generative AI-powered retrieval and question answering. You can use Knowledge base integrations to create searchable repositories of information from external sources.
In the Quick Console, choose the Knowledge button to set up a new integration. In the Set up new knowledge base section, select the plus (+) icon in the Atlassian Confluence Cloud card. The Atlassian Confluence Cloud card is displayed alongside other available knowledge base integrations such as Amazon S3 and Atlassian Jira Cloud.
In the Create Confluence Knowledge base page, choose the My Data Access Integration dropdown menu and select Add account to connect your Confluence Cloud instance.
In the Authentication Method screen, enter your base Confluence URL in the Confluence URL text box. The URL for Confluence Cloud must be the base URL, ending with .atlassian.net (for example, yourinstance.atlassian.net).
Connecting Confluence Cloud to a Quick knowledge base requires no administrator involvement. Enter your Confluence URL and accept the OAuth permission prompt. Quick handles the authentication for you. Any user can set this up independently, without needing API keys, admin console access, or IT involvement.
Document-level access controls (ACLs) is an optional advanced feature for organizations that need Quick to enforce per-user Confluence permissions — ensuring users only see answers from content they’re already authorized to access. Enabling ACLs requires Atlassian admin credentials (API key, Organization ID, and Directory ID).
For more information, see Document-level access controls. If you do not enable ACLs, access is controlled at the knowledge base level. Anyone who has access to the knowledge base can get insights from all the content within it.
This blog post uses the ACL-enabled connection.
To enable document-level access controls, check the Use Atlassian admin credential check box under ACL Management and fill in the API Key, Organization ID and Directory ID fields. Please see here on how to obtain these Atlassian admin credentials.
When enabled, Amazon Quick verifies a user’s access in real time and crawls the following Confluence ACL resources:
- Spaces – Space permissions apply to all documents in the space by default.
- Pages – Pages can be restricted to specific users and groups. Nested pages inherit restrictions from the parent page and can have their own restrictions.
- Blogs – Blog posts can be restricted to specific users and groups in the space.
- Attachments – Files attached to pages or blog posts inherit the access controls of their parent document.
When the Amazon Quick requesting access to your Atlassian account pop-up window appears, review the permissions listed and choose Accept to complete the authorization and sign-in process.
After you’re signed in, enter a descriptive name for your knowledge base and provide the Confluence URL including the space key (for example, yourinstance.atlassian.net/wiki/spaces/SPACEKEY).
Choose Add and then Next: Additional settings to complete the knowledge base setup.
After you successfully create the knowledge base, it appears in the Existing Knowledge bases section. The Status column shows the current sync state of your knowledge base.
A successfully created knowledge base in Quick syncs with the available content in Confluence Cloud. After the sync is complete, the Status field changes to Available.
You can view more details about the knowledge base by choosing the ellipsis (…) button in the Action column and selecting View knowledge base.
In the knowledge base details page, you can view the Summary, Sync Schedules, Sync Reports, and Permissions for that knowledge base.
The Summary tab of the knowledge base details page displays the knowledge base status, its last refresh timestamp, and the content URL that Quick crawled. You can choose Sync now to trigger a manual refresh or Edit to modify the knowledge base configuration, such as adding additional content URLs and other advanced indexing settings.
The Sync Schedules tab displays the current sync schedules and the history of refreshes. You can change the current schedule by choosing Add new Schedule or run an on-demand refresh by selecting Sync now.
The Sync Reports tab gives you an overview of items that Quick synced or refreshed along with items that skipped or failed. Here, you can also download a detailed CSV report for further analysis of sync results.

<img loading="lazy" class="alignleft size-full wp-image-131273" style="margin: 10px 0px 10px 0px;border: 1px solid #CCCCCC" src="https://d2908q01vomqb2.cloudfront.net/f1f836cb4ea6efb2a0b1b99f41ad8b103eff4b59/2026/05/09/ML-1995111.jpeg" alt="Screenshot of the Sync items summary for a Confluence knowledge base sync in Amazon Quick. The 'Available Items' panel shows a donut chart indicating 7 items Added (orange), with a legend for Unmodified (blue), Modified (purple), and Added (orange). The 'Unavailable Items' panel shows 0 items, with a legend for Deleted (dark blue), Failed (red), and Skipped (yellow). This image illustrates a successful full sync that added 7 Confl
関連記事
今日のまとめ
AI日報で今日の重要ニュースをまとめ読み