Amazon QuickがSnowflakeデータソースへのキーペア認証をサポート
Amazon Quick SightがSnowflakeデータソース向けに鍵ペア認証をサポートし、パスワードベース認証の廃止に伴うセキュリティ課題を解決する実用的な機能強化を発表した。
キーポイント
セキュリティ強化の必要性
Snowflakeがパスワードベース認証を廃止する動きがあり、より安全な認証方法が求められていた。
技術的解決策
Amazon Quick Sightが非対称暗号方式のRSA鍵ペア認証をサポートし、パスワードレス接続を実現した。
実装要件
設定にはAmazon Quickの管理者権限、Snowflakeの管理者ロール、OpenSSLによる鍵生成が必要となる。
エンタープライズ対応
この機能により、企業のセキュリティ基準を満たすシームレスで安全な統合体験が提供される。
影響分析・編集コメントを表示
影響分析
この機能強化は、クラウドデータウェアハウスとBIプラットフォーム間の接続におけるセキュリティ標準を向上させる重要な進展である。Snowflakeの認証方針変更に先んじて対応することで、AWSユーザーに移行の猶予と実用的なソリューションを提供し、クラウドデータエコシステムの成熟度を示している。
編集コメント
技術的な詳細と実装手順が具体的に記載されており、実際の導入を検討するユーザーにとって価値の高い実用的な記事となっている。セキュリティ要件の変化に迅速に対応するAWSの姿勢が窺える。
現代の企業は、自動化を維持しながらビジネスインテリジェンスプラットフォームとクラウドデータウェアハウスを接続する際に大きな課題に直面しています。パスワードベースの認証はセキュリティ上の脆弱性、運用上の摩擦、コンプライアンスの欠陥をもたらします—特に Snowflake がユーザー名とパスワードの組み合わせを廃止しようとしている現在、これは極めて重要な問題です。
Amazon Quick Sight(Amazon Quick の機能の一つ)は、Snowflake 統合において鍵ペア認証をサポートするようになりました。ここでは非対称暗号化技術を用い、従来のパスワードに代わって RSA キーペアが利用されます。この強化機能は、より安全な認証方式を必要とする Snowflake がパスワードベースの認証の廃止へ移行しているという重要なニーズに応えるものです。この新機能により、Amazon Quick のユーザーは RSA キーペアを使用して、Snowflake データソースへの安全でパスワード不要な接続を確立できます。これにより、企業のセキュリティ基準を満たすシームレスかつ安全な統合体験が提供されます。
本ブログ記事では、セキュアな鍵ペア認証を通じて Amazon Quick Sight と Snowflake の間のデータソース接続を設定する方法をご案内します。
前提条件
Amazon Quick と Snowflake の間で鍵ペア認証を設定する前に、以下の準備を整えてください:
- 適切な権限を持つアクティブな Amazon Quick アカウント – データソースの作成と管理、認証設定の構成、ユーザーへの権限付与には管理者アクセスが必要です。Amazon Quick Enterprise ライセンスまたは Amazon Quick Sight Edition の Author ロールが通常十分なアクセス権を提供します。
- Snowflake アカウントで ACCOUNTADMIN、SECURITYADMIN、または USERADMIN ロール – これらの特権はユーザーアカウントの修正、ALTER USER コマンドを使用した公開鍵の割り当て、ウェアハウスおよびデータベースへの権限付与に不可欠です。これらのロールへのアクセス権がない場合は、Snowflake 管理者にお問い合わせください。
- OpenSSL のインストール(鍵生成用)– この暗号化ツールキットは PKCS#8 形式で RSA キーペアを生成します。Linux および macOS システムの多くには OpenSSL がプリインストールされています。Windows ユーザーは Windows Subsystem Linux (WSL) を使用するか、別途 OpenSSL をダウンロードしてください。
- (オプション)AWS Secrets Manager アクセス(API ベースの設定用)– プログラムによる設定に必要です。シークレットの作成と管理には IAM 権限が、自動化されたデプロイメントおよびインフラストラクチャ・アズ・コード (IaC) 実装には Amazon Quick Sight API アクセスが必要です。
ソリューションのウォークスルー
Amazon Quick Sight と Snowflake の間でセキュアなキーペア認証を確立するための、以下の重要なステップをご案内します:
- RSA キーペアの生成 – OpenSSL を使用して、適切な暗号化基準に従って公開鍵と秘密鍵を作成します
- Snowflake ユーザーの設定 – 公開鍵を Snowflake ユーザーアカウントに割り当て、セットアップを確認します
- データソース接続の確立 – インタラクティブなセットアップには Amazon Quick Sight UI を、プログラムによるデプロイには AWS コマンドラインインターフェース (AWS CLI) を通じて接続を作成します
各ステップを詳しく見ていきましょう。鍵ペア認証を使用して、Amazon Quick Sight と Snowflake の接続を安全に確保しましょう!
RSA キーペアの生成:
- AWS Management Console 内の AWS CloudShell に移動し、以下のコマンドを実行して RSA 秘密鍵を生成します。暗号化パスフレーズの入力を求められます。強力なパスフレーズを選択し、安全に保管してください – これは公開鍵を生成する際に後で必要になります。
openssl genrsa 2048 | openssl pkcs8 -topk8 -inform PEM -out rsa_key.p8
- 以下のコマンドを実行して、公開鍵ペアを作成します。前ステップで使用したフレーズの入力を求められます。
openssl rsa -in rsa_key.p8 -pubout -out rsa_key.pub
- 秘密鍵の内容(ヘッダーとフッターを含む)を抽出します。
cat rsa_key.p8これは、以下の形式で秘密鍵を表示します:
-----BEGIN PRIVATE KEY-----[key content]-----END PRIVATE KEY-----
注意: -----BEGIN PRIVATE KEY----- と -----END PRIVATE KEY----- の行を含む出力全体をコピーしてください。この完全な秘密鍵(ヘッダーとフッター付き)は、Snowflake データソース接続を作成する際に使用します。
- Snowflake では、ヘッダーや改行のない特定の形式の公開鍵が必要です。キーを正しく抽出してフォーマットするには、以下のコマンドを実行してください。
grep -v KEY rsa_key.pub | tr -d '\n' | awk '{print $1}' > pub.Key
cat pub.Key

これで、フォーマットされた公開鍵文字列が表示されます。この出力をコピーしてください。次のステップで Snowflake ユーザーアカウントを設定する際に使用します。
Snowflake ユーザーへの公開鍵の割り当て:
- Snowflake にログインし、以下の SQL コマンドを実行して、公開鍵をユーザーに割り当ててください:
ALTER USER SET RSA_PUBLIC_KEY='';
- キーの割り当てを確認する: RSA_PUBLIC_KEY プロパティを探して、公開鍵が設定されているか確認してください。
DESCRIBE USER ;
Amazon Quick UI で Snowflake 接続を設定する:
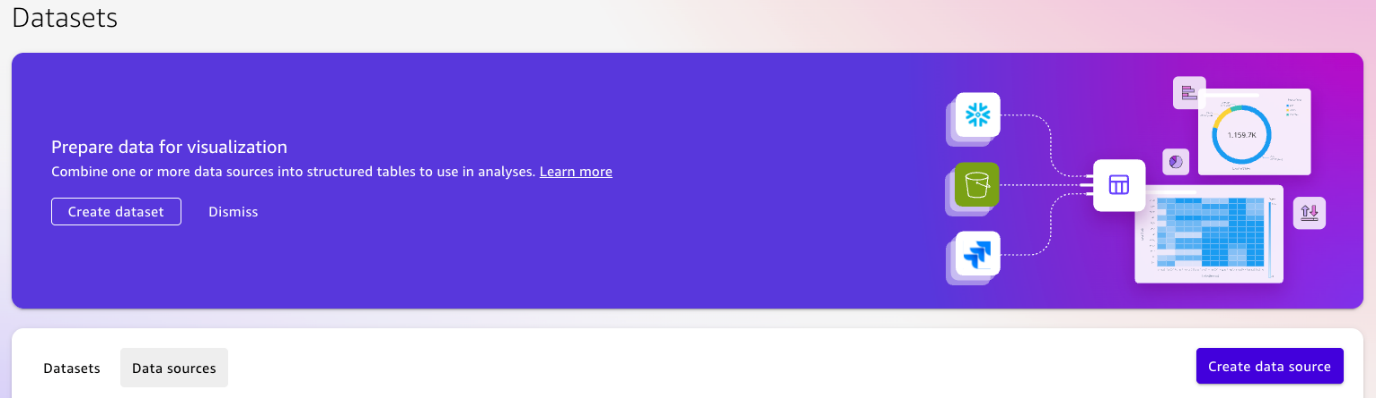
- AWS Management Console の Amazon Quick に移動し、[Datasets] を選択します。次に [Data sources] タブを選択して、[Create data source] を選びます。
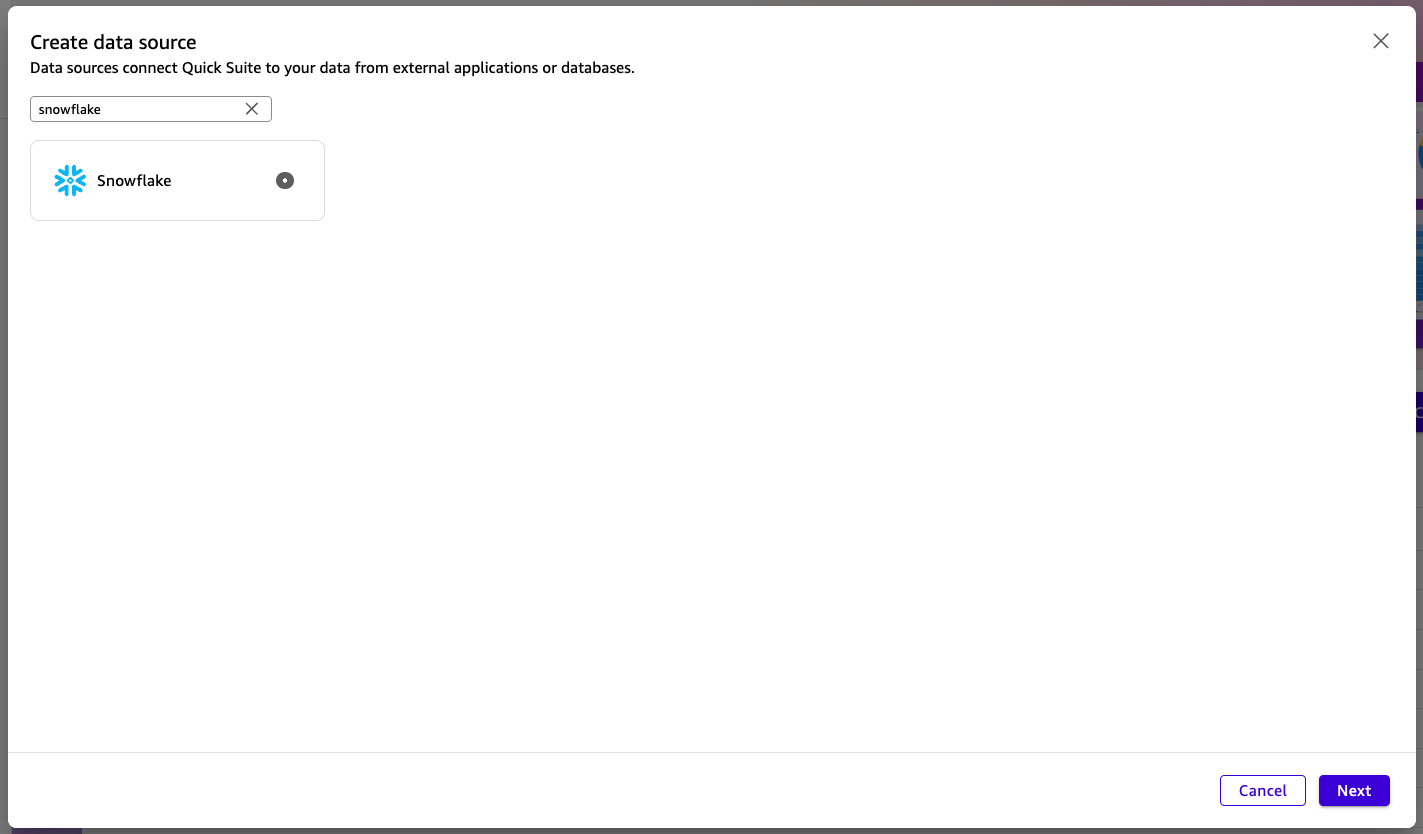
- [Create data source] パネルで、[Search datasets] に「snowflake」と入力し、Snowflake を選択して [Next] をクリックします。
- [New Snowflake data source] パネルで、データソース名を入力し、接続タイプとして「Public Network」または「Private VPC Connection」を選択します。VPC 接続が必要な場合は、Quick での VPC 接続の設定方法をご覧ください。
- 次に、データベースサーバーのホスト名、データベース名、およびウェアハウス名を入力します。
- [Authentication Type] を「KeyPair」に選択し、Snowflake ユーザーのユーザー名を入力します。
- [Private Key] フィールドには、cat rsa_key.p8 コマンドの完全な出力(BEGIN および END ヘッダーを含む)を貼り付けます。キー生成時にパスフレーズを設定している場合は、オプションの [Passphrase] フィールドに入力してください。
- すべてのフィールドを入力した後、[Validate connection] ボタンを選択します。
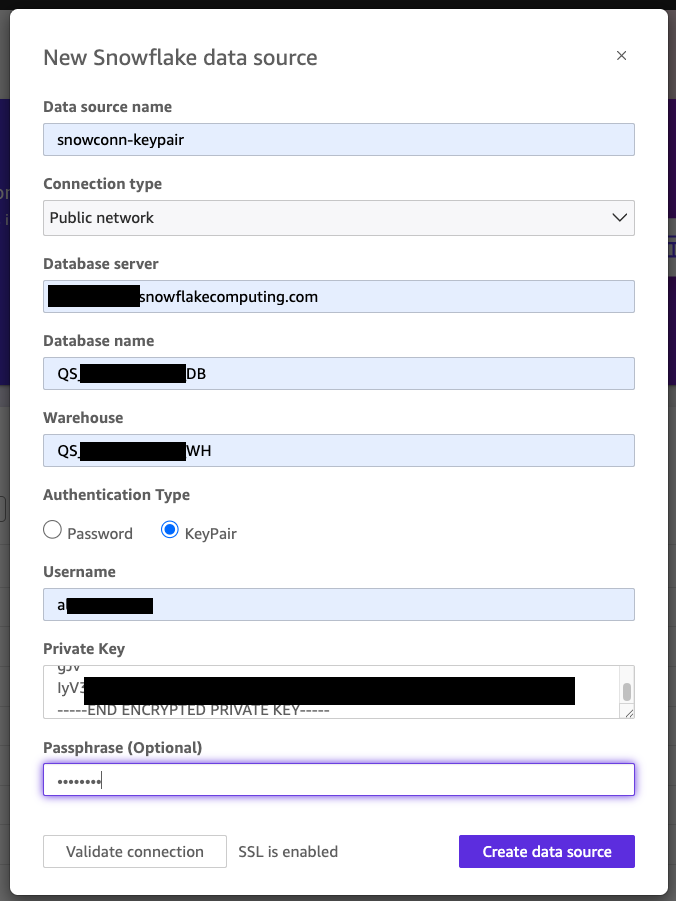
- 接続が検証された後、[データソースの作成] ボタンを選択してください。
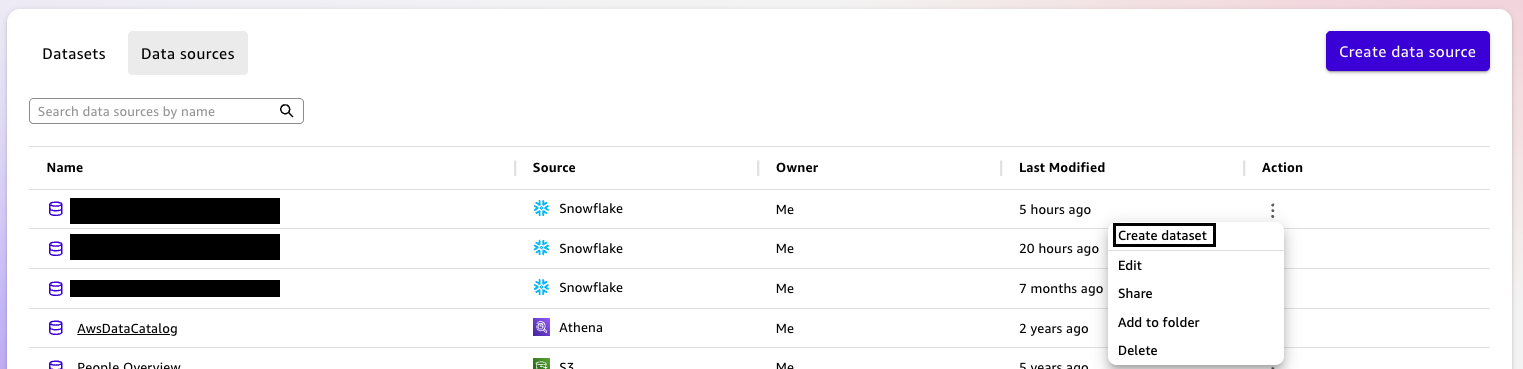
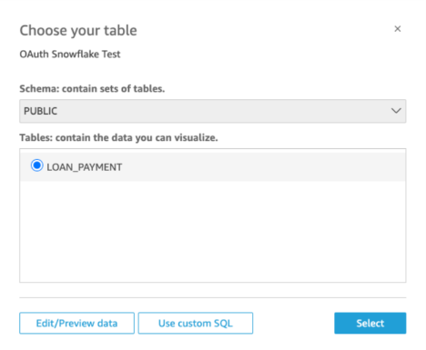
- 次に、データソース一覧で、作成した Snowflake データソースを見つけてください。
- [アクション] メニューから、[データセットの作成] オプションを選択してください。

Amazon QuickSight API を使用して Snowflake 接続を設定する:
AWS CLI を使用し、以下のコマンドを実行することで、Snowflake への Amazon QuickSight データソース接続を作成します。
aws quicksight create-data-source \
--aws-account-id 123456789 \
--data-source-id awsclikeypairtest \
--name "awsclikeypairtest" \
--type SNOWFLAKE \
--data-source-parameters '{
"SnowflakeParameters": {
"Host": "hostname.snowflakecomputing.com",
"Database": "DB_NAME",
"Warehouse": "WH_NAME",
"AuthenticationType": "KEYPAIR"
}
}' \
--credentials '{
"KeyPairCredentials": {
"KeyPairUsername": "SNOWFLAKE_USERNAME",
"PrivateKey": "-----BEGIN ENCRYPTED PRIVATE KEY-----\nPRIVATE_KEY\n-----END ENCRYPTED PRIVATE KEY-----",
"PrivateKeyPassphrase": "**"
}
}' \
--permissions '[
{
"Principal": "arn:aws:quicksight:us-east-1: 123456789:user/default/Admin/username,
"Actions": [
"quicksight:DescribeDataSource",
"quicksight:DescribeDataSourcePermissions",
"quicksight:PassDataSource",
"quicksight:UpdateDataSource",
"quicksight:DeleteDataSource",
"quicksight:UpdateDataSourcePermissions"
]
}
]' \
--region us-east-1
次のコマンドを使用して、作成ステータスを確認してください:
aws quicksight describe-data-source --region us-east-1 --aws-account-id 123456789 --data-source-id awsclikeypairtest
initially、describe-data-source コマンドから返されるステータスは CREATION_IN_PROGRESS(作成中)となります。新しいデータソースが使用可能になると、ステータスは CREATION_SUCCESSFUL(作成成功)に切り替わります。
あるいは、CreateDataSource を使用してデータソースをプログラムで作成する場合は、ユーザー名、キー、およびパスフレーズを AWS Secrets Manager に保存し、Secret ARN を使用して参照することができます。
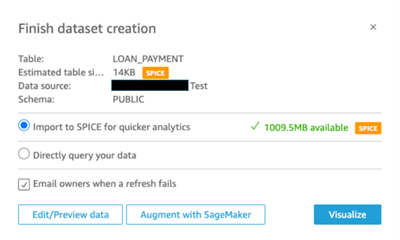
データソースが正常に作成された後、Quick コンソールへ移動できます。データセットの作成ページでは、データソースリストの下に新しく作成されたデータソース接続 awsclikeypairtest を表示できます。その後、データセットの作成を継続できます。
クリーンアップ
追加料金を発生させないようリソースをクリーンアップするには、以下の手順に従ってください:
- AWS Secrets Manager コンソールで作成したシークレットを削除します。
- Amazon Quick で作成したデータソース接続を削除します。
結論
キーペア認証は、Amazon Quick と Snowflake の間のデータ接続のセキュリティにおける変革的な進展を表しています。パスワードベースの脆弱性を排除し、暗号化認証を採用することで、組織はシームレスな自動化ワークフローを維持しながら、優れたセキュリティ体制を達成できます。この実装は、非対称暗号化によるセキュリティ強化、サービスアカウント管理の簡素化、および Snowflake が従来のパスワード方式から移行するにつれて変化する認証基準への準拠など、重要なエンタープライズ要件に対応しています。
直感的な Amazon Quick UI を通じてデプロイする場合も、Infrastructure as Code 実装のために AWS CLI を使用する場合も、鍵ペア認証はセキュリティを損なうことなく柔軟性を提供します。AWS Secrets Manager との統合により秘密鍵が保護され、シンプルセットアッププロセスによって開発、ステージング、本番環境全体での迅速なデプロイが可能になります。
データセキュリティが継続的に進化する中、鍵ペア認証を採用することは、組織をベストプラクティスの最前線に位置づけます。ビジネスインテリジェンスチームは、Snowflake データからの実行可能な洞察の抽出に集中できるようになり、認証の複雑性の管理から解放されることで、最終的に洞察までの時間を短縮し、運用効率を向上させます。
詳細については、Snowflake Key-Pair Authentication をご覧ください。
著者について

Vignessh Baskaran
Vignessh Baskaran は、Amazon Quick の構造化データドメインにおいて BI(ビジネスインテリジェンス)および GenAI(生成 AI)の取り組みを推進するシニア・テクニカルプロダクトマネージャーです。大規模なデータおよび分析ソリューションの開発に 9 年以上の実績があります。この役職以前には、AWS でシニア・アナリティクスリードとして勤務し、Quick を活用した包括的な BI ソリューションを構築していましたが、これは AWS ワールドワイドのスペシャリストセールスチーム全体で世界的に採用されています。仕事以外では、クリケット観戦、ラケットボール、シアトルの多様な料理探索を楽しんでいます。

Chinnakanu Sai Janakiram
Chinnakanu Sai Janakiram は、Amazon Quick のソフトウェア開発エンジニアとして、AWS テクノロジーを活用したクラウドインフラストラクチャの自動化および機能開発に従事しています。AWS におけるスケーラブルなシステムの構築、CI/CD パイプライン、CloudFormation、React、Spring Boot において 2 年以上の実績があります。この役職以前には AWS でデータおよび分析ソリューションに貢献し、地域全体でのデプロイの信頼性と拡張性を向上させました。仕事以外では、フォーミュラ 1 の追随や新興技術の最新動向をフォローすることを楽しんでいます。

Nithyashree Alwarsamy
Nithyashree Alwarsamy は、Amazon Web Services のパートナー・ソリューション・アーキテクトであり、ストリーミングおよびイベント駆動型アーキテクチャに焦点を当てたデータおよび分析ソリューションの専門家です。現代のデータアーキテクチャに関する深い専門知識を活かし、Snowflake のクラウドネイティブなデータプラットフォームと AWS サービスの幅広い機能を統合することで、組織がデータの潜在能力を最大限に引き出すお手伝いをしています。

Andries Engelbrecht
Andries Engelbrecht は、Snowflake で AWS と連携するシニア・パートナー・ソリューション・エンジニアです。製品およびサービスの統合支援や、AWS との共同ソリューション開発を担当しています。Andries はデータおよび分析分野で 25 年以上の実績を持っています。
原文を表示
Modern enterprises face significant challenges connecting business intelligence platforms to cloud data warehouses while maintaining automation. Password-based authentication introduces security vulnerabilities, operational friction, and compliance gaps—especially critical as Snowflake is deprecating username password.
Amazon Quick Sight (a capability of Amazon Quick) now supports key pair authentication for Snowflake integrations, using asymmetric cryptography where RSA key pairs replace traditional passwords. This enhancement addresses a critical need as Snowflake moves toward deprecating password-based authentication, which requires more secure authentication methods. With this new capability, Amazon Quick users can establish secure, passwordless connections to Snowflake data sources using RSA key pairs, providing a seamless and secure integration experience that meets enterprise security standards.
In this blog post, we will guide you through establishing data source connectivity between Amazon Quick Sight and Snowflake through secure key pair authentication.
Prerequisites
Before configuring key pair authentication between Amazon Quick and Snowflake, ensure that you have the following:
- An active Amazon Quick account with appropriate permissions – You need administrative access to create and manage data sources, configure authentication settings, and grant permissions to users. Amazon Quick Enterprise license or Author role in Amazon Quick Enterprise Sight Edition typically provide sufficient access.
- A Snowflake account with ACCOUNTADMIN, SECURITYADMIN, or USERADMIN role – These elevated permissions are essential for modifying user accounts, assigning public keys using ALTER USER commands, and granting warehouse and database permissions. If you don’t have access to these roles, contact your Snowflake administrator for assistance.
- OpenSSL installed (for key generation) – This cryptographic toolkit generates RSA key pairs in PKCS#8 format. Most Linux and macOS systems include OpenSSL pre-installed. Windows users can use Windows Subsystem Linux (WSL) or download OpenSSL separately.
- (Optional) AWS Secrets Manager access (for API-based setup) – Required for programmatic configurations, you will need IAM permissions to create and manage secrets, and Amazon Quick Sight API access for automated deployments and infrastructure as code (IaC) implementations.
Solution walkthrough
We will guide you through the following essential steps to establish secure key pair authentication between Amazon Quick Sight and Snowflake:
- Generate RSA Key Pair – Create public and private keys using OpenSSL with proper encryption standards
- Configure Snowflake User – Assign the public key to your Snowflake user account and verify the setup
- Establish Data Source Connectivity – Create your connection through either the Amazon Quick UI for interactive setup or AWS Command Line Interface (AWS CLI) for programmatic deployment
Let’s explore each step in detail and secure your Amazon Quick Sight-Snowflake connection with key pair authentication!
Generate RSA key pair:
- Navigate to AWS CloudShell in AWS Management Console and execute the following command to generate the RSA private key. You will be prompted to enter an encryption passphrase. Choose a strong passphrase and store it securely—you will need this later when generating the public key.
openssl genrsa 2048 | openssl pkcs8 -topk8 -inform PEM -out rsa_key.p8- Run the following commands to create a public key pair. You will be prompted to enter the phrase that you used in the previous step.
openssl rsa -in rsa_key.p8 -pubout -out rsa_key.pub- Extract the private key content (including header and footer):
cat rsa_key.p8This displays your private key in the format:
-----BEGIN PRIVATE KEY-----[key content]-----END PRIVATE KEY-----
Note: Copy the entire output including the -----BEGIN PRIVATE KEY----- and -----END PRIVATE KEY----- lines. You will use this complete private key (with headers and footers) when creating your Snowflake data source connection.
- Snowflake requires the public key in a specific format without headers or line breaks. Run these commands to extract and format the key properly.
grep -v KEY rsa_key.pub | tr -d '\n' | awk '{print $1}' > pub.Key
cat pub.KeyThis will display your formatted public key string. Copy this output—you will use it in the next step to configure your Snowflake user account.
Assign public key to Snowflake user:
- Log in to Snowflake and execute the following SQL commands to assign the public key to your user:
ALTER USER SET RSA_PUBLIC_KEY='';- Verify the key assignment: Look for the RSA_PUBLIC_KEY property to confirm if the public key is set.
DESCRIBE USER ;Establish your Snowflake connection in Amazon Quick UI:
- Navigate to Amazon Quick in AWS Management Console and select Datasets. Then select the Data sources tab and choose Create data source.
- In the Create data source pane, enter “snowflake” in Search datasets, select Snowflake, and then choose Next.
- In the New Snowflake data source pane, enter the data source name, then enter the connection type as Public Network or a Private VPC Connection. If you need a VPC connection, see configure the VPC connection in Quick.
- Then, enter the database server hostname, database name, and warehouse name.
- Select Authentication Type as KeyPair and then enter the username of the Snowflake user.
- In the Private Key field, paste the complete output from cat rsa_key.p8 (including the BEGIN and END headers). If you have configured a passphrase during key generation, provide it in the optional Passphrase field.
- After all the fields are entered, select the Validate connection button.
- After the connection is validated, select the Create data source button.
- Then in the Data sources list, find the snowflake data source that you created.
- From the Action menu, select the Create dataset option.
Establish your Snowflake Connection using the Amazon Quick Sight API:
Using AWS CLI, create the Amazon Quick data source connection to Snowflake by executing the following command:
aws quicksight create-data-source \
  --aws-account-id 123456789 \
  --data-source-id awsclikeypairtest \
  --name "awsclikeypairtest" \
  --type SNOWFLAKE \
  --data-source-parameters '{
    "SnowflakeParameters": {
      "Host": "hostname.snowflakecomputing.com",
      "Database": "DB_NAME",
      "Warehouse": "WH_NAME",
      "AuthenticationType": "KEYPAIR"
    }
  }' \
  --credentials '{
    "KeyPairCredentials": {
      "KeyPairUsername": "SNOWFLAKE_USERNAME",
      "PrivateKey": "-----BEGIN ENCRYPTED PRIVATE KEY-----\nPRIVATE_KEY\n-----END ENCRYPTED PRIVATE KEY-----",
      "PrivateKeyPassphrase": "******"
    }
  }' \
    --permissions '[
    {
      "Principal": "arn:aws:quicksight:us-east-1: 123456789:user/default/Admin/username,
      "Actions": [
        "quicksight:DescribeDataSource",
        "quicksight:DescribeDataSourcePermissions",
        "quicksight:PassDataSource",
        "quicksight:UpdateDataSource",
        "quicksight:DeleteDataSource",
        "quicksight:UpdateDataSourcePermissions"
      ]
    }
  ]' \
  --region us-east-1
Use the following command to check the status of creation:
aws quicksight describe-data-source --region us-east-1 --aws-account-id 123456789 --data-source-id awsclikeypairtestInitially, the status returned from the describe-data-source command will be CREATION_IN_PROGRESS. The status will change to CREATION_SUCCESSFUL if the new data source is ready for use.
Alternatively, when creating the data source programmatically via CreateDataSource, you can store the username, key and passphrase in AWS Secrets Manager and reference them using the Secret ARN.
After the data source is successfully created, you can navigate to the Quick console. In the Create a Dataset page, you can view the newly created data source connection awsclikeypairtest under the data sources list. You can then continue to create the datasets.
Cleanup
To clean up your resources to avoid incurring additional charges, follow these steps:
- Delete the secret created in the AWS Secrets Manager Console.
- Delete the data source connection created in Amazon Quick.
Conclusion
Key pair authentication represents a transformative advancement in securing data connectivity between Amazon Quick and Snowflake. By removing password-based vulnerabilities and embracing cryptographic authentication, organizations can achieve superior security posture while maintaining seamless automated workflows. This implementation addresses critical enterprise requirements, such as enhanced security through asymmetric encryption, streamlined service account management, and compliance with evolving authentication standards as Snowflake transitions away from traditional password methods.
Whether deploying through the intuitive Amazon Quick UI or using AWS CLI for Infrastructure as Code implementations, key pair authentication provides flexibility without compromising security. The integration with AWS Secrets Manager helps protect the private keys, while the straightforward setup process enables rapid deployment across development, staging, and production environments.
As data security continues to evolve, adopting key pair authentication positions your organization at the forefront of best practices. Business intelligence teams can now focus on extracting actionable insights from Snowflake data rather than managing authentication complexities, ultimately accelerating time-to-insight and improving operational efficiency.
For further reading, see Snowflake Key-Pair Authentication.
About the authors
Vignessh Baskaran
Vignessh Baskaran is a Sr. Technical Product Manager in the structured DATA domain in Amazon Quick powering BI and GenAI initiatives. He has 9+ years of experience in developing large-scale data and analytics solutions. Prior to this role, he worked as a Sr. Analytics Lead in AWS building comprehensive BI solutions using Quick which were globally adopted across AWS Worldwide Specialist Sales teams. Outside of work, he enjoys watching Cricket, playing Racquetball and exploring different cuisines in Seattle.
Chinnakanu Sai Janakiram
Chinnakanu Sai Janakiram is a Software Development Engineer in Amazon Quick, working on cloud infrastructure automation and feature development using AWS technologies. He has 2+ years of experience building scalable systems across AWS, CI/CD pipelines, CloudFormation, React, and Spring Boot. Prior to this role, he contributed to data and analytics solutions on AWS, improving deployment reliability and scalability across regions. Outside of work, he enjoys following Formula 1 and staying up to date with emerging technologies.
Nithyashree Alwarsamy
Nithyashree Alwarsamy is a Partner Solutions Architect at Amazon Web Services, specializing in data and analytics solutions with a focus on streaming and event-driven architecture. Leveraging deep expertise in modern data architectures, Nithyashree helps organizations unlock the full potential of their data by integrating Snowflake’s cloud-native data platform with the breadth of AWS services.
Andries Engelbrecht
Andries Engelbrecht is a Principal Partner Solutions Engineer at Snowflake working with AWS. He supports product and service integrations, as well as the development of joint solutions with AWS. Andries has over 25 years of experience in the field of data and analytics.
関連記事
今日のまとめ
AI日報で今日の重要ニュースをまとめ読み