埋め込み型 Amazon SageMaker AI MLflow アプリをカスタムポータルに構築する方法
AWS は、大規模な ML チーム向けに、SSO を統合したカスタムポータルへ Amazon SageMaker AI MLflow アプリを埋め込むためのアーキテクチャと実装手順を公開し、運用負荷の軽減とアクセス管理の簡素化を実現する。
キーポイント
スケーラブルなアクセス管理の実現
個別の presigned URL やコンソール権限付与に代わり、SSO 統合ポータルへの埋め込みにより、大規模チームでも一元的かつ安全に MLflow UI にアクセス可能にする。
技術アーキテクチャの詳細
React フロントエンドと Flask リバースプロキシ(EC2 上)を組み合わせ、SigV4 認証を裏側で処理して MLflow API との安全な通信を実現する構成が提示される。
AWS CDK による自動化デプロイ
Application Load Balancer を含む全スタックを AWS Cloud Development Kit (CDK) で定義・デプロイすることで、環境構築の標準化と迅速な展開を可能にする。
AWS CDK の環境設定とデプロイ
プロジェクトディレクトリに移動し、依存関係をインストール後、AWS アカウントIDやリージョンを環境変数として設定してCDKでブートストラップを実行する必要があります。
EC2 への接続と Python 環境構築
デプロイ出力から取得した EC2 インスタンス ID を用いて AWS Systems Manager Session Manager で接続し、Python 3.13 と必要な依存関係をインストールします。
キャッシュファイルの削除推奨事項
以前に異なるリージョンへデプロイしていた場合、CDK のコンテキストキャッシュファイルを削除して環境をクリーンにするよう指示されています。
MLflow プロキシサービスの検証とトラブルシューティング
システムctlコマンドでサービスステータスを確認し、起動していない場合はjournalctlでログを確認する必要がある。
重要な引用
Distributing presigned URLs doesn't scale for teams with dozens of data scientists
Teams who rely on SSO-integrated internal portals need their MLflow experiment tracking accessible alongside other internal applications through a single bookmarkable URL
SigV4 authentication handled behind the scenes
If previously deployed to a different Region, delete the cached context file.
Note the ALB DNS name and Amazon EC2 instance ID from the deployment output. You need these in the following steps.
You are automatically redirected to /app, where the React dashboard displays the MLflow UI embedded in an iframe
影響分析・編集コメントを表示
影響分析
この記事は、ML 運用(MLOps)の成熟度が高い組織において、ツール間のサイロ化を解消し、データサイエンティストの生産性を向上させる具体的な実装パターンを提供します。特に、セキュリティ要件が厳しい環境でも SSO と組み合わせて MLflow を利用できるようにする手法は、企業内での AI 資産管理の標準化に寄与します。
編集コメント
大規模な ML チームを抱える組織にとって、個別の認証管理から脱却し、統一されたポータルで実験追跡を一元化するこのアプローチは、MLOps の成熟度を高める重要なステップです。
ML チームが成長するにつれ、Amazon SageMaker AI MLflow Apps をカスタムポータルに埋め込むには、アクセス管理のためのスケーラブルなアプローチが必要です。プレサインド URL の配布は、数十人のデータサイエンティストを抱えるチームでは拡張性がなく、個別の AWS Management Console アクセス権を付与すると、アクセス制御を管理する管理者にとって運用オーバーヘッドが増大します。SSO 統合型内部ポータルに依存しているチームは、MLflow の実験追跡機能を、他の内部アプリケーションと同様に、単一のブックマーク可能な URL から利用できるようにする必要があります。カスタムポータルを導入することで、新規メンバーのオンボーディング時間を短縮し、アクセス管理を簡素化するとともに、データサイエンティストが社内ツール全体で一貫した体験を得られるようになります。
このソリューションにより、ML チームに対して、プレサインド URL や AWS Management Console アクセスを必要とせず、永続的でブックマーク可能な MLflow Web UI への URL を提供できます。MLflow の実験追跡 UI を、組織の SSO 統合型内部ポータルやカスタムダッシュボードに直接埋め込むことで、ユーザーは一度だけ認証するだけで、他の社内ツールと同様に実験追跡機能を利用できるようになります。また、継続的インテグレーションおよび継続的デリバリー(CI/CD)パイプラインや自動化スクリプトも、同じプロキシエンドポイントを通じて MLflow REST APIs にプログラム的にアクセスでき、SigV4 認証は裏側で自動的に処理されます。
本記事では、埋め込まれた SageMaker AI MLflow Apps UI を備えたカスタムポータルの構築方法について学びます。React フロントエンドと AWS Signature Version 4 (SigV4) 認証を処理する Flask リバースプロキシを組み合わせたアーキテクチャパターンを解説し、AWS Cloud Development Kit (AWS CDK) を通じてスタック全体を展開する方法、展開の検証手順、およびセキュリティ上の考慮事項とクリーンアップ手順についてレビューします。
ソリューション概要
SageMaker AI MLflow Apps UI を iframe で埋め込んだカスタム React ウェブアプリケーションを、Amazon Elastic Compute Cloud (Amazon EC2) 上で動作する Flask リバースプロキシをバックエンドとして展開します。このアーキテクチャは、チームが MLflow に認証されたアクセスを取得できるよう連携して機能する 4 つのコンポーネントで構成されています。
Application Load Balancer
Application Load Balancer (ALB) は、ユーザーにとっての単一のエントリーポイントとして機能します。トラフィックを適切なバックエンドターゲットにルーティングすることで HTTPS 終端処理を行い、組織の既存の DNS および証明書インフラストラクチャと統合されます。これにより、既存の SSO インフラストラクチャと連携可能な、安定したパブリック URL をポータルに対して提供します。React ダッシュボードおよび MLflow API リクエストの両方のトラフィックを分散し、カスタムドメイン名と SSL 終端処理をサポートします。
注意: この実装では HTTP を使用した ALB(Application Load Balancer)を採用しています。本番環境では、AWS Certificate Manager (ACM) を経由して SSL/TLS 証明書による HTTPS の追加が必要です。
React フロントエンドポータル
React フロントエンドは、チームに対して MLflow エクスペリエンスへのブランド化されたエントリーポイントを提供します。これは、MLflow 追跡 UI を iframe に埋め込み、組織のブランディングや追加ツールの統合ポイントとして機能するカスタムポータルです。静的ファイルは /app パスから Flask プロキシを介して配信されます。
Flask リバースプロキシサービス
Flask リバースプロキシは、フロントエンドと MLflow バックエンドの間に位置し、認証を処理することで、ユーザーが AWS 資格情報を直接管理する必要がないようにします。Python ベースの Flask アプリケーションは以下の処理を担当します:
- UI パスおよび REST API 呼び出しを含む着信リクエストのインターセプト。
- 専用の AWS Identity and Access Management (IAM) ロールを想定することで取得した一時的資格情報を使用して、AWS SigV4 で各リクエストに署名すること。
- 署名されたリクエストを Amazon SageMaker AI MLflow Apps エンドポイントへ転送すること。
- HTML レスポンス内の絶対 MLflow URL を相対パスに書き換え、X-Frame-Options ヘッダーを削除して、UI が iframe 内で正しくレンダリングされるようにすること。
Amazon SageMaker AI MLflow アプリ
Amazon SageMaker AI は、MLflow アプリを完全にマネージド型で提供するため、サーバーのプロビジョニングやパッチ適用の必要はありません。Amazon SageMaker AI MLflow Apps では、ラン、メトリクス、パラメータ、アートを備えた実験追跡機能と、モデルバージョン管理およびライフサイクル管理のためのモデルレジストリを提供します。これは維持すべきインフラストラクチャのない完全にマネージド型のバックエンドです。
このアーキテクチャは、既存のエンタープライズポータルとの互換性を維持しつつ、安全な通信をサポートします。プロキシサービスは、標準的な HTTPS リクエストを認証された AWS API 呼び出しに変換する橋渡し役として機能します。
アーキテクチャとリクエストワークフロー
以下の図は、チームが Amazon SageMaker AI MLflow Apps に安全にブラウザベースでアクセスできるよう、各コンポーネントがどのように連携するかを示しています。
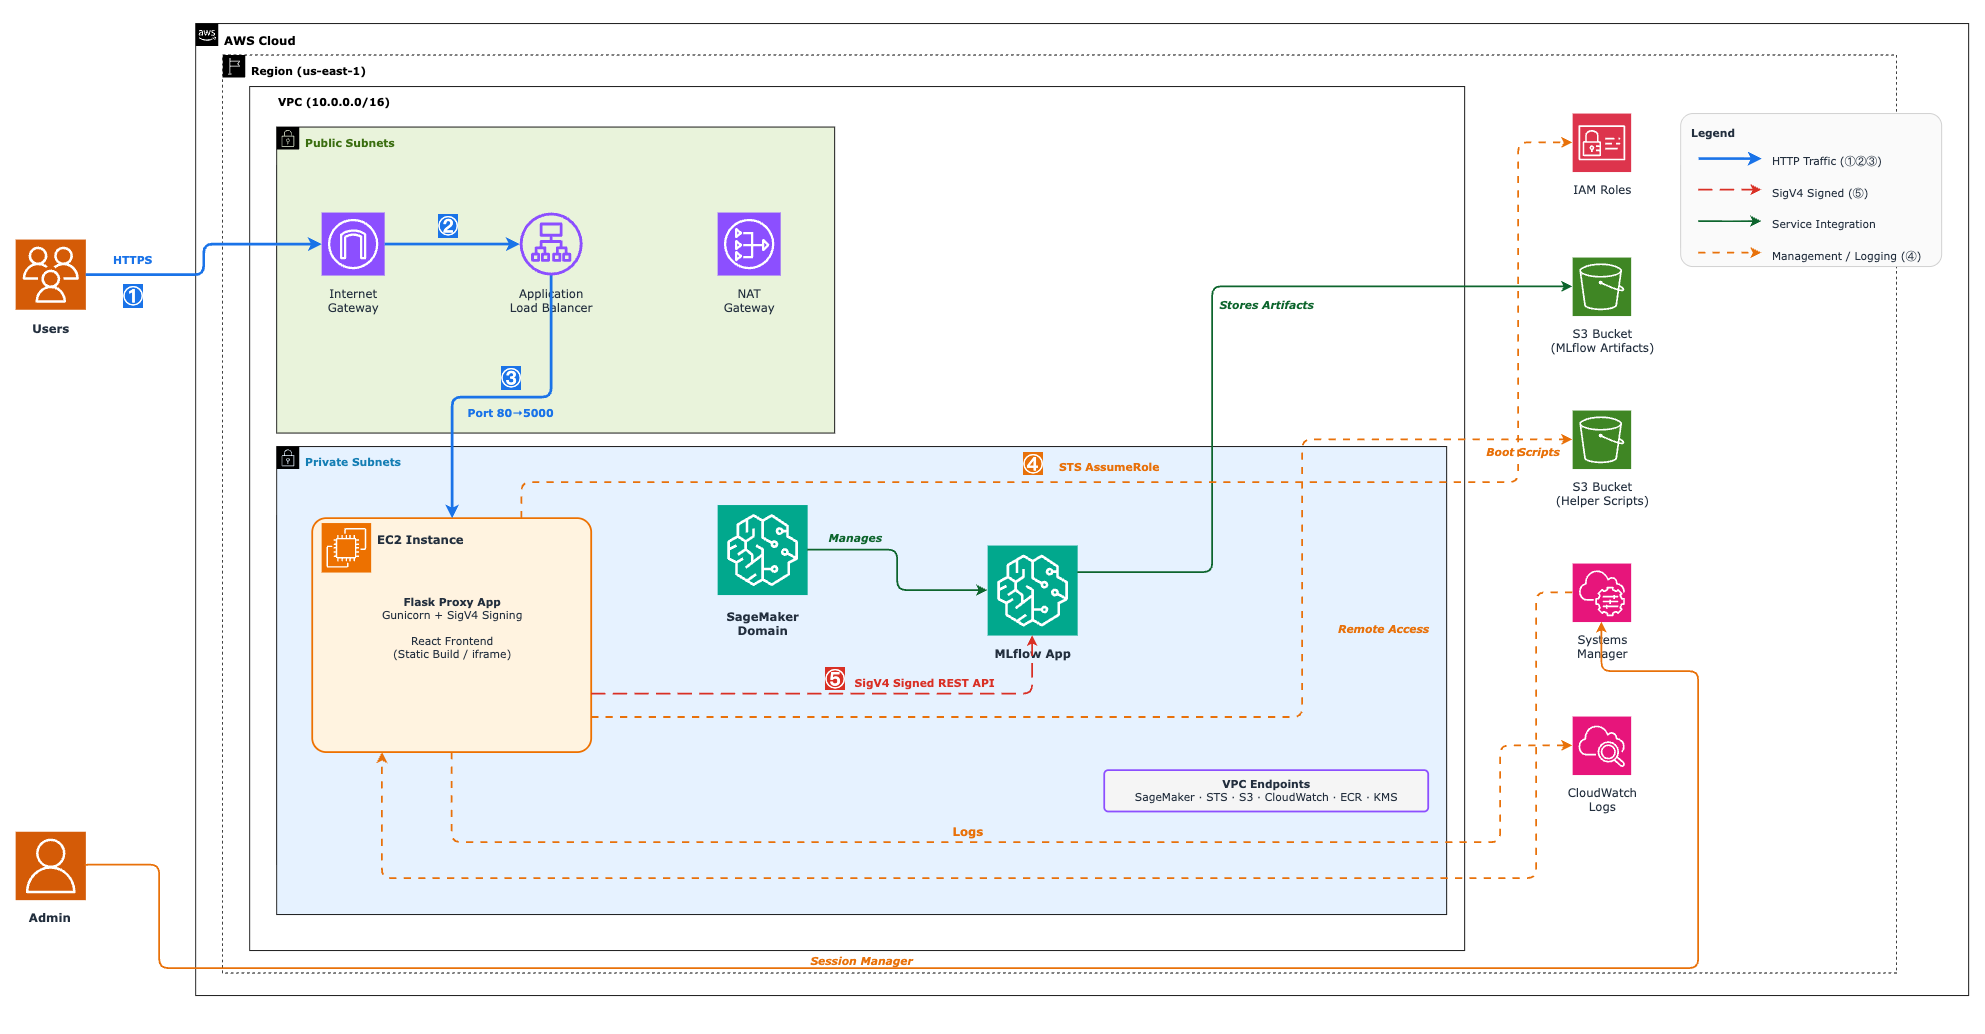
ユーザーがポータルにアクセスした際に発生する処理は以下の通りです:
- ユーザーは、組織内の内部ポータル内のリンクを経由するか、直接ブラウザで ALB の URL を開きます。ALB はリクエストを Flask プロキシを実行中の Amazon EC2 インスタンスにルーティングします。
- Flask プロキシは React ダッシュボード(/app パスから)を提供します。React アプリがページを描画し、/mlflow-ui/ を指す iframe 内に MLflow UI を読み込みます。
- この時点以降、iframe が行うすべてのリクエスト(MLflow UI ページの読み込みや /api/2.0/mlflow/experiments/search などの API エンドポイントへの呼び出しを含む)は Flask プロキシを経由します。プロキシは、専用 IAM ロールを想定して取得した一時的な認証情報を使用して AWS SigV4 で各リクエストに署名し、サーバーレス MLflow アプリのエンドポイントへ転送します。
- MLflow アプリが応答すると、プロキシはブラウザへの応答を返す前に 2 つの処理を行います。絶対パスで記述された MLflow の URL を相対パスに書き換えて、プロキシ経由でのナビゲーションが正しく機能するようにします。また、X-Frame-Options ヘッダーを削除して、ブラウザがコンテンツを iframe 内でレンダリングできるようにします。
ユーザーは、AWS 認証の処理が裏側で行われる中で、実験、ラン、メトリクス、モデルレジストリを含む完全な MLflow 追跡 UI をブラウザ上で直接確認できます。
ウォークスルー
以下のセクションでは、このソリューションをデプロイする方法について順を追って説明します。### 前提条件
このウォークスルーに従うには、以下の前提条件を満たしていることを確認してください:
- AWS アカウント。
- AWS Command Line Interface (AWS CLI) v2.34.5 以降(create-mlflow-app、list-mlflow-apps、describe-mlflow-app コマンドに必須)。
- ローカル環境にインストールされた Python 3.13 以降(デプロイメントスクリプトで JSON 出力を解析するために使用)。
- ターゲットの AWS アカウントおよびリージョンにインストールされ、ブートストラップされた AWS CDK v2 (aws-cdk-lib 2.243.0 以降)。手順については、「AWS CDK の始め方」をご覧ください。
- CDK デプロイメント用のローカル環境にインストールされた Node.js 18.x 以降。
- Amazon EC2 インスタンス上にインストールされた Python 3.13(セットアップスクリプトにより自動化)。
- VPC、Amazon EC2 インスタンス、ALB (Application Load Balancer)、Amazon SageMaker AI ドメイン、MLflow Apps、IAM ロールの作成に必要な十分な IAM 権限。
- ターゲットの AWS リージョンで利用可能な Ubuntu 24.04 LTS AMI(SSM Parameter Store を使用して自動的に解決)。
- 必要な知識:
AWS サービスおよび IAM 権限に関する基本的な理解。
- Python および Flask アプリケーションへの親和性。
- MLflow の概念と運用に関する理解。
- コストに関する考慮事項:
このソリューションは、コストが発生する可能性のある AWS リソースを作成します。
- 主要なコスト要因となるリソースには以下が含まれます:
Amazon EC2 インスタンス。
- Application Load Balancer (ALB)。
- Amazon SageMaker AI リソース。
- Amazon Simple Storage Service (Amazon S3) ストレージ。
AWS サービスの価格に関する情報は、AWS Pricing Calculator をご覧ください。
ソリューションのデプロイ
このセクションでは、AWS アカウント内でソリューションをデプロイし、検証する方法について説明します。デプロイには、CDK スタックのデプロイとサーバーレス MLflow アプリケーションの作成をオーケストレーションする単一の deploy.sh スクリプトが使用されます。
ステップ 1: リポジトリのクローンとインフラストラクチャのデプロイ
- ソリューションコードをダウンロードし、依存関係をインストールします:
# リポジトリをクローンする
git clone https://github.com/aws-samples/sample-sagemaker-mlflow-embedded-ui.git
プロジェクトディレクトリに移動し、依存関係をインストールする
cd sample-sagemaker-mlflow-embedded-ui
npm install
- AWS アカウント ID とリージョンを環境変数として設定します:
export CDK_DEFAULT_ACCOUNT=
export CDK_DEFAULT_REGION=
export AWS_DEFAULT_REGION=
export AWS_REGION=
注意:以前に別のリージョンへデプロイしたことがある場合は、キャッシュされたコンテキストファイルを削除してください。
rm -f cdk.context.json
AWS CDK の環境をブートストラップしてください(AWS アカウントとリージョンが既に AWS CDK 用にブートストラップされている場合はこのステップをスキップ)。CDK 用の AWS アカウントおよびリージョンのブートストラップ:
cdk bootstrap aws:///
必要なリソースを AWS アカウントにデプロイします。デプロイスクリプトを実行してスタックをデプロイしてください:
bash deploy.sh
デプロイ出力から ALB の DNS 名と Amazon EC2 インスタンス ID をメモしてください。これらの情報は次のステップで必要になります。
ステップ 2: Amazon EC2 上で Flask プロキシサービスのセットアップ
- ステップ 1 で取得したインスタンス ID を使用して、Amazon EC2 インスタンスにサインインします。AWS Systems Manager Session Manager を使用してインスタンスにアクセスしてください。詳細な手順については、Session Manager の接続ガイドを参照してください。
- Python 3.13 および依存関係をインストールします。Python パッケージをインストールします:
# ルートユーザーに切り替え
sudo su -
cd /root
Python と依存関係のインストール
chmod +x install_python13.sh
./install_python13.sh
注: このスクリプトは Ubuntu ベースのシステム向けです。他の Linux ディストリビューションの場合は、システムのパッケージマネージャーを使用して、Python 3.12 以上、PIP3、および Virtualenv がインストールされていることを確認してください。
- MLflow プロキシサービスをインストールして起動します:
chmod +x setup_mlflow_proxy_app.sh
./setup_mlflow_proxy_app.sh
- Flask MLflow プロキシサービスのステータスを確認します:
systemctl status mlflowproxy
サービスが実行されていない場合は、以下のコマンドでログを確認してください。
journalctl -u mlflowproxy
ステップ 3: デプロイメントの検証
このセクションでは、ALB を介して MLflow REST API にどのようにアクセスするかを示します。これらの例では HTTP(非暗号化)プロトコルを使用していますが、本番環境では HTTPS の使用を推奨します。以下の例では curl ツールを使用して API リクエストを行いますが、Postman などの同等のツールを使用することも可能です。
- ステップ 1 でメモした ALB の URL をブラウザで開きます。また、AWS CloudFormation スタックの出力から取得することもできます:
aws cloudformation describe-stacks --stack-name sagemaker-infra-flaskapp --query 'Stacks[0].Outputs[?OutputKey==ALBUrl].OutputValue' --output text
- ブラウザで ALB の URL を http:/// で開きます。自動的に /app にリダイレクトされ、以下の図に示すように、React ダッシュボードの iframe 内に MLflow UI が埋め込まれて表示されます。
- ヘルスエンドポイントを確認します:
curl http:///health
これは {"status": "healthy"} を返すべきです。
- REST API を介して MLflow の実験追跡をテストします。実験を作成します。ALB を通じて MLflow REST API を使用して新しい実験を作成し、レスポンスから実験 ID をメモしてください。
curl -X POST http:///api/2.0/mlflow/experiments/create -H "Content-Type: application/json" -d '{"name": "my-first-experiment"}'
- 実行(run)を作成してログに記録します。その実験の下で実行を作成し、メトリクスとパラメータをログに記録します。
curl -X POST http:///api/2.0/mlflow/runs/create -H "Content-Type: application/json" -d '{"experiment_id": "", "run_name": "training-run-1"}'
curl -X POST http:///api/2.0/mlflow/runs/log-parameter -H "Content-Type: application/json" -d '{"run_id": "", "key": "learning_rate", "value": "0.01"}'
curl -X POST http:///api/2.0/mlflow/runs/log-metric -H "Content-Type: application/json" -d '{"run_id": "", "key": "accuracy", "value": 0.95, "timestamp": 1700000000000, "step": 1}'
- React ダッシュボードで実行を確認します。ブラウザの http:///app で React ダッシュボードをリフレッシュしてください。MLflow UI には、前述の手順で作成した実験、実行、メトリクス、パラメータが表示されます(以下の図参照)。
クリーンアップ
継続的な課金を回避し、このソリューションによって作成されたリソースを削除するには、以下のクリーンアップ手順に従ってください:
- プロジェクトのルートからクリーンアップスクリプトを実行します。
bash cleanup.sh
このスクリプトは、依存関係の逆順でデプロイされたリソースを破棄します。まず Flask アプリケーションスタックを削除し、次に AWS CLI を通じてサーバーレス MLflow アプリを削除して、削除が完了するまで待機します。その後、MLflow リソース、Amazon SageMaker ドメイン、およびネットワークスタックを削除します。ネットワークスタックには、AWS Lambda にバックされたカスタムリソースが含まれています。VPC を削除する前に、自動的に Amazon SageMaker AI によって作成された Amazon Elastic File System (Amazon EFS) ファイルシステム、孤立したネットワークインターフェース、およびセキュリティグループをクリーンアップします。
- リソースの手動クリーンアップ。MLflow アーティファクト用の Amazon S3 バケットには「RETAIN(保持)」の削除ポリシーが設定されており、不要になった場合は手動で削除する必要があります。詳細な手順については、Amazon S3 ユーザーガイドの「汎用バケットの削除」を参照してください。
CDK スタックの詳細
本ソリューションは、アーキテクチャの各層をそれぞれ担当する 4 つの CDK スタックを展開します。
ネットワーキングスタック
このスタックは、VPC および関連するネットワークコンポーネント(パブリックサブネットとプライベートサブネット、ルートテーブル、セキュリティグループなど)を作成します。これは、他のすべてのスタックが依存するネットワーク基盤を提供します。
SageMaker AI ドメインスタック
このスタックは、SageMaker リソースの組織用コンテナとして機能する Amazon SageMaker AI ドメインを設定します。このドメインは、MLflow アプリに必要なアイデンティティとアクセスコンテキストを提供します。
SageMaker MLflow スタック
このスタックは、実験、ラン、メトリクス、モデルレジストリデータを格納するために、SageMaker AI ドメイン内にサーバーレスの MLflow アプリを展開します。
Flask アプリケーションスタック
このスタックは、ALB(Application Load Balancer)の背後にある Amazon EC2 インスタンス上で Flask リバースプロキシサービスを展開します。これは SigV4 認証を処理し、React フロントエンドポータルを提供します。
次のステップ
ポータルの展開後、これらのユースケースで拡張することを検討してください:
- ポータルに SSO(シングルサインオン)認証を追加します。Amazon Cognito や Okta などの ID プロバイダーを ALB に統合し、プロキシに到達する前にユーザーの認証を行います。手順については、「アプリケーションロードバランサーを使用したユーザー認証」をご覧ください。
- AWS PrivateLink を使用してプロキシを保護します。チームがパブリックインターネットを経由しないプライベート接続を必要とする場合は、MLflow 対応の Amazon SageMaker における AWS PrivateLink サポートに関するドキュメントをご覧ください。
- AWS Signature Version 4 の署名プロセスについて学習してください。
このソリューションを生産環境にデプロイする際は、以下の追加セキュリティ対策の実装を検討してください:
Flask ベースのプロキシサービスに対して Amazon CloudWatch モニタリングを設定し、アプリケーションの
原文を表示
As ML teams grow, embedding Amazon SageMaker AI MLflow Apps into a custom portal requires a scalable approach to access management. Distributing presigned URLs doesn’t scale for teams with dozens of data scientists, and granting individual AWS Management Console access adds operational overhead for administrators managing access controls. Teams who rely on SSO-integrated internal portals need their MLflow experiment tracking accessible alongside other internal applications through a single bookmarkable URL. With a custom portal, you reduce onboarding time for new team members, simplify access management, and give data scientists a consistent experience across your internal tools.
With this solution, you give your machine learning (ML) teams a persistent, bookmarkable URL to the full MLflow web UI without presigned URLs or AWS Management Console access. You can embed the MLflow experiment tracking UI directly into your organization’s SSO-integrated internal portal or custom dashboard, so users authenticate once and access experiment tracking alongside other internal tools. Your continuous integration and continuous delivery (CI/CD) pipelines and automation scripts can interact with MLflow REST APIs programmatically through the same proxy endpoint, with SigV4 authentication handled behind the scenes.
In this post, you learn how to build a custom portal with embedded SageMaker AI MLflow Apps UI. You walk through the architecture pattern behind a React front end paired with a Flask reverse proxy that handles AWS Signature Version 4 (SigV4) authentication, deploy the entire stack through the AWS Cloud Development Kit (AWS CDK), validate the deployment, and review security considerations and cleanup procedures.
Solution overview
You deploy a custom React web application with the SageMaker AI MLflow Apps UI embedded using iframe, backed by a Flask reverse proxy running on Amazon Elastic Compute Cloud (Amazon EC2). The architecture consists of four components that work together to give your team authenticated access to MLflow.
Application Load Balancer
The Application Load Balancer (ALB) serves as the single entry point for your users. It handles HTTPS termination by routing traffic to the appropriate backend targets and integrates with your organization’s existing DNS and certificate infrastructure. It provides a stable, public-facing URL for the portal that can integrate with existing SSO infrastructure. It distributes traffic for both the React dashboard and MLflow API requests, and supports custom domain names and SSL termination.
Note: This implementation uses ALB with HTTP. For production environments, you should add HTTPS with an SSL/TLS certificate via AWS Certificate Manager (ACM).
React front end portal
The React front end gives your team a branded entry point to the MLflow experience. It provides a custom portal that embeds the MLflow tracking UI in an iframe and serves as an integration point for organizational branding and additional tools. It delivers static files through the Flask proxy from the /app path.
Flask reverse proxy service
The Flask reverse proxy sits between the front end and the MLflow backend, handling authentication so your users never manage AWS credentials directly. A Python-based Flask application handles:
- Intercepting incoming requests, including UI paths and REST API calls.
- Signing each request with AWS SigV4 using temporary credentials obtained by assuming a dedicated AWS Identity and Access Management (IAM) role.
- Forwarding signed requests to the Amazon SageMaker AI MLflow Apps endpoint.
- Rewriting absolute MLflow URLs in HTML responses to relative paths and stripping X-Frame-Options headers so the UI renders correctly inside an iframe.
Amazon SageMaker AI MLflow apps
Amazon SageMaker AI fully manages MLflow apps for you, so there are no servers to provision or patch. Amazon SageMaker AI MLflow Apps provides experiment tracking with runs, metrics, parameters, and artifacts, along with a model registry for model versioning and lifecycle management. It is a fully managed backend with no infrastructure to maintain.
This architecture supports secure communication while maintaining compatibility with existing enterprise portals. The proxy service acts as a bridge, transforming standard HTTPS requests into authenticated AWS API calls.
Architecture and request workflow
The following diagram shows how the different components work together to give your team secure, browser-based access to Amazon SageMaker AI MLflow Apps.
Here’s what happens when a user navigates to the portal:
- The user opens the ALB URL in their browser, either directly or through a link in your organization’s internal portal. The ALB routes the request to the Amazon EC2 instance running the Flask proxy.
- The Flask proxy serves the React dashboard (from the /app path). The React app renders the page and loads the MLflow UI inside an iframe pointing to /mlflow-ui/.
- From this point on, every request the iframe makes goes through the Flask proxy, whether it’s loading the MLflow UI pages or calling API endpoints like /api/2.0/mlflow/experiments/search. The proxy signs each request with AWS SigV4 using temporary credentials (obtained by assuming a dedicated IAM role) and forwards it to the serverless MLflow App endpoint.
- When the MLflow App responds, the proxy does two things before passing the response back to the browser. It rewrites absolute MLflow URLs to relative paths so that navigation works correctly through the proxy. It also strips X-Frame-Options headers so that the browser allows the content to render inside the iframe.
Your users see the full MLflow tracking UI, including experiments, runs, metrics, and model registry, right in their browser, with AWS authentication handled behind the scenes.
Walkthrough
The following section walks you through how to deploy the solution. ### Prerequisites
To follow along with this walkthrough, make sure you have the following prerequisites:
- An AWS account.
- AWS Command Line Interface (AWS CLI) v2.34.5 or later (required for create-mlflow-app, list-mlflow-apps, and describe-mlflow-app commands).
- Python 3.13 or later installed locally (used by the deployment script to parse JSON outputs).
- AWS CDK v2 (aws-cdk-lib 2.243.0 or later) installed and bootstrapped in the target account and Region. For instructions, see Getting started with the AWS CDK.
- Node.js 18.x or later installed locally for CDK deployment.
- Python 3.13 installed on the Amazon EC2 instance (automated by the setup script).
- Sufficient IAM permissions to create VPCs, Amazon EC2 instances, ALBs, Amazon SageMaker AI domains, MLflow Apps, and IAM roles.
- An Ubuntu 24.04 LTS AMI available in the target AWS Region (automatically resolved using SSM Parameter Store).
- Required knowledge:
Basic understanding of AWS services and IAM permissions.
- Familiarity with Python and Flask applications.
- Understanding of MLflow concepts and operations.
- Cost considerations:
This solution creates AWS resources that may incur costs.
- Key cost-driving resources include:
Amazon EC2 instances.
- Application Load Balancer.
- Amazon SageMaker AI resources.
- Amazon Simple Storage Service (Amazon S3) storage.
For information about AWS service pricing, see the AWS Pricing Calculator.
Deploy the solution
This section guides you through deploying the solution in your AWS account and validating it. The deployment uses a single deploy.sh script that orchestrates CDK stack deployment and serverless MLflow App creation.
Step 1: Clone the repository and deploy the infrastructure
- Download the solution code and install dependencies:
# Clone the repository
git clone https://github.com/aws-samples/sample-sagemaker-mlflow-embedded-ui.git

# Navigate to project directory and install dependencies
cd sample-sagemaker-mlflow-embedded-ui
npm install- Set your AWS account ID and Region as environment variables:
export CDK_DEFAULT_ACCOUNT=
export CDK_DEFAULT_REGION=
export AWS_DEFAULT_REGION=
export AWS_REGION=
Note: If you previously deployed to a different Region, delete the cached context file.
rm -f cdk.context.json- Bootstrap your environment for AWS CDK (skip this step if your AWS account and Region is already bootstrapped for AWS CDK).Bootstrap the AWS account and Region for CDK:
cdk bootstrap aws:///- Deploy the required resources on your AWS account.Run the deployment script to deploy the stacks:
bash deploy.shNote the ALB DNS name and Amazon EC2 instance ID from the deployment output. You need these in the following steps.
Step 2: Set up the Flask proxy service on Amazon EC2
- Sign in to the Amazon EC2 instance using the instance ID from Step 1. Use AWS Systems Manager Session Manager to access the instance. For detailed instructions, see the Session Manager connection guide.
- Install Python 3.13 and dependencies.Install Python packages:
# Switch to root user
sudo su -
cd /root

# Install Python and dependencies
chmod +x install_python13.sh
./install_python13.sh
Note: This script works on Ubuntu-based systems. For other Linux distributions, verify that Python 3.12+, PIP3, and Virtualenv are installed using your system’s package manager.
- Install and start the MLflow proxy service:
chmod +x setup_mlflow_proxy_app.sh
./setup_mlflow_proxy_app.sh- Check Flask MLflow proxy service status:
systemctl status mlflowproxyIf the service isn’t running, check logs with the following.
journalctl -u mlflowproxyStep 3: Validate the deployment
This section demonstrates how to interact with MLflow REST APIs through the ALB. These examples use the HTTP (unsecured) protocol, and for production environments, HTTPS is recommended. The following examples use the curl tool to make API requests, but you can also use a tool like Postman or equivalent.
- Open the ALB URL that you noted in Step 1 in your browser. You can also retrieve it from the AWS CloudFormation stack output:
aws cloudformation describe-stacks --stack-name sagemaker-infra-flaskapp --query 'Stacks[0].Outputs[?OutputKey==`ALBUrl`].OutputValue' --output text- Open the ALB URL in your browser at http:///. You are automatically redirected to /app, where the React dashboard displays the MLflow UI embedded in an iframe, as shown in the following figure.
- Verify the health endpoint:
curl http:///healthThis should return {"status": "healthy"}.
- Test MLflow experiment tracking via the REST API.
Create an experiment.Use the MLflow REST API through the ALB to create a new experiment. Note the experiment ID from the response.
curl -X POST http:///api/2.0/mlflow/experiments/create -H "Content-Type: application/json" -d '{"name": "my-first-experiment"}'- Create and log a run.Create a run under the experiment and log metrics and parameters.
curl -X POST http:///api/2.0/mlflow/runs/create -H "Content-Type: application/json" -d '{"experiment_id": "", "run_name": "training-run-1"}'

curl -X POST http:///api/2.0/mlflow/runs/log-parameter -H "Content-Type: application/json" -d '{"run_id": "", "key": "learning_rate", "value": "0.01"}'

curl -X POST http:///api/2.0/mlflow/runs/log-metric -H "Content-Type: application/json" -d '{"run_id": "", "key": "accuracy", "value": 0.95, "timestamp": 1700000000000, "step": 1}'- Verify the run in the React dashboard.Refresh the React dashboard in your browser at http:///app. The MLflow UI now displays the experiment, runs, metrics, and parameters you created in the preceding steps, as shown in the following figure.
Clean up
To avoid ongoing charges and remove the resources created by this solution, follow these cleanup steps:
- Run the cleanup script from the project root.
bash cleanup.shThis script tears down the deployed resources in reverse dependency order. It starts by destroying the Flask app stack, then deletes the serverless MLflow App through the AWS CLI and waits for the deletion to finish. After that, it removes the MLflow resources, Amazon SageMaker domain, and networking stacks. The networking stack includes an AWS Lambda-backed custom resource. It automatically cleans up Amazon SageMaker AI-created Amazon Elastic File System (Amazon EFS) file systems, orphaned network interfaces, and security groups before deleting the VPC.
- Manual resource cleanup.The MLflow artifacts Amazon S3 bucket has a RETAIN removal policy and must be manually deleted if no longer needed. For detailed instructions, see Deleting a general purpose bucket in the Amazon S3 User Guide.
CDK stack details
The solution deploys four CDK stacks, each responsible for a distinct layer of the architecture.
Networking stack
This stack creates the VPC and associated networking components, including public and private subnets, route tables, and security groups. It provides the network foundation that all other stacks depend on.
SageMaker AI domain stack
This stack sets up the Amazon SageMaker AI domain, which serves as the organizational container for SageMaker resources. The domain provides the identity and access context needed for the MLflow App.
SageMaker MLflow stack
This stack deploys the serverless MLflow App within the SageMaker AI domain that stores experiments, runs, metrics, and model registry data.
Flask application stack
This stack deploys the Flask reverse proxy service on an Amazon EC2 instance behind an ALB. It handles SigV4 authentication and serves the React front end portal.
Next steps
After deploying the portal, consider extending it with these use cases:
- Add SSO authentication to the portal. Integrate an identity provider such as Amazon Cognito or Okta with the ALB to authenticate users before they reach the proxy. For instructions, see Authenticate users using an Application Load Balancer.
- Secure the proxy with AWS PrivateLink. If your team requires private connectivity without traversing the public internet, see AWS PrivateLink support for Amazon SageMaker with MLflow.
- Learn about the AWS Signature Version 4 signing process.
When deploying this solution in a production environment, consider implementing these additional security measures:
Configure Amazon CloudWatch monitoring for the Flask-based proxy service to track application
関連記事
今日のまとめ
AI日報で今日の重要ニュースをまとめ読み