エンタープライズアプリケーションにAmazon Quick Suiteチャットエージェントを組み込む
AWSはAmazon Quick Suiteの埋め込みチャット機能を、ワンクリックデプロイでエンタープライズアプリケーションに統合するソリューションを発表し、セキュリティと開発効率の課題を解決する。
キーポイント
埋め込みチャットによる課題解決
Amazon Quick Suiteの埋め込みチャットは、ユーザーがCRMやサポートコンソールなど作業環境内で会話型AIを利用できるようにし、ツール切り替えの必要性を解消する。
ワンクリックデプロイによる開発効率化
Quick Suite Embedding SDKを使用したソリューションは、認証、トークン検証、セキュリティなどのインフラ構築を簡素化し、数週間かかる開発を大幅に短縮する。
多層防御によるセキュリティアーキテクチャ
CloudFront、Cognito、API Gateway、Lambda、OIDC連携などを組み合わせ、DDoS保護、オリジンアクセス制御、レート制限など多層的なセキュリティを実装している。
エンタープライズ統合の実現
構造化データのクエリ、ドキュメント検索、アクションのトリガーなど、業務アプリケーション内での会話型AIの実用的な利用を可能にする。
影響分析・編集コメントを表示
影響分析
この発表は、会話型AIのエンタープライズ導入における主要な障壁である「統合の複雑さ」と「セキュリティ要件」を同時に解決する実用的なソリューションを示している。AWSの既存サービスを組み合わせたアプローチは、同社のクラウドエコシステムの強みを活かしつつ、競合に対する差別化要因となり得る。
編集コメント
AWSが自社のクラウドサービスを活用して会話型AIの実用化ハードルを下げる戦略的な発表。技術的革新よりも、既存サービスの組み合わせによる実用性重視のアプローチが特徴。
組織は会話型AI(Conversational AI)において、2つの重要な課題に直面することがあります。第一に、ユーザーは別々のツールではなく、自分たちが作業する場所(CRM、サポートコンソール、分析ポータルなど)で回答を得る必要があります。第二に、アプリケーションに安全な埋め込みチャット(embedded chat)を実装するには、認証、トークン検証、ドメインセキュリティ、グローバル配信インフラストラクチャの構築に数週間の開発を要する場合があります。
Amazon Quick Suiteの埋め込みチャット(embedded chat)は、会話型AIを直接アプリケーションに組み込むことで最初の課題の解決を支援し、ユーザーがツールを切り替えることなく構造化データをクエリしたり、ドキュメントを検索したり、アクションをトリガーしたりできるようにします。
この投稿では、Quick Suiteの埋め込みSDK(Embedding SDK)を使用してチャットエージェントをエンタープライズポータルに埋め込むワンクリックデプロイメントソリューションで、2番目の課題を解決する方法を紹介します。
ソリューション概要
このソリューションは、埋め込みチャット用の安全なウェブポータルを、グローバルなコンテンツ配信にはAmazon CloudFront、OAuth 2.0認証にはAmazon Cognito、REST APIエンドポイントにはAmazon API Gateway、サーバーレスAPI処理にはAWS Lambda、Quick Suiteとのアイデンティティ統合にはOpenID Connect(OIDC)フェデレーションを使用してデプロイします。
このソリューションは、多層防御によるセキュリティを実装しています。CloudFrontでのDDoS攻撃保護(DDoS protection)、オリジンアクセス制御(origin access control)によりフロントエンドアセットへの直接アクセスを防ぐプライベートなAmazon Simple Storage Service(Amazon S3)バケット、API GatewayでのAWS WAFレート制限保護(rate limiting protection)、最小権限のAWS Identity and Access Management(IAM)権限で時間制限付きのユーザー固有の埋め込みURLを生成する前に行う、Amazon Cognito公開鍵を使用したJSON Web Token(JWT)署名検証(signature validation)です。
次の図はソリューションアーキテクチャを示しています。
ワークフローは以下のステップで構成されます:
- ユーザーがウェブポータルURLにアクセスし、CloudFrontにルーティングされます。
- CloudFrontはオリジンアクセス制御を使用して、プライベートS3バケットからHTML、CSS、JavaScriptファイルを取得します。
- ウェブアプリケーションは有効な認証トークンをチェックし、未認証ユーザーをOAuth 2.0ログイン用のAmazon Cognitoホスト型UIにリダイレクトします。
- ユーザーはAmazon Cognitoログインページで認証情報を入力し、検証後に単一使用の認可コード(authorization code)付きでCloudFront URLにリダイレクトされます。
- アプリケーションは認可コードを抽出し、AWS WAFレート制限を通過するAPI GatewayへのHTTPS API呼び出しを行います。
- API Gatewayは認可コード付きでLambda関数を呼び出します。
- Lambda関数はサーバー間HTTPS呼び出しでAmazon Cognito OAuthトークンエンドポイントにアクセスし、認可コードをJWTトークン(IDトークン、アクセストークン、リフレッシュトークン)と交換します。
- 関数は、スレッドセーフなキャッシュ(thread-safe caching)を使用したAmazon Cognito公開鍵セットJSON Web Key Set(JWKS)でIDトークンの暗号署名を検証します。
以下はデコードされたJWTの例です:
- Lambda関数は、検証済みIDトークンを使用してAWS Security Token Service(AWS STS)のAssumeRoleWithWebIdentity APIを呼び出し、IAMウェブアイデンティティロールを引き受けて一時的なAWS認証情報を受け取ります。
- 関数は一時認証情報を使用してQuick SuiteのListUsers APIを呼び出してユーザーの存在を確認し、次にGenerateEmbedUrlForRegisteredUser APIを呼び出してドメイン制限付きの安全な埋め込みURLの生成を支援します。
- 関数は埋め込みURLをJSONレスポンスで、API Gateway経由でCloudFrontにクロスオリジンリソース共有(cross-origin resource sharing, CORS)ヘッダー付きで返します。以下は埋め込みURLの例です:
- CloudFrontアプリケーションはQuick Suite Embedding SDKを使用して埋め込みコンテキストを作成し、安全なクロスオリジン通信(secure cross-origin communication)でHTML iframe内にチャットインターフェースをレンダリングします。
このソリューションは以下の高レベルステップでデプロイできます:
- AWS Cloud Development Kit(AWS CDK)を使用してサーバーレスインフラストラクチャをデプロイします。
- Amazon CognitoとQuick Suiteにユーザーをプロビジョニングします。
- Quick Suiteアセット(チャットエージェントと関連する接続、ナレッジベース)を共有します。
- ウェブポータルにアクセスしてQuick Suiteチャットエージェントを使用します。
前提条件
この投稿で紹介するソリューションをデプロイするには、以下の前提条件が必要です:
- AWSアカウント
- 認証方法が「パスワードベース」または「シングルサインオン」のQuick Suiteサブスクリプション
- AWS CDK CLI
- AWS SDK for Python(Boto3)
- ソリューションをデプロイするための適切な権限を持つAWS CLIプロファイル(Quick Suiteネームスペースのリスト表示、IAMロールおよびCloudFrontディストリビューション、S3バケット、API Gateway REST API、AWS WAFウェブアクセス制御リスト、Lambda関数、Amazon Cognitoユーザープールを含むAWSリソースの作成権限を含む)
- Node.js 20以上
- jq 1.7以上
- Docker Desktopが実行中
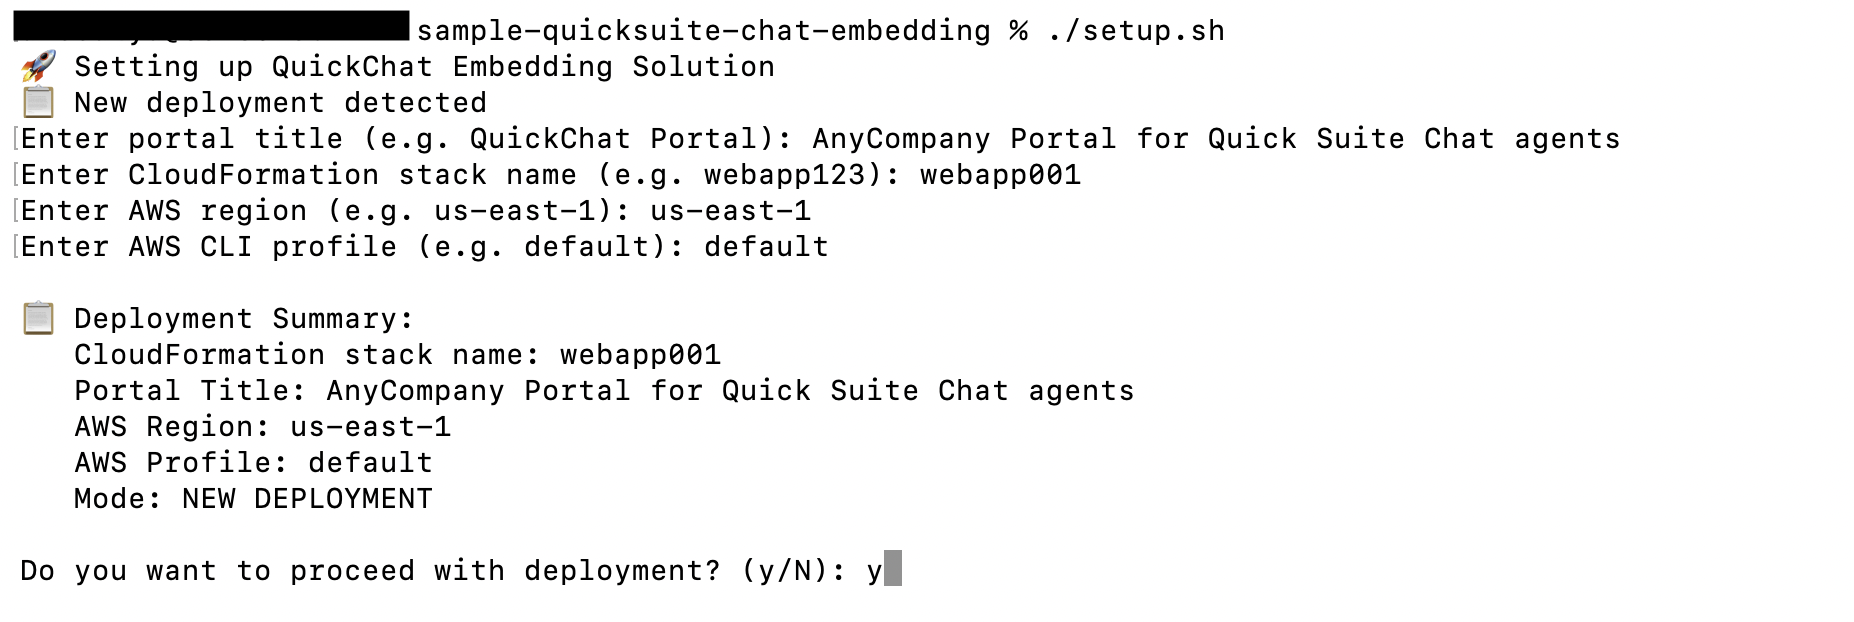
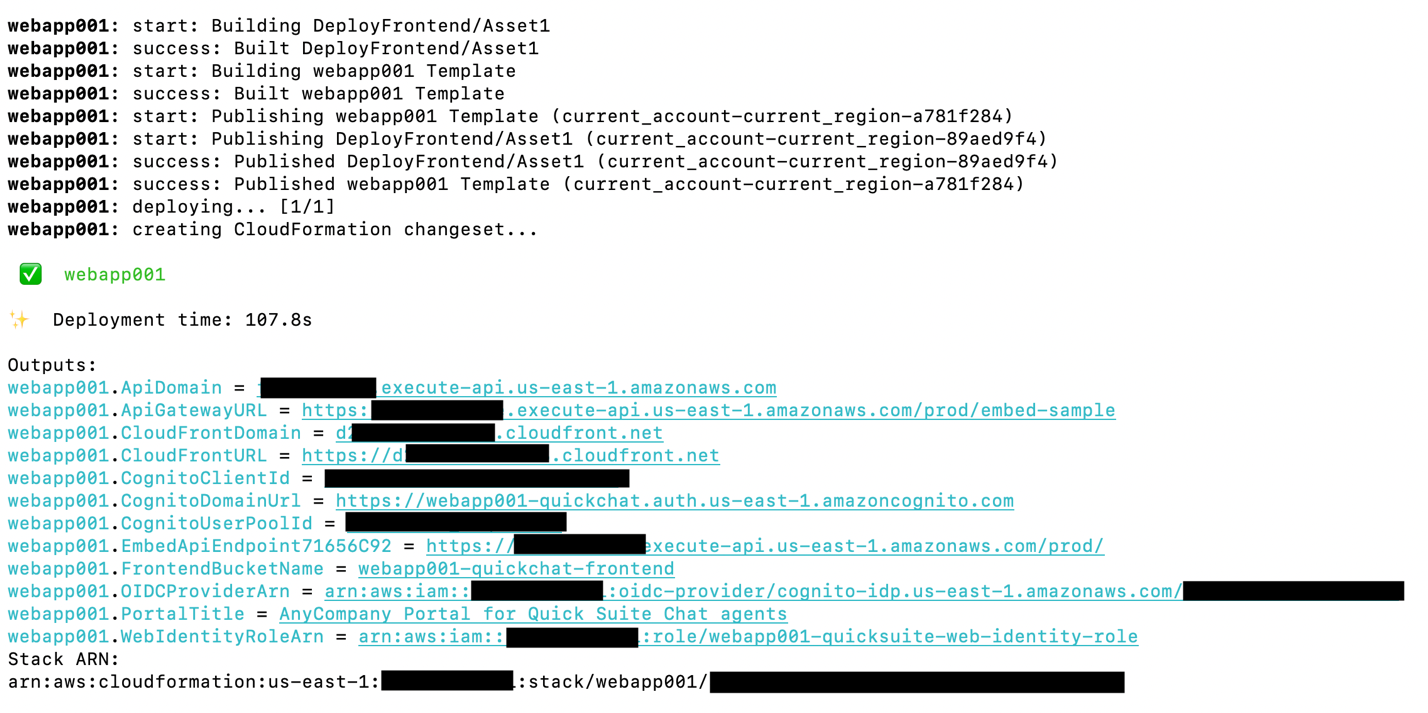
AWS CDKを使用したサーバーレスインフラストラクチャのデプロイ
AWS CDKを使用してサーバーレスインフラストラクチャをデプロイするには、以下のステップを完了してください:
- GitHubリポジトリをクローンします:
- インフラストラクチャをデプロイします:
AWSリージョンコード、AWS CloudFormationスタックIDとポータルタイトル、AWS CLIプロファイルの入力を求められます。
Amazon CognitoとQuick Suiteへのユーザーのプロビジョニング
Amazon CognitoとQuick Suiteにユーザーをプロビジョニングするには、以下のステップを完了してください:
- Amazon CognitoユーザープールにAmazon Cognitoユーザーを作成します:
- Quick Suiteにフェデレーテッドユーザーを作成します:
Quick Suiteチャットエージェントの共有
Quick Suiteチャットエージェントを共有するには、以下のステップを完了してください:
- Quick Suite Author Proロールの認証情報を使用してQuick Suiteコンソールにサインインします。
- ナビゲーションペインで「チャットエージェント」を選択します。
- 共有したいエージェント(例:AnyCompany Ecom注文アシスタント)を選択し、「共有」を選択します。
- 前に作成したユーザー名(例:user123@example.com)を検索します。
- 「共有」を選択します。
このエージェントを共有した後、完全な機能を確認するためにエージェントの各リンクされたリソースも個別に共有する必要があります。
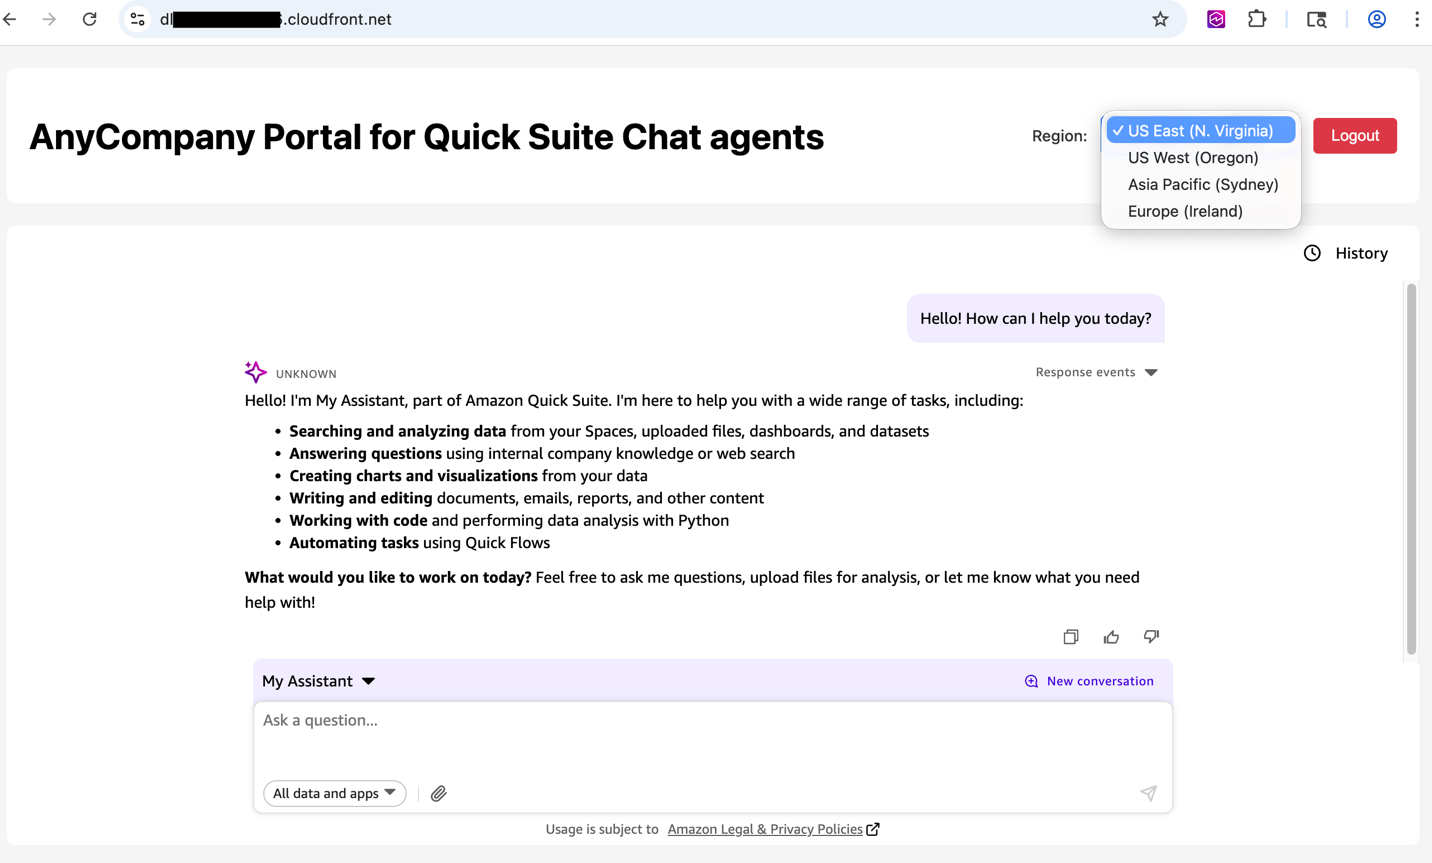
Quick Suiteチャットエージェントを使用するためのウェブポータルへのアクセス
ウェブポータルにアクセスしてチャットエージェントの使用を開始するには、以下のステップを完了してください:
- Amazon Cognito確認メールに記載されている一時パスワードを探します。
- ウェブブラウザからユーザーIDと一時パスワードでCloudFront URLにアクセスします。
- 初回ログイン時にパスワードの変更を求められます。
ログインが成功すると、チャットインターフェースに「マイアシスタント」が表示されます。
- カスタムQuick Suiteチャットエージェントに接続するリージョンを選択します。
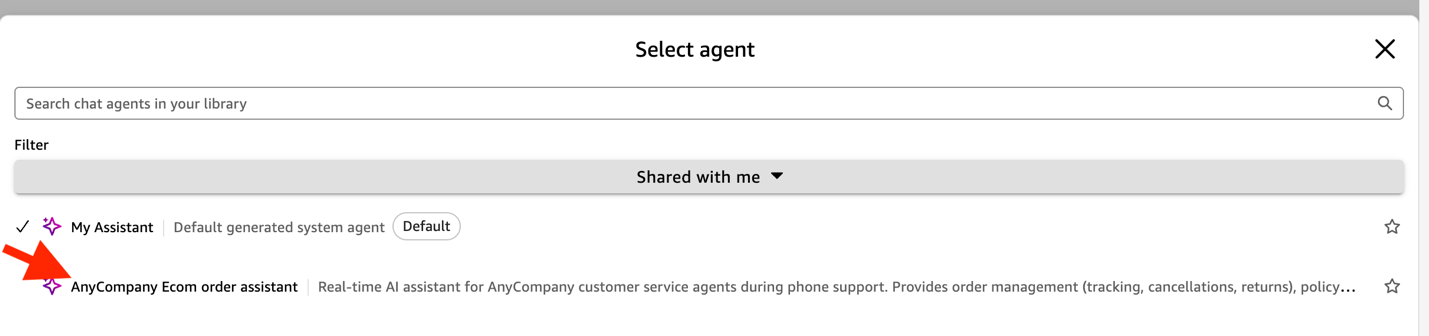
- 自分に共有されているチャットエージェントを表示するには、「フィルター」の下の「共有済み」を選択します。
- 使用したいエージェントを選択してチャットを開始します。
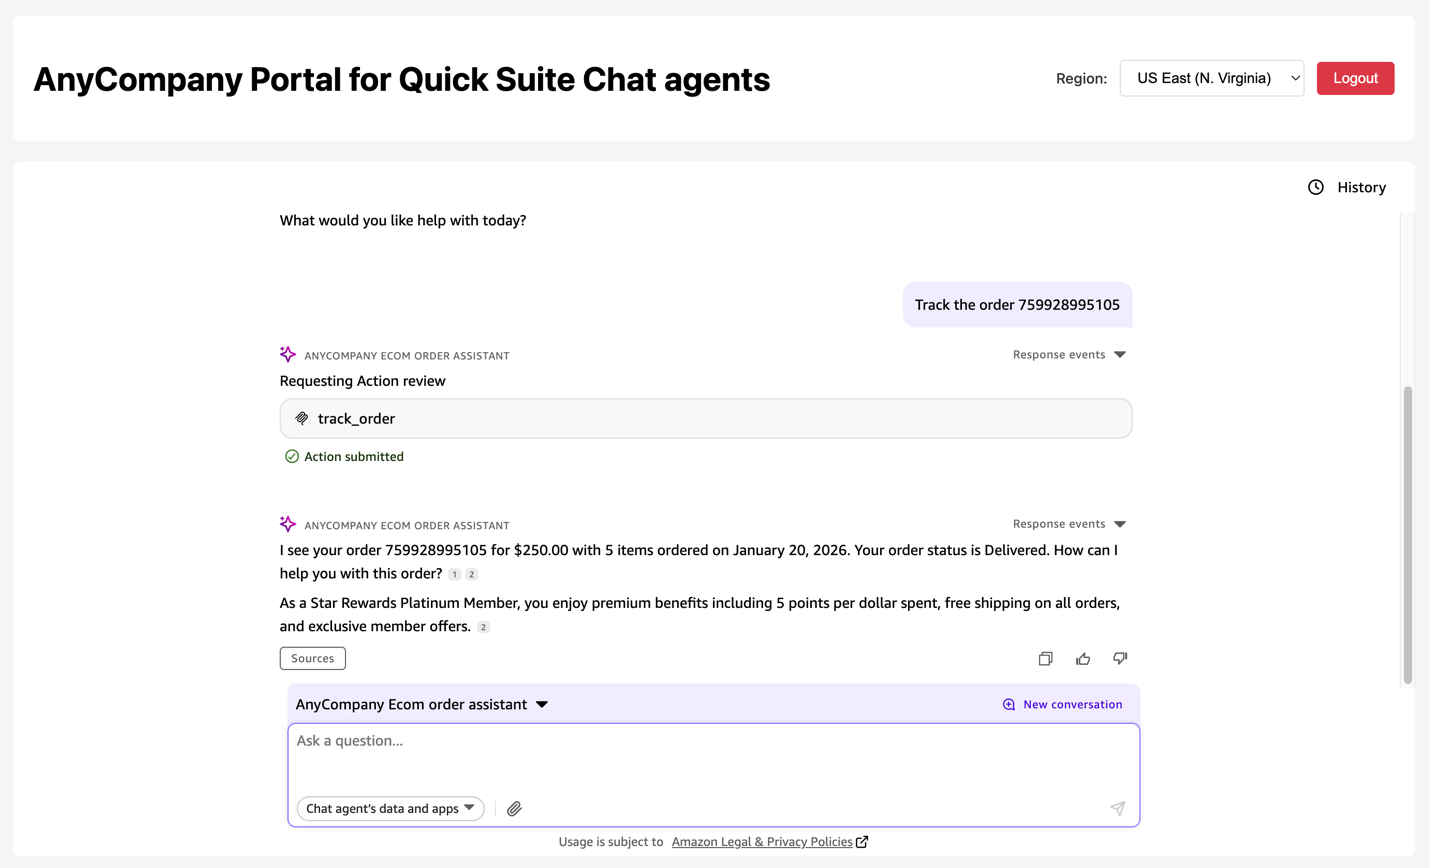
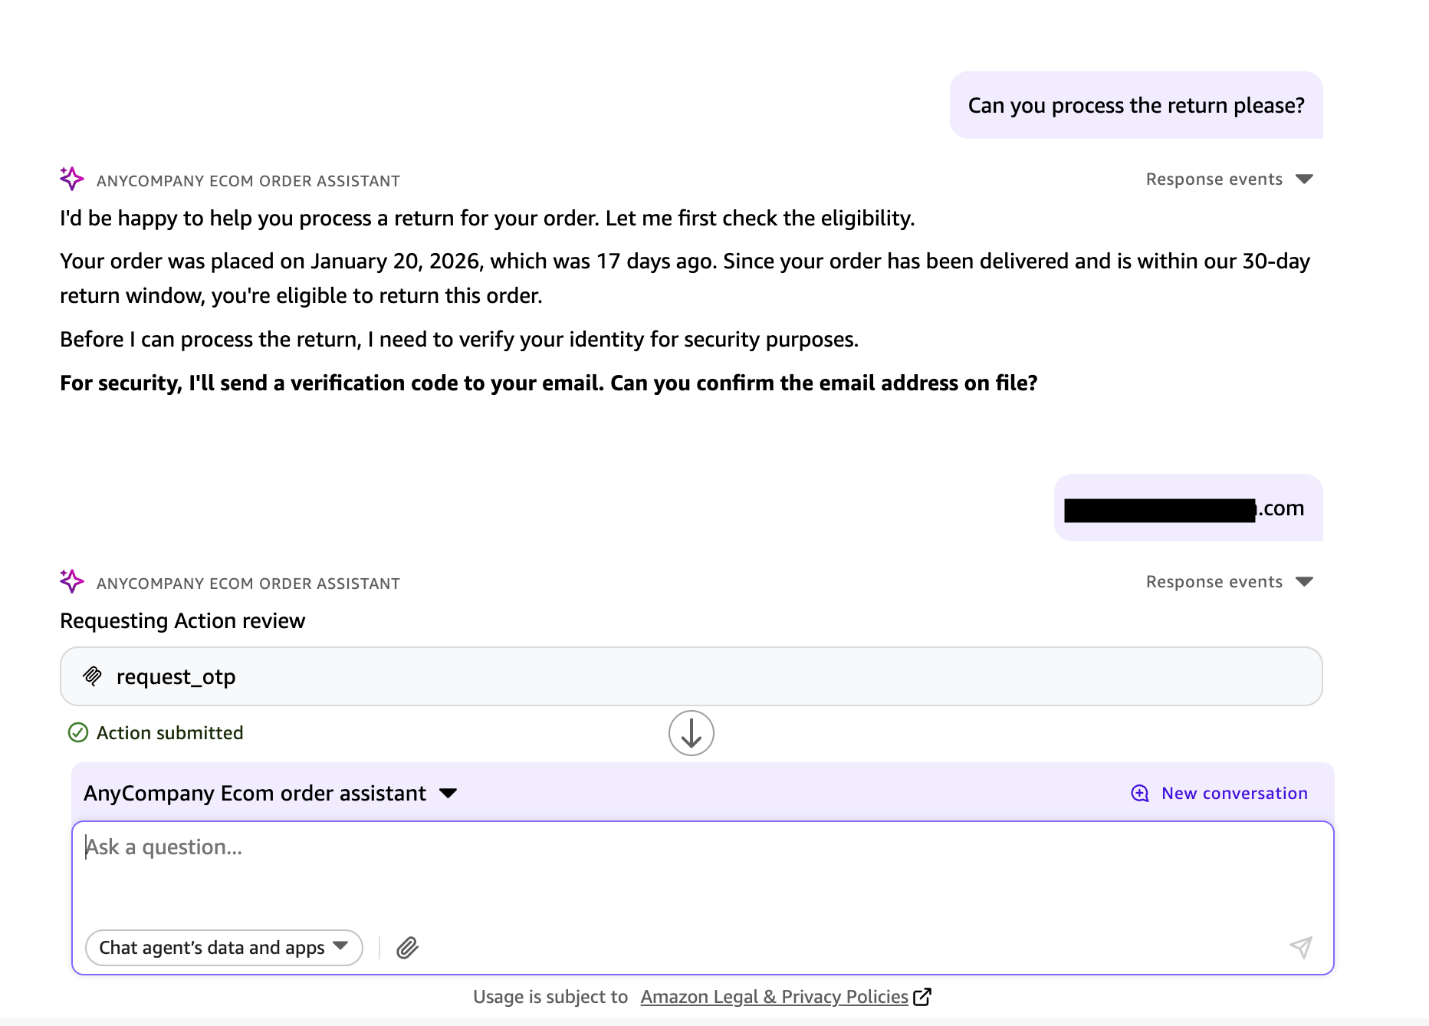
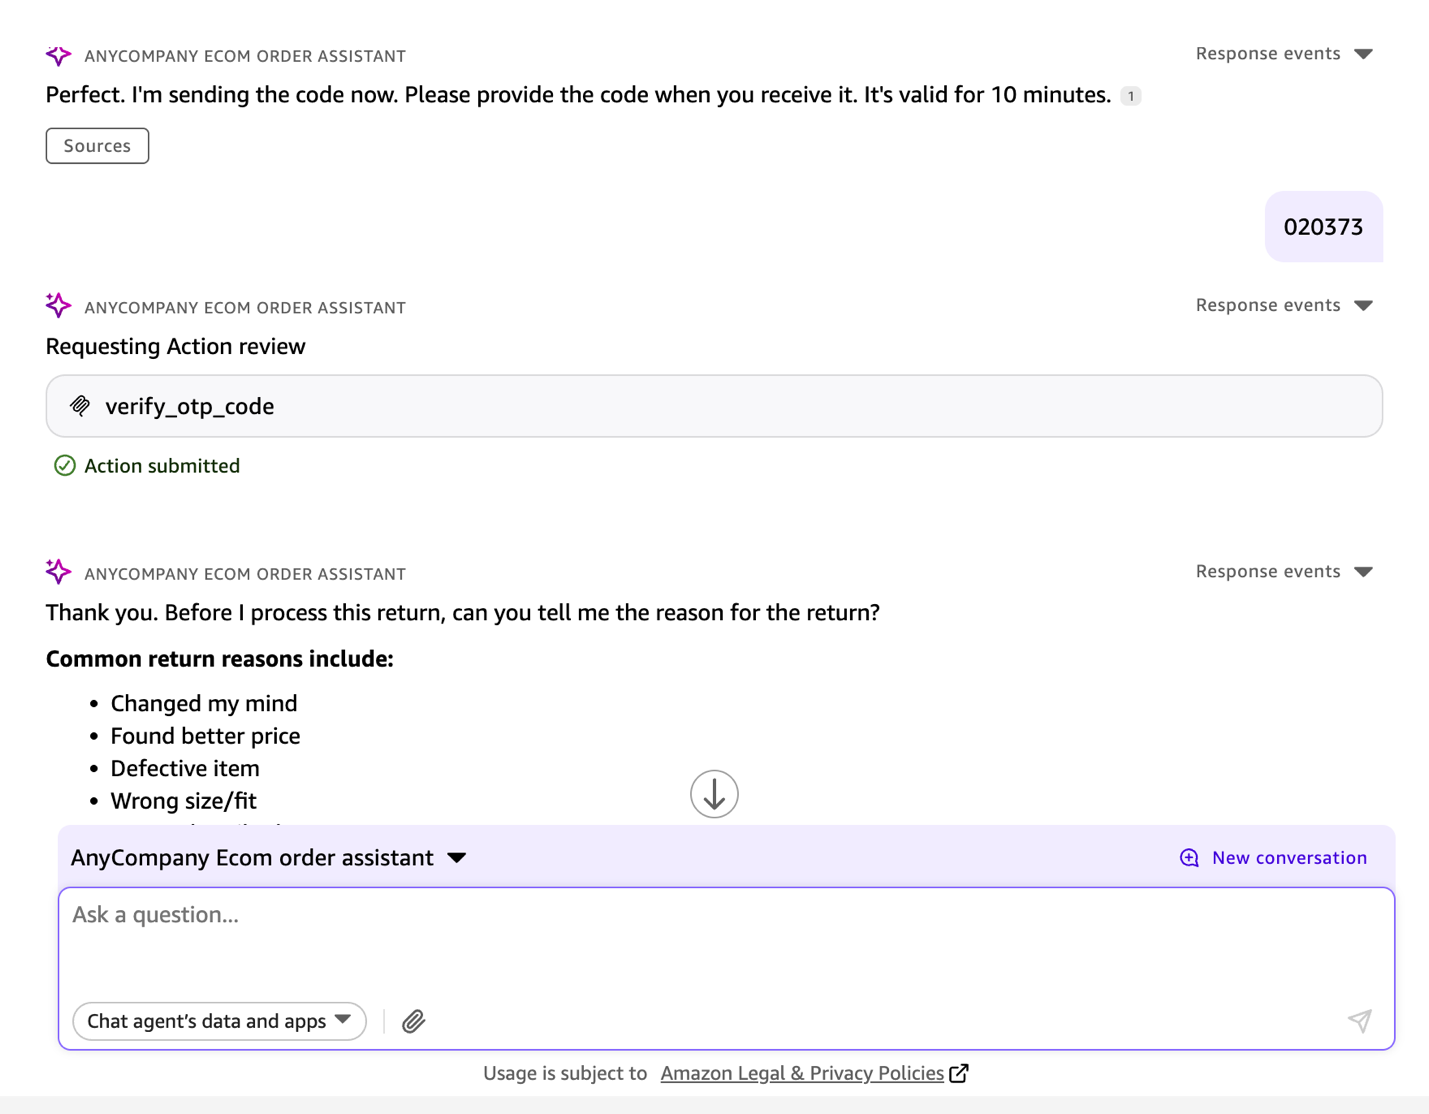
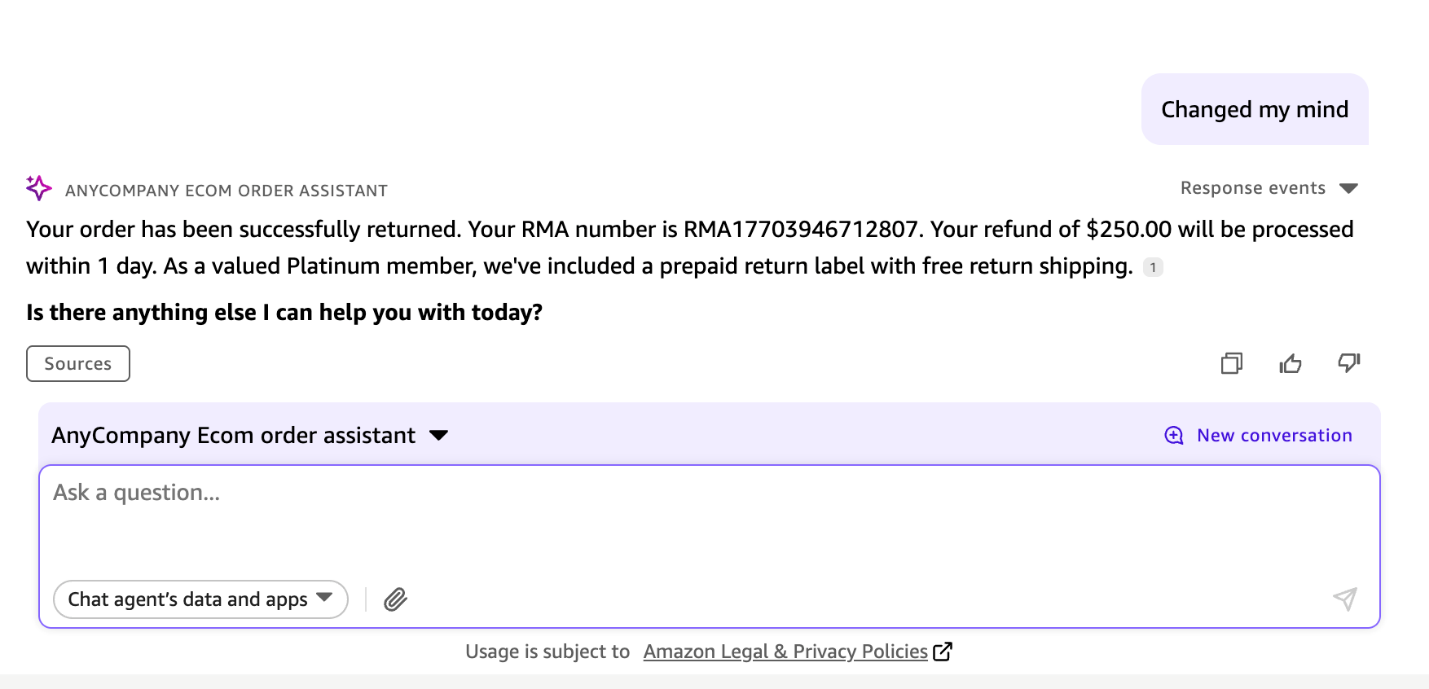
以下のスクリーンショットは、カスタマーサービス担当者が電話で確認済みの顧客から依頼された例のオンライン注文を追跡し、その返品を処理するチャットインタラクションを示しています。
クリーンアップ
リソースをクリーンアップするには、デプロイされたAWSリソースを削除します:
結論
このソリューションは、会話型AIを大規模に埋め込むための中核的な課題に対処します。世界中の数千の同時ユーザーに対する認証のセキュリティ確保、包括的な監査証跡によるエンタープライズグレードのセキュリティ維持、自動化されたインフラストラクチャプロビジョニングによるデプロイの簡素化です。ポータルのブランディングをカスタマイズし、セキュリティポリシーを調整し、既存のアイデンティティプロバイダーと統合できます。従量課金制の価格設定を維持しながら、数千の同時ユーザーに自動的にスケールできます。
このソリューションを試すには、GitHubリポジトリをクローンし、ワンクリックで完全なインフラストラクチャをデプロイしてQuick Suiteチャットエージェントを埋め込んでください。
著者について
Satyanarayana Adimulaは、AWS Generative AI Innovation & Deliveryのシニアビルダーです。20年以上のデータと分析の専門知識を活かし、大企業が複雑なワークフローを自動化し、意思決定を加速し、測定可能なビジネス成果を達成できるようにするエージェント型AIシステムの構築を専門としています。
原文を表示
Organizations can face two critical challenges with conversational AI. First, users need answers where they work—in their CRM, support console, or analytics portal—not in separate tools. Second, implementing a secure embedded chat in their applications can require weeks of development to build authentication, token validation, domain security, and global distribution infrastructure.
Amazon Quick Suite embedded chat helps solve the first challenge by bringing conversational AI directly into your applications, so users can query structured data, search documents, and trigger actions without switching tools.
In this post, we show you how to solve the second challenge with a one-click deployment solution to embed the chat agents using the Quick Suite Embedding SDK in enterprise portals.
Solution overview
The solution deploys a secure web portal for the embedded chat using Amazon CloudFront for global content delivery, Amazon Cognito for OAuth 2.0 authentication, Amazon API Gateway for REST API endpoints, AWS Lambda for serverless API processing, and OpenID Connect (OIDC) federation for identity integration with the Quick Suite.
The solution implements defense-in-depth security with multiple layers of protection: DDoS protection on CloudFront, a private Amazon Simple Storage Service (Amazon S3) bucket with origin access control helping prevent direct access to frontend assets, AWS WAF rate limiting protection on API Gateway, and JSON Web Token (JWT) signature validation using Amazon Cognito public keys before generating time-limited user-specific embed URLs with least-privilege AWS Identity and Access Management (IAM) permissions.
The following diagram illustrates the solution architecture.
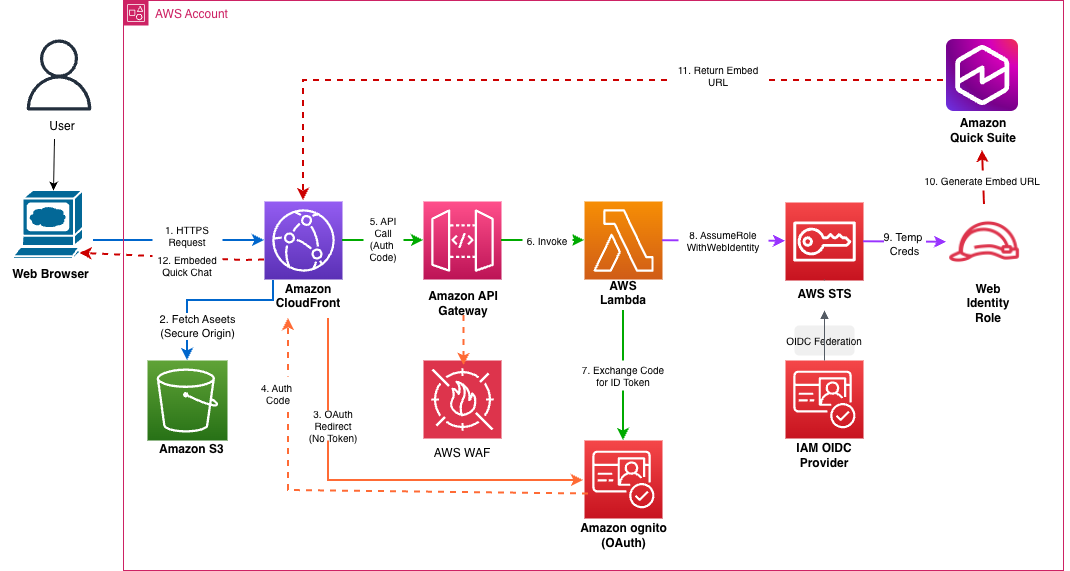
The workflow consists of the following steps:
- Users access the web portal URL, which routes to CloudFront.
- CloudFront uses origin access control to fetch HTML, CSS, and JavaScript files from a private S3 bucket.
- The web application checks for a valid authentication token and redirects unauthenticated users to the Amazon Cognito hosted UI for OAuth 2.0 login.
- Users enter credentials on the Amazon Cognito login page, which validates them and redirects back to the CloudFront URL with a single-use authorization code.
- The application extracts the authorization code and makes an HTTPS API call to API Gateway, which passes through AWS WAF rate limiting.
- API Gateway invokes a Lambda function with the authorization code.
- The Lambda function makes a server-to-server HTTPS call to the Amazon Cognito OAuth token endpoint, exchanging the authorization code for JWT tokens (ID token, access token, refresh token).
- The function validates the ID token’s cryptographic signature using Amazon Cognito public keys JSON Web Key Set (JWKS) with thread-safe caching.
The following is a decoded JWT example:
{"at_hash": "abcdefifB5vH2D0HEvLghi", "sub": "12345678-abcd-1234-efgh-123456789012", "email_verified": true, "iss": "https://cognito-idp.us-east-1.amazonaws.com/us-east-1_EXAMPLE123", "cognito:username": "12345678-abcd-1234-efgh-123456789012", "origin_jti": "abcd1234-5678-90ef-ghij-klmnopqrstuv", "aud": "1a2b3c4d5e6f7g8h9i0j1k2l3m", "event_id": "a1b2c3d4-e5f6-7890-abcd-ef1234567890", "token_use": "id", "auth_time": 1704063600, "exp": 1704067200, "iat": 1704063600, "jti": "abcdef12-3456-7890-abcd-ef1234567890", "email": "user123@example.com"}- The Lambda function calls the AWS Security Token Service (AWS STS) AssumeRoleWithWebIdentity API with the verified ID token to assume the IAM web identity role and receive temporary AWS credentials.
- The function uses the temporary credentials to call the Quick Suite ListUsers API to verify the user exists, then calls the GenerateEmbedUrlForRegisteredUser API to help generate a secure embedded URL with domain restrictions.
- The function returns the embed URL in a JSON response with cross-origin resource sharing (CORS) headers through API Gateway to CloudFront. The following is an embed URL example:
{"ChatEmbedUrl": "https://us-east-1.quicksight.aws.amazon.com/embedding/abcdefe827dd4ef8b4e1fb921db046c4/quick/chat?code=Abcdef....&identityprovider=quicksight&isauthcode=true", "user": "user123@example.com"}- The CloudFront application uses the Quick Suite Embedding SDK to create an embedding context and render the chat interface in an HTML iframe with secure cross-origin communication.
You can deploy the solution with the following high-level steps:
- Deploy the serverless infrastructure using the AWS Cloud Development Kit (AWS CDK).
- Provision users in Amazon Cognito and Quick Suite.
- Share the Quick Suite assets (chat agent and associated connections, knowledge base).
- Access the web portal to use Quick Suite chat agents.
Prerequisites
The following prerequisites are required to deploy the solution demonstrated in this post:
- An AWS account
- A Quick Suite subscription with the authentication method Password-based or Single-Sign On.
- The AWS CDK CLI
- The AWS SDK for Python (Boto3)
- An AWS CLI profile with appropriate permissions to deploy the solution, including list Quick Suite namespaces, create IAM roles and AWS resources including CloudFront distribution, S3 bucket, API Gateway REST API, AWS WAF web access control list, Lambda function, and Amazon Cognito user pool
- Node.js 20+
- jq 1.7+
- Docker Desktop running
Deploy serverless infrastructure using AWS CDK
Complete the following steps to deploy the serverless infrastructure using the AWS CDK:
- Clone the GitHub repository:
git clone git@github.com:aws-samples/sample-quicksuite-chat-embedding.git
cd sample-quicksuite-chat-embedding- Deploy the infrastructure:
./setup.shYou will be prompted to enter your AWS Region code, AWS CloudFormation stack ID and portal title, and your AWS CLI profile.**

Provision users in Amazon Cognito and Quick Suite
Complete the following steps to provision users in Amazon Cognito and Quick Suite:
- Create an Amazon Cognito user in an Amazon Cognito user pool:
python scripts/create_cognito_user.py --profile 
- Create a federated user in Quick Suite:
python scripts/create_quicksuite_user.py --profile 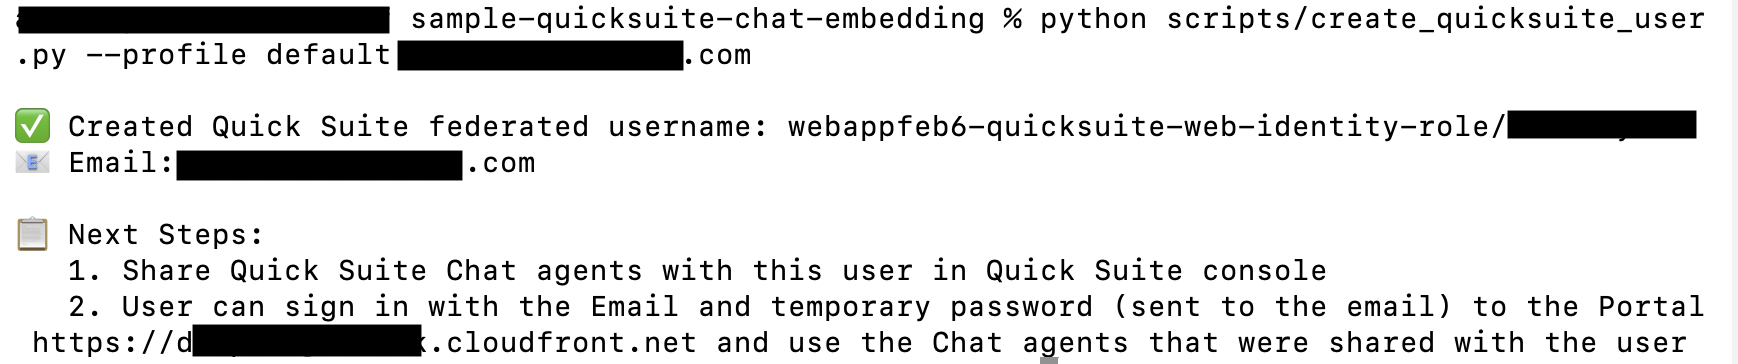
Share Quick Suite chat agent
Complete the following steps to share your Quick Suite chat agent:
- Sign in to the Quick Suite console using credentials with the Quick Suite Author Pro role.
- Choose Chat agents in the navigation pane.
- Select the agents you want to share (for example, AnyCompany Ecom order assistant) and choose Share.
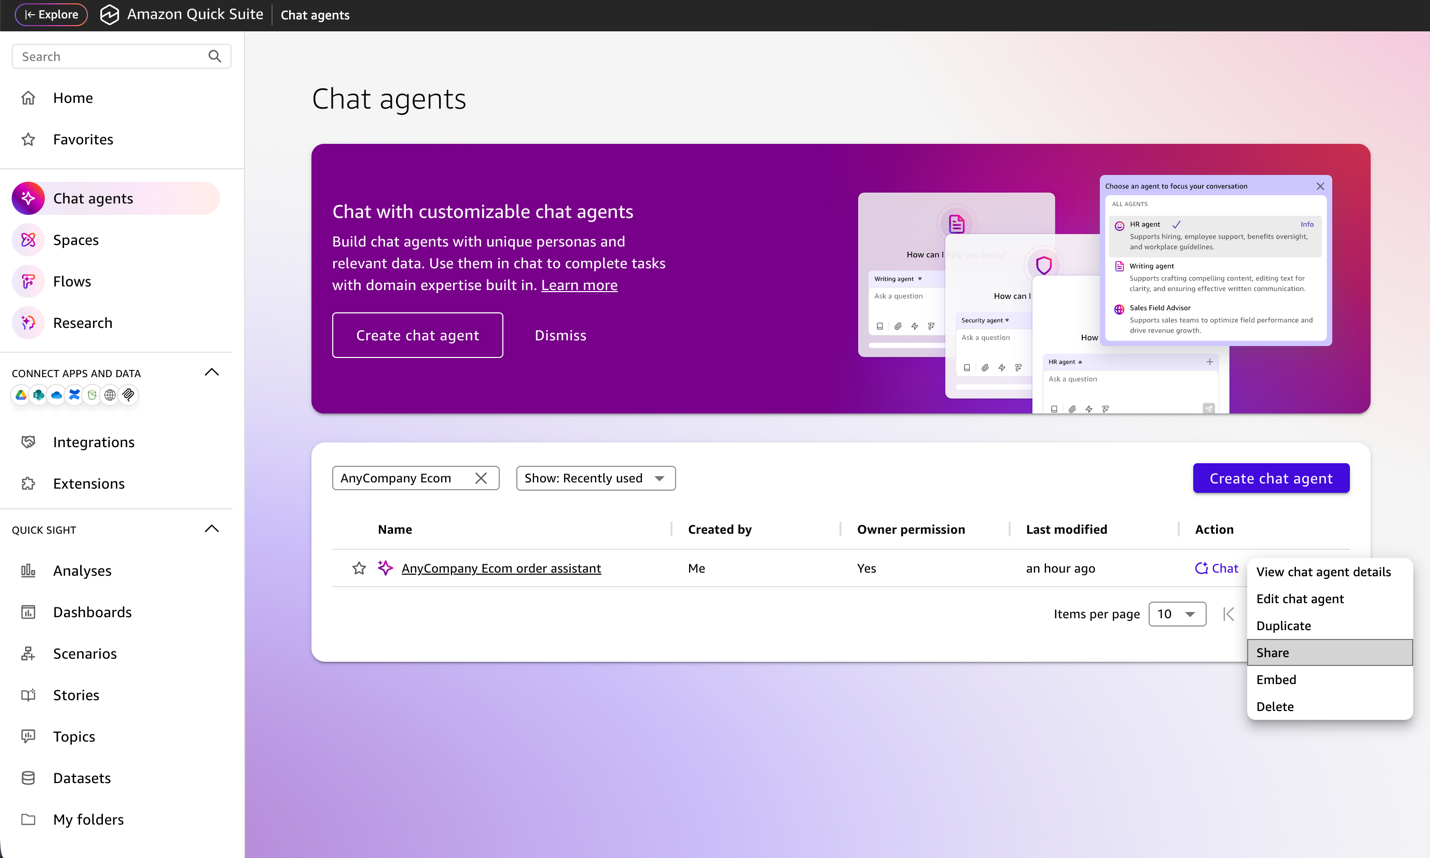
- Search for the user name (for example, user123@example.com) you created earlier.
- Choose Share.
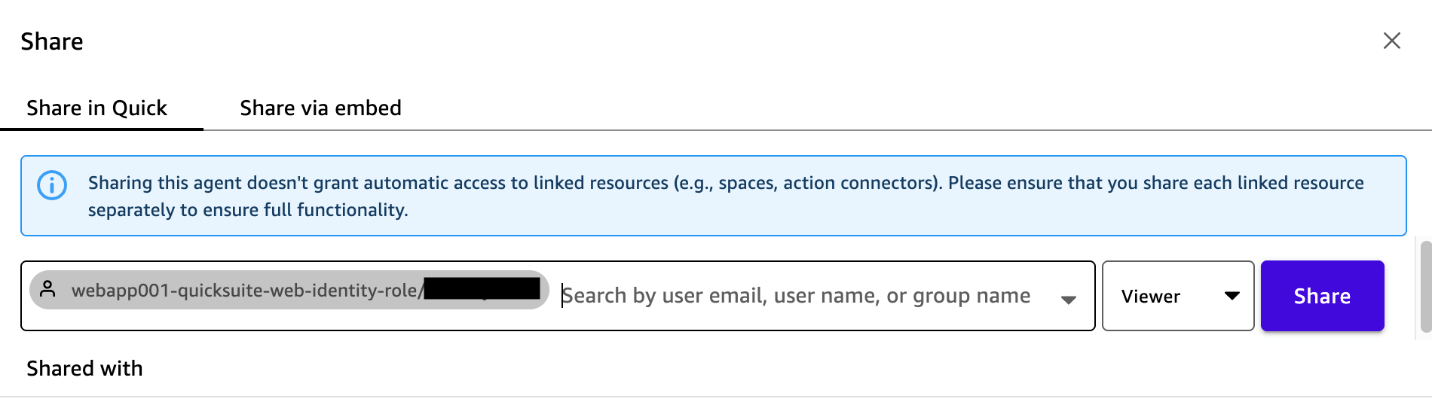

After sharing this agent, you also need to share each linked resource of the agent separately to confirm full functionality.
Access web portal to use the Quick Suite chat agents
Complete the following steps to access the web portal and start using the chat agents:
- Look for the temporary password in the Amazon Cognito verification email.
- Access the CloudFront URL from your web browser with the user ID and temporary password.
- You will be prompted to change your password at your first login.
After the successful login, you can see My Assistant** in the chat interface.
- Choose the Region to connect to the custom Quick Suite chat agents.
- To see the chat agents shared with you, choose Shared with me under Filter.
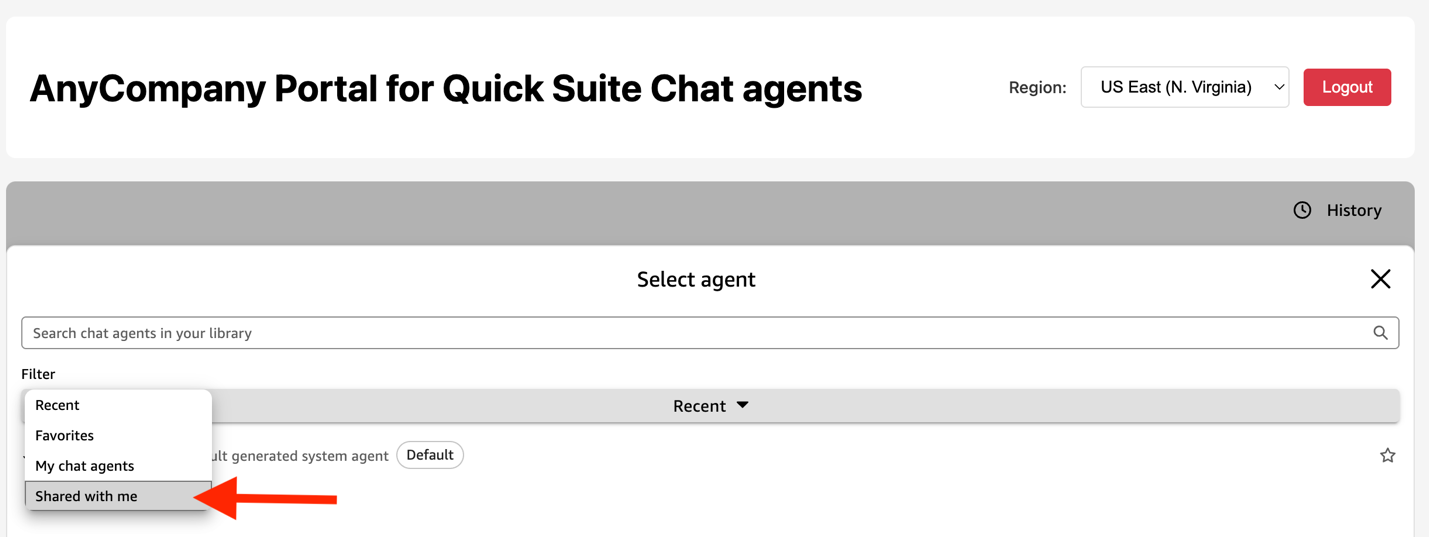
- Choose the agent you want and start chatting.
The following screenshots show chat interactions of a customer service representative tracking an example online order and processing its return as requested by a verified customer over the phone.
Clean up
To clean up your resources, delete the AWS resources deployed:
./cleanup.shConclusion
This solution addresses core challenges for embedding conversational AI at scale: securing authentication for thousands of concurrent users across global locations, maintaining enterprise-grade security with comprehensive audit trails, and simplifying deployment with automated infrastructure provisioning. You can customize the portal branding, adjust security policies, and integrate with existing identity providers. You can scale to thousands of concurrent users automatically while maintaining pay-as-you-go pricing.
To try this solution, clone the GitHub repository and deploy the complete infrastructure with one click to embed Quick Suite chat agents.
About the authors

Satyanarayana Adimula is a Senior Builder in AWS Generative AI Innovation & Delivery. Leveraging over 20 years of data and analytics expertise, he specializes in building agentic AI systems that enable large enterprises to automate complex workflows, accelerate decision-making, and achieve measurable business outcomes.
関連記事
今日のまとめ
AI日報で今日の重要ニュースをまとめ読み