SageMaker AIモデルとMLflowを用いたStrandsエージェントの構築
AWSはSageMaker AIエンドポイントとStrands Agents SDK、およびServerless MLflowを組み合わせたAIエージェント構築手法を公開し、エンタープライズ向けの高制御性と観測可能性のある実装例を示した。
キーポイント
SageMaker AIによるエージェント基盤の提供
マネージドFMサービスでは不十分な「運用制御、コスト最適化、コンプライアンス、データ所在」などの要件に対し、SageMaker AIエンドポイントがインフラストラクチャの制御権を保持しつつ運用層を提供する。
Strands Agents SDKとの統合実装
オープンソースのStrands Agents SDKを用い、SageMaker JumpStartから取得した基盤モデルをデプロイしてエージェントとして動作させる具体的な手順を示す。
Serverless MLflowによる運用観測と評価
SageMaker Serverless MLflowを活用し、エージェントのトレーシング、A/Bテスト、メトリクス評価を通じて、生産環境での継続的な改善と品質保証を行う方法を解説する。
SageMaker AIモデル使用の利点
インフラストラクチャの制御、モデルの柔軟性、コストの見通し、および高度なMLOps統合により、厳格なSLAやエンタープライズレベルのガバナンスが必要な組織に適している。
Strands Agents SDKのSageMaker統合
Strands Agents SDKはSageMaker AIプロバイダーを実装しており、OpenAI互換のチャット完了APIをサポートするSageMakerエンドポイント上のモデル(JumpStartまたはカスタム微調整モデル)とエージェントを実行可能。
実装に必要な前提条件と準備
AWSアカウント、適切なIAM権限を持つロール、およびJupyterノートブック環境が必要であり、strands-agentsやmlflowなどのPythonパッケージをインストールしてモデルをSageMakerエンドポイントとしてデプロイする必要がある。
SageMaker エンドポイントの統合
デプロイ済みの SageMaker エンドポイントを `SageMakerAIModel` クラス経由で Strands Agents に接続し、モデルとの連携を可能にします。
影響分析・編集コメントを表示
影響分析
本記事は、単なるモデルAPIの呼び出しを超え、エンタープライズが求める「インフラ制御」と「運用観測」を両立させる具体的なアーキテクチャを示している。特に、マネージドサービス(Bedrock等)では得られないデータ所在やセキュリティ要件を満たしつつ、最新のエージェントフレームワークを活用できる点は、大規模組織のAI導入において重要な指針となる。
編集コメント
マネージドFMサービスとの違いを明確にし、インフラ制御権を持つSageMaker AIの強みをエージェント開発文脈で再定義した点に注目。実務での適用可能性は高いが、Strands SDKの普及度次第で採用範囲が決まるため注目して推移を見守る。
AIエージェントを構築する企業は、マネージドなファウンデーションモデル(FM)サービスが提供するもの以上のものを必要とすることがよくあります。パフォーマンスのチューニング、大規模なコスト最適化、コンプライアンスとデータ居住性、モデルの選択、既存のセキュリティアーキテクチャと統合されるネットワーク構成などに対する正確な制御を求めています。Amazon SageMaker AI エンドポイントこれらの要件に適合し、組織がコンピューティングリソース、スケーリング動作、インフラストラクチャの配置を制御できるようにしながら、AWS のマネージド運用レイヤーからの恩恵を受けます。SageMaker AI によってデプロイされるこれらのモデルは、AI エージェントを駆動し、会話ワークロードを処理し、Amazon Bedrock で利用可能な FM のようなオーケストレーションフレームワークと統合することができます。異なる点は、推論がどのように、どこで行われるかについて組織がアーキテクチャ上の制御を維持することです。
この投稿では、SageMaker AI エンドポイントにデプロイされたモデルを使用して Strands Agents SDK で AI エージェントを構築する方法を示します。SageMaker JumpStart からファウンデーションモデルをデプロイし、Strands Agents と統合し、エージェントのトレーシングに SageMaker Serverless MLflow を使用して本番環境レベルの観測可能性を確立する方法を学びます。また、複数のモデルバリアントにわたる A/B テストの実装方法、MLflow メトリクスを使用したエージェントパフォーマンスの評価方法、そして制御されたインフラストラクチャ上で AI エージェントを構築、デプロイ、継続的に改善する方法についてもカバーします。
Strands Agents SDK は、数行のコードで AI エージェントを構築・実行するためのモデル駆動型アプローチを採用したオープンソース SDK です。Strands は、単純なケースから複雑なエージェントユースケースまで、ローカル開発から本番環境へのデプロイに至るまでスケーリング可能です。
Amazon SageMaker JumpStart は、機械学習(ML)の取り組みを加速させることができる ML ハブです。SageMaker JumpStart を使用すれば、記事の要約や画像生成などのタスクを実行するために、事前に定義された品質および責任性指標に基づいてファウンデーションモデル(FMs)を迅速に評価、比較、選択できます。
SageMaker AI MLflow は、実験の追跡、モデルのバージョン管理、デプロイメント管理を通じて機械学習ライフサイクルを効率化するマネージド機能です。
本記事では、以下の内容について説明します。
- SageMaker AI にモデルをデプロイする – SageMaker JumpStart からファウンデーションモデルをデプロイします。
- Strands と SageMaker AI を統合する – デプロイされた SageMaker AI モデルを Strands Agents と併用します。
- エージェントの観測可能性を設定する – エージェントのトレーシング用に SageMaker AI MLflow App を構成します。
- 評価付き A/B テストを実装する – 複数のモデルバリアントをデプロイし、MLflow メトリクスでエージェントを評価します。
この投稿で使用するための完全なコードを含む Jupyter ノートブックは、GitHub リポジトリ で見つかります。
最初の Strands エージェントの構築
Strands エージェントは、モデル、システムプロンプト、一連のツールを組み合わせて、シンプルな AI エージェントを構築します。Strands は Amazon SageMaker AI を含む多くのモデルプロバイダーを提供しています。また、strands-agent-tools SDK の一部として一般的に使用される多くのツールも提供しているため、組織はビジネスニーズに合わせて AI エージェントを迅速に構築できます。
以下のコードスニペットは、Strands Agents SDK を使用して最初のエージェントを作成する方法を示しています。Strands Agents SDK を使用して構築されたエージェントの詳細なサンプルは、GitHub リポジトリ で見つかります。
model = BedrockModel(
model_id="us.anthropic.claude-sonnet-4-5-20250929-v1:0"
)
agent = Agent(model=model, tools=[http_request])
agent("Where is the international space station now?")
このエージェントは、Amazon Bedrock 上で Claude 4.5 Sonnet のマルチリージョン推論モデルを使用しています。利用可能な推論プロファイルのリストは、Amazon Bedrock ユーザーガイドで確認できます。
Amazon Bedrock では、モデルを選択することができます。利用可能なモデルのモデル ID は、Amazon Bedrock ユーザーガイドで確認できます。
SageMaker AI にデプロイされたモデルを使用する理由
組織は、以下の理由から基盤モデルを SageMaker AI にデプロイすることを検討できます。
- インフラストラクチャの制御 – SageMaker AI は、コンピューティングインスタンス、ネットワーク構成、スケーリングポリシーに対する制御を提供します。これは、厳格なレイテンシ SLA(サービスレベル合意)や特定のハードウェア要件を持つ組織にとって重要です。
- モデルの柔軟性 – SageMaker AI では、カスタムアーキテクチャ、ファインチューニングされたバリエーション、Llama や Mistral などのオープンソース代替案など、異なるモデルのデプロイを可能にします。
- コストの見通し – SageMaker AI の専用エンドポイントは、予約インスタンス、スポットプライシング、適切なサイズのコンピューティングリソースを通じて、正確なコスト予測と最適化を可能にします。これは、高ボリュームのワークロードにとって特に有益です。
- 高度な MLOps – SageMaker AI は、MLflow モデルレジストリおよび A/B テスティング機能と統合されており、多くの組織が生産環境の AI システムに必要とするエンタープライズグレードのモデルガバナンスを提供します。
SageMaker AI モデルを用いた Strands エージェントの構築
Strands Agents SDK は SageMaker AI プロバイダーを実装しているため、SageMaker AI 推論エンドポイントにデプロイされたモデルに対してエージェントを実行することができます。これには、SageMaker JumpStart からの事前学習済みモデルとカスタムファインチューニング済みモデルの両方が含まれます。Strands Agents SDK で使用するモデルは、OpenAI 互換のチャット完了 API をサポートしている必要があります。本稿では、SageMaker AI JumpStart で利用可能な Qwen3 4B モデルおよび Qwen3 8B モデルを Strands Agents とともに使用する方法を示します。
前提条件
本稿のコードを実行するには、以下の準備が必要です:
- Amazon Bedrock および Amazon SageMaker AI へのアクセス権限を持つ AWS アカウント。
- SageMaker AI、Amazon Bedrock モデル、SageMaker AI Serverless MLflow、Amazon Simple Storage Service (Amazon S3)、および Amazon SageMaker AI JumpStart へのアクセス権限を持つロール。信頼ポリシーを使用して、そのロールを引き受けることができます。
- デスクトップ上でローカルに実行している、または SageMaker AI Studio 上で実行している Jupyter ノートブック。ローカルで実行する場合は、AWS アカウントに認証し、必要な権限を持つロールを引き受けていることを確認してください。
ステップ 1:必要なパッケージのインストール
まず、環境に必要な Python パッケージをインストールします。
%%writefile requirements.txt
strands-agents>=1.9.1
strands-agents-tools>=0.2.8
mlflow>=3.4.0
strands-agents[sagemaker]
mlflow-sagemaker>=1.5.11
pip install -r requirements.txt
ステップ 2: SageMaker AI エンドポイントとしてモデルをデプロイ
パッケージの準備が整ったので、SageMaker JumpStart API を使用して Qwen3-4B モデルを SageMaker AI エンドポイントとしてデプロイします。
# Qwen-4B で初期エンドポイントをデプロイ
import sagemaker
import boto3
from boto3.session import Session
from sagemaker.jumpstart.model import JumpStartModel
boto_session = Session()
sts = boto3.client('sts')
account_id = sts.get_caller_identity().get("Account")
region = boto_session.region_name
ENDPOINT_NAME = INITIAL_CONFIG_NAME = "llm-qwen-endpoint-sagemaker"
このエンドポイント名を引き続き使用します
model_a = JumpStartModel(
model_id="huggingface-reasoning-qwen3-4b",
model_version="1.0.0",
name="qwen3-4b-model"
)
モデルをエンドポイントにデプロイ
predictor_a = model_a.deploy(
initial_instance_count=1,
instance_type="ml.g5.2xlarge",
endpoint_name=ENDPOINT_NAME
)
ステップ 3: Strands エージェントで使用する
モデルのデプロイが完了したため、SageMakerAIModel を作成し、Strands Agents とともに使用します。
from strands.models.sagemaker import SageMakerAIModel
from strands import Agent, tool
from strands_tools import http_request, calculator
model_sagemaker = SageMakerAIModel(
endpoint_config={
"endpoint_name": ENDPOINT_NAME,
"region_name": region
},
payload_config={
"max_tokens": 2048,
"temperature": 0.2,
"stream": True,
}
)
エージェントのテスト
agent = Agent(model=model_sagemaker, tools=[http_request])
agent("国際宇宙ステーションは現在どこにあるか?(使用:http://api.open-notify.org/iss-now.json)")
Strands Agent ウェブサイトにおけるモデルプロバイダーとして SageMaker AI に関する詳細情報は、Amazon SageMaker を参照してください。
エージェントの観測可能性のための SageMaker AI Serverless MLflow アプリの使用
SageMaker AI Serverless MLflow は、カスタム計装を必要とせずに、実行トレース、ツール使用パターン、意思決定ワークフローを自動的にキャプチャすることで、AI エージェントに対する包括的な観測可能性を提供します。このマネージドサービスは運用オーバーヘッドを軽減しつつ、Strands Agents SDK とのネイティブ統合を提供します。これにより、エージェントの会話フローを追跡することが可能になります。この集中型観測可能性サービスを使用することで、チームは複数のデプロイメントにわたるエージェントの動作を監視し、パフォーマンスのボトルネックを特定し、コンプライアンス要件のための監査証跡を維持できます。
ステップ 1: SageMaker AI Serverless MLflow アプリの設定
AI エージェントの観測可能性を設定する最初のステップは、MLflow App の設定 です。デプロイメントには、以下の 2 つの主要なオプションがあります:
- 直感的な SageMaker AI Studio UI を使用して、ガイド付き設定で迅速にセットアップする
- Boto3 を使用したプログラムによるデプロイにより、自動化やインフラストラクチャ・アズ・コード(Infrastructure-as-Code)のプラクティスを可能にする
どちらのアプローチでも Serverless MLflow App が作成されるため、基盤となる観測可能性(observability)インフラストラクチャの管理に注力するのではなく、Strands エージェントの構築とモニタリングに集中できます。本稿では、Boto3 SDK を使用して MLflow App をデプロイします。
# Create S3 bucket for MLflow artifacts
s3_client = boto3.client('s3', region_name=region)
bucket_name = f'{account_id}-mlflow-bucket'
if region == 'us-east-1':
            s3_client.create_bucket(Bucket=bucket_name)
        else:
            s3_client.create_bucket(
                Bucket=bucket_name,
                CreateBucketConfiguration={'LocationConstraint': region}
            )
# Create SageMaker client
sagemaker_client = boto3.client('sagemaker')

# Create MLflow App
mlflow_app_details = sagemaker_client.create_mlflow_app(
    Name='strands-mlflow-app',
    ArtifactStoreUri=f's3://{account_id}-mlflow-bucket/artifacts',
    RoleArn=role,

)

print(f"MLflow app creation initiated: { mlflow_app_details['Arn']}")
ステップ 2: Strands エージェントのトレーシング用に MLflow App を設定する
MLflow App の作成が完了したため、Strands エージェントの自動ログ記録を有効にします。これにより、エージェントとのインタラクション、ツールの使用状況、パフォーマンス指標が手動でのインストルメンテーション(計装)を必要とせず、自動的にキャプチャされて MLflow App に送信されます。
import os
import mlflow
tracking_uri = mlflow_app_details['Arn']
print(f"MLflow App URL: {tracking_uri}")
Set MLflow tracking URI
os.environ["MLFLOW_TRACKING_URI"] = tracking_uri
Or you can set the tracking server as below.
#mlflow.set_tracking_uri(tracking_uri)
mlflow.set_experiment("Strands-MLflow") # This experiment name will be used in the UI
mlflow.strands.autolog()
Step 3: Run the agent
With MLflow App setup and auto logging enabled, you’re now ready to invoke our Strands Agent exactly like you did at the beginning.
def capitalize(response):
return response.upper()
agent = Agent(model=model_sagemaker, tools=[http_request])
response = agent("Where is the international space station now?")
capitalize(response.message['content'][0]['text'])
Traces and metrics will be available on your MLflow App that can be accessed using the signed URL constructed using information from mlflow_app_details and AWS Region variables.
def get_presigned_url():
# Get presigned URL for MLflow App
presigned_response = sagemaker_client.create_presigned_mlflow_app_url(
Arn=mlflow_app_details['Arn']
)
mlflow_ui_url = presigned_response['AuthorizedUrl']
print(f"MLflow UI URL: {mlflow_ui_url}")
Step 4: Review traces in MLflow
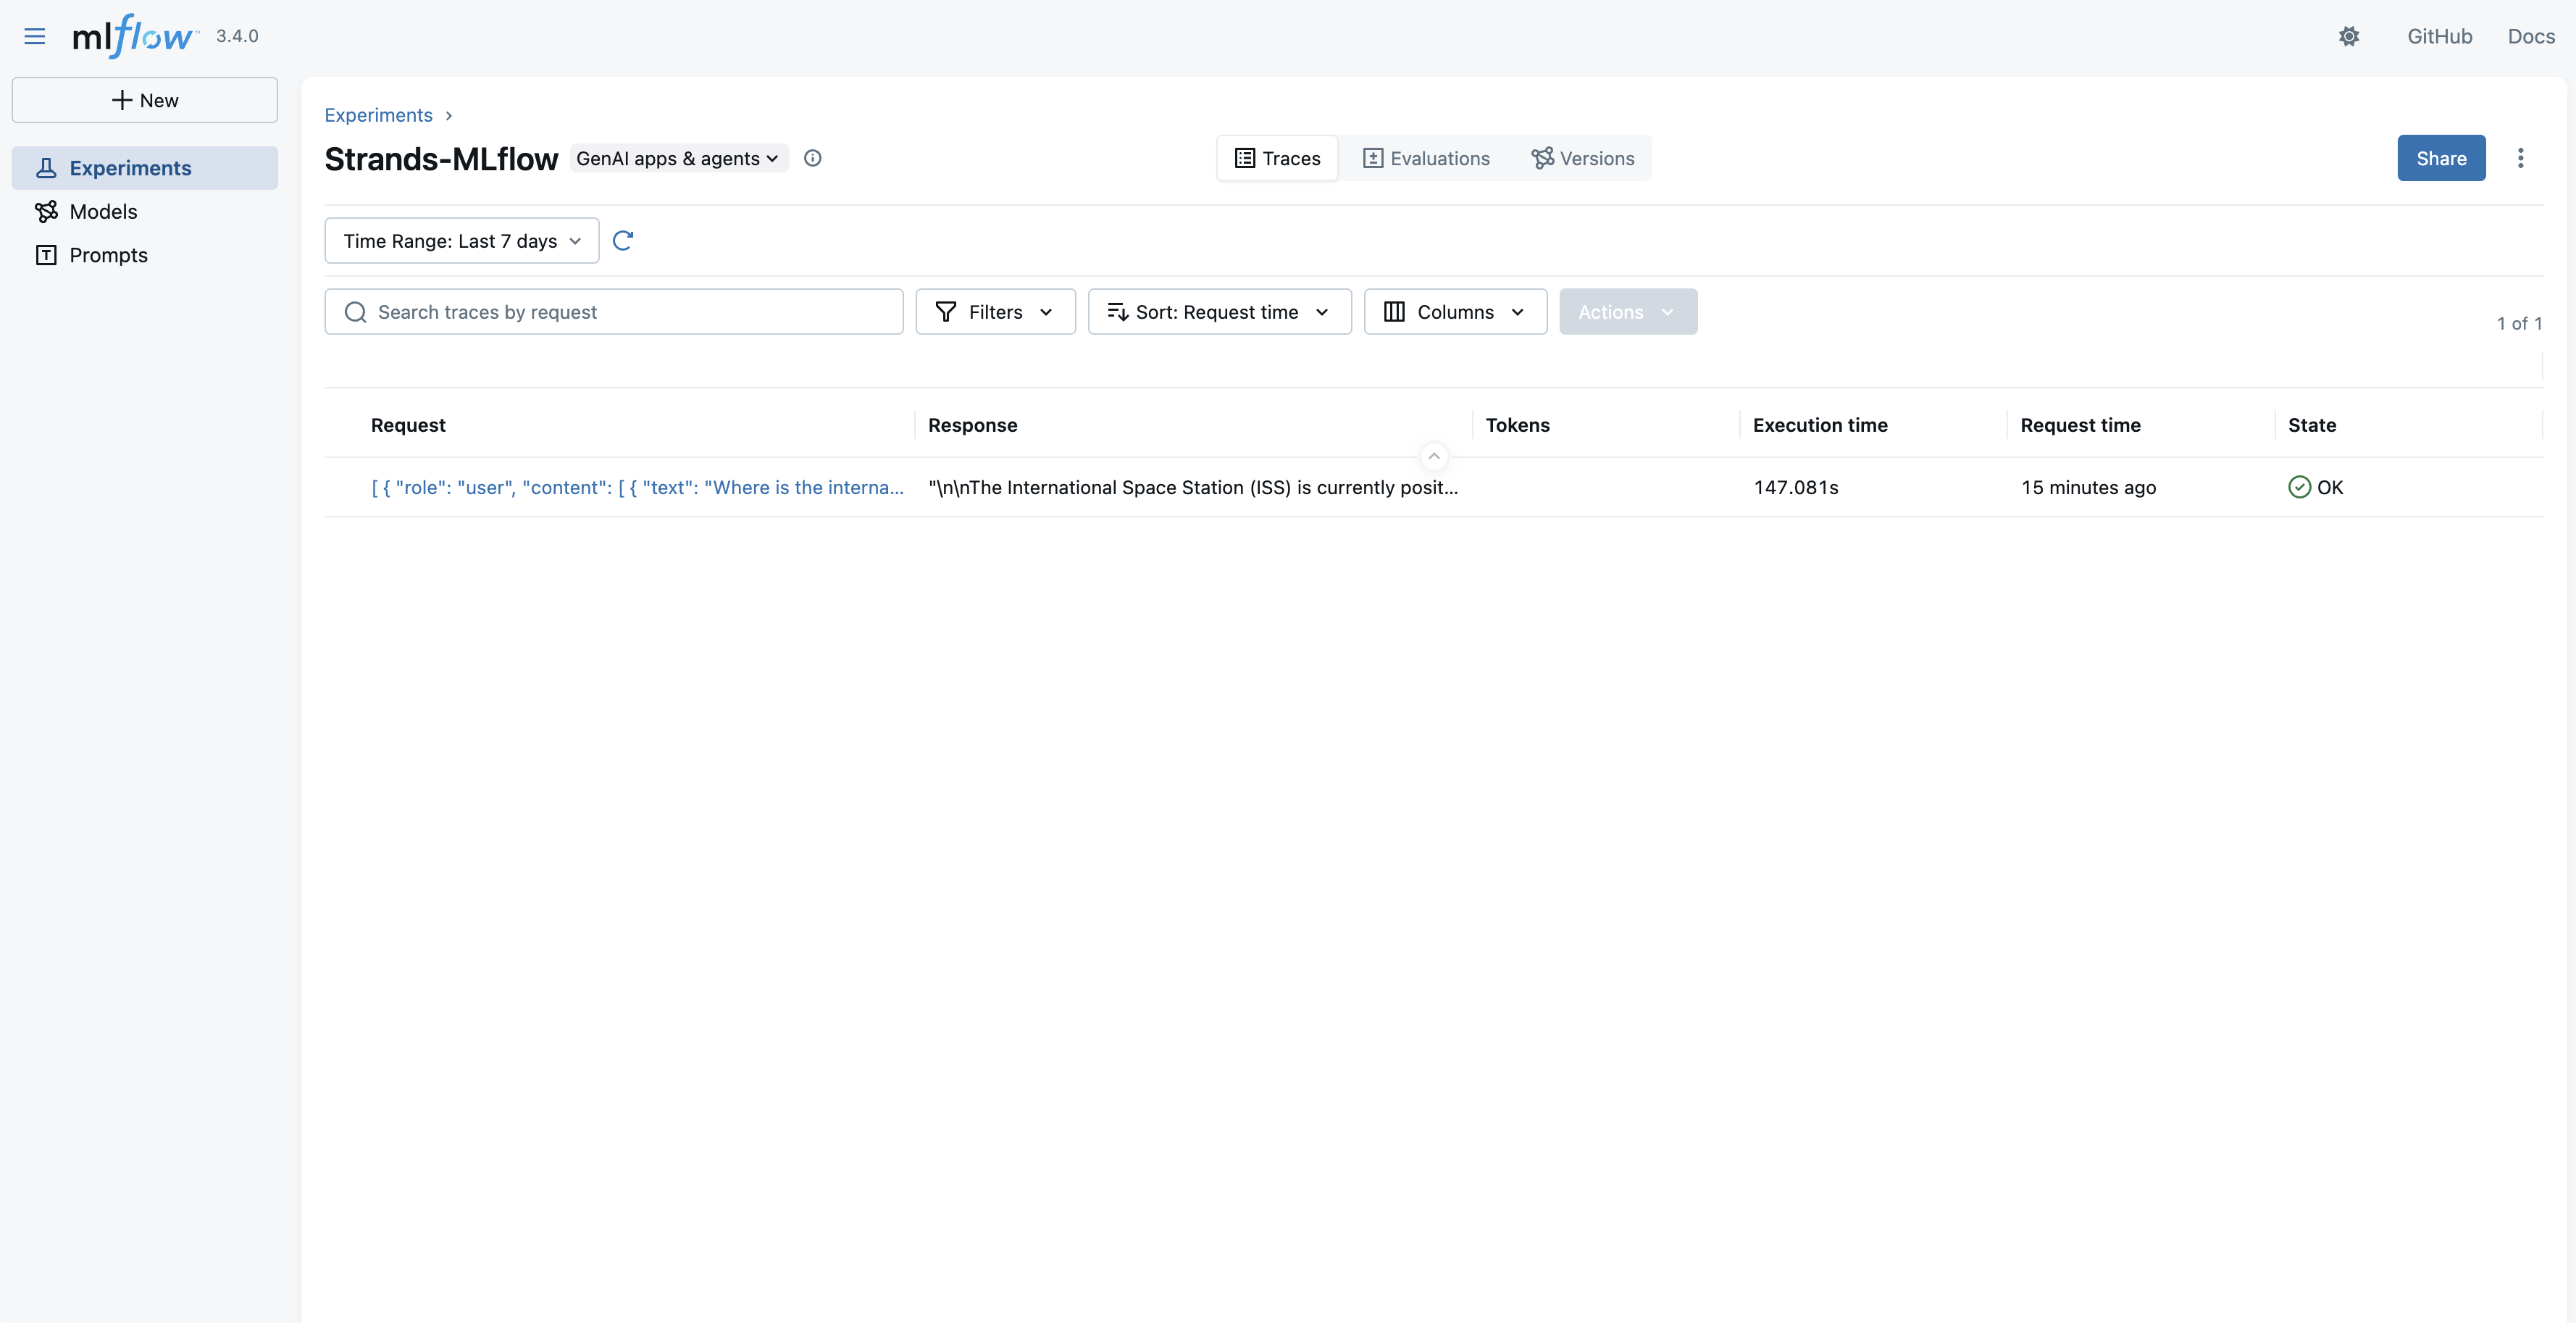
Post agent run, your agent trace, tool calling, and other metrics will be available through the MLflow App UI’s Traces section.
The traces in an experiment are available in a list view to inspect further.
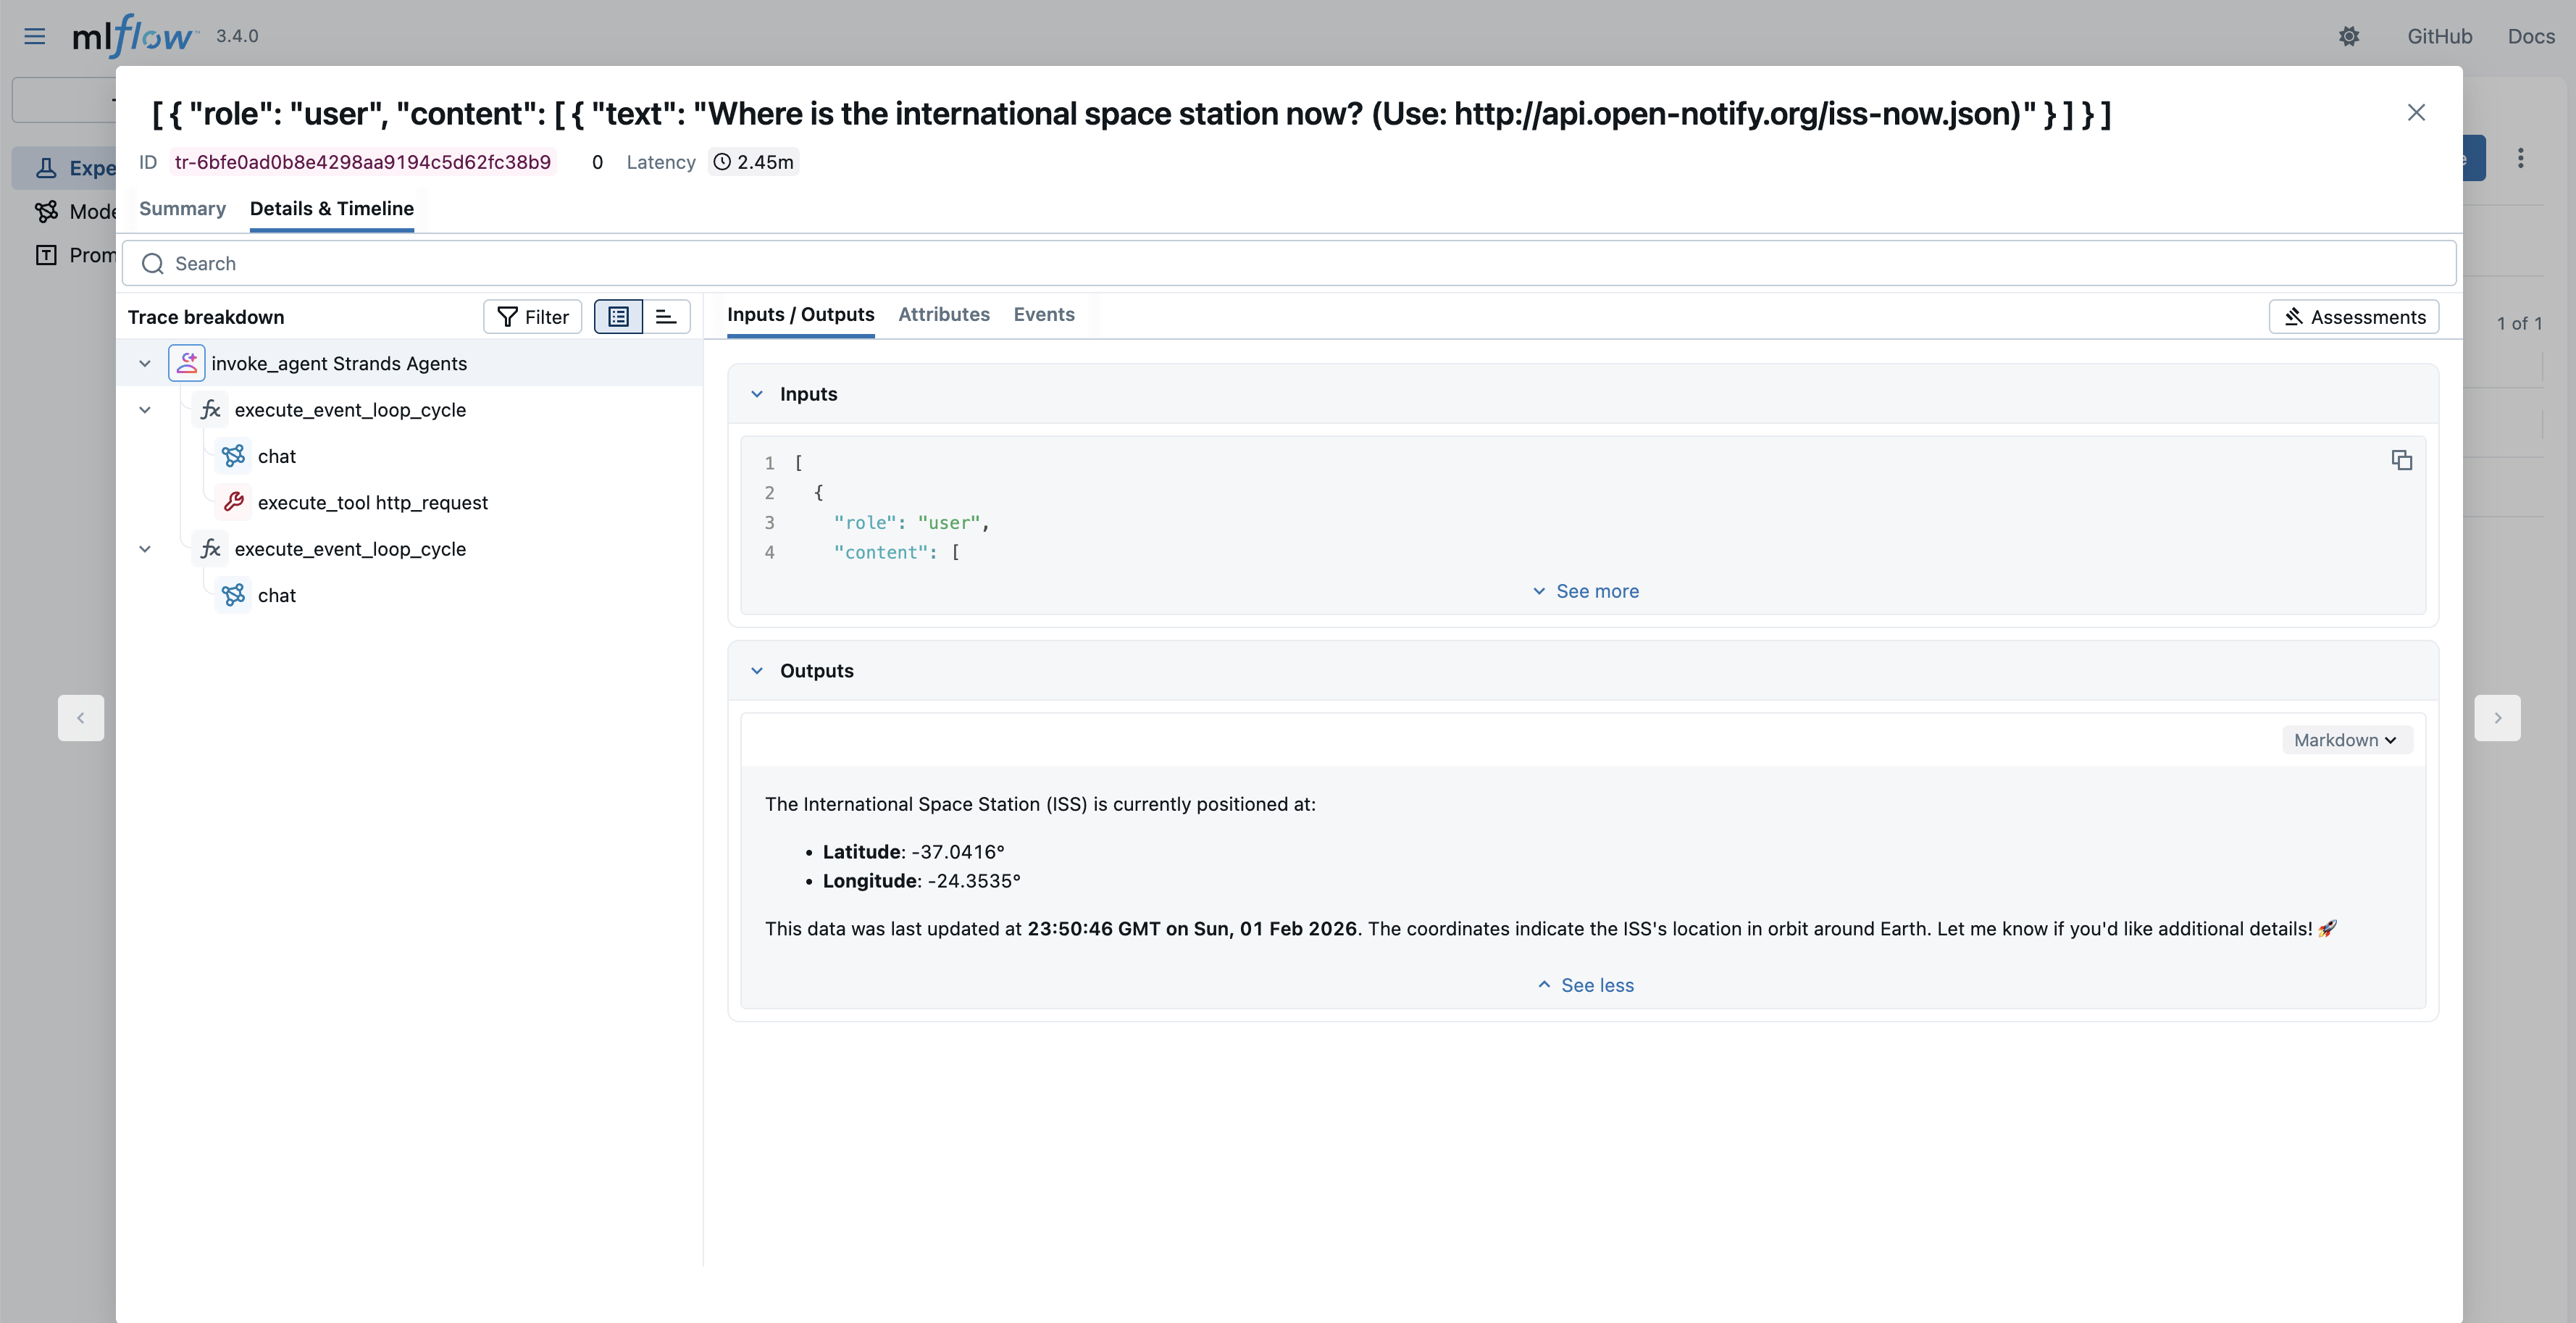
特定のトレースを選択すると、実行タイムラインまたはスパンツリーとして詳細を表示するオプションがあります。どちらのビューでも、エージェントループ、ツール呼び出し、各ステップへの入力/出力、その他の情報を確認できます。
マニュアルトレーシング
前のコードブロックでは capitalize(response.message['content'][0]['text']) を使用していましたが、MLflow のトレースでは capitalize 関数は表示されません。MLflow Strands の自動トレーシングは、エージェントの呼び出し(およびそのツールや大規模言語モデル (LLM) の呼び出し)をログに記録します。他の関数呼び出しはログに記録されません。完全なコードブロックのトレースが必要な場合、以下のコードブロックに示すように MLflow のマニュアルトレーシング機能を使用できます。
@mlflow.trace(span_type="func", attributes={"operation": "capitalize"})
def capitalize(response):
    return response.upper()

@mlflow.trace
def run_agent():
    agent = Agent(tools=[http_request])
    mlflow.update_current_trace(request_preview="Run Strands Agent")
response = agent("Where is the international space station now? (Use: http://api.open-notify.org/iss-now.json) ")
    capitalized_response = capitalize(response.message['content'][0]['text'])

    return capitalized_response
トレースされた関数の実行
capitalized_response = run_agent()
print(capitalized_response)
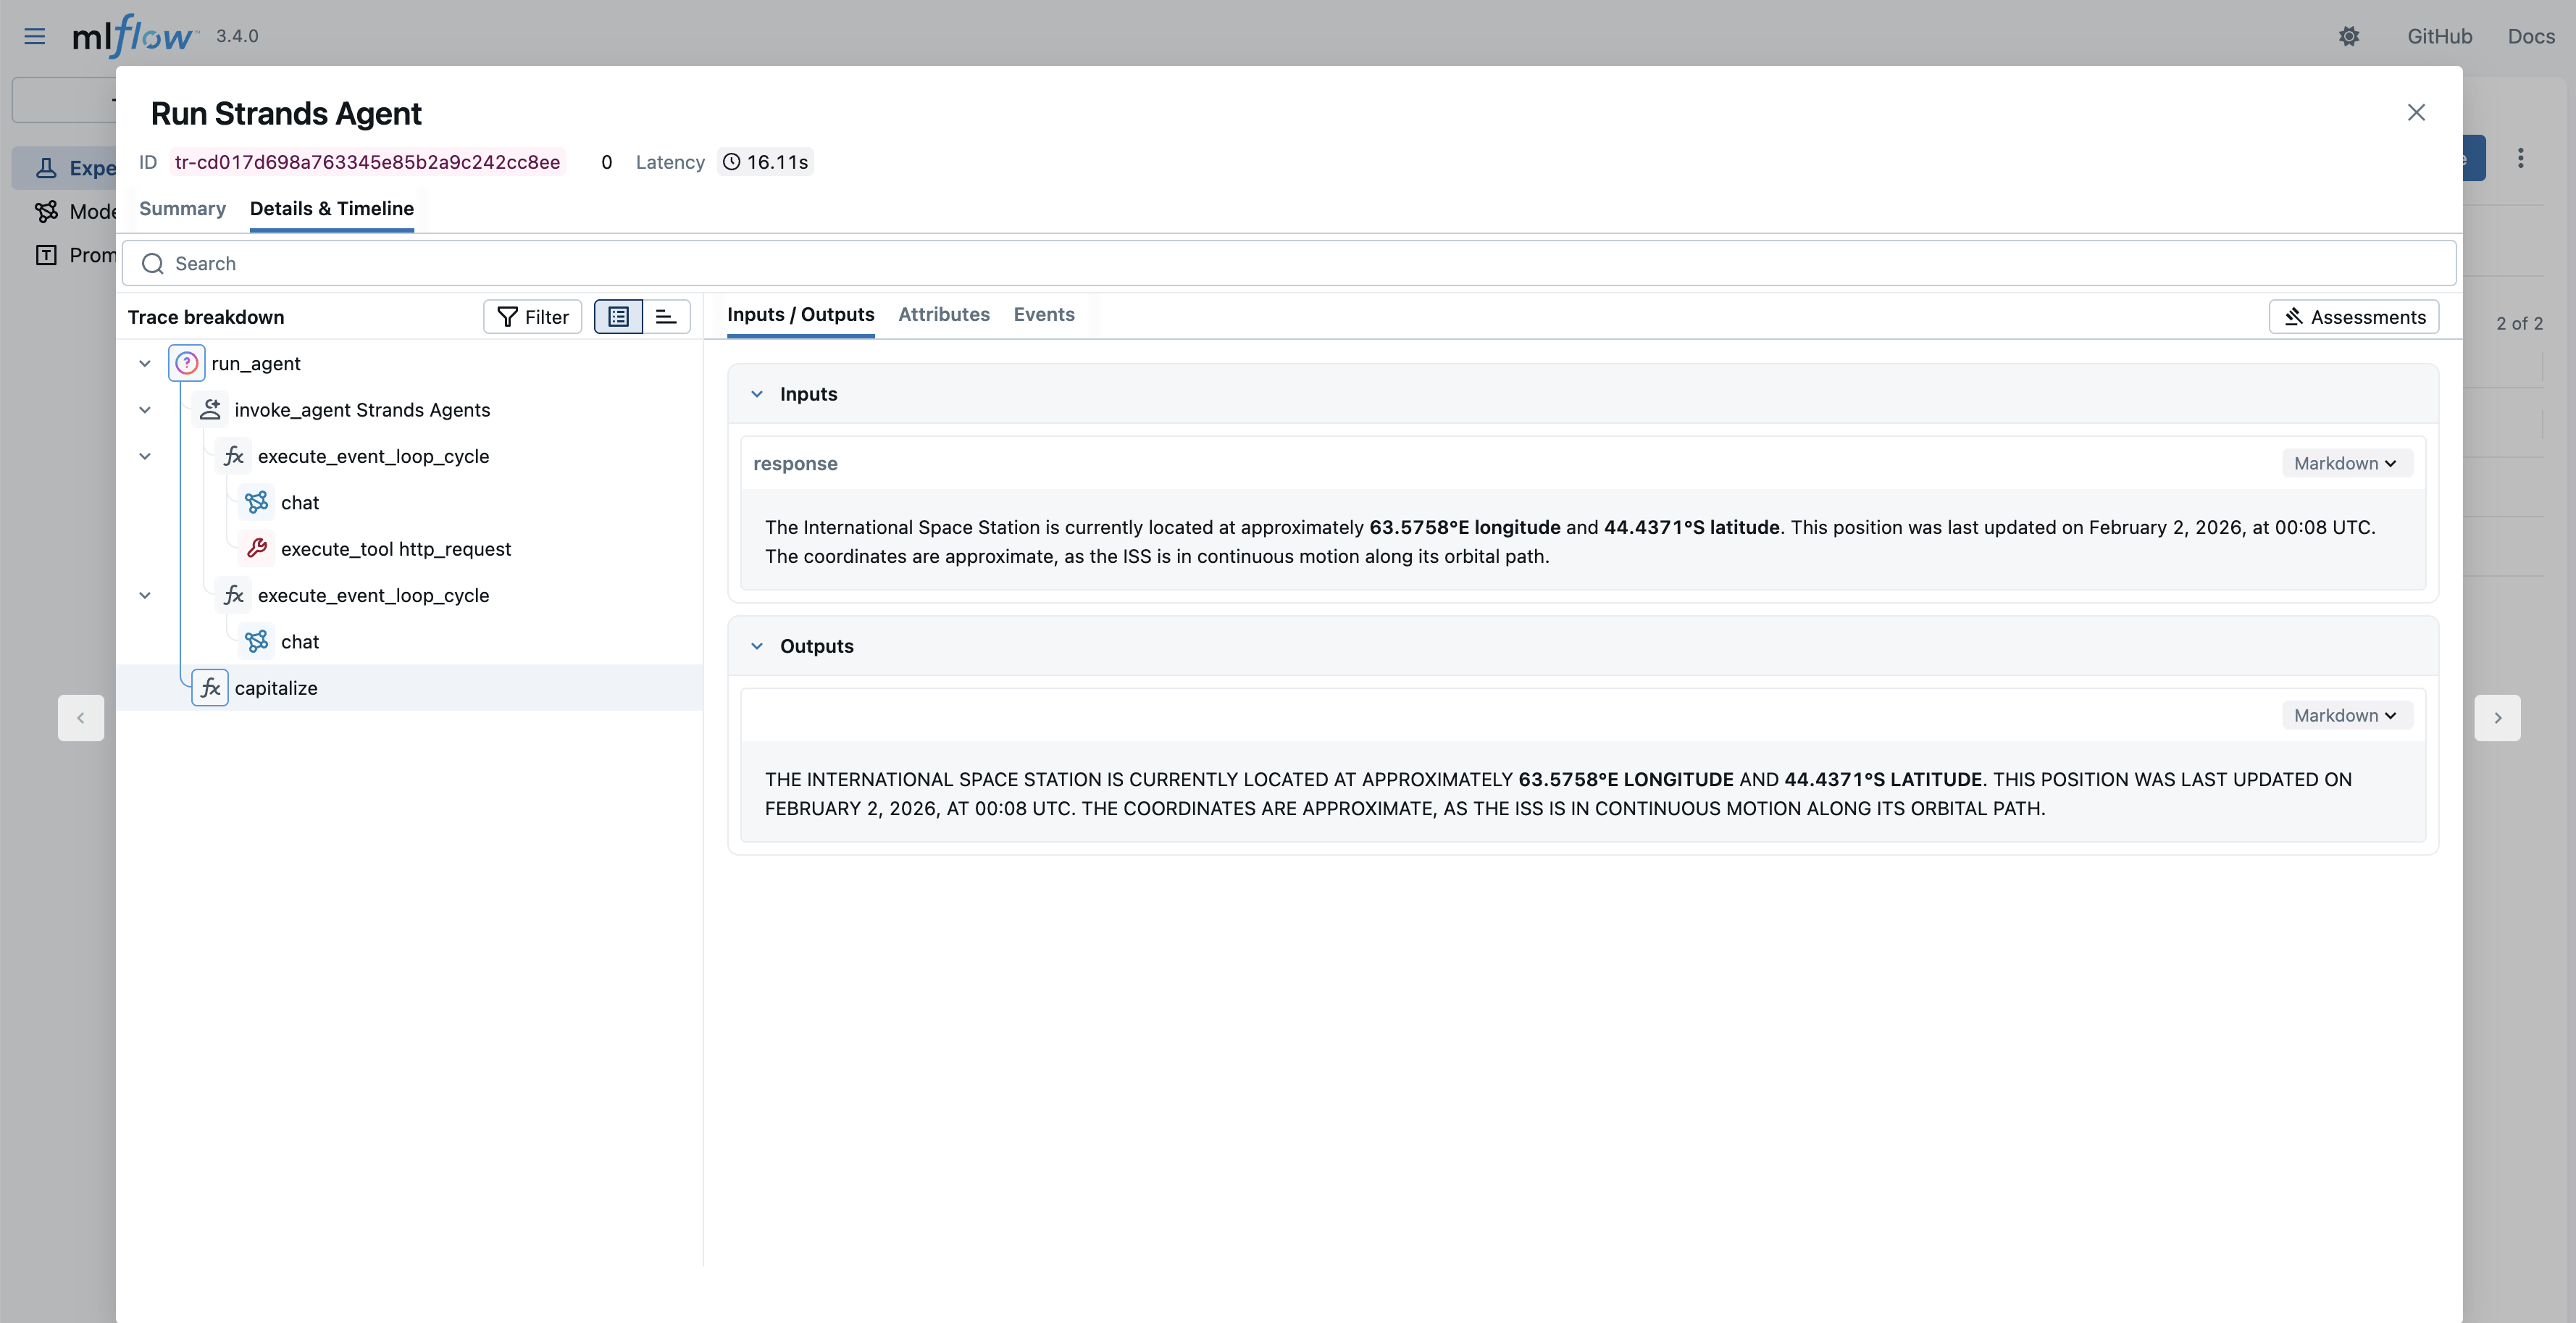
このコードブロックでは、capitalize 関数に @mlflow.trace デコレータを適用し、その実行内容、入力、出力が MLflow で確認できるようにしています。その結果、エージェントの呼び出しと「capitalize」関数の呼び出しを含む以下のトレースが MLflow に表示されます。
A/B テスト用の新しい LLM のデプロイ
Amazon SageMaker AI を使用すると、エージェントアプリケーション向けに大規模言語モデル(LLM: Large Language Model)を最適化できます。例えば、より小さな Qwen3-4B モデルからより大きな Qwen3-8B モデルへのアップグレードによりアプリケーションのパフォーマンスを向上させたい場合、必ずしも即時に完全な移行を行う必要はありません。現在 Qwen3-4B を使用しているエージェントが正常に機能しているため、新しい Qwen3-8B モデルを既存のモデルと並行してデプロイし、両方の LLM エンドポイント間でトラフィックを分散させることができます。このアプローチにより、アップグレードに完全に移行する前に、より大きなモデルの影響と有効性を測定するための A/B テストを実施できます。まず、同じエンドポイントの背後に、2 番目のバリアントとして新しいモデルをデプロイします:
# ステップ 1: JumpStart からモデルを作成する
model_b_name ="sagemaker-strands-demo-qwen3-8b"
model_b_id, model_b_version = "huggingface-reasoning-qwen3-8b", "1.0.0"
model_8b = JumpStartModel(
model_id="huggingface-reasoning-qwen3-8b",
model_version="1.0.0",
name=model_b_name
)
model_b.create(instance_type="ml.g5.2xlarge")
ステップ 2: A/B テスト用のプロダクションバリアントを作成する
A/B テスト用のプロダクションバリアントを作成する
production_variants = [
# 元のモデル(チャンピオン)
{
"VariantName": "qwen-4b-variant",
"ModelName": "qwen3-4b-model",
"InitialInstanceCount": 1,
"InstanceType": "ml.g5.2xlarge",
"InitialVariantWeight": 0.5 # トラフィックの 50% を受け取る
},
# 新しいモデル(チャレンジャー)
{
"VariantName": "qwen3-8b-variant",
"ModelName": model_b_name,
"InitialInstanceCount": 1,
"InstanceType": "ml.g5.2xlarge",
"InitialVariantWeight": 0.5 # トラフィックの 50% を受け取る
}
]
ステップ 3: 新しいエンドポイント構成を作成する
sagemaker_client = boto3.client('sagemaker')
ENDPOINT_CONFIG_AB_TESTING = "llm-endpoint-config-ab"
sagemaker_client.create_endpoint_config(
EndpointConfigName=ENDPOINT_CONFIG_AB_TESTING,
ProductionVariants=production_variants
)
ステップ 4: 新しい A/B テスト構成でエンドポイントを更新する
sagemaker_client.update_endpoint(
EndpointName=ENDPOINT_NAME, # 覚えておいて、エンドポイント名は変わらない
EndpointConfigName=ENDPOINT_CONFIG_AB_TESTING
)
更新が完了するまで待機する
waiter = boto3.client('sagemaker').get_waiter('endpoint_in_service')
waiter.wait(EndpointName=ENDPOINT_NAME)
アップデートが完了すると、このエンドポイントを使用して作成したエージェントは、50%の確率で両方のLLMを使用するようになります。制御された実験を行うには、特定のバリアントを指し示す2つの新しいエージェントを作成できます。
from strands.models.sagemaker import SageMakerAIModel
from strands import Agent, tool
from strands_tools import http_request, calculator
model_sagemaker_a = SageMakerAIModel(
endpoint_config={
"endpoint_name": ENDPOINT_NAME,
"region_name": region,
"target_variant":"qwen-4b-variant"
},
payload_config={
原文を表示
Enterprises building AI agents often require more than what managed foundation model (FM) services can provide. They need precise control over performance tuning, cost optimization at scale, compliance and data residency, model selection, and networking configurations that integrate with existing security architectures. Amazon SageMaker AI endpoints align with these requirements by giving organizations control over compute resources, scaling behavior, and infrastructure placement, while benefiting from the managed operational layer of AWS. These models that are deployed by SageMaker AI, can power AI agents, handle conversational workloads, and integrate with orchestration frameworks like the FMs that are available on Amazon Bedrock. The difference is that the organization retains architectural control over how and where inference happens.
In this post, we demonstrate how to build AI agents using Strands Agents SDK with models deployed on SageMaker AI endpoints. You will learn how to deploy foundation models from SageMaker JumpStart, integrate them with Strands Agents, and establish production-grade observability using SageMaker Serverless MLflow for agent tracing. We also cover how to implement A/B testing across multiple model variants and evaluate agent performance using MLflow metrics and show how you can build, deploy, and continuously improve AI agents on infrastructure you control.
Strands Agents SDK is an open source SDK that takes a model-driven approach to building and running AI agents in only a few lines of code. Strands scales from simple to complex agent use cases, and from local development to deployment in production.
Amazon SageMaker JumpStart is a machine learning (ML) hub that can help you accelerate your ML journey. With SageMaker JumpStart, you can evaluate, compare, and select FMs quickly based on predefined quality and responsibility metrics to perform tasks, like article summarization and image generation.
SageMaker AI MLflow is a managed capability that streamlines the machine learning lifecycle through experiment tracking, model versioning, and deployment management.
In this post we:
- Deploy models on SageMaker AI – Deploy foundation models from SageMaker JumpStart.
- Integrate Strands with SageMaker AI – Use deployed SageMaker AI models with Strands Agents.
- Set up Agent Observability – Configure SageMaker AI MLflow App for agent tracing.
- Implement A/B Testing with evaluation – Deploy multiple model variants and evaluate agent with MLflow metrics.
A Jupyter notebook with complete code to use with this post can be found in the GitHub repo.
Building your first Strands Agent
Strands agents put together a model, a system prompt, and a set of tools to build a simple AI agent. Strands offers many model providers, including Amazon SageMaker AI. It also provides many commonly used tools as part of strands-agent-tools SDK, so organizations can quickly build AI agents for their business needs.
The following code snippet shows how to create your first agent using the Strands Agents SDK. A detailed sample of agents built using Strands Agents SDK can be found in the GitHub repo.
model = BedrockModel(
    model_id="us.anthropic.claude-sonnet-4-5-20250929-v1:0"
)

agent = Agent(model=model, tools=[http_request])
agent("Where is the international space station now?")
This agent uses Claude 4.5 Sonnet multi-Region inference model on Amazon Bedrock. A list of available inference profiles can be found in the Amazon Bedrock User Guide.
Amazon Bedrock gives you a choice of models. The model ID for available models can be found in the Amazon Bedrock User Guide.
Why use models deployed on SageMaker AI?
Organizations can consider deploying foundation models on SageMaker AI for the following reasons.
- Infrastructure Control – SageMaker AI provides control over compute instances, networking configurations, and scaling policies. This is crucial for organizations with strict latency SLAs or specific hardware requirements.
- Model Flexibility – SageMaker AI enables deployment of different models, whether it’s a custom architecture, fine-tuned variant, or open-source alternative like Llama or Mistral.
- Cost Predictability – The SageMaker AI dedicated endpoints enable precise cost forecasting and optimization through reserved instances, spot pricing, and right-sized compute resources. This can be especially beneficial for high-volume workloads.
- Advanced MLOps – The SageMaker AI integration with MLflow model registry, and A/B testing capabilities provides enterprise-grade model governance that many organizations require for production AI systems.
Building a Strands Agent with SageMaker AI models
The Strands Agents SDK implements a SageMaker AI provider, so you can run agents against models deployed on SageMaker AI inference endpoints. This includes both pre-trained models from SageMaker JumpStart and custom fine-tuned models. The model that you use with Strands Agents SDK should support OpenAI compatible chat completions APIs.In this post, we see how Qwen3 4B and Qwen3 8B models available on SageMaker AI JumpStart are used with Strands Agents.
Prerequisites
To execute the code from this post you must have the following:
- An AWS Account with access to Amazon Bedrock and Amazon SageMaker AI.
- A role with access to SageMaker AI, Amazon Bedrock models, SageMaker AI Serverless MLflow, Amazon Simple Storage Service (Amazon S3), and Amazon SageMaker AI JumpStart. You can use trust policy to assume that role.
- A Jupyter notebook running locally on your desktop or on SageMaker AI Studio. When running locally, make sure that you authenticate into your AWS Account and assume the role that has the required permissions.
Step 1: Install required packages
First, we install the required Python packages in our environment.
%%writefile requirements.txt
strands-agents>=1.9.1
strands-agents-tools>=0.2.8
mlflow>=3.4.0
strands-agents[sagemaker]
mlflow-sagemaker>=1.5.11
pip install -r requirements.txt
Step 2: Deploy model as SageMaker AI endpoint
Now that the packages are available, we use SageMaker JumpStart API to deploy Qwen3-4B model as a SageMaker AI endpoint.
# Deploy initial endpoint with Qwen-4B
import sagemaker
import boto3
from boto3.session import Session
from sagemaker.jumpstart.model import JumpStartModel

boto_session = Session()
sts = boto3.client('sts')
account_id = sts.get_caller_identity().get("Account")
region = boto_session.region_name

ENDPOINT_NAME = INITIAL_CONFIG_NAME = "llm-qwen-endpoint-sagemaker"
# We will keep using this endpoint name

model_a = JumpStartModel(
    model_id="huggingface-reasoning-qwen3-4b",
    model_version="1.0.0",
    name="qwen3-4b-model"
)

# Deploy the model to an endpoint
predictor_a = model_a.deploy(
    initial_instance_count=1,
    instance_type="ml.g5.2xlarge",
    endpoint_name=ENDPOINT_NAME
)
Step 3: Use with Strands agent
With the model deployed, we create a SageMakerAIModel and use it with Strands Agents.
from strands.models.sagemaker import SageMakerAIModel
from strands import Agent, tool
from strands_tools import http_request, calculator

model_sagemaker = SageMakerAIModel(
    endpoint_config={
        "endpoint_name": ENDPOINT_NAME,
        "region_name": region
    },
    payload_config={
        "max_tokens": 2048,
        "temperature": 0.2,
        "stream": True,
    }
)

# Test the agent
agent = Agent(model=model_sagemaker, tools=[http_request])
agent("Where is the international space station now? (Use: http://api.open-notify.org/iss-now.json")
For more information about SageMaker AI as a Model Provider for Strands Agents, see Amazon SageMaker on the Strands Agent website.
Using SageMaker AI Serverless MLflow App for Agent Observability
SageMaker AI Serverless MLflow helps provide comprehensive observability for AI agents by automatically capturing execution traces, tool usage patterns, and decision-making workflows without requiring custom instrumentation. The managed service helps reduce operational overhead while offering native integration with Strands Agents SDK. This enables the tracking of agent conversation flows. With this centralized observability service, teams can monitor agent behavior across multiple deployments, identify performance bottlenecks, and maintain audit trails for compliance requirements.
Step 1: Setting up SageMaker AI Serverless MLflow App
The first step of setting observability for your AI agent is to set up a MLflow App. You have two primary options for deployment:
- using the intuitive SageMaker AI Studio UI for quick setup with guided configuration
- using Boto3 for programmatic deployment that enables automation and infrastructure-as-code practices.
Both approaches create a Serverless MLflow App, so you can focus on building and monitoring your Strands Agents rather than managing the underlying observability infrastructure.In this post, we use the Boto3 SDK to deploy a MLflow App.
# Create S3 bucket for MLflow artifacts
s3_client = boto3.client('s3', region_name=region)
bucket_name = f'{account_id}-mlflow-bucket'
if region == 'us-east-1':
            s3_client.create_bucket(Bucket=bucket_name)
        else:
            s3_client.create_bucket(
                Bucket=bucket_name,
                CreateBucketConfiguration={'LocationConstraint': region}
            )
# Create SageMaker client
sagemaker_client = boto3.client('sagemaker')

# Create MLflow App
mlflow_app_details = sagemaker_client.create_mlflow_app(
    Name='strands-mlflow-app',
    ArtifactStoreUri=f's3://{account_id}-mlflow-bucket/artifacts',
    RoleArn=role,

)

print(f"MLflow app creation initiated: { mlflow_app_details['Arn']}")
Step 2: Set up MLflow App for Strands Agent tracing
Now that you’ve created an MLflow App, you enable automatic logging for Strands Agents so that the agent interactions, tool usage, and performance metrics are automatically captured and sent to the MLflow App without requiring manual instrumentation.
import os
import mlflow

tracking_uri = mlflow_app_details['Arn']
print(f"MLflow App URL: {tracking_uri}")

# Set MLflow tracking URI
os.environ["MLFLOW_TRACKING_URI"] = tracking_uri
# Or you can set the tracking server as below.
#mlflow.set_tracking_uri(tracking_uri)

mlflow.set_experiment("Strands-MLflow") # This experiment name will be used in the UI
mlflow.strands.autolog()
Step 3: Run the agent
With MLflow App setup and auto logging enabled, you’re now ready to invoke our Strands Agent exactly like you did at the beginning.
def capitalize(response):
    return response.upper()

agent = Agent(model=model_sagemaker, tools=[http_request])
response = agent("Where is the international space station now?")
capitalize(response.message['content'][0]['text'])
Traces and metrics will be available on your MLflow App that can be accessed using the signed URL constructed using information from mlflow_app_details and AWS Region variables.
# Get presigned URL for MLflow App
presigned_response = sagemaker_client.create_presigned_mlflow_app_url(
    Arn=mlflow_app_details['Arn']
)
mlflow_ui_url = presigned_response['AuthorizedUrl']
print(f"MLflow UI URL: {mlflow_ui_url}")
Step 4: Review traces in MLflow
Post agent run, your agent trace, tool calling, and other metrics will be available through the MLflow App UI’s Traces section.
The traces in an experiment are available in a list view to inspect further.
When you select a specific trace, you have the option to see the details as an Execution Timeline or as a Span Tree. In both views, you can see the Agent Loop, tool calls, input/output to each step, and other information.
Manual tracing
While the previous code block had capitalize(response.message['content'][0]['text']), the capitalize function isn’t visible in the MLflow trace. MLflow Strands automated tracing logs agent invocation (and its tool and FM invocations). Other function calls aren’t logged. If you need trace for a complete block of code, you can use MLflow’s manual tracing capability as shown in the following code block.
@mlflow.trace(span_type="func", attributes={"operation": "capitalize"})
def capitalize(response):
    return response.upper()

@mlflow.trace
def run_agent():
    agent = Agent(tools=[http_request])
    mlflow.update_current_trace(request_preview="Run Strands Agent")
response = agent("Where is the international space station now? (Use: http://api.open-notify.org/iss-now.json) ")
    capitalized_response = capitalize(response.message['content'][0]['text'])

    return capitalized_response

# Execute the traced function
capitalized_response = run_agent()
print(capitalized_response)
In this code block, the capitalize function is decorated with @mlflow.trace to make sure that its execution, input, and output are seen in MLflow. As a result, you will see the following trace in MLflow that includes the agent invocation and “capitalize” function call.
Deploying a new LLM for A/B testing
With Amazon SageMaker AI, you can optimize large language models (LLMs) for your agent applications. For example, to enhance your application’s performance by upgrading from a smaller Qwen3-4B model to the larger Qwen3-8B model, you don’t need to perform a complete migration immediately. Because your current agent with Qwen3-4B is functioning well, you can deploy the new Qwen3-8B model alongside it and distribute traffic between both LLM endpoints. With this approach, you can conduct A/B testing to measure the impact and effectiveness of the larger model before fully committing to the upgrade. First, deploy a new model behind the same endpoint as a second variant:
# Step1: Create a model from JumpStart
model_b_name  ="sagemaker-strands-demo-qwen3-8b"
model_b_id, model_b_version = "huggingface-reasoning-qwen3-8b", "1.0.0"

model_8b = JumpStartModel(
    model_id="huggingface-reasoning-qwen3-8b",
    model_version="1.0.0",
    name=model_b_name
)
model_b.create(instance_type="ml.g5.2xlarge")

# Step2: Create production variants for A/B testing
# Create production variants for A/B testing
production_variants = [
   # The original model (champion)
   {
        "VariantName": "qwen-4b-variant",
        "ModelName": "qwen3-4b-model",
        "InitialInstanceCount": 1,
        "InstanceType": "ml.g5.2xlarge",
        "InitialVariantWeight": 0.5  # It will take 50% of the traffic
    },
   # The new model (challenger)
    {
        "VariantName": "qwen3-8b-variant",
        "ModelName": model_b_name,
        "InitialInstanceCount": 1,
        "InstanceType": "ml.g5.2xlarge",
        "InitialVariantWeight": 0.5  # It will take 50% of the traffic
    }
]

# Step3: Create new endpoint configuration
sagemaker_client = boto3.client('sagemaker')
ENDPOINT_CONFIG_AB_TESTING = "llm-endpoint-config-ab"
sagemaker_client.create_endpoint_config(
    EndpointConfigName=ENDPOINT_CONFIG_AB_TESTING,
    ProductionVariants=production_variants
)
# Step4: Update the endpoint with new A/B testing configuration
sagemaker_client.update_endpoint(
    EndpointName=ENDPOINT_NAME, #Remember, the endpoint name stays the same
    EndpointConfigName=ENDPOINT_CONFIG_AB_TESTING
)
# Wait until the update is completed
waiter = boto3.client('sagemaker').get_waiter('endpoint_in_service')
waiter.wait(EndpointName=ENDPOINT_NAME)
After the update is done, the agent that you created with this endpoint will use both LLMs with a 50/50 chance. For a controlled experiment, you can create two new agents that will point to specific variants.
from strands.models.sagemaker import SageMakerAIModel
from strands import Agent, tool
from strands_tools import http_request, calculator
model_sagemaker_a = SageMakerAIModel(
endpoint_config={
"endpoint_name": ENDPOINT_NAME,
"region_name": region,
"target_variant":"qwen-4b-variant"
},
payload_config={
関連記事
今日のまとめ
AI日報で今日の重要ニュースをまとめ読み