プロンプトを隠すな、見せろ
Hamel Husain は、LLM 抽象化ツールがプロンプトの可視性を阻害し「偶発的複雑性」を生むと指摘し、mitmproxy を用いて内部プロンプトを直接取得・分析する手法を提案している。
キーポイント
抽象化ツールの隠蔽リスク
Guardrails や DSPy などのツールは安全性や構造化を謳うが、ユーザーからプロンプト生成プロセスを遮断し、内部動作の理解を困難にしている。
偶発的複雑性の危険性
LLM 抽象化が過度に進むと、自然言語での対話という本来の目的から逸れ、人間には理解できないコードやフレームワークへの回帰を強いる。
mitmproxy による可視化手法
ドキュメントやソースコードを読まずに API コールをインターセプトし、ツールが生成した最終プロンプトを直接取得・分析する実用的な方法を提示している。
自動化の適切な境界線
ルーティングやリトライなどのコード処理はコードで記述すべきだが、プロンプト構築は意図を自然言語で表現するのが最適であり、そのバランスが重要である。
フレームワークの必要性を判断する重要性
プロンプトと API 呼び出しを確認することで、そのフレームワークが本当に必要か、あるいは最終的なプロンプストリングだけを抽出して直接使用すべきかを判断できる。
ソースコードの修正に頼らない監視手法
ソースコードの品質やドキュメントのばらつきにより、モンキーパッチなどの手法は時間がかかるため、mitmproxy を使用したフレームワーク非依存なプロキシ設定が推奨される。
特定プログラムへのプロキシスコープ化
不要なノイズを排除し特定の Python プログラムのみを対象とするために、システム全体のプロキシ設定を一時的に無効化し、対象プログラムに限定してトラフィックをルーティングする必要がある。
影響分析・編集コメントを表示
影響分析
この記事は、LLM エコシステムにおける「ブラックボックス化」への警鐘を鳴らす重要な視点を提供しています。開発者がツールの内部ロジックを理解し、プロンプトエンジニアリングの真価を発揮するためには、抽象化レイヤーを透過的に可視化するスキルが不可欠であることを示唆しており、今後の LLM 応用開発におけるベストプラクティスに大きな影響を与える可能性があります。
編集コメント
ツールのブラックボックス化が進む中、開発者が自らの意図を正しく反映できているかを確認する「可視化」の重要性を説く、非常に示唆に富んだ記事です。
背景
LLM の出力を、プロンプトの再書き換えや構築によって改善することを目指すライブラリは数多く存在します。これらのライブラリは、LLM の出力を以下のように目指しています:
より安全に(例:ガードレール)
決定論的に(例:ガイダンス)
構造化された形式で(例:インストラクター)
回復力のあるものとして(例:LangChain)
…あるいは任意の指標に対して最適化されたものとして(例:DSPy)。
これらのツールの一部に共通するテーマは、ユーザーがプロンプト作成から自らを排除することを推奨している点です。
DSPy:「これは、言語モデルとそのプロンプトが背景に退き……プログラムを再コンパイルすると DSPy が新しい効果的なプロンプトを作成するという新たなパラダイムです」
ガイダンス:「ガイダンスは、従来のプロンプト作成と比較して優れた制御性と効率性を提供するプログラミングのパラダイムです…」
ツールがプロンプト作成を否定していない場合でも、これらのツールが言語モデルに送信する最終的なプロンプスを取得するのはしばしば困難だと感じています。これらのツールが LLM に送信するプロンプトは、それらのツールが行っていることを自然言語で記述したものであり、その仕組みを理解するための最速の方法です。さらに、一部のツールには内部構造を説明するために複雑な用語が使われており、それが何をしようとしているかをさらに曖昧にしていることもあります。
以下で説明する理由から、私はほとんどの人が以下の心構え benefited すべきだと考えています:

このブログ記事では、ドキュメントをくまなく読み込んだりソースコードを読んだりすることなく、あらゆるツールのプロンプト付き API 呼び出しをどのようにインターセプトできるかをお見せします。また、以前ご紹介した LLM ツールからの例を用いて、mitmproxy のセットアップと運用方法についても解説いたします。
動機:偶発的複雑さの最小化
抽象化を採用する前に、偶発的複雑さ(accidental complexity)を引き起こす危険性を考慮することが重要です。この危険性は、プログラミングにおける抽象化と比較して LLM 抽象化において特に顕著です。LLM 抽象化では、ユーザーに自然言語で AI と対話する代わりにコードを書く方向へ後退させることが多く、これは LLM の目的に反することになりかねません。
プログラミングの抽象化 -> タスクを機械語に変換するために使用できる人間らしい言語
LLM の抽象化 -> タスクを人間語に変換するために使用できる理解不能なフレームワーク
— Hamel Husain (@HamelHusain) 2024年2月5日
これは皮肉なコメントですが、ツールを評価する際にこの点を心に留めておく価値があります。ツールが提供する自動化には主に 2 つのタイプがあります。
コードと LLM の交互実行:この自動化を表現するには、タスクを実行するためにコードを実行する必要があるため、コードを通じて行うのが最も適切です。例としては、ルーティング、関数の実行、リトライ、チェーン化などがあります。
プロンプトの再作成と構築:意図を表現するには、自然言語を使うのが最も効果的な場合が多いです。しかし、例外もあります!例えば、関数の定義やスキーマをコードから表現する方が便利な場合があります。
多くのフレームワークが両方のタイプの自動化を提供しています。ただし、2 番目のタイプに頼りすぎると悪影響を及ぼす可能性があります。プロンプトを確認することで、以下のような判断が可能になります。
このフレームワークは本当に必要なのか?
最終的なプロンプト(文字列)をそのまま盗んで、フレームワークを捨てるべきではないか?
これよりも良いプロンプト(より短く、意図に合致するなど)を作成できないか?
これが最善のアプローチなのか(API 呼び出しの回数が適切に見えるか)?
私の経験則では、プロンプトと API 呼び出しを確認することは、情報に基づいた判断を下すために不可欠です。
LLM API 呼び出しの傍受
LLM の API 呼び出しを傍受する方法は多数あります。例えば、ソースコードへのモンキーパッチ適用や、ユーザー向けのオプションを見つける方法などです。しかし、これらのアプローチは、ソースコードやドキュメントの品質が大きく異なるため、非常に時間がかかると感じています。結局のところ、コードがどのように動作するかを気にせず、API 呼び出しを確認したいだけなのです。
フレームワークに依存せずに API 呼び出しを確認する方法として、送信される API リクエストをログ出力するプロキシを設定するという方法があります。これは、無料かつオープンソースの HTTPS プロキシである mitmproxy を使用すると簡単に実現できます。
mitmproxy のセットアップ
これは、私たちの目的に対して初心者にも優しい、特定の視点に基づいた mitmproxy のセットアップ方法です:
ウェブサイトのインストール手順に従ってください
ターミナルで mitmweb を実行して、インタラクティブ UI を起動してください。ログに表示されるインタラクティブ UI の URL に注意してください。これは以下のような形式になります:Web server listening at http://127.0.0.1:8081/
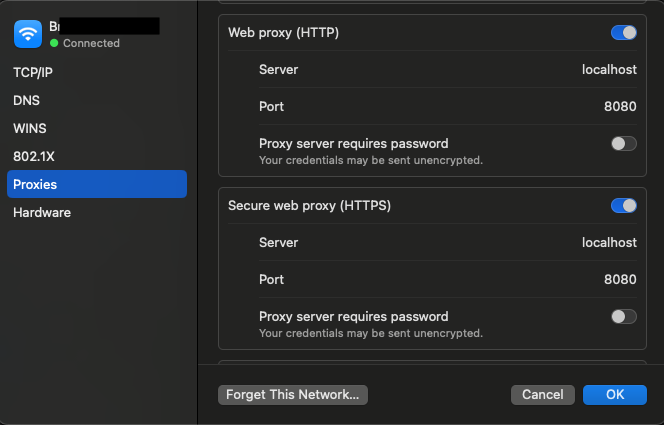
次に、デバイス(つまりノートパソコン)を構成して、すべてのトラフィックを localhost:8080 でリッスンしている mitproxy 経由でルーティングする必要があります。ドキュメントによると以下の通りです。
システム用の HTTP プロキシの設定方法についてウェブ検索を行うことをお勧めします。一部のオペレーティングシステムにはグローバル設定があり、一部のブラウザには独自の設定があり、他のアプリケーションは環境変数を使用するなど、方法は様々です。
私の場合、「set proxy for macos」という Google 検索で以下の結果が返されました:
Apple メニュー > システム設定を選択し、サイドバーの「ネットワーク」をクリックします。右側のネットワークサービスをクリックし、「詳細」をクリックした後、「プロキシ」をクリックしてください。
その後、UI の以下の場所に localhost と 8080 を入力します:
次に、http://mitm.it に移動すると、HTTPS リクエストをインターセプトするために必要な mitmproxy Certificate Authority (CA) のインストール方法に関する指示が表示されます。(手動でこれを行うこともできます。こちらを参照してください。)また、後で参照する必要があるため、CA ファイルの場所もメモしておいてください。
https://mitmproxy.org/ などのウェブサイトにアクセスし、mtimweb UI(私の場合は http://127.0.0.1:8081/ にあります。URL はターミナルのログを確認してください)に対応する出力が表示されるかどうかで、すべてが正しく動作しているかテストできます。
これで設定が完了したら、以前にネットワーク上で有効化したプロキシを無効化できます。私は Mac では上記のスクリーンショットに表示されているプロキシボタンを切り替えることでこれを行っています。これは、不要なノイズを排除するためにプロキシを Python プログラムだけに限定したいからです。
ヒント
ネットワーク関連のソフトウェアでは、環境変数を設定することで送信されるリクエストをプロキシ経由で処理できるものが一般的です。これが、特定の Python プログラムにのみプロキシを適用するためのアプローチとなります。ただし、この手順に慣れた後は、他の種類のプログラムでも試してどのような発見があるか遊んでみることをお勧めします!
Python 用の環境変数
requests および httpx ライブラリがトラフィックをプロキシへ向け、HTTPS トラフィックに対して CA ファイルを参照するようにするために、以下の環境変数を設定する必要があります。
重要
このブログ記事内のコードスニペットを実行する前に、必ずこれらの環境変数を設定してください。
import os
私の CA ファイルの場所
cert_file = '/Users/hamel/Downloads/mitmproxy-ca-cert.pem'
os.environ['REQUESTS_CA_BUNDLE'] = cert_file
os.environ['SSL_CERT_FILE'] = cert_file
os.environ['HTTPS_PROXY'] = 'http://127.0.0.1:8080'
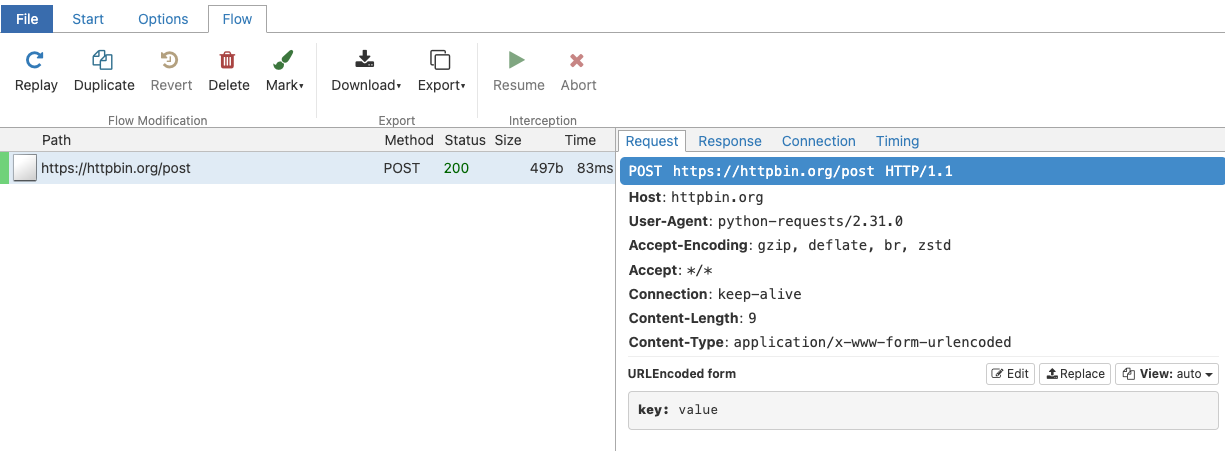
以下のコードを実行して最小限のテストを行うことができます:
import requests
requests.post('https://httpbin.org/post',
data={'key': 'value'})
これは、UI 上では以下のように表示されます:
例
翻訳全文
翻訳全文
わん。構造化された出力を得るために、これほど多くの儀式が必要だとは!このライブラリは構造化された出力に対して XML スキーマ(他の手法では関数呼び出しを使用)を採用していることを学びました。魔法が解けた今、より良く、あるいはより単純なアプローチを考案できるかどうかを検討する価値があります。いずれにせよ、不必要な複雑さに巻き込まれることなく仕組みを理解できるようになったのは、大きな勝利です。
ガイダンス(Guidance)
ガイダンスは、プロンプト作成のための制約付き生成とプログラミング構文を提供します。チュートリアルからのチャット例を見てみましょう:
import guidance
gpt35 = guidance.models.OpenAI("gpt-3.5-turbo")
import re
from guidance import gen, select, system, user, assistant
@guidance
def plan_for_goal(lm, goal: str):
# これは以下で使用するヘルパー関数です
def parse_best(prosandcons, options):
best = re.search(r'Best=(\d+)', prosandcons)
if not best:
best = re.search(r'Best.*?(\d+)', 'Best= option is 3')
if best:
best = int(best.group(1))
else:
best = 0
return options[best]
# モデルに対する一般的な指示
with system():
lm += "You are a helpful assistant."
ユーザーからの簡単なリクエストをシミュレートする
# ここで 'lm2' の使用に切り替えることに注意してください。これらは中間ステップであるため、現在の lm オブジェクトを上書きしたくないからです
with user():
lm2 = lm + f"""
私は {goal} をしたいです
これを達成する方法のオプションを 1 つ生成してもらえますか?
そのオプションは非常に短く、最大 1 行にしてください。"""
# 複数のオプションを生成します。これは複数の連続した生成リクエストを意味することに注意してください
n_options = 5
with assistant():
options = []
for i in range(n_options):
options.append((lm2 + gen(name='option', temperature=1.0, max_tokens=50))["option"])
# ユーザーに各オプションの長所と短所を要求します
with user():
lm2 += f"""
私は {goal} をしたいです
以下の各オプションの長所と短所についてコメントし、最も良いオプションを選んでください。
"""
for i, opt in enumerate(options):
lm2 += f"Option {i}: {opt}\n"
lm2 += f"""
各オプションを非常に簡潔に議論してください(長所は 1 行、短所は 1 行)。最後に「Best=X」と述べてください。ここで X は最も良いオプションの番号です。"""
# モデルから長所と短所を取得します
with assistant():
lm2 += gen(name='prosandcons', temperature=0.0, max_tokens=600, stop="Best=") + "Best=" + gen("best", regex="[0-9]+")
ユーザーは現在、最も優れていると選択されたものを抽出し、完全な計画を求めています
# これは最終結果なので、'lm' に戻します
with user():
lm += f"""
私は {goal} をしたいです
これが私の計画です: {options[int(lm2["best"])]}
この計画について詳しく説明し、それを最も効果的に達成する方法を教えてください。"""
# 計画が生成されます
with assistant():
lm += gen(name='plan', max_tokens=500)
return lm
results = gpt35 + plan_for_goal(goal="read more books")
system
あなたは役立つアシスタントです。
user
私はもっと本を読みたいと思います
私の計画は: 毎日、読書に充てるための 30 分を確保することです。
この計画について詳しく説明し、それを最も効果的に達成する方法を教えてください。
assistant
毎日、読書に充てるための 30 分を確保することは、より多くの本を読むための素晴らしい計画です。この目標を達成するためのいくつかのヒントをご紹介します:
- ルーティンを確立する: 朝、昼休みの間、就寝前など、あなたにとって最も適した一日の特定の時間を選びましょう。習慣化には一貫性が鍵となります。
- 読書に最適な環境を作る: 集中して読書に没頭できる、静かで快適な場所を見つけましょう。自宅の居心地の良い隅、公園のベンチ、あるいは地元の図書館などが挙げられます。
- 気を散らす要素を最小限に抑える:集中して読む時間中は、携帯電話を片付け、テレビの電源を切り、その他の潜在的な妨害要因を避けてください。これにより、集中力を維持し、本に完全に没頭することができます。
- 興味のある本を選ぶ:自分の個人的な関心、趣味、または目標と一致する本を選んでください。主題に対して本当に興味を持てば、定期的に読むことへの動機が高まります。
- 達成可能な目標から始める:読書が初めての場合やスケジュールが忙しい場合は、15 分といった短い時間から始め、徐々に慣れてきたら 30 分以上へと延長してください。
- タイマーを設定する:読書時間を追跡できるタイマーまたはリーディングアプリを使用してください。これにより責任感が生まれ、読書に確実に 30 分を捧げることができます。
- 読書を楽しいものにする:キャンドルに火を灯したり、お茶をすすったり、柔らかい背景音楽を流したりして、居心地の良い読書環境を作りましょう。五感すべてを使うことで、読書の体験がより豊かになります。
- ブッククラブや読書グループに参加する:他の本好きとつながるために、ブッククラブへの参加や読書グループへの参加を検討してください。これにより、追加の動機づけ、議論の機会、そして本の推薦を得ることができます。
- 読書ログをつける:読んだ本の記録、およびその感想や考察を記録し続けること。これにより、進捗を追跡したり、読書の好みに潜むパターンを発見したり、将来の読書のためのインスピレーション源としたりすることができます。
- 柔軟に対応する:専用の読書時間を設けることは重要ですが、柔軟で適応力のある姿勢も大切です。生活が忙しくなることもありますので、一日でも読み忘れたとしても落胆する必要はありません。単にその続きから始めて、読書の習慣を継続すればよいのです。
覚えておいてください。目標は読書の過程を楽しむこと、そしてそれを生活の恒久的な一部にすることです。楽しい読書を!
これはかなり neat ですね!しかし、具体的に何をしているのでしょうか?これにより OpenAI に対して合計 7 回の呼び出しが行われますが、私はこれを gist にまとめています。この API 呼び出しのうち 7 つのうち 5 つは、「LLM にアイデアを生成させる」という「内部的な思考」です。温度パラメータ(temperature)を 1.0 に設定しているにもかかわらず、これらの「アイデア」の多くは重複しています。OpenAI に対する二番目に最後の呼び出しでは、これら「アイデア」を列挙しており、以下にその内容を含めています:
もっと本を読みたい
以下の各オプションの長所と短所についてコメントし、その上で最適な選択肢を選んでください。
オプション 0: 毎日、読書に充てる専用時間を確保する。
オプション 1: 毎日、30 分の読書に充てる専用時間を確保する。
オプション 2: 毎日、読書に充てる専用時間を確保する。
オプション 3: 毎日、読書に充てる専用時間を確保する。
オプション 4: 読書クラブに参加する。
各オプションについては非常に簡潔に議論してください(長所は 1 行、短所も 1 行)。最後に「Best=X」と述べてください。ここで X は最良のオプションの番号です。
私は経験から、言語モデルに対してアイデアを一度で生成するよう指示した方がより良い結果が得られることを知っています。そのようにすれば、LLM(大規模言語モデル)は以前のアイデアを参照でき、多様性を高めることができます。これは偶発的な複雑さの良い例です:この設計パターンを盲信して適用したくなるのは非常に魅力的ですが、コードを見ると 5 つの独立した呼び出しが行われることが明確であるため、この特定のフレームワークに対する批判というよりは、API 呼び出しを検証することで自分の作業を確認するのが良いアイデアだと言えます。
Langchain
Langchain は LLM(大規模言語モデル)に関するあらゆる事柄のためのマルチツールです。LLM の利用を始める際、多くの人々が Langchain に依存しています。コアとなる LangChain ライブラリは通常、プロンプトを隠しませんが、一部の実験的機能にはその例外もあります。これらの機能の一つである SmartLLMChain について見てみましょう。
from langchain.prompts import PromptTemplate
from langchain_experimental.smart_llm import SmartLLMChain
from langchain_openai import ChatOpenAI
hard_question = "I have a 12 liter jug and a 6 liter jug.\
I want to measure 6 liters. How do I do it?"
prompt = PromptTemplate.from_template(hard_question)
llm = ChatOpenAI(temperature=0, model_name="gpt-3.5-turbo")
chain = SmartLLMChain(llm=llm, prompt=prompt,
n_ideas=2,
verbose=True)
result = chain.run({})
print(result)
Idea 1: 1. Fill the 12 liter jug completely.
- Pour the contents of the 12 liter jug into the 6 liter jug. This will leave you with 6 liters in the 12 liter jug.
- Empty the 6 liter jug.
- Pour the remaining 6 liters from the 12 liter jug into the now empty 6 liter jug.
- You now have 6 liters in the 6 liter jug.
Idea 2: 1. Fill the 12 liter jug completely.
- Pour the contents of the 12 liter jug into the 6 liter jug. This will leave you with 6 liters in the 12 liter jug.
- Empty the 6 liter jug.
- Pour the remaining 6 liters from the 12 liter jug into the now empty 6 liter jug.
- You now have 6 liters in the 6 liter jug.
Improved Answer:
- Fill the 12 liter jug completely.
- Pour the contents of the 12 liter jug into the 6 liter jug until the 6 liter jug is full. This will leave you with 6 liters in the 12 liter jug and the 6 liter jug completely filled.
- Empty the 6 liter jug.
- Pour the remaining 6 liters from the 12 liter jug into the now empty 6 liter jug.
- You now have 6 liters in the 6 liter jug.
Full Answer:
To measure 6 liters using a 12 liter jug and a 6 liter jug, follow these steps:
- Fill the 12 liter jug completely.
- Pour the contents of the 12 liter jug into the 6 liter jug until the 6 liter jug is full. This will leave you with 6 liters in the 12 liter jug and the 6 liter jug completely filled.
- Empty the 6 liter jug.
- Pour the remaining 6 liters from the 12 liter jug into the now empty 6 liter jug.
- You now have 6 liters in the 6 liter jug.
Neat! So what happened exactly? While this API emits logs that show you a lot of information (available on this gist), the API request pattern is interesting:
Two seperate api calls for each "idea".
Another API call that incorporates the two ideas as context, with the prompt:
You are a researcher tasked with investigating the 2 resp
原文を表示
Background
There are many libraries that aim to make the output of your LLMs better by re-writing or constructing the prompt for you. These libraries purport to make the output of your LLMs:
safer (ex: guardrails)
deterministic (ex: guidance)
structured (ex: instructor)
resilient (ex: langchain)
… or even optimized for an arbitrary metric (ex: DSPy).
A common theme among some of these tools is they encourage users to disintermediate themselves from prompting.
DSPy: “This is a new paradigm in which LMs and their prompts fade into the background …. you can compile your program again DSPy will create new effective prompts”
guidance “guidance is a programming paradigm that offers superior control and efficiency compared to conventional prompting …”
Even when tools don’t discourage prompting, I’ve often found it difficult to retrieve the final prompt(s) these tools send to the language model. The prompts sent by these tools to the LLM is a natural language description of what these tools are doing, and is the fastest way to understand how they work. Furthermore, some tools have dense terminology to describe internal constructs which can further obfuscate what they are doing.
For reasons I’ll explain below, I think most people would benefit from the following mindset:
In this blog post, I’ll show you how you can intercept API calls w/prompts for any tool, without having to fumble through docs or read source code. I’ll show you how to setup and operate mitmproxy with examples from the LLM the tools I previously mentioned.
Motivation: Minimize accidental complexity
Before adopting an abstraction, its important to consider the dangers of taking on accidental complexity. This danger is acute for LLM abstractions relative to programming abstractions. With LLM abstractions, we often force the user to regress towards writing code instead of conversing with the AI in natural language, which can run counter to the purpose of LLMs:
Programming abstraction -> a human-like language you can use to translate your task into machine code
LLM abstraction -> an unintelligible framework you can use to translate your task into human language
— Hamel Husain (@HamelHusain) February 5, 2024
While this is a cheeky comment, it’s worth keeping this in mind while evaluating tools. There are two primary types of automation that tools provide:
Interleaving code and LLMs: Expressing this automation is often best done through code, since code must be run to carry out the task. Examples include routing, executing functions, retries, chaining, etc.
Re-Writing and constructing prompts: Expressing your intent is often best done through natural language. However, there are exceptions! For example, it is convenient to express a function definition or schema from code instead of natural language.
Many frameworks offer both types of automation. However, going too far with the second type can have negative consequences. Seeing the prompt allows you decide:
Is this framework really necessary?
Should I just steal the final prompt (a string) and jettison the framework?
Can we write a better prompt than this (shorter, aligned with your intent, etc)?
Is this the best approach (do the # of API calls seem appropriate)?
In my experience, seeing the prompts and API calls are essential to making informed decisions.
Intercepting LLM API calls
There are many possible ways to intercept LLM API calls, such as monkey patching source code or finding a user-facing option. I’ve found that those approaches take far too much time since the quality of source code and documentation can vary greatly. After all, I just want to see API calls without worrying about how the code works!
A framework agnostic way to see API calls is to setup a proxy that logs your outgoing API requests. This is easy to do with mitmproxy, an free, open-source HTTPS proxy.
Setting Up mitmproxy
This is an opinionated way to setup mitmproxythat’s beginner-friendly for our intended purposes:
Follow the installation instructions on the website
Start the interactive UI by running mitmweb in the terminal. Pay attention to the url of the interactive UI in the logs which will look something like this: Web server listening at http://127.0.0.1:8081/
Next, you need to configure your device (i.e. your laptop) to route all traffic through mitproxy, which listens on http://localhost:8080. Per the documentation:
We recommend to simply search the web on how to configure an HTTP proxy for your system. Some operating system have a global settings, some browser have their own, other applications use environment variables, etc.
In my case, A google search for “set proxy for macos” returned these results:
choose Apple menu > System Settings, click Network in the sidebar, click a network service on the right, click Details, then click Proxies.
I then insert localhost and 8080 in the following places in the UI:
Next, navigate to http://mitm.it and it will give you instructions on how to install the mitmproxy Certificate Authority (CA), which you will need for intercepting HTTPS requests. (You can also do this manually here.) Also, take note of the location of the CA file as we will reference it later.
You can test that everything works by browsing to a website like https://mitmproxy.org/, and seeing the corresponding output in the mtimweb UI which for me is located at http://127.0.0.1:8081/ (look at the logs in your terminal to get the URL).
Now that you set everything up, you can disable the proxy that you previously enabled on your network. I do this on my mac by toggling the proxy buttons in the screenshot I showed above. This is because we want to scope the proxy to only the python program to eliminate unnecessary noise.
Tip
Networking related software commonly allows you to proxy outgoing requests by setting environment variables. This is the approach we will use to scope our proxy to specific Python programs. However, I encourage you to play with other types of programs to see what you find after you are comfortable!
Environment variables for Python
We need to set the following environment variables so that the requests and httpx libraries will direct traffic to the proxy and reference the CA file for HTTPS traffic:
Important
Make sure you set these environment variables before running any of the code snippets in this blog post.
import os
The location of my CA File
cert_file = '/Users/hamel/Downloads/mitmproxy-ca-cert.pem'
os.environ['REQUESTS_CA_BUNDLE'] = cert_file
os.environ['SSL_CERT_FILE'] = cert_file
os.environ['HTTPS_PROXY'] = 'http://127.0.0.1:8080'
You can do a minimal test by running the following code:
import requests
requests.post('https://httpbin.org/post',
data={'key': 'value'})
<Response [200]>
This will appear in the UI like so:
Examples
Now for the fun part, let’s run through some examples of LLM libraries and intercept their API calls!
Guardrails
Guardrails allows you specify structure and types, which it uses to validate and correct the outputs of large language models. This is a hello world example from the guardrails-ai/guardrails README:
from pydantic import BaseModel, Field
from guardrails import Guard
import openai
class Pet(BaseModel):
pet_type: str = Field(description="Species of pet")
name: str = Field(description="a unique pet name")
prompt = """
What kind of pet should I get and what should I name it?
${gr.complete_json_suffix_v2}
"""
guard = Guard.from_pydantic(output_class=Pet, prompt=prompt)
validated_output, *rest = guard(
llm_api=openai.completions.create,
engine="gpt-3.5-turbo-instruct"
)
print(f"{validated_output}")
{
"pet_type": "dog",
"name": "Buddy
What is happening here? How is this structured output and validation working? Looking at the mitmproxy UI, I can see that the above code resulted in two LLM API calls, the first one with this prompt:
What kind of pet should I get and what should I name it?
Given below is XML that describes the information to extract from this document and the tags to extract it into.
<output>
<string name="pet_type" description="Species of pet"/>
<string name="name" description="a unique pet name"/>
</output>
ONLY return a valid JSON object (no other text is necessary), where the key of the field in JSON is the name attribute of the corresponding XML, and the value is of the type specified by the corresponding XML's tag. The JSON MUST conform to the XML format, including any types and format requests e.g. requests for lists, objects and specific types. Be correct and concise.
Here are examples of simple (XML, JSON) pairs that show the expected behavior:
<string name='foo' format='two-words lower-case' />=>{'foo': 'example one'}<list name='bar'><string format='upper-case' /></list>=>{"bar": ['STRING ONE', 'STRING TWO', etc.]}<object name='baz'><string name="foo" format="capitalize two-words" /><integer name="index" format="1-indexed" /></object>=>{'baz': {'foo': 'Some String', 'index': 1}}
Followed by another call with this prompt:
I was given the following response, which was not parseable as JSON.
"{\n \"pet_type\": \"dog\",\n \"name\": \"Buddy"
Help me correct this by making it valid JSON.
Given below is XML that describes the information to extract from this document and the tags to extract it into.
<output>
<string name="pet_type" description="Species of pet"/>
<string name="name" description="a unique pet name"/>
</output>
ONLY return a valid JSON object (no other text is necessary), where the key of the field in JSON is the name attribute of the corresponding XML, and the value is of the type specified by the corresponding XML's tag. The JSON MUST conform to the XML format, including any types and format requests e.g. requests for lists, objects and specific types. Be correct and concise. If you are unsure anywhere, enter null.
Woof. That’s a whole lot of ceremony to get structured output! We learned that this library’s approach to structured output uses XML schemas (while others use function calling). It’s worth considering if you can fashion a better or simpler approach now that the magic has been lifted. Either way, we now have insight into how it works without dragging you into unnecessary complexity, which is a win.
Guidance
Guidance offers constrained generation and programming constructs for writing prompts. Let’s dive into a chat example from their tutorials:
import guidance
gpt35 = guidance.models.OpenAI("gpt-3.5-turbo")
import re
from guidance import gen, select, system, user, assistant
@guidance
def plan_for_goal(lm, goal: str):
# This is a helper function which we will use below
def parse_best(prosandcons, options):
best = re.search(r'Best=(\d+)', prosandcons)
if not best:
best = re.search(r'Best.*?(\d+)', 'Best= option is 3')
if best:
best = int(best.group(1))
else:
best = 0
return options[best]
# Some general instruction to the model
with system():
lm += "You are a helpful assistant."
# Simulate a simple request from the user
# Note that we switch to using 'lm2' here, because these are intermediate steps (so we don't want to overwrite the current lm object)
with user():
lm2 = lm + f"""\
I want to {goal}
Can you please generate one option for how to accomplish this?
Please make the option very short, at most one line."""
# Generate several options. Note that this means several sequential generation requests
n_options = 5
with assistant():
options = []
for i in range(n_options):
options.append((lm2 + gen(name='option', temperature=1.0, max_tokens=50))["option"])
# Have the user request pros and cons
with user():
lm2 += f"""\
I want to {goal}
Can you please comment on the pros and cons of each of the following options, and then pick the best option?
"""
for i, opt in enumerate(options):
lm2 += f"Option {i}: {opt}\n"
lm2 += f"""\
Please discuss each option very briefly (one line for pros, one for cons), and end by saying Best=X, where X is the number of the best option."""
# Get the pros and cons from the model
with assistant():
lm2 += gen(name='prosandcons', temperature=0.0, max_tokens=600, stop="Best=") + "Best=" + gen("best", regex="[0-9]+")
# The user now extracts the one selected as the best, and asks for a full plan
# We switch back to 'lm' because this is the final result we want
with user():
lm += f"""\
I want to {goal}
Here is my plan: {options[int(lm2["best"])]}
Please elaborate on this plan, and tell me how to best accomplish it."""
# The plan is generated
with assistant():
lm += gen(name='plan', max_tokens=500)
return lm
results = gpt35 + plan_for_goal(goal="read more books")
system
You are a helpful assistant.
user
I want to read more books
Here is my plan: Set aside 30 minutes of dedicated reading time each day.
Please elaborate on this plan, and tell me how to best accomplish it.
assistant
Setting aside 30 minutes of dedicated reading time each day is a great plan to read more books. Here are some tips to help you accomplish this goal:
- Establish a routine: Choose a specific time of day that works best for you, whether it's in the morning, during lunch break, or before bed. Consistency is key to forming a habit.
- Create a reading-friendly environment: Find a quiet and comfortable spot where you can focus on your reading without distractions. It could be a cozy corner in your home, a park bench, or a local library.
- Minimize distractions: Put away your phone, turn off the TV, and avoid any other potential interruptions during your dedicated reading time. This will help you stay focused and fully immerse yourself in the book.
- Choose books that interest you: Select books that align with your personal interests, hobbies, or goals. When you're genuinely interested in the subject matter, you'll be more motivated to read regularly.
- Start with manageable goals: If you're new to reading or have a busy schedule, start with a smaller time commitment, such as 15 minutes, and gradually increase it to 30 minutes or more as you become more comfortable.
- Set a timer: Use a timer or a reading app that allows you to track your reading time. This will help you stay accountable and ensure that you dedicate the full 30 minutes to reading.
- Make reading enjoyable: Create a cozy reading atmosphere by lighting a candle, sipping a cup of tea, or playing soft background music. Engaging all your senses can enhance your reading experience.
- Join a book club or reading group: Consider joining a book club or participating in a reading group to connect with fellow book lovers. This can provide additional motivation, discussion opportunities, and book recommendations.
- Keep a reading log: Maintain a record of the books you've read, along with your thoughts and reflections. This can help you track your progress, discover patterns in your reading preferences, and serve as a source of inspiration for future reading.
- Be flexible: While it's important to have a dedicated reading time, be flexible and adaptable. Life can sometimes get busy, so if you miss a day, don't be discouraged. Simply pick up where you left off and continue with your reading routine.
Remember, the goal is to enjoy the process of reading and make it a regular part of your life. Happy reading!
This looks pretty neat! But what is it doing exactly? This makes a total of 7 calls to OpenAI, which I have put in this gist. 5 of 7 of these API calls are “internal” thoughts asking the LLM to generate ideas. Even though the temperature is set to 1.0, these “ideas” are mostly redundant. The penultimate call to OpenAI enumerates these “ideas” which I’ve included below:
I want to read more books
Can you please comment on the pros and cons of each of the following options, and then pick the best option?
Option 0: Set aside dedicated time each day for reading.
Option 1: Set aside 30 minutes of dedicated reading time each day.
Option 2: Set aside dedicated time each day for reading.
Option 3: Set aside dedicated time each day for reading.
Option 4: Join a book club.
Please discuss each option very briefly (one line for pros, one for cons), and end by saying Best=X, where X is the number of the best option.
I know from experience that you are likely to get better results if you tell the language model to generate ideas in one shot. That way, the LLM can reference previous ideas and achieve more diversity. This is a good example of accidental complexity: its very tempting to take this design pattern and apply it blindly. This is less of a critique of this particular framework, since the code makes it clear that 5 independent calls will happen. Either way, its good idea to check your work by inspecting API calls!.
Langchain
Langchain is a multi-tool for all things LLM. Lots of people rely on Langchain when get started with LLMs. The core LangChain library doesn’t generally hide prompts from you, however there are experimental features that do. Let’s take a look at one of these features called SmartLLMChain:
from langchain.prompts import PromptTemplate
from langchain_experimental.smart_llm import SmartLLMChain
from langchain_openai import ChatOpenAI
hard_question = "I have a 12 liter jug and a 6 liter jug.\
I want to measure 6 liters. How do I do it?"
prompt = PromptTemplate.from_template(hard_question)
llm = ChatOpenAI(temperature=0, model_name="gpt-3.5-turbo")
chain = SmartLLMChain(llm=llm, prompt=prompt,
n_ideas=2,
verbose=True)
result = chain.run({})
print(result)
Idea 1: 1. Fill the 12 liter jug completely.
- Pour the contents of the 12 liter jug into the 6 liter jug. This will leave you with 6 liters in the 12 liter jug.
- Empty the 6 liter jug.
- Pour the remaining 6 liters from the 12 liter jug into the now empty 6 liter jug.
- You now have 6 liters in the 6 liter jug.
Idea 2: 1. Fill the 12 liter jug completely.
- Pour the contents of the 12 liter jug into the 6 liter jug. This will leave you with 6 liters in the 12 liter jug.
- Empty the 6 liter jug.
- Pour the remaining 6 liters from the 12 liter jug into the now empty 6 liter jug.
- You now have 6 liters in the 6 liter jug.
Improved Answer:
- Fill the 12 liter jug completely.
- Pour the contents of the 12 liter jug into the 6 liter jug until the 6 liter jug is full. This will leave you with 6 liters in the 12 liter jug and the 6 liter jug completely filled.
- Empty the 6 liter jug.
- Pour the remaining 6 liters from the 12 liter jug into the now empty 6 liter jug.
- You now have 6 liters in the 6 liter jug.
Full Answer:
To measure 6 liters using a 12 liter jug and a 6 liter jug, follow these steps:
- Fill the 12 liter jug completely.
- Pour the contents of the 12 liter jug into the 6 liter jug until the 6 liter jug is full. This will leave you with 6 liters in the 12 liter jug and the 6 liter jug completely filled.
- Empty the 6 liter jug.
- Pour the remaining 6 liters from the 12 liter jug into the now empty 6 liter jug.
- You now have 6 liters in the 6 liter jug.
Neat! So what happened exactly? While this API emits logs that show you a lot of information (available on this gist), the API request pattern is interesting:
Two seperate api calls for each “idea”.
Another API call that incorporates the two ideas as context, with the prompt:
You are a researcher tasked with investigating the 2 resp
関連記事
今日のまとめ
AI日報で今日の重要ニュースをまとめ読み