Amazon EKS上でSageMaker AI SpacesがインタラクティブIDEを可能に
本文の状態
日本語全文を表示中
詳細モードで約12分の本文を読めます。
同じ出来事の情報源
この情報源を基点に整理
AWS Machine Learning Blog
SageMaker AI Spaces アドオンにより、データサイエンティストはクラスターを離脱することなく JupyterLab や Code Editor を直接起動できる。
Continue in AI NEW LAB
このニュースを、実務の判断につなげる
AI NEW LABで、試したことや先に確認したい条件を共有できます。まずはログインなしで読めます。
AI NEW LABで論点を見るAI深層分析を開く2026年8月11日 02:13
AI深層分析
キーポイント
EKS クラスター内での IDE 実行
SageMaker AI Spaces アドオンにより、データサイエンティストはクラスターを離脱することなく JupyterLab や Code Editor を直接起動できる。
環境構築時間の劇的短縮
プラットフォームチームが従来 3〜5 日かけていた GPU アクセスや認証設定を含むスタンドアロン環境の構築を、データサイエンティスト自身で約 5 分で完了可能にする。
統合されたネットワークとアクセス制御
Amazon Route 53 と AWS Certificate Manager を活用した TLS 対応 ALB や、AWS Systems Manager を介した VS Code への SSH-over-SSM 接続が実装される。
セキュアなクラスタールーティング
AWS Load Balancer Controller と Traefik がホスト名ベースのルーティングを行い、AWS KMS を用いた JWT 暗号化で認証ミドルウェアがトークンを検証する。
GPU リソースの効率化とコスト削減
インタラクティブなワークロードとトレーニングを同一クラスターに統合することで、GPU の稼働率が最大 30% 向上する。常時稼働型の GPU 環境に必要な数千ドル規模の月額コストを回避できる。
重要な引用
The Amazon SageMaker AI Spaces add-on for Amazon EKS closes that gap.
Standing up a standalone JupyterHub environment with GPU access, storage, and authentication typically takes a platform team 3–5 days.
With the add-on, a data scientist launches a fully configured Space in about 5 minutes.
This can lift GPU utilization by up to 30 percent compared with a dedicated notebook fleet.
編集コメントを表示
編集コメント
EKS と SageMaker の統合により、開発環境の分断という長年の課題に対する実用的な解決策が提示された。インフラ運用コストを下げつつ開発者の生産性を最大化するアプローチとして注目される。
Source Article
元記事を日本語で読む
本文に関係しない購読案内、埋め込み通知、サイト内プロモーションは除いています。
Amazon EKS で AI ワークフローを強化するには、JupyterLab や Code Editor などのインタラクティブな IDE が必要です。しかし、これらの IDE を実行すると、パイプラインがホストされているクラスターから離れ、スタンドアロンの JupyterHub デプロイメントやローカルのラップトップに移動することになります。その切り替えにより、パイプラインが依存する GPU ノード、共有ストレージ、そして AWS Identity and Access Management (IAM) ロールへのアクセスができなくなります。
Amazon EKS 向けの Amazon SageMaker AI Spaces アドオンは、このギャップを埋めます。これは、あなたがすでに運用しているクラスター上で管理された JupyterLab と Code Editor の環境を実行します。GPU アクセス、ストレージ、認証機能を備えたスタンドアロンの JupyterHub 環境を構築するには、通常、プラットフォームチームで 3〜5 日かかります。一方、このアドオンを使えば、データサイエンティストは約 5 分で完全に設定された Space を起動できます。
本記事では、Amazon E クラスターに SageMaker AI Spaces アドオンをインストールする方法を解説します。まず、サポート用のアドオンと IAM ロールを設定し、AWS Load Balancer Controller をデプロイして TLS 証明書を要求し、AWS Key Management System (AWS KMS) の暗号化キーを作成します。その後、最初の Space を作成し、ブラウザ上のプレサイン URL や VS Code 経由の SSH-over-SSM でアクセスできるようにします。最後に、チームを Amazon Cognito を使った OpenID Connect (OIDC) ログインに移行する方法を確認します。
ソリューションの概要
本ソリューションは、単一の EKS クラスター上で 3 つのレイヤーを構成して動作します。
- ネットワークとアクセス。Amazon Route 53 がワイルドカードドメインをインターネット公開型の Application Load Balancer (ALB) に解決し、TLS は AWS Certificate Manager (ACM) から取得します。VS Code の場合は、AWS Systems Manager を用いて Space ポッドに直接トンネルを張ります。
- クラスター内のルーティング。AWS Load Balancer Controller が ALB のプロビジョニングを担当します。トラフィックは Traefik によってホスト名ごとにルーティングされ、認証ミドルウェアが AWS Key Management Service (AWS KMS) を用いて JSON Web Token (JWT) の暗号化を検証します。
- コンピューティングとストレージ。Space ポッドはプライベートサブネット内のワーカー上で実行されます。Amazon Elastic Block Store (Amazon EBS) CSI ドライバーが永続ボリュームを提供し、Amazon Elastic File System (Amazon EFS) または Amazon FSx が共有ストレージや高スループットなストレージを担います。EKS Pod Identity により、ポッドにスコープ限定の IAM ロールが付与されます。
インタラクティブな開発環境とトレーニングワークロードを 1 つのクラスターに統合することで、ジョブ間の GPU ノード稼働率を最大化できます。これにより、専用ノートブック群を使用する場合と比較して、GPU の利用率を最大 30% 向上させることが可能です。また、常時稼働する GPU 環境に必要なコスト(月額数千ドル規模)も回避できます。
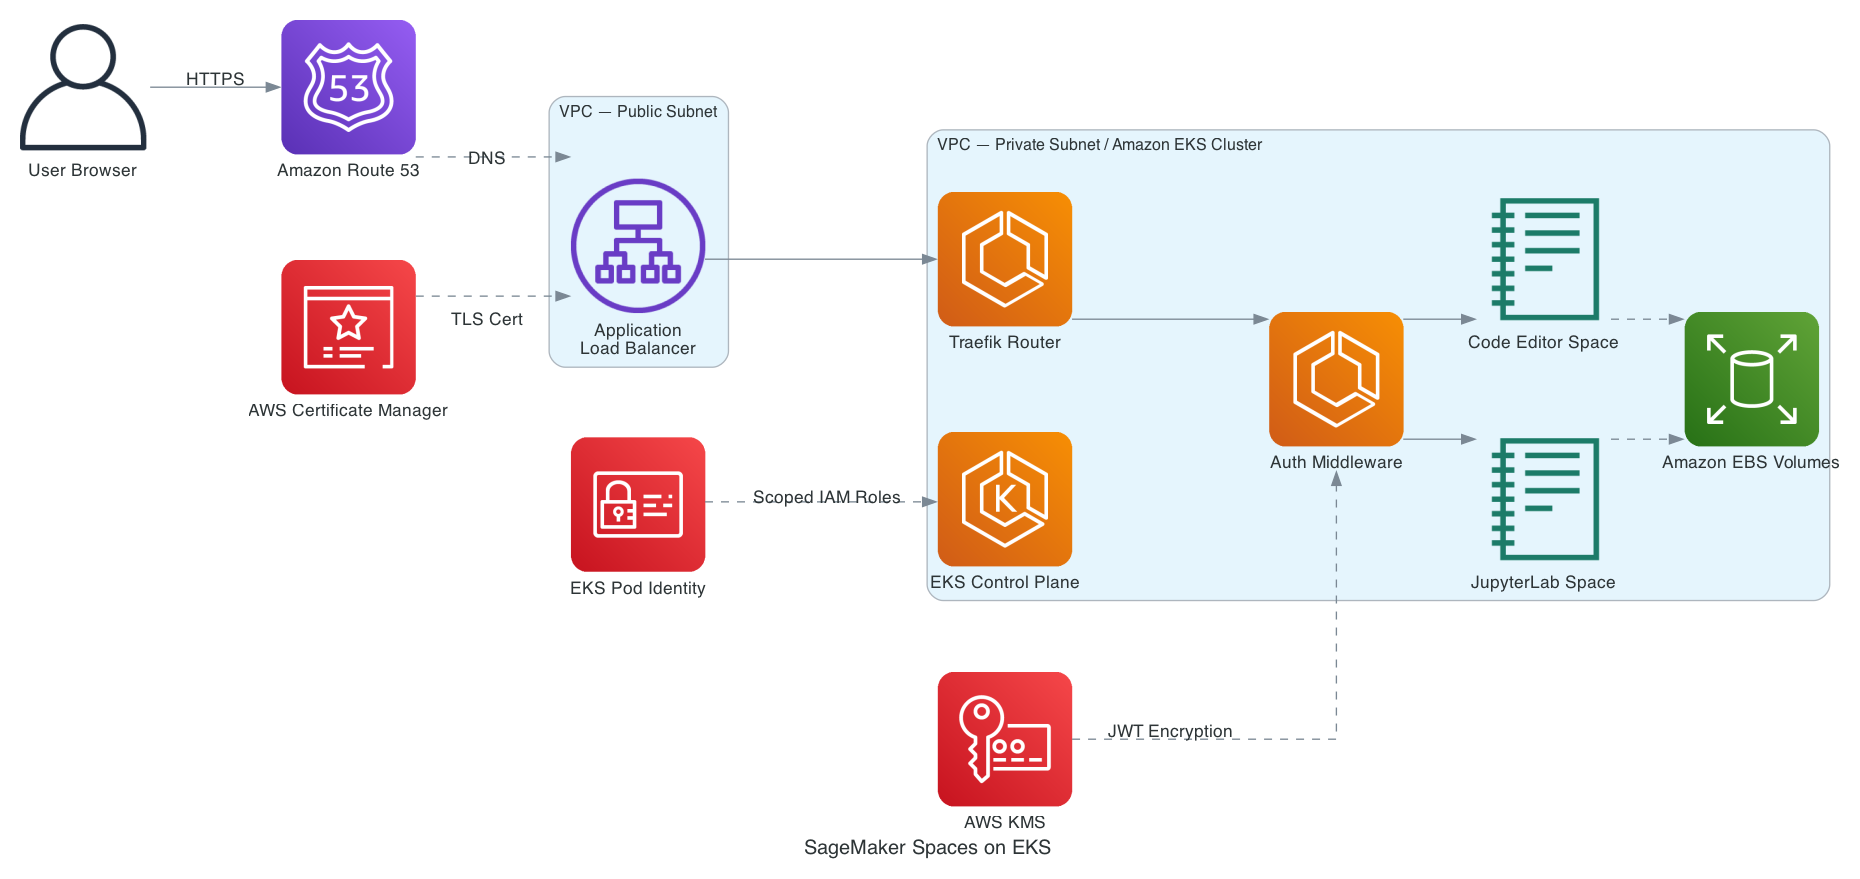
図 1: ソリューションアーキテクチャ
事前準備
本ガイドを実行するには、対象の AWS リージョンで設定済みの AWS Command Line Interface (AWS CLI) 2.x 以降、kubectl 1.30 以降、および Helm v3 が必要です。また、本記事で `` と参照するドメイン用の Route 53 パブリックホストゾーンも用意してください。さらに、ロールやポリシーの作成、EKS アドオンの追加、アクセスエントリの設定、Pod Identity の関連付け、ACM 証明書および KMS キーの生成に必要な IAM 権限も必要です。
なお、Spaces アドオンはバージョン 0.1.4 以上を使用してください。それ以前のバージョンでは Amazon SageMaker HyperPod しかサポートしていないためです。
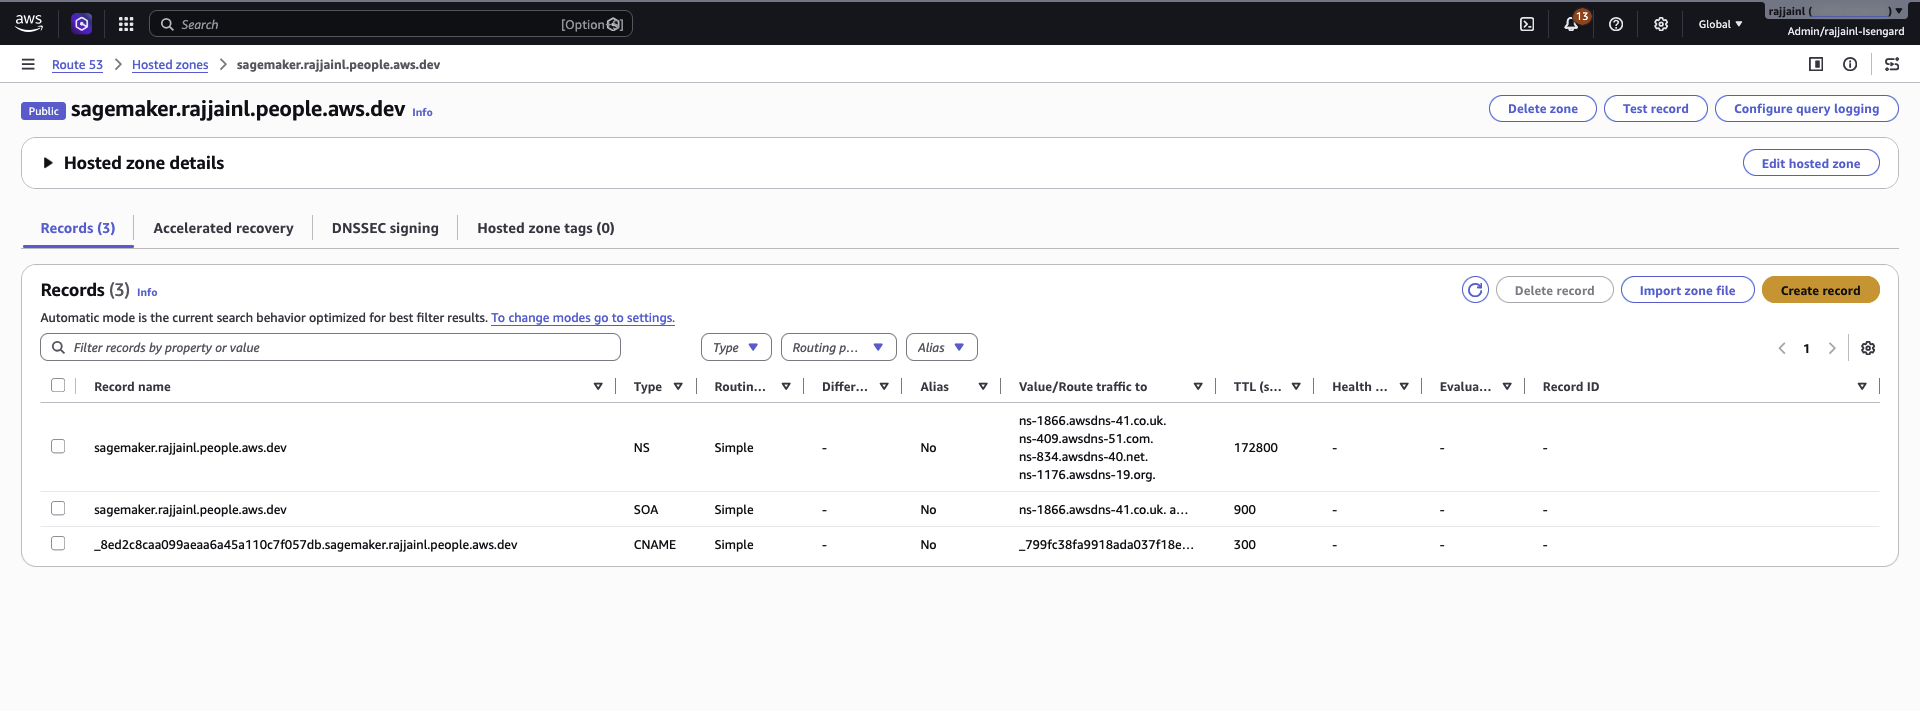
図 2: 検証レコードを含む Route 53 ホストドメイン
これらの変数は一度だけ設定し、以降の記事で再利用します。
export CLUSTER_NAME=
export REGION=
export ACCOUNT_ID=$(aws sts get-caller-identity --query Account --output text)
本記事のすべての IAM ロールは、EKS Pod Identity を介して Kubernetes サービスアカウントによって想定されるため、共通の信頼ポリシーを共有しています。このポリシーは一度保存して再利用してください。
cat > pod-identity-trust.json <<'EOF'
{
  "Version": "2012-10-17",
  "Statement": [{
    "Effect": "Allow",
    "Principal": { "Service": "pods.eks.amazonaws.com" },
    "Action": ["sts:AssumeRole", "sts:TagSession"]
  }]
}
EOF
注意: このチュートリアルでは、インターネット接続型の ALB、EBS ボリューム、および EKS クラスターなど、AWS 課金が発生するリソースが作成されます。SSM アドバンスドインスタンス tiers は、Space ポッドあたり約 0.00695 ドル/時間で追加料金を発生させます。作業完了後は Cleanup セクションに従ってリソースの削除を行ってください。
EKS クラスターの作成
クラスターの作成自体は、標準的な EKS の始め方ガイド に従います。重要なのは、4 つのスペース固有の要件を満たすことです。EKS Auto Mode は無効にしてください。アドオンには Kubernetes 1.30 以降で動作する従来の EC2 ベースのノードが必要だからです。
パブリックサブネットとプライベートサブネットを少なくとも 2 つのアベイラビリティゾーンにまたがった VPC を使用し、NAT ゲートウェイでプライベートサブネットへのアクセスを可能にし、クラスターエンドポイントアクセスはパブリックおよびプライベートの両方に設定してください。作成時には、EKS Pod Identity Agent、Amazon EBS CSI Driver、Cert manager、そして External DNS の各アドオンを追加しますが、Amazon SageMaker Spaces と AWS Load Balancer Controller は後でインストールするまで保留にします。
最後に、プライベートサブネット上に Amazon Linux 2023 を使用したマネージドノードグループを 2 ノード作成し、m5.xlarge 以上のインスタンスサイズを選択してください。すでに要件を満たすクラスターを実行している場合は、この手順はスキップして構いません。
よく見落とされるのが、VPC のすべてのサブネットにタグ付けを行うことです。AWS Load Balancer Controller がサブネットを検出できるようにするためです。これは Spaces アドオンのインストール前に行う必要があります。そうしないと、コントローラーが ALB をプライベートサブネット上に配置してしまい、Spaces にアクセスできなくなる恐れがあります。
export VPC_ID=$(aws eks describe-cluster \
  --name $CLUSTER_NAME --region $REGION \
  --query 'cluster.resourcesVpcConfig.vpcId' --output text)

ALL_SUBNETS=$(aws ec2 describe-subnets --region $REGION \
  --filters "Name=vpc-id,Values=${VPC_ID}" \
  --query 'Subnets[*].SubnetId' --output text)
aws ec2 create-tags --region $REGION --resources ${ALL_SUBNETS} \
  --tags Key=kubernetes.io/cluster/$CLUSTER_NAME,Value=shared

PUBLIC_SUBNETS=$(aws ec2 describe-subnets --region $REGION \
  --filters "Name=vpc-id,Values=${VPC_ID}" "Name=map-public-ip-on-launch,Values=true" \
  --query 'Subnets[*].SubnetId' --output text)
aws ec2 create-tags --region $REGION --resources ${PUBLIC_SUBNETS} \
  --tags Key=kubernetes.io/role/elb,Value=1

PRIVATE_SUBNETS=$(aws ec2 describe-subnets --region $REGION \
  --filters "Name=vpc-id,Values=${VPC_ID}" "Name=map-public-ip-on-launch,Values=false" \
  --query 'Subnets[*].SubnetId' --output text)
aws ec2 create-tags --region $REGION --resources ${PRIVATE_SUBNETS} \
  --tags Key=kubernetes.io/role/internal-elb,Value=1
基盤のセットアップ
クラスターが稼働したら、kubectl でクラスターを指し示し、アドオンのポッドが正常に動作していることを確認します。さらに、DNS レコードの管理に必要な Route 53 への権限を External DNS に付与してください。
- kubectl の設定:
aws eks update-kubeconfig --name $CLUSTER_NAME --region $REGION
kubectl get nodes
両方のワーカーが Ready を報告します:
NAME                        STATUS   ROLES    AGE   VERSION
ip-10-0-1-42.ec2.internal   Ready       38m   v1.34.6-eks-bbe087e
ip-10-0-2-96.ec2.internal Ready 38m v1.34.6-eks-bbe087e各アドオンネームスペースでシステムポッドが正常に動作しているか、kubectl get pods -A コマンドを実行して確認してください。
処理を続ける前に、kube-system、cert-manager、external-dns の各ポッドがすべて「実行中(Running)」の状態になっていることを確認してください。
External DNS はレコード管理のために Route 53 の権限が必要です。ロールを作成し、最小限の権限を持つポリシーをアタッチして、Pod Identity を通じてバインドしてください。
aws iam create-role --role-name ExternalDNSRole \
  --assume-role-policy-document file://pod-identity-trust.json

aws iam put-role-policy --role-name ExternalDNSRole \
  --policy-name ExternalDNSRoute53Policy \
  --policy-document '{
  "Version":"2012-10-17",
  "Statement":[
    {"Effect":"Allow","Action":["route53:ChangeResourceRecordSets"],
     "Resource":"arn:aws:route53:::hostedzone/*"},
    {"Effect":"Allow","Action":["route53:ListHostedZones","route53:ListResourceRecordSets","route53:ListTagsForResource"],
     "Resource":"*"}
  ]}'

aws eks create-pod-identity-association \
  --cluster-name $CLUSTER_NAME --region $REGION \
  --namespace external-dns --service-account external-dns \
  --role-arn arn:aws:iam::${ACCOUNT_ID}:role/ExternalDNSRole

kubectl rollout restart deployment -n external-dns external-dns
セキュリティの注意: Pod Identity のロールは、最小限の権限とリソースに限定してください。ワイルドカードよりも明示的なリソース ARN を優先し、意図したサービスアカウントのみがロールを想定できることを確認してください。
AWS Load Balancer Controller のインストール
AWS Load Balancer Controller は、Spaces UI の前面に配置される ALB をプロビジョニングします。Helm を使用してインストールしてください。
- コントローラーの IAM ポリシー、ロール、Pod Identity 関連付けを定義する:
curl -sS -o /tmp/lbc-iam-policy.json \
  https://raw.githubusercontent.com/kubernetes-sigs/aws-load-balancer-controller/main/docs/install/iam_policy.json

aws iam create-policy --policy-name AWSLoadBalancerControllerIAMPolicy \
  --policy-document file:///tmp/lbc-iam-policy.json

aws iam create-role --role-name AWSLoadBalancerControllerRole \
  --assume-role-policy-document file://pod-identity-trust.json

aws iam attach-role-policy --role-name AWSLoadBalancerControllerRole \
  --policy-arn arn:aws:iam::${ACCOUNT_ID}:policy/AWSLoadBalancerControllerIAMPolicy

aws eks create-pod-identity-association \
  --cluster-name $CLUSTER_NAME --region $REGION \
  --namespace kube-system --service-account aws-load-balancer-controller \
--role-arn arn:aws:iam::${ACCOUNT_ID}:role/AWSLoadBalancerControllerRole- Helm チャートをインストールする際、
vpcIdとregionは明示的に指定します。チャートバージョン v3.2 以降では、EKS がポッドに対して EC2 メタデータ経由での VPC の自動検出をブロックしているため、コントローラーは自動的に失敗します。
helm repo add eks https://aws.github.io/eks-charts
helm repo update eks

helm install aws-load-balancer-controller eks/aws-load-balancer-controller \
  -n kube-system \
  --set clusterName=$CLUSTER_NAME \
  --set serviceAccount.create=true \
  --set serviceAccount.name=aws-load-balancer-controller \
  --set region=$REGION \
  --set vpcId=$VPC_ID

kubectl rollout status deployment -n kube-system aws-load-balancer-controller --timeout=180sコントローラーのレプリカが両方とも起動します:`
NAME READY UP-TO-DATE AVAILABLE AGE
aws-load-balancer-controller 2/2 2 2 174m
## 証明書、キー、SSM 設定の作成

Spaces アドオンには、TLS 証明書、JWT 暗号化用の KMS キー、およびリモートアクセス用の SSM サービス設定が必要です。

ドメインとワイルドカードをカバーする ACM 証明書(DNS 検証を使用)をリクエストし、ACM が期待する CNAME レコードを確認します。
CERT_ARN=$(aws acm request-certificate \
--domain-name "" \
--subject-alternative-names "*." \
--validation-method DNS \
--region $REGION \
--query CertificateArn --output text)
Read the CNAME records ACM expects, then add them to your Route 53
hosted zone. The console's 'Create records in Route 53' button
does this for you.
aws acm describe-certificate --certificate-arn "$CERT_ARN" \
--region $REGION \
--query 'Certificate.DomainValidationOptions[].ResourceRecord'
証明書のステータスが **Issued** になるまで待ってから ARN をコピーしてください。

図 3: ドメインに対して発行された証明書

> **セキュリティに関する注意**: DNS 検証はドメインの所有権を検証し、ACM の自動更新をトリガーします。Route 53 に検証用 CNAME を保持してください。これらを削除すると更新が失敗します。

KMS 暗号化キーを作成します。認証ミドルウェアは JWT ごとに `kms:GenerateDataKey` を呼び出すため、このキーは対称型の `ENCRYPT_DECRYPT`(CLI のデフォルト)である必要があります。
KMS_KEY_ARN=$(aws kms create-key --region $REGION \
--description "SageMaker Spaces JWT encryption" \
--query 'KeyMetadata.Arn' --output text)
aws kms create-alias --region $REGION \
--alias-name alias/sagemaker-spaces-jwt \
--target-key-id "$KMS_KEY_ARN"
SSM アドバンスド・インスタンス・ティアを有効にします。Session Manager はハイブリッド管理インスタンスへのトンネリングをサポートしており、これが VS Code Remote が使用する機能です。このティアは必須となります(スペースポッドあたり約 0.00695 ドル/時間)。
aws ssm update-service-setting --region $REGION \
--setting-id arn:aws:ssm:$REGION:${ACCOUNT_ID}:servicesetting/ssm/managed-instance/activation-tier \
--setting-value advanced
## Spaces アドオンのインストール

Spaces コントローラーと認証ミドルウェア用の IAM ロールを作成した上で、アドオンをインストールします。

まず、各スペースポッドが SSS フリートで使用する SSM 管理インスタンスロールから始めます。
aws iam create-role --role-name SageMakerSpacesSSMManagedNodeRole \
--assume-role-policy-document '{
"Version":"2012-10-17",
"Statement":[{"Effect":"Allow","Principal":{"Service":"ssm.amazonaws.com"},"Action":"sts:AssumeRole"}]
}'
aws iam attach-role-policy --role-name SageMakerSpacesSSMManagedNodeRole \
--policy-arn arn:aws:iam::aws:policy/AmazonSSMManagedInstanceCore
次に、Spaces コントローラー用ロールを作成します。このロールには SSM、PassRole、KMS の権限が必要です。以下のポリシーを `spaces-controller-policy.json` として保存し、``、``、`` を各自の値に置き換えてください。
{
"Version": "2012-10-17",
"Statement": [
{
"Sid": "SSMAccountLevel",
"Effect": "Allow",
"Action": [
"ssm:CreateActivation",
"ssm:DeleteActivation",
"ssm:DescribeActivations",
"ssm:DescribeInstanceInformation",
"ssm:DeregisterManagedInstance",
"ssm:ListTagsForResource",
"ssm:AddTagsToResource",
"ssm:ListDocuments",
"ssm:DescribeSessions"
],
"Resource": "*"
},
{
"Sid": "SSMDocumentMgmt",
"Effect": "Allow",
"Action": [
"ssm:CreateDocument",
"ssm:DescribeDocument",
"ssm:GetDocument",
"ssm:UpdateDocument",
"ssm:UpdateDocumentDefaultVersion",
"ssm:DeleteDocument"
],
"Resource": "arn:aws:ssm:::document/SageMaker-Space*"
},
{
"Sid": "SSMSessionMgmt",
"Effect": "Allow",
"Action": [
"ssm:StartSession",
"ssm:TerminateSession",
"ssm:ResumeSession",
"ssm:GetConnectionStatus"
],
"Resource": [
"arn:aws:ssm:::document/SageMaker-Space*",
"arn:aws:ssm:::managed-instance/*",
"arn:aws:ssm:::document/AWS-StartSSHSession"
]
},
{
"Sid": "PassSSMManagedNodeRole",
"Effect": "Allow",
"Action": "iam:PassRole",
"Resource": "arn:aws:iam:::role/SageMakerSpacesSSMManagedNodeRole",
"Condition": {
"StringEquals": {
"iam:PassedToService": "ssm.amazonaws.com"
}
}
},
{
"Sid": "KMSForJWT",
"Effect": "Allow",
"Action": [
"kms:GenerateDataKey",
"kms:Decrypt",
"kms:Encrypt",
"kms:DescribeKey"
],
"Resource": ""
}
]
}
ロールを作成してポリシーをアタッチします。
aws iam create-role --role-name SageMakerSpacesControllerRole \
--assume-role-policy-document file://pod-identity-trust.json
aws iam put-role-policy --role-name SageMakerSpacesControllerRole \
--policy-name SageMakerSpacesControllerPolicy \
--policy-document file://spaces-controller-policy.json
Pod Identity を通じて、コントローラーと認証ミドルウェアのサービスアカウントをこのロールにバインドします。

```bash
for SA in jupyter-k8s-controller-manager jupyter-k8s-authmiddleware; do
  aws eks create-pod-identity-ass
原文を表示
To power up AI workflows on Amazon Elastic Kubernetes Service (Amazon EKS), data scientists need interactive IDEs like JupyterLab and Code Editor. Yet running those IDEs usually means leaving the cluster that hosts their pipelines, moving to a standalone JupyterHub deployment or a local laptop. That switch leaves them without the GPU nodes, shared storage, and AWS Identity and Access Management (IAM) roles their pipelines depend on. The Amazon SageMaker AI Spaces add-on for Amazon EKS closes that gap. It runs managed JupyterLab and Code Editor environments on the cluster that you already operate. Standing up a standalone JupyterHub environment with GPU access, storage, and authentication typically takes a platform team 3–5 days. With the add-on, a data scientist launches a fully configured Space in about 5 minutes.
In this post, you install the SageMaker AI Spaces add-on on an Amazon EKS cluster. You set up the supporting add-ons and IAM roles, deploy the AWS Load Balancer Controller, request a TLS certificate, and create an AWS Key Management System (AWS KMS) encryption key. You then create your first Space and reach it through a presigned URL in the browser and from VS Code over SSH-over-SSM. Finally, you review how to move your team to OpenID Connect (OIDC) sign-in with Amazon Cognito.
Solution overview
The solution runs on a single EKS cluster in three layers:
- Network and access. Amazon Route 53 resolves a wildcard domain to an internet-facing Application Load Balancer (ALB) with TLS from AWS Certificate Manager (ACM). For VS Code, AWS Systems Manager tunnels directly to the Space pod.
- Cluster routing. The AWS Load Balancer Controller provisions the ALB. Traefik routes by hostname. Auth middleware validates tokens using AWS Key Management Service (AWS KMS) for JSON Web Token (JWT) encryption.
- Compute and storage. Space pods run on private-subnet workers. The Amazon Elastic Block Store (Amazon EBS) CSI driver provides persistent volumes, and Amazon Elastic File System (Amazon EFS) or Amazon FSx handle shared or high-throughput storage. EKS Pod Identity grants pods scoped IAM roles.
Consolidating interactive and training workloads on one cluster keeps GPU nodes busy between jobs. This can lift GPU utilization by up to 30 percent compared with a dedicated notebook fleet. It also avoids the cost of an always-on GPU environment, which can run into thousands of dollars a month.
**Figure 1: Solution architecture
Prerequisites
To follow along, you need an AWS account with the AWS Command Line Interface (AWS CLI) 2.x or later configured for your target AWS Region, plus kubectl 1.30 or later and Helm v3. You also need a Route 53 public hosted zone for a domain you own, referenced as `` throughout this post, and IAM permissions to create roles, policies, EKS add-ons, access entries, Pod Identity associations, ACM certificates, and KMS keys. The Spaces add-on must be version 0.1.4 or later, because earlier versions supported Amazon SageMaker HyperPod only.
Figure 2: Route 53 hosted zone with validation records
Set these variables once. The rest of the post reuses them.
export CLUSTER_NAME=
export REGION=
export ACCOUNT_ID=$(aws sts get-caller-identity --query Account --output text)
Every IAM role in this post is assumed by a Kubernetes service account through EKS Pod Identity, so they all share one trust policy. Save it once and reuse it:
cat > pod-identity-trust.json <<'EOF'
{
  "Version": "2012-10-17",
  "Statement": [{
    "Effect": "Allow",
    "Principal": { "Service": "pods.eks.amazonaws.com" },
    "Action": ["sts:AssumeRole", "sts:TagSession"]
  }]
}
EOF
Note:** This walkthrough creates resources that incur AWS charges: an internet-facing ALB, EBS volumes, and an EKS cluster. SSM advanced-instances tier adds about $0.00695/hr per Space pod. Follow the Cleanup section when you finish.
Create the EKS cluster
Cluster creation itself follows the standard EKS getting started guide. What matters here is meeting four Spaces-specific requirements. Keep EKS Auto Mode disabled, because the add-on requires classic EC2-backed nodes on Kubernetes 1.30 or later. Use a virtual private cloud (VPC) with public and private subnets across at least two Availability Zones, with a NAT gateway serving the private subnets, and set cluster endpoint access to Public and private. During creation, add the EKS Pod Identity Agent, Amazon EBS CSI Driver, Cert manager, and External DNS add-ons, but hold off on Amazon SageMaker Spaces and the AWS Load Balancer Controller. You install those later. Finally, create a managed node group on your private subnets with Amazon Linux 2023, m5.xlarge or larger, and 2 nodes. Skip ahead if you already run a cluster that fits.
One step is often overlooked. Tag every subnet in the VPC so the AWS Load Balancer Controller can discover them, and tag them *before* you install the Spaces add-on. Otherwise, the controller can place the ALB on private subnets, making Spaces unreachable.
export VPC_ID=$(aws eks describe-cluster \
  --name $CLUSTER_NAME --region $REGION \
  --query 'cluster.resourcesVpcConfig.vpcId' --output text)

ALL_SUBNETS=$(aws ec2 describe-subnets --region $REGION \
  --filters "Name=vpc-id,Values=${VPC_ID}" \
  --query 'Subnets[*].SubnetId' --output text)
aws ec2 create-tags --region $REGION --resources ${ALL_SUBNETS} \
  --tags Key=kubernetes.io/cluster/$CLUSTER_NAME,Value=shared

PUBLIC_SUBNETS=$(aws ec2 describe-subnets --region $REGION \
  --filters "Name=vpc-id,Values=${VPC_ID}" "Name=map-public-ip-on-launch,Values=true" \
  --query 'Subnets[*].SubnetId' --output text)
aws ec2 create-tags --region $REGION --resources ${PUBLIC_SUBNETS} \
  --tags Key=kubernetes.io/role/elb,Value=1

PRIVATE_SUBNETS=$(aws ec2 describe-subnets --region $REGION \
  --filters "Name=vpc-id,Values=${VPC_ID}" "Name=map-public-ip-on-launch,Values=false" \
  --query 'Subnets[*].SubnetId' --output text)
aws ec2 create-tags --region $REGION --resources ${PRIVATE_SUBNETS} \
  --tags Key=kubernetes.io/role/internal-elb,Value=1
Set up the foundation
With the cluster running, you point kubectl at it, confirm the add-on pods are healthy, and give External DNS the Route 53 permissions that it needs to manage DNS records.
- Configure kubectl:
aws eks update-kubeconfig --name $CLUSTER_NAME --region $REGION
kubectl get nodes
Both workers report Ready:
NAME                        STATUS   ROLES    AGE   VERSION
ip-10-0-1-42.ec2.internal   Ready       38m   v1.34.6-eks-bbe087e
ip-10-0-2-96.ec2.internal Ready 38m v1.34.6-eks-bbe087e- Confirm the system pods are healthy across the add-on namespaces with kubectl get pods -A. Every pod in kube-system, cert-manager, and external-dns should be Running before you continue.
- External DNS needs Route 53 permissions to manage records. Create the role, attach a least-privilege policy, and bind it through Pod Identity:
aws iam create-role --role-name ExternalDNSRole \
  --assume-role-policy-document file://pod-identity-trust.json

aws iam put-role-policy --role-name ExternalDNSRole \
  --policy-name ExternalDNSRoute53Policy \
  --policy-document '{
  "Version":"2012-10-17",
  "Statement":[
    {"Effect":"Allow","Action":["route53:ChangeResourceRecordSets"],
     "Resource":"arn:aws:route53:::hostedzone/*"},
    {"Effect":"Allow","Action":["route53:ListHostedZones","route53:ListResourceRecordSets","route53:ListTagsForResource"],
     "Resource":"*"}
  ]}'

aws eks create-pod-identity-association \
  --cluster-name $CLUSTER_NAME --region $REGION \
  --namespace external-dns --service-account external-dns \
  --role-arn arn:aws:iam::${ACCOUNT_ID}:role/ExternalDNSRole

kubectl rollout restart deployment -n external-dns external-dns
Security note: Scope each Pod Identity role to minimum actions and resources. Prefer explicit resource ARNs over wildcards, and confirm only the intended service account can assume the role.
Install the AWS Load Balancer Controller
The AWS Load Balancer Controller provisions the ALB that fronts your Spaces UI. Install it with Helm.
- Define the controller’s IAM policy, role, and Pod Identity association:
curl -sS -o /tmp/lbc-iam-policy.json \
  https://raw.githubusercontent.com/kubernetes-sigs/aws-load-balancer-controller/main/docs/install/iam_policy.json

aws iam create-policy --policy-name AWSLoadBalancerControllerIAMPolicy \
  --policy-document file:///tmp/lbc-iam-policy.json

aws iam create-role --role-name AWSLoadBalancerControllerRole \
  --assume-role-policy-document file://pod-identity-trust.json

aws iam attach-role-policy --role-name AWSLoadBalancerControllerRole \
  --policy-arn arn:aws:iam::${ACCOUNT_ID}:policy/AWSLoadBalancerControllerIAMPolicy

aws eks create-pod-identity-association \
  --cluster-name $CLUSTER_NAME --region $REGION \
  --namespace kube-system --service-account aws-load-balancer-controller \
--role-arn arn:aws:iam::${ACCOUNT_ID}:role/AWSLoadBalancerControllerRole- Install the Helm chart. Pass vpcId and region explicitly. On chart v3.2+, the controller fails if it auto-detects the VPC through EC2 metadata, which EKS blocks for pods.
helm repo add eks https://aws.github.io/eks-charts
helm repo update eks

helm install aws-load-balancer-controller eks/aws-load-balancer-controller \
  -n kube-system \
  --set clusterName=$CLUSTER_NAME \
  --set serviceAccount.create=true \
  --set serviceAccount.name=aws-load-balancer-controller \
  --set region=$REGION \
  --set vpcId=$VPC_ID

kubectl rollout status deployment -n kube-system aws-load-balancer-controller --timeout=180s
Both controller replicas come up:
NAME                           READY   UP-TO-DATE   AVAILABLE   AGE
aws-load-balancer-controller   2/2     2            2           174m
Create the certificate, key, and SSM configuration
The Spaces add-on needs a TLS certificate, a KMS key for JWT encryption, and SSM service settings for remote access.
- Request an ACM certificate covering your domain and a wildcard, using DNS validation, then read back the CNAME records ACM expects:
CERT_ARN=$(aws acm request-certificate \
  --domain-name "" \
  --subject-alternative-names "*." \
  --validation-method DNS \
  --region $REGION \
  --query CertificateArn --output text)

# Read the CNAME records ACM expects, then add them to your Route 53
# hosted zone. The console's 'Create records in Route 53' button
# does this for you.
aws acm describe-certificate --certificate-arn "$CERT_ARN" \
  --region $REGION \
  --query 'Certificate.DomainValidationOptions[].ResourceRecord'
Wait for the certificate status to reach Issued, then copy the ARN.
Figure 3: Certificate issued for the domain
Security note: DNS validation verifies domain ownership and triggers ACM automatic renewal. Keep the validation CNAMEs in Route 53. Removing them breaks renewal.
- Create a KMS encryption key. The auth middleware calls kms:GenerateDataKey per JWT, so the key must be symmetric ENCRYPT_DECRYPT, which is the CLI default:
KMS_KEY_ARN=$(aws kms create-key --region $REGION \
  --description "SageMaker Spaces JWT encryption" \
  --query 'KeyMetadata.Arn' --output text)

aws kms create-alias --region $REGION \
  --alias-name alias/sagemaker-spaces-jwt \
--target-key-id "$KMS_KEY_ARN"- Turn on the SSM advanced-instances tier. Session Manager tunnels to hybrid managed instances, which is what VS Code remote uses, require this tier (about $0.00695/hr per Space pod):
aws ssm update-service-setting --region $REGION \
  --setting-id arn:aws:ssm:$REGION:${ACCOUNT_ID}:servicesetting/ssm/managed-instance/activation-tier \
  --setting-value advanced
Install the Spaces add-on
You create IAM roles for the Spaces controller and auth middleware, then install the add-on.
- Start with the SSM managed-instance role that each Space pod uses in the SSM fleet:
aws iam create-role --role-name SageMakerSpacesSSMManagedNodeRole \
  --assume-role-policy-document '{
  "Version":"2012-10-17",
  "Statement":[{"Effect":"Allow","Principal":{"Service":"ssm.amazonaws.com"},"Action":"sts:AssumeRole"}]
}'

aws iam attach-role-policy --role-name SageMakerSpacesSSMManagedNodeRole \
--policy-arn arn:aws:iam::aws:policy/AmazonSSMManagedInstanceCore- Next, create the Spaces controller role. It needs SSM, PassRole, and KMS permissions. Save the following policy as spaces-controller-policy.json, replacing , , and with your own values:
{
  "Version": "2012-10-17",
  "Statement": [
    {
      "Sid": "SSMAccountLevel",
      "Effect": "Allow",
      "Action": [
        "ssm:CreateActivation",
        "ssm:DeleteActivation",
        "ssm:DescribeActivations",
        "ssm:DescribeInstanceInformation",
        "ssm:DeregisterManagedInstance",
        "ssm:ListTagsForResource",
        "ssm:AddTagsToResource",
        "ssm:ListDocuments",
        "ssm:DescribeSessions"
      ],
      "Resource": "*"
    },
    {
      "Sid": "SSMDocumentMgmt",
      "Effect": "Allow",
      "Action": [
        "ssm:CreateDocument",
        "ssm:DescribeDocument",
        "ssm:GetDocument",
        "ssm:UpdateDocument",
        "ssm:UpdateDocumentDefaultVersion",
        "ssm:DeleteDocument"
      ],
      "Resource": "arn:aws:ssm:::document/SageMaker-Space*"
    },
    {
      "Sid": "SSMSessionMgmt",
      "Effect": "Allow",
      "Action": [
        "ssm:StartSession",
        "ssm:TerminateSession",
        "ssm:ResumeSession",
        "ssm:GetConnectionStatus"
      ],
      "Resource": [
        "arn:aws:ssm:::document/SageMaker-Space*",
        "arn:aws:ssm:::managed-instance/*",
        "arn:aws:ssm:::document/AWS-StartSSHSession"
      ]
    },
    {
      "Sid": "PassSSMManagedNodeRole",
      "Effect": "Allow",
      "Action": "iam:PassRole",
      "Resource": "arn:aws:iam:::role/SageMakerSpacesSSMManagedNodeRole",
      "Condition": {
        "StringEquals": {
          "iam:PassedToService": "ssm.amazonaws.com"
        }
      }
    },
    {
      "Sid": "KMSForJWT",
      "Effect": "Allow",
      "Action": [
        "kms:GenerateDataKey",
        "kms:Decrypt",
        "kms:Encrypt",
        "kms:DescribeKey"
      ],
      "Resource": ""
    }
  ]
}
Create the role and attach the policy:
aws iam create-role --role-name SageMakerSpacesControllerRole \
  --assume-role-policy-document file://pod-identity-trust.json

aws iam put-role-policy --role-name SageMakerSpacesControllerRole \
  --policy-name SageMakerSpacesControllerPolicy \
  --policy-document file://spaces-controller-policy.json
Bind controller and auth middleware service accounts to this role through Pod Identity:
for SA in jupyter-k8s-controller-manager jupyter-k8s-authmiddleware; do
aws eks create-pod-identity-ass
関連記事
今日のまとめ
AIデイリーブリーフで今日の重要ニュースをまとめ読み